Wednesday, October 26, 2022

How to Upsell Products in WooCommerce (5 Easy Ways)

Are you looking for ways to upsell products on your WooCommerce store?

Upselling is a great way to boost your sales and earn more money. You can encourage customers to purchase a more expensive version of your product.

In this article, we’ll show you how to upsell products in WooCommerce.

How to upsell products in WooCommerce

Why Upsell Products in WooCommerce?

Upselling is a sales technique that you can use to encourage shoppers to purchase a higher-priced product instead of the one they already have in their shopping cart.

These products provide more value to your customers because they have higher quality, include more features, and are more lucrative for your business.

For example, let’s say a customer adds a hiking shoe to their cart. You can offer them higher-quality hiking shoes that are more comfortable, durable, and versatile. Similarly, if you’re selling software or plugins on your WooCommerce store, then you can offer upgrades and addons to customers.

Since upselling persuades customers to buy a higher-priced product, you get to increase your average order value and boost the revenue of your online store. It also helps to increase the visibility of products that aren’t purchased frequently.

That said, let’s see how you can upsell products in WooCommerce. We’ll cover multiple methods, so you can click the links below to jump ahead to your preferred section:

Adding Upsell Products in WooCommerce

In WooCommerce, you can link different products and show them as upsell on the product page.

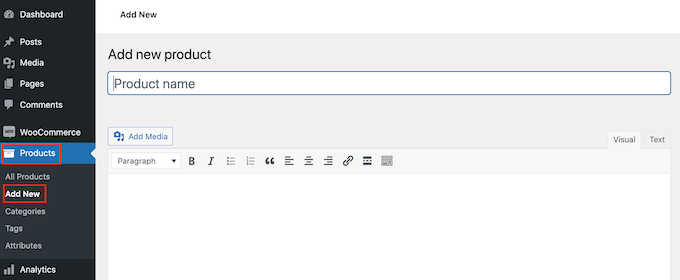
To start, you’ll need to go to Products » Add New from the WordPress dashboard. You can also edit an existing product.

Creating a new WooCommerce product

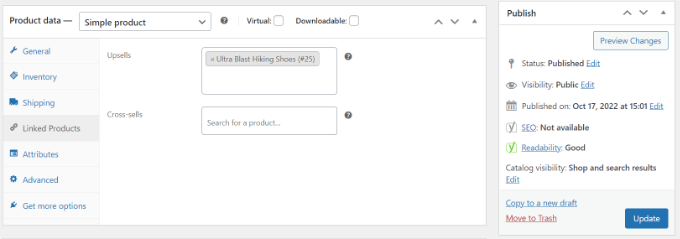
Next, you can scroll down to the Product Data section and click on the ‘Linked Products’ tab.

Here, you’ll be able to add different products under the ‘Upsell’ section. Simply enter a name and search for the product your want to upsell.

Add products to upsell

Go ahead and update your product page.

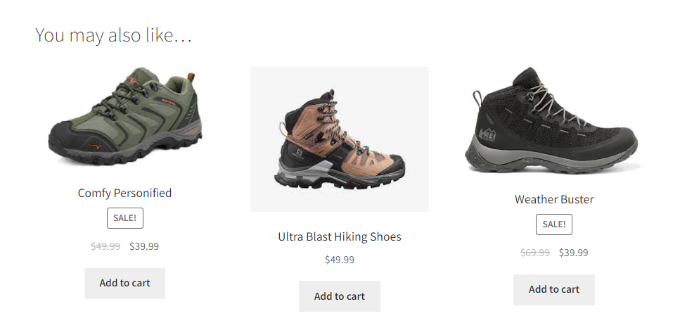
You can now visit your WooCommerce store and see the upsell products under the ‘You may also like’ section.

View upsell products

Creating a WooCommerce Popup to Upsell Products

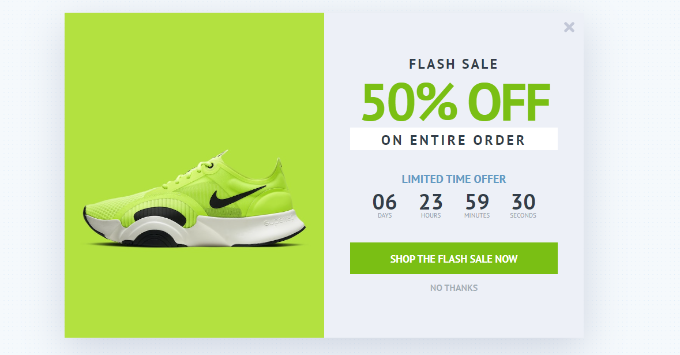
A great way to upsell your products is by displaying a lightbox popup on your WooCommerce store. It can instantly grab your users’ attention and help boost sales.

You can offer discounts or limited-time offers on high-value goods. Plus, you can show it on specific pages, when a user spends a particular time on a page or is about exit your store.

Upsell popup preview

The best way to create a WooCommerce upsell popup is using OptinMonster. It is the best WordPress popup plugin and lead generation software in the market.

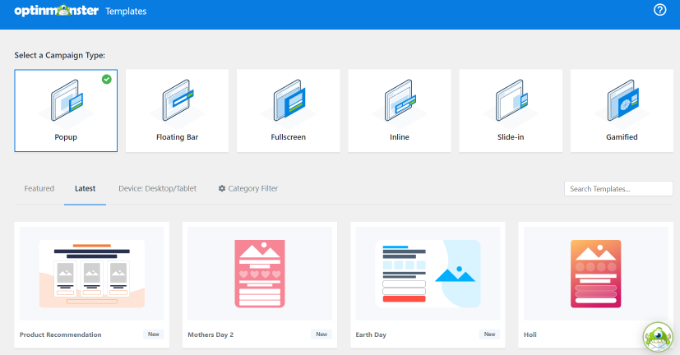
You can choose from multiple pre-built popup templates and campaign types.

Choose a campaign type and template

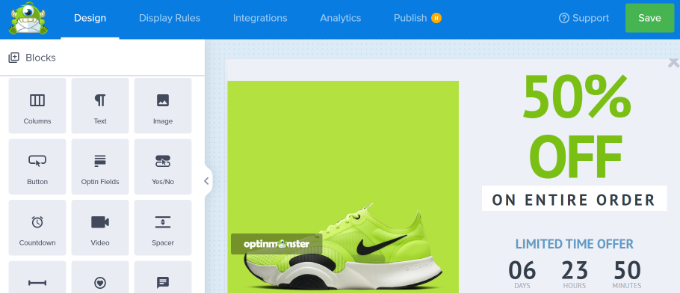
Plus, you can use the drag-and-drop campaign builder to customize your upsell popup.

You can edit different blocks, including the existing ones in the template.

Customize your upsell popup

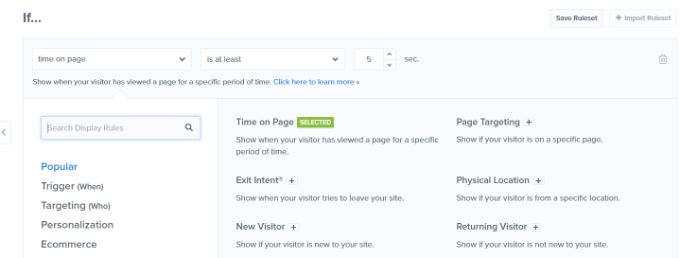
After customizing your popup, you can head to the display rules tab and configure when you’d like to show it to your customers.

OptinMonster offers powerful options, including the Exit Intent technology. This allows you to show your campaign just as the user is about to leave your website. Plus, there are many eCommerce-related display options.

For example, you can display your campaign when a visitor views a particular product on your WooCommerce store or adds a certain number of items to a cart.

Popular display rules

For more details, you can see our guide on how to create a WooCommerce popup to increase sales.

Offer One-Click Upsells on Checkout Page

Another way to upsell in WooCommerce is by showcasing your products at different points in the customer journey.

For instance, you can display high-priced products on the checkout page and allow users to instantly add them to the cart before placing an order. This helps you optimize your sales funnel, boost sales, and earn more revenue.

The easiest way to upsell products during checkout is by using FunnelKit, formerly known as WooFunnels. It is the best WordPress sales funnel and automation plugin, and it offers a one-click upsell option that you can add to your checkout page.

First, you’ll need to install and activate the Funnel Builder Pro plugin. If you need help, then please see our guide on how to install a WordPress plugin.

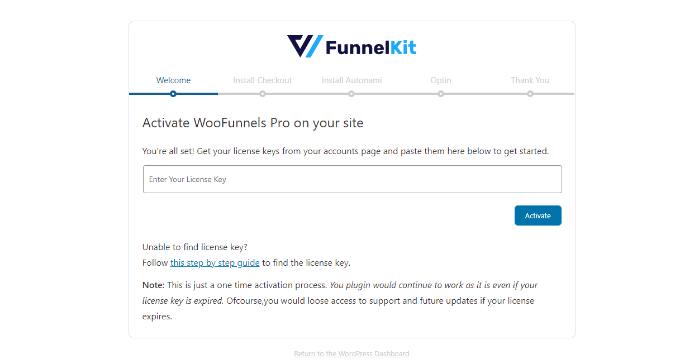
Upon activation, you’ll see the FunnelKit setup wizard. You can start by entering the license key and following the onscreen instructions to configure the plugin.

Enter your WooFunnel license key

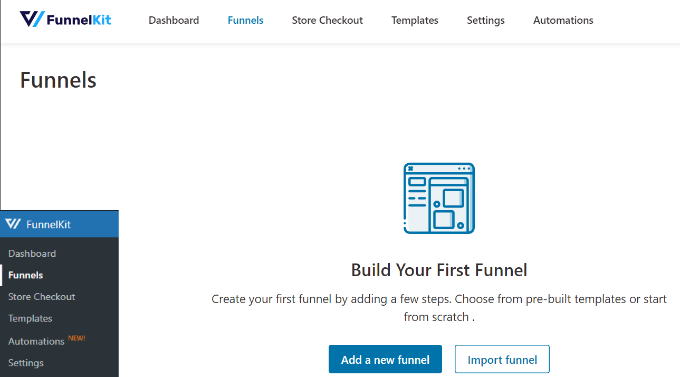
Once the plugin is set up, you can go to FunnelKit » Funnels from your WordPress dashboard.

After that, simply click the ‘Add new funnel’ button.

Add a new funnel button

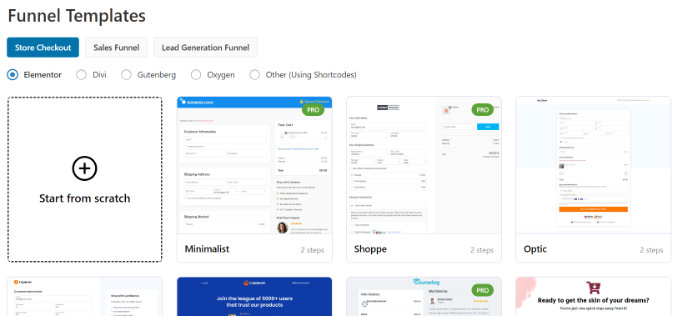
FunnelKit offers different funnel templates for your WooCommerce store, including store checkout, sales funnel, and lead generation funnel.

Go ahead and select a template for your online store. We’ll use the ‘Optic’ store checkout template for this tutorial.

Select a funnel template

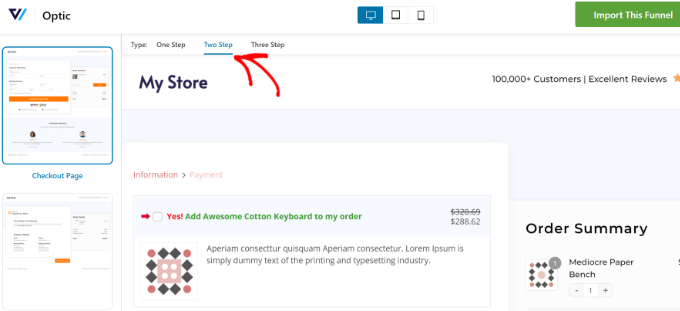
Next, you can preview the template and choose whether you’d like a one-step, two-step, or three-step funnel. The difference between these is that you can show different checkout steps on other pages.

For example, in one-step checkout, all the information is displayed on a single page. On the other hand, a three-step checkout would show basic information, shipping details, and payment on multiple pages.

After that, click the ‘Import This Funnel’ button at the top.

Import the template

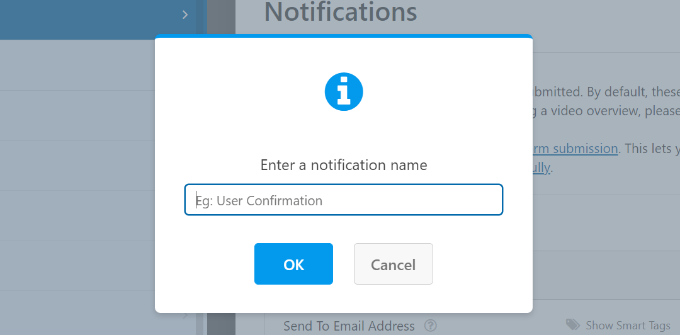
Next, a popup window will open where you’ll need to enter a name for your funnel.

Go ahead and click the ‘Add’ button.

Enter a name for your funnel

FunnelKit will now import the template.

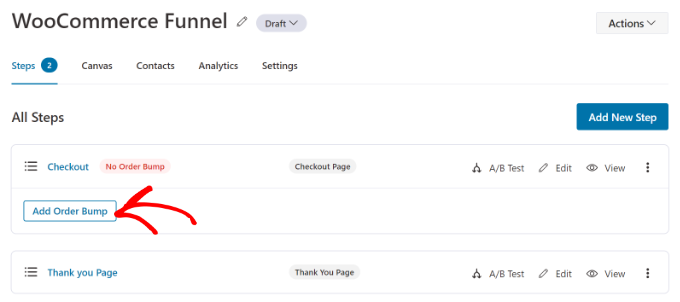
On the next screen, you’ll see different pages in the funnel. You can edit each of these pages and add additional steps.

To add a one-click upsell option, simply click the ‘Add Order Bump’ button under the Checkout step.

Edit your funnel and add new steps

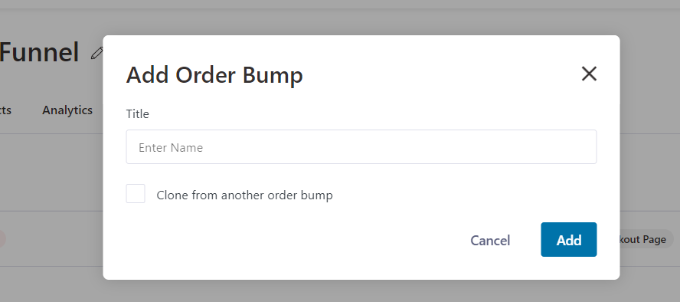
After that, a popup window will open.

Go ahead and enter a name for your Order Bump and click the ‘Add’ button.

Add an order bump

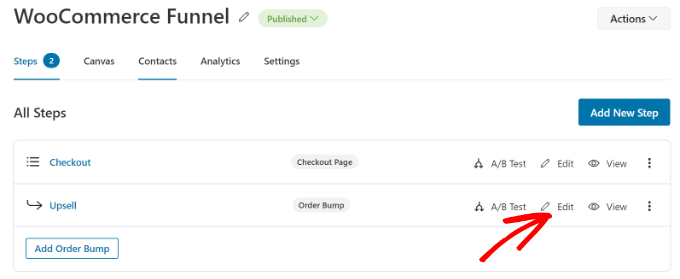
You should now see your Order Bump as a sub-step under the Checkout page.

To add products for upselling, you can edit the order bump page.

Edit the order bump page

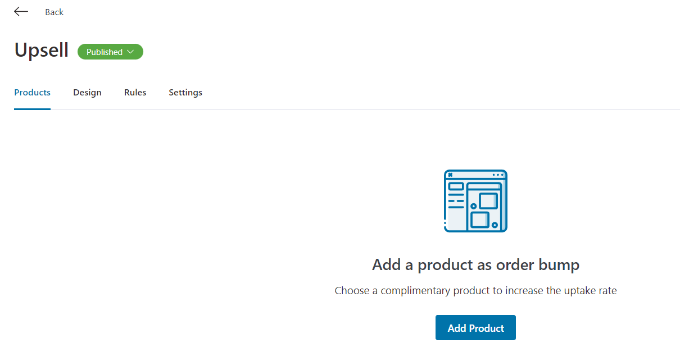
Next, you’ll need to add products you’d like to show on checkout.

Simply click the ‘Add Product’ button to continue.

Add product to your bump offer

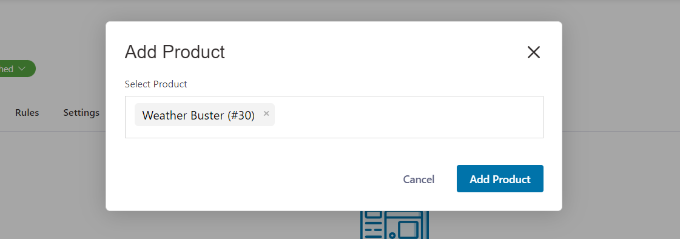
After that, a popup window will open to add your products.

You can search for the products and then click the ‘Add Product’ button.

Search and add products to upsell
Next, you will see the products you just added. FunnelKit lets you rearrange its order if there are multiple items.

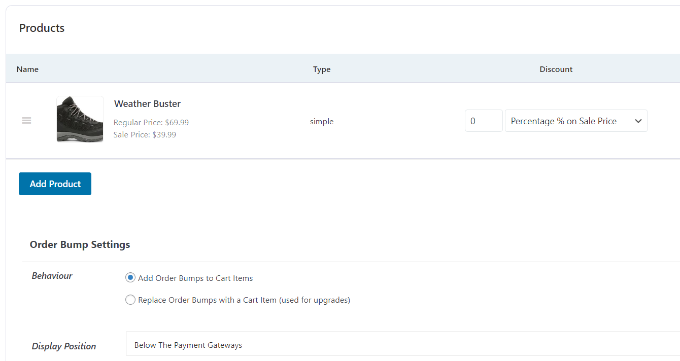
You can also change the behavior and display position of the goods you’d like to upsell on the checkout page. For example, the plugin lets you show upsell products below the payment gateways, above or below the order summary, inside the mini cart, or above the checkout form.

Change bump offer settings

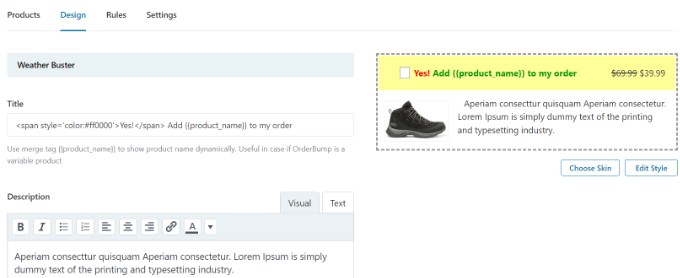
FunnelKit also offers options to change the design of your order bump.

Simply switch to the ‘Design’ tab to edit the title, description, and style. There are different skins to choose from and additional options to further customize each skin.

Edit design of your bump offer

Once you’re done, go back to the Store Checkout dashboard in FunnelKit.

Next, click on the dropdown menu next to the title of your store checkout and change the status to Publish.

Publish your store checkout page

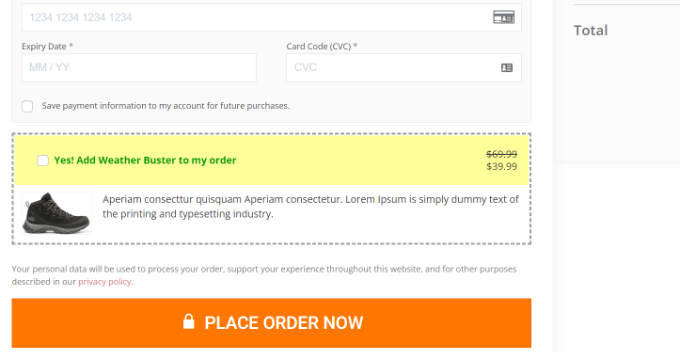
Your one-click upsell will now be active on your WooCommerce store. You can now visit your online store to see it in action.

For instance, our upsell offer appears after the payment gateway on the checkout page. Customers can add the item to their order with a single click.

One click upsell preview

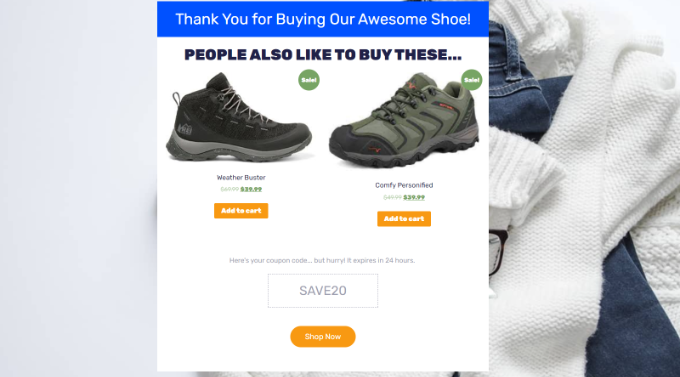
Upsell Products on a Custom WooCommerce Thank You Page

In addition to showing products during checkout, you can create a custom thank you page and upsell products on your WooCommerce store.

Many WordPress website owners might think of a thank you page as a small part of their eCommerce store, but it can have a huge impact on your sales. It gives you the opportunity to recommend more valuable items, offer a discount coupon, and increase your sales.

Thank you page preview

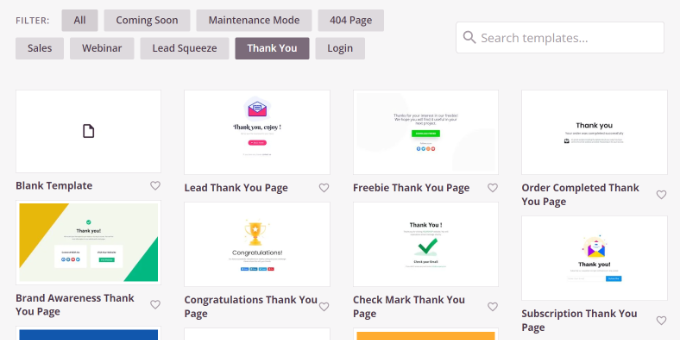
With SeedProd, you can easily create a custom WooCommere thank you page. It is the best website builder and landing page plugin for WordPress.

The plugin offers different pre-built page templates and lots of customization options.

Thank you page template

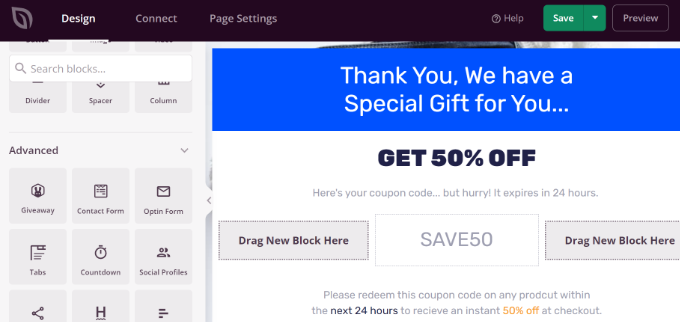
You can use the drag-and-drop page builder to customize your thank you page.

For example, there are blocks for adding text, images, buttons, contact forms, countdown timers, social profiles, and more. Plus, you can control and edit each element on your template.

Customize your custom thank you page

The best part is that SeedProd offers WooCommerce blocks as well.

You can add a product grid or simply add your best-selling, recent, featured, or top-rated products to the thank you page.

Add WooCommerce blocks

For step-by-step instructions, please see our guide on how to create a custom WooCommerce thank you page.

Automatically Add Products to Cart Using a Coupon

Did you know that you can upsell products by automatically adding them to the customer’s cart? For example, when a customer purchases over $200 worth of goods, you can give them a free gift bag.

With the help of the Advanced Coupons plugin, you can set up personalized coupons in WooCommerce and automatically add products to the cart when a coupon is applied.

You’ll need at least the Advanced Coupon Growth plan to add products via coupons. Once you’ve set up the plugin, go to Coupons » Add New from your WordPress dashboard.

Add a new coupon code

Next, you can enter a coupon code at the top or click the ‘Generate coupon code’ button to automatically create a random code.

After that, scroll down to the Coupon data section and switch to the ‘Add Products’ tab.

Add a product

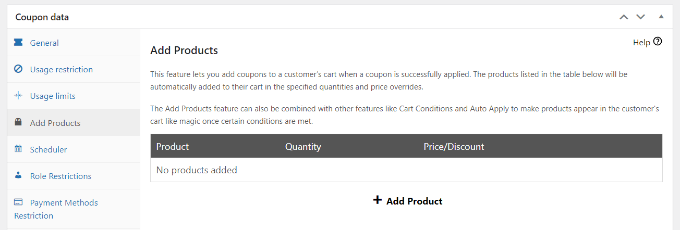
From here, you can search for the product you’d like to automatically add to your cart when the coupon code is applied.

There are also options to set the order quantity and add a price or discount for the selected product.

Search for your product to add for coupon code

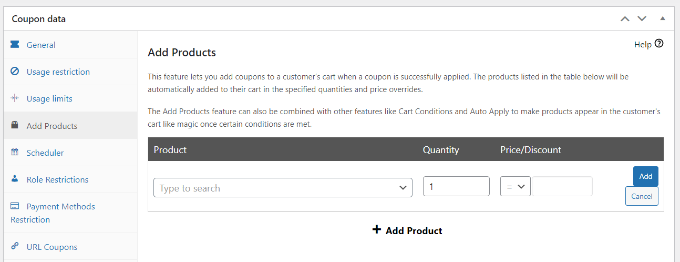
Once you’ve selected a product, click the ‘Add’ button.

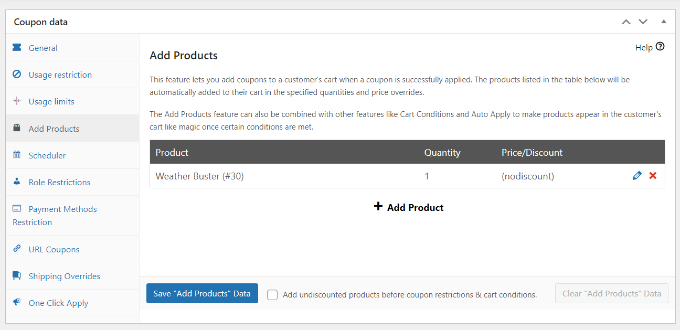
You should see your product under the Add Products section. Don’t forget to click the ‘Save Add Products Data’ button.

Save your add products data

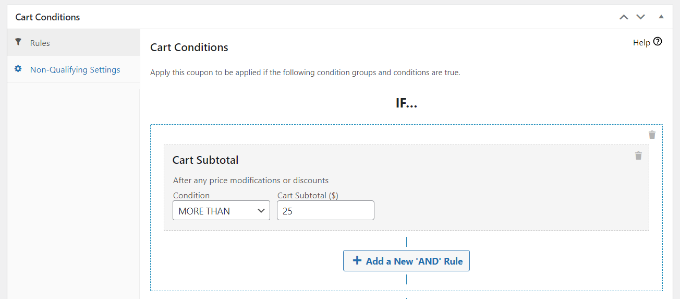
Besides that, Advanced Coupon also lets you set up cart conditions.

This way, you can set up rules for applying your coupon code. For example, the coupon code will only work if the cart quantity or subtotal is more than a certain amount, or a customer adds products from a specific category.

Add cart conditions

After setting up these conditions, you can publish your coupon code.

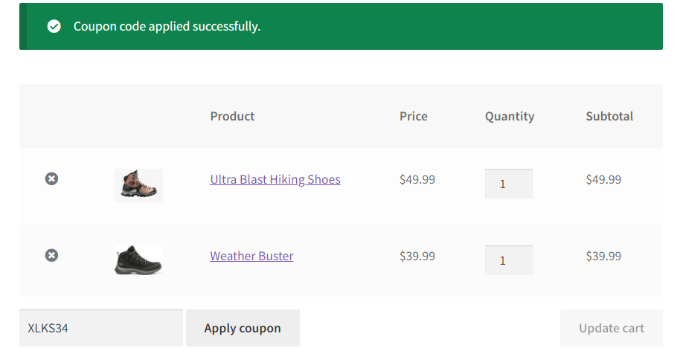
Now, your product will automatically add to the cart whenever a customer enters the discount coupon on checkout.

Automatically add products using coupon

For more details, please see our guide on how to auto-apply coupons in WooCommerce.

We hope this article helped you learn how to upsell products in WooCommerce. You can also see our guide on the best WooCommerce plugins and how to speed up your WooCommerce performance.

If you liked this article, then please subscribe to our YouTube Channel for WordPress video tutorials. You can also find us on Twitter and Facebook.

The post How to Upsell Products in WooCommerce (5 Easy Ways) first appeared on WPBeginner.


October 26, 2022 at 04:01PM

Tuesday, October 25, 2022

How to Create a Contract Agreement Form with Digital Signatures in WordPress

Do you want to add a contract agreement form to your WordPress website that people can e-sign?

Typically to get contracts signed, you either have to manually print/scan the signature, or pay for an expensive third-party e-sign service. Wouldn’t it be nice if you could get users to sign forms with a digital signature in WordPress without the high costs?

In this article, we’ll show you how to easily create a contract agreement form with digital signatures in WordPress.

How to create a contract agreement form with digital signature

Why Create an Online Contract Agreement Form?

An online contract agreement form is easy to fill out and submit. Normally, you’ll send the agreement as PDF, which the other party will have to print, fill in, scan, and send back.

That’s a lot of work.

By creating an online contract agreement form on your WordPress website, users can fill it out right away and sign it digitally with an e-signature.

It does not require any overly priced SaaS software and works very well for many different kinds of legal documents.

For instance, you can use it to create a code of conduct form, employment forms, non-profit or volunteer application forms, and more.

Are Digital Signatures Legal?

Yes, digital signatures and digitally signed documents are legally enforceable. If both parties agree to digital signatures, and the software used keeps a record of digital signatures, then they are legally binding.

However, they cannot be used for all kinds of legal documents. For example, legal documents or forms that require to be notarized, need court stamps, or witnesses.

With that said, this article is not legal advice. Please consider a lawyer for practical legal advice and guidance.

Preparing Your Contract Agreement Form

If you don’t already have a contract drawn up, it’s a very good idea to consult a lawyer. You want to be sure that your contract is legal and that it won’t cause you any possible problems in the future.

Apart from the contract terms themselves, your contract form will probably need space for:

  • The name of the person signing.
  • The address of the person signing.
  • The date the contract is signed.
  • Space for your client (or new employee) to actually sign the contract.

That being said, let’s create a contract agreement form with a digital signature field.

You can click the link below to jump ahead to your preferred method:

Method 1: Create a Digitally Signed Contract Form Using WPForms

The first thing you need to do is install and activate the WPForms plugin. For more details, see our step-by-step guide on how to install a WordPress plugin.

WPForms is a premium plugin, and you’ll need at least their Pro plan to access the Signatures addon.

Upon activation, you need to visit the WPForms » Settings page to enter your license key. You can find this information under your account on the WPForms website.

Entering the WPForms license key

Next, you need to visit the WPForms » Addons page and go to the Signature addon.

Simply click the ‘Install Addon’ button, and the addon will install and activate.

Install the signature addon

You are now ready to create your contract agreement form with the digital signature feature.

Simply go to the WPForms » Add New page to create your form. This will launch the WPForms form builder interface, where you need to provide a title for your form and then choose a template.

We’re going to use the ‘Blank Form’ template for this example, but you can choose a different one if you prefer. Just click on the template to load it.

Choose a form template

You’ll probably want to include the text of your contract itself on the page above the form. This could consist of your signature as an image.

In the form itself, you just need to add the fields that need to be filled in.

To add a new field, click on a field from the left column and drag it onto the template. You can rearrange fields by moving them up and down in the preview column.

Add form fields

If you want to send a copy of the signed form to the user as well, then don’t forget to add an email field where users can provide their email addresses.

Once you’re happy with the fields you’ve added, it’s time to add the most important form field: the signature field.

Scroll down to the ‘Fancy Fields’ section and click to add the Signature field to your form.

Add a signature field

That’s it. You’ve created your form. Next, we need to make sure the settings are correct.

Configuring Your Contract Agreement Form’s Settings

Simply click on the ‘Settings’ tab to view your form’s settings. The default settings will work in most cases, but you may want to make some changes.

In particular, you’ll want to check that the ‘Notifications’ are correct.

By default, the signed contract agreement form will be sent to the administrator’s email address. This is normally the email address of whoever set up your WordPress site. If that’s not you, then enter your email address here instead.

You may also want to send a copy of the form to the user as well. To do that, go to the Settings » Notifications tab and click on the Add New Notification button.

Creating a new WPForms notification

A popup window will now open, where you’ll need to add a name for your new notification. Let’s name it Send to User.

After entering a name, click the ‘Ok’ button.

Enter a name for new notification

You should now see your new notification.

In the ‘Send to Email Address’ section, click on the Smart Tags link and select the Email field.

Select the email smart tag

Review all other settings and adjust them to your requirements. WPForms will now send the form confirmation email to the user as well.

Next, switch to the ‘Confirmation’ tab. You can edit the confirmation message that the client (or employee or volunteer) signing the form will see.

Edit form confirmation settings

Once you’re happy with the settings, click the ‘Save’ button at the top of the screen. You can now close and exit the form builder.

Add Your Contract Agreement Form to Your Site

Finally, you need to put your contract agreement form on your website.

You can create a new page or edit an existing one. First, you’ll need to add the text of your contract terms before including the form itself.

After that, simply add the WPForms block to your content area.

Add a WPForms block in wordpress

Select your contract agreement form from the drop-down box, and WPForms will automatically load a preview of the form in the content editor.

You can now save or publish your page to make your form publicly available.

After that, visit the page to see your contract agreement form in action. Don’t forget to test out the contract agreement form. You should be able to enter your signature using your mouse, trackpad, or touchscreen.

WPForms signature field example

Ensure you see the confirmation message and receive an email after submitting the form.

If you don’t get an email, don’t worry. It’s quite a common problem, and we’ve got instructions on how to fix WordPress not sending emails.

Method 2: Digitally Sign Contract Forms Using signNow

If you already have forms or agreements created in PDF or Microsoft Word format and want to invite others to sign the contract, then you can use signNow.

You can use it to set up electronic signatures, generate agreements, negotiate contracts, collaborate with others, and more. The best part is that it offers a free trial.

To start, you can visit the signNow website and click the ‘Free Trial’ button at the top. There is also an option to enter your email address and click the ‘Try for free’ button.

Visit signNow website

On the next screen, you’ll need to enter a password for your account.

signNow also lets you sign up using Facebook, Microsoft, or Google accounts to create an account.

Sign up for a free trial

After that, you’ll see a welcome screen where you can enter your name to create a digital signature.

Once that’s done, click the ‘Next’ button.

Enter your name to create a signature

Next, signNow will show you a signature style and your initials.

If you want, you can change the style of your signature and then click the ‘Next’ button.

View your signature style

In the next step, you’ll need to select what interests you about signNow.

Simply select one or more options and click the ‘Next’ button.

Tell your interests

After that, you can invite others to collaborate on a document in signNow.

Simply enter the email addresses and click the ‘Invite’ button. You can also skip this step for now and invite people later.

Invite other friends

You are now ready to use SignNow to add electronic signatures to your documents.

Simply click the ‘Upload Your First Document’ to get started.

Upload a document

After that, upload a contract agreement document from your laptop or computer.

signNow will now load your contract in its document viewer.

Add your signature to the document

From the menu on your left, you can select who will be filling the document. For instance, select the ‘Me (Fill Out Now)’ option and then add your signature anywhere on the contract.

After that, you can change to ‘Recipient 1’ under the Select who will be filling out section. From here, add a ‘Signature’ element where you want others to sign on the contract.

Add a recipient to the contract

Next, go ahead and click the ‘Continue’ button at the top.

You can now enter the recipient’s email address and click the ‘Send Invite’ button.

Send invite to recipients

That’s it! Your recipients will receive an email invite to sign the document. Once they send the signed contract back to you, signNow will keep a record of the signatures.

We hope this article helped you learn how to create a contract agreement form with digital signatures in WordPress. You may also be interested in our articles on the best WordPress plugins and the best business phone services for small businesses.

If you liked this article, then please subscribe to our YouTube Channel for WordPress video tutorials. You can also find us on Twitter and Facebook.

The post How to Create a Contract Agreement Form with Digital Signatures in WordPress first appeared on WPBeginner.


October 25, 2022 at 11:43PM

How to Convert a WordPress Widget into a Block (Step by Step)

Are you looking to use a legacy widget in your WordPress sidebar or post content?

In version 5.8, WordPress added a new block-based widget editor. Blocks are more flexible and make it easier to add rich content to your site. Luckily, you can still use classic widgets on your site as well.

In this article, we’ll show you how to convert a WordPress widget to a block.

How to Convert a WordPress Widget to a Block

Here’s what we’ll cover in this tutorial:

What Is the Difference Between a WordPress Widget and Block?

Widgets are used to add blocks of content to the sidebar, footer, or other areas of your WordPress website. They’re an easy way to add image galleries, social media feeds, quotes, calendars, popular posts, and other dynamic elements to your site.

In version 5.8, WordPress introduced a new block-based widget editor that allows you to use blocks to create more engaging widget areas. For instance, you can add buttons, choose colors, group different blocks, and more.

But what if you still rely on a legacy widget that has not been upgraded to a WordPress block? Luckily, you can still use it.

We’ll show you how to easily add legacy widgets to your sidebar and other widget-ready areas. The method you use depends on whether you are using a classic theme or a block theme. On top of that, we will also show you how to add a widget to your posts and pages.

But first, let’s take a brief look at the difference between widgets and blocks from a developer’s point of view.

Can a WordPress Widget Be Simply Converted to a Block?

If you’re a developer who created a legacy widget for WordPress, then you may be wondering whether you can convert it into a new block widget.

While widgets and blocks look similar, they are actually quite different. For example, they are coded using completely different programming languages. Widgets are written in PHP and blocks are written in JavaScript.

This means that there is no simple way to convert a widget into a block.

But that’s not a problem. Your existing widget will continue to work with new versions of WordPress. If you don’t plan to update your widget code, then you can leave it as it is.

However, if you want to continue adding new features to your widget, then it’s best to create a new block to replace the legacy widget. You can follow our guide on how to create a custom WordPress block.

Creating a new custom block

Adding Widgets to Your Classic Theme’s Sidebar in WordPress

If you are using a classic theme, then you can add classic widgets to your sidebar or other widget-ready areas of your site by using the Legacy Widget.

First, you need to navigate to Appearance » Widgets in your WordPress admin area.

Next, you should click the ‘+ Add Block’ button. From the popup, you need to click the ‘Legacy Widget’ icon.

Add the Legacy Widget to Your Sidebar

Note: If you see Appearance » Edit instead of Appearance » Widgets, then you are using a block theme. You’ll need to follow the next method below.

Now you can select the widget you wish to use from the drop down menu.

Select the Desired Widget from the Drop Down Menu

The widget will be added to your sidebar. Make sure you click the ‘Update’ button at the top of the screen to save the new widget.

The Legacy Widget Is Added to the Sidebar

To learn more, see our step by step guide on how to add and use widgets in WordPress.

Adding Widgets to Your Block Theme’s Sidebar in WordPress

Block themes, such as the default Twenty Twenty-Two theme, let you use the Full Site Editor in WordPress. Full site editing offers custom blocks for styling your website’s theme, but doesn’t include the Legacy Widget by default.

That means you won’t be able to access legacy widgets from the Full Site Editor, and when you switch from a classic theme to a block theme, any legacy widgets you were using are not migrated over.

Luckily, you can add legacy widget support using a plugin. Simply install and activate the X3P0 Legacy Widget plugin. For more details, see our step by step guide on how to install a WordPress plugin.

Upon activation, the plugin will add the Legacy Widget to the Full Site Editor. This will allow you to use legacy widgets with newer themes.

The Legacy Widget Is Now Available in the Full Site Editor

Adding Widgets to Your Post Content in WordPress

First, you will need to edit an existing WordPress post/page or add a new one. Once you’re in the WordPress content editor, go ahead and click the ‘+ Toggle block inserter’ button at the top of the screen.

Next, scroll down to the ‘Widgets’ section and find the widget that you want to add to the content. You can then drag the widget onto your post.

Scroll Down to the Widgets Section

You can customize the widget by using the Settings panel on the right of the screen.

Once you’re done, go ahead and publish your blog post or page.

Configure the Widget From the Right Settings Pane

To learn more, see our guide on how to add WordPress widgets in post and page content.

We hope this tutorial helped you learn how to use legacy widgets in WordPress. You may also want to learn how to track website visitors, or check out our list of the best contact form plugins for WordPress.

If you liked this article, then please subscribe to our YouTube Channel for WordPress video tutorials. You can also find us on Twitter and Facebook.

The post How to Convert a WordPress Widget into a Block (Step by Step) first appeared on WPBeginner.


October 25, 2022 at 03:52PM