Tuesday, November 15, 2022

How to Do a Twitch Giveaway in WordPress (Step-by-Step)

Do you want to do a Twitch giveaway in WordPress?

Giveaways can help you get more followers on your Twitch channel. They’re also a great way to engage with the people who already watch you on Twitch.

In this article, we’ll show you how to run a Twitch giveaway in WordPress.

How to do a Twitch giveaway in WordPress

Why Do a Twitch Giveaway in WordPress?

There are many reasons why you may want to do a Twitch giveaway.

Giveaways are popular because they can help you reach a wider audience and increase your followers. You can then ask people to follow you on Twitch, in order to enter your contest.

A Twitch giveaway

You can also use a contest to engage with the people who already watch your Twitch channel.

A giveaway with a valuable prize is much more engaging than other content, so watchers who typically don’t interact with you may decide to visit your WordPress website in order to enter the competition. This means you can increase your blog traffic and get more engagement from your Twitch audience.

You can also offer multiple ways to earn more giveaway entries by encouraging users to follow you on Instagram, YouTube, Twitter, join your email list, etc, so you can get your Twitch followers to follow you on other social channels.

With that being said, let’s see how you can do a Twitch giveaway on your WordPress website.

How to Do a Twitch Giveaway in WordPress (Step-by-Step)

The easiest way to create a Twitch giveaway is by using RafflePress. It’s the best WordPress giveaway plugin and lets you create all kinds of contests using a simple drag-and-drop editor.

There is a free version of RafflePress that makes it easy to run giveaways and competitions no matter what your budget. However, in this guide, we’ll be using RafflePress pro as it has ‘Follow us on Twitch’ as an entry method.

A Twitch giveaway, created using RafflePress and WordPress

First, you’ll need to install and activate the RafflePress plugin. If you need help, then please see our guide on how to install a WordPress plugin.

Upon activation, you’ll see the RafflePress welcome screen in the WordPress dashboard. You can now go ahead and enter your license key.

Adding the RafflePress license key

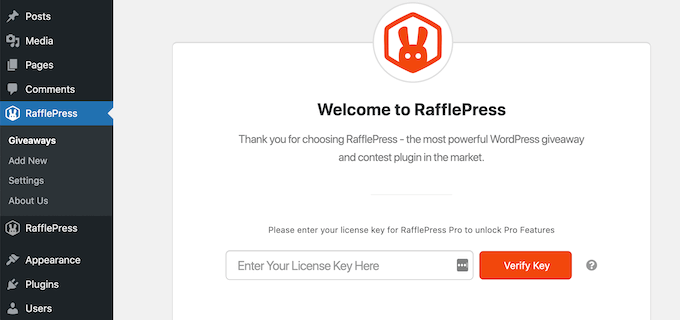
You’ll find this information in your account on the RafflePress website. Once you’ve done that, click on the ‘Verify Key’ button.

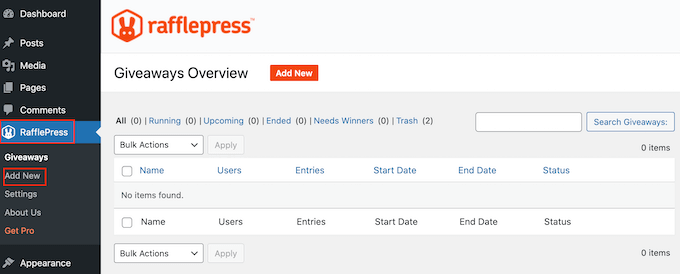
After that, go to RafflePress » Add New.

Creating a new giveaway in WordPress

On the next screen, you’ll need to give your Twitch giveaway a name.

This is just for your reference so you can use anything you want.

Adding a title to your Twitch giveaway

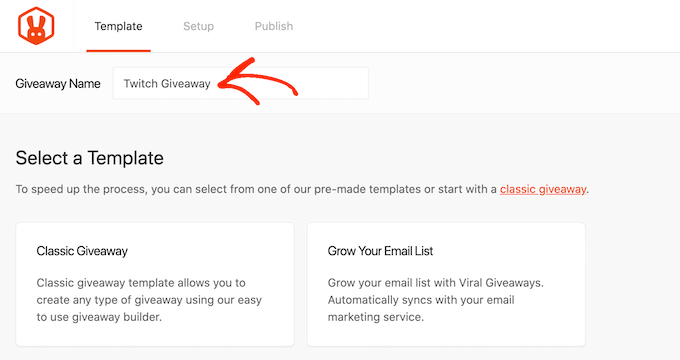
Next, choose the template that you want to use. RafflePress has ready-made templates for specific goals such as growing your YouTube channel or going viral.

For this guide, we’ll use the Classic Giveaway template as it lets us create a contest from scratch. Simply hover your mouse over the Classic Giveaway template and then click on the ‘Use this Template’ button when it appears.

Choosing a template for your Twitch giveaway

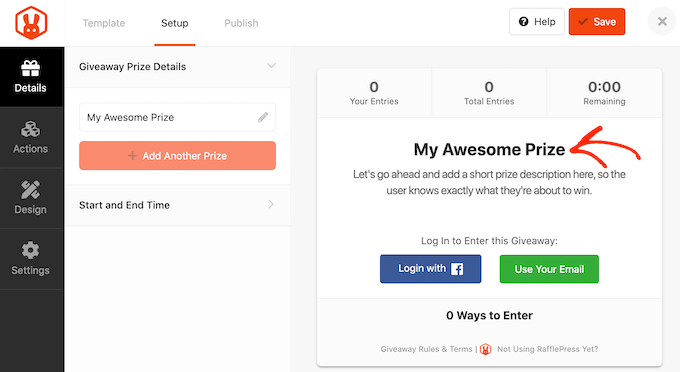
This opens the template in RafflePress’ drag and drop builder.

We’ll start by entering some information about the prize so simply click to select the headline area, which shows ‘My Awesome Prize’ by default.

The RafflePress WordPress giveaway plugin

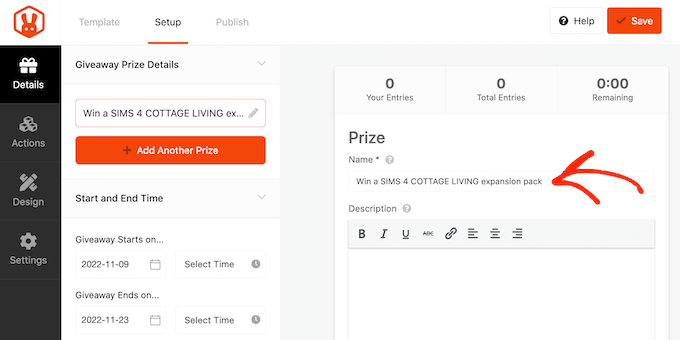
You can now go ahead and type a title into the ‘Name’ field.

You’ll usually want to talk about your exciting prize, but you can use any title you want.

Adding a title to your Twitch giveaway

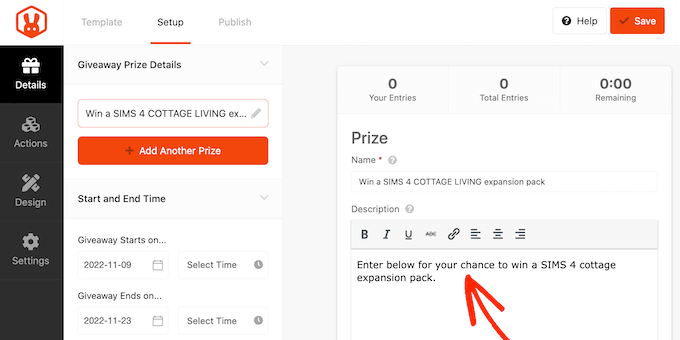
Once you’ve done that, type in a description, which will appear below the headline.

Here, you may want to add some more information about the competition, such as how much the prize is worth and what it has to offer users.

Adding a description to a Twitch giveaway

You might also add a photo of the prize, so visitors can see what’s at stake. Even simply adding the product’s logo can make the competition more eye-catching.

To do this, simply click on ‘Select Image.’

How to create a Twitch giveaway in WordPress

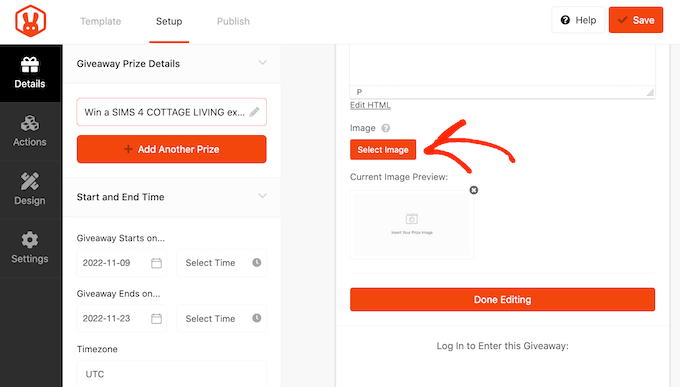
Then, either choose an image from the media library or upload a new file from your computer.

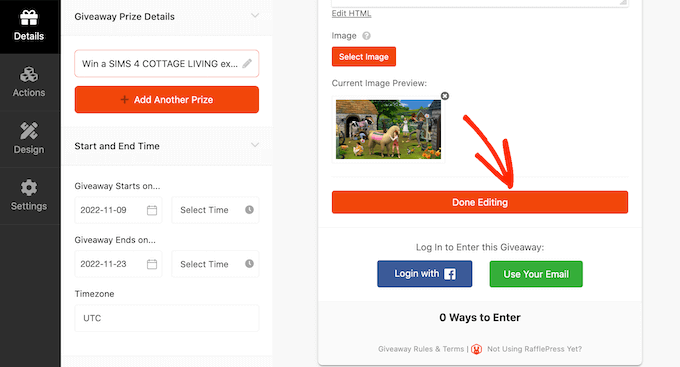
When you’ve finished making changes to this section, click on the ‘Done Editing’ button.

Adding an image to a Twitch giveaway

Now it’s time to set a start and end date for your giveaway. If you have lots of giveaways planned, then this allows you to schedule them in advance. It also guarantees that your contests will start and end on time, no matter how busy you get.

To schedule the contest, simply enter a date and time into the ‘Giveaway starts…’ and ‘Giveaway ends…’ sections.

Scheduling your Twitch contest

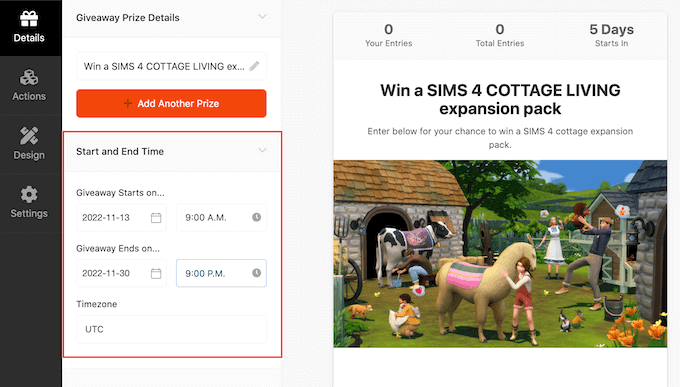
By default, RafflePress uses the UTC timezone, but you can change this using the ‘Timezone’ dropdown menu.

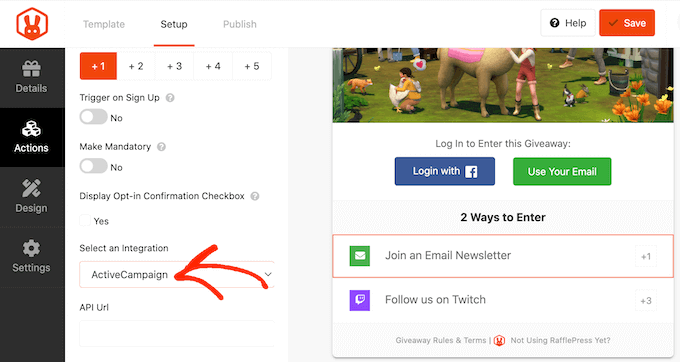
Your next task is choosing how visitors will enter the giveaway, by selecting ‘Actions.’

Adding actions to your Twitch giveaway

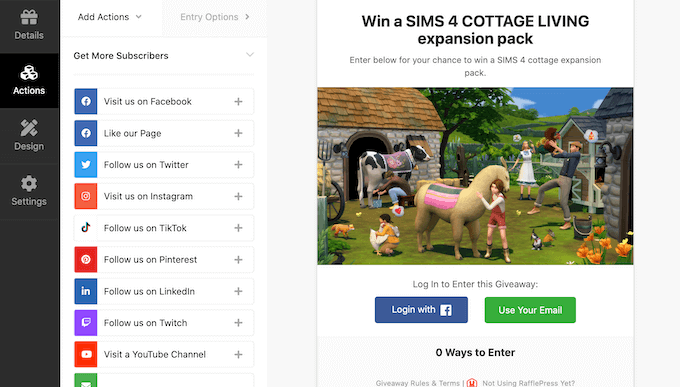
You will now see all the different entry methods. For example, if you want to create a Facebook giveaway to boost engagement, then you can select ‘Like our Page’ or ‘Visit us on Facebook’ as the entry method.

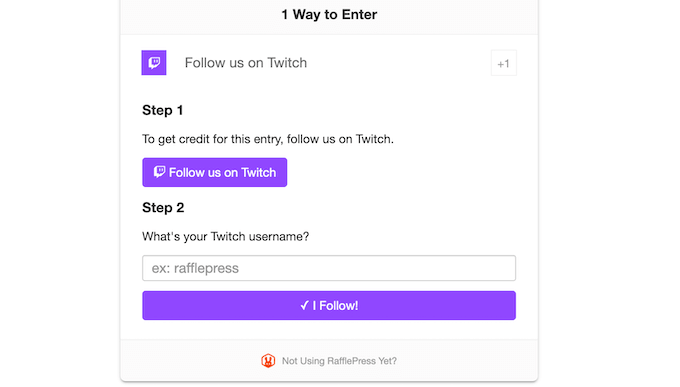
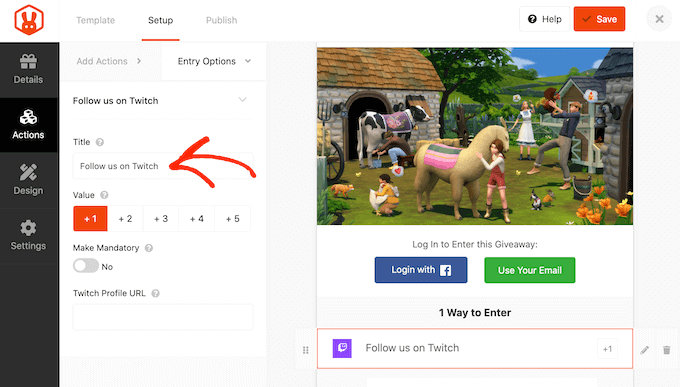
To get more followers on Twitch, just click on the ‘Follow us on Twitch’ action.

You can then type in the text that will appear to the people who visit your WordPress website. This is ‘Follow us on Twitch’ by default, but you can use anything you want.

Adding a Twitch action to a WordPress contest

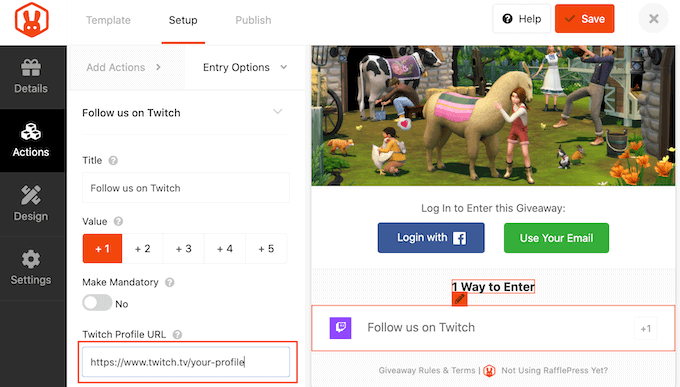
Next, paste your Twitch link into the ‘Twitch Profile URL’ field.

Every time someone clicks on the link, they’ll be asked to follow you on Twitch and also type in their username, so you can verify that they’re following your account.

Adding your Twitch profile to RafflePress

You can add multiple entry methods to a single competition. By offering visitors a choice, you can often boost the number of entries you get. For example, some people may not have a Twitch account, but will happily enter the contest by subscribing to your podcast or completing a survey in WordPress.

Some people may even want to boost their chances of winning by using more than one entry method.

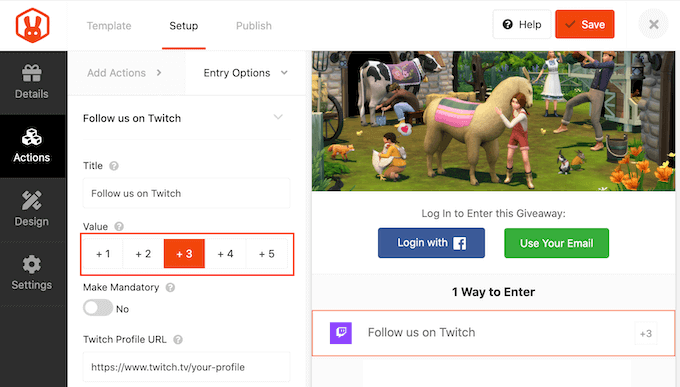
If you do offer visitors a choice, then you may want to make some methods more appealing than others. For example, if your main goal is to grow your Twitch followers, then you might make this method worth two entries.

By default, every action is worth one entry, but you can change this by selecting a new number in the ‘Value’ area.

Changing the value of a Twitch entry method

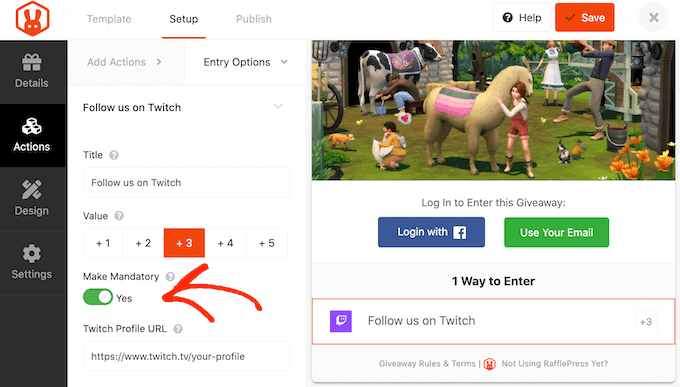
You could also make the Twitch action mandatory, while all other entry methods are optional. This means all participants must follow you on Twitch in order to enter the contest, but they can get additional entries by performing other tasks.

To do this, simply click the ‘Make Mandatory’ slider so that it turns from ‘No’ to ‘Yes.’

Making the Twitch method mandatory

To add more entry methods, simply click on the ‘Add Actions’ tab and then follow the same process described above.

Every time you add an action, RafflePress will show the settings you can use to configure that action. For example, if you add ‘Join an Email Newsletter’ as an entry method then you’ll need to select your email marketing service.

Adding an email marketing service to your RafflePress contest

By default, RafflePress will show the actions in the order you add them to your competition.

To change this, simply hover over the action in the editor and then grab the dotted button that appears to the left of the action.

Rearranging your giveaway entry methods

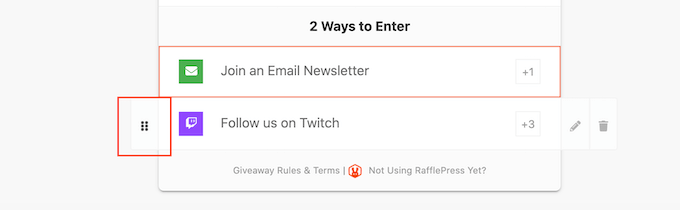
Then, move the entry method using drag and drop.

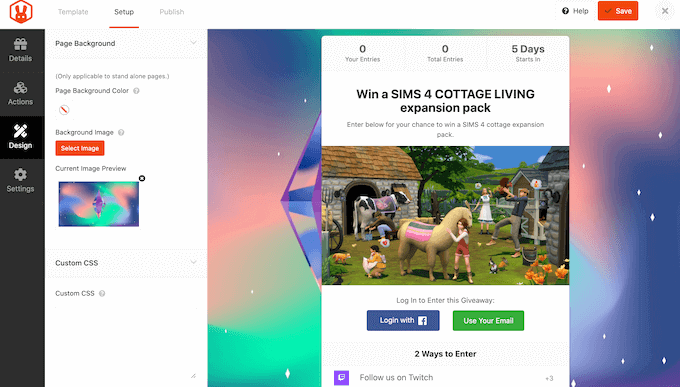
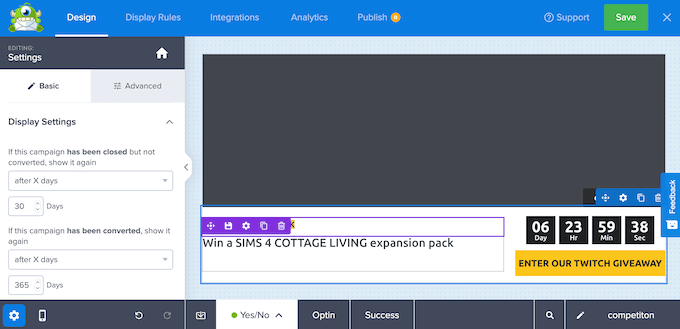
When you’re happy with how the giveaway is set up, you can change how it looks by clicking on the ‘Design’ tab.

Changing the design of your Twitch contest

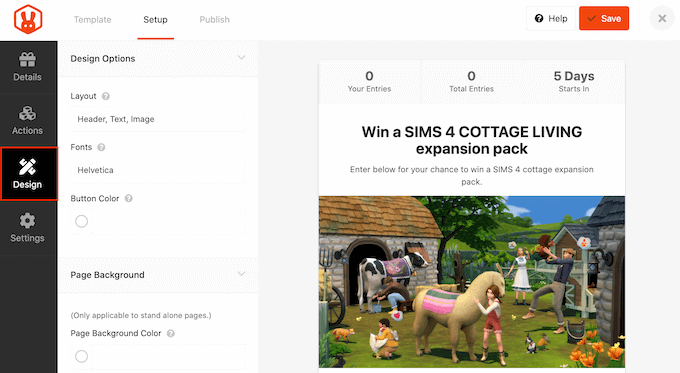
Here, you can change the fonts, select a new button color, change the background color, add a background image, and more.

You can even customize the giveaway template using custom CSS.

Adding a background image to a Twitch giveaway

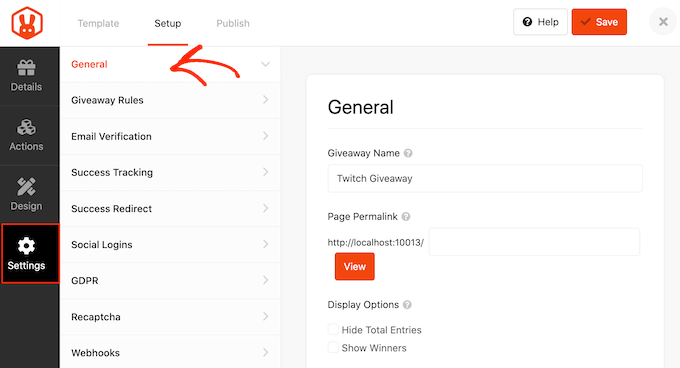
When you’re happy with how the contest looks, select the ‘Settings’ tab.

Here, you can edit the giveaway’s general settings including its name, URL, and whether it’ll show the total number of entries to visitors.

You can also join the RafflePress affiliate marketing program and make money from your Twitch giveaway.

Configuring the RafflePress contest

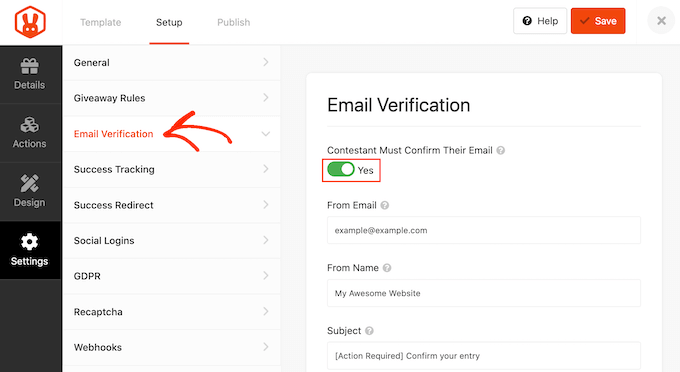
If you’re using the contest to grow your mailing list or generate leads, then you may want to verify each participant’s email address by selecting the ‘Email Verification’ tab.

Here, click on the ‘Contestant Must Confirm Their Email’ toggle to turn it from ‘No’ to ‘Yes.’

Requiring email verification for contest entries

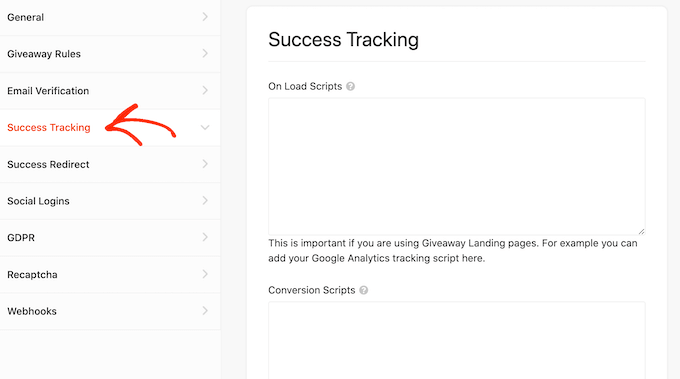
If you’re using Google Analytics to track user engagement, then you can select the ‘Success Tracking’ tab.

This section has two text editors where you can add your tracking scripts.

Adding tracking scripts to a Twitch contest

When you’re happy with how your giveaway is setup, make sure you store your changes by clicking on the ‘Save’ button.

Then, it’s time to make your giveaway live by clicking on the ‘Publish’ tab.

How to publish a Twitch giveaway using WordPress

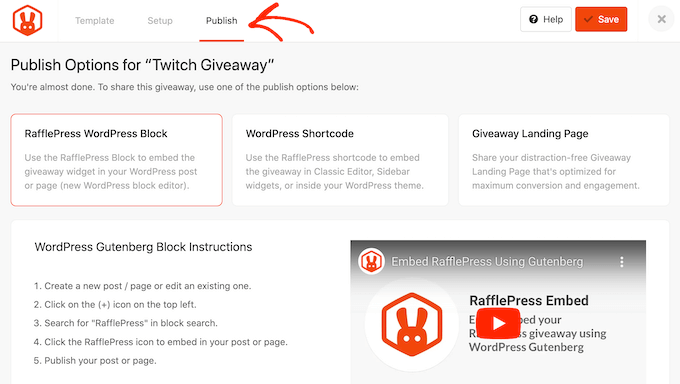
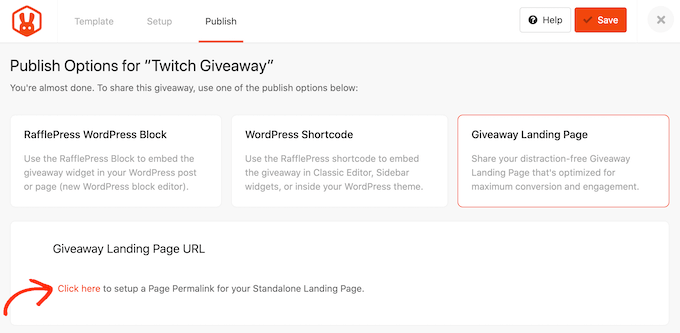
You can add the contest to your site using a shortcode, the RafflePress WordPress block, or by creating a landing page.

If you want to add the giveaway to a post or page, then the easiest option is using the RafflePress WordPress block.

However, if you want to get as many entities as possible, then we recommend choosing the ‘Giveaway Landing Page’ option as it creates a separate page that you can easily share on social media.

To get started, click on ‘Giveaway Landing Page’ and then select the ‘Click here’ link.

Creating a landing page for your giveaway

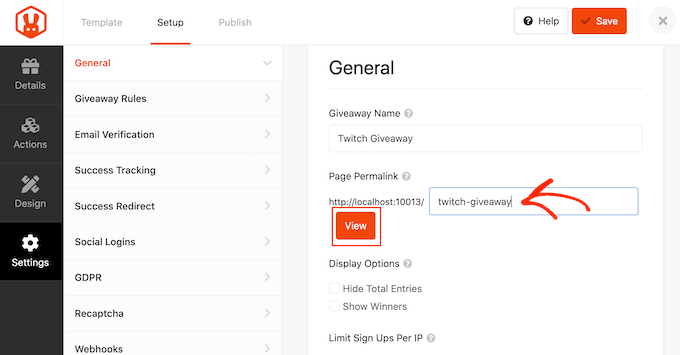
If you haven’t already, then type the URL that you want to use into the ‘Page Permalink’ field.

Finally, go ahead and click on ‘View.’

Setting the permalink for your giveaway landing page

RafflePress will now publish your giveaway as a landing page. If you visit the URL, then you’ll see the giveaway live.

How to Promote your Twitch Giveaway

After creating a giveaway, you’ll want to promote it so more people can enter. Wherever possible, it’s a good idea to promote a giveaway before publishing it, so you can get a ton of entries straight away.

To start, you’ll want to help visitors find your giveaway landing page by promoting it on your site’s most important pages.

One option is adding the giveaway to your navigation menu or sidebar. You can also create a floating bar with a link to the giveaway landing page using a plugin such as OptinMonster.

Creating a floating banner in OptinMonster

You might even create a sense of urgency by adding a countdown timer to the floating bar. In this way, you can use FOMO on your WordPress site to get more entries and Twitch followers.

Promoting the giveaway on your social media profiles is also a great way to get more participants. Since these people already follow you on social media, they may be interested in watching your Twitch, so this is a great way to grow your channel.

Sending web push notifications can also boost your participants. You can ask your push notification subscribers to follow you on Twitch if they haven’t already, or to refer any friends or family members who might want to enter the competition.

It’s also important to promote the giveaway to your Twitch audience. They may already be following you on Twitch, but contests are a great way to engage with your followers. For example, you might announce the competition on a stream, or add the giveaway to your Twitch stream panels.

How to Pick a Twitch Giveaway Winner

Once your giveaway closes, it’s time to choose a lucky winner.

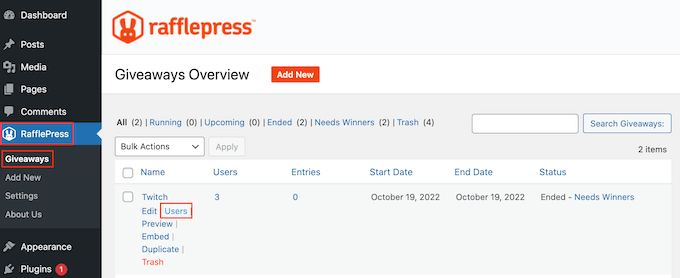
To pick a winner at random, simply head over to RafflePress » Giveaways in your WordPress dashboard. If you didn’t set an end date, then you’ll need to hover over the giveaway and click on the ‘End Now’ link when it appears.

How to close a contest manually

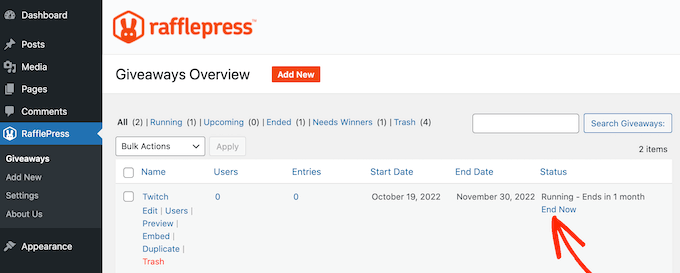
When it shows up, click on ‘Needs Winners.’

On the following page, RafflePress will show all the people who entered your giveaway, along with how they entered, their total entries, and more.

Here, just type in the number of winners that you want to pick.

Picking a winner for your Twitch competition

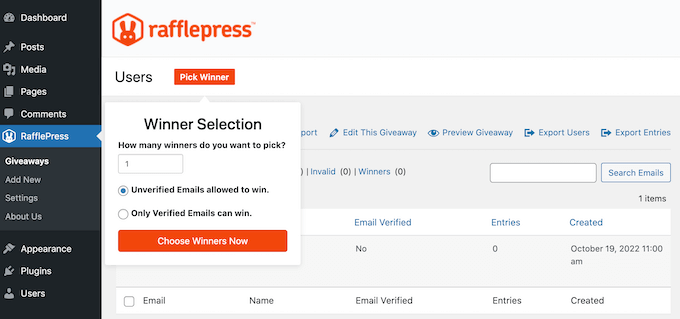
When you’re ready, go ahead and click on the ‘Choose Winners Now’ button. RafflePress will then show the winner highlighted at the top of the list.

You’re now ready to contact the winner and let them know the good news, for example you might send them an email or even announce the winner on a live Twitch stream.

It’s also a good idea to thank everyone for taking part and encourage them to join your giveaways in the future.

Analyze Your Twitch Giveaway

After announcing the winner and thanking your audience, it’s smart to analyze your giveaway. You can use this information to fine-tune all the competitions you run in the future.

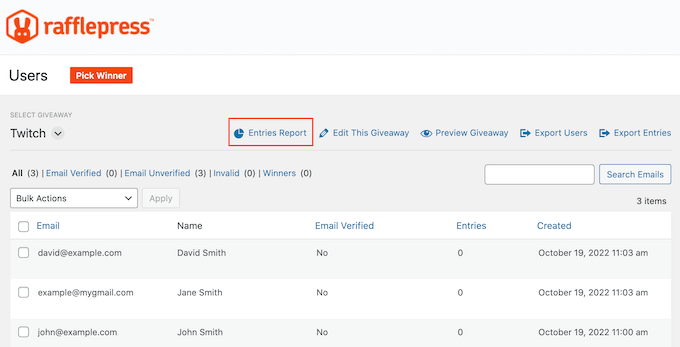
If you offered multiple entry methods, then we recommend using RafflePress’ Entries Report to see which method was the most popular.

To see this information, head over to RafflePress » Giveaways and then hover your mouse over the contest that you want to analyze. When the ‘Users’ link appears, give it a click.

Analyzing your Twitch giveaway

On the next screen, click on ‘Entries Report.’

You will now see a pie chart of all the different entry methods, along with the percentage for each method.

How to analyze a WordPress competition

Another easy way to analyze your giveaway is by using MonsterInsights.

MonsterInsights is the best WordPress Google Analytics plugin, and it allows you to track all your website activity right from your WordPress dashboard. For example, you can see how people arrived at your giveaway landing page, the actions they took on that page, and more.

The MonsterInsights Google Analytics plugin

By anazlying your website data with MonsterInsights, you can see which actions and promotions drove the most people to your giveaway and the traffic sources that got you the most entries. You can then use this insight to improve your next contest.

We hope this article helped you learn how to do a Twitch giveaway in WordPress. You can also go through our expert pick on the best social media plugins for WordPress, and our step by step guide on how to create an email newsletter.

If you liked this article, then please subscribe to our YouTube Channel for WordPress video tutorials. You can also find us on Twitter and Facebook.

The post How to Do a Twitch Giveaway in WordPress (Step-by-Step) first appeared on WPBeginner.


November 15, 2022 at 03:46PM

Monday, November 14, 2022

How to Add Rotating Testimonials in WordPress (3 Ways)

Do you want to add rotating testimonials to your WordPress website?

Testimonials are a great way to show social proof and boost your credibility. That’s why so many online businesses proudly display customer testimonials across their websites.

In this article, we’ll show you how to easily add rotating testimonials in WordPress.

How to add rotating testimonials in WordPress

Why Add Rotating Testimonials to WordPress?

Many businesses use rotating testimonials to help them win new customers, get more sales and signups to their email list, and more.

If you’re running an online store, then testimonials are a powerful form of social proof that can help turn visitors into customers, and boost your conversion rates.

A rotating testimonials section

When it comes to social proof, positive reviews from multiple people are far more credible than a single five-star review. With that in mind, rotating testimonials are a great way to show lots of positive comments in a small space.

Rotating testimonials also add some animation to your WordPress website, which can make your site more eye-catching and engaging.

Positive reviews for WPForms

With that said, let’s see how you can add rotating testimonials to WordPress. Simply use the quick links below to jump to the method you want to use.

Method 1. Adding Rotating Testimonials to WordPress Using WP Testimonials Rotator (Quick and Simple)

If you want to create a simple rotating testimonials section, then you can use a free plugin such as WP Testimonials Rotator.

The first thing you need to do is install and activate the plugin. For more details, see our step-by-step guide on how to install a WordPress plugin.

Upon activation, go to WP Testimonials » Add New in your WordPress dashboard.

Adding a new testimonial using a free plugin

To get started, type in the title that will appear above the testimonial quote.

You can then add the testimonial in the main text editor.

Adding social proof to your WordPress website

To help organize your testimonials, you may want to add some categories, in the same way that you add categories and subcategories in WordPress.

After that, scroll to the ‘Testimonial Details’ box and add information such as the person’s name, job title, and company.

How to add a positive customer review to WordPress

You can also add a featured image, which will appear above the testimonial title. For example, you might use the person’s headshot or the product logo.

When you’re happy with the information you’ve entered, click on ‘Publish’ to make it live.

You can now add more testimonials by repeating the same process described above. Once you’ve created all your customer testimonials, it’s time to show them on your website.

Simply open up the post or page where you want to add your rotating testimonials. Then, click the ‘Plus’ icon to open the WordPress block editor. You can then type in ‘Shortcode’ and select the right block when it appears.

Adding a shortcode block in WordPress

After that, you’ll need to add the following shortcode to the box: [sp_testimonials_slider]

Then, click the ‘Update’ or ‘Publish’ button to save your changes.

Now your visitors can see all your positive customer testimonials. These testimonials will automatically rotate after each one displays for a few seconds.

A rotating customer testimonial created using a free plugin

Method 2. Adding Custom Rotating Testimonials to WordPress Using SeedProd (More Customizable)

If you want to create a beautiful, fully-customizable testimonials section, then we recommend using a page builder plugin.

SeedProd is one of the best drag and drop WordPress page builder in the market used by over 1 million websites.

It comes with ready-made blocks and more than 180 templates that allow you to create custom pages in WordPress and easily add rotating testimonials to your website.

First, just install and activate the plugin. For more details, see our beginner’s guide on how to install a WordPress plugin.

Note: There is a free version of SeedProd available, but we’ll be using the Pro version since it has a ready-made testimonial block. It also integrates with all of the best email marketing services you may already be using to promote your products and services.

Upon activation, you need to visit SeedProd » Settings and enter your license key.

Entering your SeedProd license

You can find this information under your account on the SeedProd website. After entering the key, click on the ‘Verify Key’ button.

After that, go to SeedProd » Pages and then click on the ‘Add New Landing Page’ button.

Creating a new page layout using SeedProd

On the next screen, you’ll be asked to choose a template. SeedProd has dozens of professionally designed templates organized into different campaign types such as ‘lead,’ ‘squeeze,’ and ‘coming soon.’ 

To choose a template, hover over it and then click the ‘Checkmark’ icon.

Choosing a professionally-designed SeedProd template

If you want to start from scratch, then SeedProd also has a blank template that you can use. We’ll be using the ‘Juicy Sales Page’ template in all our images, but you can use any design you want.

Next, go ahead and type in a name for the custom page. SeedProd will automatically create a URL based on the page’s title, but you can change this URL to anything you want.

Creating an SEO-friendly URL

A descriptive URL will help search engines understand what the page is about, so they can show it to the right users. With that in mind, you may want to add some relevant keywords to the URL.

For more information, please see our guide on how to do keyword research for your WordPress blog.

After entering this information, click on the ‘Save and Start Editing the Page’ button.

This will load the SeedProd page builder interface.

The SeedProd page builder plugin

It is a simple drag-and-drop builder that shows a live preview of your page to the right. You will also see block settings on the left.

The left-hand menu has blocks that you can add to your page using drag and drop.

First, we’ll add a customer testimonial block. Simply drag the ‘Testimonials’ block onto the page where you want it to appear.

The ready-made testimonial block

You can now customize the testimonial by adding images, changing the text, adding the customer’s name, and more.

To make these changes, simply click to select the testimonials block and then use the settings in the left-hand menu.

Configuring the SeedProd testimonials block

To create a rotating section, you’ll need to create two or more testimonials by clicking the ‘Add Testimonial’ button.

You can then customize the testimonial. For example, you can type the quote into the text editor or upload an image.

Adding more testimonials to your page layout

Next, you can change how the rotating testimonials will look and act, by clicking on ‘Carousel Settings’ to expand that section.

Here you can change the color scheme, the slider speed, and whether the slider will scroll through the different customer testimonials automatically.

Configuring the rotating testimonials carousel

You can continue to customize the page by adding more blocks and changing the settings in the left-hand menu.

When you’ve finished customizing your page, it’s time to publish it by clicking the dropdown arrow next to ‘Save’ and then selecting the ‘Publish’ option. 

A rotating testimonial with a unique layout

Now if you visit your WordPress blog or website, you’ll see the page with your rotating testimonial live.

Method 3. Adding Rotating Social Media Testimonials to WordPress Using Smash Balloon

If your users are already leaving fantastic reviews on Facebook and Twitter, then you can create a testimonials section using a social media plugin.

Smash Balloon is one of the best WordPress testimonial plugins in the market and supports all of the major social networks. This means you don’t have to copy and paste new testimonials to your WordPress website since they’ll show up automatically.

The Smash Balloon testimonials plugin

For example, Smash Balloon’s Facebook Social Reviews Feed lets you display reviews from your Facebook Page on your site. Visitors can see that these reviews come from real Facebook users, which makes them more credible.

Setting up your social networks is simple, and if you want to add rotating Twitter testimonials to your site, then see our guide on how to embed tweets in WordPress. For Facebook, see our guide on how to create a custom Facebook feed.

Once you activate, set up, and connect your social media accounts, your social media testimonials will update automatically every time you get a new review. This can save you a lot of time and effort, and is a great way to keep your website fresh.

Smash Balloon also has plenty of options for filtering and moderating which reviews show up on your website, so you still have complete control.

Configuring your Facebook feed with Smash Balloon

We hope this article helped you add rotating testimonials to your WordPress website. You may also want to see our expert picks of the best virtual business phone number apps and our beginner’s guide on how to run a giveaway in WordPress.

If you liked this article, then please subscribe to our YouTube Channel for WordPress video tutorials. You can also find us on Twitter and Facebook.

The post How to Add Rotating Testimonials in WordPress (3 Ways) first appeared on WPBeginner.


November 15, 2022 at 12:40AM

How to Easily Add Browser Tab Notification in WordPress

Do you want to add browser tab notifications for your website?

Adding browser tab notifications can be a great way to recapture a user’s attention, can lower the rate of cart abandonment, and increase sales and revenue.

In this article, we will show you how to add browser tab notifications in WordPress.

How to Add Browser Tab Notification in WordPress

What is Browser Tab Notification?

A browser tab notification is when you change something on the tab for your website when the user is focusing on a different site in their browser.

By adding a browser tab notification feature on your WordPress website, you can grab the user’s attention the moment they open another tab to leave your page.

For instance, you can change the favicon of your website, animate it, write a custom message, or just flash the tab.

If you have an online store, browser tab notifications can really help you out. These notifications will bring back distracted customers, lower cart abandonment rates, and increase customer engagement.

Using this feature, you can alert your customers about cart abandonment or even offer a discount if they return their attention to your site.

Here is an example of a browser tab notification.

Browser tab notification example gif

With that being said, we will show you how to add three different types of browser notifications to WordPress.

Install WPCode to Add Browser Tab Notifications

You can easily add browser tab notifications on your site by adding custom code in WordPress. Usually, you have to edit your theme’s functions.php file, but that can break your website with even a small error.

That’s why we recommend using WPCode, the safest and most popular code snippet plugin, used by over 1 million websites.

First, you will need to install and activate the free WPCode plugin. For more details, you can see our step to step guide on how to install a WordPress plugin.

Once you’ve activated the plugin, simply go to Code Snippets » All Snippets in your WordPress admin panel.

Go to Code Snippets an click on Add New

Just click on the ‘Add New’ button, which will then bring you to the ‘Add Snippet’ page.

Now, hover over the ‘Add Your Custom Code (New Snippet)’ option and click on the ‘Use Snippet’ button below it.

Simply click on the Use Snippet button

The plugin will then take you to the ‘Create Custom Snippet’ page.

No matter which type of browser tab notification you use, you will enter the code below using this page.

Create Custom Snippet page

Type 1. Showing New Updates as a Browser Tab Notification

If you use the code below, your users will be alerted about any new updates that are being posted on your site. A number will appear in the tab to tell them how many new items they are missing.

For example, if you have an online store and you just added some new products to the inventory, the user will see the browser tab notification as a number that indicates how many new products were added.

You can see this in the image below:

New Updates as browser tab notification

Once you’re on the ‘Create Custom Snippet’ page, you need to name your snippet. You can choose anything that helps you identify the code. This is only for you.

Next, you’ll select the ‘Code Type’ from the drop-down menu on the right. This is JavaScript code, so simply click on the ‘JavaScript Snippet’ option.

Select JavaScript as Code Type

Then, all you have to do is copy and paste the following code snippet into the ‘Code Preview’ area.

let count = 0;
const title = document.title;
function changeTitle() {
    count++;
    var newTitle = '(' + count + ') ' + title;
    document.title = newTitle;
}
function newUpdate() {
    const update = setInterval(changeTitle, 2000);
}
document.addEventListener('DOMContentLoaded', newUpdate );
Copy and paste the JavaScript code

Once you’ve pasted the code, scroll down to the ‘Insertion’ section. You will find two options: ‘Auto Insert’ and ‘Shortcode.’

Simply choose the ‘Auto Insert’ option, and your code will be automatically inserted and executed on your site.

You can use the ‘Shortcode’ method if you only want to show new updates on specific pages where you add the shortcode.

Choose an insertion mode

Once you’ve chosen your option, return to the top of the page.

Click the switch from ‘Inactive’ to ‘Active’ in the top right corner, and then simply click the ‘Save Snippet’ button.

Save your code snippet

With that finished, your custom code snippet will be added to your site and start working.

Type 2. Changing Favicons as a Browser Tab Notification

With this method, you will show a different favicon on your site’s browser tab when users navigate away to another tab.

A favicon is a small image that you see on web browsers. Most businesses will use a smaller version of their logo.

Favicon as web browser notification

Now, to change favicons on your browser tab, we will be using the WPCode plugin.

First, go to Code Snippets » All Snippets in your WordPress admin panel and then click on the ‘Add New’ button.

Next, simply hover over the ‘Add Your Custom Code (New Snippet)’ option and click on the ‘Use Snippet’ button below it

This will take you to the ‘Create Custom Snippet’ page. You can start by entering a title for your code snippet.

Now simply choose a ‘Code type’ from the dropdown menu at the right. For this code snippet, you need to select the ‘HTML Snippet’ option.

Choose HTML as your Code Type

Once you’ve done that, simply copy and paste the following code in the ‘Code Preview.’

<link id="favicon" rel="icon" href="https://example.com/wp-content/uploads/2022/10/favicon.png"/>

<script>var iconNew = 'https://example.com/wp-content/uploads/2022/10/favicon-notification.png';

function changeFavicon() {
    document.getElementById('favicon').href = iconNew;
}
function faviconUpdate() {
    const update = setInterval(changeFavicon, 3000);
    setTimeout(function() { 
        clearInterval( update ); 
    }, 3100);
}

After you’ve pasted the code, simply remove the example favicon links from the code and replace them with your own images.

Paste the HTML code and remove the example favicon image links

Remember, the images you choose as favicons should already be uploaded to the media library of your WordPress site.

Otherwise, the code will not work, and your favicon will display as normal.

Change favicon image links

Once you’ve pasted the links to your new favicons, scroll down to the ‘Insertion’ section. Here, you’ll find two options: ‘Auto Insert’ and ‘Shortcode.’

You can choose the ‘Auto Insert’ option if you want to automatically embed the code on every page.

Choose an insertion mode

To change the favicon on only specific pages, select the ‘Shortcode’ option and paste it into any shortcode-enabled area, such as sidebar widgets or at the bottom of the content editor.

Then, simply go to the top of the page and toggle the switch from ‘Inactive’ to ‘Active’ in the top right corner, and then click the ‘Save Snippet’ button.

After that, your favicon will start changing as a browser tab notification.

Type 3. Changing Site Title as a Browser Tab Notification

If you want to change the site title to recapture your visitor’s attention, then you can use this method.

By using this code snippet, your site title will change to show an eye-catching message when users switch to another tab in the browser.

Changing site title in a browser

We will be using the WPCode plugin to change your site title as a browser tab notification.

To get to the ‘Create Custom Snippet’ page, go to Code Snippets » All Snippets and simply click on ‘Add New’ button.

Then, simply select the ‘Add Your Custom Code’ option as shown in the examples above.

Now that you’re on the ‘Create Custom Snippet’ page, start by entering a title for your code snippet.

Next, you’ll have to select the ‘Code Type’ from the dropdown menu on the right. As this is JavaScript code, simply click on the ‘JavaScript Snippet’ option.

Select JavaScript as Code Type

After that, scroll down to the ‘Location’ option and click on the dropdown menu beside it.

From the dropdown menu, simply click on the ‘Site Wide Footer’ option.

Choose Site Wide Footer as location

Then, all you have to do is copy and paste the following code snippet in the ‘Code Preview’.

function changeTitleOnBlur() {
        var timer     = null;
        var     title     = document.title;
        var altTitle  = 'Return to this page!';
        window.onblur = function() {
                timer = window.setInterval( function() {
                        document.title = altTitle === document.title ? title : altTitle;
                }, 1500 );
        }
        window.onfocus = function() {
                document.title = title;
                clearInterval(timer);
        }
}

changeTitleOnBlur();

Once you’ve pasted the code, you can now edit it and simply write whatever message you want to display on your browser tab in the code.

To write your desired message, simply go to the var altTitle = 'Return to this page!'; line and remove the placeholder text with the message for your browser tab notification.

Type a sentence of your choosing

Next, scroll down to the ‘Insertion’ section, where you will find two insertion methods: ‘Auto Insert’ and ‘Shortcode.’

If you click on the ‘Auto Insert’ option, your browser tab notification will be active on every page. However, if you only want your eye-catching message on specific pages, you can choose the ‘Shortcode’ option.

Choose an insertion mode

For example, you might only want to add this code on the ‘Add to Cart’ page so that it can lower cart abandonment rates on your website.

If that is the case, you can choose the Shortcode option.

All that’s left after that is to go to the top of the page and toggle the switch from ‘Inactive’ to ‘Active’, then click the ‘Save Snippet’ button.

Click on the Save Snippet button

That’s it! Now, your browser tab notification will alert users who leave your site.

We hope this article helped you learn how to add browser tab notifications in WordPress. You may also want to see our tutorial on how to add web push notifications to your WordPress site and check out our top picks of must-have WordPress plugins to grow your site.

If you liked this article, then please subscribe to our YouTube Channel for WordPress video tutorials. You can also find us on Twitter and Facebook.

The post How to Easily Add Browser Tab Notification in WordPress first appeared on WPBeginner.


November 14, 2022 at 04:02PM