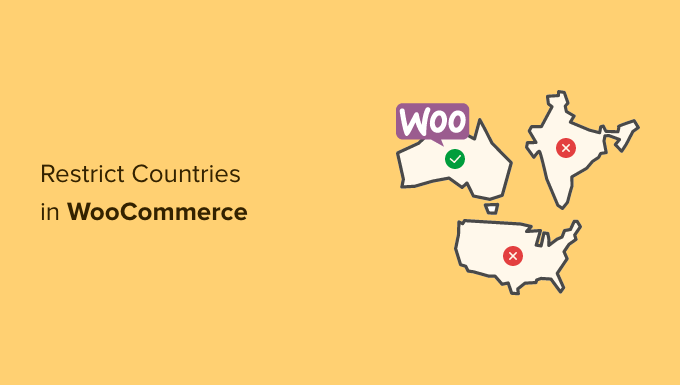
Recently one of our readers asked if it was possible to restrict countries in your WooCommerce store?
By hiding your WooCommerce store from specific countries, you can control your product visibility around the world. That way, your products will only be available in specific countries.
In this article, we will show you how to easily add country based restriction to WooCommerce products or even your entire WooCommerce store.
Why Restrict Your WooCommerce Store in a Country?
When selling products online, an online store owner can come across a lot of problems. For example, you can get a product order from a country where that product is illegal, or your payment gateways can’t process fees.
When building a WooCommerce store, it is important to provide the best user experience to your customers. You don’t want the customer to place an order only to find out that they can’t complete their purchase.
This can result in customer frustration, and it can keep them from ever coming back to your site or buying something else from you.
To avoid these kinds of situations, it is better to restrict access to your WooCommerce store or products from specific countries.
With that being said, let’s take a look at how you easily can restrict your WooCommerce store and products in specific countries.
You can jump to either method by clicking the links below:
Method 1. Restricting Countries Using WooCommerce Settings
You can easily hide your online store in specific countries using WooCommerce default settings.
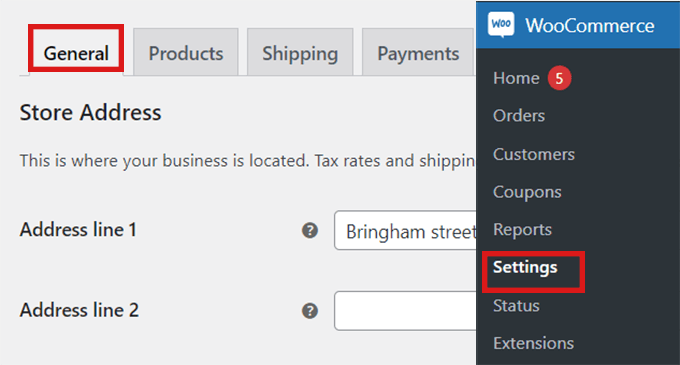
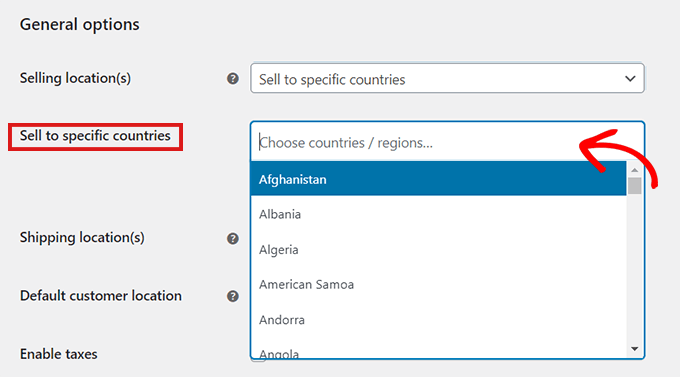
First, go ahead and click on the WooCommerce » Settings option in your WordPress dashboard and then go to the ‘General’ tab.
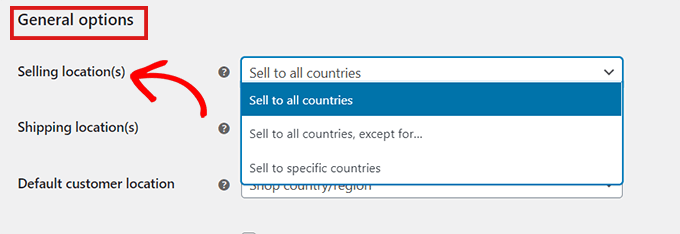
Once there, scroll down to the ‘General Options.’ Here you will find the ‘Selling Location’ section. Simply click on the dropdown menu in the field where you will find three options.
You can either select the ‘Sell to specific countries, except for…’ option, or you can choose the ‘ Sell to specific countries’ option.
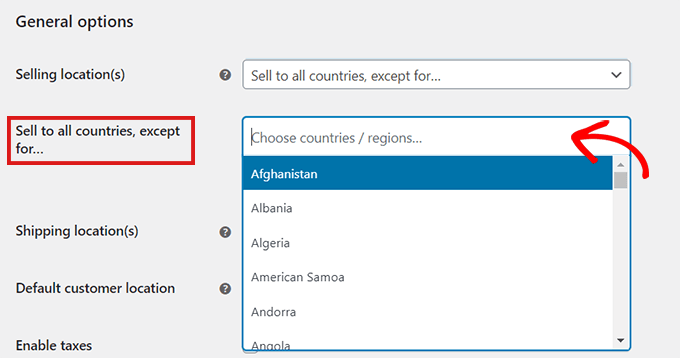
When you select the ‘Sell to specific countries, except for…’ option, another field will appear.
Now, just select from the dropdown any countries where you don’t want to sell your products.
If you’ve chosen the ‘Sell to specific countries’ option, a ‘Sell to specific countries’ field will appear in the settings below.
Now you can select all the countries where your store will be available.
The main downside of this method is that you cannot hide specific products.
By restricting countries using the default settings method in WooCommerce, the restrictions will be applied to your whole online store, and users in those countries won’t be able to buy any of your products.
If you only want to hide some specific products in different countries, it is better to use a plugin mentioned in Method 2. Let’s take a look at how to restrict specific WooCommerce products in different countries.
Method 2. Add Country Based Restrictions for WooCommerce Products
It is a free WooCommerce plugin that allows you to hide your products in specific countries.
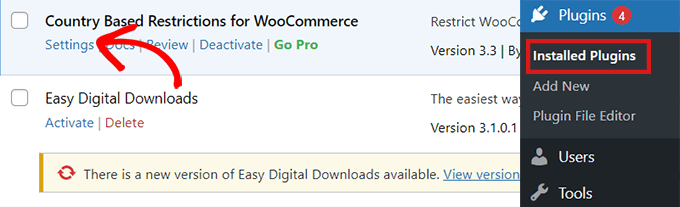
First, you’ll need to install and activate the ‘Country Based Restrictions For WooCommerce’ plugin. For more details, please take a look at our guide on how to install a WordPress plugin.
After you’ve activated the plugin, go to Plugins » Installed Plugins.
Here, click on the ‘Settings’ link in the ‘Country Based Restrictions for WooCommerce’ entry.
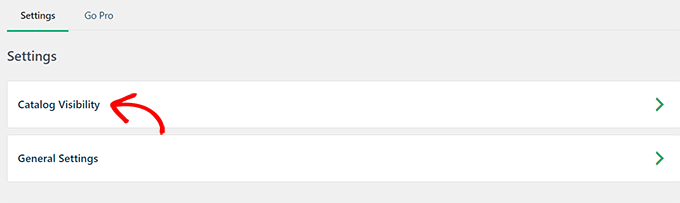
Once you’re on the ‘Settings’ page, just click on the ‘Catalog Visibility’ option.
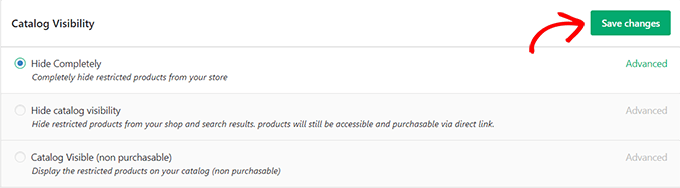
After you’ve clicked on the ‘Catalog Visibility’ option, you will have 3 choices:
Hide Completely – Restricted products will not appear in your store.
Hide Catalog Visibility – Restricted products will only be available by direct links, but not through browsing or search results.
Catalog Visible (non purchasable) – Restricted products will appear as normal, but customers will be unable to purchase them.
Once you’ve chosen an option, simply click on the ‘Save Changes’ button.
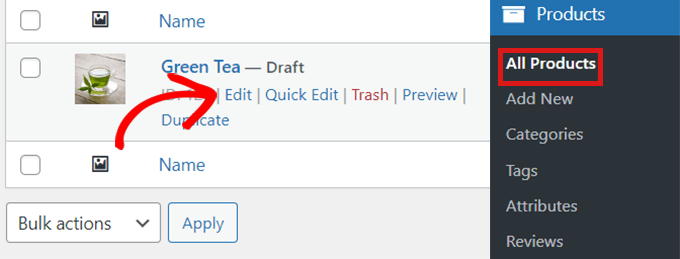
Next, go to WooCommerce » All Products in your WordPress dashboard.
Locate the product that you want to restrict and simply click on the ‘Edit’ link.
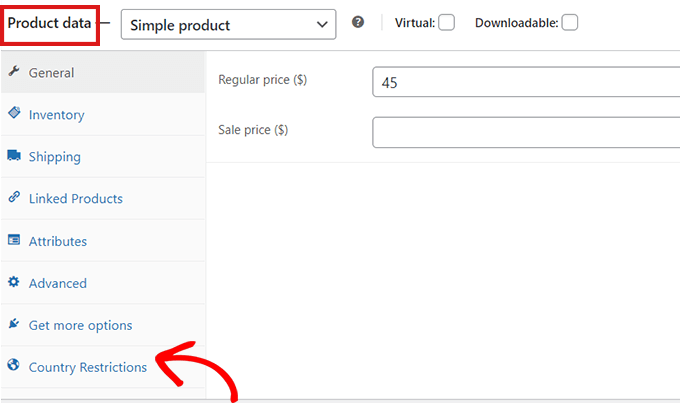
This will open the ‘Edit Product’ page. You can then scroll down to the ‘Product Data’ section.
Next, simply click on the ‘Country Restrictions’ option to the left.
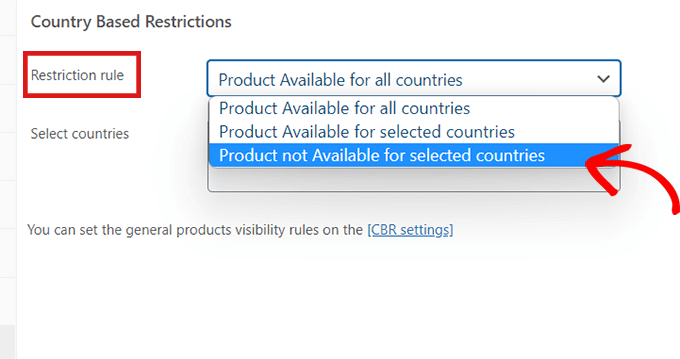
After you’ve clicked on the ‘Country Restrictions’ option, you’ll see a ‘Restriction Rule’ field.
Simply click on the dropdown menu beside the field and select the ‘Product Not Available For Selected Countries’ option.
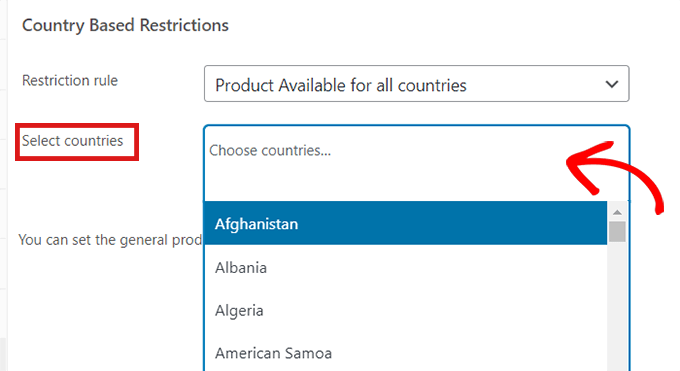
After that, go to the ‘Select Countries’ field and click on the dropdown beside it.
Then, simply choose the countries where your product won’t be available for purchase.
Once you’re happy with your choice, don’t forget to click on the ‘Publish button.’
Now, if a customer from the chosen country visits your store, the product you’ve restricted won’t appear.
Bonus: Geolocation Targeting for WooCommerce to Grow Sales
Did you know that geotargeting in WooCommerce can help you grow sales?
For example, you can use a plugin like OptinMonster to run specific discounts for certain locations, offer different prices based on countries, and so much more.
We hope this article helped you learn how to restrict countries in your WooCommerce store. You may also want to see our ultimate WooCommerce SEO guide to improve your SEO rankings, or see our tutorial on how to fix WooCommerce not sending email issue to improve your email deliverability.
If you liked this article, then please subscribe to our YouTube Channel for WordPress video tutorials. You can also find us on Twitter and Facebook.
Do you want to track conversions on your WooCommerce store?
Conversion tracking helps you understand what’s working on your online store and what needs more attention. It helps you keep track of your best-performing products while also allowing you to see what’s stopping customers from completing a purchase.
In this guide, we’ll show you how to easily set up WooCommerce conversion tracking, step by step.
Why Set up WooCommerce Conversion Tracking?
WooCommerce makes it easy to sell anything online. However, once you have set up your WooCommerce store, you will need to learn what works on your website to grow your business.
You will need to learn which products are popular among your users, what they are viewing the most, how many users end up making a purchase, how they are finding your website, and more.
To get all this information, you need to set up conversion tracking on your online store. This helps you get access to insights you need to make informed decisions about growing your business.
Conversion tracking helps you unlock key performance indicators including your eCommerce conversion rate, average order value, shopping cart abandonment, cost per acquisition, top referral sources, and more.
Apart from that you also get to learn about:
Shopping behavior – It tells you what products users are adding to carts, which products are being abandoned, what pages lead users to a successful purchase, and more.
Checkout behavior – Helps you view how users successfully complete a checkout.
Product performance – Tells you which products are bringing you the most sales.
Product list performance – This allows you to group products and see their performance as a list. This comes in handy when you want to see how different product categories are doing in your online store.
That being said, let’s take a look at how to unlock all this useful information by setting up conversion tracking on your store.
Setting Up WooCommerce Conversion Tracking in WordPress
The easiest way to track WooCommerce conversions is by using MonsterInsights.
It is the best Google Analytics plugin for WordPress and comes with an eCommerce addon that literally enables all the tracking within a few clicks.
The challenge is that setting up Google Analytics with WooCommerce requires a lot of custom coding, event tracking, and more.
The good news is that MonsterInsights makes it super easy to set up eCommerce tracking, and you can do it without writing any code. It works seamlessly with WooCommerce and supports other popular eCommerce plugins.
For this tutorial, we’ll use the MonsterInsights Pro version because it includes the eCommerce addon, advanced tracking features, and eCommerce dashboard report. There is also a MonsterInsights Lite version you can use to get started for free.
First, you will need to install and activate the MonsterInsights plugin. If you need help, then please see our guide on how to install a WordPress plugin.
Upon activation, you can see the MonsterInsights welcome screen in your WordPress admin area. Simply click the ‘Launch the Wizard’ button.
Next, you can follow the onscreen instructions in the setup wizard to configure Google Analytics with your website. See our guide on how to install Google Analytics in WordPress for complete installation instructions.
With MonsterInsights, you can also set up dual tracking and set up a Google Analytics 4 (GA4) property. GA4 is the latest version of Google Analytics, and it will replace Universal Analytics on July 1, 2023.
After this date, you won’t be able to track your online store’s data in Google Analytics and will have to start from scratch. However, dual tracking lets you send data to GA4 and Universal Analytics at the same time.
This way, you will have historical data in your GA4 property when the time comes to completely switch to the new version. For more details, please see our guide on how to switch to Google Analytics 4 in WordPress.
Once you have installed Google Analytics using MonsterInsights, you can move on to installing the MonsterInsights eCommerce addon.
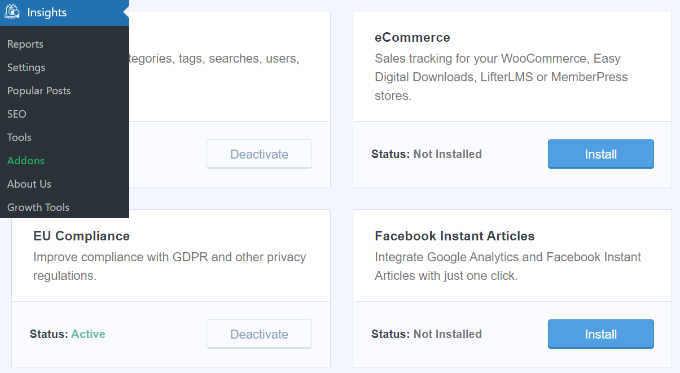
First, you need to visit the Insights » Addons page from your WordPress dashboard and navigate to the ‘eCommerce’ addon.
Go ahead and click the ‘Install’ button. The addon will now install and activate on your site. You should see the ‘Status’ change from ‘Not Installed’ to ‘Active.’
Next, you’ll need to enable enhanced eCommerce in Google Analytics.
Enable Enhanced Ecommerce in Google Analytics
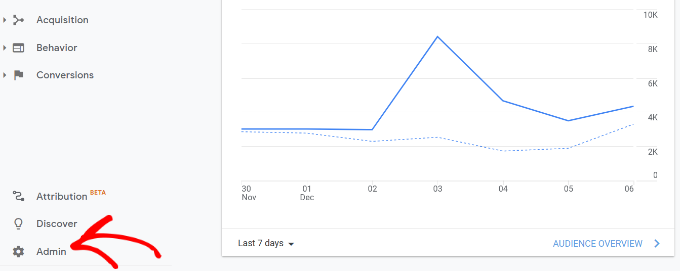
First, you need to go to your Google Analytics account and select your website.
From here, you need to click on the Admin button located at the bottom left corner of the screen.
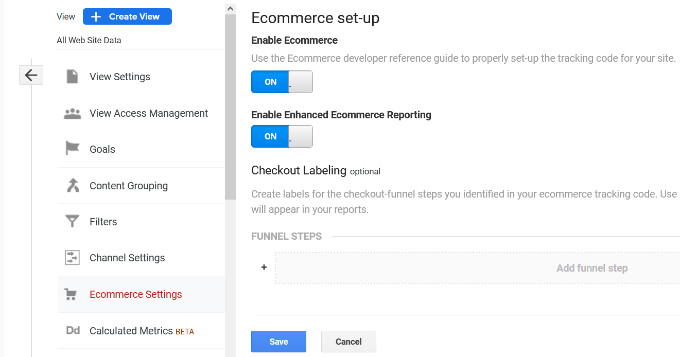
Next, you need to click on the ‘Ecommerce settings’ option.
It is located under the ‘View’ column.
After that, you need to turn on the toggles for ‘Enable Ecommerce’ and ‘Enable Enhanced Ecommerce Reporting’ options.
Google Analytics will now turn on the eCommerce reporting feature for your account.
Next, you can go back to your WordPress dashboard and head over to the Insights » Settings page.
From here, switch to the eCommerce tab and make sure to turn on the ‘Use Enhanced eCommerce’ option.
MonsterInsights will automatically detect your eCommerce software. Currently, it supports WooCommerce, Easy Digital Downloads, LifterLMS, and MemberPress.
That’s all, you have successfully set up WooCommerce conversion tracking on your online store.
Viewing WooCommerce Conversion Reports
Now that you have set up conversion tracking on your WooCommerce store, you need to give Google Analytics some time to collect data.
After a while, you will be able to view your eCommerce reports in both MonsterInsights and Google Analytics.
Let’s start with your eCommerce reports in MonsterInsights.
eCommerce Reporting in MonsterInsights
Log in to your WordPress site and go to the Insights » Reports page and switch to the eCommerce tab.
At the top, you’ll get your most important conversion metrics including the conversion rate, transactions, revenue, and average order value.
Below that you will see a list of your top products with quantity, sale percentage, and total revenue.
Next, you’ll see your top conversion sources. You can use this report to attract more customers and offer exclusive discounts for customers from specific sources.
That’s not all the data. You can dig deeper with more advanced reports under your Google Analytics account.
WooCommerce Tracking in Universal Analytics
Google Analytics provides even more in-depth reporting for your WooCommerce store.
Simply visit your Universal Analytics dashboard and click on Conversions » Ecommerce from the left column.
First, the overview report will provide you with important numbers such as revenue, conversion rate, transactions, and average order value.
You can then switch to different reports for more in-depth analysis. For example, the ‘Shopping Behavior’ report will break down user sessions to add to cart, cart abandonment, and sessions that resulted in the checkout.
WooCommerce Tracking in Google Analytics 4
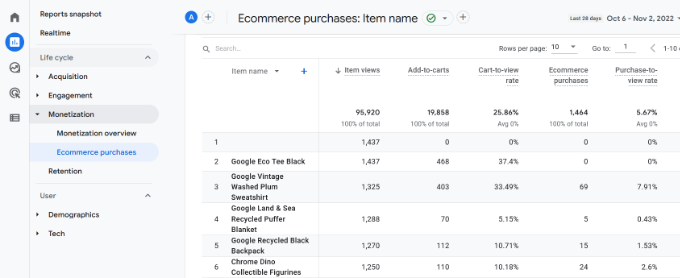
To view your WooCommerce reports in Google Analytics 4, you can go to Reports » Monetization » Ecommerce purchases.
In the report, you’ll see different metrics like total items viewed, add to carts, eCommerce purchases, and more for each product.
Boost Your WooCommerce Conversions and Increase Sales
Now that you have the data you need to track your WooCommerce conversions, let’s take a look at how to improve your conversion rates and make more sales.
1. Improve Speed and Performance
According to a StrangeLoop case study, a 1 second delay in page load time can lead to a 7% loss in conversions, 11% fewer page views, and a 16% decrease in customer satisfaction.
Slower websites create a bad user experience which results in lower conversion rates. See our complete step-by-step guide to improve your WooCommerce speed and performance.
2. Recover Abandoned Cart Sales
On average 60 – 80% of people who “add to cart” do not end up buying. This means if you have an online store, then you’re losing out on a lot of sales.
Luckily, there are several best practices that help you recover some of those abandoned cart sales. See our tips on how to recover abandoned cart sales and increase your conversions.
3. Provide Users with Alternatives
If users decide to leave your website without making a purchase, then there is very little chance that they will ever see your website again.
You need to provide users a chance to stay in touch even if they don’t end up making a purchase.
Are you wondering whether it’s safe to install and use an outdated WordPress plugin?
Sometimes when you are searching for a plugin to add a new feature to your website, you may find one that looks perfect, but it hasn’t been updated for a while or hasn’t been tested with your version of WordPress. Often times this leads to beginner readers asking the question can I use it without breaking my website?
In this article, we’ll discuss how to determine whether or not you can safely install outdated WordPress plugins.
How Do WordPress Plugins Become Outdated?
A WordPress plugin can become outdated if it hasn’t received any updates for a while, or if it hasn’t been tested by the plugin author to ensure it’s compatibility with the latest 3 major releases of WordPress.
We always recommend our readers to keep the plugins in your WordPress website up to date. These updates keep the plugin compatible with changes made to WordPress core, add new features, fix bugs, and address security vulnerabilities.
But what if a plugin that you are using or want to use hasn’t been updated for some time? Or what if it hasn’t been tested with the latest version of WordPress? Is it still safe to use?
The short answer is, it depends on the plugin.
Sometimes outdated plugins simply will not work correctly with newer versions of WordPress. Or the plugin may have even been abandoned by the developer, so that no new features will ever be added.
The biggest concern with outdated plugins is that there may be security issues that can come up. If the plugin isn’t maintained or updated, it might become a target for hackers.
However, just because a plugin is outdated doesn’t mean that it has any of those issues. Some outdated plugins are perfectly safe to use. However, we recommend that you thoroughly test the plugin before installing it on your live site.
With that being said, let’s take a look at how to tell if a WordPress plugin is outdated, and how you can decide whether it is safe to install.
Checking Whether a Plugin Is Outdated
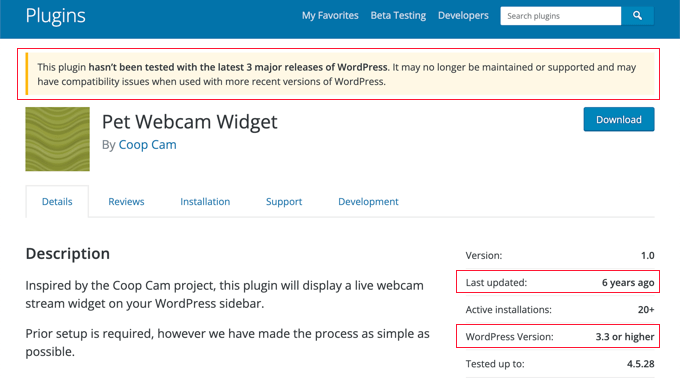
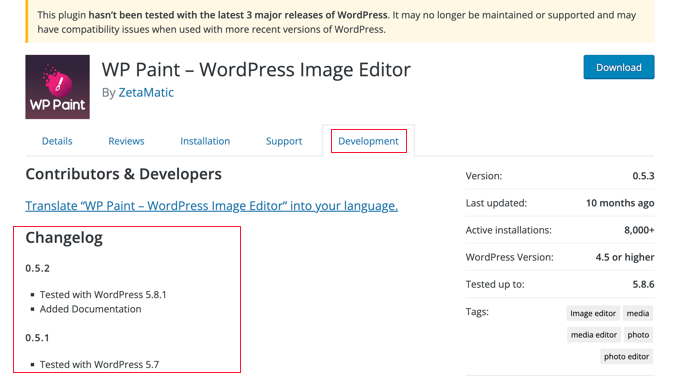
The WordPress Plugin Directory displays a lot of useful information about each plugin. For example, it clearly shows the date each plugin was last updated, and the latest version of WordPress it was tested with.
If a plugin has not been tested for several versions of WordPress, then a warning will be displayed at the top of the plugin page, similar to this one:
This plugin hasn’t been tested with the latest 3 major releases of WordPress. It may no longer be maintained or supported and may have compatibility issues when used with more recent versions of WordPress.
Unfortunately, busy developers don’t always update the readme file when a new WordPress update is released. Sometimes a plugin was tested more recently than its plugin page shows.
Now that you know how to check if a WordPress plugin is outdated, let’s take a look at how to tell whether it is safe to install.
Checking Whether an Outdated Plugin Is Safe to Install
Just because a plugin hasn’t been updated or tested recently doesn’t mean that it won’t work. How can you tell if the plugin is safe to install on your WordPress site?
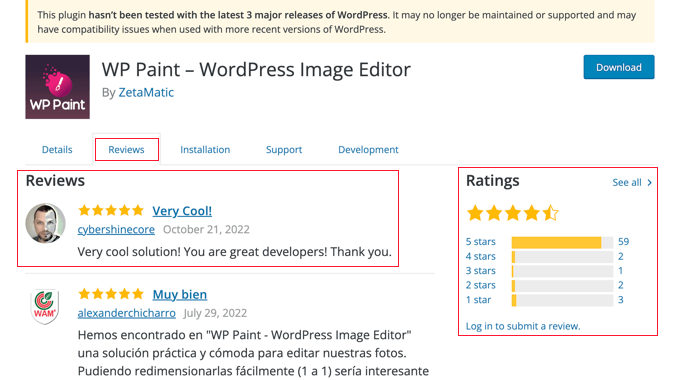
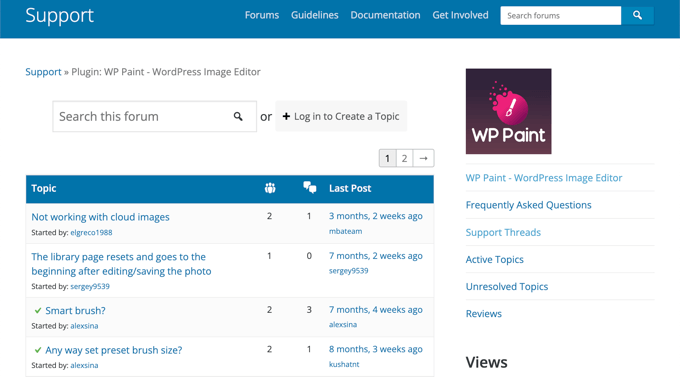
Check User Ratings and Reviews
You can click on the ‘Reviews’ tab on the WordPress Plugin Directory to see user opinions and complaints about the plugin. If there is a compatibility problem with a recent version of WordPress, then other users may have mentioned it on this page.
You can also check the user ratings. If the reviews are recent and five stars, then it’s safe to assume that you can use the plugin on your website.
Check the Plugin Support Page
When you click the ‘Support’ tab, you will be taken to the support forum for the plugin. Here you can see any issues that users have been having with the plugin.
You will also see how responsive the plugin’s developer is, and whether they successfully solve issues in a timely manner.
Another way to check whether it’s safe to install the plugin is by going to the plugin development page. This shows you how active the plugin developer is.
Simply go to the WordPress plugin page and click on the ‘Development’ tab.
In particular, take a look at the ‘Changelog’ section to see how often the plugin is being updated and what recent changes and improvements have been made.
If the developer is actively updating the plugin, then it usually means the plugin is high quality and safe to use on your WordPress website.
On the other hand, if a plugin hasn’t been updated in more than two years, then it may mean the plugin has been abandoned. In that case, you shouldn’t install the plugin since the developer is not actively maintaining it.
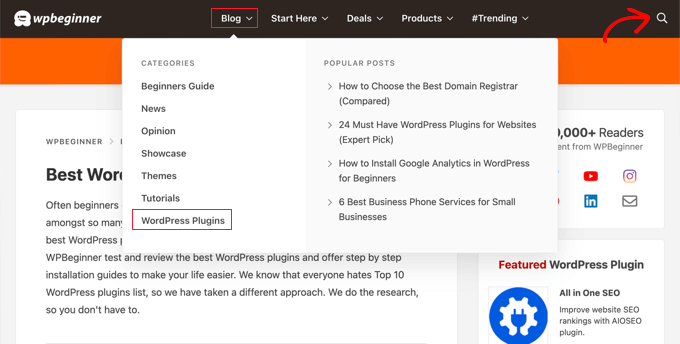
Check for WPBeginner Tutorials on the Plugin
You can also check whether the plugin is safe to install on the WPBeginner blog. You can look for tutorials on the plugin by navigating to the Blog » WordPress Plugins page or by using the search feature.
If we recently published a tutorial on a plugin, then this means the plugin was compatible with the latest version of WordPress when we tested it.
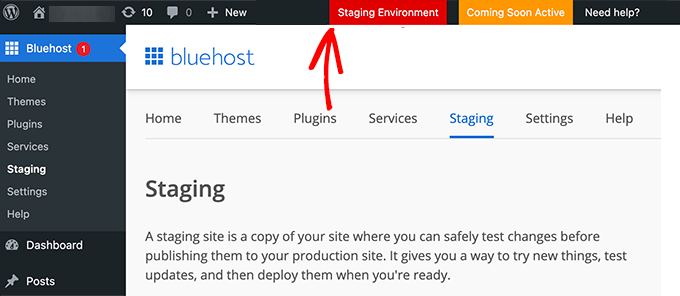
Testing the Plugin on a Staging Site or Local WordPress Installation
Let’s say that you’ve gone through the steps above and decided that an outdated plugin looks safe to install. What should you do next?
Instead of immediately installing the plugin on your live site, you may wish to first test it on a staging site or local WordPress installation.
A WordPress staging site is a test site that you can use to safely test a plugin for problems before going live.
The staging site lives on your web hosting server, so you can be confident that if the plugin works there, you won’t encounter problems on your live site.
While it’s not a good idea to use outdated plugins, sometimes the plugin you’re looking for is the only one that does what you need. In that case, you will need to do your due diligence as we mentioned in our guide.
Other things you can look for is author’s reputation. If it’s a popular plugin author, then you can email them and ask whether they have plans to update the plugin.
Some plugins are so simple that they don’t need any updates, and this is why the author may not push out an update because they know it still works. The popular Page Links To plugin is a good example of that.
It’s written by one of WordPress core contributors, Mark Jaquith, and the plugin has been around for a long time. It doesn’t need any active development because it does one thing and does it well. So even though it shows the outdated error on WordPress.org, this plugin would be something that you can safely install.
The downside though is that if you were hoping to have more advanced redirection features, then it’s going to be lacking in the plugin which is why many users switch to the All in One SEO plugin because it includes this feature and many more powerful SEO features in the plugin.
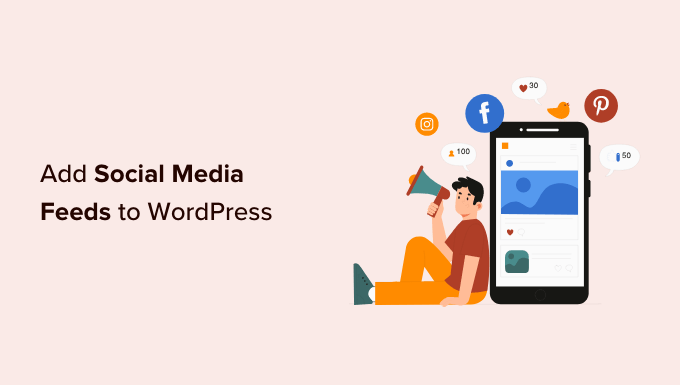
Do you want to add your social media feeds to a WordPress website?
Showing Facebook, Twitter, YouTube, and Instagram feeds on WordPress can get you more followers and engagement on social media. It’s also a great way to keep your website fresh and interesting.
In this guide, we’ll show you how to add custom social media feeds to WordPress and even create a social wall that brings all your social content together in one place.
Why Add Social Media Feeds to Your WordPress Site?
Billions of people use social media every day to connect with family, friends, and even brands. According to our marketing statistics research, people spend around 2 hours and 29 minutes on social media every day. That’s plenty of time to promote your content to existing followers and connect with new people.
If you have one or more social media accounts, then you’re already off to a good start. However, it’s also smart to add these social feeds to your WordPress website.
By embedding social media posts in WordPress, you can promote your different accounts to the people who visit your website. This can get you more likes, shares, and engagement.
If visitors like what they see, they might even decide to start following you on different social networks.
Once you’ve embedded a social feed, new posts will appear on your website automatically. This can be a great way to keep your website fresh and interesting, even for regular visitors.
If you run an online store, then a social media feed can even help you get more sales. In fact, 43% of people use social media to make purchasing decisions.
It’s the best social media feed plugin for WordPress and it’s trusted by over 1.5 million users. With this plugin, you don’t have to spend time dealing with jQuery code, APIs, or trying to arrange your social posts in a nice layout. Everything just works.
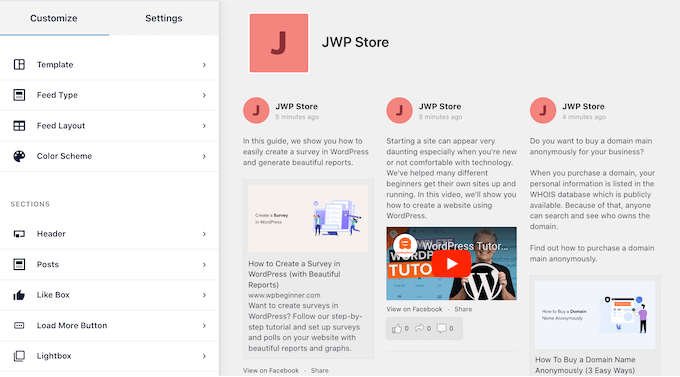
Smash Balloon has separate plugins for all the major social networks including YouTube, Twitter, and Facebook. It even allows you to combine multiple social networks and show all of your posts in a single feed.
With that being said, let’s see how you can add different social feeds to your WordPress website. Simply use the quick links below to jump straight to the social network that you want to add.
Facebook is the most popular social media platform in the world, with 2.9 billion monthly active users. No matter whether you have a small business website, a personal blog, a WordPress membership website, or something else, it’s very likely that your target audience are familiar with Facebook.
When you add a Facebook feed to WordPress, new posts will appear on your website in real-time. Visitors can also like, share, and comment on your WordPress posts, so this is a great way to get more engagement on Facebook.
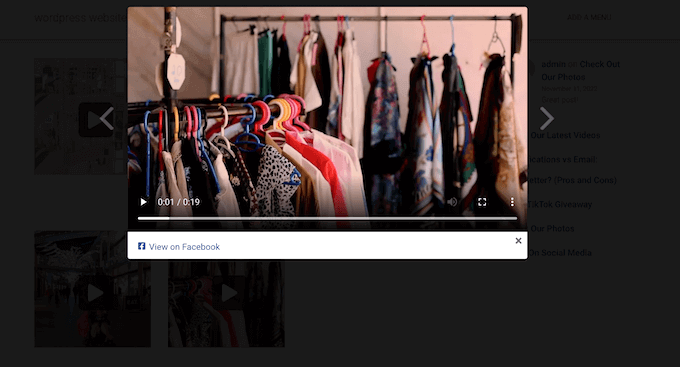
You can even create a custom lightbox popup so visitors can see your full-sized images and watch your Facebook videos, without having to leave your WordPress website.
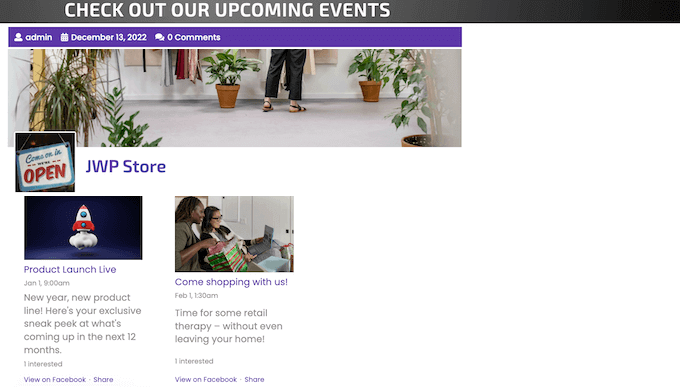
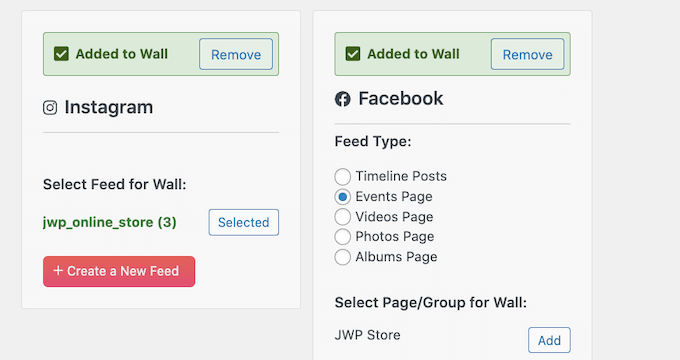
If you host regular in-person or online events, then it’s a good idea to create them as Facebook events on your page or group. Visitors can then mark themselves as interested or going to the event, invite other people, and share the event on their own Facebook page.
Once you’ve added these events to Facebook, you can easily promote them to the people who visit your website. Simply create a feed of your upcoming Facebook events and then add it to your WordPress website.
Adding an Instagram Social Media Feed in WordPress
With more than 2 billion monthly active users, Instagram is a great place to promote your website, products, and services.
Depending on your industry, Instagram may even be the most important part of your social media strategy. For example, Instagram is particularly popular among top fashion blogs, lifestyle, cooking, and photography websites.
If you’re posting beautiful photos and engaging videos to Instagram, then it makes sense to post that content to WordPress too.
You can add images in WordPress manually, but you’ll need to keep adding new photos as you post them to Instagram. This can take a lot of time and effort.
Since there’s no link between your WordPress website and your Instagram account, visitors can’t easily like or share these photos on Instagram. As a result, you may miss out on lots of social media engagement.
The easiest way to add an Instagram feed to WordPress is by using the Smash Balloon Instagram Feed plugin. This plugin allows you to embed a beautiful and professionally-designed Instagram feed on your website.
The feed updates automatically every time you post to Instagram, so visitors always see the latest photos.
You can even show other people’s photos on your site by creating a hashtag feed or displaying the posts that other people have tagged your account in. This can be a powerful form of social proof that encourages people to trust your website or business.
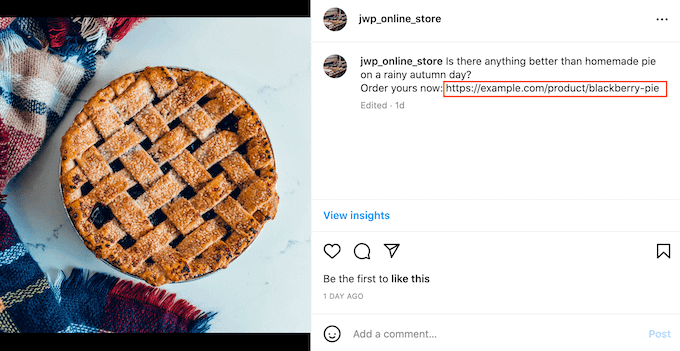
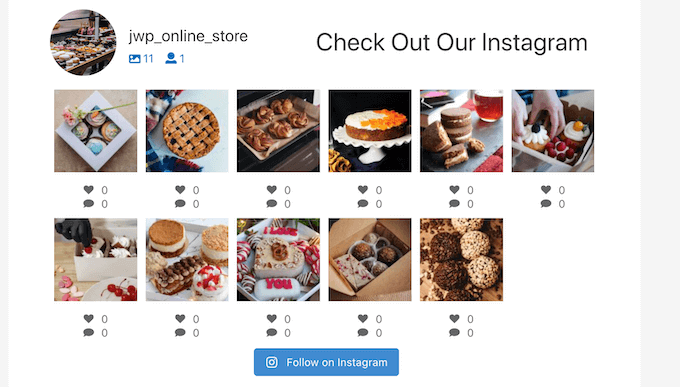
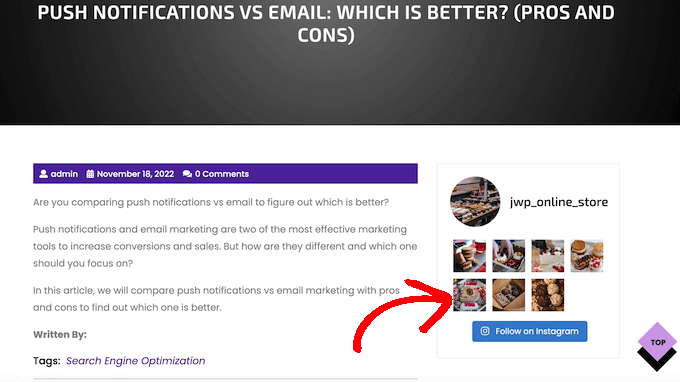
In the following image you can see an example of an online store that uses a custom Instagram feed to show user-generated content.
In this way, you can use a custom Instagram feed to create customer trust and make more money online.
However, this block only lets you embed a single tweet at a time. This is a quick and easy method if you just want to show a small number of tweets. However, if you want to embed multiple tweets then we recommend using Smash Balloon Twitter Feed.
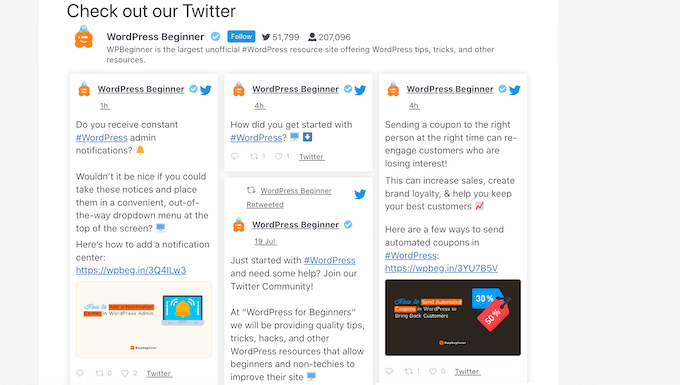
This plugin allows you to create a Twitter feed that updates automatically as you post new tweets. You can then add this feed to any page, post, or widget-ready area.
Smash Balloon Twitter Feed also lets you create hashtag feeds.
This is useful for adding context and third-party content to your blog posts. For example, if you’re starting a fashion blog then you might create feeds for popular fashion-related hashtags such as #lookbook or #OOTD.
You can even use Smash Balloon to show the Twitter feed from a third-party account. This is perfect if you have a relationship with an influencer or affiliate marketer, and want to show their tweets on your website.
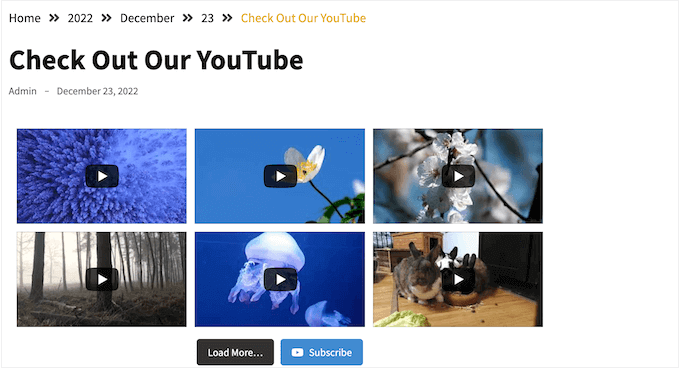
Blog posts with videos get 83% more traffic than those without videos. With that in mind, we recommend adding your YouTube videos to WordPress, too.
If you run an online store using a plugin such as WooCommerce, then videos can even get you more sales. In fact, 88% of people have bought a product or service after watching a video.
If you’ve created any YouTube videos showing your products or services, then adding them to your website could boost your profits.
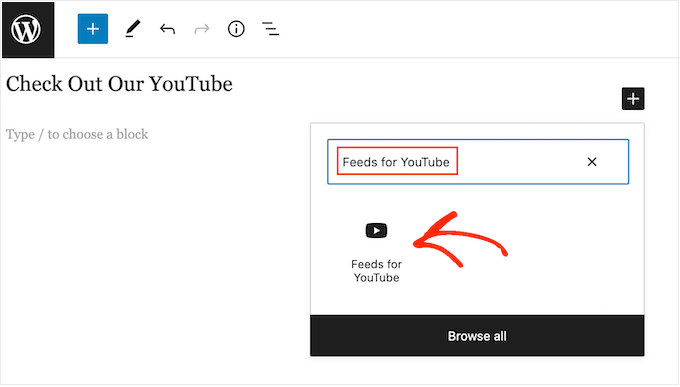
If you only want to add a small number of videos to your site, then it’s easy to embed YouTube videos in WordPress blog posts. However, if you want to show more than one video, then it’s difficult to create a nice gallery layout using the built-in blocks and tools alone.
This plugin allows you to show videos from your favorites list, embed live streams, and more.
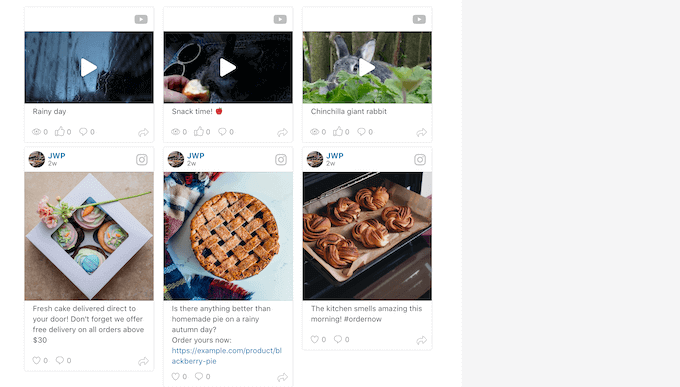
Adding a Combined Social Wall in WordPress
So far, you’ve seen how to add individual feeds from different social media platforms. However, many websites have multiple social media accounts, such as a Facebook page, a YouTube channel, and a Twitter profile.
If you create unique content for each platform, then you may want to combine all of that content into a single social media feed. This kind of social wall can convince visitors that you have a big presence on social media, and that you’re creating all kinds of interesting and varied content across the different platforms.
This single feed can get you followers and engagement across multiple platforms. It’s also a good choice if you have limited space, and don’t want to fill up your website with lots of separate social media feeds.
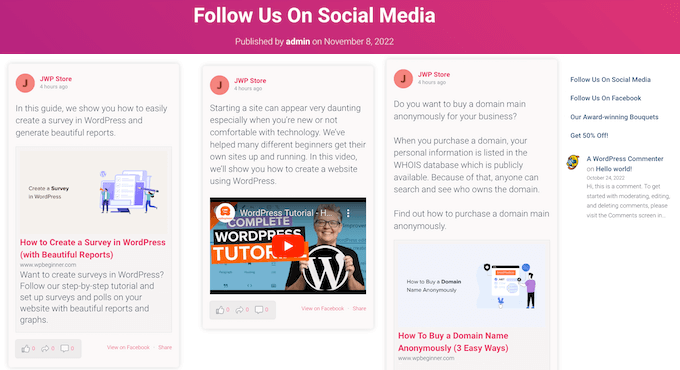
If you want to combine several social media accounts into a single feed, then we recommend the Smash Balloon Social Wall plugin.
It’s the best social stream plugin for WordPress and allows you to combine Instagram, Facebook, Twitter, and YouTube social content into a single feed.
Already used the Smash Balloon plugins to create separate Facebook, Instagram, Twitter, or YouTube feeds? Then you can add these feeds to your social wall with a few clicks.
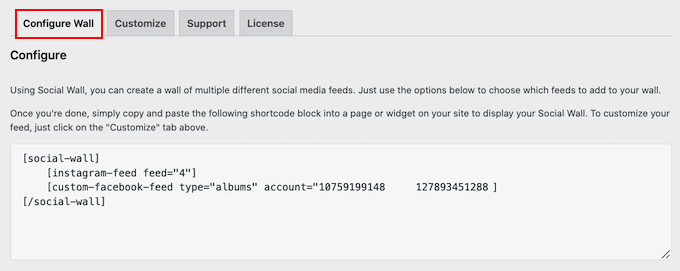
Social Wall will then take your settings and automatically create a shortcode that you can add to any page, post, or widget-ready area. Simply publish your changes, and the social wall will appear on your website.
Note: To use this plugin, you’ll need to install and activate at least one of the Pro Smash Balloon plugins mentioned above. For example, if you wanted to show Facebook and Instagram content on your social wall, then you’ll need both the Social Post Feed and the Social Photo Feed plugins.
To get started, you’ll need to install and activate the Smash Balloon Social Wall plugin. For more information, please see our guide on how to install a WordPress plugin.
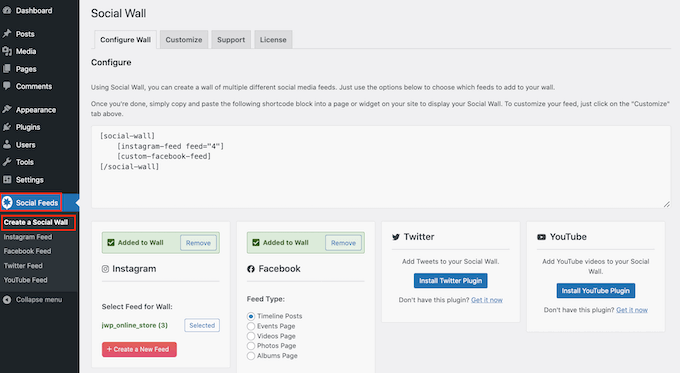
Once the plugin is installed and activated, go to Social Feeds » Create a Social Wall.
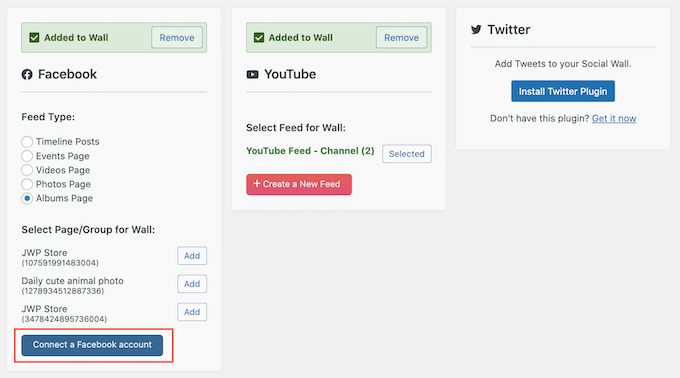
Simply select each feed that you want to add to the social wall.
For example, you can combine posts from your Instagram and Facebook accounts.
On this screen you can also connect any extra social accounts that you want to use.
Simply click on a ‘Connect…’ button and then follow the onscreen instructions to connect the social media account.
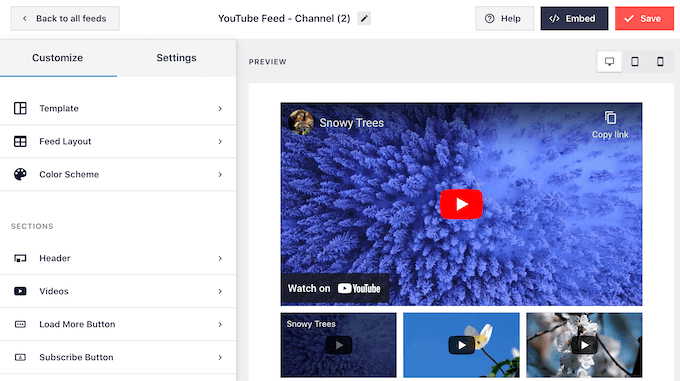
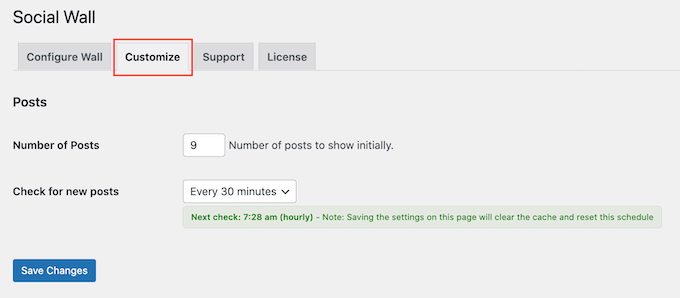
After that, click on the ‘Customize’ tab.
Here, you can change the number of posts to show in the social wall, the feed layout, how often it updates, and more.
There are other settings you can use to change the wall’s color scheme, background color, button text, and more. Most of these settings are fairly self-explanatory, so it’s worth looking through them to see what changes you want to make.
When you’re finished, click on ‘Save Changes’ to store your settings.
Once you’ve done that, click on the ‘Configure Wall’ tab. Here, you’ll see a shortcode that allows you to add the social wall to any page, post, or widget-ready area.