Are you looking for the best footer design examples to help you get inspired?
The footer is the area at the bottom of your website, and website owners often overlook it. By checking out great website footers, you can get design inspiration and improve your footer.
In this article, we’ll show you some of the best footer design examples and offer best practices and tips to help you take action.
")
Why Is a Good WordPress Footer Design Important?
The footer is the area of your website that appears at the very bottom of the page. It will normally be on every page of your WordPress website.
Here’s an example of our footer on WPBeginner that millions of readers see every month.
We include links to our free tools and product sites, as well as ways for users to learn about us, find jobs with us, follow us on social media, and more.

Since it’s located at the bottom of the website, most beginners forget to optimize this area.
However, your website footer is an important area of your website. It lets you show important details and final takeaways in one place.
By customizing your footer, you can improve the overall user experience of your website and even optimize your site for WordPress SEO.
Plus, visitors who scroll to the bottom of the page are very engaged, so you can capture their attention with a call to action, email subscribe box, or send them to the most important pages on your website.
That being said, let’s show you some of the best footer design examples and best practices to optimize your WordPress footer.
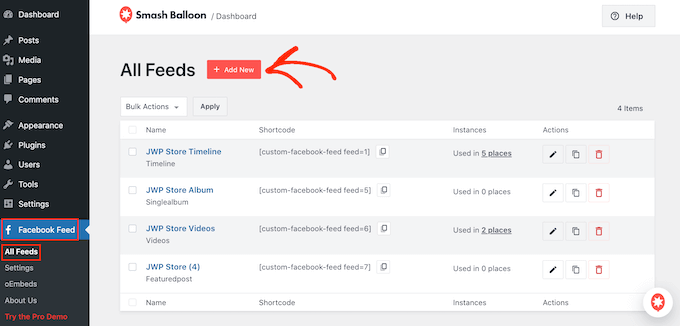
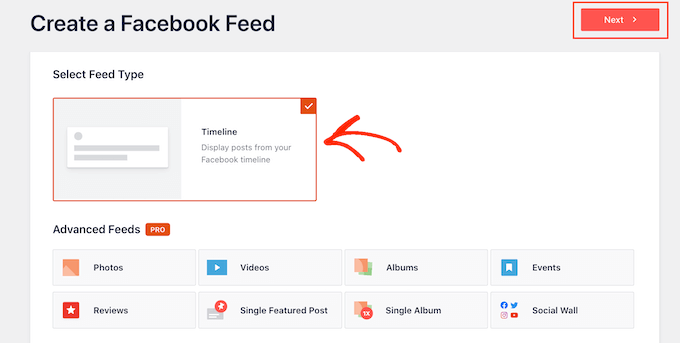
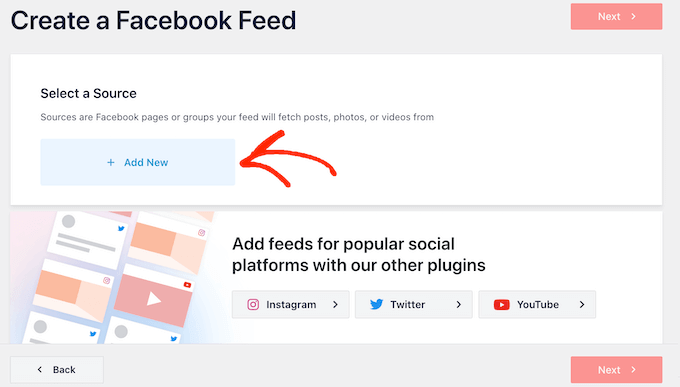
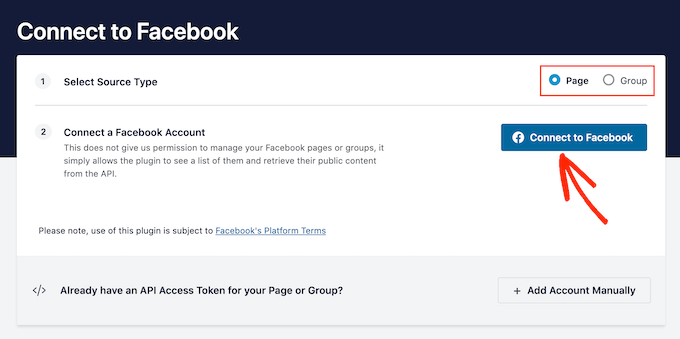
Best WordPress Footer Design Examples
We’ve rounded up some of the top footer design examples to help you get design inspiration for your own footer area.
1. WPForms

WPForms has a footer with all kinds of useful links. You’ll find links that go to the most helpful company pages, the top features of the plugin, and some useful WordPress links.
This ensures that when the reader gets to the bottom of the page and still has questions, they’ll find the exact resources they need. There’s also a floating alert bar at the bottom of the page with a call to action.
2. OptinMonster

OptinMonster has a footer that offers readers links to important company pages, top features, helpful product links, and much more.
It also has simple social media icons, trust icons, and a company logo for branding purposes.
3. Neil Patel

Neil Patel has a compact and straightforward footer that offers readers quick navigation links. The footer menu is the same as the navigation menu at the top of the site.
Plus, readers have the option to follow Neil Patel on social media as well.
4. Michael Hyatt

Michael Hyatt has another simple and compact footer. It highlights the copyright date, easy social sharing buttons, and links to pages like terms of service and privacy policy.
Directly above the footer, you’ll see a call to action to download a free guide, which can convert a lot of visitors that make it to the bottom of the page.
5. ReddBar

ReddBar is a WooCommerce store with a footer that encourages email sign-ups. Directly above the footer links, there’s a massive sign-up box for readers.
Some of the helpful links include a link to their FAQ page, contact page, wholesale pricing page, and more.
6. Reader’s Digest
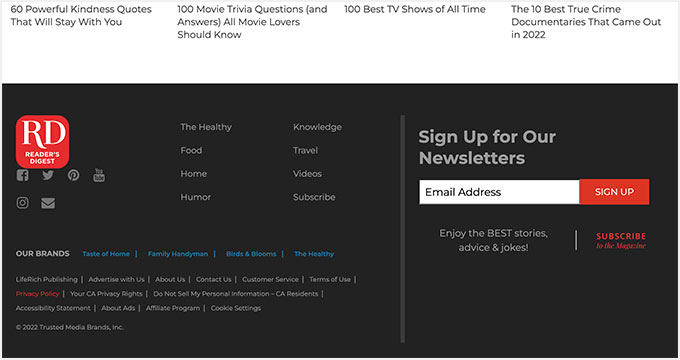
The Reader’s Digest footer contains a lot of information for visitors. You’ll find links to their category pages, other company brands, social media sharing buttons, and more.
Plus, there’s an eye-catching email sign-up box to encourage visitors to join their email list.
7. IsItWP

The IsItWP footer has a quick section on what the website is about and links to other sites and company pages.
It also has a unique site links drop-down menu that lets readers click to find the exact type of content they’re looking for.
8. MonsterInsights

MonsterInsights has a simple footer that focuses on helping readers find the information they need. There are links to their premium features, company resources, and other brand links.
Plus, there’s a call to action to lead visitors to the pricing page. There are also social icons.
9. Printing New York

Printing New York is an online store that ships worldwide. The footer highlights their address, services, and popular products.
They use the structure of their links to help boost their local SEO and search engine rankings.
10. Nalgene

Nalgene has a clean and well-organized footer section. Directly above the footer, there’s a simple email sign-up box.
After that, there are well-organized links to help visitors find the exact products they’re looking for, along with company-related links.
11. ProBlogger

The ProBlogger footer has links to their most popular posts, top resources, and new jobs posted on their job board.
There’s also a big email sign-up form directly above the footer and a small footer navigation menu with the same menu options as the header navigation.
12. TrustPulse

TrustPulse is the best social proof notifications plugin on the market. Instead of including multiple navigation menus or page links, they feature an email newsletter sign-up box.
Although it’s different from most other brands, a minimalist footer like this can convert well since there are fewer distractions or actions the visitor can take.
13. The Next Web

The Next Web has a footer that stands out from the rest of the website. It has social media sharing buttons, links to important pages, and more.
You’ll see a social proof section directly above the footer where they feature logos from popular brands and websites they’ve been mentioned or featured.
WordPress Footer Design – Tips and Best Practices
There are a lot of ways you can improve your user experience and create a better footer for your WordPress blog.
Let’s take a quick look at some of the best practices to keep in mind as you edit your website footer.
Include Your Business Contact Information
Having contact information listed on your site is essential. You should have a separate contact form page on your website, so your visitors can get in touch.
However, the footer is also an excellent place to include your contact information, especially if you have local customers who will be looking for your physical address.

For local businesses, the more ways you can feature your contact information, address, and even business hours, the better.
Add Links to Important Website Pages
It’s important to have clear navigation across your entire website. That’s why it’s common for websites to include links in their footers.
You can add links for your most important product pages, top blog posts, about pages, and more.

Think about the most valuable pages on your website and what your visitors will find the most useful.
Adding and optimizing your links can also give you an SEO benefit and boost your search engine rankings.
Add Social Proof to Improve Conversions
One thing you may have seen certain websites do in their footer is to add social proof. This can help to earn your customer’s trust and position you as an expert in your space.
It can be as simple as a customer testimonial or a collection of logos of popular websites you’ve been featured on.
Here at WPBeginner, we highlight logos of popular websites where we’ve been featured directly above the website footer.

Add a Call to Action
When your visitors get to the bottom of your website, you’ll want to tell them the exact action they should take and how they should do it.
For some websites, this will be a call to action to sign up for their email newsletter. For others, it will be links to explore popular product features or even a call to action button.

Your footer is the last chance to get your visitors’ attention and encourage them to become subscribers and customers or simply spend more time on your website.
For more optimization tips, see our checklist of ten things to add to your website footer.
We hope this article helped you find some of the best footer examples to help you optimize your website footer. You may also want to see our guide on how to choose the best blogging platform and our picks on the best virtual business phone number apps for small businesses.
If you liked this article, then please subscribe to our YouTube Channel for WordPress video tutorials. You can also find us on Twitter and Facebook.
The post 13 Best WordPress Footer Design Examples (+ Best Practices) first appeared on WPBeginner.
January 12, 2023 at 01:01AM