By default, WordPress comes with a lazy load feature, which delays downloads for images and other media to improve page load speed.
However, for some websites, it may affect user experience by not displaying images and media right away.
In this article, we’ll show you how to easily disable lazy load in WordPress both using a code method as well as a plugin method.
What is Lazy Loading?
WordPress first introduced lazy loading images in WordPress 5.5. Later it extended the lazy load feature to iframes embeds (e.g. YouTube videos, Spotify, and other embeds).
A faster website is not just good for users, but it is also good for SEO. Search engines like Google consider speed as an important ranking factor.
Apart from images and embeds, you can also easily lazy load comments and Gravatars to further improve page load speed.
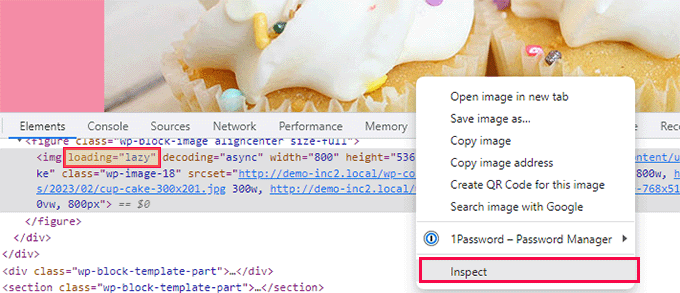
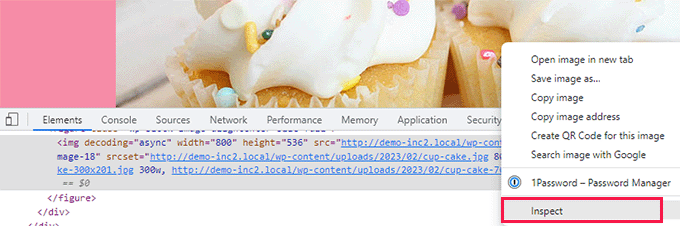
Lazy loading can be seen in action by right-clicking on an image and selecting the Inspect tool in your browser.
This will split your browser screen and show you the HTML source code. From here, you’ll be able to see the “loading=lazy” attribute added to the image.
Now normally, we don’t recommend disabling lazy load due to its overall benefits for your WordPress website. Turning it off can result in slower website speed, lower conversion rates, and lower SEO rankings.
However, sometimes lazy loading can affect the user experience for some websites.
For instance, if you run a photography website where images are the most significant aspect of your content, then lazy loading them may ruin the user experience for your customers.
In other cases, you might be using a different lazy loading solution and just want to turn off the default WordPress lazy load.
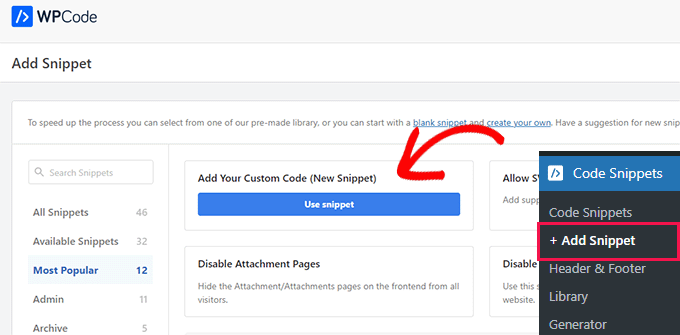
That being said, let’s see how you can easily disable lazy load in WordPress.
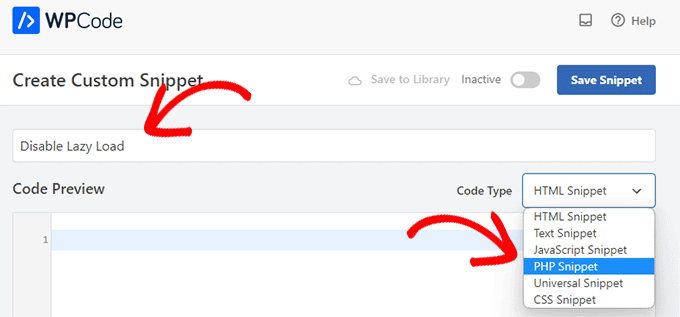
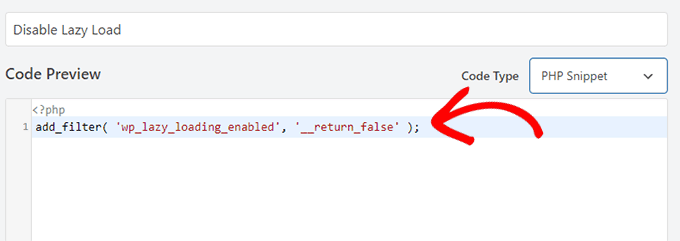
This is how the code will look after it is pasted in the ‘Code Preview’ box.
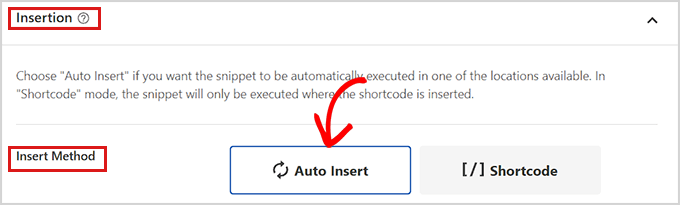
After adding the code, scroll down to the ‘Insertion’ section.
Here, simply choose ‘Auto Insert’ as the insertion mode. This will ensure that your custom code is automatically executed everywhere on your website once you activate the snippet.
Next, you need to scroll to the top of the page and simply toggle the ‘Inactive’ switch to ‘Active’.
After that, don’t forget to click the ‘Save Snippet’ button to save and execute your custom snippet.
Once activated, this custom code snippet will disable the lazy loading feature on your WordPress website.
You can test by right-clicking on an image and selecting Inspect from the browser menu.
In the HTML code for the image, the loading=lazy attribute will now disappear.
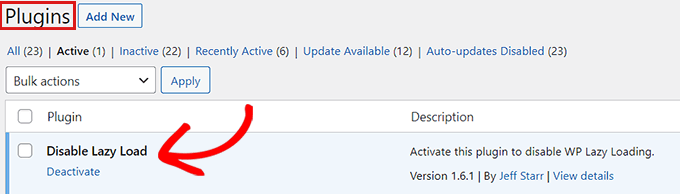
Method 2. Disable Lazy Load in WordPress Using a Plugin
If you don’t want to add code to your site, then you can use the Disable Lazy Load plugin.
The plugin works out of the box and does not require any configuration. Once activated, it will automatically disable the lazy load feature on your site.
Do you want to add a YouTube video gallery on your WordPress website?
You can add YouTube videos to WordPress blog posts using the built-in Embed block. However, you can’t easily arrange these videos in a nice gallery layout.
In this article, we will share the best YouTube video gallery plugins for WordPress so you can show your videos in an organized and eye-catching way.
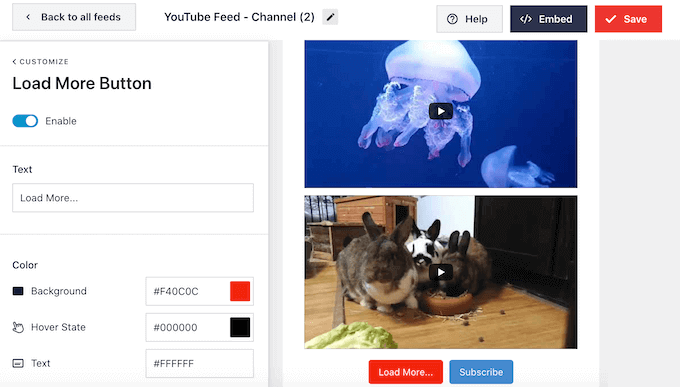
This plugin allows you to hand-pick specific videos from your account, or automatically show all the latest videos from your YouTube channel. You can even combine multiple YouTube channels into a single feed.
Smash Balloon has a ready-made gallery layout so you can organize your videos with the click of a button. After creating a gallery, you can control exactly how the videos look by choosing whether to show the YouTube description, title, comments, the total number of likes, and much more.
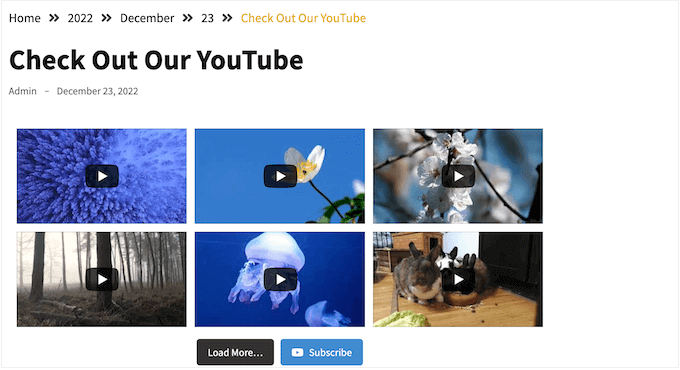
You can even encourage visitors to join your YouTube channel, by adding a ‘Subscribe’ button to the gallery.
By default, the gallery layout also has a ‘Load More’ button so visitors can scroll through your entire YouTube channel without leaving your website.
When a visitor clicks on a video, Smash Balloon will start playing it in an embedded video player. In this way, you can get more YouTube views and engagement without driving visitors away from your website.
By default, the player shows related videos when the playback finishes, or the visitor pauses the video. Smash Balloon lets you replace these suggested videos with a custom call to action, so you can promote a specific post, page, or even the most popular WooCommerce products from your online store.
You can also use Smash Balloon to embed YouTube playlists, favorites, and livestreams on your WordPress website.
The best part about Smash Balloon is that it doesn’t slow down your site. The plugin’s built-in YouTube caching feature will make sure your site always loads fast, which is great for SEO.
The other nice thing about Smash Balloon is that you can combine social content from Instagram, Facebook, Twitter, and YouTube into a single social wall. If you’re serious about growing your online presence, then we highly recommend the Smash Balloon All Access Bundle, which gives you access to the social wall feature.
Note: If you’re just getting started or have a limited budget, then there’s also a free version of the YouTube feed plugin. Although this plugin is missing the more advanced features, it still has everything you need to embed YouTube videos on your WordPress website.
Pricing: Smash Balloon YouTube Feed Pro licenses start at $49 per year. If you want to embed Facebook, Twitter, Instagram, and YouTube content on your WordPress website, then you can grab the All Access Bundle for $299 per year.
However, there’s also an Envira Gallery Videos Addon that allows you to create a YouTube gallery. Simply enter the URL for each YouTube video and then specify the thumbnail that you want to show in the gallery. The Videos Addon will then fetch the video automatically.
After adding all your videos, Envira Gallery lets you fine-tune the playback experience. You can make the video autoplay, open it fullscreen by default, hide the playback controls, and much more.
Envira Gallery can also embed entire YouTube playlists, although you’ll need to get a YouTube API from the Google Cloud Console and then add it to the plugin’s settings first.
As well as YouTube, Envira Gallery supports other popular video hosting services such as Vimeo, Wistia, Twitch, VideoPress, and Dailymotion.
One major drawback is that Envira Gallery won’t automatically fetch new YouTube videos from your channel. If you want to update the gallery, then you’ll need to add each new video manually using its URL.
Pricing: To get Envira with the Video Gallery addon, you’ll need to either buy a Pro license ($89 per year) or a Lifetime license ($209).
With the YouTube Showcase plugin, you can add a YouTube video gallery or grid to your WordPress website.
After activating the plugin, you can add any YouTube video to your site using the 11-digit alphanumeric video key shown at the end of the video’s URL.
To help visitors find what they’re looking for, YouTube Showcase lets you add categories and tags to your videos. These work in exactly the same way as the built-in WordPress categories and tags, so they’re very easy to use.
Once you’ve done that, you just need to add the plugin’s shortcode to any page, post, or widget-ready area. YouTube Showcase will then show all your videos in a nice gallery layout.
YouTube Showcase automatically adds a row of video thumbnails below the gallery, so visitors can easily move between the different videos. For visitors who are using a smartphone or tablet, YouTube Showcase replaces these thumbnails with more mobile-friendly ‘Prev’ and ‘Next’ icons.
The plugin uses pagination by default, so your gallery should load quickly no matter how many videos you add.
The default gallery layout should be a good fit for most websites. However, if you want to make changes then the plugin has a straightforward settings page.
While it isn’t as customizable as some of the other gallery plugins, YouTube Showcase does have a section where more advanced users can add custom CSS and custom JavaScript.
If you don’t like the gallery layout, then YouTube Showcase also has a video grid shortcode. This shows all your YouTube videos in a 4-column grid layout.
Pricing: You can download YouTube Showcase for free from the official WordPress repository.
YourChannel is one of the easiest ways to create a YouTube gallery. It allows visitors to look through your entire YouTube channel feed and watch any video without leaving your website.
YourChannel also comes with a built-in WordPress caching system, to help keep your website running smoothly.
To set up YourChannel, simply enter your YouTube username or channel ID. After that, the plugin will automatically fetch banner images, video thumbnails, your subscriber count, and your total number of views.
The plugin’s settings are straightforward and user-friendly, so you can create a beautiful-looking gallery simply by checking a few boxes and typing some numbers.
You can change how many videos YourChannel shows when the gallery page first loads, and set a maximum number of videos that visitors can scroll through. This is particularly useful for creating a mobile-friendly video gallery.
YourChannel also helps you stay GDPR compliant by showing an ‘Allow Cookies’ message when a visitor first clicks the ‘Play’ button. This message includes a link to your privacy policy.
When you’re happy with how the gallery looks, you can add it to any page, post, or widget-ready area using a shortcode provided by the plugin.
Pricing: Simply visit the WordPress repository and download the YourChannel plugin for free.
According to our marketing statistics research, 70% of people visit YouTube on a smartphone or tablet. If you run an online store using a plugin such as WooCommerce, then you’ll be interested to learn that 90% of consumers watch videos on a mobile device.
With that in mind, you’ll want to make sure your YouTube gallery looks just as good on mobile, as it does on desktop. With Photo Gallery by 10Web, you can create a mobile responsive image and video gallery within minutes.
Despite the name, Photo Gallery supports all the best video hosting sites including Vimeo, Dailymotion, and YouTube. Simply copy the video’s URL, and Photo Gallery will add that video to your website.
After that, you can fine-tune how the gallery looks by choosing different layouts, switching between dark and light themes, adding pagination, and more. You’ll also have complete control over the content that appears in your gallery, including adding or removing the video title, description, tag box, and more.
Visitors can watch each video directly on your website, using the Photo Gallery lightbox popup. The lightbox comes with built-in social share buttons, which make it easy for visitors to share your videos on Facebook and Twitter. This can help you create a buzz on social media, get more engagement, and grow your social media following.
Pricing: You can download Photo Gallery for free from the official WordPress repository. If you need more advanced features, then there’s also a premium version of Photo Gallery.
Embed Plus for YouTube allows you to create a YouTube gallery using videos, playlists, shorts, and livestreams.
This plugin has a few unusual features, such as ‘Modest Branding’ which reduces the amount of YouTube branding in your video gallery.
Another unique feature is ‘facade mode,’ which aims to make your WordPress website faster by loading a lighter version of the video player initially, and then downloading the rest of the player when the visitor clicks a video.
To make your pages load even faster, Embed Plus can defer JavaScript while serving minified CSS and JavaScript.
Embed Plus can even convert non-HTTPs videos to HTTPS. Since Google uses HTTPS/SSL as a ranking factor in its search results, this can improve your search engine rankings.
To keep people on your website for longer, Embed Plus can automatically play the next video in the gallery, which is particularly useful if you’re adding playlists to your WordPress blog.
This plugin has in-depth and detailed settings that cover several tabs. This gives you complete control over how the YouTube gallery looks and acts, but it can be confusing when you first activate the plugin.
Thankfully, Embed Plus has a built-in setup wizard that asks questions about the kind of gallery you want to create and then changes the default settings based on your answers.
Pricing: You can download Embed Plus YouTube for free from the official WordPress repository. If you need more advanced features then there’s also a Pro YouTube plugin.
Automatic YouTube Gallery lets you create unlimited video galleries on your site. As the name suggests, this plugin automates most of the setup process so you can create a YouTube video gallery in minutes.
With this plugin, you can create a YouTube gallery using a channel ID, username, playlist, search terms, or even by entering specific video URLs. You can also embed live streams on your WordPress website.
After choosing your videos, Automatic YouTube Gallery lets you fine-tune how the gallery looks. This includes changing the number of columns in the gallery layout, changing the ratio, adding or removing the video titles, and more.
Automatic YouTube Gallery also has some settings to help keep visitors on your website for longer, such as autoplaying the next video and looping a single video. To make your YouTube gallery more accessible, you can also activate closed captions by default or change the language used by the video player’s interface.
With Automatic YouTube Gallery, you don’t have to worry about videos slowing down your site. The plugin has a caching feature that can reduce page loading times and boost your WordPress speed and performance.
You can use All-in-One Video Gallery to show videos from YouTube, Vimeo, Dailymotion, Rumble, and more in an HTML5 video player.
Unlike other plugins that have their own editors, All-in-One Video Gallery integrates with the familiar WordPress page and post editor. It also has video categories and tags that work exactly the same as the built-in WordPress categories and tags.
With this in mind, it’s very easy to get started with the All-in-One Video Gallery.
After adding your videos, All-in-One Video Gallery lets you customize the player controls, playback options, and video quality levels. This plugin also aims to make your videos more accessible by supporting WebVTT subtitles and showing the subtitles automatically.
The plugin is GDPR compliant and will get the visitor’s consent before loading YouTube, Vimeo, or embedded videos from third-party websites. If you prefer, then you can also disable the plugin’s cookies for added privacy.
When you’re ready, you can either show all your videos in a single gallery or create different galleries using the plugin’s categories feature. This allows you to create lots of different galleries, with different content.
Another option is embedding the built-in All-in-One Video Gallery search form. This allows visitors to search through all your videos, to find exactly the content they’re looking for.
Pricing: You can download All-in-One Video Gallery for free from the WordPress repository.
Video Gallery by Total Soft can add an unlimited number of professionally-designed video galleries to your website. This plugin supports YouTube plus other major video platforms such as Vimeo and Wistia.
When building a gallery, you can choose between 16 different themes and 9 layouts. If your YouTube channel has lots of videos, then you can use pagination to spread the content across multiple pages.
This plugin puts a strong focus on gallery thumbnails. Every time you add a video to a gallery, you can replace the default YouTube thumbnail with an image of your choice.
After that, Video Gallery will play different hover effects when the visitor moves their mouse over the thumbnail. This includes some advanced hover effects that animate the video’s title, description, and other elements. In this way, your gallery can catch the visitor’s attention before it starts playing videos.
Video Gallery allows you to show videos from different online platforms, and even self-hosted videos, in the same gallery.
After building a gallery, you can add it to any page, post, or widget-ready area using a shortcode. Video Gallery also provides a code snippet that adds the gallery to your WordPress theme. For more information, please see our guide on how to easily add custom code in WordPress.
Pricing: You can download Video Gallery for free from the official WordPress repository.
What is the Best YouTube Video Gallery Plugin for WordPress?
If you’re looking for the easiest way to add a gallery to WordPress, then Smash Balloon Youtube Feed Pro is our top pick.
This plugin guides you through the process of connecting YouTube and WordPress and then makes it easy to build a professionally-designed gallery. It also lets you fine-tune every part of the gallery so it perfectly suits your WordPress theme.
When you’re happy with how the gallery looks, you can add it to any page, post, or widget-ready area using either a shortcode or the plugin’s Feeds for YouTube block.
Unlike some other plugins on the list, your Smash Balloon gallery will update automatically as you publish new videos to YouTube. This means visitors will always see the latest videos, and you don’t have to worry about updating your gallery manually.
While Smash Balloon YouTube Feed Pro is our top choice, it is a premium plugin. If you’re looking for a free YouTube gallery plugin, then you may want to take a look at Feeds for YouTube instead.
While this plugin is missing some of Smash Balloon’s advanced features, it still has everything you need to create a YouTube video gallery for your WordPress website.
This makes Feeds for YouTube our top pick for anyone who is just getting started, has a limited budget, or just wants to embed a small number of videos in their WordPress website.
We hope this article helped you choose the best YouTube gallery plugins for WordPress. You may also want to see our list of best drag-and-drop WordPress page builders to create custom designs and our tutorial on how to create an email newsletter to keep your visitors updated with your new videos.
If you liked this article, then please subscribe to our YouTube Channel for WordPress video tutorials. You can also find us on Twitter and Facebook.
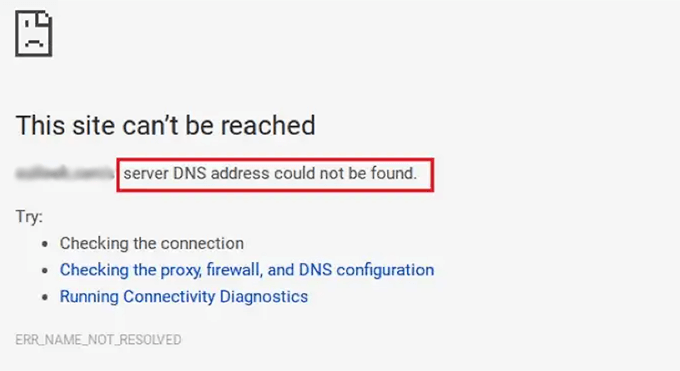
This error prevents you from visiting your own website which makes it difficult to troubleshoot. Many beginners aren’t sure if it is just them or everyone else seeing this error.
The ‘DNS server not responding’ error means that your browser was unable to establish a connection with the servers that are hosting the website.
This error usually occurs when there is an unavailable DNS provider, firewall issues, network connectivity problems, or when there is an issue in your internet modem or router.
That being said, let’s take a look at multiple ways to easily troubleshoot and fix the ‘DNS server not responding’ error on your website.
You might get the ‘DNS server not responding’ error because your internet connection has been disconnected. So to start, you need to make sure that you’re currently connected to the internet.
If your internet is connected, but the error is still present, then you can restart your internet connection by switching your computer on and off.
Or you can simply disconnect your router from its power supply and then wait at least a minute before reconnecting it.
After that, try visiting your WordPress blog to see if the error’s gone.
2. Try Switching to Another Web Browser or Incognito Mode
Sometimes this error occurs because there is an issue in your default web browser.
You can simply try to solve the ‘DNS server not responding’ error by visiting your WordPress site using another browser like Mozilla Firefox or Microsoft Edge.
For example, if you use Google Chrome and the browser is showing the ‘DNS server not responding’ error, try accessing your website using Mozilla Firefox.
You could also try opening the page in a private tab, such as using Chrome’s Incognito mode.
If you are able to access the website in the other browser that means the problem is with your default web browser.
In that case, you can clear the browser cache to see if that fixes the issue. If that doesn’t solve the problem, then you can try reinstalling the browser.
3. Disable Your Firewall or Antivirus
Firewall and Antivirus programs protect your computer from malicious software.
However, sometimes these programs can also block trustworthy sites due to strict settings or an issue within the program itself.
To check if you’re getting the ‘DNS server not responding’ error due to these software, you need to temporarily deactivate your firewall and antivirus programs.
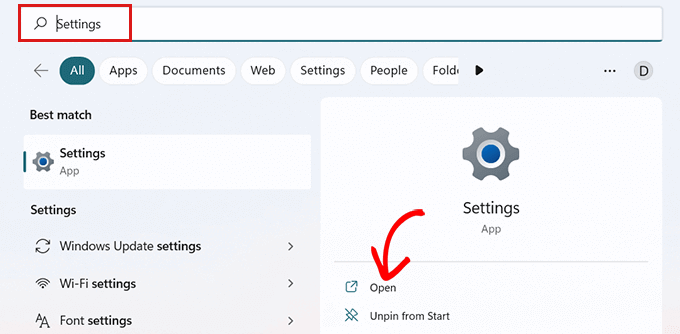
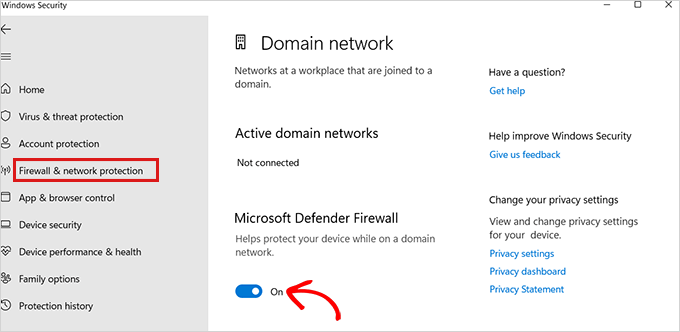
If you’re using Windows, then you can easily disable firewall and antivirus programs by selecting the Settings app from the Start menu.
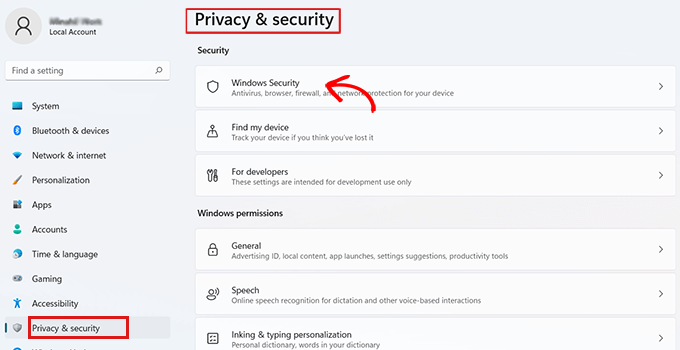
Once you’re on the ‘Settings’ app, click the ‘Privacy and Security’ option from the sidebar.
Now simply choose the ‘Windows Security’ option in the ‘Privacy and Security’ tab.
On the ‘Windows Security’ page, you need to select the ‘Virus and Threat Protection’ option from the list.
After that, you need to toggle the switch below the ‘Microsoft Defender Firewall’ option and set it to Off.
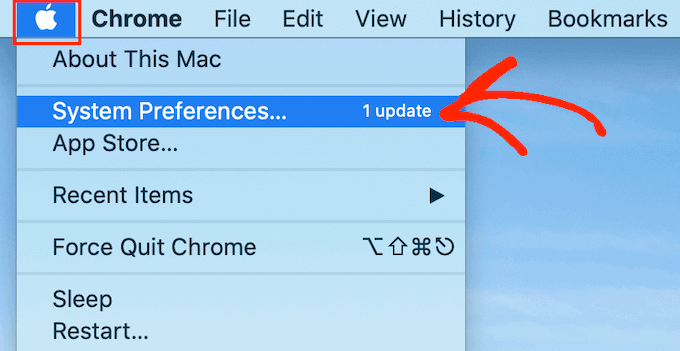
If you’re using a Mac, then simply go to System Preferences » Security and Privacy from the Apple toolbar.
This will take you to the ‘Security and Privacy’ window.
Here simply click the ‘Firewall’ tab and then turn off the firewall.
You have now disabled the antivirus and firewall programs.
After disabling the firewall, visit your site to see if the error has been resolved.
4. Change the DNS Server Address
Sometimes the ‘DNS server not responding’ error is caused when the DNS server assigned to you by your internet service provider is unavailable or has incorrect information.
In that case, you can solve the problem by switching to a different public DNS server, such as Cloudflare or Google Public DNS which offer DNS address for free.
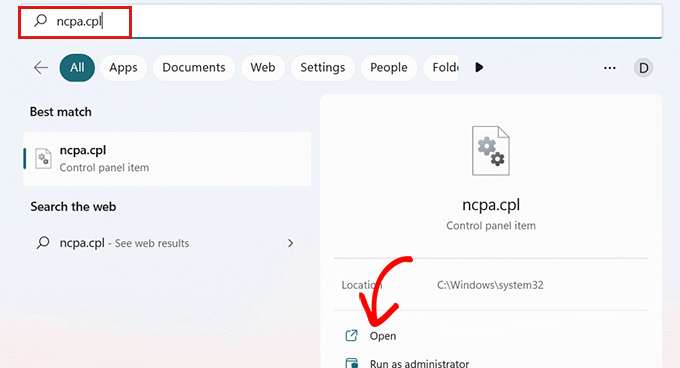
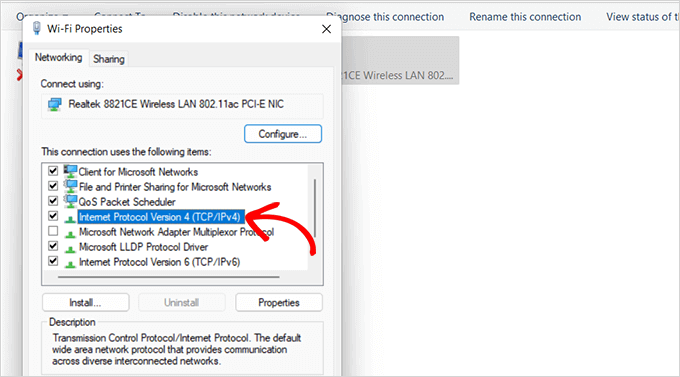
If you use Windows, go to the Windows Search Box from the taskbar and type ‘ncpa.cpl‘ to access the Network Connections page.
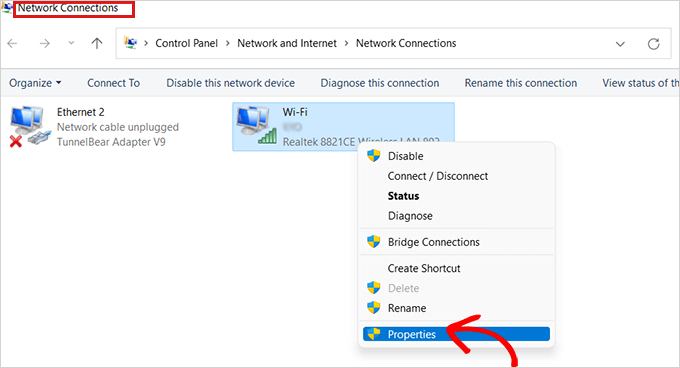
Once you’re on the ‘Network Connections’ page, right-click on the internet connection that you’re currently using.
Next, simply select the ‘Properties’ option from the prompt that opens up.
At this point, you may need to provide an administrator password. If you don’t have those permissions, contact your IT department or computer admin.
After that, you will see the ‘Properties’ window.
Here you have to locate and double-click the ‘Internet Protocol Version 4 (TCP/IPv4)’ option from the list which will open up a new window.
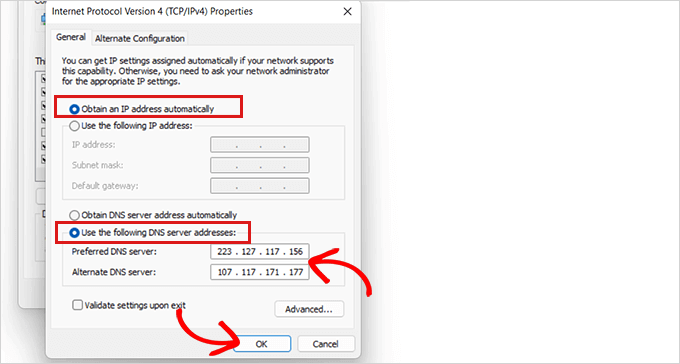
Once here, simply check the ‘Obtain an IP address automatically’ box and then check the ‘Use the following DNS server addresses’ box.
After that, you need to type the DNS address you obtained from the public DNS servers and click the ‘OK’ button at the bottom.
For example: Cloudflare public DNS is 1.1.1.1 vs Google public DNS is 8.8.8.8 and 8.8.4.4.
Now restart your computer and visit your site to see if the error is resolved.
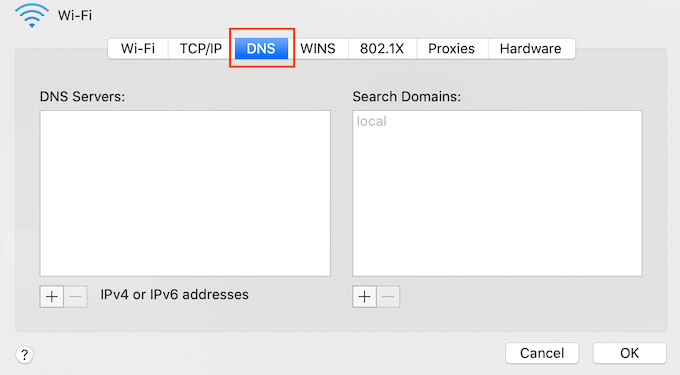
If you’re a Mac user, simply select the Apple icon in the toolbar and click the ‘System Preferences option.
In the popup that appears, select ‘Network’ and then click on the ‘Advanced’ button.
After that, simply open the ‘DNS’ tab. Here you will find a ‘+’ button at the bottom-left corner.
Clicking it will add a new DNS server with the address 0.0.0.0.
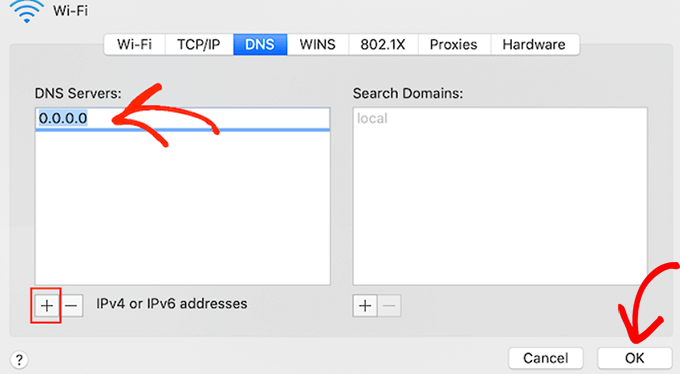
Now go ahead and type the numbers for the public DNS server you want to use.
For example: Cloudflare public DNS is 1.1.1.1 vs Google public DNS is 8.8.8.8 and 8.8.4.4.
After that, simply click on the ‘OK’ button which will take you back to the previous popup.
Here, simply click the ‘Apply’ button to save your changes.
Now, you need to visit your site to check if the error has been removed.
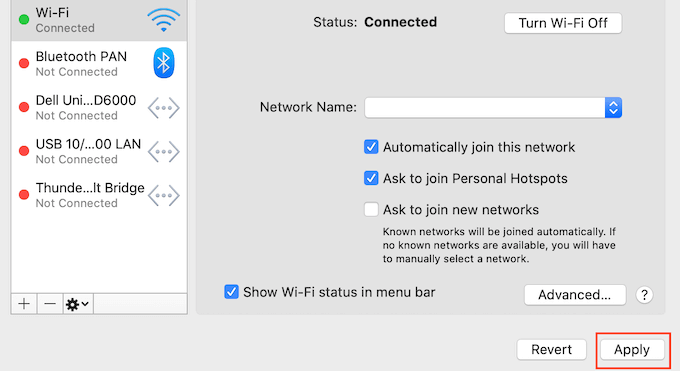
5. Flush Your DNS Cache
Just like your browser, the computer also stores all the IP addresses of the websites that you visit so it won’t have to look up the same IP address twice.
However, DNS cache information can get outdated which can cause the ‘DNS server not responding’ error on your site.
By embedding PDF files in your website, you can make sure those files always have the same layout, no matter what device the visitor is using. These files can also keep people on your website for longer and add value for your uses.
In this article, we will show you how to add a PDF viewer in WordPress.
Why Do You Need a PDF Viewer in WordPress?
Many websites use PDF files to share information about their services and products. For example, restaurant owners often publish their menu as an online PDF.
However, this isn’t the best user experience for people who want to quickly look at a PDF document. For example, someone who is planning to visit your restaurant may prefer to read the PDF menu on your website rather than downloading a copy to their computer.
Instead, you can add a PDF viewer in WordPress and then show the PDFs directly on your website. This allows visitors to see the document without downloading it to their computer, which is often quicker and easier. This is particularly true for visitors who are using smartphones or tablets.
With that being said, let’s see how you can easily add a PDF viewer to WordPress. Simply use the quick links to jump straight to the method you want to use.
Method 1. Add a PDF Viewer Using the Block Editor (Easy)
The easiest way to show PDFs on your WordPress website is by using the built-in File block.
This method doesn’t require a special plugin, but you can only customize the viewer in a few ways. If you want more advanced customizations and features, then we recommend using a plugin instead.
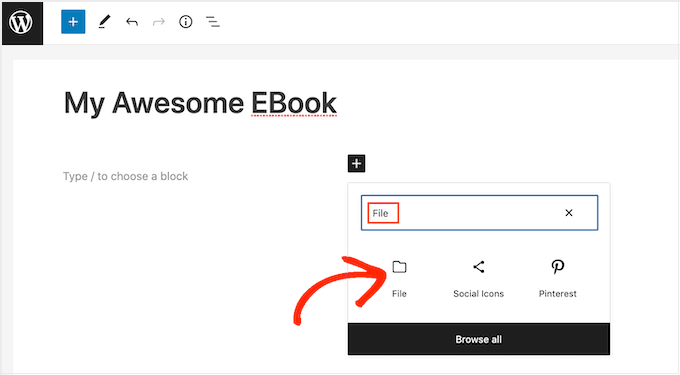
To get started, simply open the page or post where you want to add the PDF viewer in the content editor and then click on the ‘+’ button to add a new block.
After that, start typing in ‘File’ and select the right block when it appears.
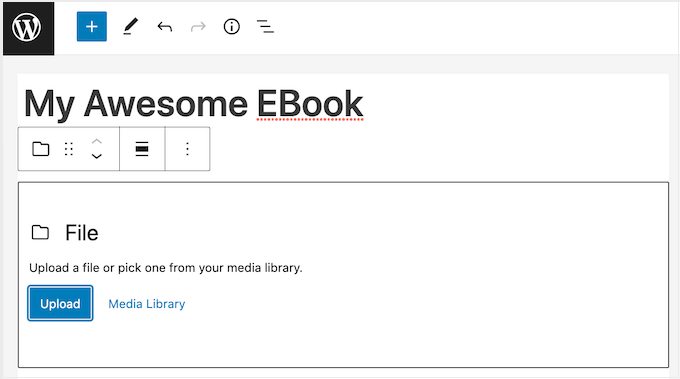
If you’ve already uploaded your PDF to the WordPress media library, then click on the ‘Media Library’ button. You can then select the PDF that you want to embed.
If you haven’t already uploaded the PDF, then click on ‘Upload’ and then choose a file from your computer.
WordPress will automatically choose a size for the embedded PDF.
Note that the default view may not show the full document, but the ‘File’ block includes a toolbar that allows visitors to zoom in and out of the document. They can also scroll through the PDF to see more content.
If you prefer, then you can change the PDF viewer’s height to show more or less of the embedded document.
To do this, simply use the ‘Height in pixels’ slider in the right-hand menu.
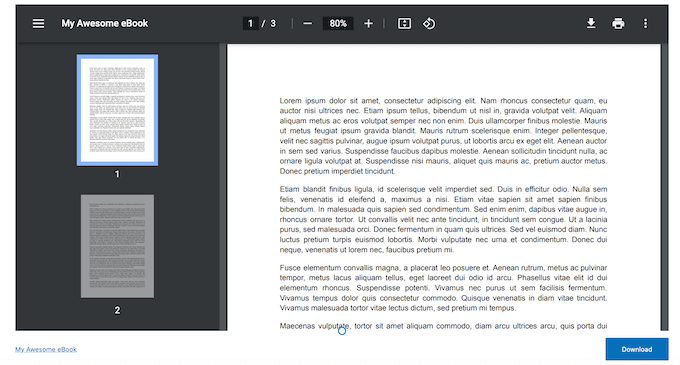
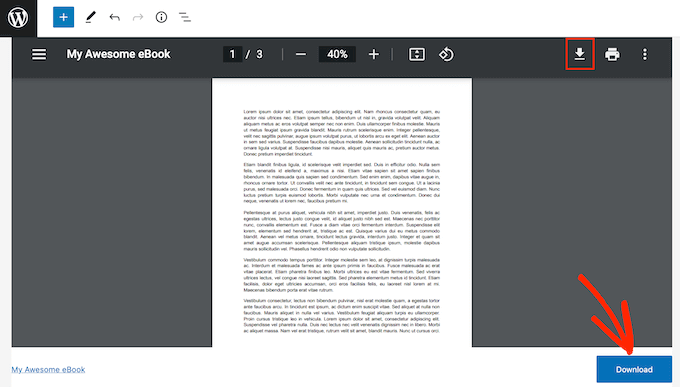
Sometimes, visitors may want to download a PDF so they always have it close by. For example, customers may want to download the user manual for your most popular product or the programming schedule for an upcoming event or conference.
By default, WordPress shows a ‘Download’ icon in the toolbar and a button below the PDF.
The ‘Download’ button beneath the PDF is useful for visitors who are unfamiliar with the different PDF toolbar icons. By showing a ‘Download’ button, visitors will immediately understand that this file is not tied to your site alone.
With that in mind, you may want to leave the ‘Download’ button enabled. However, if you don’t want to include this duplicate content then you can click to disable the ‘Show Download Button’ toggle.
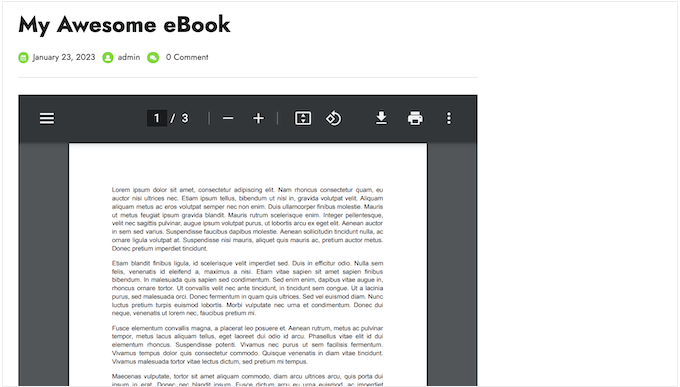
When you’re happy with how the PDF is set up, either click on ‘Update’ or ‘Publish’ to make your changes live.
Now if you visit your WordPress website you’ll see the PDF viewer in action.
Method 2. Add a PDF Viewer in WordPress Using a Plugin (More Customizable)
The built-in WordPress File block should be a good fit for websites that simply want to embed a few PDFs. However, if you want more control over the viewer then it often makes sense to use a plugin instead.
It also comes with a fullscreen mode, which is perfect for showing longer documents such as ebooks and user manuals.
First, you’ll need to install and activate PDF.js Viewer. If you need help, then please see our guide on how to install a WordPress plugin.
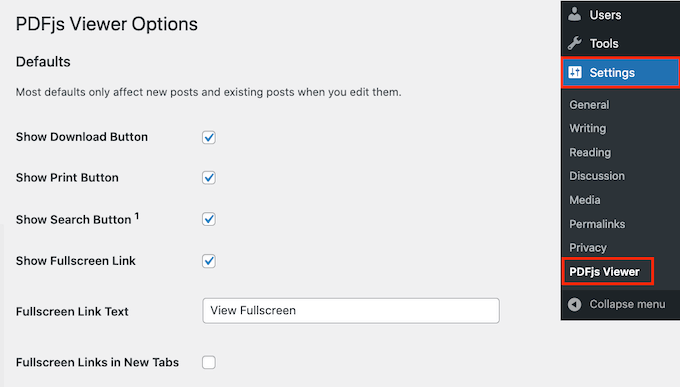
Upon activation, go to Settings » PDFjs Viewer to configure the plugin’s settings.
Most of the time, you can override these default settings when embedding each PDF. For example, you can change an individual PDF’s settings for size or scale.
However, we still recommend changing the default settings to better match your own requirements, as this can save you a lot of time and effort.
By default, the plugin includes Download, Print, and Search buttons in the PDF toolbar. If you want to remove any of these buttons, then simply uncheck the box next to it.
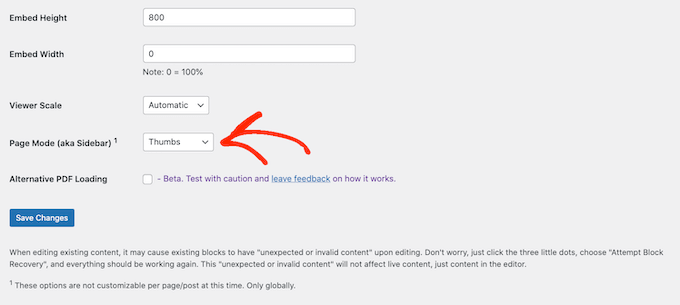
You can also change the default embed height and width, and the ‘Viewer Scale.’
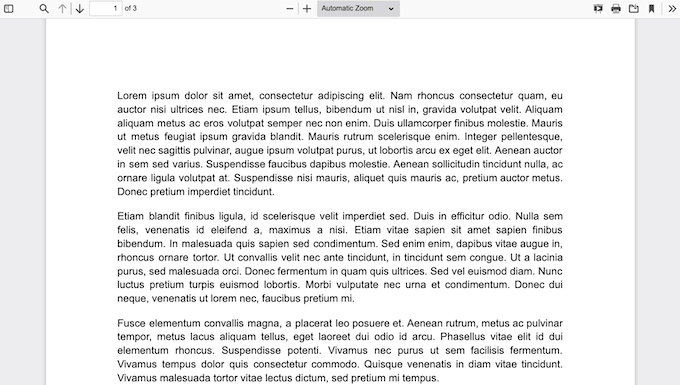
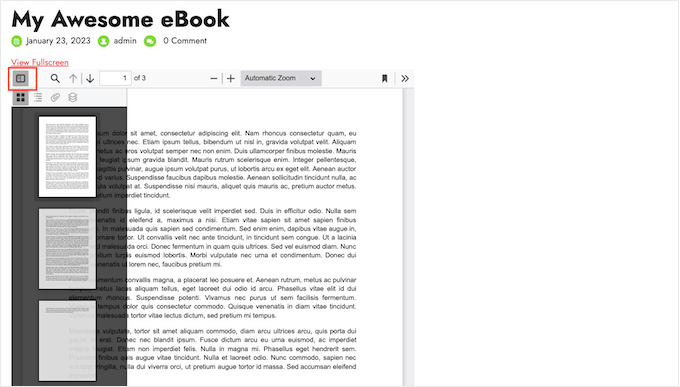
Out-of-the-box, PDF.js Viewer shows the PDF without any sidebar so visitors can see the full document when they arrive on the page. They can open the sidebar at any point by clicking on the ‘Toggle Sidebar’ button, as you can see in the following image.
If you plan to include longer documents or multi-page PDFs then it may be helpful to show the sidebar by default.
To do this, simply open the ‘Page Mode’ dropdown menu and select either Thumbs, Bookmarks, or Attachments.
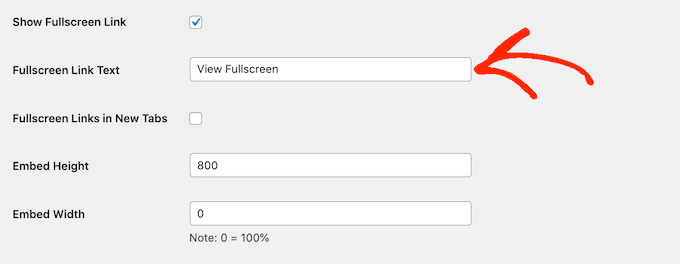
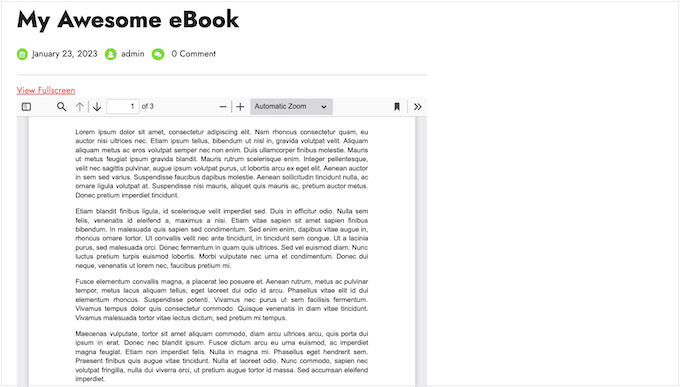
PDF.js Viewer allows visitors to open the PDF in fullscreen mode. By default, visitors can open this mode by clicking on a ‘View Fullscreen’ link above the embedded PDF.
To replace the text with your own custom messaging simply type into the ‘Fullscreen Link Text’ field.
You can also choose whether the link opens in a new tab using the ‘Fullscreen Links in New Tabs’ box.
Launching a new tab will help to keep visitors on your website, but it can be annoying for mobile and tablet users.
Fullscreen mode makes it easier to read long documents so we recommend leaving this feature enabled. However, if you don’t want to use it then you can uncheck the box next to ‘Show Fullscreen Link.’
When you’re happy with how the plugin is set up, click on ‘Save Changes.’
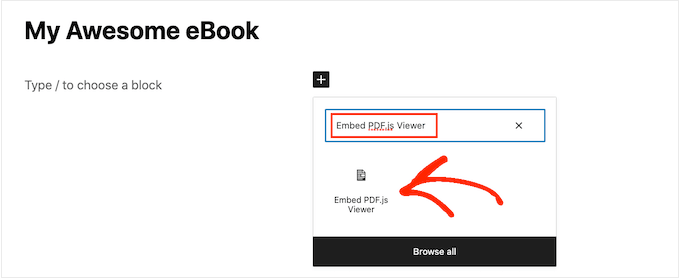
You’re now ready to add a PDF viewer in WordPress. Simply open the page or post where you want to show the PDF and then click on the ‘+’ button.
You can now start typing in ‘Embed PDF.js Viewer’ and select the right block when it appears.
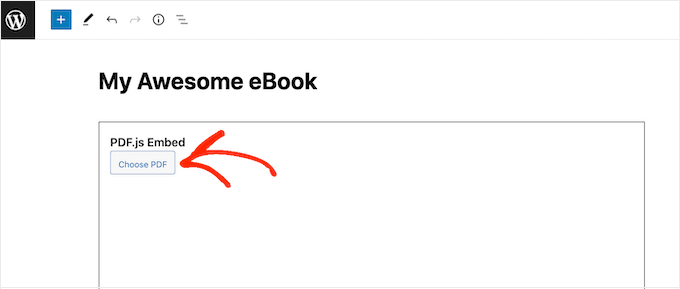
After that, click on ‘Choose PDF’ to open the WordPress media library.
You can now either choose a PDF from the library or upload a file from your computer.
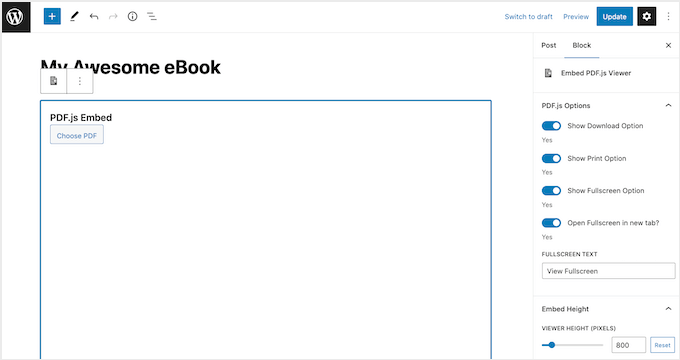
The plugin will use your default settings, but you can fine-tune how this PDF looks and acts using the settings in the right-hand menu.
Here, you can change the PDF’s height, width, and scale. You can also remove or customize the ‘View Fullscreen’ link.
Finally, you can choose to remove or show the ‘Download’ and ‘Print’ buttons.
When you’re happy with how the PDF is set up, simply click on ‘Update’ or ‘Publish.’ You can now visit your WordPress blog or website to see the embedded PDF viewer.
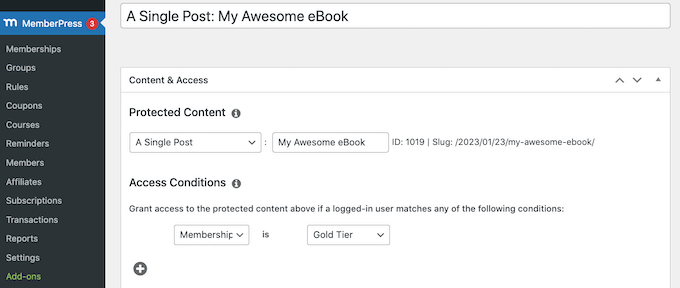
After embedding a PDF document in your website, you can turn that page or post into exclusive members-only content. Visitors will then need to buy a membership to access that page or post, and see the embedded PDF.
The easiest way to turn WordPress into a membership site is by using MemberPress. It is the best WordPress membership plugin and allows you to turn any page or post into exclusive subscriber-only content, including embedded PDFs.
We also suggest using Easy Digital Downloads to manage and sell PDFs on your website. You can sell all kinds of digital goods easily and embed PDFs in the product pages as previews, too.