Friday, March 17, 2023

How to Create a Welcome Mat for Your WordPress Site (+ Examples)

Do you want to add a full-screen welcome mat to your website?

A welcome mat is a full-screen, dynamic overlay that can help you get more newsletter subscribers, eBook downloads, sales to your products, and more.

In this article, we’ll share how to create a welcome mat for your WordPress site, along with some great welcome mat examples to learn from.

How to create a welcome mat for your WordPress

Why a Welcome Mat Can Boost Your Conversions

More than 70% of visitors leaving your WordPress website will never return unless you convert them into email subscribers or customers.

A welcome mat is a large, full-screen interstitial that blocks the view of the rest of your website’s content to capture the user’s attention.

That might sound like a bad idea, but it’s a great way to get your message in front of visitors straight away.

If visitors don’t want what you’re offering, then they can simply close the welcome mat.

Of course, you’ll want to give people a good reason to sign up if you’re showing a welcome mat instead of an exit-intent popup, such as a discount code or even a freebie.

For example, you may have seen popular eCommerce stores offer a special discount using a full-screen welcome mat with gamification.

Gamified Spin a Wheel Campaign

In other cases, you may have seen popular bloggers using a full-screen welcome mat to grow their email newsletter.

Goins writer welcome screen mat

That being said, let’s take a look at how to easily add a welcome mat to your website.

How to Create a Welcome Mat for Your Website

The easiest way of creating a welcome mat in WordPress is using OptinMonster. It is the best lead generation software in the world and allows you to easily create optin forms, including welcome mats.

First, you’ll need to visit the OptinMonster website and signup for an account. You will need at least the Basic plan to create fullscreen overlays.

OptinMonster

Next, you’ll need to install and activate the OptinMonster WordPress plugin. For more details, see our step-by-step guide on how to install a WordPress plugin.

The plugin connects the OptinMonster app to your website. Once you’ve activated the plugin, you’ll see the setup wizard in your WordPress dashboard. Go ahead and click the ‘Connect Your Existing Account’ button.

Connecting an OptinMonster account to WordPress

Next, a new window will open.

Simply click the ‘Connect to WordPress’ button.

Connect OptinMonster to WordPress

Now, you’re ready to create your welcome mat.

Creating a Welcome Mat for Your Website

You can head to OptinMonster » Campaigns to create a new campaign.

Go ahead and click the ‘Create Your First Campaign’ button to start creating your welcome mat.

Create first OptinMonster campaign

A new window will now pop up where you can select pre-built templates or choose ready-to-use campaigns and lead magnets, inspired by successful brands. OptinMonster also gives you the option to hire a specialist to customize your campaigns.

For this tutorial, we will use the ‘Templates’ option.

Choose a template or playbook

This will take you to the OptinMonster campaign builder.

Next, choose ‘Fullscreen’ for your campaign type.

Select fullscreen template and campaign

You’ll need to choose a template for your campaign. We will use the ‘Entrance’ template, but you can pick a different one if you want.

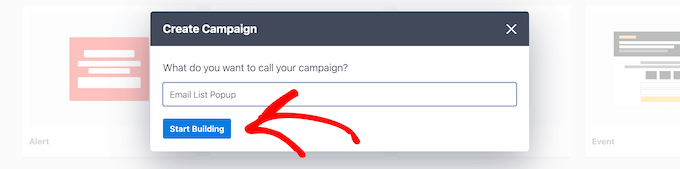
Once you’ve selected a template, go ahead and enter a name for your campaign and click the ‘Start Building’ button.

Click start building

Next, you can customize your campaign using the drag-and-drop builder. You can change anything you like here.

There are different blocks that can be added to the campaign, like images, text, buttons, and more. You’ll also want to edit the text to correspond to your offer.

Customize your fullscreen campaign

Simply click on any element, and you’ll see that you can edit it in the left-hand pane.

For instance, we will change the headline of the full-screen welcome mat for our demo campaign.

Edit the text of welcome mat

The next step is to let your welcome mat slide in. You can do this by clicking the Settings gear icon on the bottom left-hand side.

From here, you need to toggle the ‘Display a Page Slide?’ option to enable it.

Display a page slide

This means your welcome mat will slide down from the top of the screen instead of fading into view.

Next, you need to switch to the ‘Success’ view of your welcome mat. This is what your users will see after they perform the desired action. If you want, you can customize the success view or use the default template.

View the success view of welcome screen mat

Once you’re happy with your welcome mat, you can set up how it will display on your site.

Displaying the Welcome Mat on Your WordPress Site

You can set how to display your welcome mat popup by switching to the ‘Display Rules’ tab in OptinMonster.

There are lots of personalization and targeting options like users’ location, what items they have in their eCommerce cart, what they have done previously on your site, exit intent, and more.

By default, OptinMonster campaigns display on all pages of your site after the visitor has been there for 5 seconds.

Select display rules

Since this is a welcome mat, you’ll probably want it to display immediately. Just change this value to 0 seconds.

By default, the welcome mat will display on every page of your site. You can easily include or exclude specific pages by using OptinMonster’s personalization rules.

Choose display rules for welcome mat

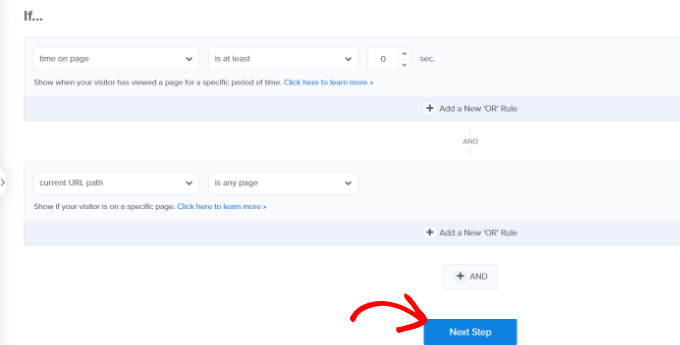
You can click the ‘Next Step’ button when you’re done.

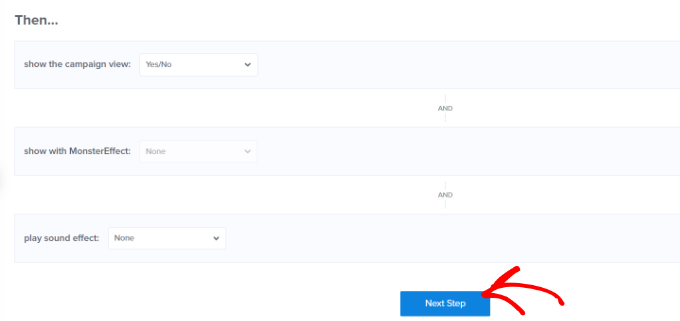
Next, you’ll see more options for displaying your campaign. For instance, you can add an effect or play a sound when the campaign appears on a user’s screen.

For this tutorial, we’ll use the default settings and click the ‘Next Step’ button.

Add effects to campaign

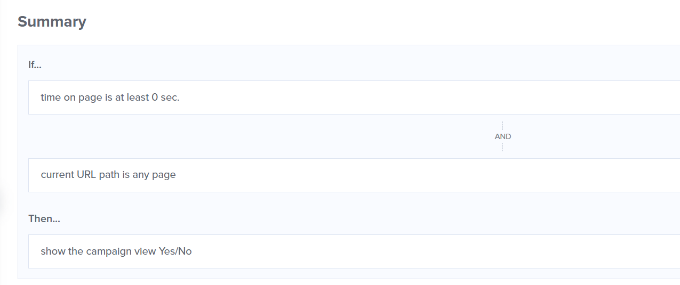
On the next screen, you will see a summary of your display rules settings.

You can edit the settings before publishing the campaign.

Summary of display rules

Once you are ready to make your welcome mat live, simply go to the ‘Publish’ tab at the top of the screen.

Go ahead and change the Publish Status from ‘Draft’ to ‘Publish.’

Publish welcome screen campaign

Don’t forget to click ‘Save’ to store your changes and close the campaign builder.

Next, you will see WordPress Output Settings for your campaign. Make sure that your campaign is published.

If it isn’t, then simply click the Status dropdown menu and select the ‘Published’ option. Don’t forget to click the ‘Save Changes’ button when you’re done.

Change the status of welcome mat campaign

To check out your campaign, you can visit your website in a new incognito browser window.

You should see your welcome mat slide in seamlessly from the top of your screen.

Fullscreen welcome mat preview

Examples of Great Welcome Mats

Let’s take a look at some welcome mat examples from different industries. For each, we’ll go through what they’re doing well, plus any minor changes we might suggest.

1. Singularity

This welcome mat from Singularity prompted users to sign up and watch the livestream of the Singularity University Global Summit. It was hugely successful and captured over 2,000 new email signups in under 9 days.

Singularity fullscreen mat preview

We particularly like the great use of the logo, the clear fonts, and the bright “Remind Me!” button.
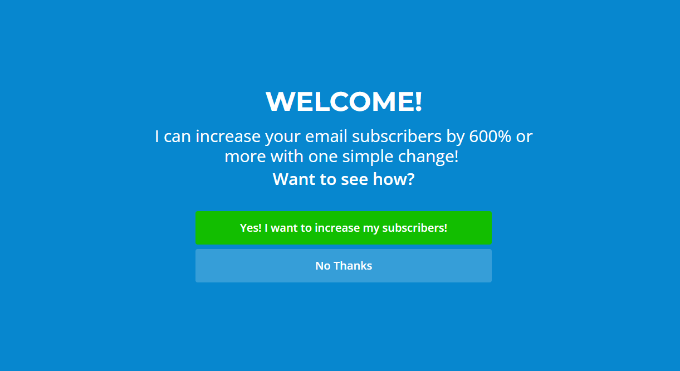
2. Goins, Writer

This welcome mat from Goins, Writer offers a free guide. It’s a clear, simple offer, and the minimalist design is in keeping with the rest of the website.

Goins writer welcome screen mat

We feel that the “Yes” and “No Thanks” buttons are clear and easy to use, and the use of numbers in the headline makes for a compelling offer.

3. AVweb

This welcome mat has a large, clear image of a small airplane. It’s instantly eye-catching.

Welcome mat example AVweb

We like the great image, and the clear “Sign Me Up!” call to action. One small possible tweak would be to shorten the tagline to avoid having it cover the top of the image.

4. Loaded Landscapes

This welcome mat from Loaded Landscapes is a little different from other examples. The background is slightly transparent.

Loaded landscape

We like the clear offer and the enthusiasm of the red call to action button. The background of the site beneath the welcome mat could be a little distracting, so it might be worth changing it to be fully opaque, however.

5. OptimizeMyBnb

This welcome mat was used on a specific page, which was included as a clickable link inside a book the website owner sold through third-party retailers. These retailers didn’t pass on customers’ details, though. Using a welcome mat in this way helped capture customers’ email addresses.

Optimize your Airbnb thank you

We feel the very clear headline, subheading, and call-to-action text all worked well, and that the ‘no, thanks’ button is used well to give the user sense of FOMO.

There are dozens more full-screen welcome mat examples that you can see, but we didn’t add them all in this guide.

If you’re looking for more inspiration, here are some things you can do with a fullscreen welcome mat:

  • Present a targeted offer or coupon
  • Showcase new products and services
  • Let visitors know what to expect from the site
  • Win new subscribers by highlighting their best content
  • Point visitors to their social media profiles
  • Collect email subscribers as part of a prelaunch phase

If you’re serious about improving your website conversions, then welcome mat and even exit fullscreen interstitials are some of the highest converting elements you can add to your website.

We hope this article helped you learn how to create a welcome mat for your website and that you found the examples inspiring. You may also want to take a look at our comparison of the best email marketing services, and our list of the must-have WordPress plugins.

If you liked this article, then please subscribe to our YouTube Channel for WordPress video tutorials. You can also find us on Twitter and Facebook.

The post How to Create a Welcome Mat for Your WordPress Site (+ Examples) first appeared on WPBeginner.


March 18, 2023 at 12:42AM

8 Best Online Content Optimization Tools for WordPress (in 2023)

Are you looking for the best online content optimization tools for WordPress?

You can increase the search traffic to your WordPress website or blog by optimizing your online content. Luckily, there are plenty of easy-to-use tools you can use to make your content more readable and rank higher on search engine results pages.

In this article, we’ll share the very best online content optimization tools that experts use to grow their website traffic.

8 Best Online Content Optimization Tools for WordPress

What Is a Content Optimization Tool?

When you optimize your posts for SEO, you can improve your search engine rankings and consistently get more traffic to your WordPress website.

That’s why we created a handy checklist of tips to optimize your blog posts for SEO. This is a list of all the steps we use on our own blogs, such as keyword research, crafting effective titles, internal linking, improving readability, and much more.

But even using our checklist, optimizing your content is a lot of work. Luckily, there are handy online tools that can recommend specific steps you should take to improve your content so it ranks higher on search engine results pages.

That being said, let’s take a look at the best online content optimization tools for WordPress.

1. All in One SEO

The AIOSEO SEO plugin for WordPress

All in One SEO (AIOSEO) is the best SEO plugin for WordPress websites. It’s beginner-friendly and at the same time, comes with advanced optimization features, and gives you SEO insights from your WordPress dashboard.

Once you finish setting up All in One SEO, it will automatically perform an SEO audit so you can see the overall SEO health score for your website.

It will also give you a detailed report with practical suggestions to improve your SEO score.

SEO audit in AIOSEO

AIOSEO will also help you find semantic keywords for your focus keyword, and the headline analyzer tool will give your headline a score and offer tips to make your headline even better.

The plugin’s Link Assistant offers suggestions for relevant posts you can link to and the anchor text to use. Simply click the ‘Add Link’ button, and the link will automatically be added to your post.

Link assistant add link

All in One SEO will also automatically analyze readability issues and make suggestions for you in the analysis section. It also lets you take your XML sitemaps to the next level and allows you to add schema markup for your WordPress website.

Pricing: Starts at $49.50 for the Basic plan that supports one site. You can also get started using the free plugin which offers fewer features.

2. Semrush SEO Writing Assistant

Semrush SEO Writing Assistant

SEO Writing Assistant is a content optimization tool created by Semrush, one of the best SEO tools on the market. You can use it to check your content in real-time for SEO suggestions and improve the overall SEO score of the content on your WordPress website.

You start by entering a focus keyword to generate content templates based on the top 10 results for that phrase. After that, you will be given scores on readability, SEO, originality, and tone based on rival results.

SEO Writing Assistant Overall Score

Next, you look for ways to improve your content. For example, you can use Writing Assistant to optimize your article headline, include recommended keywords, adjust the article length, make sure the tone sounds natural and casual, and check for plagiarism.

We show you how to do all of this step-by-step in our guide on how to use the SEO Writing Assistant in WordPress to improve SEO.

Pricing: Starts at $119.95/month for a Pro account. A free trial is available.

3. Surfer SEO

Surfer SEO

Surfer SEO helps you write articles that read well and rank high. It helps you structure your posts, provides a list of relevant keywords you should include, and offers a content score and real-time feedback on how to optimize your content.

This software offers many of Clearscope’s features at a more affordable price. For example, when you paste your content into the app, it will give you a content score, show you which keywords you are using and which you aren’t, and display an outline of the post’s structure.

Surfer SEO Report

Surfer SEO also offers an audit showing actionable steps to improve your content, a keyword research tool, and a page speed comparison so you know whether you need to improve your page’s load time.

Pricing: Starts at $49/month for the Basic plan when paid annually. This plan supports two users. There is a 7-day money-back guarantee if you are not satisfied.

4. Clearscope

Clearscope

Clearscope offers a wide range of tools that helps you optimize your online content. For example, it can show you the keywords you should use, the questions you need to answer, how to structure the article, how long the post should be, and how to improve readability.

You create a report by typing in a query such as a post title, and Clearscope will analyze relevant content from your competitors to determine which keywords should be included in the post and much more.

Next, you can paste the contents of your article to see how it can be improved. This will show you the length of your post compared with the typical length of your competitors’ posts and the readability level.

Clearscope Report

You’ll see a list of important keywords, and those you have already included will have a checkmark next to them. In the top left of the screen, you will see a content grade, and you can improve your grade by adding keywords that are not already in the post.

Clearscope also has a Keyword Discover tool. After typing in a keyword, you will see related keywords, questions that are asked related to that keyword, and which keywords are trending.

Clearscope Keyword Discovery

Pricing: Starts at $170/month for the Essentials plan which is for one user. Business and Enterprise plans have custom pricing. You can request a free demonstration of the software.

5. Frase

Frase

Frase is an affordable content optimization tool that identifies relevant content you should include in your post and provides a smart outline for your content.

Once you write or paste your content, smart insights will pop up on the right of the screen. It will also be given a content score so you can see how much it needs to be improved.

Frase Content Optimization

The app can autocomplete or rewrite sentences for you using artificial intelligence, suggest transition words that add interest to your writing, and recommend topics to include in your post by analyzing the most popular Google search results.

Pricing: Starts at $12.66/month for the Solo plan when paid annually. A 7-day free trial is available.

6. MarketMuse

MarketMuse

MarketMuse is another excellent content optimization tool, but its pricing makes it more suitable for enterprise-level companies than small businesses. It offers applications to help you research, compete, optimize, and more.

You’ll see a personalized difficulty score of your existing content so you can see how your content competes with articles on other sites. It uses natural language rather than keywords to suggest content you should add to your post.

MarketMuse Content Optimization

It also offers tools that perform keyword research and competitive content analysis.

This will show you the strengths and weaknesses of your competitors’ content in a chart so you can add content that they are missing.

MarketMuse Competitive Analysis

Pricing: Starts at $600/month for the Standard plan, which supports one user. You can add additional users for $99/month each. The Premium plan costs $12,000/year, and there is also a limited free plan for one user so you can test the software.

7. Ahrefs

Ahrefs

Ahrefs is an excellent keyword explorer and rank tracker tool and comes with a site audit tool to optimize your entire website.

Using the Keyword Explorer, you can come up with keyword ideas by simply typing a keyword into the search box. You’ll then see a whole list of keyword suggestions.

Its Rank Tracker feature lets you add the keywords you want to track to your Ahrefs dashboard. It shows you an overview of your search engine rankings. You can see your visibility percentage, average position, traffic, SERP features, and changes in position.

Ahrefs Overview

You can also use Ahrefs to see the keywords that your competitors are ranking for, so you can create new content pieces targeting keywords related to those subjects.

The Content Explorer feature finds the most popular content for any keyword or topic. You can see why those posts rank higher and replicate their strategy in your own content.

Pricing: Starts at $99/month for the Lite plan. Pay annually and get two months free.

8. Headline Analyzer (Free)

Headline Analyzer

Headline Analyzer is a free tool that helps you evaluate your headlines and improve the copy to make it more engaging and click-worthy. It provides data-driven insights and suggestions for creating irresistible SEO titles.

It can be tricky for beginners to come up with a headline that instantly captures your users’ attention and gets them to click your website link. This is where you can use the headline analyzer tool.

All you have to do is enter your blog title, and the Headline Analyzer will give it an overall content score along with suggestions on how to improve it.

The tool will also tell you if your title needs to be longer or shorter to make sure it displays properly on SERPs (search engine results pages). It even shows you a preview of how your blog will appear in Google search results.

Pricing: Absolutely free.

We hope this tutorial helped you find the best online content optimization tools for WordPress. You may also want to learn how to increase your blog traffic, or check out our list of the best WordPress landing page plugins.

If you liked this article, then please subscribe to our YouTube Channel for WordPress video tutorials. You can also find us on Twitter and Facebook.

The post 8 Best Online Content Optimization Tools for WordPress (in 2023) first appeared on WPBeginner.


March 17, 2023 at 02:29PM

Thursday, March 16, 2023

How to Add Magnifying Zoom for Images in WordPress

Do you want to add an Amazon-like magnifying zoom for images in WordPress?

Adding a zoom feature will allow users to see details that they would not see in a normal-sized image.

In this article, we’ll show you how to easily add magnifying zoom for images in WordPress.

How to add magnifying zoom for images in WordPress

Why Add a Magnifying Zoom for Images?

Adding a magnifying zoom feature on your WordPress website will allow visitors to view the intricate details of the images clearly.

If you have a photography website, then adding a magnifying feature will allow users to zoom in on your photographs to view the finer details.

Similarly, if you run an online store, then your customers will be able to zoom in on product images.

Many big eCommerce websites already use magnifying zoom for product images. It allows customers to examine the product and creates a better shopping experience in your store.

That being said, let’s see how you can easily add a magnifying zoom for images in WordPress.

How to Add a Magnifying Zoom For Images in WordPress

First, you need to install and activate the WP Image Zoom plugin. For more details, please see our step-by-step guide on how to install a WordPress plugin.

Upon activation, you need to head over to the WP Image Zoom » Zoom Settings page from the WordPress admin sidebar.

Next, you need to configure the zoom effect settings by switching to the ‘Zoom Settings’ tab and choose a lens shape that you want to use.

Choose a lens shape

You can choose from circle, square, and zoom window lens shapes. You can even choose a ‘No Lens’ (⨯) option if you don’t want to use a shape for magnifying effect.

After choosing your preferred lens, you need to scroll down to the next step where you can preview an image with the selected lens to see how it works. The plugin has a preview image that you can use to test your changes.

Check the preview of the lens in step two

Next, you need to switch to the ‘General’ tab.

From here, you can select a cursor type, set an animation effect, enable the zoom on mouse hover or mouse click, and define a zoom level.

If you want even more options, some of the features are only available for the pro version of the WP Image Zoom plugin.

Configure General tab settings in step 3

After making your choices accordingly, simply go to the ‘Lens’ tab from the top.

You can now configure settings like lens size, lens color, lens border options, and more if you selected the ‘circle’ or ‘square’ lens in Step 1.

Lens Settings

If you selected the Zoom Window Lens, then you need to switch to the ‘Zoom Window’ configuration tab.

From here, you can change the width and height of the zoom window, positioning, distance from the main image, border colors, and more.

Zoom window settings

Next, you need to simply click the ‘Save Changes’ to store your settings.

After that, all you have to do is configure a few general settings.

Clcik the Save Changes for the last step

Configure General Plugin Settings

Next, you need to switch to the General Settings tab under the plugin settings.

From here, you can now enable features like zoom on WooCommerce product images, thumbnails, mobile devices, attachment pages, product category pages, and more.

All you need to do is simply check the boxes next to these options.

Go to the General Settings tab and check the boxes beside the options you want to activate

You can also remove the lightbox effect, so users can smoothly zoom images.

However, you would need the Pro version of the plugin for this feature.

Remove the lightbox option by checking the box

If you are not going to remove the lightbox for images, then you need to scroll down to the ‘Enable inside a Lightbox’ option and check the box next to it.

Note: You can see supported lightboxes to make sure that the zoom works fine inside a lightbox on your site.

Check enable inside lightbox option

Once you are done adjusting the settings, don’t forget to click on the ‘Save Changes’ button to store your settings.

Magnifying zoom will now be enabled for WooCommerce products.

You can go visit your online store to check our zoom feature.

Zoom feature enabled on the WooCommerce store

However, if you want to enable zoom for images on WordPress posts and pages, you need to follow the step below.

Step 3. Enable Magnifying Zoom for Images in Block Editor

By default, the magnifying zoom is not enabled for images on your posts and pages. You need to do it manually after adding an image to your content.

First, you need to open a post you want to edit in the block editor.

Next, you need to upload an image to that post from the media library or your computer.

Once you do that, simply click on the image to open up its’ Block Settings panel on the right corner of the screen.

From here, simply go to the ‘Styles’ tab and click on the ‘With Zoom’ button to apply magnifying zoom to your image.

Click on the Zoom button

After that, simply click the ‘Update’ or ‘Publish’ button at the top to store your settings.

The zoom feature will look like this on your site:

Zoom feature preview

Note: You will need to repeat this step each time you want to add the zoom effect to an individual image.

We recommend using high-quality images for the zoom feature to look great. High-quality images are normally larger in file size and take longer to load which will affect your website speed and performance.

To solve this issue, you need to optimize your images for the web before uploading them to WordPress.

We hope this article helped you learn how to add magnifying zoom for images in WordPress. You may also want to see our guide on how to optimize images for search engines and our top picks for the best image compression plugins.

If you liked this article, then please subscribe to our YouTube Channel for WordPress video tutorials. You can also find us on Twitter and Facebook.

The post How to Add Magnifying Zoom for Images in WordPress first appeared on WPBeginner.


March 17, 2023 at 12:30AM