Thursday, March 23, 2023

How to Easily Add CSS Animations in WordPress

Do you want to add CSS animations in WordPress?

Animations are a great way to grab the visitor’s attention and highlight a page’s most important content. They can also encourage customers to click on your call-to-action buttons and links.

In this article, we will show you how you can easily add CSS animations in WordPress.

How to easily add CSS animations in WordPress

Why Add CSS Animations in WordPress?

You can use CSS animations to draw the visitor’s attention to different parts of a page. For example, if you have an online store then animations can highlight a product’s most important features or biggest selling points.

Animations will also make your CTAs stand out, which can help you reach a specific goal such as getting more people to subscribe to your email newsletter.

You can add CSS animations to your theme or child theme‘s stylesheet. However, this takes a lot of time and effort, and it can break your website’s design and even function if you make a mistake.

With that being said, let’s see how you can easily add CSS animations to your WordPress site. If you prefer to jump straight to a particular method, then you can use the links below.

Method 1. How to Easily Animate Any WordPress Block (Quick and Easy)

The easiest way to add a simple CSS animation is by using Blocks Animation.

This free plugin allows you to add an entrance animation to any block without having to write a single line of CSS. It also has a typing animation and a ticker-style effect that you can add to text and numbers.

A count animation, created using the Animation Blocks plugin

First, you’ll need to install and activate the plugin. If you need help, then please see our guide on how to install a WordPress plugin.

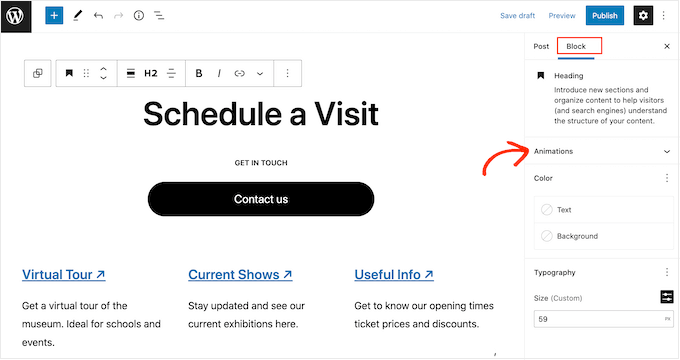
Upon activation, open any page or post in the WordPress editor. Then, simply click on the block that you want to animate and select the ‘Block’ tab in the right-hand menu.

You’ll see this menu has a new ‘Animations’ section.

How to animate any WordPress block

Simply click to expand the ‘Animations’ section, and you’ll see three different options: Animations, Count Animations, and Typing Animations.

‘Animations’ are short effects that play once when the page loads. To add this kind of entrance animation to your WordPress blog, just click on the dropdown next to ‘Animation.’

Adding a CSS animation to WordPress using a free plugin

This opens a menu where you can choose the animation you want to use.

The WordPress editor will show a preview of the animation, so you can try different options to see what looks the best.

Adding loading animations to WordPress

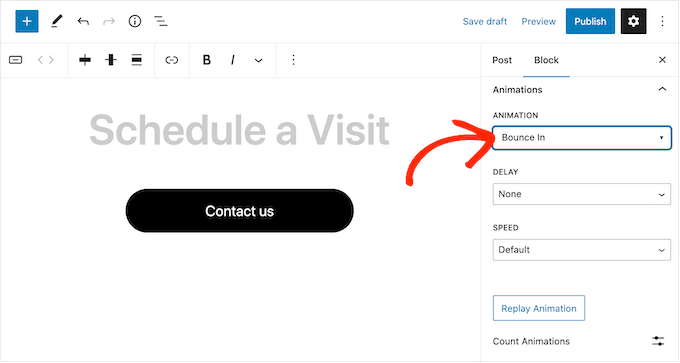
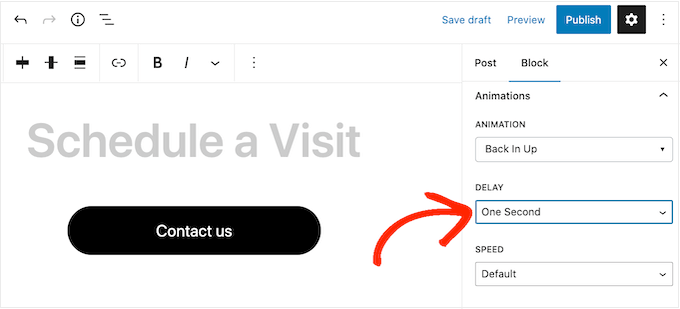
By default, the entrance animation will play as soon as the page loads, but you can add a delay if you prefer. If you use multiple animations on the same page, then you can even use delays to stagger your animations so they’re not overwhelming.

Simply open the ‘Delay’ dropdown and choose a time from the list.

How to add loading CSS animations to WordPress

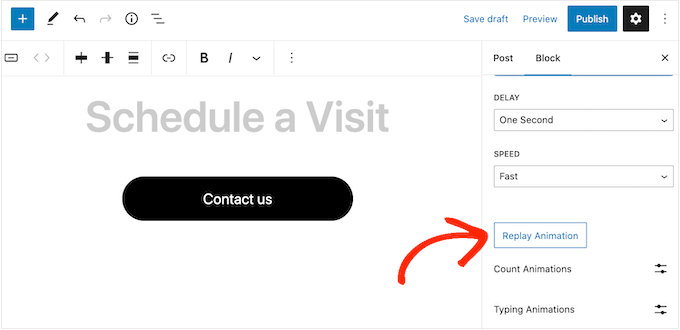
You can also make the animation faster or slower using the ‘Speed’ dropdown.

As you’re trying different settings, you can preview the animation at any point by clicking on ‘Replay Animation.’

Previewing CSS animations in WordPress

The plugin also has ‘Count Animations’ and ‘Typing Animations.’

Typing Animations allow you to animate text, while Count Animations add a ticker-style effect to numbers. These animations work with any block that supports text or numbers, so you can use them to animate buttons, image captions, headings, and more.

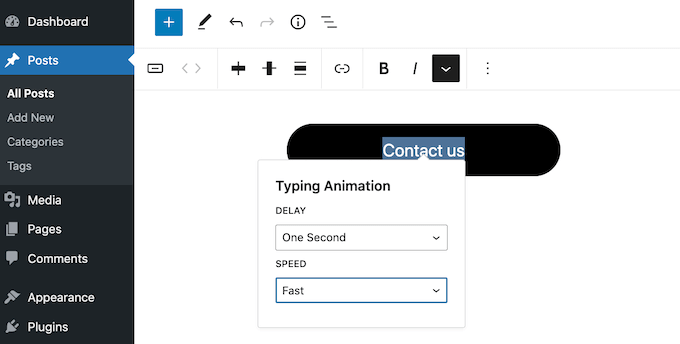
To add either of these effects, start by highlighting the text or numbers that you want to animate. Then, click on the downward arrow in the small toolbar.

Adding a typing animation to a text block

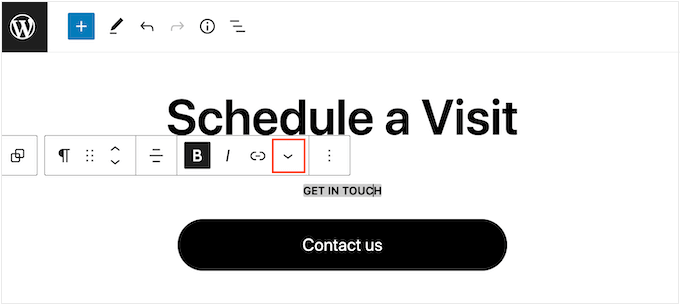
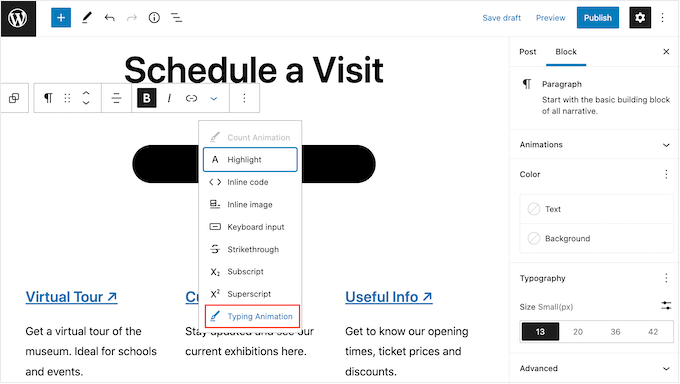
You can now choose ‘Count Animations’ or ‘Typing Animations’ from the dropdown menu.

If these options are grayed out, then make sure you’ve highlighted the right content. For example, you won’t be able to select ‘Count Animation’ if you’ve only highlighted text.

Creating typing animations with a WordPress plugin

After adding the animation, you can change the speed and add an optional delay using the dropdown menus in the small popup.

For example, in the following image, we’re using a delay of one second.

Adding a typing animation to WordPress

When you’re ready to make the CSS animation live, either click on the ‘Publish’ or ‘Update’ button. Now, if you visit your WordPress website you’ll see the animation live.

Method 2. How to Add CSS Animations to Custom Pages (Recommended)

If you want to add simple animations to the built-in WordPress blocks, then Blocks Animation is a good choice. However, if you want to really grab the visitor’s attention, keep people on your website, and get more conversions then we recommend using SeedProd.

SeedProd is the best page builder plugin that allows you to create beautiful landing pages, sales pages, and more using a simple drag-and-drop editor.

It also comes with an ‘Animated Headline’ block that you can use to create rotating and highlighted animated headlines.

An animated headline created using SeedProd

Despite the name, you can use the Animated Headline block to animate any text including a call to action, subheading, or any other text that you want to emphasize.

SeedProd also comes with over 40 entrance animations that you can add to any block including images, text, buttons, videos, and more.

SeedProd entrance animations

You can even animate entire sections and columns with just a few clicks. In this way, you can create engaging animated pages within minutes.

If you’re using animations to get more conversions and sales, then SeedProd integrates with WooCommerce and supports many of the top email marketing services you may already be using to promote your website.

How to Setup the SeedProd Page Builder

The first thing you need to do is install and activate SeedProd. For more details, see our step-by-step guide on how to install a WordPress plugin.

Upon activation, you need to enter your license key.

SeedProd license key

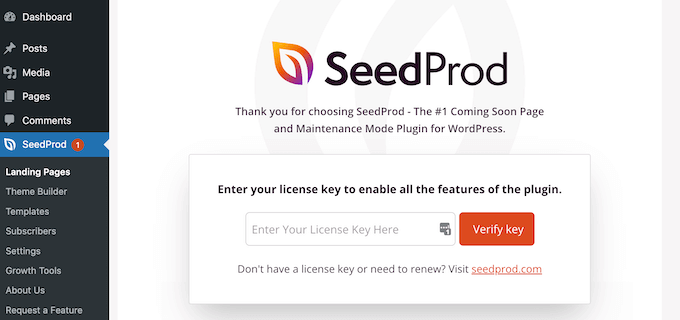
You can find this information under your account on the SeedProd website. After adding the license key, simply click on ‘Verify Key.’

Create a Custom Page Design

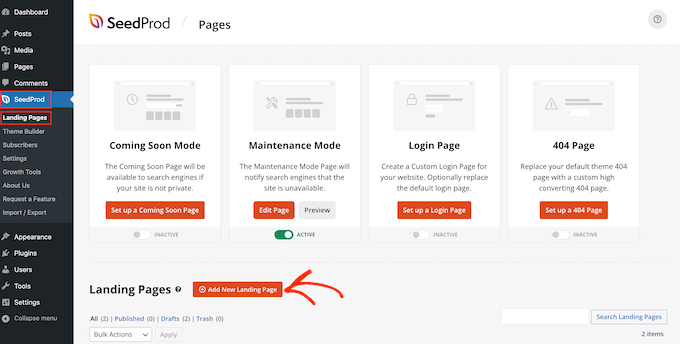
To get started, go to SeedProd » Landing Pages and click on ‘Add New Landing Page.’

Creating a new landing page with SeedProd

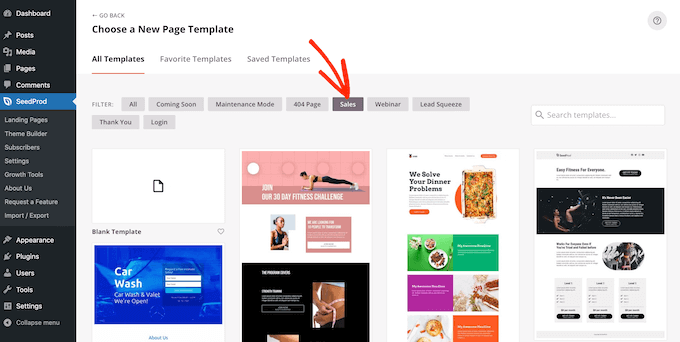
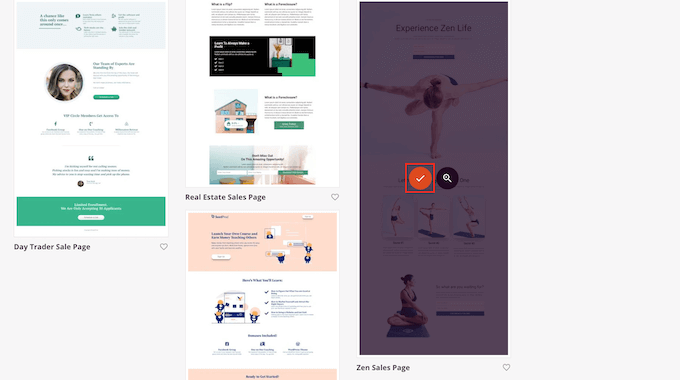
On the next screen, you’ll be asked to choose a template.

SeedProd comes with over 180 beautiful templates that are organized into different categories such as 404-page templates and custom WooCommerce ‘thank you’ pages.

For this guide, we’ll show you how to create a sales page with animated text and entrance animations, but the steps will be similar no matter what kind of page you create.

Simply click on any tab to see the different templates within that category.

The SeedProd template library

When you find a template you want to use, just hover your mouse over it and then click on the checkmark icon.

We’re using the ‘Zen Sales Page’ template in all our images, but you can use any template.

Selecting a sales template in SeedProd

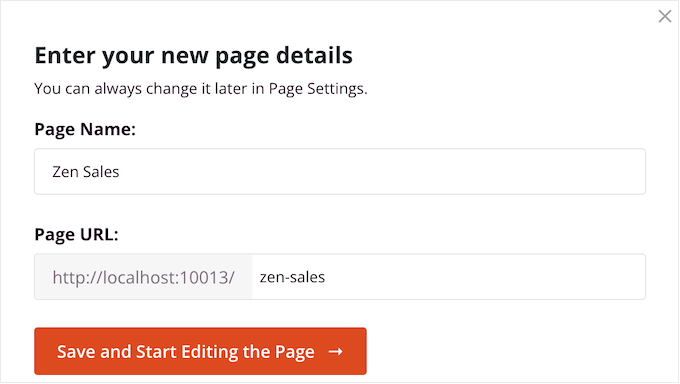
Next, you need to give the page a title.

SeedProd will automatically create a URL based on the page title, but you can change this to anything you want. For example, adding relevant keywords to a URL can often improve your WordPress SEO and help the page appear in relevant search results.

To learn more, please see our guide on how to do keyword research for your WordPress blog.

When you’re happy with the title and URL, click on ‘Save and Start Editing the Page.’

Adding a title to a custom page design

This will load the SeedProd drag-and-drop page editor.

On the right, you’ll see a live preview of the page design, with some settings on the left.

The SeedProd page editor

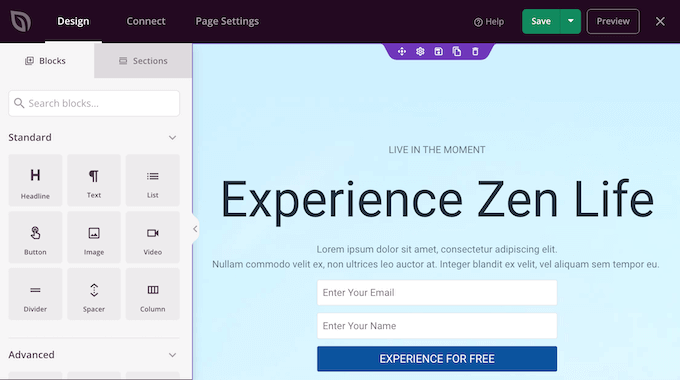
SeedProd comes with lots of blocks that you can add to your design, including blocks that allow you to add social share buttons, videos, contact forms, and more.

For more information, please see our guide on how to create a custom page in WordPress.

How to Add Animated Text to WordPress

To add some animated text to the page, find the Animated Headline block and drag it onto your page design.

The SeedProd Animated Headline block

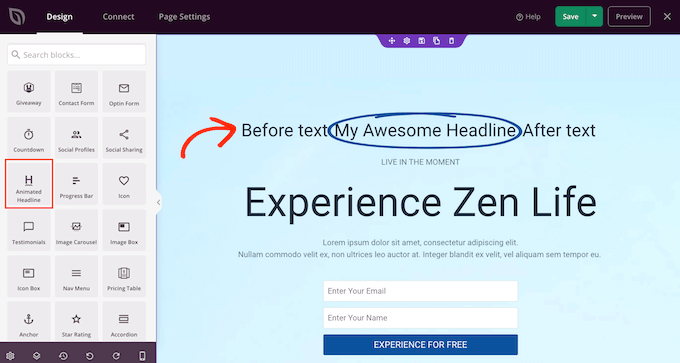
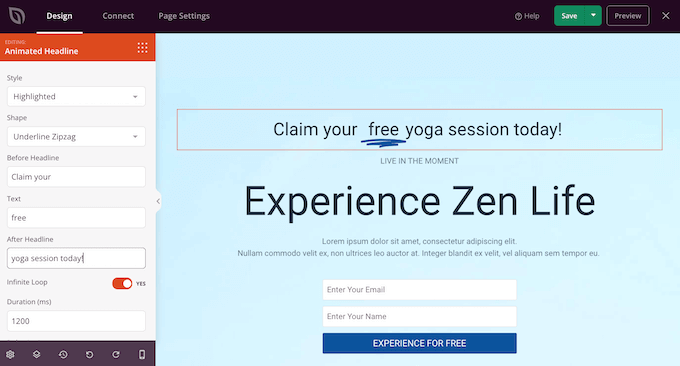
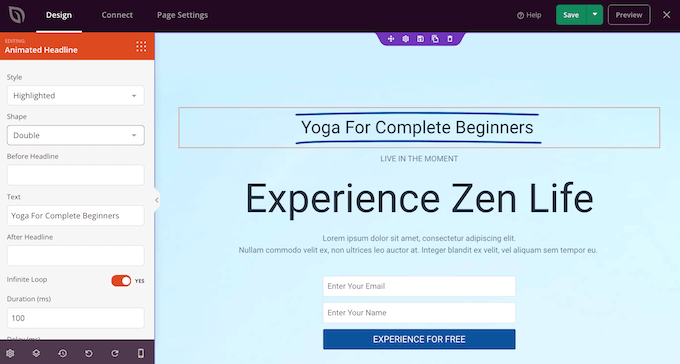
There are two ways to animate your headline. First, the ‘Highlighted’ style adds a shape animation to your text, such as a circle or an underlined zigzag.

You can use this animation to draw attention to a particular word or phrase inside the headline. This can make your headline easier to read and understand by highlighting the most important content. It’s also a great way to draw attention to a call to action.

Adding a CSS animation to a headline in WordPress

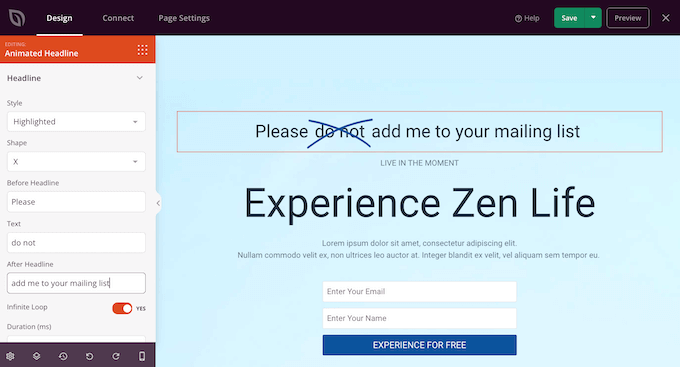
The Highlighted style also has a few strikethrough shapes.

You can use strikethroughs to create interesting and eye-catching effects, or it can simply add some fun to your design.

A strikethrough animation created with SeedProd

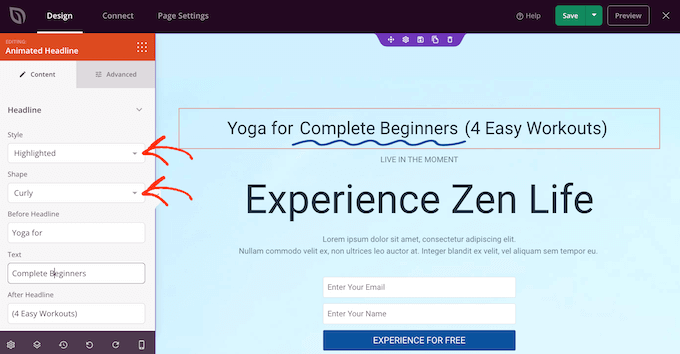
To create a Highlighted animation, just open the ‘Style’ dropdown and select ‘Highlighted.’

Next, open the ‘Shape’ dropdown and choose a shape. When you click on a shape, SeedProd will show a preview of that animation, so you can try different shapes to see which one you like the most.

A curly CSS animation created with SeedProd

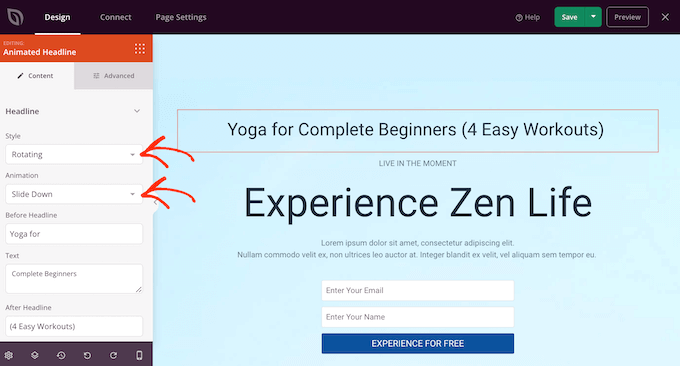
SeedProd also has a ‘Rotating’ animation style, which adds a transition effect to the text.

Often, animated text is the first thing visitors look at when a page loads, so it’s a great way to highlight the most important piece of text.

To create a transition animation, simply open the ‘Style’ dropdown and click on ‘Rotating.’

You can then open the ‘Animation’ dropdown and choose the type of transition you want to use, such as fade, zoom, or roll. Again, SeedProd will play the animation inside the page editor so you can try different effects to see which you prefer.

A transition animation in WordPress

No matter whether you’re creating a ‘Highlighted’ or ‘Rotating’ animation, you can add text before and after the animated text.

Simply type into the ‘Before Headline’ and ‘After Headline’ fields. In the ‘Text’ field, add the word or phrase that you want to animate.

If you want to animate the whole headline, then simply leave the ‘Before Headline’ and ‘After Headline’ fields empty.

Animating an entire headline in WordPress

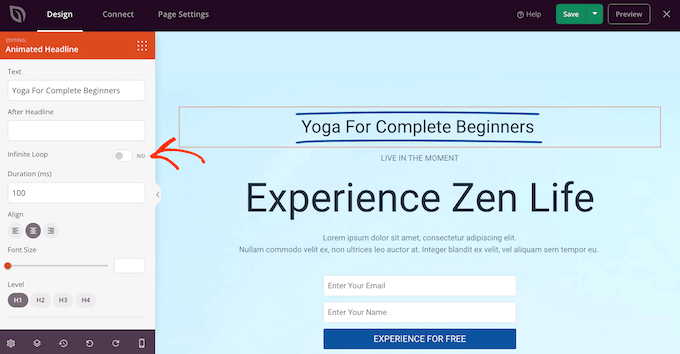
By default, SeedProd will play the animation on a loop, which some visitors may find annoying.

To only play the animation once, click to deactivate the ‘Infinite Loop’ switch.

Disabling the infinite loop animation settings

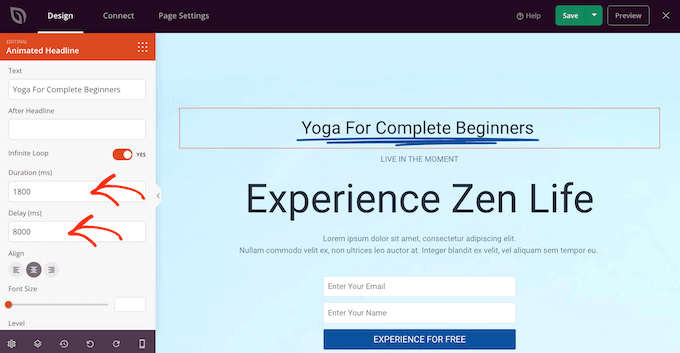
By default, the animation will play for 1200 milliseconds after an 8000 milliseconds delay.

To use different values, type into the ‘Duration’ and ‘Delay’ fields. For example, you can make the animation faster by using a shorter duration.

Changing the animation duration

You may also want to style the text. For example, you can change the font size and alignment.

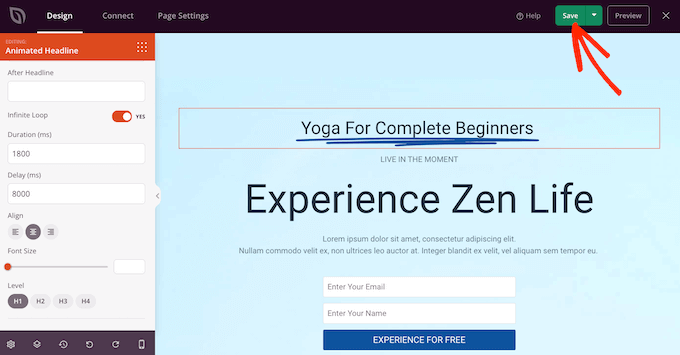
When you’re happy with how the animated headline looks, go ahead and click on the ‘Save’ button to store your changes.

Saving a CSS animation in WordPress

Add Entrance Animations in WordPress

Entrance animations play when the page first loads, so they’re a great way to catch the visitor’s attention.

You can also use them to highlight the content visitors should look at first. For example, if you have an online marketplace then you might animate the product’s hero image, or the banner advertising your Black Friday sale.

Inside the SeedProd editor, simply click on the content you want to animate, and then select the ‘Advanced’ tab in the left-hand menu.

Adding entrance animations using SeedProd

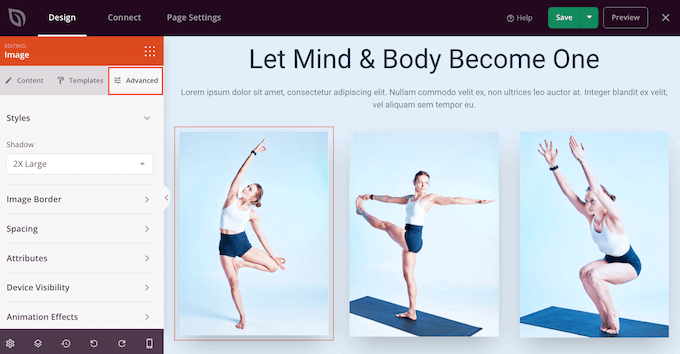
You can then go ahead and click to expand the ‘Animation Effects’ section.

After that, simply choose an animation from the ‘Entrance Animation’ dropdown.

Adding entrance animations using SeedProd

You can now add entrance animations to any block, section, or column simply by following the same process described above.

Publish Your CSS Animations in WordPress

When you’re happy with how the page is set up, click the dropdown menu on the ‘Save’ button and select ‘Publish.’

Publishing a WordPress landing page

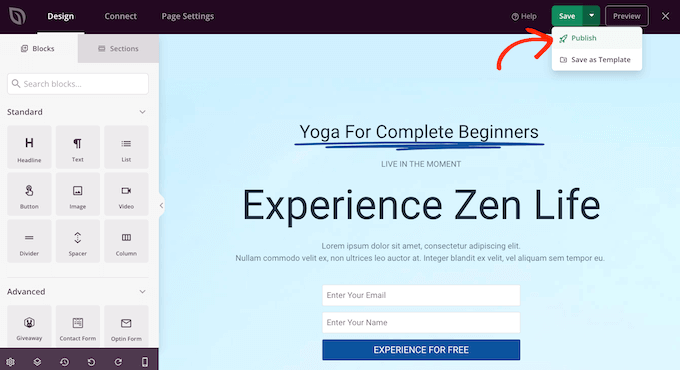
You can now visit this page to see the CSS animations live.

We hope this article helped you learn how to add CSS animations in WordPress. You may also go through our ultimate guide to boost speed and performance, or see our list of the most common WordPress errors and how to fix them.

If you liked this article, then please subscribe to our YouTube Channel for WordPress video tutorials. You can also find us on Twitter and Facebook.

The post How to Easily Add CSS Animations in WordPress first appeared on WPBeginner.


March 24, 2023 at 02:00AM

WordPress Widgets vs Blocks – What’s the Difference? (Explained)

Are you trying to understand the difference between WordPress widgets vs blocks?

WordPress widgets and blocks are both used to add dynamic content elements to posts, pages, sidebars, and templates. Widgets have been a core part of WordPress for 16 years, while blocks have only been a part of the platform since 2018. They serve similar functions, but they aren’t the same.

In this article, we’ll explain the difference between WordPress widgets and blocks, so you can learn how to use them properly.

Understanding the difference between WordPress widgets and blocks

Here is a quick overview of the topics we’ll cover in this article.

What are WordPress Widgets?

WordPress widgets are dynamic-content elements that you can add to widget-ready areas like sidebars.

Widgets were introduced in WordPress 2.2 (May 2007). The purpose was to provide users with an easy way to add customizable elements to their website without having to repeatedly insert the same element at the end of blog posts, for instance, or edit their WordPress theme files to create a sidebar and manually code in something like Google AdSense tracking codes.

Users could simply insert content or features using widgets that didn’t have to be part of their overall theme files or blog posts.

Widgets made it much easier for users to create their ideal WordPress blog, letting them easily add banner ads or email sign-up forms.

Gradually, almost all WordPress themes adapted widgets by adding widget-ready areas in their design and layouts. These were most often sidebars and footers.

The WordPress widget editor looked like this until WordPress 5.8 was released in 2021.

Old widgets screen

What are Blocks in WordPress?

Blocks are the elements that users can add to an area using the WordPress content editor. WordPress switched to this block-based content editor in WordPress 5.0.

You may also see it referred to as the Gutenberg editor, which was its development codename.

Blocks are very similar to widgets because each one handles a single element of the page or post. Unlike widgets, however, blocks were introduced only as part of the post and page editor, which means they could not be easily added to areas like the site footer or sidebar.

A block can be inserted into a post or page for any element, including a paragraph, an image, a gallery, a plugin-specific feature like email signups, or a video embed.

Block editor in WordPress

There are also blocks to add design layout elements like covers, patterns, tables, columns, groups, and more.

To learn more, see our complete WordPress block editor tutorial which shows how to use the default editor to create beautiful content layouts.

The Difference Between Widgets vs Blocks in WordPress

Until WordPress 5.8, the difference between widgets and blocks was quite obvious.

Users added widgets to their theme’s widget-ready areas. They were primarily used to display elements that were not post/page content. For instance, recent posts lists, important links, banner ads, forms, and more.

However, the difference between widgets and blocks has become quite blurry now.

Widgets are self-contained elements that can be used in widget-ready areas like sidebars on a WordPress website.

Blocks are also self-contained elements that you can access through the block editor. They can be used in posts and pages, as well as widget-ready areas. You can also use them in templates if your theme has enabled the full site editor.

Widgets were the first to allow developers to output other elements like contact forms, testimonials, social media feeds, and more.

However, the same can be achieved using blocks. Many of the top WordPress plugins now come with blocks that you can add anywhere.

Plugin blocks

For instance, WPForms comes with a contact form block that you can add anywhere to display a form.

Similarly, All in One SEO comes with blocks for the table of contents, HTML sitemap, breadcrumb navigation, and more.

The Block-Based Widget Editor

WordPress planned to adapt the block editor for editing all areas of your website including the widget-ready areas.

To make this happen, the new block-based widget editor was introduced in WordPress 5.8.

Users were now able to use blocks in widget-ready areas of their themes.

Block widget editor

Widgets are still located under the Appearance » Widgets menu.

However, if you are using a block-based theme that doesn’t have any defined widget-ready areas, then you may not see it under there. You will see Appearance » Editor instead.

Site editor with no widgets screen

Many of the legacy WordPress widgets already have blocks that can do the same thing.

Click on the add new block button (+) and you will find a bunch of blocks categorized as Widgets.

Widget blocks

These are still blocks, but they are just categorized as widgets so that users can understand that these blocks behave like legacy widgets.

However, if a user still needed to use a legacy widget that doesn’t have an alternative block, then they can do so by using the Legacy Widgets block.

Legacy widget block

If a WordPress plugin has a block that you can add to the posts and pages, you can now also use the same block in widget-ready areas.

Theme developers can also create custom blocks that users can add to different areas of their websites.

The Future of WordPress Widgets

WordPress is moving forward towards using a more intuitive and unified way to edit the content on a WordPress website.

This means that older widgets will no longer be available going forward. WordPress themes and plugin developers are already adapting and adding support for the block editor in their products.

However, many WordPress themes still use older widgets. Similarly, many WordPress plugins still use shortcodes and legacy widgets.

If you still need to use the old widgets, then you can disable block widgets in WordPress.

The simple way would be to do it by using the free WPCode plugin which allows you to customize WordPress without adding dozens of plugins.

It has a pre-made snippets that you can use to disable block widgets.

Select the Disable Widget Blocks snippet from the WPCode library

Alternatively, you can also use Classic Widgets plugin. For more details, see our step-by-step guide on how to install a WordPress plugin.

Upon activation, the plugin will simply replace the block-based widget editor with the older widget page.

Note: Classic Widgets plugin will only be supported until 2024. After then, the plugin will not be updated or maintained this is why we recommend using WPCode to future-proof your customization.

Blocks vs Widgets – Which One is Better?

We recommend users start using the new block-based widgets editor as soon as possible because that’s the direction WordPress development is heading.

It is easy to use, modern, and more flexible than the previous Widgets screen.

If a WordPress plugin or theme on your website doesn’t support block-based widgets, then you can reach out to the developer and ask them to convert their widgets into blocks.

If they don’t have plans to release an update, then you can easily find alternative plugins or themes to replace them.

We hope this article helped you understand the difference between WordPress widgets vs blocks. You may also want to see our pick of the best block plugins for WordPress or see our guide on the difference between the block editor vs page builders.

If you liked this article, then please subscribe to our YouTube Channel for WordPress video tutorials. You can also find us on Twitter and Facebook.

The post WordPress Widgets vs Blocks – What’s the Difference? (Explained) first appeared on WPBeginner.


March 23, 2023 at 02:46PM

Wednesday, March 22, 2023

Nextiva vs RingCentral vs Ooma: Which is Better? (Compared)

Are you comparing Nextiva vs RingCentral vs Ooma to find out the best VoIP provider for your business?

Many small businesses rely on phone services to communicate with customers and Nextiva, RingCentral, and Ooma are among the top business VOIP providers on the market.

In this article, we’ll compare Nextiva vs RingCentral vs Ooma to help you decide which one is the best small business VoIP provider.

Comparing Nextiva vs RingCentral vs Ooma

Comparing Nextiva vs RingCentral and Ooma VOIP Services

Many small businesses use VoIP phone services for sales, customer support, and team collaboration.

Nextiva, RingCentral, and Ooma are considered among the top VoIP providers for small businesses.

They offer toll-free numbers, virtual numbers, cheaper local and international call rates, easier team collaboration, and more.

Business phone services is a highly competitive industry and all of our top three contenders offer similar features and pricing. This makes it difficult for small business owners to choose one of them for their business.

To make this easier, we’ll do a side-by-side comparison of Nextiva, RingCentral, and Ooma for the best business VoIP service providers.

We’ll look into the following criteria.

That being said, let’s take a look at Nextiva vs RingCentral vs Ooma to find out which one is the best small business VOIP provider.

Pricing Comparison

Pricing is one of the top deciding factors for small businesses looking for a VoIP service provider.

All three of our contenders offer very competitive pricing for similar features. However, they use a variable pricing model based on the number of users, plan duration, and features.

This makes it difficult to decide which VoIP service provider is cheaper for small businesses.

Nextiva Pricing

Nextiva has a variable pricing model where your pricing changes based on the number of users, payment duration, and feature plans.

For instance, you can get started for $18.95 per user each month (paid annually) if you have more than 20 users.

Nextiva pricing

If you have fewer than 4 users, then you can get started for $23.95 per user each month (paid annually).

This means that your costs will go down as your team size grows and you need to add more users to your account.

RingCentral Pricing

RingCentral pricing plans use a slightly different pricing model.

Their Essential plan starts at $19.95 per user each month (paid annually) for up to 20 users.

RingCentral pricing

This means that if you have a smaller team of fewer than 20 users, then you can save some money and have room for growth too.

Ooma Pricing

Ooma offers pretty straightforward fees. Their rates differ based on which plan you choose regardless of the number of users.

This means that if you choose the Essential plan, then you will pay at the same rate when your team grows.

Ooma Pricing

Ooma only offers month-to-month payment plans which means you pay as you go and can easily cancel at any time.

Winner: Tie – All three of our contenders offer similar pricing that is very close to each other.

Feature Comparison

Perhaps the most important thing when choosing a VoIP provider is the features they offer.

Nextiva, RingCentral, and Ooma all offer a ton of features with each of their business phone service plans.

However, you’ll need to choose one based on your own requirements. For instance, video conferencing may not be important for some small businesses, while it could be a deal breaker for others.

Another important thing to consider is which pricing plan includes the features you need. As all of them offer different sets of features for each VoIP plan.

Nextiva Features

As one of the best business VoIP providers on the market, Nextiva offers a unified communications platform with the most value-to-money features.

  • Unlimited domestic calls in US and Canada
  • HD voice quality
  • Free local and toll-free number plus number porting allows you to bring your existing number as well.
  • Voicemail, voicemail to email notifications, voicemail to SMS, voicemail transcription
  • Support for desk phones, conference phones, and other telephone devices you may want to use.
  • Apps for browsers, iPhone, Android, and desktop computers
  • Video meetings and conferencing
  • Call logs, call recording, call routing, auto attendant, IVR, and more.

Plus, you can share the same number with different team members.

Contact management features make it super easy to follow up on calls and don’t let the leads slip away.

You can also integrate your own CRM software or use Nextiva CRM for better lead management.

Basically, you can run your own small cloud-based call center at the fraction of the cost with highly advanced features to save you time and resources.

RingCentral Features

When it comes to features RingCentral gives tough competition to Nextiva.

They offer all the business phone features that a small business would need and then some more.

  • Unlimited calling for the US and Canada.
  • Free local and toll-free phone numbers.
  • SMS and voicemail support
  • Team messaging
  • Voicemail to text alerts
  • Video meetings and conferencing
  • Desk phone support
  • You can receive calls on the go using your phone or laptop
  • Real-time call analytics

RingCentral offers all common VoIP phone features like call forwarding, number sharing, call waiting, call management, and more.

It also has integrations for popular CRM software like Salesforce, Zendesk, and more.

Ooma Features

Ooma Office offers a bunch of features in their VoIP plans that will help you grow your small business.

However, some features are available in their more expensive plans. For instance, you can only get access to the Desktop app and text messaging with their PRO plan.

Following are the features you can expect to get based on the plan you choose:

  • Local and toll-free numbers
  • Unlimited local calls to the US, Canada, Mexico, and Puerto Rico
  • Call features like recording, call waiting, voicemail, and more.
  • Microsoft Dynamics, Office 365, and Google integrations are available
  • Salesforce Integration (only with Pro Plus plans)

While Ooma offers the most commonly requested features for a VoIP provider, it does lack several features offered by the other top contenders.

Winner: Nextiva

Available Integrations

Integrations help you connect your VoIP phone service to other apps and platforms that you may already be using.

Many businesses need integrations with CRM software like Salesforce, Zendesk, Hubspot, and more. This helps them easily manage customer relationships and can keep track of leads without losing them.

Let’s see how our top contenders stack up when it comes to integrations.

Nextiva Integrations

Nextiva offers comprehensive integrations suitable for all types of small businesses.

Nextiva integrations

It has ready-to-use integrations for all the top CRM software, productivity suites, team communication apps, and more.

This includes Salesforce, Zendesk, HubSpot, Zoho, Microsoft Outlook, Google Workspace, Microsoft Teams, and more.

RingCentral Integrations

RingCentral offers an extensive set of integrations as apps and add-ins that you can add to your account.

RingCentral Integrations

They offer several apps for Google Workspace, Microsoft 365, Microsoft Teams, Microsoft Dynamics, and more.

Their integrations also cover the top CRM software that you may already be using including Salesforce, Zoho, HubSpot, and more.

Ooma Integrations

Ooma does not offer as many integrations as Nextiva or RingCentral. Their Pro plan offers integration with Google and Microsoft Office 365.

You’ll need to upgrade to their Pro Plus plan to unlock Salesforce and Microsoft Dynamics 365 integrations.

Apart from that, you can still use it with your own CRM software but it will be less efficient to track contact history and manage leads within your phone or CRM software.

Winner: Nextiva

Customer Support Options

Unlike traditional phones, VoIP phones are a relatively new technology so many small businesses may need a little bit of help to make the most out of it.

This is why customer support is an important aspect to consider when choosing your VoIP phone service provider.

Let’s compare how our top contenders stack up in terms of customer support options.

Nextiva Customer Support

Nextiva customer support is available through 24/7 live chat, email tickets, and phone.

Nextiva customer support

Plus, they have a comprehensive knowledge base that covers all the commonly asked questions by users.

Finding answers in the knowledge base is fast and easiest way to fix things on your own. However, if you need to speak with someone, then you’ll find their phone and live chat support agents friendly and helpful.

Customer support representatives know their stuff very well and wouldn’t mind going to great lengths to help you out.

RingCentral Customer Support

RingCentral offers support through 24/7 phone, live chat, and email tickets. They also have an extensive library of articles, how-to guides, manuals, and more.

RingCentral customer support

Support response times are fast and representatives are well-trained and highly helpful.

Ooma Customer Support

Ooma offers the same customer support options as the other contenders on the list.

This includes 24/7 live chat support, email tickets, self-help articles, and phone support.

Ooma support

Winner: Tie

Mobile App Comparison

With many businesses switching to a remote or hybrid work model, it is important to consider the mobility of your VoIP service.

This allows remote teams to stay in touch and never miss a call even when away from the desk.

All three of our contenders offer mobile apps for Android and iOS devices. Let’s see how their mobile apps perform against each other.

Nextiva Mobile Apps

Apart from laptop and desk phone systems, Nextiva also offers apps for iOS and Android smartphones.

Nextiva mobile app for iPhone

These apps come with a sleek and easy-to-use interface that allows you to easily make and receive calls, text with team members, manage contacts, and more.

RingCentral Mobile Apps

RingCentral also offers mobile apps for Android and iOS smartphones. These apps are highly intuitive and allow you to easily manage calls while on the go.

RingCentral mobile app

Additionally, RingCentral offers separate apps for Meeting Rooms, which is their video conferencing platform.

Ooma Mobile Apps

Ooma doesn’t offer desktop apps for its Essential plan but it does offer mobile apps for all small business plans including the Essential plan.

Ooma app for Android phones

The app provides easier contact management, and call and text functions. However, user reviews indicate that it does not work very well for many users.

Winner: RingCentral

Conclusion: Nextiva vs RingCentral vs Ooma – Which is The Best Small Business VoIP Provider?

We believe that Nextiva is the best small business VoIP phone provider on the market.

It offers competitive pricing, a ton of features, the best call quality, lower rates for international calls, and a wide range of numbers to choose from (local, international, toll-free, vanity numbers, and more).

→ Click Here to Get Started with Nextiva ←

Note: WPBeginner users can use our Nextiva Coupon to get 20% off when they sign up.

RingCentral comes as a very close second. They offer many of the features offered by their competitors and a slightly better mobile app experience. You can use our RingCentral coupon to get a discount.

We hope this article helped you compare Nextiva vs RingCentral vs Ooma to find out which one is the best VoIP service. You may also want to see our pick of the best email marketing services for small business, or see our article on how to get a free business email address.

If you liked this article, then please subscribe to our YouTube Channel for WordPress video tutorials. You can also find us on Twitter and Facebook.

The post Nextiva vs RingCentral vs Ooma: Which is Better? (Compared) first appeared on WPBeginner.


March 22, 2023 at 03:23PM

Tuesday, March 21, 2023

Internal Linking for SEO: The Ultimate Guide of Best Practices

Are you looking for the best practices to maximize the SEO benefits of internal links?

Internal links play an important role in search engine optimization (SEO). They help search engines discover your content and rank them higher in search results.

In this article, we’ll list the best practices to use for internal linking for SEO.

Internal Linking for SEO: The Ultimate Guide of Best Practices

How Does Internal Linking Improve SEO in WordPress?

Internal links are links between posts on your own website. Having internal links is important for your WordPress SEO. They help search engines like Google crawl your website and discover new content to index and rank.

Generally, the more links a page has pointing to it, the more likely it is to rank higher in search results. That means that you can use internal links to point to important pages on your site as a way to increase their traffic.

Internal links also help your visitors easily find related articles and provide a better user experience overall. This can also help increase pageviews and reduce your bounce rate.

That being said, let’s take a look at the best practices for improving SEO by adding internal links in WordPress. Since this is a comprehensive guide, we have included a table of contents for easier navigation.

1. Make Internal Linking a Habit

We recommend that you make a habit of linking to your older articles from your new articles.

It’s a great way to develop a contextual relationship between your new and old posts. It also allows you to pass relevant link juice to your older articles.

Because internal links play such an important role in SEO, we have even made it part of our pre-publish blog post checklist for WPBeginner writers.

You can also edit your older articles to add links to your newer content whenever you publish. Many successful bloggers dedicate time to adding internal links that point to new articles on a weekly or monthly basis.

This will help you boost your pageviews, increase the time users spend on your site, and ultimately will improve the SEO score of your individual blog posts and pages.

WordPress makes it easy to search for your old posts right inside the post editor. Simply select the text you want to link and click on the link button in the toolbar that appears.

A text pop-up will appear below your highlighted words. Then, you can start typing to search for the older articles you want to link to.

Add a Link to a Post

To learn more, see our beginner’s guide on how to add a link in WordPress.

It’s helpful to see your website’s SEO performance in terms of links by using a tool such as the Links Report in Google Search Console. This is a helpful starting point for working out how to improve internal linking on your site.

Filter internal links

The Links Report will show you how many pages are linking to this page. You can compare it with other pages and see whether pages with more internal links are ranking higher than posts with many internal links.

If you find that posts with more links do rank higher, then you can go ahead and start adding internal links to pages that you want to rank higher. For the details, see our guide on using Google Search Console to effectively grow your website traffic.

Just make sure you are only linking to the article when it makes sense. Adding links where they don’t make sense creates a bad user experience.

Another way to monitor the impact of internal linking is to see which keywords are gaining or losing position. All in One SEO makes this extremely easy with the Search Statistics feature.

Once you connect the plugin with Google Search Console, All in One SEO will fetch your Google Search Console data and present it under All in One SEO » Search Statistics.

Search statistics dashboard

The keyword positions chart shows a graph of your site’s keyword positions.

Below this, you’ll see the Keyword Rankings overview box. This shows your top 10 keywords, and if you use them for internal links they are very likely to be clicked.

keywords overview

3. Improve Your WordPress Site’s Internal Linking With a Plugin

If you’re not sure which posts you want to link to, then you will often find it faster to add internal links in WordPress using an internal linking plugin.

We recommend using All in One SEO. It includes a unique Link Assistant feature that lets you add links to your old and new content without having to open up the post. Plus, it provides link recommendations, detailed link reports, and much more.

To set up the plugin, see our guide on how to set up All in One SEO for WordPress correctly. After that, simply navigate to All in One SEO » Link Assistant in your WordPress dashboard.

Link Assistant will crawl every link on your website and then show a comprehensive list report.

Link assistant overview

The report will show you an overview of the links with total counts for internal, external, and affiliate links. It will also show you the number of orphaned posts that have not yet been linked to from another post or page.

You can switch to the Links Report tab for detailed information on all your links. Here you’ll see a list of all your posts and pages with columns for internal, external, and affiliate links.

Links report

It will also show a number of suggestions where you can add links.

For more details, you can click on the right arrow button next to a post or page. This will show all links organized in different tabs. From the suggestions tab, you can quickly view link suggestions and add links without directly editing a post or page.

View links details

Link Assistant also helps you discover more internal linking opportunities.

You can switch to the ‘Linking Opportunities’ tab to see suggestions about how to improve the internal linking on your website, and also see the list of orphaned posts so you can add links to them.

Linking opportunities

Another plugin useful for internal linking is Semrush SEO Writing Assistant because it can help you keep track of links inside your article.

For example, it lets you know when your article has too many or too few internal links and also suggests ways you can improve your links.

SEO Reporting Assistant Reports Issues With Links

This tool also comes in handy if you have other authors working on articles. Editors can quickly see if the article includes internal links to other posts on your website.

We show you how to use this plugin step-by-step to improve your SEO in our guide on how to use the SEO Writing Assistant in WordPress.

You can use a WordPress popular posts plugin to point users toward the articles that other users have already found helpful. These plugins automatically create a list of internal links to your most popular content.

Popular posts are usually your most successful content, which means they are more likely to increase user engagement, conversions, and sales. They are also a good opportunity for internal linking to your other less popular articles.

For example, MonsterInsights has a feature that allows you to show your popular articles anywhere on your WordPress site. You can use also use inline popular posts to show articles inside your content.

MonsterInsights Inline Popular Posts

If you want to show articles in the sidebar or at the end of your content, then you can select the Popular Post Widget. MonsterInsights even lets you display your top-performing products anywhere on your eCommerce store.

You can learn more in our guide on how to display popular posts in WordPress.

Another way to increase the number of internal links on your WordPress blog is to create roundups of your existing content. You do this by creating a new post that mentions your best articles on a certain subject to give a detailed overview of the topic.

In fact, you’re reading a post like that now.

Luckily, there are some plugins that make this job easy. For example, WP Tasty Roundups allows you to quickly repurpose your existing content into beautiful roundup posts that rank in search results.

All you need to do is type one or two keywords into the built-in search functionality, and the plugin will automatically pull images, titles, descriptions, and links from relevant posts into your roundup list.

WP Tasty Roundups

Sitelinks are a feature on Google search engine results pages (SERPs) where additional sub-pages appear under a website in the search results.

These are often internal links to the most popular pages of that website.

Google Sitelinks Example

The top 3 spots on Google get the most clicks. When sitelinks are shown for a website, it takes up the same amount of space as three regular search listings.

Having this much screen space dedicated to your site significantly increases your overall click-through rate. Simply put, more visitors will visit your website from the keyword.

While there is no guaranteed way to get Google to show sitelinks for your website, it certainly helps to create lots of internal links to your most important posts and pages.

You can learn more in our guide on how to get Google sitelinks for your WordPress site.

Link preloading is a browser technology that will load links in the background before a site visitor clicks them. This makes your website seem faster, which can improve SEO.

Because loading speed is one of the top indicators for search engine rankings and user engagement, when your internal pages are preloaded, your visitors are more likely to stay on your website longer.

They are more likely to view more pages because they’re loading instantly.

The easiest way to preload links is by using the Flying Pages plugin. It simply adds intelligent preloading to make sure preloading won’t crash your site or even slow it down.

Flying Links settings set the preloader delay

We show you how to set up the plugin step-by-step in our guide on how to preload links in WordPress for faster loading speeds.

Broken links are bad for your website’s SEO. Search engine crawlers find new content on your website by following internal links, so a broken link can stop them from indexing a new post.

They also negatively impact user experience because broken links will return a 404 error. If a visitor clicks on a link and is unable to find a page they’re looking for, then they may leave.

The MonsterInsights custom 404 error design

You can easily find and fix broken links on your WordPress website using All in One SEO.

AIOSEO offers a powerful redirection manager that helps track 404 errors on your website and lets you set up permanent 301 redirects to fix broken links.

404 error logs in AIOSEO

To learn more, see our detailed guide on how to find and fix broken links in WordPress.

If you ever move your WordPress site to a new domain name, then it is important to update all internal link URLs. Otherwise, you will have lots of broken links.

You should start by changing the WordPress address and site URL by visiting the Settings » General page from your WordPress dashboard.

Change the WordPress Address and Site URL to Your New Domain

But you will also need to change the URLs of every internal link added to your posts and pages.

You’ll find the simplest way to do this in our step-by-step guide on how to easily update URLs when moving your WordPress site.

If you want to make internal linking a habit, then it helps to use the most efficient method. Since WordPress 6.0, WordPress has supported standard MediaWiki syntax to quickly add internal links when creating or editing a post.

You can now quickly add links by adding two square brackets followed by the post title. The animated gif below shows you how easy this feature is to use inside WordPress.

Add link shortcut

The link will automatically add the correct URL to the post, and use the post title as an anchor link.

If you know the title of a post (or even just part of it), then using the double square bracket method is the fastest way of creating an internal link.

One of the best ways to uncover how users interact with your website is to track which internal links your visitors are clicking. Tools such as MonsterInsights can help you see which internal links your visitors are the most interested in.

You can then use these insights to improve the way you add internal links to your posts and pages.

We offer detailed instructions on tracking different types of links in our guide on how to track link clicks and button clicks in WordPress.

You might also like to see our guide on how to track user engagement in WordPress.

12. Enable Breadcrumbs in WordPress or WooCommerce

Breadcrumb navigation is a term used to describe a hierarchical navigation menu presented as a trail of links.

It’s often used as a secondary navigation that allows users to go up in the website’s hierarchy of pages.

Navigational links preview in WPBeginner

Breadcrumbs are great for internal linking because they define a clean path or trail to the page you are on.

These breadcrumbs also appear in search results giving your site an extra advantage in rankings.

Breadcrumb Navigation Links in Search Results

We cover two ways to add breadcrumbs in our guide on how to display breadcrumb navigation links in WordPress. Most users will find Method 1 easier, using All in One SEO.

The AIOSEO Breadcrumbs Settings Page

You can also use All in One SEO to enable breadcrumbs for your WooCommerce products. For details, see the fifth tip in our guide on WooCommerce SEO made easy.

We hope this tutorial helped you learn how the best internal linking practices for SEO. You may also want to see our ultimate WordPress security guide, or check out our list of tips on how to increase your blog traffic.

If you liked this article, then please subscribe to our YouTube Channel for WordPress video tutorials. You can also find us on Twitter and Facebook.

The post Internal Linking for SEO: The Ultimate Guide of Best Practices first appeared on WPBeginner.


March 21, 2023 at 03:03PM