Do you want to start a successful YouTube channel for your business?
YouTube is one of the biggest video-sharing and social media platforms in the world. It can help you bring more customers and sales to your business.
In this article, we’ll show you how to easily start a successful YouTube channel for your business with practical tips to promote and grow it.

Why Start a YouTube Channel for Your Business
YouTube is one of the biggest video-sharing and social media platforms in the world. With more than 2 Billion active users, it is also the second most popular search engine on the market after Google.
With such a huge user base, YouTube is the perfect place to promote your business and acquire new customers and followers.
Following are some of the top benefits of creating a YouTube channel.
- Increased brand recognition – A YouTube channel helps you promote your brand and strengthen brand recognition among your audiences.
- Increased sales – Videos are the most engaging content for any marketing strategy and engaged audiences are more likely to make a buying decision. This means more sales for your business.
- Increased website traffic – YouTube videos can help promote your website on one of the biggest social platforms and search engines. You can add links to your products, services, landing pages, or blog posts in your video descriptions with a direct call to action.
- Promote products/services – YouTube videos provide more opportunities to educate customers about your products or services. These videos can be embedded on your support docs which can reduce support requests while making sure that your customers make the most out of your products.
- Build a loyal following – A YouTube channel helps you build a more engaging community around your brand and products.
- Adds an extra source of revenue – YouTube Monetization options can add an extra source of revenue for your business. Your video content can also unlock many potential partnership opportunities with other businesses.
Starting a YouTube channel requires commitment. You’ll need to create a consistent content strategy and stick to it in order to make a successful YouTube channel.
That being said, let’s take a look at how to easily start a YouTube channel step by step.
Here is an overview of all the steps we’ll walk you through to create a YouTube channel.
- Creating a YouTube Channel for Your Business
- Securing Your Brand Name
- Making Artwork for YouTube Channel
- Creating a Featured Video and YouTube Channel Trailer
- What Do You Need to Make Great YouTube Videos
- How to Edit YouTube Videos
- Video Editing Best Practices to Follow
- Making Thumbnails for YouTube Videos
- Uploading Your First YouTube Video
- Mastering YouTube SEO
- Growing Your YouTube Channel
- Using Your Website to Promote YouTube Videos
- Making a Consistent Video Calendar
- Experiment with Different Video Styles and Formats
- Frequently Asked Questions About Creating a YouTube Channel
1. Creating a YouTube Channel for Your Business
YouTube makes it super easy to create a channel. You can make a channel by simply visiting the YouTube website and signing in with a Google Account.
Once signed in, you can click on your profile icon in the top-right corner of the screen and then select the “Create a Channel” option.
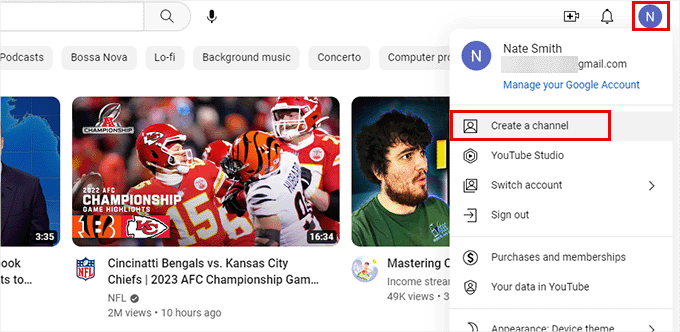
This will bring up a popup to fill out basic information for your channel.
You’ll need to choose a channel name and handle, and upload a profile photo.
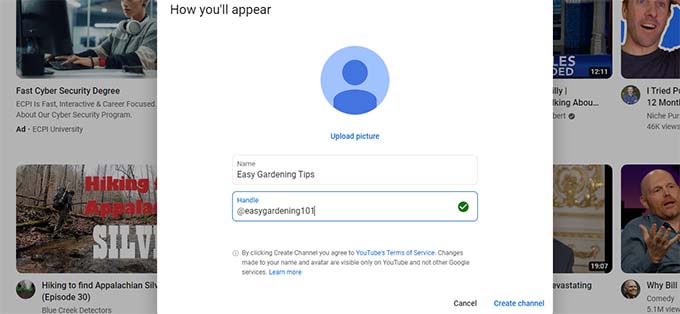
Now, we want you to take a few minutes before choosing a channel name and handle.
Tips on Choosing The Perfect YouTube Channel Name
Your channel name and handle may help it appear in YouTube and Google Search results.
That’s why you need to use keywords in your channel name and handle. Keywords are the search terms that users would enter when looking for videos.
You may also want to consider what kind of videos you’ll be uploading when choosing a channel name.
For instance, will you be uploading tips & advice, general entertainment, infotainment, interviews, podcasts, documentary-style videos, and more?
Let’s say you want to create a YouTube channel for your gardening business. In that case, using gardening in the channel name and handle will increase the chances of YouTube algorithm displaying your channel in search results.
You can also use the existing brand name that you use on your business website. This helps strengthen your brand identity and keeps things consistent across different platforms (your website and social profiles).
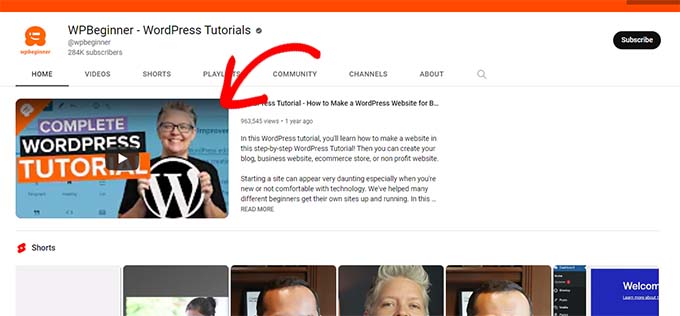
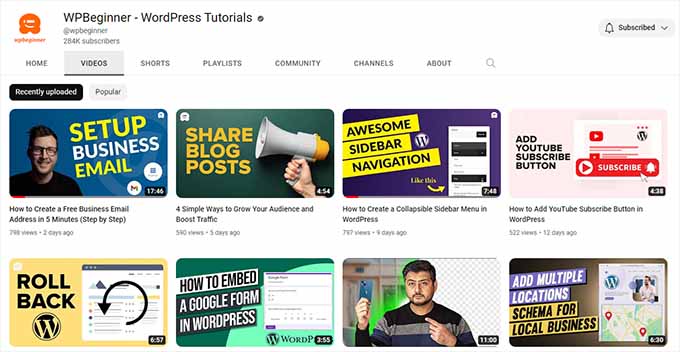
For instance, we use our brand name for our YouTube channel with keywords that explain what our channel is all about (i.e. ‘WPBeginner – WordPress Tutorials‘).
Tips on Making YouTube Profile Photo
Your YouTube profile photo appears across the YouTube platform next to your channel name. This includes your channel homepage, below each video, and in the search results.
Many small businesses use their logo as their YouTube channel profile photo.
If you don’t already have a business logo that you can use, then you can create a YouTube channel photo using Canva.
This free online image editor comes with ready-to-use templates for different social networks including YouTube.
If you want to use any other image editing software or your own logo, then make sure that your channel photo is a square image with at least 800×800 pixels in size.
Once you have entered the channel name, handle, and photo, simply click on the Create Channel button to continue.
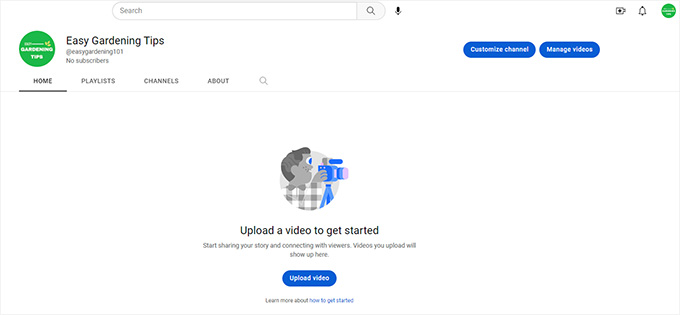
Youtube will now create the channel and redirect you to your new YouTube channel’s page.
2. Securing Your Brand Name
Before you upload your first video and start promoting your YouTube channel, it is important to secure your brand name.
This includes purchasing a domain name that matches your YouTube Channel name, making a WordPress website, and creating social media accounts for your channel.
Doing this protects your business from copyright infringement and blocks scammers from impersonating your brand on social media platforms.
Let’s start with a domain name and a website.
1. Making a Website for YouTube Channel
To make a website for your YouTube channel, you’ll need the following items.
- A domain name. This is what users will type in their browsers to visit your website (e.g. wpbeginner.com)
- Web hosting account. This is where all your website files will be stored.
Normally, a domain costs $14.99 per year and web hosting plans start at $7.99 per month (usually paid for a full year).
This is a significant amount and if you are just starting out then this may look a bit excessive.
Luckily, the folks over at Bluehost have agreed to offer WPBeginner users a free domain name with a generous discount on hosting.
Basically, you can get started for $2.75 per month.
Simply visit the Bluehost website and click on the Get Started Now button.

On the next screen, you’ll be asked to choose a plan.
The Basic and Plus plans are more popular among WPBeginner users.
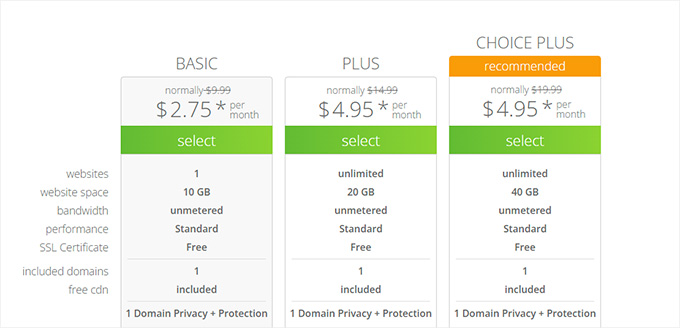
Simply click to select a plan and continue.
Next, you’ll be asked to choose your domain name.
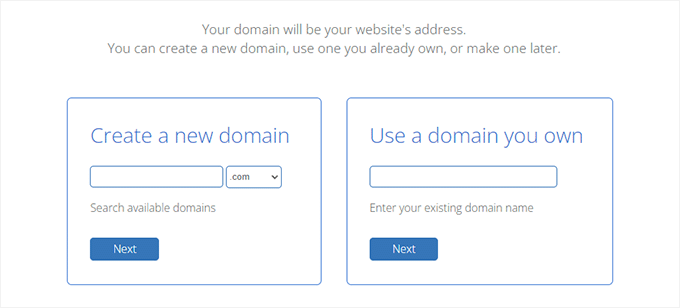
You can look up a domain name matching your YouTube channel name or handle.
If the exact name is not available, then Bluehost will recommend similar domain names to choose from.
Need more help choosing a domain name? See our expert tips on choosing the best domain name for your website.
Once you have chosen the domain name, click on the Next button to continue and finalize your purchase.
From here, you’ll first provide your personal information. After that, you can choose a plan duration (the 12-month plan gives you the best value).
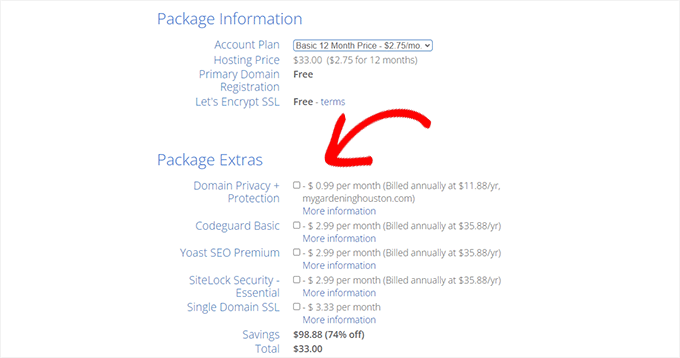
Below that, don’t forget to uncheck all the options under Package Extras to further reduce the costs. Don’t worry you can always add them later when needed.
Finally, fill in your payment information to complete the purchase.
Bluehost will now register your domain name and set up your web hosting account. It will also automatically install WordPress, which is the best website builder on the market.
You’ll receive an email with instructions on how to log in to your hosting account.
For more details, see our step-by-step tutorial on how to make a website for beginners.
Remember, the goal here is to just get started with a basic website at first. You can work on your website later on as needed.
2. Securing Your Social Media Profiles
If your business doesn’t already have social media profiles, then it is time to create those and protect your brand.
Depending on your target audience you can choose which platforms would work best for your social media marketing strategy.
For instance, you would definitely want to create a profile on Facebook and Twitter. Optionally, you can choose to sign up for other platforms that may be useful for your businesses.
For instance, a business organization may want to sign up for LinkedIn, a lifestyle business may find Pinterest and Instagram more useful, and an educational website may want to build a community on Redditt as well.
It is important to choose the same brand name that you use for your business and your YouTube channel.
3. Making Artwork for YouTube Channel
Now let’s get back to your newly created YouTube channel which would be empty at the moment.
You can start working on your YouTube channel by creating channel art like a banner or cover image. This image appears at the top of your YouTube channel.
Once again, you can use Canva to create a very professional-looking cover art for your YouTube channel.
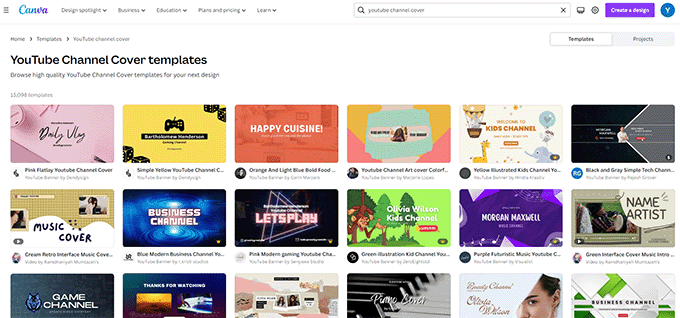
Canva comes with hundreds of built-in templates for YouTube channel covers to choose from.
Once you have found a template that matches your channel thumbnail and logo colors you can edit it using Canva’s built-in editor.
More advanced users can create their own cover images using image editing software like Photoshop, Illustrator, or Affinity.
Make sure that your YouTube banner image is 2048 x 1152 pixels in dimensions and no more than 6MB in file size.
Once your image is ready you can go to your YouTube channel page and click on the Customize Channel button.
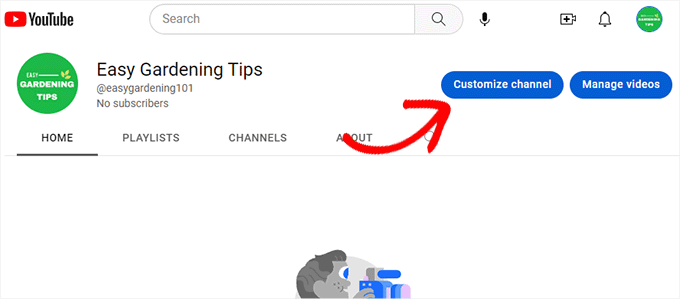
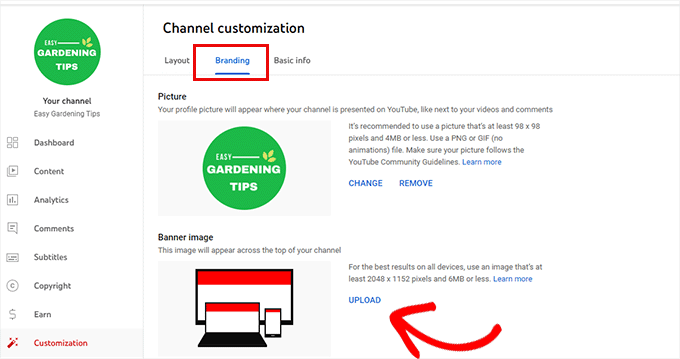
This will bring you to the Channel Customization page. From here, you need to switch to the Branding tab.
You’ll notice that the channel profile photo you created earlier is already there. Next, click on the Upload button next to the banner image option.
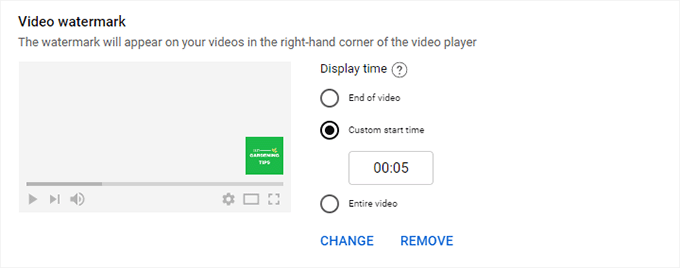
Optionally, you can also add a watermark to your YouTube videos. It appears on your videos in the right-hand corner of the video player.
You can upload the watermark image from the Branding tab. Most channels typically use their channel profile photo or their business logo. Some also use watermarks as a reminder for viewers to subscribe.
You’ll need a square image with dimensions of at least 150×150 pixels. We recommend using a transparent image so that it doesn’t take up much on-screen space.
4. Creating a Featured Video and YouTube Channel Trailer
A YouTube channel trailer is an impactful way to introduce new users to your channel. A good channel trailer provides users with a glimpse into what kind of content your channel offers.
When enabled, this trailer appears at the top of your channel page and automatically plays for new users.
Similarly, you can also create a separate featured video for users who have already subscribed to your channel.
The downside is that they will not see this video at the top of your channel if they have already watched it.
These videos can be uploaded by visiting the YouTube Studio page.
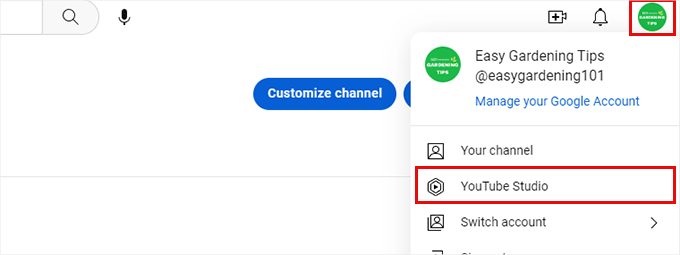
From here, you can switch to the Customization tab and then upload your trailer or a featured video.
Not ready to make a video yet? Don’t worry we’ll talk more about making videos later in this article.
5. What Do You Need to Make Great YouTube Videos
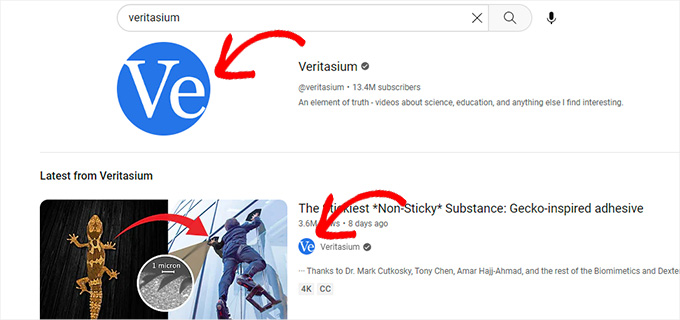
You may have noticed the very high quality of videos uploaded by the most popular YouTube channels such as Mr. Beast, Lemmino, Veritasium, and more.
These videos are made using top-of-the-line cameras, professional lighting, custom-made graphics, and really good editing.

However, the vast majority of videos uploaded on YouTube are not as high-quality as you may think.
You can basically just shoot a YouTube video using your phone camera. Most modern phones are equipped with very capable cameras.
With a little effort and some inexpensive equipment, you can easily make very polished YouTube videos all by yourself.
Here is a list of equipment that you can use to get started.
1. A Good Camera

Digital cameras are becoming quite inexpensive and can shoot high-resolution 4k videos. If you are looking to spend some money then we recommend these starter digital cameras:
However, if you cannot afford a separate camera, then most modern phones come with very capable built-in cameras.
With an inexpensive tripod, some basic lighting, and an inexpensive microphone, you can easily use your own phone to shoot high-quality YouTube videos.
This brings us to other equipment that you may want to look into.
2. An Affordable Tripod or Camera Stand
A tripod or camera stand allows you to firmly place your camera or phone in one place to shoot videos.
There are hundreds of tripods, gimbal stabilizers, and selfie sticks available on Amazon.

Ideally, you would want to buy one that works with your camera or mobile phone and offers different heights and adjustments to shoot a variety of video styles.
For mobile users, Rode Vlogging Kit can be a good starting point. It comes with a 3.5mm audio jack to capture better sound quality and has a separate version for iOS devices.
3. A basic lighting setup
If you are planning to shoot most of your videos indoors, then adding some extra lighting can make a huge difference in video quality.
However, professional-grade lighting equipment can be very expensive. Luckily, there are a ton of inexpensive options that can do the trick.

For beginners, we recommend starting out with ring lights. These portable LED lights come in different shapes and sizes and include adjustments like tripods and extendable heights.
4. A Video Editing Software
Once you have shot your video, you’ll need to edit it to add graphics, background music, credits, and more. You may also want to cut out some parts or merge multiple video files.
Now you may have heard popular YouTubers talking about Final Cut Pro or Adobe Premiere Pro. These are very powerful video editing software but they are also quite expensive and come with a learning curve.
Luckily, your computer may already have basic and easy-to-use video editing software installed on it.
Mac computers come with the iMovie app which is a very capable video editing software. It also has a trimmed-down version available for iOS devices.
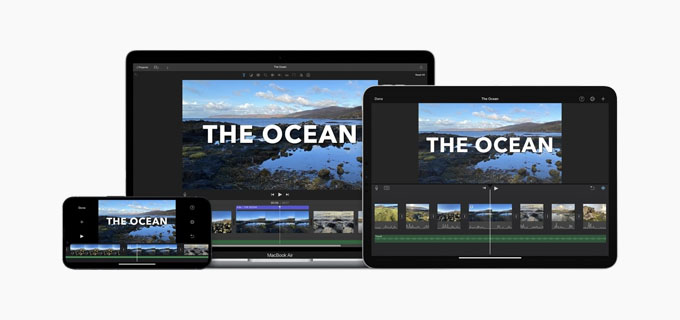
iMovie includes some basic transition effects, the ability to add sounds and music overlays, trim clips, adjust the screen size, and more.
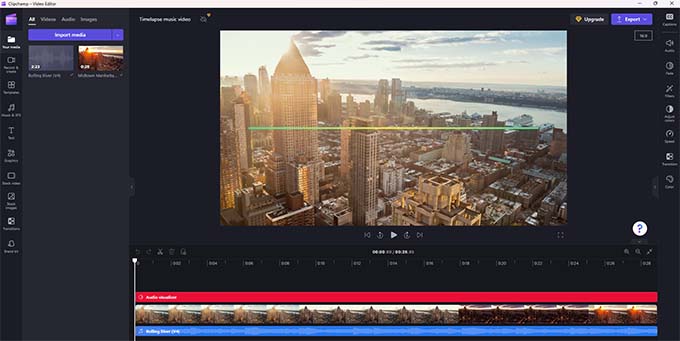
Similarly, Windows users can use Clipchamp which is a great free video editor and comes with dozens of ready-to-use templates for different video platforms including YouTube.
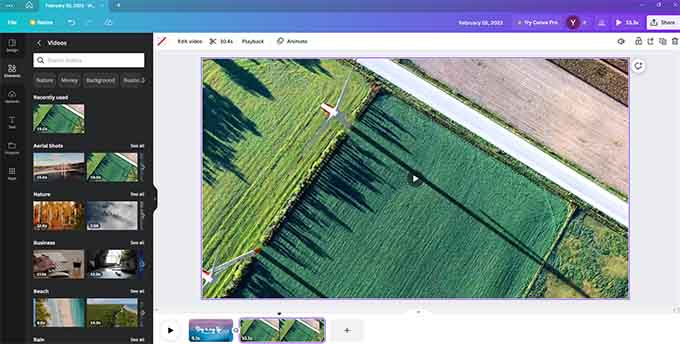
Alternately, the popular design tool Canva also comes with a built-in video editor. It includes a huge library of images, videos, transitions, and other elements that you can use in your videos.
Plus, it works on Windows, Mac, iOS, and Android devices as well. It is extremely easy to use and a good option for absolute beginners.
All these video editing software options are beginner friendly and will allow you to create professional-looking videos for your YouTube channel.
6. How to Edit YouTube Videos
As we mentioned earlier that the vast majority of YouTube videos don’t have the production levels of the most popular YouTubers.
As a YouTube beginner, you just need to learn some video editing basics to polish your YouTube videos before uploading.
Let’s start with the shooting first.
Shooting Videos with Editing in Mind
- When you are shooting your videos always record them in the highest quality settings available on your camera.
- Use a tripod or gimbal to avoid shaky footage.
- Use manual focus whenever possible to make sure that the subject of your video is always in focus.
- Record in a quiet space or use a microphone to avoid background noise.
Editing Videos for Your YouTube Channel
Now that you have your video ready let’s bring it into your video editing software.
- First, you would want to cut and trim the portions that you don’t want to include in the video.
- Add background music when you need it.
- Use transition effects to merge two video footage
- Add text, images, and graphics to provide more context if needed.
Your video editing software will show you a live preview of your changes as you make them. Once you are satisfied with the changes you have made it is time to export your video.
Finding Media to Use in Your YouTube Videos
YouTube takes copyright violations seriously and can take down your videos or entire channel for any violations.
Make sure that all the media (images, video clips, sounds, and music) that you use in your video are royalty free or that you have written permission to use them in your video.
Luckily there are many open-source and royalty-free sources that you can use in your videos. Most video editing software choices we mentioned above include royalty-free media that you can add to your videos.
YouTube also has its own audio library with thousands of music and audio files that you can use in your videos.
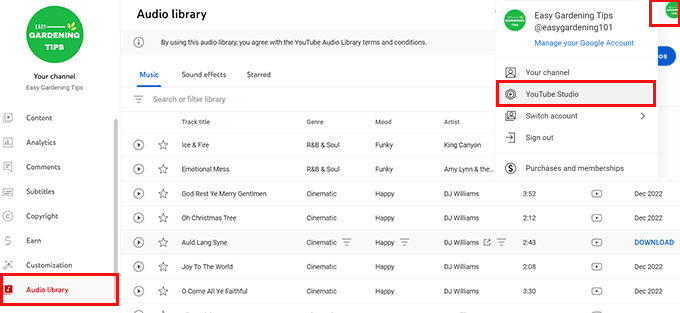
You can find the audio library under YouTube Studio. From here, you can search or browse the audio files and download them to your computer.
After that, you can add them to your video using your video editing software.
Saving Video to Upload on YouTube
By default, YouTube allows you to upload videos of 15 minutes duration. Verified users can upload longer videos.
The video file size limit for YouTube is 256 GB or 12 hours duration, whichever is less.
Make sure that you export your video from your video editor software using the highest quality settings. Using H.264 (mp4 file format) for compression produces higher-quality results with a smaller file size.
Depending on your video duration and file size, it may take a while for your video editing software to process the video.
7. Video Editing Best Practices to Follow
As you edit more videos for your YouTube channel, you’ll be able to pick up new tips and tricks on the way to produce better results.
Following are just some of the very basic tips that you should keep in mind.
- Always save your videos in the highest quality. This allows YouTube to display your video in the best possible quality to your users.
- Longer videos take more time to process on your computer. Make sure that your computer is connected to a power source to avoid any interruption.
- Similarly, video files are massive and may take some time to upload. Make sure you have a faster and more stable internet connection before you begin uploading the video to YouTube.
8. Making Thumbnails for YouTube Videos
A YouTube video thumbnail is the image used as a placeholder for your video across the YouTube platform.
They play the most significant role in boosting a video’s click-through rate.
Most experienced users spend a lot of their time creating and experimenting with different YouTube video thumbnail styles.
YouTube allows you to pick a thumbnail from your video after you upload the video. However, it is not recommended to use a video still as your thumbnail.
You’ll need to use an image editing tool like Photoshop or Canva to create your YouTube thumbnail. It needs to be at least 1280×720 in dimensions.
Here are some of the tips you can use when making a thumbnail for YouTube videos.
1. Use Hi-res Images – It is important to use high-quality images in your video thumbnail so that they look good in all sizes on all devices.
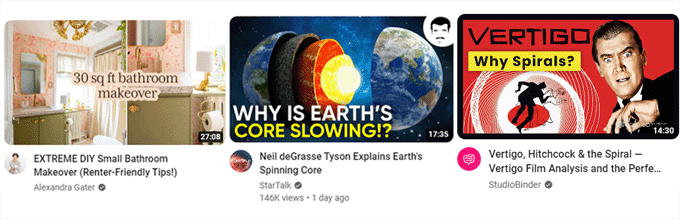
2. Grab user attention – You’ll need to make your images eye catchy by using bold colors, strong contrast, or emotional reactions. That’s why so many popular YouTubers have an image showing their surprised, amazed, disappointed, and other reactions.

3. Showcase Key Event – Show the main subject or event of your video in the thumbnail to build anticipation and provide users with a preview of the video.
4. Use Text Cleverly – Use text whenever needed to provide more context or insert an engagement hook for your audiences.
5. Keep it Simple – Avoid adding too many elements to your thumbnail to keep it clean and easy on the eyes. Cluttered elements in thumbnails can make it look unpolished to your users.
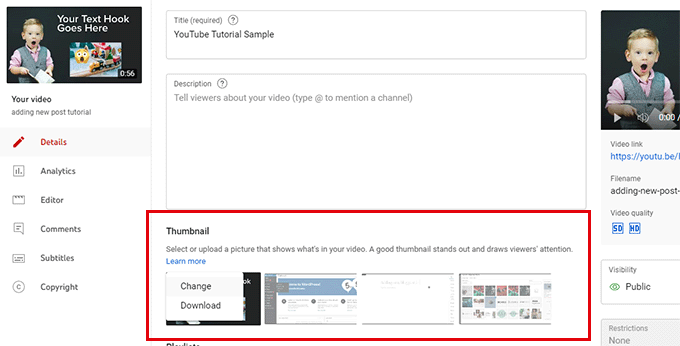
Once you have created a thumbnail for your video, you can add it after your video upload is complete.
You can also change the thumbnail for a video by editing it in YouTube Studio.
9. Uploading Your First YouTube Video
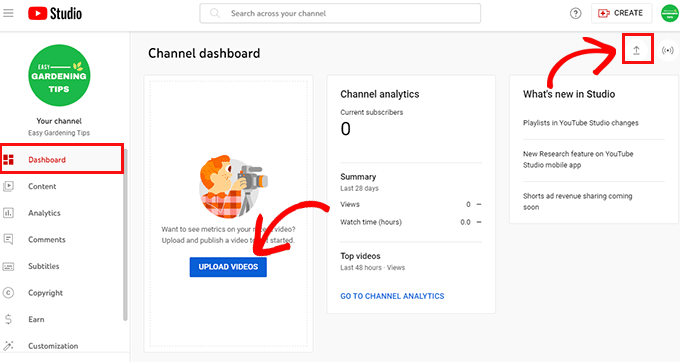
You can upload your video by visiting the YouTube Studio page.
Then, you just need to click on the Upload Videos button.
This will bring up a popup where you need to select the video file(s) you have saved on your computer.
Simply click on the Select Files button to continue. You can upload more than one video at a time if you want.
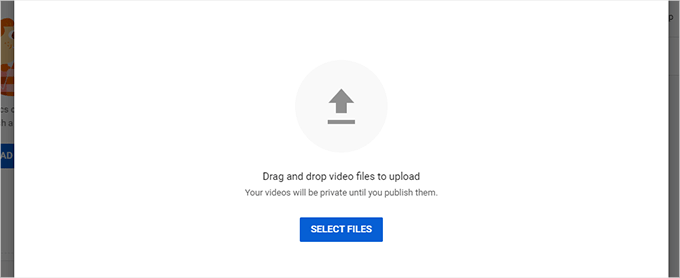
However, it is better to upload one video at a time to avoid any interruptions during the upload.
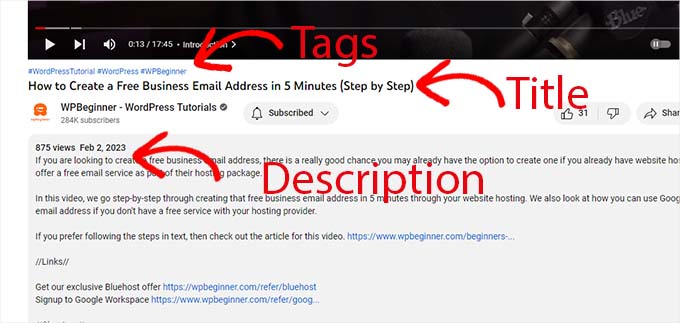
YouTube will now start uploading your video in the background. Meanwhile, you can fill in the video details such as the video title, description, thumbnail, and tags.
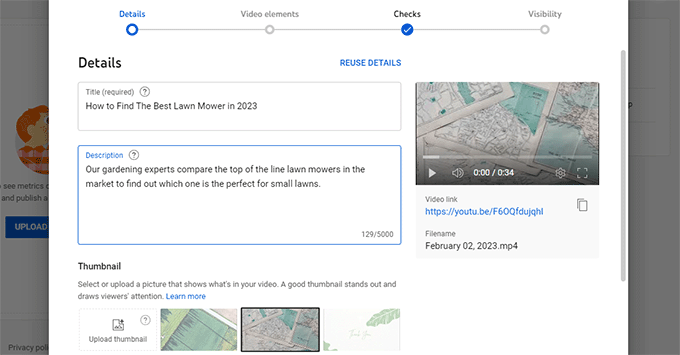
Once you are satisfied with the settings click on the Next button to continue.
Now, you’ll be asked to provide additional information about your video. For instance, you can add subtitles, choose an end screen, and add video cards to promote other content during your video playback.
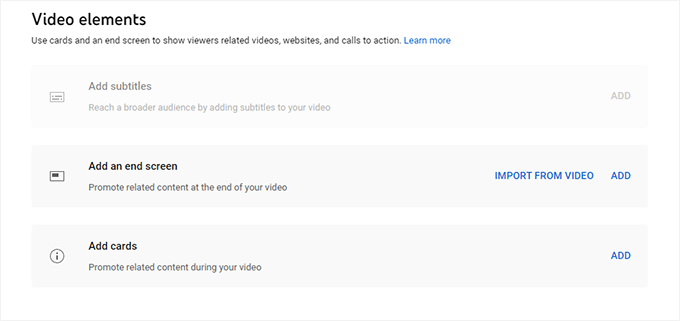
All these video elements help you promote your videos and grow your channel.
After that, you need to click on the Next button to continue. YouTube will now check your video for common issues such as copyright infringements or inappropriate content.
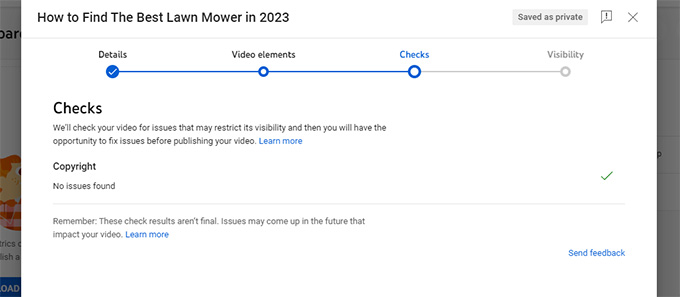
If everything looks good, click on the next button to continue.
Now, you can choose how you want to publish your YouTube video. You can make a video private, unlisted, or public so that everyone on the internet can view it.
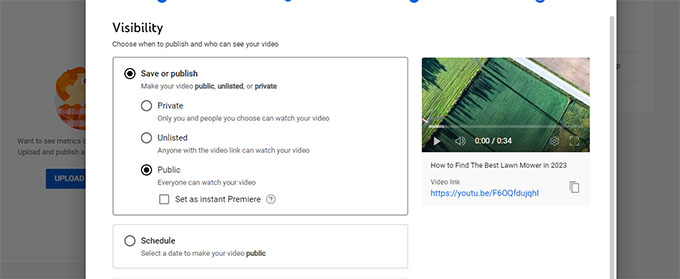
You can also schedule the video to become public at a specific time. This helps you schedule videos for the future and get ahead on your video calendar.
Finally, click on the Publish button to save your video. You can now preview your video on YouTube.
10. Mastering YouTube SEO
As we mentioned earlier, YouTube is not only a video-sharing platform but also the second most popular search engine.
It receives more searches than any other search engine on the market except for Google itself.
This is why you need to pay attention to YouTube SEO from day one.
This helps your videos and channel appear in YouTube searches more often.
YouTube SEO best practices will also help your channel appear in Google video results and you may even appear in featured snippets.
Following are some of the basic YouTube SEO tips that will help you optimize your videos for higher search rankings.
- Use keywords in Title & Description – Keywords are search terms that users type to search for something. Using them in your video’s title and description increases its potential to appear for those search terms. You can also use your keywords in channel description, about page, and other areas to improve your YouTube SEO.
- Add a custom YouTube Video Thumbnail – A good custom video thumbnail can provide search engines with more context about your video. It boosts your click-through rate which helps you rank even higher.
- Add closed captions and subtitles – Subtitles and closed captions help you provide a video transcript for your video. This provides YouTube with plenty of context to match with the search terms.
- Add Tags to Your Videos – Tags help you organize your videos into topics using them strategically has the potential to appear higher for relevant search terms.
- Use Given Character Limit – YouTube has character limits for titles, descriptions, tags, and other fields. Make sure that you utilize these fields to provide more detailed information about your video. Here is a quick breakdown of character limits:
- Video Title – 100, make sure that you use all of them and try to replicate the style of other popular YouTubers in your industry.
- Description – 5000, use the description field to write a catchy but more detailed description of your video. You can also include links here to your website, relevant blog posts, products, affiliate links, and more.
- Tags – 500, tags can help users find your content by categorizing it and letting YouTube know who to promote it to.
YouTube SEO is a highly sought-after skill and as you work on growing your YouTube channel you’ll pick up more tips and tricks along the way.
11. Growing Your YouTube Channel
Growing a successful YouTube channel takes time, some effort, and patience. In most cases success will not come overnight, rather your channel will grow bit by bit slowly and steadily.
Following are a few tips that will help you keep up the momentum and grow your YouTube channel.
1. Create High-Quality Videos
This goes without saying that users will abandon your YouTube videos if they don’t find your content useful or entertaining.
Producing higher quality content that answers users’ questions, provides them value (information, education, or entertainment), and keeps them hooked is the key to keep gaining subscribers for your YouTube channel.
2. Upload Regularly
Publishing regularly is one of the most common traits of almost all successful YouTube channels.
For beginners, this may seem hard at first. We recommend committing to at least one video per week. As you work regularly on your videos you will be able to pick up more tricks to produce higher-quality videos more quickly.
Whatever frequency you choose, you need to stick to it. This helps you keep your existing subscribers engaged which leads to acquiring new subscribers and more views.
3. Engage with Your Audience
YouTube is a social media platform as well. In the US alone, 62% of internet users access YouTube daily and the majority of them access it several times a day.
The easiest way to keep your audience engaged is through YouTube comments. Asking users questions in your videos or replying to them via comments helps you bring back those users. They are also more likely to view more of your content in the future.
4. Curate Your Content in Playlists
As your videos increase it will become harder for users to find all your videos on a similar topic.
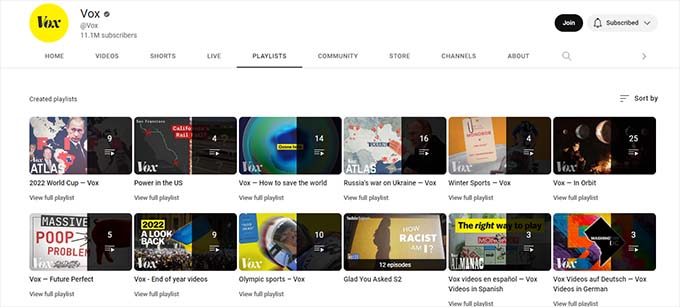
For instance, let’s say you run a gardening channel with several videos about budget landscaping. You can help your users find them all by creating a playlist.
Creating playlists also helps with YouTube SEO as these playlists often appear in search engines.
5. Dig Down the Analytics
YouTube offers built-in analytics tools to track the performance of your videos. This helps you gain insights into your audience.
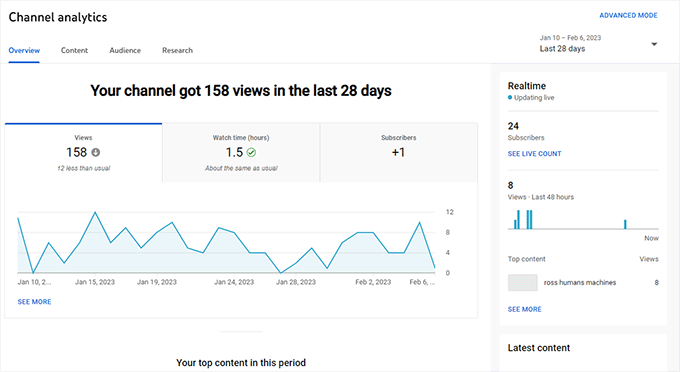
From here, you can analyze important data such as views, watch time, and demographics to improve your content and reach more viewers.
6. Promote Your Videos
To grow your YouTube channel you cannot just upload videos and wait for viewers to come.
You need to proactively promote your videos across all your digital marketing channels, email marketing, and through your website.
This brings us to our next section.
12. Using Your Website to Promote YouTube Videos
All popular YouTube channels have a website.
This helps them to continuously bring traffic to their business website from their Youtube channel which leads to more sales and growth for their business.
It also helps them send more users to their YouTube channel by promoting videos and helping new users discover their YouTube channel.
Here is a step-by-step playbook that you can apply to your website to grow your YouTube channel.
1. Start a Blog To Promote Your YouTube Channel
For many businesses, starting a blog allows them to consistently cover topics that their potential customers will be looking for in search.
This helps them gain free organic search traffic to their website which they can then convert into customers and subscribers.
Adding a blog to your website helps you repurpose content you have used in your videos and make them into articles. This increases your potential to rank for those particular keywords and get traffic to both your video and blog content.
Need more convincing? See our article on why you should start a blog right away.
2. Learn WordPress SEO to Promote Your Video Content
To promote your video content on your website you will need to follow some basic WordPress SEO best practices.
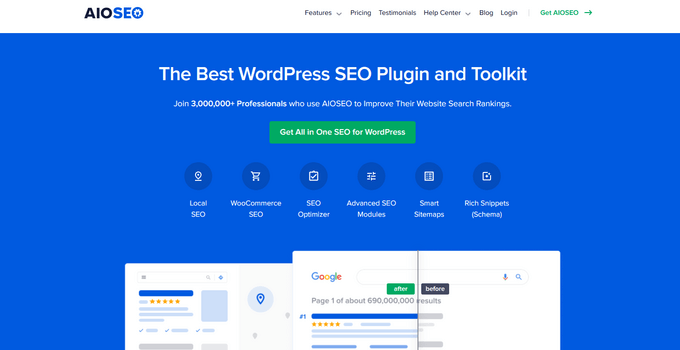
This is where All in One SEO comes in. It is the best WordPress SEO plugin on the market that enables you to optimize your website like a total SEO pro.
Note: All in One SEO is a paid plugin and you’ll need at least their Pro plan to access the video sitemaps feature.
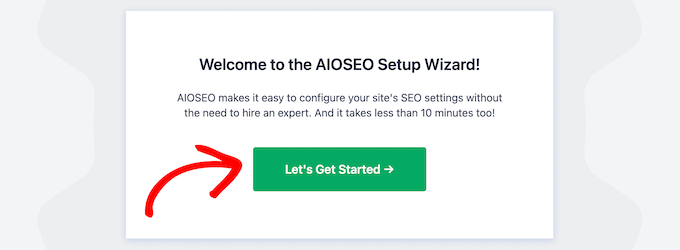
Simply install and activate the All in One SEO for WordPress plugin. For more details, see our step-by-step guide on how to install a WordPress plugin.
Upon activation, the plugin will launch a setup wizard which will walk you through the basic setup.
Need more help? We have a step-by-step WordPress SEO guide for beginners, which will help you properly optimize your website for SEO.
3. Embed Your Videos in Blog Posts to Get More Subscribers
An easy way to get more views and subscribers for your YouTube channel is by embedding videos in your blog posts.
WordPress makes it super easy. Simply copy the URL of your video and edit the post or page where you want to embed the video.
On the post editor screen, paste the URL on the line where you want to display the video.
WordPress will automatically fetch the required embed code and display your video.
4. Submit Video Sitemaps for Better Rankings
Video Sitemaps are like regular XML sitemaps but only for your video posts. The include links to your WordPress posts or pages containing YouTube video embeds.
You can then submit this sitemap using Google Search Console. Google could then display your article with an enhanced snippet with a video preview.
To generate this sitemap, you’ll need the Pro plan of All in One SEO for WordPress.
It comes with a video sitemap feature that automatically detects your posts and pages with video embeds and includes them in the video sitemap.
Once you have installed and activated the All in One SEO for WordPress, go to All in One SEO » Sitemaps page and switch to the Video Sitemap tab.
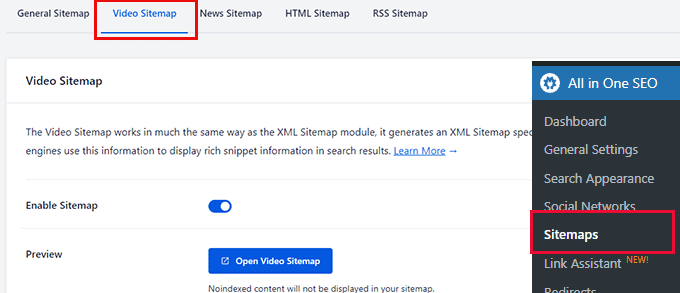
From here simply switch the Enable Sitemap toggle on and then click on the Open Video Sitemap button to see it in action.
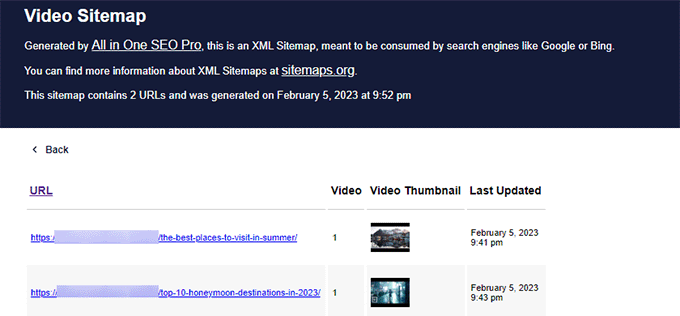
It will show you the list of articles with video embeds with video thumbnails.
For more details, see our article on XML Sitemaps and how to submit them to search engines.
5. Create Video Galleries on Your Website
Now adding YouTube videos to your blog posts and pages is quite simple. However, it is quite boring and doesn’t add any social sharing features to your video embeds.
This is where Smash Balloon comes in. It is the best social media plugin suite for WordPress and allows you to easily embed social media feeds into your WordPress website.

SmashBalloon offers separate plugins for different social media platforms like Facebook, Instagram, Twitter, and YouTube. You can also buy the all-access plan to get all plugins.
For the sake of this article, we’ll be using SmashBalloon’s YouTube Feed Pro plugin.
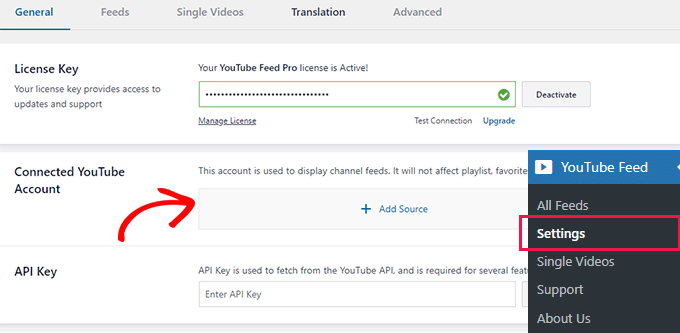
First, you need to install and activate the SmashBalloon YouTube Feed Pro plugin. Upon activation, head over to YouTube Feed » Settings page and provide your plugin license key. You can find this information under your account on the Smash Balloon website.
After that, you need to click on the ‘Add Source’ button to connect your WordPress website to your YouTube account.
Smash Balloon will ask for your permission to access your channel information under your Google Account.
Simply follow the on-screen instructions to complete the setup and get your channel name added as the source.
For more details, see our tutorial on how to show the latest videos from your YouTube channel in WordPress.
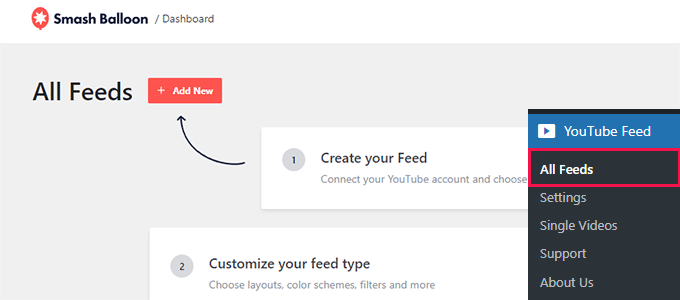
Next, you need to visit YouTube Feed » All Feeds page and click on the ‘Add New’ button to add a YouTube feed that you want to display.
Follow the on-screen instructions to select a source, template, and style for your feed.
Once finished, Smash Balloon will show you a live preview of your YouTube feed.
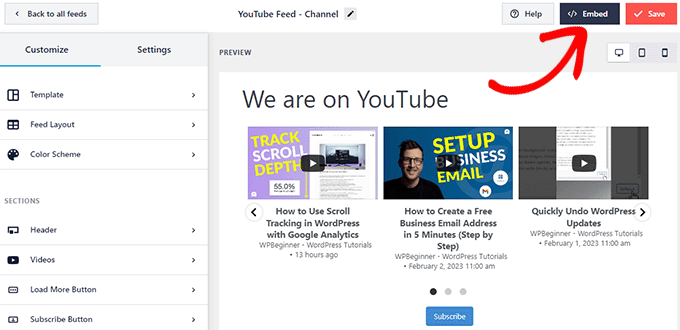
If everything looks good, then you can click on the Embed button to continue.
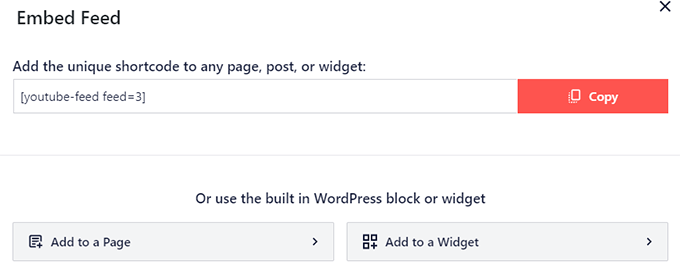
The plugin will now show you a shortcode that you can add to any post or page to display your YouTube feed. Optionally, you can also add it directly to a widget or a page.
Here is how it looked on our test website.
We changed the video template color scheme from light to dark and used the carousel-style gallery.
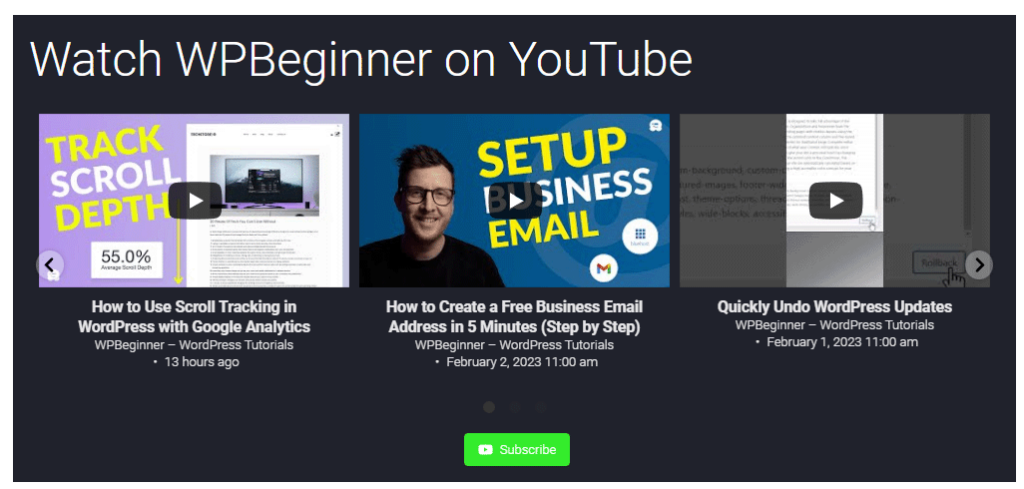
Smash Balloon allows you to fetch video feeds for your own channel, any other public channel, search term, or favorite videos.
It also works great on mobile devices and will automatically adjust your Gallery width for your smaller screens.
For more details, you may also want to see our guide on how to create a video gallery in WordPress to promote your YouTube channel.
13. Making a Consistent Video Calendar
You’ll need to consistently upload new videos in order to make a successful YouTube channel.
You can choose your own frequency which gives you plenty of time to make a video. Many beginners start with one or two videos each month and increase it gradually to one video per week.
You can choose a day and time to publish your videos. This way your users would know when to expect a new video from your channel.
Now the real challenge for most beginners is to come up with ideas for new videos.
Following are a few easy tips to generate video ideas for your YouTube channel.
1. View YouTube Analytics – You can see what kind of content your users like by viewing your YouTube Channel Analytics. Then branch out your most viewed videos into deeper and related topics.
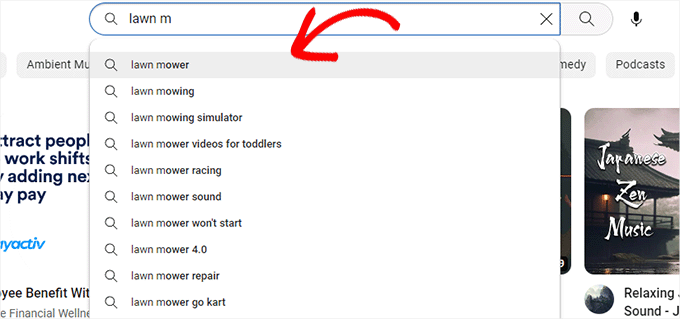
2. Get Hints by YouTube Search – As you type a keyword in YouTube search it would start suggesting popular search terms. These are the search terms that users are already looking for and they can be immensely helpful in generating new video ideas.
3. YouTube Comments – Your users would often post questions in the comments section below your YouTube videos. You can convert the most common questions into separate videos.
4. Your WordPress Blog – You can repurpose your most popular blog content into YouTube videos.
5. Ask Your Users – You can ask your users on social media profiles about what topics they would like you to cover next. Similarly, you can run surveys and polls on your website to gather user feedback.
6. Online Communities – Forums such as Reddit, Facebook Groups, LinkedIn, and Twitter are the discussion hubs of the internet. You can join the communities covering similar topics as your YouTube channel and see which topics come up more frequently under discussion.
Advanced users can use third-party tools to perform deeper keyword research. Following are some of the most popular keyword research tools for YouTubers.
- Semrush – It offers a keyword magic tool where you can sort ideas by SERP features and select Video to explore video ideas.
2. vidIQ – A keyword research and video ideas generator platform made specifically for video content creators.
3. TubeBuddy – Offers YouTube SEO, video optimization, and keyword research tools as a browser extension.
14. Experiment with Different Video Styles and Formats
A YouTube channel doesn’t become successful overnight. It will take some time and effort until you find out what kind of content strategy works for your audience.
Meanwhile, we recommend trying different video formats to see which one of them brings you more user engagement, views, or likes.
You can try YouTube shorts to experiment with shorter video formats.
You can also try how-tos, interviews, video podcasts, essays, commentaries, and more.
Switching styles will help you figure out what your audience finds more engaging and then you can create more such videos.
Similarly, you can experiment by changing thumbnails for your older videos that are not getting any views.
You can also try different video titles and descriptions to see if they help you grab user attention.
15. Frequently Asked Questions About Creating a YouTube Channel
Now that your YouTube channel is up and running following are some of the most commonly asked questions asked by beginner YouTube creators.
1. How many views do I need to get paid on YouTube?
You’ll need at least 4000 public watch hours or 1000 subscribers in 12 months period to be eligible for the YouTube partner program, which gives you access to YouTube monetization tools including ad revenue sharing. For Shorts, you’ll need at least 10 million views in the last 90 days.
2. Can I start a YouTube Channel with my phone?
Yes, you can start a YouTube channel using your mobile phone. YouTube app for smartphones makes it super easy to create a channel, record live videos, or upload videos from your phone.
3. How to make money online using YouTube?
The easiest way to make money online using YouTube is by joining the YouTube partner program. Once you are approved, you become eligible to get paid for revenue sharing on ads displayed during your videos.
4. Can I start a YouTube channel without showing my face?
Yes, you can start a YouTube channel and upload videos without showing your face.
5. Do I need an LLC to start a YouTube channel for my business?
No, you don’t need an LLC to start a YouTube channel for your business. You’ll automatically be considered a sole proprietor for the YouTube channel and all your earnings from YouTube will be subjected to local taxes like income tax. However, some YouTube channels may register as a limited liability company (LLC) to protect their business from potential liabilities, insurance reasons, and other legal and financial reasons.
We hope this article helped you learn how to easily start a successful YouTube channel for your business. You may also want to see our list of other popular online business ideas or learn how to create and sell online courses to generate passive income.
If you liked this article, then please subscribe to our YouTube Channel for WordPress video tutorials. You can also find us on Twitter and Facebook.
The post How to Start a Successful YouTube Channel for Your Business first appeared on WPBeginner.
April 12, 2023 at 05:34PM