Sunday, April 16, 2023

How to Add an Audio Music Player Widget in WordPress

Do you want to add an audio music player widget in WordPress?

A music player is a great way to share songs, podcasts, interviews, and other audio files with your audience. This can help to create a more interesting and engaging experience on your site.

In this article, we will show you how you can add an audio music player in WordPress.

How to add an audio music player widget in WordPress

Why Add an Audio Music Player Widget in WordPress

A music player lets visitors listen to audio directly on your WordPress website.

If you’re a podcaster or a musician, then featuring audio on your own site can keep your visitors and fans up to date with your work.

It can also encourage people to visit your website directly rather than playing your audio on other platforms. Once these people are on your site, you may be able to make more money by showing ads on your WordPress blog or selling the audio file as a digital download.

Even if you don’t create any original audio, embedding content from third-party platforms such as Spotify is an easy way to create a more engaging website. This can keep visitors on your site for longer and make the experience more fun.

That being said, let’s take a look at how you can add an audio music player in WordPress. Simply use the quick links below to jump straight to the method you want to use.

Method 1. How to Add an Audio Music Player Widget Using the Audio Block (Easy)

With this method you can create a simple audio music player using the built-in WordPress Audio block. You can use the block to play any .mp3, .m4a, .ogg, or .wav file.

The audio player is very simple compared to most audio player plugins. It has a play/pause button, volume controls, a download button, and a button to change the playback speed.

A music player widget created using the Audio block

The built-in Audio block is a good choice if you want to add a few short audio clips to your site, and don’t need any advanced features.

If you embed content from a supported third-party platform such as Spotify or SoundCloud then the Audio block will show the playback controls for that platform. It may also show some extra content from the platform such as the artist’s name and the cover image.

For example, here is an Audio block with embedded SoundCloud content.

Audio player with embedded SoundCloud content

To add a simple audio music player to your WordPress website, open any page or post. Then, click on the + icon.

In the popup that appears, type ‘Audio’ to find the right block. You can then simply click on the Audio block to add it to your page.

The built-in WordPress audio block

At this point you can either add an audio file or embed an audio clip from another platform.

Note: In most cases we recommend hosting your audio and video files on a third party site for many reasons, including quality optimization and saving on bandwidth. Here’s why you should never upload a video to WordPress.

To add an audio file from your computer, click on ‘Upload’ and then choose the file that you want to use. Another option is to click on ‘Media Library’ and then choose a file from the WordPress media library.
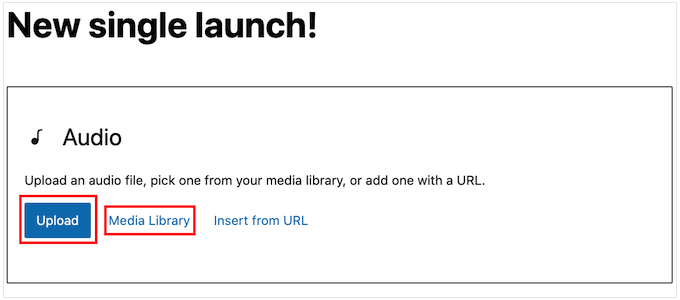
Uploading an audio file to your WordPress website

If you upload the full audio then you may want to give visitors the option to support your work as a musician or podcaster by sending you a donation. For a step-by-step walkthrough, please see our guide on how to add a Stripe donate button in WordPress.

Do you want to embed audio from another platform instead?

This is similar to how you embed videos in WordPress where you just paste the URL of a YouTube video and WordPress embeds it automatically.

Just be aware that most platforms only embed a preview of the full audio file. The block may even encourage people to leave your website and visit the third-party platform, in order to hear the full audio.

In the following image, the Audio block is driving visitors towards the Spotify website.

A Spotify playlist embedded in WordPress

If you’re a musician, then this might increase your royalties by encouraging visitors to play your content on other platforms. However, it can also drive people away from your website and onto the other platforms.

To embed audio from a third-party platform, then start by clicking on ‘Insert from URL.’

This opens a small ‘Paste or type URL’ bar.
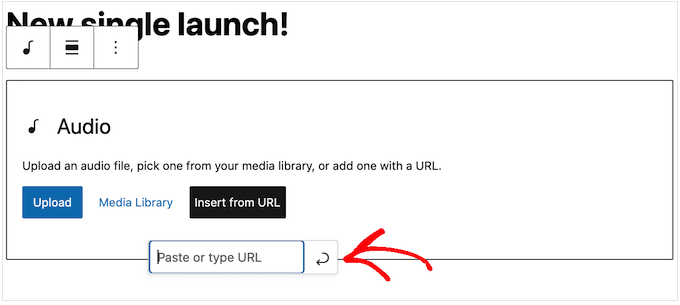
Pasting an audio file using a URL

You can now enter the URL of the audio clip that you want to embed on your WordPress blog.

Typically, you just need to visit the song or audio that you want to embed, and then open its ‘Share’ settings.

After that, you can copy the URL provided.

As an example, let’s see how you can embed any Spotify song on your site. To start, find the song or playlist that you want to add to your WordPress website.

Then, just click on the three dots that Spotify shows next to the playlist or song.

Adding Spotify audio to a WordPress website

Once you’ve done that, click on Share » Copy Song Link.

To add the audio to a music player widget, just paste the link into the Audio block.
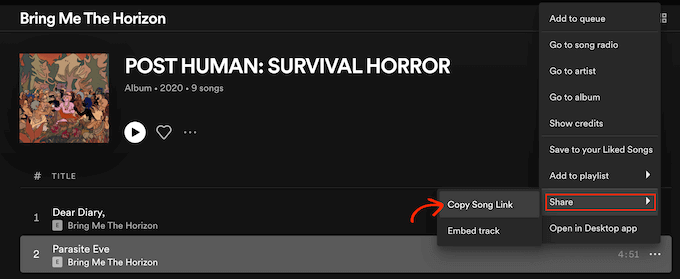
Spotify's 'Share' URL

In our Spotify example, WordPress will turn the Audio block into a Spotify block. This change happens automatically, so it’s not something you need to worry about.
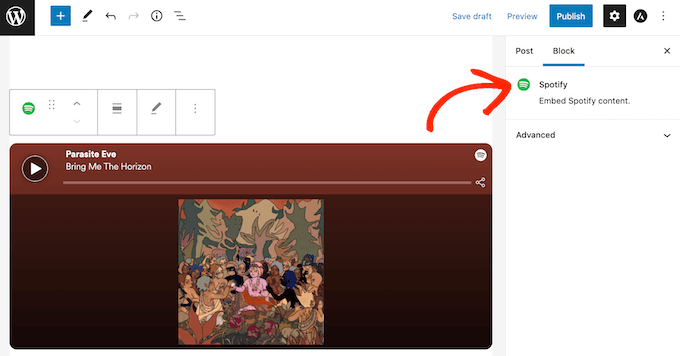
The WordPress Spotify block

After adding an audio file, you can click on the Audio block to see what settings you can configure for that block.

The settings you see may vary depending on whether you uploaded an audio file or embedded a preview from a third-party site. For example, you can often set the audio to autoplay by clicking on the ‘Autoplay’ toggle.
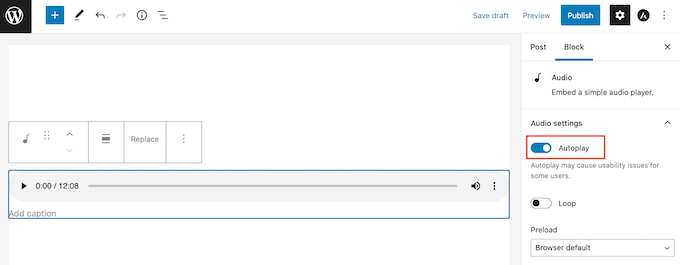
The WordPress autoplay and loop settings

Most of these settings are self-explanatory so it’s a good idea to spend some time trying the different settings to see what works best for your site.

When you’re happy with how the block is set up, you can update or publish the page.

Now if you visit the page on your site, you’ll see the audio music player live. You can also listen to the audio using the block’s playback control buttons.

Method 2. How to Add an Audio Music Player Widget Using a Plugin (More Customizable)

The built-in WordPress audio block is a quick and easy way to create a simple audio player. However, it does have its limits particularly when it comes to customizing the player and the playback experience.

There is also no central place where you can manage your audio players. This means you can’t use the same player multiple times across your site.

If you do want more advanced features and re-usable audio players, then we recommend Html5 Audio Player. This plugin can play any mp3, .wav, or .ogg file.

The plugin can only play one audio file per player. However, you can create as many audio players as you want so you can still play lots of different tracks across your site.

You can even add multiple audio players to the same page.

Multiple audio players on a single page

First, you’ll need to install and activate the plugin. If you need help, then please see our guide on how to install a WordPress plugin.

Upon activation, you’re ready to build your first audio player by going to Html5 Audio Player » Html5 Audio Player.

Here, go ahead and click on the ‘Add Audio Player’ button.
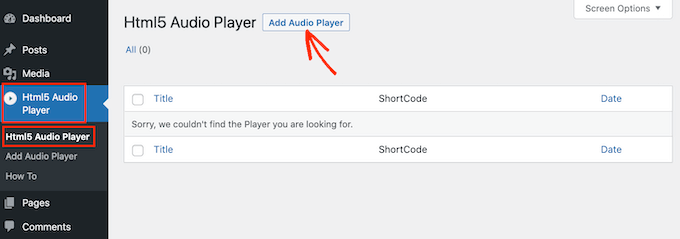
Adding an audio player to your WordPress website

To start, type a name for the audio player into the field that shows ‘Add title.’

This is just for your reference so you can use any title you want.
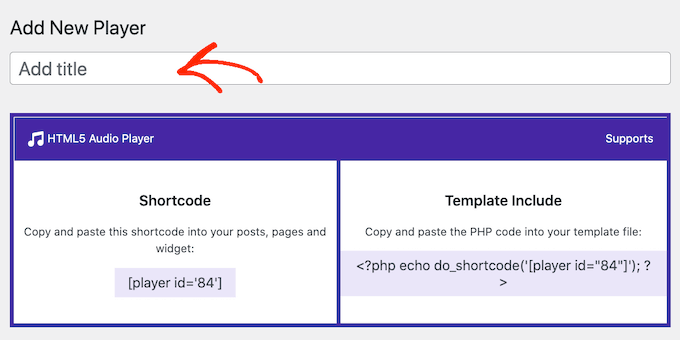
Creating an audio player widget using a plugin

Once you’ve done that, scroll to the ‘Player Configuration’ section.

Here, you can add an audio file to the player by clicking on the ‘Add Audio’ button.
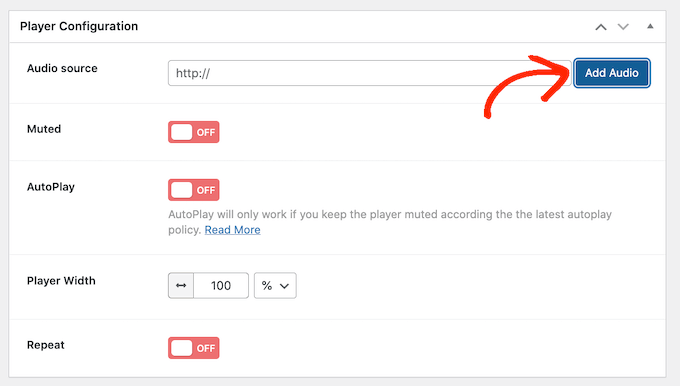
Adding an audio file to the HTML5 player

You can now select any audio file from the media library or upload a file from your computer.

After choosing a file, you’re ready to customize the audio player. By default, the visitor just needs to click on the Play button and the audio will start playing with the volume already turned up.

This is how most visitors expect an audio player to act, so you’ll typically want to use these default settings.

There are also options to mute the audio by default, autoplay, repeat, and more.

Once you’re happy with how the player is set up, just scroll to the top of the screen and click on the ‘Save’ button.
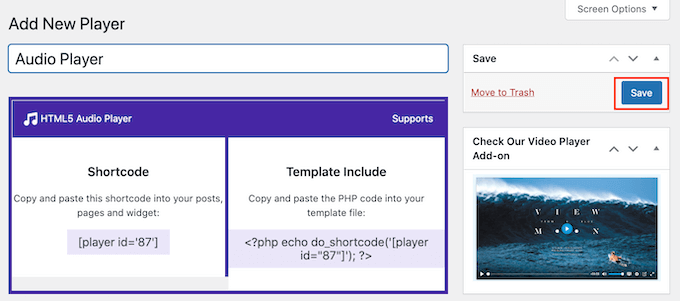
Adding a new audio player to your WordPress website

Then you can add the audio player to your site using either shortcode or the HTML5 Audio Player block.

The block is the easiest method. However, if you do want to place the player using shortcode, then you’ll find the code towards the top of the screen.
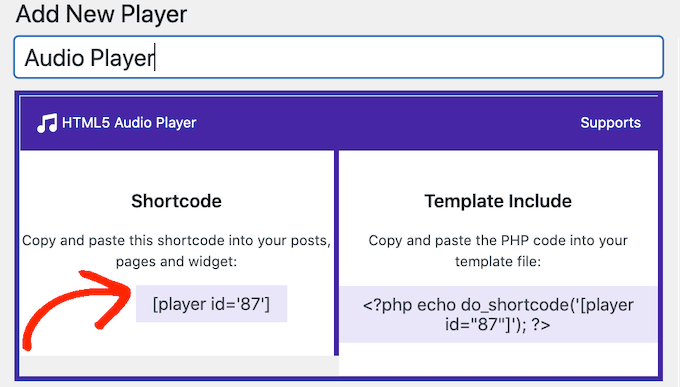
Placing an audio player widget using shortcode

For more details on how to place the shortcode, you can see our guide on how to add a shortcode in WordPress.

To add the audio music player using a block, open any page or post. You can now click on the + button.

In the popup that appears, type ‘HTML5 Audio Player’ to find the right block. Once you click on the ‘HTML5 Audio Player – Insert’ block, it will add the block to your page.
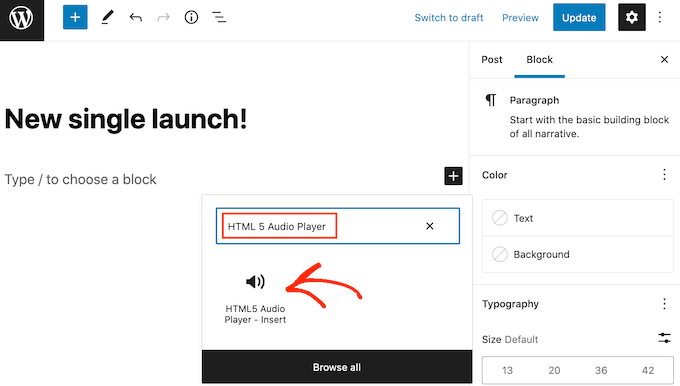
Adding an audio player block to your WordPress site

Next, open the dropdown that shows ‘Select a Player’ to see a list of all the audio players that you’ve created.

You can now click on an audio player to add it to the page or post.

An HTML5 WordPress audio block

The WordPress page editor doesn’t show the audio player.

However if you click on the Preview button then you’ll be able to see how the player will look to the people who visit your website. You can even listen to the audio and test the different playback buttons.
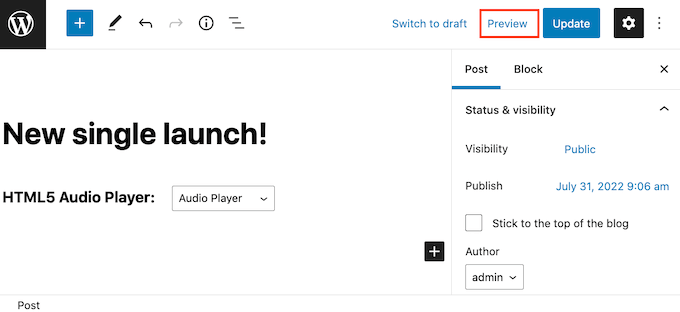
Previewing the audio music widget

When you’re happy with how the audio player looks and functions, you can update or publish the page.

Now if you visit this page on your WordPress website, you’ll see the audio player live.

Do you want to add other audio tracks to your site? Then you can simply follow the process described above to create more audio players and add them to your WordPress website.

We hope this article helped you learn how to add an audio player widget in WordPress. You can also go through our guide on the best web push notification software and how to create an email newsletter.

If you liked this article, then please subscribe to our YouTube Channel for WordPress video tutorials. You can also find us on Twitter and Facebook.

The post How to Add an Audio Music Player Widget in WordPress first appeared on WPBeginner.


April 16, 2023 at 03:20PM
Saturday, April 15, 2023

How to Create a Custom WordPress Search Form (Step by Step)

Do you want to create a custom search form for your WordPress website?

Search is how most users find relevant and interesting content on your site. If they can’t easily find what they’re looking for, then they may move on to a different website.

In this article, we’ll show you how to improve your website search by creating a custom WordPress search form.

How to create a custom WordPress search form (step by step)

Why Create a Custom Search Form for WordPress?

WordPress comes with a built-in search feature. However, this default search is quite limited and doesn’t always provide the most accurate results.

It also doesn’t search all types of content such as comments, product reviews, or custom post types. This may stop the visitor from finding what they’re looking for, including products and services they want to buy.

If you run an online store or a paid membership site, then you may be losing out on sales due to these limits.

You may also want to prioritize some content over others, so that it appears higher in the search results. For example, you may want to show your site’s latest posts at the top of the search results page, or display your most popular WooCommerce products.

Sadly, there’s no way to customize the WordPress search algorithm so that it better meets your website’s needs.

That being said, let’s take a look at how to customize the WordPress search form and results page, step-by-step.

We cover a lot of ground in this post, so you can use the following links to jump to any section:

How to Customize WordPress Search Form and Results

The easiest way to create a custom WordPress search form is by using SearchWP. SearchWP is the best WordPress search plugin. It’s easy to use and gives you complete control over your site’s search algorithm, so you can help visitors find what they’re looking for, fast.

The first step is to install the plugin. For more details, see our step-by-step guide on how to install a WordPress plugin.

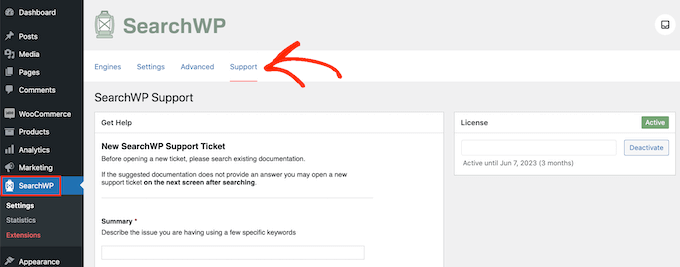
Upon activation, select SearchWP from the left-hand menu. Then, click on the ‘Support’ tab.

Add a license key to the SearchWP WordPress plugin

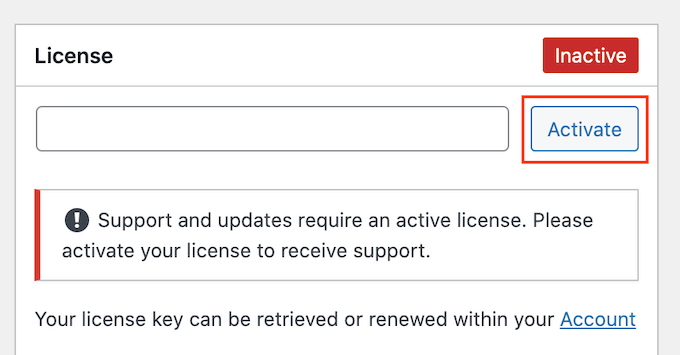
You can now add the license key to the ‘License’ field and click on the ‘Activate’ button.

You’ll find the license key by logging into your SearchWP account.

Activating the SearchWP license

Customizing the Search Engine

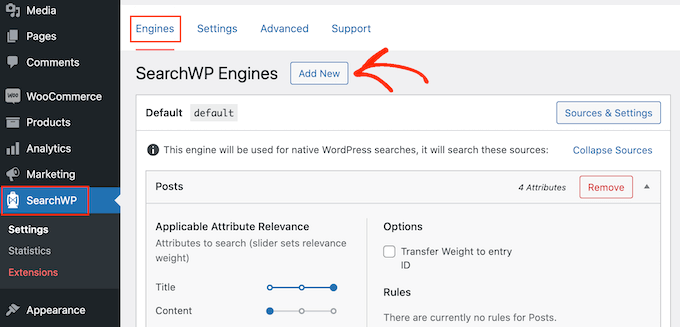
After that, you can create a new search engine by clicking on the ‘Engines’ menu option.

Here, go ahead and click on the ‘Add New’ button.

Creating a new search engine for your WordPress website

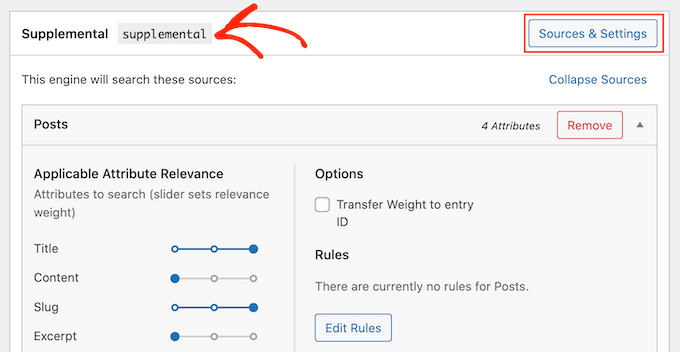
This will create a new search engine called ‘supplemental.’

To change the default name, simply click ‘Sources & Settings’ next to ‘Supplemental.’

Creating a supplemental search engine in WordPress

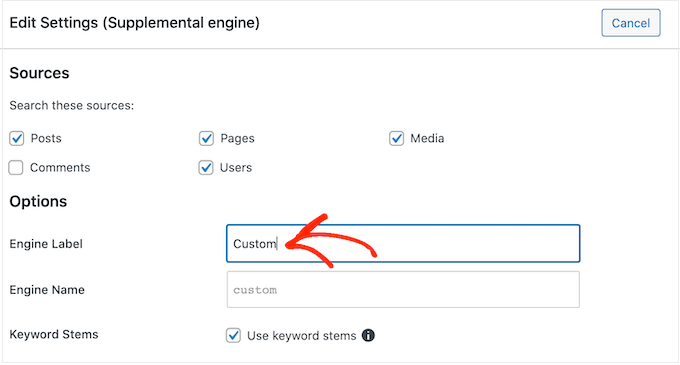
In ‘Engine Label,’ type in the name you want to use for the search engine.

We’re going to use ‘Custom’ for this tutorial, but you can call the search engine anything that helps you identify it in the WordPress dashboard.

You’ll be using this name in our code snippet, so make a note of it.

Giving the custom search engine a name

At this point, you can choose whether you want to include posts, pages, media files, comments, and users in your site’s search results.

Depending on the WordPress plugins you’ve installed, you may see some extra options. For example, if you’re using WooCommerce then you can include ‘Products’ in the SearchWP search results.

Creating a smart product search

For more on this topic, see our guide on how to make a smart WooCommerce product search.

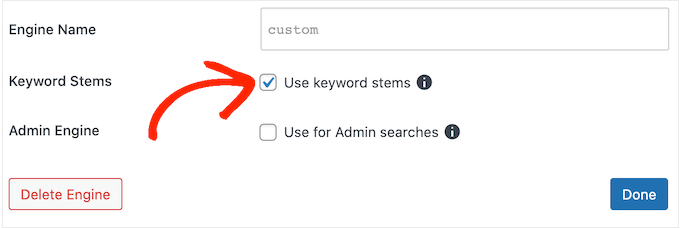
You’ll also notice that ‘Keyword Stems’ is selected by default. This means SearchWP may include results that don’t have the same ending as the search term.

For example, if you search for ‘run’ then keyword stemming will include ‘running,’ and ‘runners’ in the results.

This can help show relevant results to visitors, so we recommend leaving the ‘Use keyword stems’ box checked. However, you can uncheck it if you want to show exact matches only.

Changing the stem search settings for your website

When you’re happy with the information you’ve entered into the popup, click on ‘Done.’

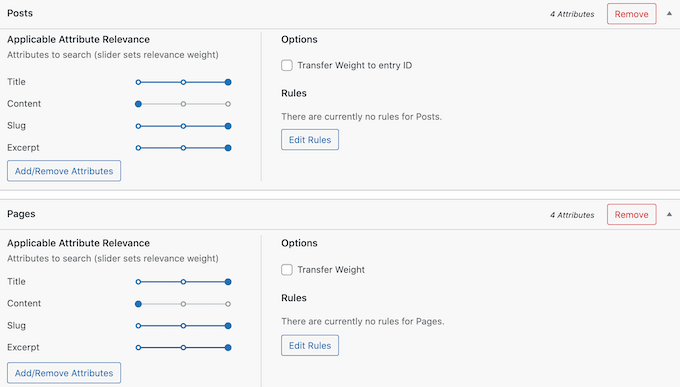
You’ll now see sections for Posts, Pages, Media, and any other sources you selected.

How to create a custom WordPress search form

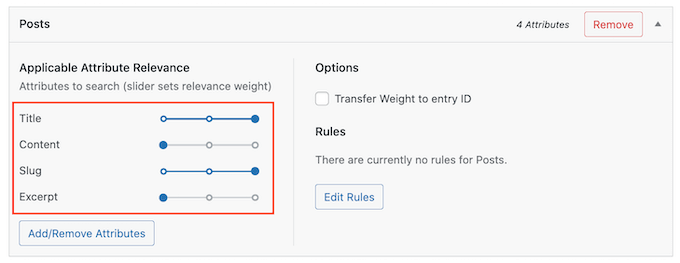
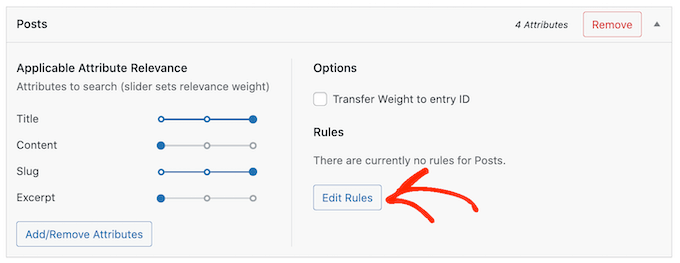
Each section has its own ‘Applicable Attribute Relevance’ sliders.

These control how SearchWP values the different attributes when creating its search results page. For example, if you want the post title to carry more weight than the content, then you should drag the sliders accordingly.

In the following image, the search engine will place more value on matches that it finds in the post title, compared to matches that it finds in the post’s content.

Customizing the search algorithm on your WordPress blog or website

You can use these sliders to fine-tune your site’s search algorithm. This may seem daunting, but you can adjust these sliders at any point. In this way, you can continuously fine-tune how search works on your site, to deliver the best results.

You can also create rules that determine whether certain content is included or excluded from the search results. For example, if you have an online marketplace then you may want to exclude the account page, checkout page, and thank you page.

Simply click the ‘Edit Rules’ button in the section where you want to create the rule. For example, in the following image, we’re adding a new rule to the ‘Posts’ section.

Creating a custom search form for your website

You’ll see a popup letting you know that the search engine doesn’t have any rules.

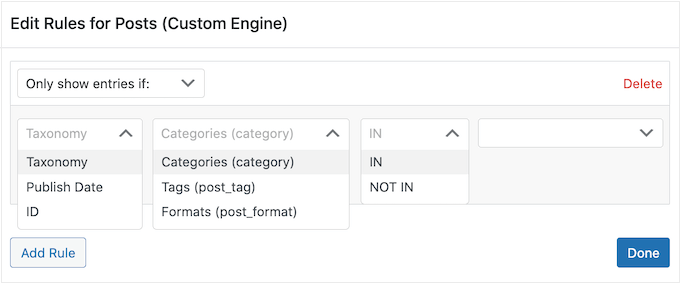
To go ahead and create the first rule, click on the ‘Add Rule’ button.

Editing the rules for your website's search

You can create rules for categories, tags, format, publish date, and ID.

By default, the plugin will include this content in its search results.

However, if you want to exclude this content instead, then click on the dropdown that displays ‘Only show entries if’ and then choose ‘Exclude entries if.’

Creating a custom search engine for your website

Also, you might want to let your visitors limit their searches to specific categories. For example, you could add a category search feature to your archive pages. To learn how to do that, please see our guide on how to search by category in WordPress.

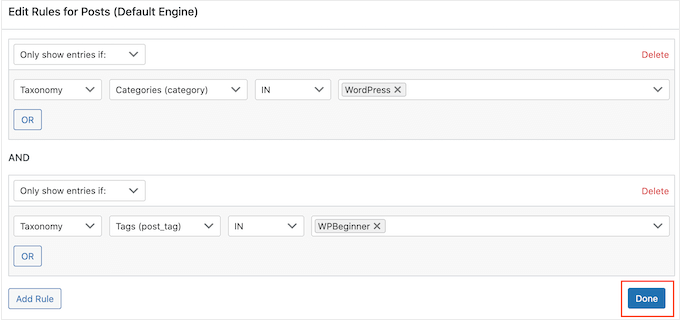
Once you’re happy with how the rule is set up, click on ‘Add Rule.’

To create more rules, simply repeat the exact steps described above. When you’ve finished adding rules for this content type, click on the ‘Done’ button to close the popup.

Adding multiple rules to a custom search form

You can now create rules for other content types such as media and pages, by scrolling to their sections and clicking on their ‘Add Rule’ buttons.

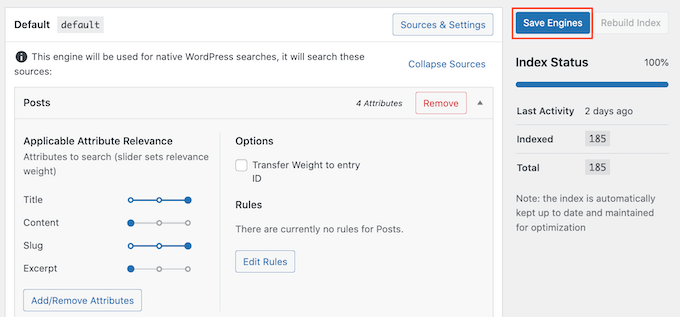
When you’re happy with how your custom search engine is set up, click on the ‘Save Engines’ button at the top of the page.

Saving the custom search engine

If you see a message asking you to rebuild the index, then click on the ‘Rebuild Index’ button.

This process may take a few minutes depending on the size of your database.

Adding the Search Form with Shortcode

The easiest way to add the form to your website is by using the Shortcodes extension.

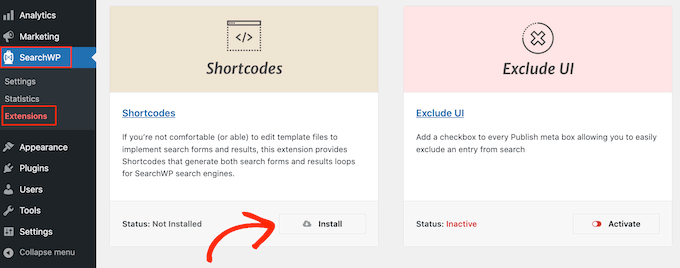
To install this SearchWP addon, head over to SearchWP » Shortcodes. You can then scroll to the ‘Shortcodes’ section and click on its ‘Install’ button.

Installing the Shortcodes extension for SearchWP

You can now add the form to any page post, or widget-ready area using some code. If you haven’t used shortcodes before, then please see our beginner’s guide on how to add a shortcode in WordPress.

As an example, we’ll add the form to a post, but the steps will be mostly the same for pages and widget-ready areas.

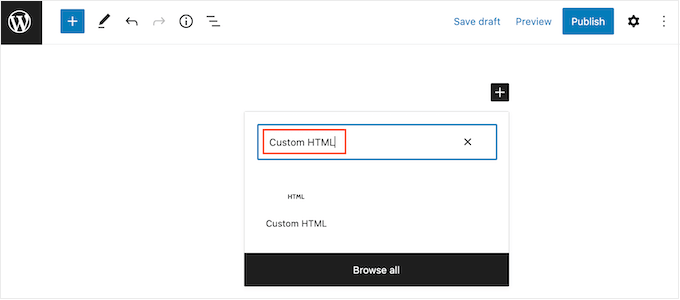
Simply open the post where you want to show the form, and then click on the ‘+’ button. In the popup that appears, type in ‘Custom HTML.’

Adding custom code to your website

When the Custom HMTL block appears, click to add it to the post.

After that, paste the following code into the block:

[searchwp_search_form engine="custom" var="searchvar" button_text="Custom Search"]

<div class="search-results-wrapper">
 [searchwp_search_results engine="custom" var="searchvar" posts_per_page=4]
  <h2>[searchwp_search_result_link direct="true"]</h2>
  [searchwp_search_result_excerpt]
 [/searchwp_search_results]
</div>

<div class="no-search-results-found">
 [searchwp_search_results_none]
 No results found, please search again.
 [/searchwp_search_results_none]
</div>

<div class="search-results-pagination">
 [searchwp_search_results_pagination direction="prev" link_text="Previous" var="searchvar" engine="custom"]
 [searchwp_search_results_pagination direction="next" link_text="Next" var="searchvar" engine="custom"]
</div>

This code will add your custom search form to the post, create a section to display the search results, and add pagination if the results cover multiple pages.

If you gave your search engine a different name, then you’ll need to replace engine=“custom” in the above snippet.

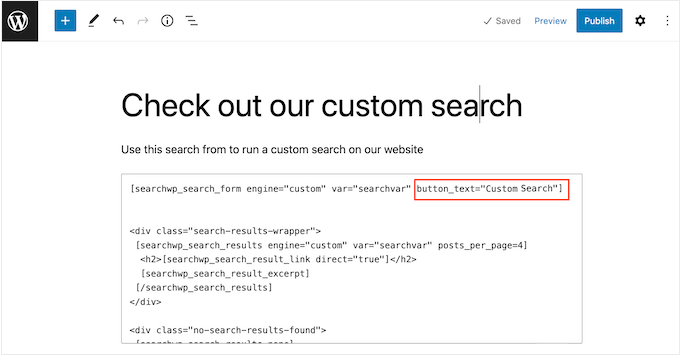
The code also creates a search button with a ‘Custom Search’ label. If you want to use a different label instead, then simply change the text inbutton_text=“Custom Search”.

Adding a label to a custom search form

After that, click on the ‘Publish’ or ‘Update’ button to make the custom search form live.

To see the search form in action, simply visit the post on your WordPress website.

An example of a custom search form

Styling the Search Form and Results Page

Your WordPress theme controls how every part of your site looks, including the search form and search results page. However, it is possible to customize the search bar’s appearance using custom CSS.

The easiest way to add custom CSS in WordPress is by using WPCode.

WPCode is the best code snippets plugin used by over 1 million WordPress websites. It makes it easy to add custom code in WordPress without having to edit the functions.php file.

With WPCode, you can edit a website’s code without risking mistakes and typos that can cause many common WordPress errors.

The first thing you need to do is install and activate the free WPCode plugin. For more details, see our step-by-step guide on how to install a WordPress plugin.

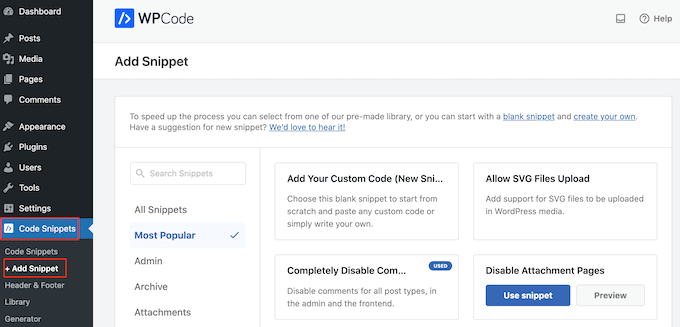
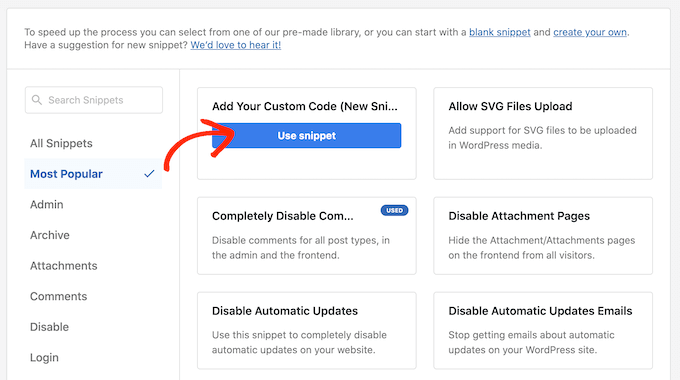
Upon activation, head over to Code Snippets » Add Snippet.

Adding custom CSS code to WordPress

Here, simply hover your mouse over ‘Add Your Custom Code.’

When it appears, click on ‘Use snippet.’

Customize the search form using WPCode

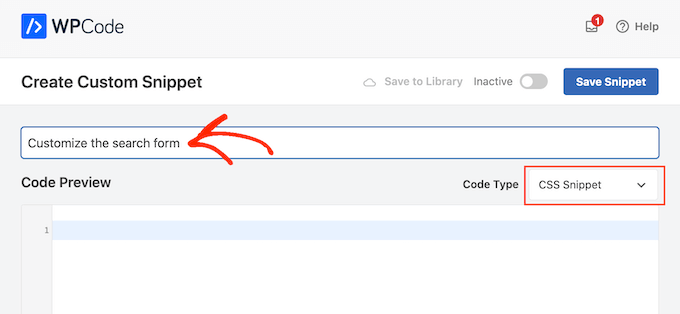
To start, type in a title for the custom code snippet. This can be anything that helps you identify the snippet in the WordPress dashboard.

After that, open the ‘Code Type’ dropdown and select ‘CSS Snippet.’

Adding a code snippet to your website using WPCode

You can now add the custom CSS code to the ‘Code Preview’ field.

To help you out, we’ve created a sample code snippet that changes the style of the search form and the search results page. You can tweak this snippet to use different colors, padding, borders, and more.

.searchform {
font-family:arial;
font-size:16px;
background:#ace5e3;
color:#ffffff;
border:1px solid #61c3c0;
padding:10px;
height:90px;
width:600px;
}

.search-results {
font-family:arial;
font-size:16px;
background:#ace5e3;
color:#000000;
border:1px solid #61c3c0;
padding:10px;
width:600px;
}

You can also delete any lines that you don’t want to use. For example, if you don’t want to change the search form’s height and width, then simply delete those lines.

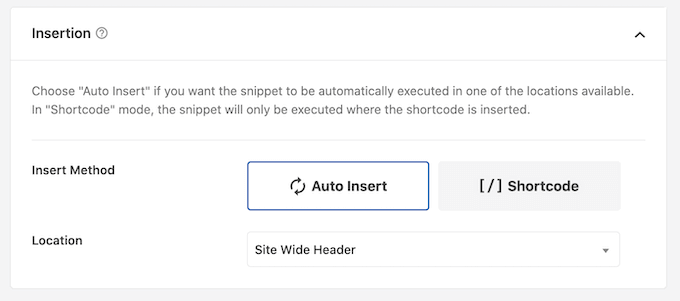
When you’re happy with the snippet, scroll to the ‘Insertion’ section. WPCode can add your code to different locations, such as after every post, on the front-end of your site only, or only in the admin area.

You will want to use the custom CSS code across your entire WordPress blog, so click on ‘Auto Insert’ if it isn’t already selected. Then, open the ‘Location’ dropdown menu and choose ‘Site Wide Header.’

Inserting custom CSS into a WordPress website

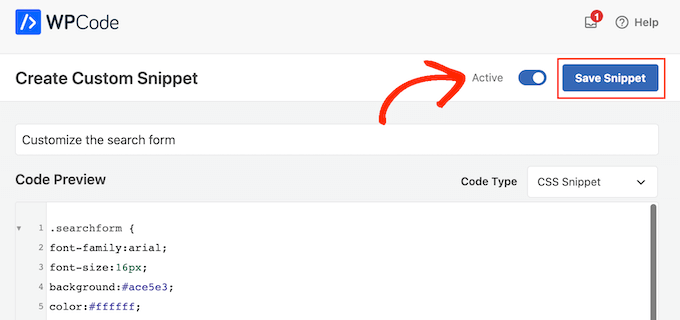
After that, you’re ready to scroll to the top of the screen and click on the ‘Inactive’ toggle, so it changes to ‘Active.’

Finally, click on ‘Save Snippet.’

Publishing custom CSS on your WordPress site

This will make the custom code live.

Now if you take a look at the custom search form, you’ll see the new style in action.

An example of a custom search form on a WordPress website

Adding Live Ajax Search to a Custom Search Form

After placing the custom search form on your website, you may want to enable live Ajax search.

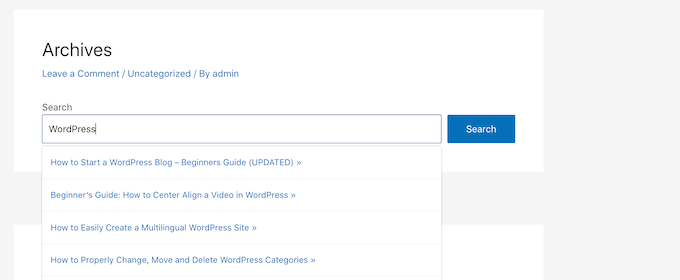
This automatically shows possible search results as the user types in your custom form, similar to how search engines such as Google work.

An example of live Ajax search on your WordPress website

You can add Ajax live search to your custom form using the free SearchWP Live Ajax Lite Search plugin.

For step-by-step instructions on how to install it, see our guide on how to add live Ajax search to your WordPress site.

Using Advanced Settings for SearchWP

Next, it’s a good idea to enable some settings that will make it easier for users to find what they’re looking for.

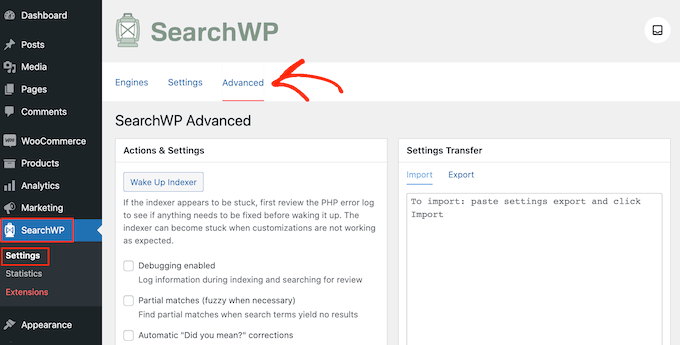
To do this, go to SearchWP » Settings and click on the ‘Advanced’ tab.

SearchWP's advanced settings

You can now click to check any of the options that you’d like to use on your site. This includes enabling partial matches, which will display results that aren’t an exact match.

If you want to offer spell checking and typo correction, then we recommend checking the ‘Partial matches’ and ‘Automatic “Did you mean?” corrections’ boxes. This will suggest a slightly different search term if it matches more posts on your website.

SearchWP's auto correct feature

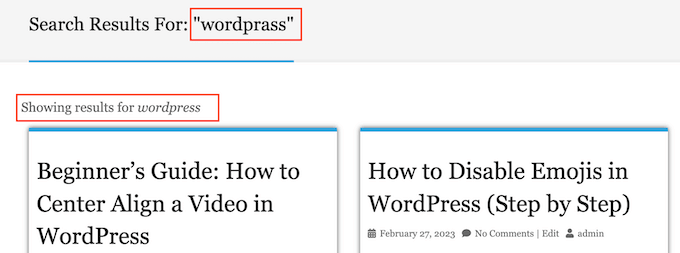
Finally, ‘quoted/phrase searches’ allows visitors to use quotes when searching for exact phrases.

This is particularly useful if you run an online store, as customers can search for an exact brand name or model number.

Measuring Search Results and Improving Conversions

Once you’ve created a custom WordPress search form, it’s a good idea to track how people are using it. This will give you a better insight into the kind of content people are looking for, which may even give you some ideas for new content.

You can also look for any problems people are having with the custom search form and ways to improve the search experience.

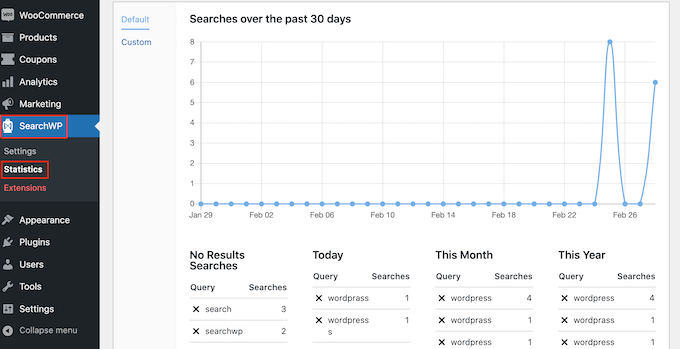
SearchWP comes with a search metrics extension that shows exactly how your website search is performing. To see these statistics, simply go to SearchWP » Statistics.

Viewing search statistics in the WordPress dashboard

You can use the search metrics to improve the search results. For example, you might find the content that gets the most clicks and then customize the SearchWP settings to place this content at the top of the search results.

Ecommerce websites can also use exit-intent popups and gamified spin a wheel campaigns to make their search pages more engaging and convert visitors into email subscribers.
Gamified Spin a Wheel Campaign

We hope this tutorial helped you learn how to create a custom WordPress search form. You may also want to see our picks of the best live chat software for small businesses and our guide on how to get a free business email address.

If you liked this article, then please subscribe to our YouTube Channel for WordPress video tutorials. You can also find us on Twitter and Facebook.

The post How to Create a Custom WordPress Search Form (Step by Step) first appeared on WPBeginner.


April 15, 2023 at 04:00PM

Friday, April 14, 2023

How to Add Drop Caps in WordPress Posts

Are you looking for a way to add drop caps in WordPress?

Drop caps are a great way to start a paragraph. By having a large first letter, they can help you to capture your reader’s attention and get them interested in reading your content.

In this article, we’ll show you how to easily add drop caps in WordPress posts.

How to add drop caps in WordPress posts

What is a Drop Cap?

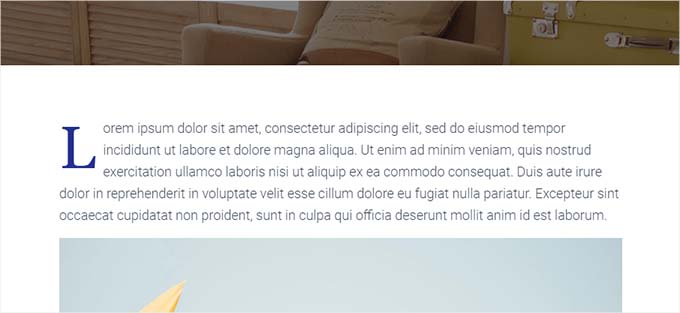
A drop cap is a styling technique commonly used in print books and magazines that feature longer reads. The first letter of the starting paragraph in each chapter uses a large font size.

Normally the large capital letter extends downwards to drop below the first few lines, which is why it’s called a “drop cap.”

Drop cap

Adding drop caps helps your content to stand out and catch your visitor’s attention. They add a more formal and traditional touch to your site’s design.

There are several ways to add drop caps to a WordPress website. You can use the built-in option in the WordPress block editor or use a plugin.

That being said, let’s see how you can easily add drop caps in WordPress posts using different methods.

Feel free to click the links below to jump ahead to your preferred method:

Method 1. Add Drop Caps Using the WordPress Block Editor

This method is recommended for all users as it comes default in the WordPress block editor. While it works, you have to manually do it for each post. If you’re looking for automatic method, skip to method 2.

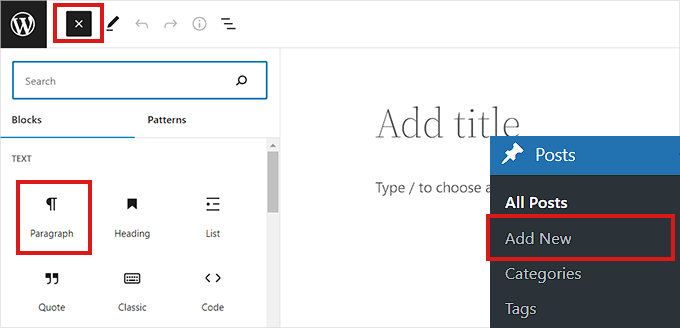
First, head over to the Posts » Add New page from the WordPress admin dashboard.

Now, simply click the ‘Add Block’ (+) button at the top left corner of the screen.

After that, simply locate and click the paragraph block to add it to your post.

add paragraph block to post

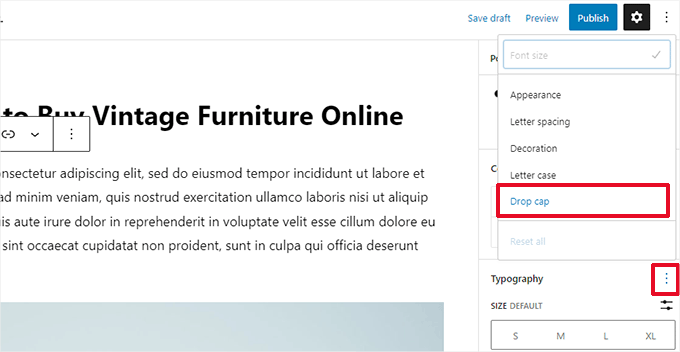
Next, you need to open up the Block Settings Panel in the right column.

Once you do that, head over to the ‘Typography’ section and click the three-dot icon beside it to open up typography options.

Next, you need to select the ‘Drop Cap’ option from the list to add it to your ‘Typography’ section.

Enable drop cap under Typography

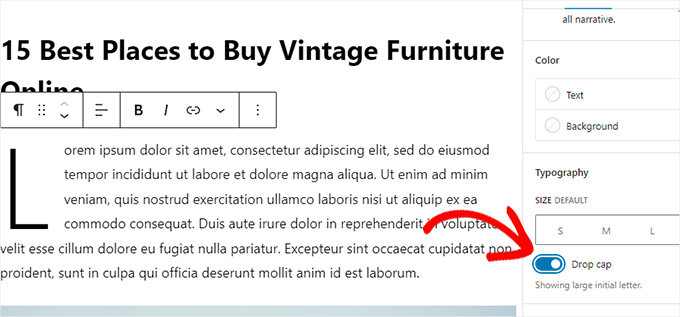
Once the drop cap feature has been added, simply toggle the switch next to the ‘Drop Cap’ option to show a large initial letter at the start of a paragraph.

Don’t forget to click the ‘Save Draft’ or ‘Publish’ button at the top to save your changes.

Toggle drop cap switch

You have now successfully added a drop cap to your post.

This is how it looked on our demo site.

Drop cap preview

Note that the built-in drop caps option in the block editor will use your WordPress theme’s styling for the color, font, and size of the first letter.

If you want to change the style of your drop caps in the WordPress block editor, then you’ll have to use custom CSS code to style your drop cap.

Method 2. Add Drop Caps Using CSS Code

For this method, we will be adding custom CSS code to automatically add drop caps to the first paragraph of each post. You can either add the CSS code to your theme’s stylesheets or use a code snippet plugin.

We recommend using WPCode, the #1 code snippet plugin used by over 1,000,000 sites across the globe. It makes it super easy to add code to your site without any hassle.

First, you need to install and activate the free WPCode plugin. For more instructions, see our guide on how to install a WordPress plugin.

Upon activation, you need to visit the Code Snippets » +Add Snippets page from the WordPress admin sidebar.

From here, you need to hover your mouse over the ‘Add Your Custom Code (New Snippet)’ option.

This will reveal the ‘Use Snippet’ button that you need to click.

Add new snippet

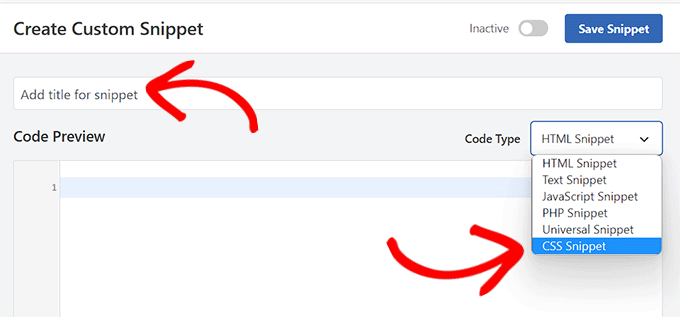
Now that you’re on the ‘Create Custom Snippet’ page, start by entering a title for your code snippet. It can be anything that will help you identify the snippet.

After that, you need to select ‘CSS Snippet’ as the ‘Code Type’ from the dropdown menu on the right.

Select CSS Snippet as code type

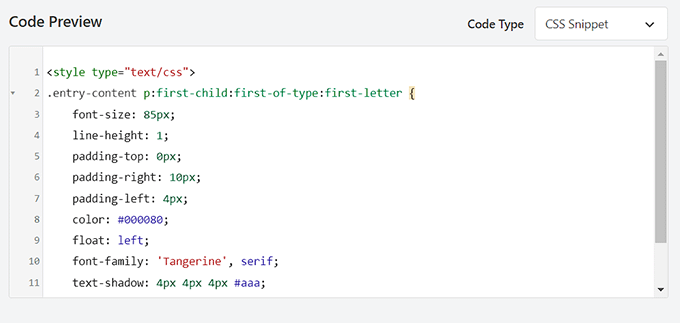
Next, simply copy and paste the following code in the ‘Code Preview’ box.

<style type="text/css">
.entry-content p:first-child:first-of-type:first-letter {
    font-size: 85px;
    line-height: 1;
    padding-top: 0px;
    padding-right: 10px;
    padding-left: 4px;
    color: #000080;
    float: left;
    font-family: 'Tangerine', serif;
    text-shadow: 4px 4px 4px #aaa;
</style>
}

This is how your code will look once you paste it into the ‘Code Preview’.

Code preview for drop caps code

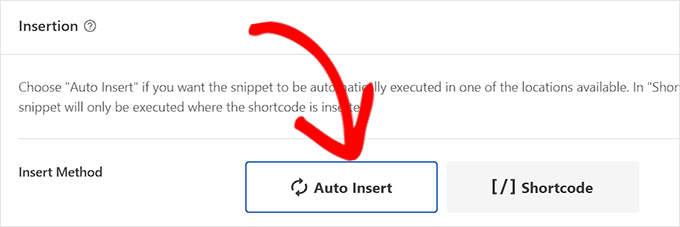
Now, you need to scroll down to the insertion section and select the ‘Auto Insert’ method if you want to execute the code all over your site.

You can use the ‘Shortcode’ method if you only want to add drop caps to specific posts.

Once you save the snippet, you’ll be given a shortcode that you can paste into the block editor of the posts where you want to add drop caps.

Choose an insertion method

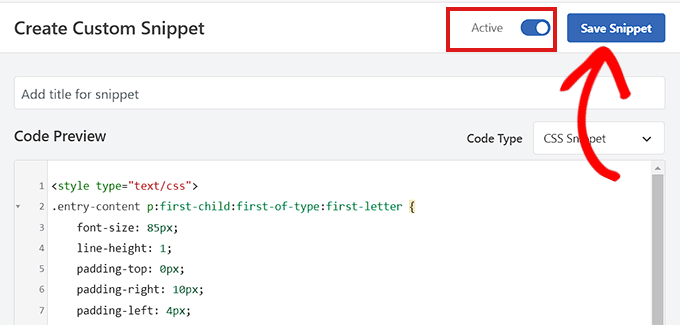
After that, head back to the top of the page and toggle the switch to ‘Active.

Finally, click on the ‘Save Snippet’ button.

Save Drop Caps snippet

Your CSS code snippet will now be live on your site.

This is how the drop caps looked on our demo site using the CSS snippet above.

Custom code preview

Method 3. Add Drop Caps Using a Plugin

If you are hesitant to add custom CSS, then you can also add drop caps using the Initial Letter plugin.

This plugin also allows you to change the size, color, and font of the drop caps.

Note: Keep in mind that the Initial Letter plugin hasn’t been tested with the latest version of WordPress and is no longer maintained by the developer.

However, we tested the plugin and it works fine. If you’re still unsure, take a look at our article on outdated plugins.

That being said, first, you need to install and activate the Initial Letter plugin. For more instructions, check our guide on how to install a WordPress plugin.

Upon activation, navigate to the Settings » Initial Letter page from the admin sidebar.

From here, you need to configure settings for drop caps.

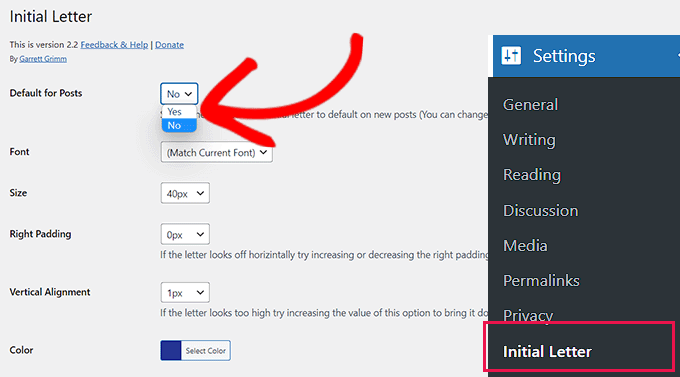
First, you need to select if you want drop caps to be automatically applied to new posts.

Simply choose ‘Yes’ or ‘No’ from the dropdown menu next to the ‘Default for Posts’ option.

Next, you need to choose your preferred font, color, size, and padding for drop caps.

Note: You may need to come back to the settings after previewing your website to adjust these styling options.

Configure settings for the Initial Letter plugin

After that, check the box next to the ‘Enable for excerpts’ option if you want drop caps to be enabled for post excerpts.

You can also check the box next to the ‘First Paragraph Only’ option if you only want drop caps to be added to the first paragraph of your post.

Click on Save Changes button

Finally, don’t forget to click the ‘Save Changes’ button to store your settings.

You can now visit any post on your website and you’ll see drop caps in action on the first paragraph of your post.

Drop cap plugin preview

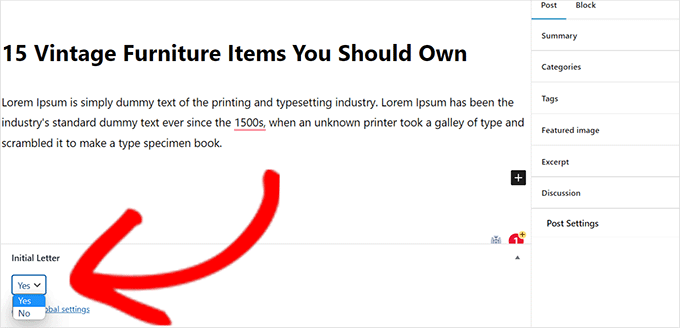
If you want to remove drop caps for a post, you can also do that by opening the post in the block editor.

Once there, scroll down to the ‘Initial Letter’ section and select the ‘No’ option from the dropdown menu.

This will disable the drop caps for that post.

Disable drop caps from a post

We hope this article helped you learn how to add drop caps in WordPress posts. You may also want to check out our guide on how to check if your WordPress posts are ranking for the right keywords and our top picks for the best block-based WordPress themes for your site.

If you liked this article, then please subscribe to our YouTube Channel for WordPress video tutorials. You can also find us on Twitter and Facebook.

The post How to Add Drop Caps in WordPress Posts first appeared on WPBeginner.


April 15, 2023