Monday, April 17, 2023

How to Fix The Critical Error in WordPress (Step by Step)

Are you seeing the critical error on your WordPress site?

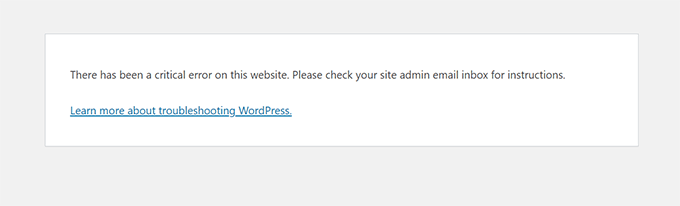
WordPress may sometimes show an error message saying, ‘There has been a critical error on this website. Please check your site admin email inbox for instructions.’ It will also include a link to the WordPress debugging guide.

In this guide, we will show you how to fix the critical error in WordPress. We will also talk about what causes this error and how to avoid it.

Fixing the critical error in WordPress

What Is the Critical Error in WordPress?

The critical error in WordPress is an error that stops WordPress from loading all the scripts it needs to work correctly.

Previously, this WordPress error resulted in a white screen of death or a fatal error message on the screen. Most beginners didn’t find it very helpful and struggled to resolve the issue on their own.

Since WordPress 5.2, users will now see a generic error message: ‘There has been a critical error on this website. Please check your site admin email inbox for instructions’ with a link to the WordPress debugging guide.

Critical error in WordPress

It will also send an email message to your WordPress site’s admin email address.

This email includes more details about the plugin or theme causing the error and a link to access your WordPress dashboard in recovery mode.

WordPress recovery mode email

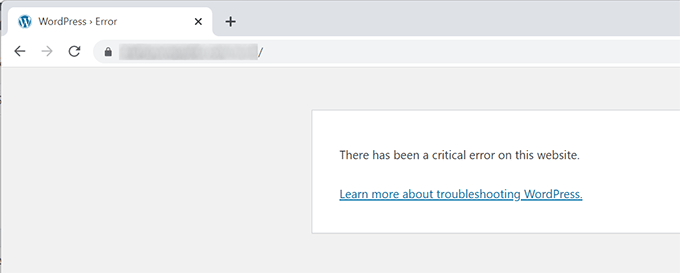
Another variant of this error will only show that your website is facing a critical error. It will not instruct you to check your email address.

This can happen because WordPress wasn’t able to load the files it needed to make the recovery mode available or to send the email.

Critical error in WordPress without email instructions

What Causes the Critical Error in WordPress?

The critical error in WordPress is generally caused by a malfunctioning plugin, script, or code that prevents WordPress from functioning correctly.

Due to the malfunctioning code, WordPress is unable to load the files it needs.

If you recently copied and pasted code snippets from a tutorial to your website, they might trigger a critical error.

All top WordPress plugins are thoroughly tested, so they are less likely to cause a critical error. However, a conflict with another WordPress plugin or some custom code may trigger the error.

Let’s look at how to fix the critical error in WordPress and get your website back.

Fixing the Critical Error in WordPress (2 Methods)

The critical error message itself is not very useful for finding and fixing the issue’s cause. Luckily, WordPress also sends an email to the admin email address of your website.

Many WordPress websites are not configured to send emails using SMTP. Due to this reason, they may not get an email despite WordPress telling them that it has sent an email.

Similarly, some WordPress sites may only see the critical error message without instructions to check the email. That’s because WordPress wasn’t able to load files it needed to send an email or make recovery mode available.

If you are among those users, don’t worry. We will show you how to fix the critical error even without the email.

On the other hand, if you received the WordPress technical issue email notification, then we will show you how to make sense of it and use it to bring your website back.

Simply click the links below to skip straight to the section you need:

Fixing the Critical Error With WordPress Debugging Email

First, you need to visit the inbox for your website’s WordPress administration email address.

Are you unsure which email address you used as the admin email? It is the email address you provided when installing WordPress.

If your site is on Bluehost or you used a WordPress auto-installer, your admin email address will likely be the same one you used for your WordPress hosting account.

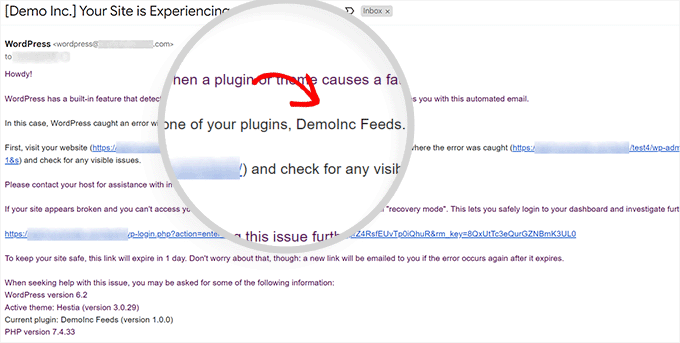
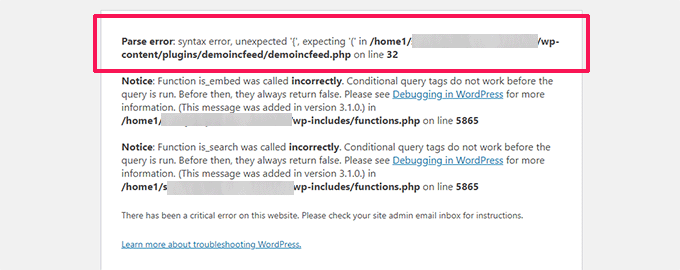
You will see an email in your inbox with the subject line, ‘Your Site is Experiencing a Technical Issue.’ Inside it, you will find more helpful information about what caused the critical error on your WordPress website.

For instance, the following screenshot shows that the critical error was caused by the WordPress theme on our test site.

Critical error caused by a WordPress theme

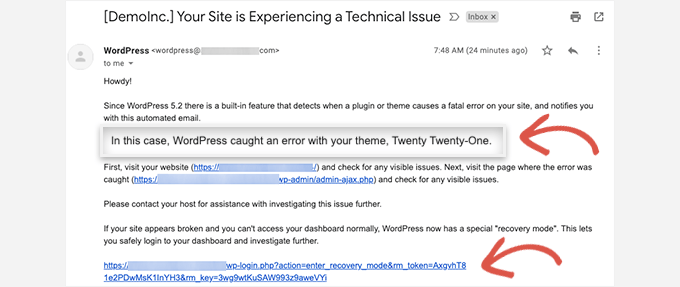
The email also includes a unique link that will allow you to log in to your WordPress website in recovery mode to investigate and fix the issue.

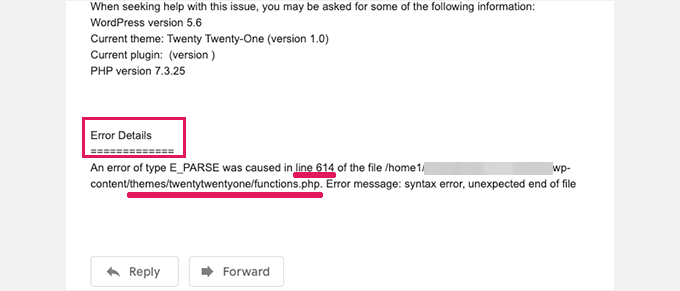
At the bottom of the email, you will see even more detailed information about the error, including the specific file and code that triggered it.

In the example below, some code on line 614 of our theme’s functions.php file is responsible for triggering the error.

Recovery email error details

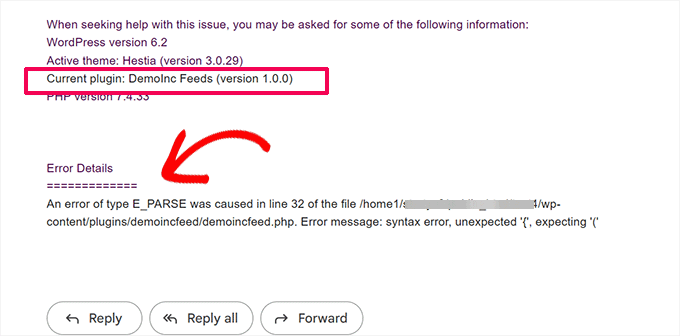
Here is another example showing an error caused by a malfunctioning WordPress plugin.

As you can see, the message highlights the plugin name and the line of code causing the error.

Plugin error details

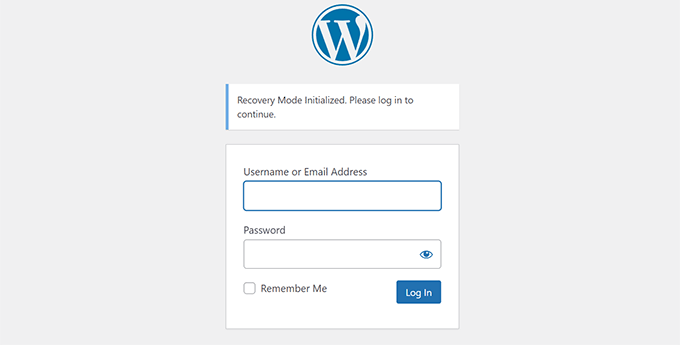
Now, you just need to click on the link to WordPress recovery mode, which will take you to your WordPress admin area.

You will be asked to log in to continue.

Recovery mode login

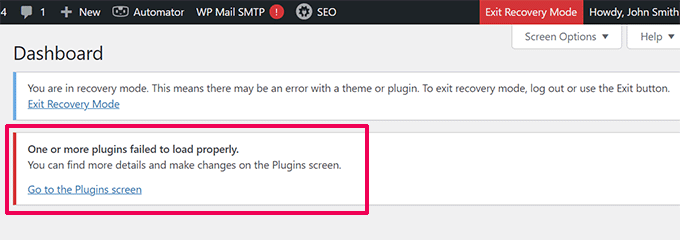
Once you are logged in, you will see a notification telling you about the critical error, what caused it, and a link to where you can go to fix it.

For instance, in the following screenshot, WordPress is notifying us about the critical error caused by the plugin with a link to the Plugins page.

WordPress recovery mode dashboard

If you click the link, it will show you the problem plugin. It will also show you exactly which line of code caused the error.

You can go ahead and deactivate the plugin for now by clicking on ‘Deactivate’.

Deactivate plugin

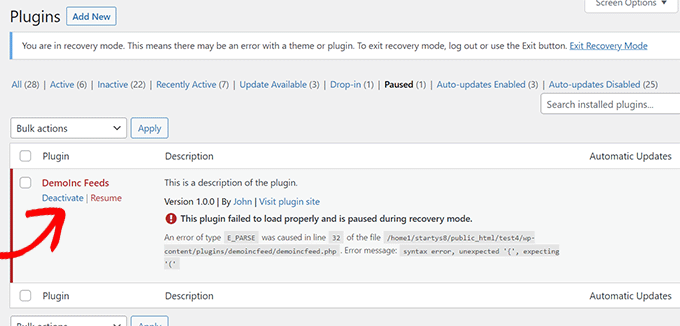
Then you can simply look for an alternative WordPress plugin or see if you can get support from the plugin developers.

Similarly, you will see a link to the Themes page if the problem lies with your theme. At the bottom of the page, it will say which theme is causing the issue.

Broken theme

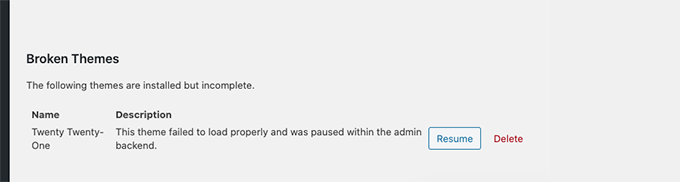
You can change your WordPress theme. Alternatively, you can delete the broken one and reinstall a fresh copy of it from the official source to see if that resolves the issue.

Once you have addressed the issue, click on the ‘Exit Recovery Mode’ button at the top.

Exiting the recovery mode in WordPress

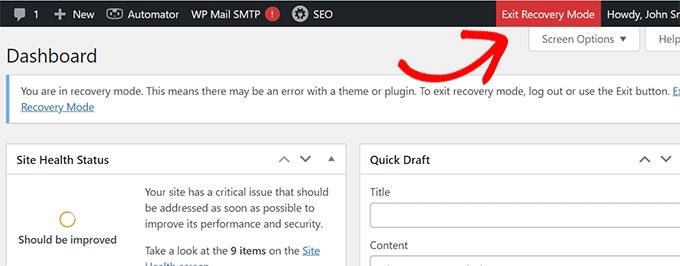
In most cases, your WordPress website would now start working normally.

However, if you still see the critical error in WordPress, you can try the troubleshooting steps in the next section.

Fixing the Critical Error in WordPress Manually (Without Email)

If you didn’t receive the WordPress critical issue notification email, then this method will teach you how to troubleshoot and fix the critical error in WordPress.

If the error was caused by a recent action you took, then you can undo that action to fix the issue.

For example, if you installed a new plugin and activating it caused the critical error, then you just need to deactivate it (we will show you how to do that in the first step below).

On the other hand, if you are unsure what caused the error, you can simply follow these steps.

1. Deactivate All WordPress Plugins

The easiest way to disable a faulty WordPress plugin is by deactivating it. However, due to the critical error, you won’t have access to the admin area or know which plugin to deactivate.

To address this, we will deactivate all WordPress plugins. Don’t worry, you can easily reactivate them once you get access to your WordPress admin area.

Simply connect to your WordPress website using an FTP client or the File Manager app in your web hosting control panel.

Once connected, you need to navigate to the wp-content folder.

Rename plugins folder

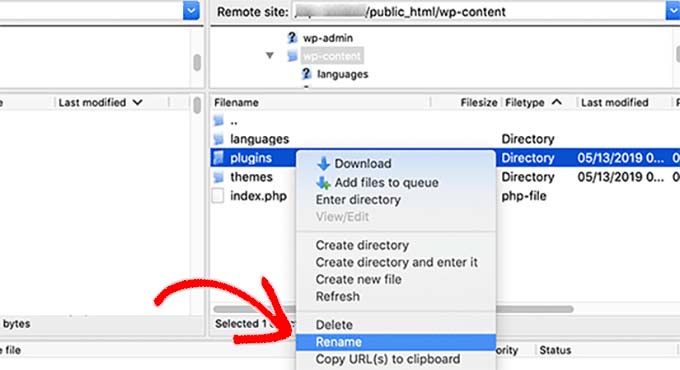
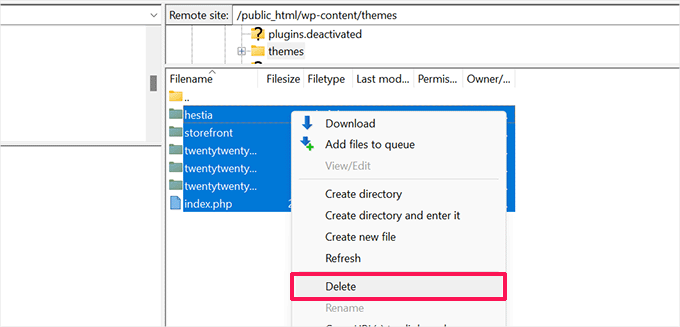
Inside the wp-content folder, you will see a folder called ‘plugins’. You need to right-click on it and then select the ‘Rename’ option.

Next, change the ‘plugins’ folder name to anything you like. In our example, we will call it ‘plugins.deactivated’.

WordPress looks for the plugins folder to load the activated plugins on your website. When it cannot find the plugins folder, it simply cannot activate them and automatically sets them as deactivated.

You can now visit your website to see if the critical error message has disappeared.

Important: Don’t forget to rename the ‘plugins’ folder if the critical error issue has been resolved. WordPress will then recognize the folder, and you can reactivate the plugins one by one from the WordPress dashboard to identify which one caused the critical error.

For more details, see our tutorial on how to deactivate all WordPress plugins.

2. Switch to a Default Theme

The next step in troubleshooting the critical error is switching your WordPress theme to a default one. This will fix the critical error issue if some code in your current WordPress theme is causing the problem.

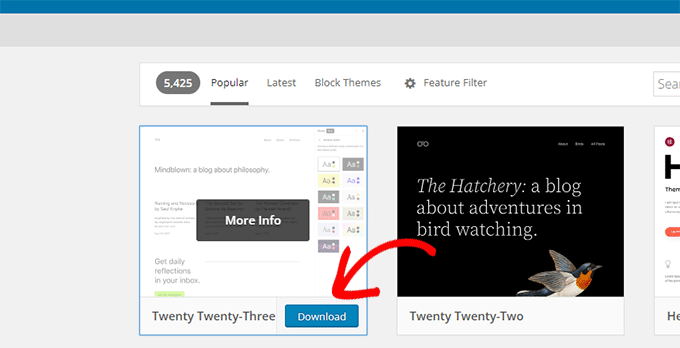
Simply go to the WordPress.org theme directory and download a fresh copy of a default theme like Twenty Twenty-Two or Twenty Twenty-Three.

Download a default theme

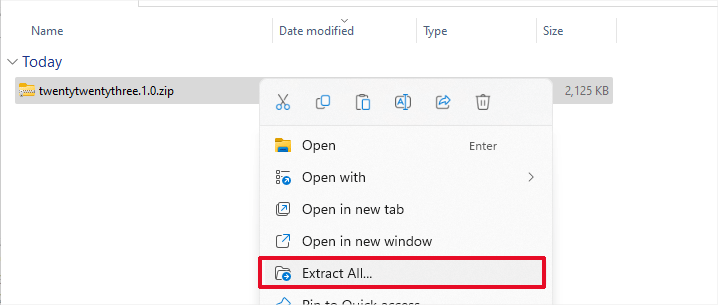
Next, you need to unzip the theme file to your computer.

This will create a folder with the theme name on your computer.

Extract theme files

Now, you need to connect to your WordPress site using an FTP client or the File Manager app in your hosting control panel.

Once you have connected, navigate to the /wp-content/themes folder, and you will see a list of all the themes installed on your website.

Download themes as backup

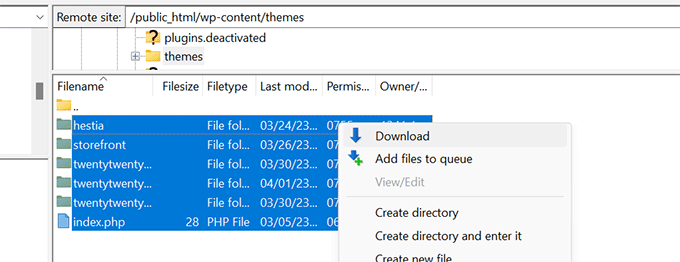
Go ahead and download all of these folders to your computer as a backup.

After that, you need to delete all the theme folders from your website.

Delete themes

Your WordPress site now doesn’t have a theme installed.

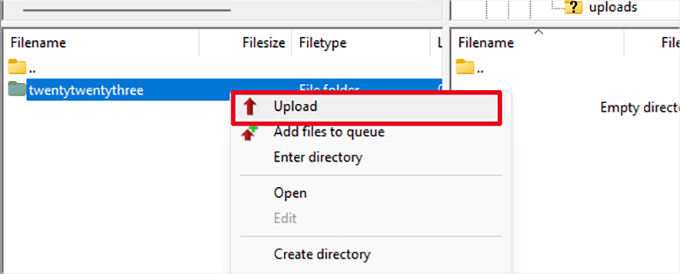
To fix this, upload the default theme folder you downloaded earlier.

Upload theme folder

Once this process has finished, you can try visiting your website.

If your WordPress theme caused the critical error, then the error message should have disappeared, and you will be able to access your website.

3. Reinstall WordPress

A corrupt WordPress core file or malware could also trigger a critical error in WordPress. The easiest way to fix this is by reinstalling WordPress.

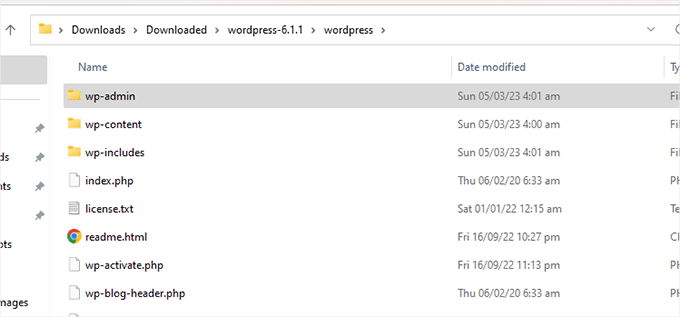
Simply go to WordPress.org and download a fresh copy of WordPress to your computer.

After downloading the file, you need to unzip it to your computer. This will create a folder called ‘wordpress’, which contains all the files you need for the reinstall.

WordPress files

Next, connect to your WordPress site using an FTP client or the File Manager app in your hosting control panel.

Once connected, navigate to the root folder of your website. This is the folder that contains the wp-admin, wp-content, wp-includes, and wp-admin folders.

Upload core WordPress files

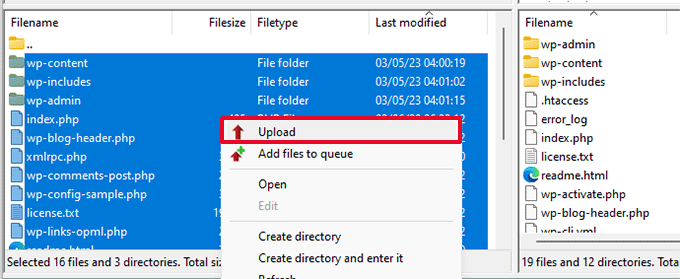
Now select the files inside the ‘wordpress’ folder on your computer and upload them to your website.

Your FTP client will ask if you want to overwrite these files or skip them. You need to select ‘Overwrite’ and check the box next to ‘Always use this action’.

Overwrite core files

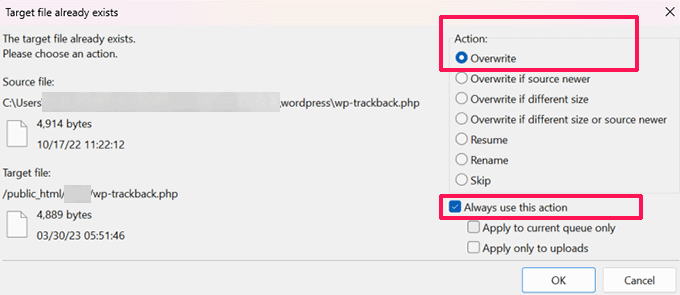
Then, simply click on the ‘OK’ button to continue. Your FTP client will now replace your core WordPress files with fresh copies from your computer.

Once it has finished, you can try visiting your website to see if this resolves the error.

If the critical error was caused by a corrupt WordPress core file or malware, then the error message should disappear now.

4. Turn On Debugging in WordPress

WordPress comes with a built-in debugging system that allows you to catch errors, log them, and troubleshoot issues.

To turn it on, you need to edit the wp-config.php file. Just locate the following line:

define( 'WP_DEBUG', false );

Now, go ahead and replace this line with the following code:

define( 'WP_DEBUG', true );
define( 'WP_DEBUG_DISPLAY', true );
define( 'WP_DEBUG_LOG', true );
define( 'SCRIPT_DEBUG', true );

If you visit your WordPress website now, it will show you debugging information and the critical error message.

Debug critical error

Debug mode not only shows errors but warnings and notices too. This helps you find out what is causing the problem so that you can fix it.

5. Increase PHP Memory Limit

Your web hosting server is like any other computer. It needs memory to efficiently run multiple applications at the same time.

If your server doesn’t have enough resources to run PHP, then it may crash or become unresponsive. This could trigger a critical error in WordPress.

To fix this, you can increase the PHP memory limit by telling your hosting server to use more memory for PHP.

You can do that by entering the following line into your wp-config.php file.

define( 'WP_MEMORY_LIMIT', '512M' );

Don’t forget to save and upload your changes to the server.

For more details, you can see our tutorial on how to increase PHP memory limit in WordPress.

Now, you can try visiting your website to see if this has resolved the critical error.

6. Upgrade Your PHP Version

WordPress requires PHP version 7.4 or greater. If your WordPress hosting server uses an older version of PHP, it may not work well and cause a critical error.

If you have access to the WordPress recovery mode, you can see which PHP version your site is using by visiting the Tools » Site Health page and switching to the Info tab.

How to check the PHP version on your WordPress website

From here, scroll down to the Server section and click to expand it.

There, you will see the PHP version installed on your hosting server.

Find PHP version

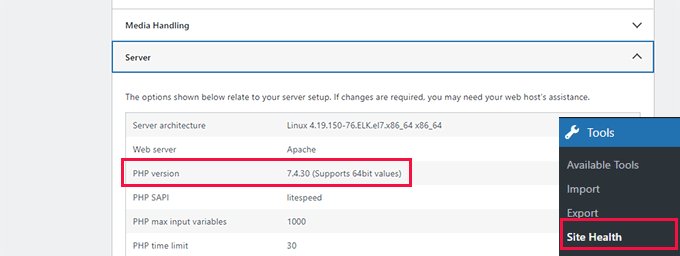
If it is lower than 7.4, then you need to update the PHP version.

Most good WordPress hosting companies allow you to easily do that from your hosting account control panel. For details, please see our article on how to update your PHP version on popular WordPress hosting platforms.

We hope this article helped you troubleshoot and fix the critical error in WordPress. You may also want to see our guide on how to get a free SSL certificate for your WordPress site or our expert comparison of the best business phone services for small businesses.

If you liked this article, then please subscribe to our YouTube Channel for WordPress video tutorials. You can also find us on Twitter and Facebook.

The post How to Fix The Critical Error in WordPress (Step by Step) first appeared on WPBeginner.


April 17, 2023 at 11:20PM

How to Easily Add Bullet Points & Numbered Lists in WordPress

Do you want to add bullet points and numbered lists in WordPress?

Adding lists to your content helps improve readability of your site. They’re also a great way to share step-by-step instructions or complicated data with your visitors. Sometimes search engines can even give higher ranking to pages that use lists in their content.

In this article, we will show you how to easily add bullet points and numbered lists in WordPress with custom styles.

How to add bullet points and numbered lists in WordPress (beginner's guide)

Why Add Bullet Points and Numbered Lists in WordPress?

Instead of showing visitors a wall of text, we believe it’s a best practice to break your content into scannable sections. There are lots of ways to make your pages more reader-friendly including creating tables, using subheadings, adding videos, and creating lists.

A list can help visitors understand your content at a glance, even if you’re sharing complicated information or lots of data. This can improve the user experience and keep people on your website for longer.

They’re also ideal for creating to-do lists or sharing step-by-step instructions with your visitors. For example, you might turn a recipe into a numbered list on your food blog.

With that in mind, let’s see how you can add bullet points and numbered lists in WordPress. Simply use the quick links below to jump straight to the method you want to use.

Method 1. Using the Built-in WordPress List Block (Easy)

The easiest way to add bullet points and numbered lists is by using the built-in List block and WordPress block editor.

This allows you to create simple lists without installing a separate WordPress plugin, although the default block only has a few customization options.

If you want to fine-tune every part of your lists with custom icons, horizontal layouts, different colors, and more, then we recommend using one of the other methods in this article.

To get started, simply open the post or page where you want to add a list. You can then choose whether to create a bullet point or numbered list.

How to Create a Bullet Point List in WordPress

To create a bullet point list, click on the ‘+’ icon to add a new block.

Adding a block to a WordPress website

In the popup that appears, type in ‘List.’

When the right block shows up, give it a click to add it to the page.

Adding a List block to a WordPress page or post

This creates the first item in a bullet point list. Simply type in the text you want to use for the first list item.

With that done, press the ‘Enter’ key on your keyboard to move to the next line. WordPress will automatically create the second bullet point.

Adding a bullet point list to WordPress

You can now go ahead and type in the text you want to use for the second bullet point. Simply repeat these steps to add more items to the list.

If you want to create a nested list, then click the ‘Indent’ button. This moves the cursor one step to the right, ready for you to type in the indented text.

How to create a nested list in WordPress

You can click on the ‘Indent’ button again, to create two levels of nested bullet points.

As you can see in the following image, each level uses a different icon.

Creating an indented bullet point

To decrease the indent, click on the ‘Outdent’ button.

This moves the cursor one step to the left, ready for you to start typing.

Creating nested lists in WordPress using the indent and outdent buttons

By pressing the ‘Indent’ and ‘Outdent’ buttons, you can create nested lists with multiple different levels.

By default, WordPress will use the ‘Medium’ font size but you can switch between small, large, and extra large using the ‘Typography’ settings in the right-hand block options.

Changing the list styles in WordPress

You can also add links, or use the standard text formatting options, such as bold and italic.

How to Create a Numbered List in WordPress

To create a numbered list in WordPress, simply press the ‘1’ key on your keyboard followed by a full stop (.).

WordPress will automatically turn this text into the first item in a numbered list.

Creating a numbered list in WordPress

You’re now ready to type the first item in the numbered list.

After that, just press the ‘Return’ key on your keyboard and WordPress will create the next numbered point automatically.

Adding a numbered list to a website or blog

Just like with bullet points, you can create nested lists by clicking on the ‘Indent’ and ‘Outdent’ buttons.

This creates an indented bullet point, underneath the numbered bullet point.

Creating an indented numbered bullet list

Unlike bullet point lists, you can only use a single level of indenting.

When you’re happy with how the list looks, simply click on the ‘Update’ or ‘Publish’ button to make it live on your WordPress website.

Method 2. Using the Super List Block WordPress Plugin (Create Multimedia Lists)

The built-in List block is perfect for creating text-based lists, but sometimes you may want to include other content. For example, you might want to create a pricing table featuring images, text, and a call to action button.

The easiest way to do this is by using Super List Block. This free plugin adds a new block that allows you to use any WordPress block in your lists.

You can even create multimedia bullet points by adding multiple blocks to a single list item. In the following image, we’re using a Paragraph and Image block in each list item.

A multimedia list created using the Super List Block plugin

Super List Block also allows you to switch between vertical and horizontal list styles, and create ‘no marker’ lists that don’t have a bullet point icon or a number.

First, you’ll need to install and activate the Super List Block plugin. If you need help, then please see our beginner’s guide on how to install a WordPress plugin.

After that, head over to the page or post where you want to add a list. You can then click on the ‘+’ icon and start typing in ‘Super List.’

When the right block appears, give it a click.

The Super List WordPress block

This adds a new block with two default list items.

To start, you can switch between horizontal and vertical layouts using the arrows in the toolbar and in the left-hand menu.

Switching between horizontal and vertical list layouts

You can also choose between a numbered or bullet point list using the icons under ‘Change List Style.’

Another option is ‘No Marker,’ which is a unique list style provided by the plugin.

How to create a no marker list using a free WordPress plugin

When you’re happy with how the list is configured, you’re ready to create your first item.

Simply click on the ‘+ button in the corner of the Super List block and choose the first block you want to add. Super List is compatible with all the default WordPress blocks, so you can add an image, heading, or any other block you want.

Adding blocks to a list item

You can then style the block as normal. For example, you might upload an image, add a download link, or type in some text.

To add another block to the bullet point, simply press the ‘Enter’ key on your keyboard. This adds a new ‘Type / to choose a block’ line underneath the first block.

You can now click on the ‘+’ icon inside the list item and add another block following the same process described above.

Adding multiple blocks to a list item

When you’re happy with how the first list item is set up, you can configure the second default item by following the same steps.

To add more bullet points, you’ll need to select an entire list item. This can be a bit tricky, as you’ll need to select the item as a whole, rather than the individual blocks within that list item.

When you see an ‘+’ icon in the toolbar, you have the right item selected. With that done, simply go ahead and give the ‘+’ button a click.

Adding list items to a multimedia WordPress list

This adds a new, empty item to the list.

Simply keep repeating these steps to add more bullet points and blocks.

A multimedia list created using the Super List Block plugin

When you’re happy with how the list looks, you can either click on the ‘Update’ or ‘Publish’ button to make it live on your WordPress blog or website.

Method 3. Using a Page Builder Plugin (Best for Landing Pages)

If you want to create beautiful lists with custom styling, then you may want to use SeedProd.

This advanced drag & drop page builder plugin lets you create professionally-designed pages using a simple drag and drop editor. It also comes with a ready-made List block that lets you fine-tune every part of the list design, including changing the space in between individual items, replacing the standard bullet points with custom icons, and more.

SeedProd makes it easy to design standalone pages that have a unique design, so this is also a great choice if you want to add lists to a custom home page or landing page.

The first thing you need to do is install and activate SeedProd. For more details, see our step-by-step guide on how to install a WordPress plugin.

Upon activation, you need to enter your license key.

Adding a license key to SeedProd

You can find this information under your account on the SeedProd website. After adding the license key, simply click on ‘Verify Key.’

After that, go to SeedProd » Landing Pages and click on ‘Add New Landing Page.’

Creating a custom landing page using a drag and drop page builder

On the next screen, you’ll be asked to choose a template.

SeedProd comes with over 180 beautiful templates that are organized into different categories such as 404-page templates and custom WooCommerce ‘thank you’ pages.

Simply click on any tab to see the different templates within that category.

SeedProd's professionally-designed templates

When you find a template you want to use, simply hover your mouse over it and then click the checkmark icon.

We’re using the ‘Explosive Growth Webinar’ template in all our images, but you can use any design you want.

Choosing a template using SeedProd

Next, you need to give the page a title.

SeedProd will automatically create a URL based on the page title, but you can change this to anything you want. For example, adding relevant keywords to a URL often improves your WordPress SEO and helps the page appear in relevant search results.

To learn more, please see our guide on how to do keyword research for your WordPress blog.

Naming a template using the SeedProd page builder

When you’re happy with the title and URL, click on ‘Save and Start Editing the Page.’

This will load the SeedProd drag-and-drop page editor. On the right, you’ll see a live preview of the page design, with some settings on the left.

The SeedProd page builder plugin for WordPress

SeedProd comes with lots of blocks that you can add to your design, including blocks that allow you to add social share buttons, videos, contact forms, and more. For more information, please see our guide on how to create a custom page in WordPress.

To add a list to your design, find the ‘List’ block and drag it onto the page.

Adding the SeedProd list block to a page template

This adds a vertical list to your page with a placeholder ‘Item 1.’

If you want to create a horizontal list instead, then click on the ‘Advanced’ tab and then select the ‘Horizontal’ button.

Switching between horizontal and vertical list layouts

You’re now ready to start building your list by selecting the ‘Content’ tab.

To replace the default text with your own messaging, click on ‘Item 1’ in the left-hand menu.

Adding items to a list using a page builder plugin

You can now type your list item into the small text editor that appears.

Here, you can also apply any formatting you want to use, such as bold or italic.

Adding items to a list using SeedProd

By default, SeedProd uses a checkmark for each bullet point, but it has a built-in library of icon fonts, which includes 1400 Font Awesome icons that you can use instead.

To replace the checkmark, simply hover your mouse over it and then click on ‘Icon Library’ when it appears.

Adding custom icons to a list

This opens a popup where you can choose the icon you want to use instead.

You can use different icons for individual bullet points within the list, so this is a great way to create more interesting and eye-catching lists.

Adding Font Awesome icons to a list

To create more bullet points, simply click on the ‘Add New Item’ button.

You can now add text and change the default icon by following the exact same process described above.

Adding new items to a list using a page builder plugin

After adding all the items to your list, you can change the font size and alignment using the settings in the left-hand menu.

You can also increase or decrease the space between the individual list items using the ‘Space Between’ slider.

Changing the spacing inbetween list items

After that, you may want to change the color of the icons in the list. Even if you’re using different icons, SeedProd will apply the same color to every item so the design will always look consistent.

To make this change, click on the ‘Icon Color’ area and then choose a new color from the popup that appears.

Changing the color of bullet points in a list

With that done, you may want to click on ‘Advanced’ and look at some additional settings. We’ve already seen how you can switch between vertical and horizontal list layouts, but you can also change the text color and font.

To really make your list stand out, you can add a box shadow or CSS animation.

SeedProd's advanced customization settings

Most of the settings in the ‘Advanced’ tab are fairly self-explanatory so it’s worth looking through them to see what different kinds of effects you can create.

That done, you can continue working on your page design by adding more blocks and then customizing them using the settings in the left-hand menu.

When you’re happy with how the page looks, click the dropdown menu on the ‘Save’ button and select ‘Publish.’

Publishing a custom landing page using SeedProd

You can now visit this page to see the list live on your online store or website.

Method 4. Add Bullet Points and Number Lists Using Code (Advanced)

You can also create lists using the built-in WordPress code editor and HTML.

This is more complicated so it isn’t the best method for beginners. However, it does allow you to use more styles and formatting in the built-in List block. For example, you can quickly and easily add heading styles to list items, using tags like h1 and h2.

For more on this topic, see our guide on how to edit HTML in the WordPress code editor.

To get started, open the page or post where you want to show the list. Then, click on the three-dotted icon in the upper-right corner and select ‘Code editor.’

Opening the WordPress code editor

The next steps will vary depending on whether you want to add a bullet point list, or a numbered list.

How to Create a Bullet Point List Using Code

To create a bullet point list, start by typing in the following:

<!-- wp:list -->
<ul>

The ul stands for ‘unordered list,’ which means the list doesn’t have any numbers, and the wp:list tells WordPress that you’re creating a List block manually.

Next, press the ‘Return’ key to move onto a new line and create your first list item:

<!-- wp:list -->
<ul>
<!-- wp:list-item -->
<li>Red</li>
<!-- /wp:list-item -->

Here, li stands for ‘list item,’ and we’re closing the line with /li.

You can repeat this process to create more list items. For example:

<!-- wp:list -->
<ul>
<!-- wp:list-item -->
<li>Red</li>
<!-- /wp:list-item -->

<!-- wp:list-item -->
<li>Orange</li>
<!-- /wp:list-item -->

<!-- wp:list-item -->
<li>Green</li>
<!-- /wp:list-item -->

When you’ve finished, close the code block with another ‘unordered list’ flag:

</ul>
<!-- /wp:list -->

This gives us the following list code:

<!-- wp:list -->
<ul>
<!-- wp:list-item -->
<li>Red</li>
<!-- /wp:list-item -->

<!-- wp:list-item -->
<li>Orange</li>
<!-- /wp:list-item -->

<!-- wp:list-item -->
<li>Green</li>
<!-- /wp:list-item -->
</ul>
<!-- /wp:list -->

As you can see in the following image, this creates a very simple list, but you can customize it by adding other HTML such as heading tags.

A simple list, created using code

How to Create a Numbered List Using Code

To create a numbered list, simply type in the following:

<!-- wp:list {"ordered":true} -->

You can then type in ol which stands for ordered list:

<!-- wp:list {"ordered":true} -->
<ol>

After that, add each list item by following the same process described above:

<!-- wp:list {"ordered":true} -->
<ol>
<!-- wp:list-item -->
<li>Red</li>
<!-- /wp:list-item -->

Finally, close the ordered list using an /ol tag and wp:list.

<!-- wp:list {"ordered":true} -->
<ol>
<!-- wp:list-item -->
<li>Red</li>
<!-- /wp:list-item -->

<!-- wp:list-item -->
<li>Orange</li>
<!-- /wp:list-item -->

<!-- wp:list-item -->
<li>Green </li>
<!-- /wp:list-item -->
</ol>
<!-- /wp:list -->

We hope this tutorial helped you learn how to add bullet points and numbered lists in WordPress. You may also want to learn how to make money online blogging, or check out our expert pick of the best WordPress contact form plugins.

If you liked this article, then please subscribe to our YouTube Channel for WordPress video tutorials. You can also find us on Twitter and Facebook.

The post How to Easily Add Bullet Points & Numbered Lists in WordPress first appeared on WPBeginner.


April 17, 2023 at 03:21PM