Do you want to easily create a custom WooCommerce thank you page?
A custom order confirmation is a great way to connect with your customers and get more sales by promoting related products, or even offering an exclusive coupon code.
In this article, we’ll show you how to create a custom WooCommerce thank you page.

Why Customize a WooCommerce Thank You Page in WordPress?
The order confirmation or thank you page may seem like a small part of your online store, but it can actually be a very valuable part of the sales process.
The default WooCommerce thank you page isn’t really optimized for conversions, so we recommend replacing it with a custom page. This page might encourage shoppers to buy more products by offering coupon codes or displaying popular products.
You can also show important information such as the items ordered, the total cost, and shipping information.
With that said, let’s show you how to easily create a custom WooCommerce thank you page, step-by-step. Simply use the links below to jump straight to the method you want to use.
Method 1. Create a Custom WooCommerce Thank You Page Using FunnelKit
The easiest way to create a custom WooCommerce thank you page is by using FunnelKit, formerly known as WooFunnels. It is the best WordPress sales funnel and automation plugin, and comes with ready-made Thank You templates that you can easily add to your online store.
This allows you to create professionally-designed and helpful thank-you pages without having to write a single line of code.
Note: There’s also a FunnelKit Pro plugin that comes with more ‘thank you’ templates. However, we’ll be using the free version of FunnelKit as it has everything you need to replace the default WooCommerce thank you page with a custom design.
The first thing you need to do is install and activate the plugin. For more details, see our step-by-step guide on how to install a WordPress plugin.
Upon activation, go to FunnelKit » Templates and click on the ‘Checkout’ button.
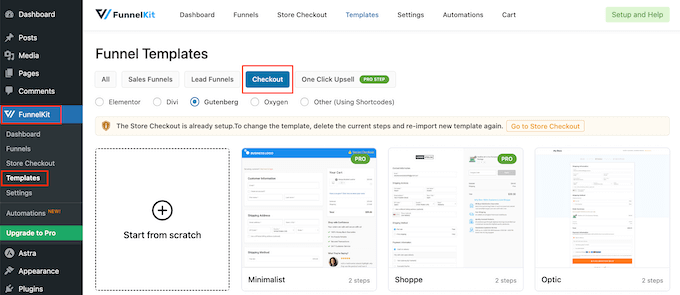
Choose a Thank You Page Template
You can now choose from any of FunnelKit’s ready-made templates, or select ‘Start from scratch.’ We recommend using a template as it helps you create a professionally designed Thank You page, fast.
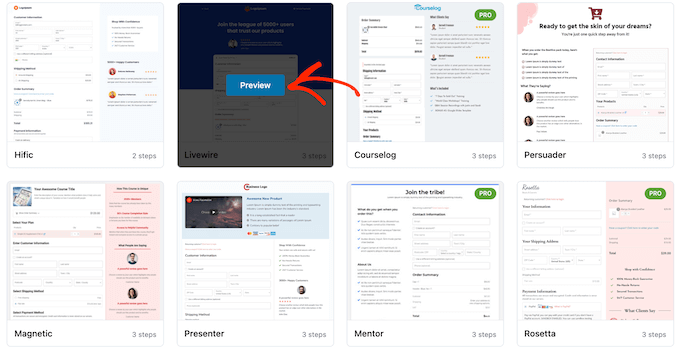
To take a closer look at any template, simply hover your mouse over it and then click on the ‘Preview’ button when it appears.
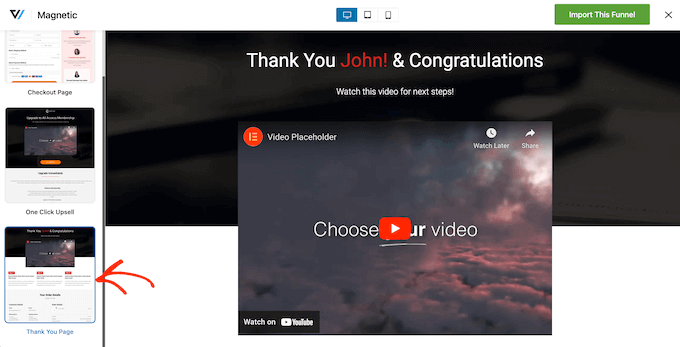
FunnelKit will show a preview of the checkout page by default.
To see the thank you design instead, simply select ‘Thank You Page’ from the left-hand menu.
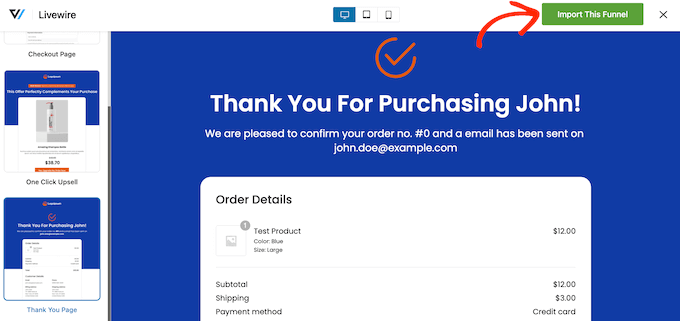
When you find a template you want to use, click on ‘Import This Funnel.’
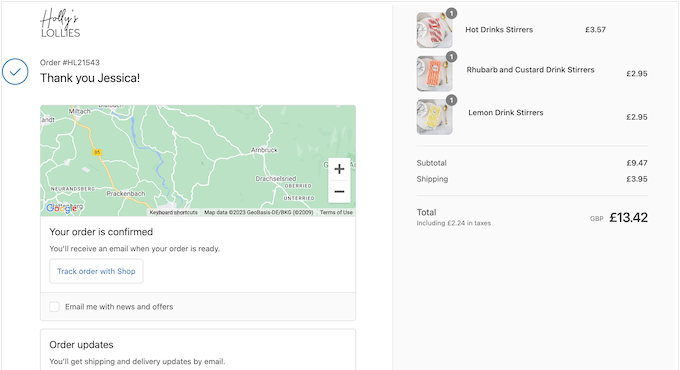
We’re using the Livewire template in all our images, but you can use any design you want.
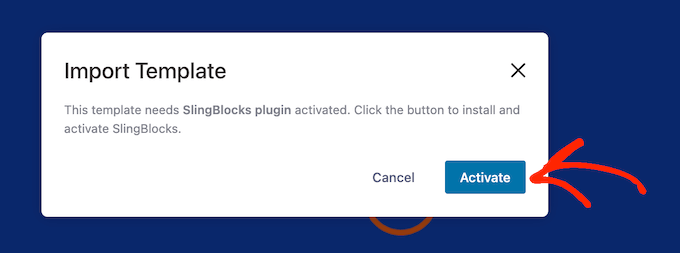
At this point, FunnelKit might ask you to install some extra plugins such as SlingBlocks, which adds page-building features to the WordPress block editor.
If you see this message, then click on ‘Activate’ to get the plugins you need.
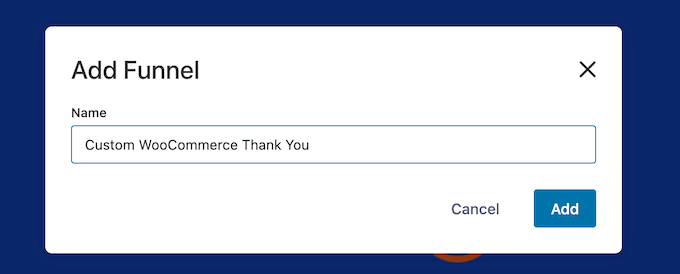
After that, type in a name for the custom thank you page. This is just for your reference so you can use anything that will help you identify the page in your WordPress dashboard.
With that done, click on the ‘Add’ button.
Customize Your WooCommerce Thank You Page
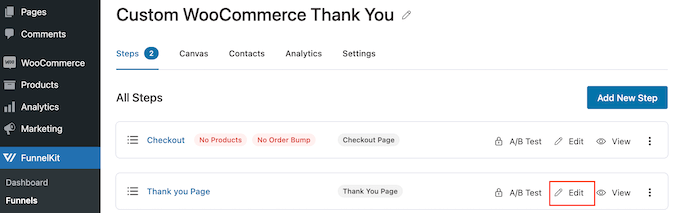
You’ll now see all the steps that are included in the template.
Since you’re using the free version of FunnelKit, the template includes a thank you page and a custom WooCommerce checkout page, which you’ll need to set up separately. For detailed step-by-step instructions, please see our guide on how to customize the WooCommerce checkout page.
To go ahead and customize the thank you page, click on its ‘Edit’ link.
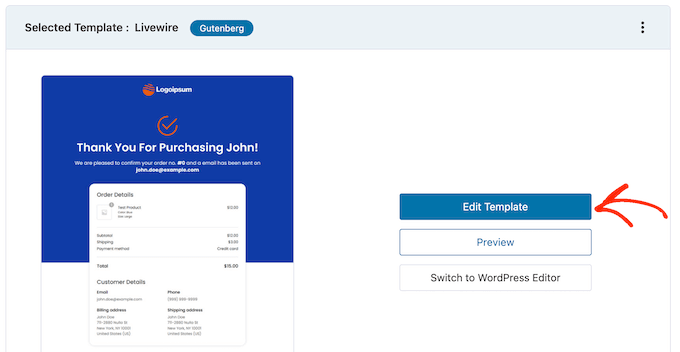
You can now click on ‘Edit Template’ to open the template in the WordPress block editor.
Note: If you’re using a page builder plugin, then FunnelKit may open the template in a different editor. If this happens, then you’ll need to click on ‘Switch to WordPress editor’ instead of ‘Edit Template.’
You can now customize the template in exactly the same way you build any WordPress page. Simply click on any block and then fine-tune it using the settings in the right-hand menu and the mini toolbar.
For example, you’ll typically want to replace the placeholder logo with your own custom logo. To do this, click to select the Image block and then select ‘Replace’ in the mini toolbar.
Now, either select Open Media Library and choose an image from the WordPress media library, or click on ‘Upload’ and select a file from your computer.
After choosing an image, you can add image alt text, change the width, add rounded corners, and more using the settings in the right-hand menu.
You’ll also want to replace the placeholder text with information about your own online marketplace. Simply click to select any text block and then type in your custom messaging.
You can also change the text’s styling using the settings in the right-hand menu. For example, you can use borders and box shadows to make the text stand out, change the font family, or change the text color in WordPress.
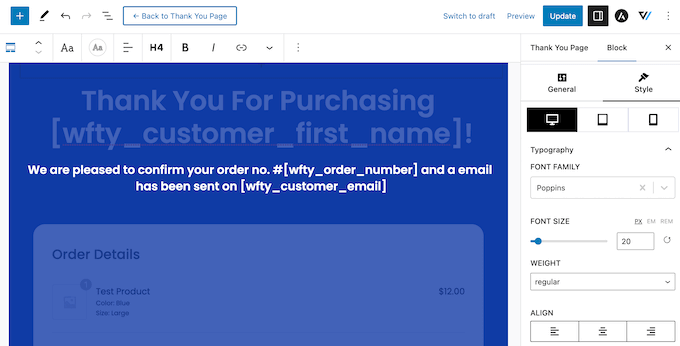
Just don’t modify any of the text inside the [ ] brackets as these tags allow FunnelKit to show personalized content, such as the customer’s name.
Customize the Order Details Widget
After that, scroll to the Order Details section and give it a click. This is a unique widget provided by FunnelKit that shows information about the customer’s order.
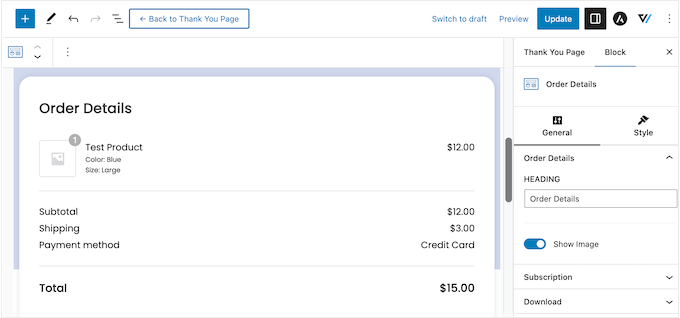
This widget works out of the box, but you may want to customize how it looks and the information it shows.
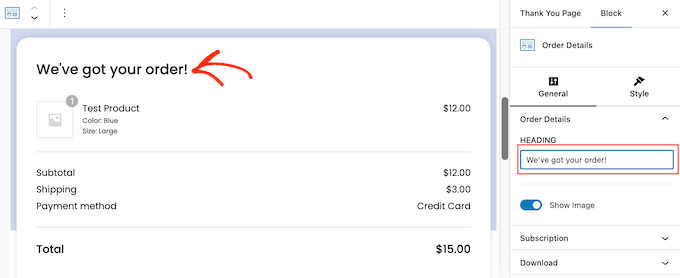
To start, you can change the section’s heading by typing into the ‘Heading’ field.
You can also choose whether to show the product image for every item in the customer’s order, using the ‘Show Image’ slider.
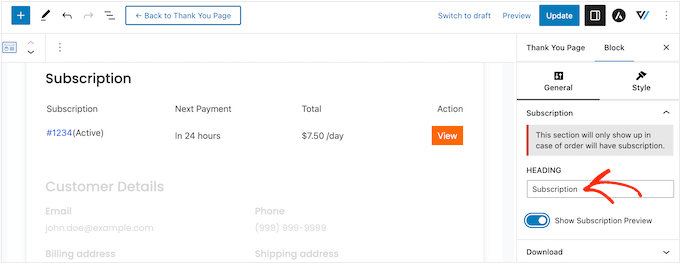
Do you sell subscriptions for a membership site, online courses, or similar? Then you may want to show information about the customer’s subscription, such as the price and when their next payment is due.
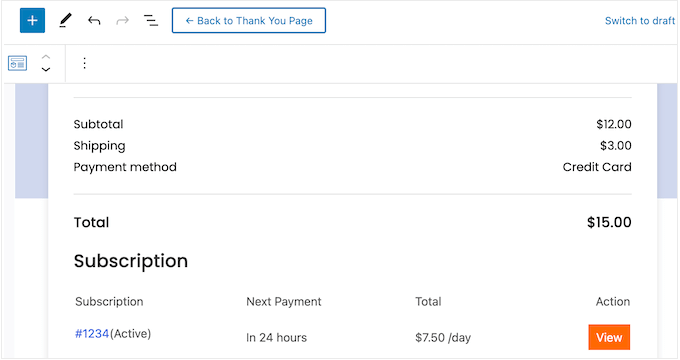
To add this section, click to expand ‘Subscription’ in the right-hand menu. Then, enable the ‘Show Subscription Preview’ toggle.
In this section, you can also replace the default ‘Subscription’ text with your own messaging by typing into the ‘Heading’ field.
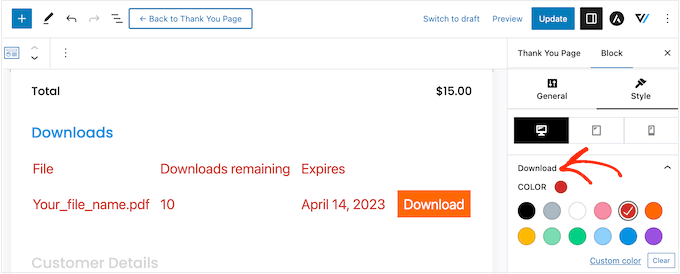
Similarly, if you sell digital downloads then you can add a ‘Downloads’ section to the thank you page. This contains useful information, such as the filename, the number of downloads remaining, and the expiration date.
You can even add a button so shoppers can download their purchase directly from the custom thank you page, which will improve the customer experience.

To add this section, simply click to expand ‘Downloads’ in the right-hand menu. You can then add and remove information using the toggles.
You can also replace the default heading and button text with your own messaging.

When you’re happy with how Order Details is set up, you may want to change how it looks by clicking on the ‘Style’ tab.
Here, you can change the heading and background colors that are used across the entire order section, or change individual elements within the ‘Download’ or ‘Subscription’ sections.
Edit the Customer Details Widget
With that done, it’s time to look at Customer Details, which is another unique widget provided by FunnelKit.
Simply click to select the Customer Details section and then make your changes in the right-hand menu. For example, you can replace the default headline with your own messaging by typing it into the ‘Heading’ field.
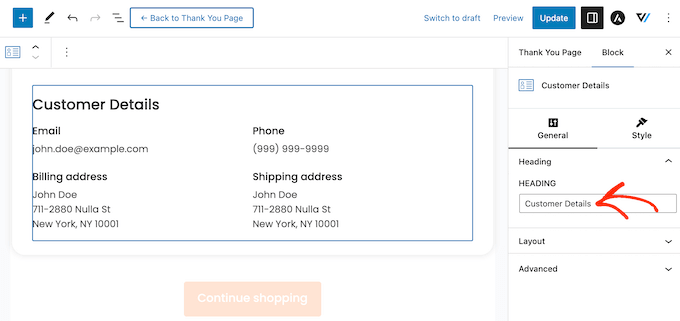
You can also switch between a multi-column or single-column layout using the ‘Layout’ dropdown menu.
After that, you can click on the ‘Style’ tab and change the fonts, text size, colors, and more.
Add More Blocks to the Custom Thank You Page
When you’re happy with the changes you’ve made to the template, you may want to add your own content. This can help you improve the customer experience, get more sales, promote your brand, and more.
To add blocks, simply click on the ‘+’ icon in the right-hand corner and then drag any block onto your design. Both FunnelKit, WooCommerce, and WordPress have lots of different blocks you can use, so let’s quickly look at a few examples.
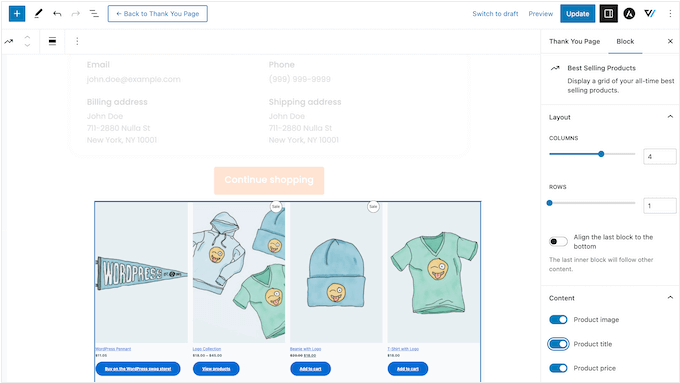
- Promote Your Other WooCommerce Products
The thank you page may seem like the end of the buyer journey, but it doesn’t have to be. You can use this page to recommend other products the shopper may want to buy. This can get you more sales, while also raising awareness about the other great products you sell.
To see what blocks are available, scroll to the ‘WooCommerce’ section in the left-hand menu. Here, you’ll find blocks such as Best-Selling Products, Newest Products, On Sale Products, and more.
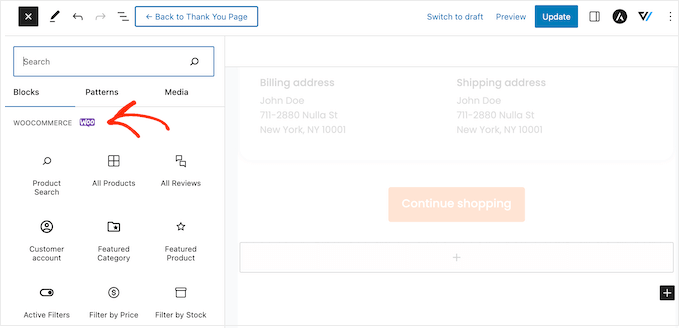
Simply find the block you want to use and drag it into your design.
With that done, click to select the block and then customize it using the settings in the right-hand menu.
- Get More Social Media Followers
Social media websites like Twitter and Facebook are the perfect place to promote your products, so you’ll want to get as many followers as possible. With that in mind, it’s a good idea to add social media links to your custom thank you page.
Since these shoppers have already bought from your business, they’re more likely to follow you on Instagram, Snapchat, YouTube, and other social platforms.
To get started, simply drag a Social Icons block onto your page. You can then click on the ‘+’ icon and choose the social icon that you want to add.
After making your selection, click on the new icon in the Social Icons block.
In the mini toolbar that appears, type in the URL of the profile you want to link to.
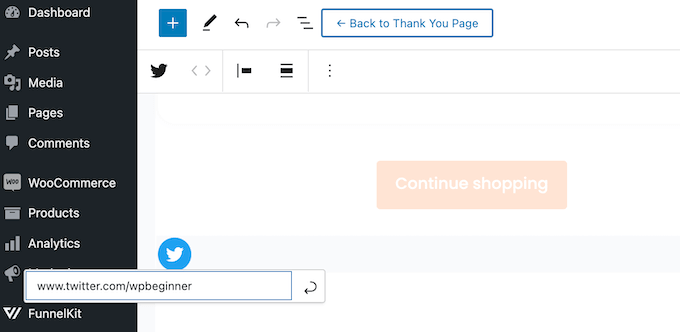
Simply repeat these steps to add all your social media accounts to the block.
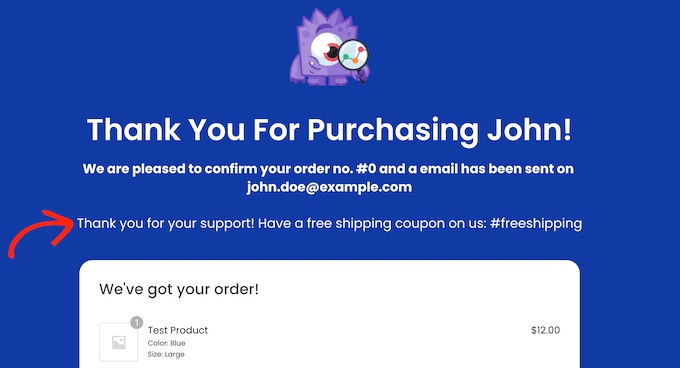
- Give Customers Exclusive Coupon Codes
A coupon code encourages shoppers to buy from you again. For that reason, you may want to add a coupon code to your thank you page. For example, you might offer shoppers a free shipping discount on their next purchase.
You can create a coupon code with WooCommerce’s built-in coupon feature, or by using a coupon code plugin.
After creating a coupon, simply add a Text block to the thank you page. You can then go ahead and type the coupon into this block, along with any other messaging you want to use.
This is a great start, but you may want to show different coupon codes to different customers. For example, you could offer first-time customers a big percentage discount on their next purchase, to help build customer loyalty.
The best way to do this is by upgrading to FunnelKit Builder Pro. This premium plugin has a powerful rules-based engine that allows you to show different coupons to shoppers based on the order total, item count, the WooCommerce payment gateway used, and much more.
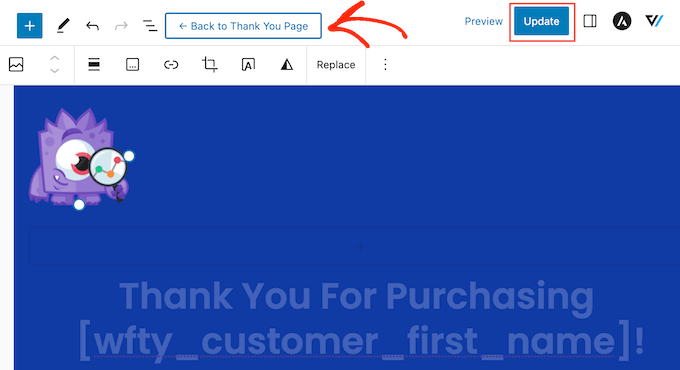
Publish the Custom WooCommerce Thank You Page
When you’re happy with how the thank you page is set up, click on ‘Update’ to save your changes. After that, click on ‘Back To Thank You Page.’
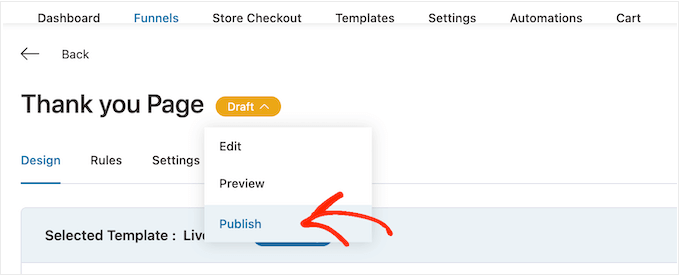
You can now click on the ‘Draft’ button next to ‘Thank you Page’ and select ‘Publish’
This will make the thank you page live on your WordPress website.
Method 2. Create a Custom WooCommerce Thank You Page Using a Page Builder
You can also create a custom WooCommerce thank you page using SeedProd. This allows you to design the page using a drag and drop editor, which is perfect if you find the WordPress block editor too restrictive or difficult to use.
SeedProd comes with more than 180 professionally-designed templates including eCommerce templates that you can use to create sales pages and lead squeeze pages.
Even better, SeedProd has full support for WooCommerce and even comes with ready-made WooCommerce blocks that you can simply drag onto your layouts.
The first thing you need to do is install and activate the plugin. For more details, see our step-by-step guide on how to install a WordPress plugin.
Note: There is a free version of SeedProd, but for this guide, we’ll use the Pro version because it has the built-in WooCommerce blocks we need. It also integrates with the email marketing services you may already be using to promote your online store.
Upon activation, go to SeedProd » Settings and enter your license key.
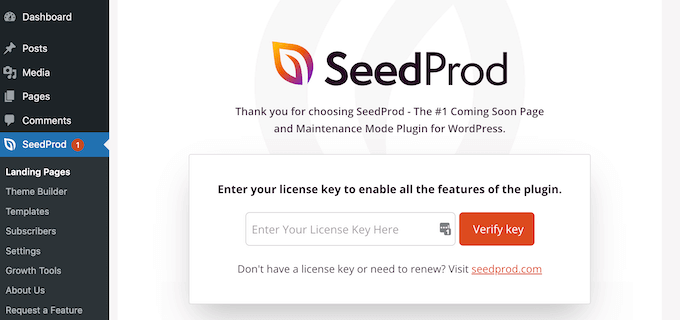
You can find this information under your account on the SeedProd website. After entering the license, click on the ‘Verify Key’ button.
Choose a Thank You Page Template
After that, go to SeedProd » Landing Pages and click on ‘Add New Landing Page.’
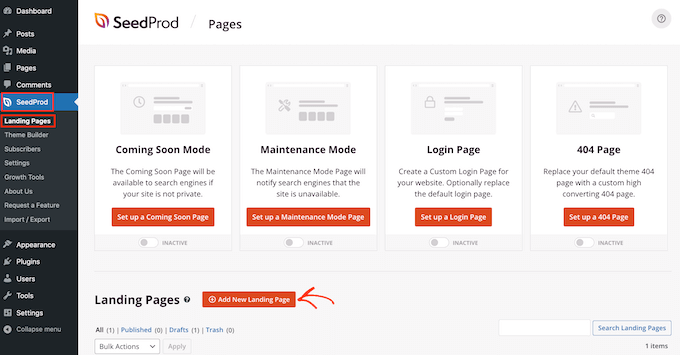
Next, you need to choose a template for your thank you page.
SeedProd’s templates are organized into different campaign types such as coming soon and 404 pages. Since you’re creating a custom WooCommerce thank you page, go ahead and click on the ‘Thank You’ tab.
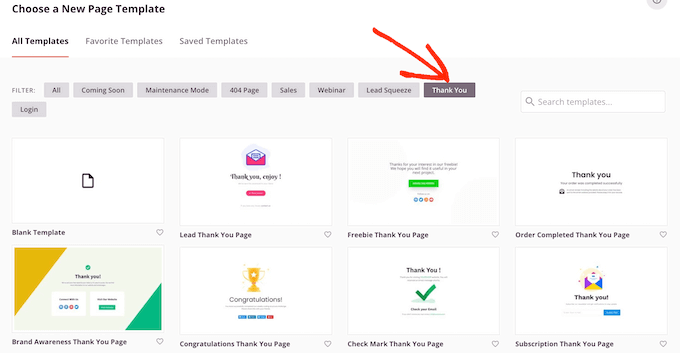
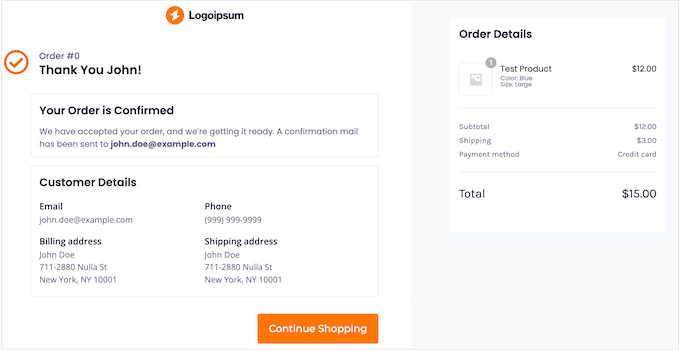
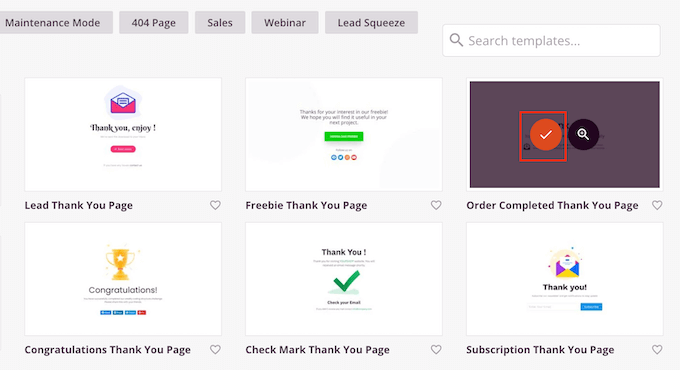
For this guide, we’ll be using the ‘Order Completed Thank You Page’ template.
Simply hover your mouse over this template and then click on the checkmark icon.
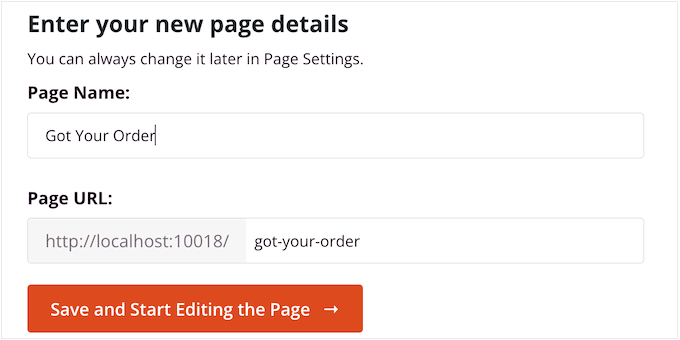
Next, type in a name for your custom WooCommerce thank you page. SeedProd will automatically use this name in its URL, but you can edit the URL if you want.
When you’re happy with the information you’ve entered, click on the ‘Save and Start Editing the Page’ button.
This loads the SeedProd editor, which shows a live preview of the page to the right and some settings on the left.
To customize a block, simply click to select it in the page builder, then use the settings in the left-hand menu.
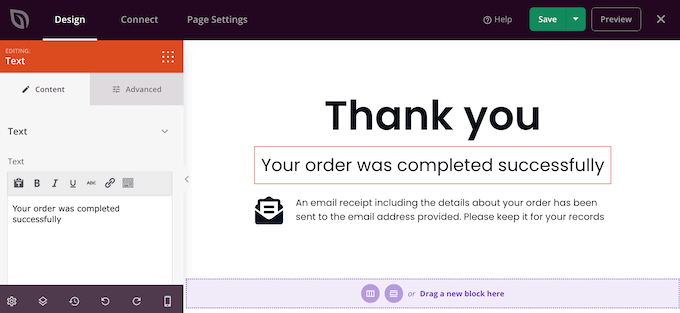
The left-hand menu also has blocks that you can drag onto the order confirmation template.
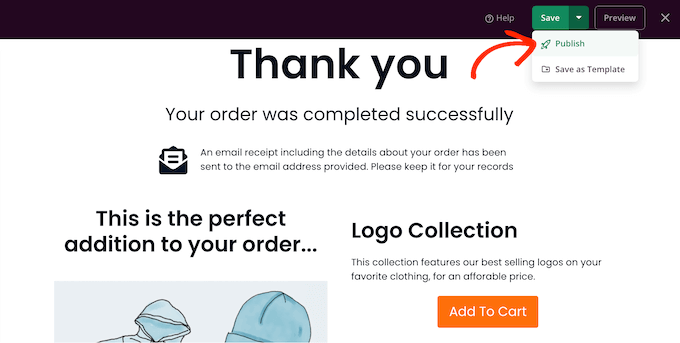
Get More Sales By Adding an Upsell Section
You may be able to get more sales by promoting other products on the thank you page. One option is to create an upsell block using SeedProd’s sections.
Sections are ready-made collections of blocks that are commonly used together, so they can help you create beautifully-designed pages, fast.
Simply click on the ‘Sections’ tab and then select ‘Hero’ in the left-hand menu. After that, hover your mouse over ‘Hero 2’ and click on the ‘+’ icon when it appears.
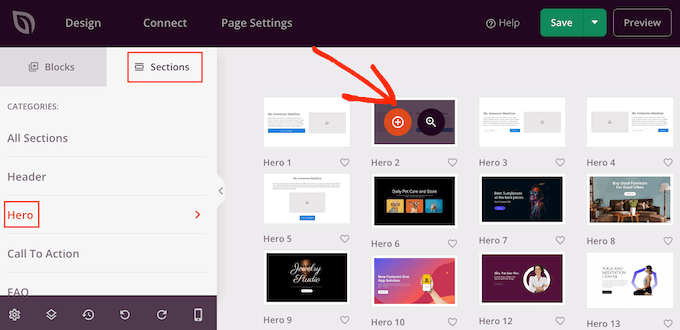
This adds the section to your page.
Go ahead and click to select the section’s ‘Image’ block. Then, in the left-hand menu click on ‘Use Your Own Image’ to open the media library.
You can now add an image for the product that you want to upsell.
Once you’ve done that, click on the ‘Headline’ block and type in the product title.
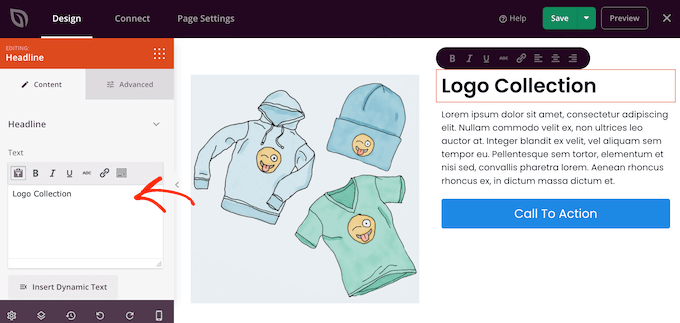
Next, click to select the ‘Text’ block and then type in the product description.
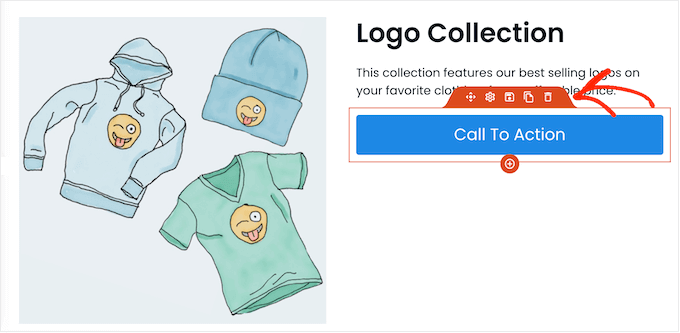
You can encourage customers to add this item to their basket, by replacing the placeholder call to action button with an ‘Add To Cart’ button.
To do this, click to select the ‘Call To Action’ block and then click on the ‘Delete Block’ icon.
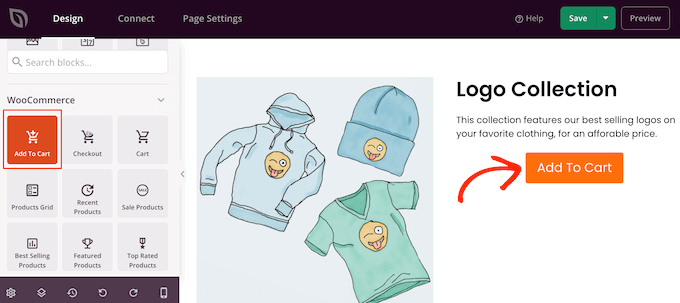
Next, find the ‘Add To Cart’ block in the menu.
Simply drop this block onto the empty space in your Hero 2 section.
Now, it’s time to connect this button to the right WooCommerce product.
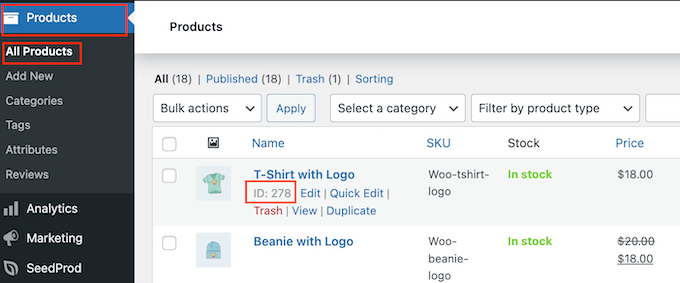
To do this, you’ll need to know the product’s ID. If you don’t know this information, then go to Products » All Products in your WordPress dashboard. Here, simply hover your mouse over the product to see its ID.
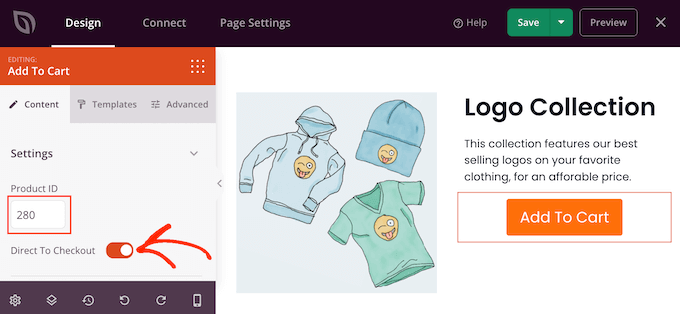
Back in the SeedProd page editor, click to select the ‘Add To Cart’ block and then add the ID to the ‘Product ID’ box.
You can also enable the ‘Direct to Checkout’ slider, so the shopper will go straight to your store’s checkout.
At this point, you can change how the button looks using the settings in the left-hand menu. For example, you can change its color scheme, button text, alignment, and more.
After that, it’s a good idea to add a heading that promotes your upsell product. For example, you could use something like ‘You may also be interested in’ or ‘This is the perfect addition to your order.’
Simply drag a ‘Headline’ block onto your layout.
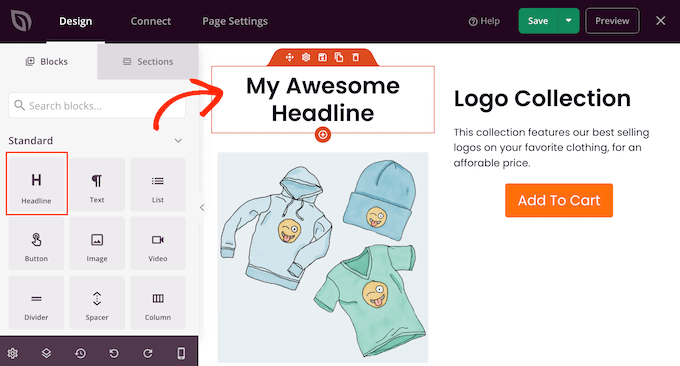
You can then type in the messaging you want to use.
Promote Your Best-Selling WooCommerce Products
Another option is adding a best-selling products section to your thank you page. Since these products are already popular, there’s a good chance the shopper may also want to buy them.
In the left-hand menu, find the ‘Best Selling Products’ block and drag it onto your layout.
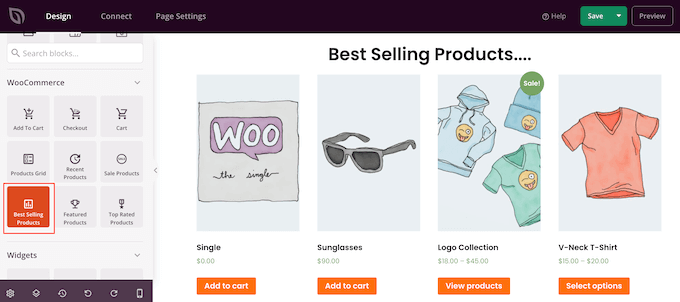
There are many other types of product grids you can add, like sale products, top-rated products, recent products, and more.
For more information, see our guide on how to display popular products in WooCommerce.
Publish your Custom WooCommerce Thank You Page
When you’re happy with how the WooCommerce thank you page looks, it’s time to publish it by clicking on the dropdown arrow next to ‘Save’ and selecting ‘Publish.’
After publishing the page, you need to change the WooCommerce settings so customers get redirected to your new page.
The easiest way to do this is by using the Thanks Redirect for WooCommerce plugin. This plugin allows you to redirect customers to any URL after making a purchase.
The first thing you need to do is install and activate the plugin. For more details, see our step-by-step guide on how to install a WordPress plugin.
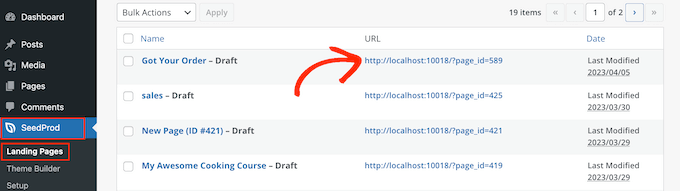
Upon activation, you’ll need to enter the URL of your custom thank you page.
To get this information, go to SeedProd » Landing Pages and find the thank you page you just created. You’ll find its link in the ‘URL’ column.
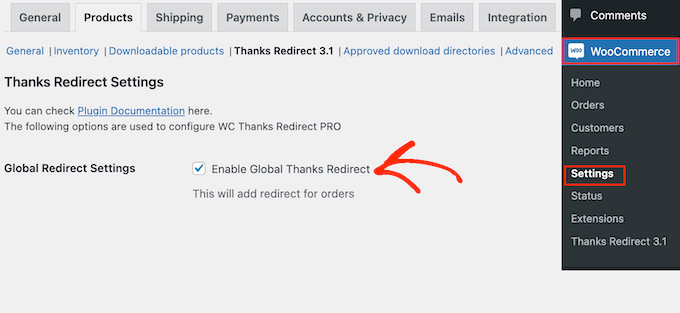
Once you have this information, go to WooCommerce » Thanks Redirect.
Here, check the ‘Enable Global Redirect’ box.
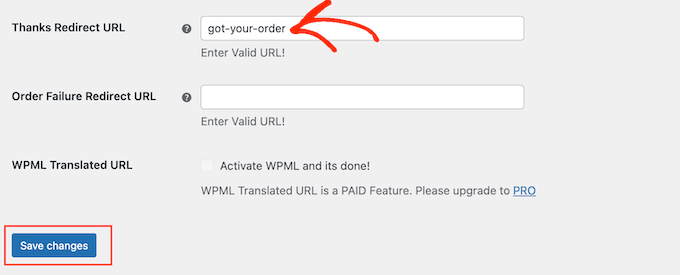
You can now type the link into the ‘Thanks Redirect URL’ box.
With that done, click on ‘Save Changes’ to store your settings.
Now, WooCommerce will send customers to your custom thank you page when they complete an order.
We hoped this article helped you create custom WooCommerce thank you pages. You may also want to see our list of the best WooCommerce plugins for your store and our guide on how to create an email newsletter.
If you liked this article, then please subscribe to our YouTube Channel for WordPress video tutorials. You can also find us on Twitter and Facebook.
The post How to Easily Create Custom WooCommerce Thank You Pages first appeared on WPBeginner.
April 20, 2023 at 04:00AM