Wednesday, May 3, 2023

How to Add Click to Tweet Boxes in Your WordPress Posts

Do you want to add a ‘click to tweet’ box in your WordPress posts?

These simple boxes allow readers to share quotes from your posts with a single click. This makes them a great way to get more engagement on social media and drive extra traffic to your website.

In this article, we will show you how to add click to tweet boxes in your WordPress posts.

How to add click to tweet boxes in your WordPress posts

Why Add Click to Tweet Boxes in Your WordPress Posts?

A ‘click to tweet’ button makes it easy for readers to share quotes from your posts and pages.

Visitors can simply click a button to create a tweet that contains the quote, plus a link to the page or post where the quote is featured.

An example of a click to tweet box in WordPress

Depending on how the box is set up, the tweet may even tag your Twitter account.

When social media users see lots of people posting your content, they’re more likely to engage with you.

How to add a 'click to tweet' box to a WordPress website

In this way, click to tweet boxes can increase your blog traffic, get you more followers, and create a buzz around your brand on social media.

All of this can translate to more sales on your online store, new subscribers for your email newsletter, and much more.

With that being said, let’s see how you can easily add click to tweet boxes in your WordPress blog posts.

How to Add Click to Tweet Boxes in Your WordPress Posts

The easiest way to create a click to tweet box is by using Better Click To Tweet. This plugin allows you to add a quote box to any page or post using either a shortcode or a block.

The first thing you need to do is install and activate the Better Click To Tweet plugin. For more details, see our step-by-step guide on how to install a WordPress plugin.

Upon activation, head over to Settings » Better Click To Tweet to configure the plugin’s settings. In the ‘Your Twitter Handle’ field, type the account you want to tag in tweets that get shared.

Configuring the Better Click to Tweet WordPress plugin

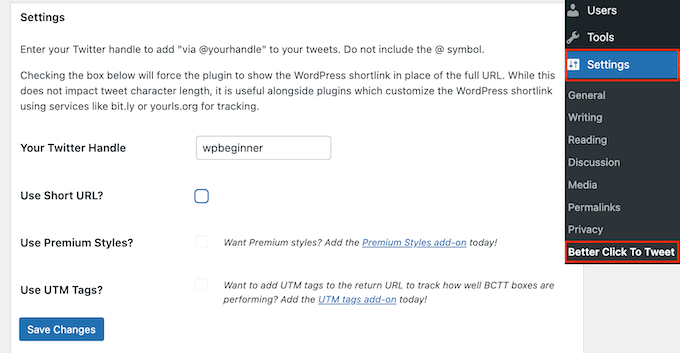
There’s no authentication process, so you can add any Twitter account to the plugin’s settings, including an account that you don’t own.

You can also override this setting for individual click to tweet boxes, so it’s easy to tag lots of different accounts across your WordPress blog.

If you use custom short URLs, then make sure to check the box next to ‘Use short URL.’ This will force the plugin to show the WordPress shortlink instead of the full URL, which is important if you use tools to track link clicks in WordPress. Again, you can override this setting for individual click to tweet boxes.

With that done, click on ‘Save Changes.’

How to Add a Click to Tweet Box Using the WordPress Block

You can add a click to tweet box to any page or post using shortcode or a block. Since it’s the easiest method, let’s start with the block.

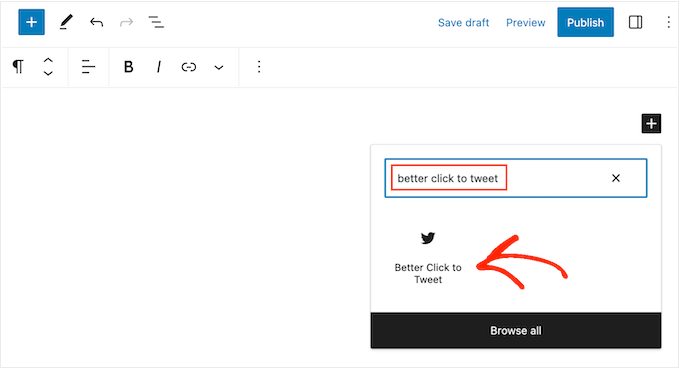
Simply open the page or post where you want to create a box and then click on the ‘+’ button.

In the popup that appears, start typing in ‘Better Click to Tweet.’ When the right block shows up, click to add it to the page.

Adding a Better Click to Tweet button to WordPress

You can now type in the quote you want to use.

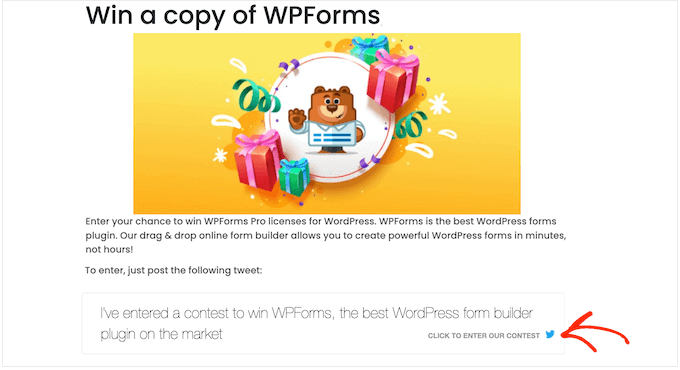
By default, the plugin shows a ‘Click to Tweet’ prompt, but you can replace this with your own messaging. For example, if you’re running a giveaway or contest in WordPress then you might encourage readers to quote the tweet, in order to enter the competition.

An example of a Twitter giveaway

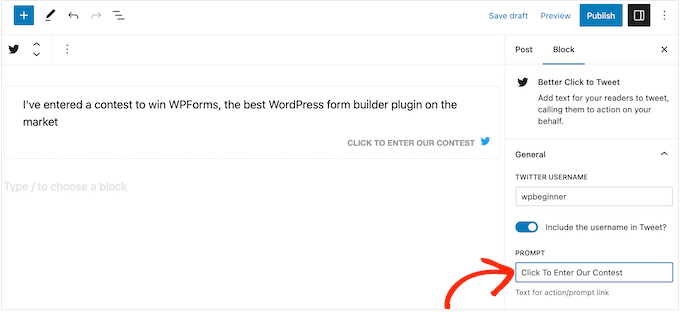
To do this, simply click to select the block.

Then, type your custom messaging into the ‘Prompt’ field.

Customizing the quote tweet block

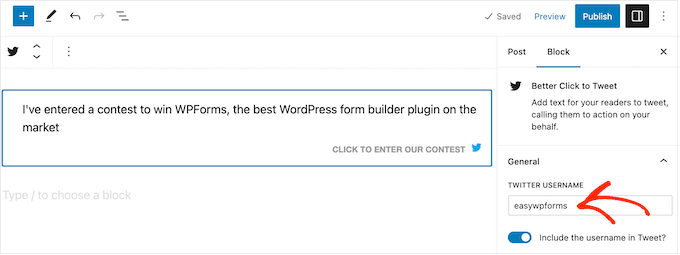
By default, the plugin will tag the account you added in its settings, but you can override this and tag a different account instead.

To make this change, simply type a different username into the ‘Twitter Username’ field.

Changing the linked Twitter account

Tagging your Twitter account is a great way to get more followers and engagement. However, if you simply want to get more visitors to your website then you can remove this tag, so the quoted tweet simply contains a link.

To do this, click to disable the ‘Include the username in Tweet?’ toggle.

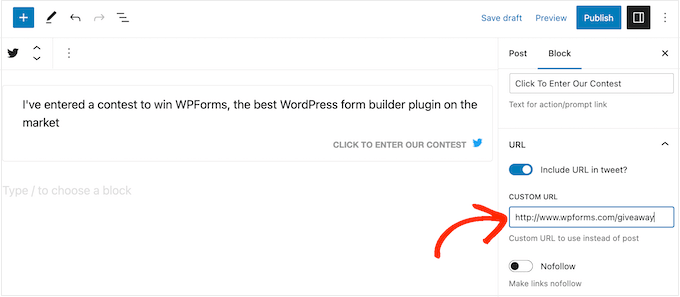
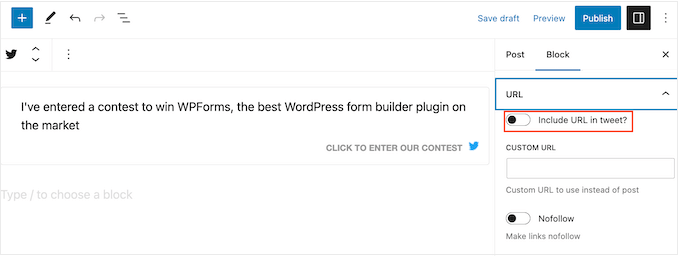
By default, the plugin includes a link to the page or post where the quote box is featured. If you prefer, then you can use a different link instead. This can be useful if you want to get more visitors to a specific page, such as the landing page for a product or service that’s mentioned in the blog post.

To do this, simply type the URL into the ‘Custom URL’ field.

You can also mark the link as nofollow, which is useful if you’re linking to a third-party website such as a client or affiliate marketing partner.

Adding a custom link to a social media block

Another option is removing the link, so the tweet just has the tagged account. This is a good option if you simply want to get more engagement on Twitter, rather than drive people to your website.

To do this, click to disable the ‘Include URL in Tweet’ toggle.

Removing the URL from a click to tweet social media block

When you’re happy with how the quote box is set up, click on the ‘Publish’ or ‘Update’ button to make it live. Now if you visit your WordPress website, you’ll see the quote box in action.

How to Add a Click to Tweet Box Using a Shortcode

If you want to show the same quote on multiple pages, then adding and configuring each box separately can take a lot of time and effort. Instead, it may be easier to paste the same shortcode into multiple locations.

You can also add a box to your WordPress theme’s sidebar or similar section, using a shortcode. For more information on how to place the shortcode, please see our guide on how to add a shortcode in WordPress.

To start, you may want to use the following shortcode:[bctt tweet="Quotable Tweet"]

This will create a tweet that tags the account linked in the plugin’s settings and includes a URL to the current page or post. Be sure to change the words “quotable tweet” in the shortcode to whatever message you want users to share.

If you don’t want to tag an account, then you can use the following instead:[bctt tweet="Quotable Tweet" via="no"]

Want to include a different URL in the tweet? Here’s the shortcode:[bctt tweet="Quotable Tweet." url="http://example.com"]

To remove the link completely, just set it to url="no.” You can also mark the link as nofollow by adding the following to the shortcode: nofollow="yes.”

Bonus: How to Add a Twitter Feed in WordPress

A click to tweet box is a quick and easy way to get engagement on Twitter. However, there are other ways to promote your social media accounts including adding a feed that shows your recent tweets and updates automatically as you make new posts.

The easiest way to do this is by using Smash Balloon Twitter Feed, which is the best Twitter plugin for WordPress.

A Twitter feed, created using Smash Balloon

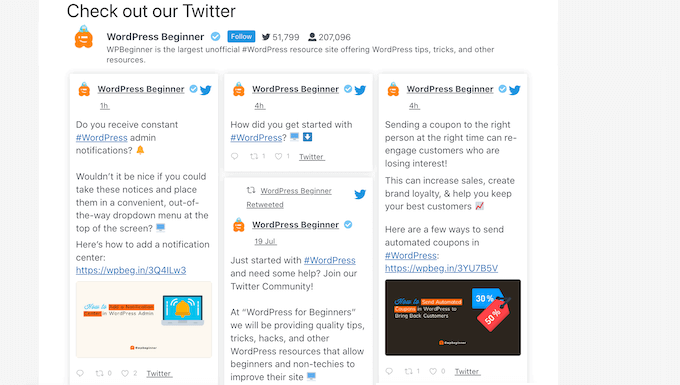
This plugin allows you to embed actual tweets in WordPress blog posts, so readers can easily comment, like, and retweet the original post.

You can quote your own tweets, or even tweets from a third party. For example, you might embed posts from an industry influencer, an advertising partner, or a happy customer.

For more information, please see our guide on how to add social media feeds to WordPress.

We hope this tutorial helped you learn how to add click to tweet boxes in your WordPress posts. You may also want to learn how to create a contact form in WordPress, or see our expert picks for the best WordPress social media plugins for WordPress.

If you liked this article, then please subscribe to our YouTube Channel for WordPress video tutorials. You can also find us on Twitter and Facebook.

The post How to Add Click to Tweet Boxes in Your WordPress Posts first appeared on WPBeginner.


May 03, 2023 at 10:00PM

How to Install Template Kits in WordPress (Step-by-Step)

Do you want to install template kits in WordPress?

Designing a website can take a lot of time and effort, especially if you don’t have any previous experience. Thankfully, template kits allow you to apply a professional design across your entire WordPress website with the click of a button.

In this article, we will show you how you can easily install website template kits in WordPress.

How to install template kits in WordPress (step-by-step)

Why Install Template Kits in WordPress?

WordPress template kits are a collection of pre-designed templates, layouts, and other elements that allow you to create a professional-looking website without having to write code.

Template kits are designed to be used together, so you can simply install a kit and use the same design across your entire site.

A good template kit has designs for all the most common pages including an about page, a contact page, and a custom home page. They may also provide templates for areas that appear across multiple pages, such as a header and footer template.

There are some template kits that you can customize to suit any kind of website, similar to multi-purpose WordPress themes. Other templates are designed for a specific industry, such as fashion, venture marketing, and tech blogging kits.

No matter what template kit you use, with the right page builder plugin you can customize it to perfectly suit your business and branding.

With that being said, let’s see how you can design a beautiful website fast, by installing template kits in WordPress.

How to Choose the Best WordPress Template Kits

Template kits have many names, as some companies call them website kits, website templates, or WordPress starter templates. No matter what the name, the best place to find template kits is by installing a drag-and-drop page builder plugin.

SeedProd is the best page builder plugin with over 1 million users. It allows you to create a complete WordPress website without having to write a single line of code.

SeedProd comes with 90 ready-made blocks that you can add to any page, and over 180 templates that you can use to create landing pages, sales pages, and more.

The SeedProd drag and drop page builder

SeedProd also has a growing library of professional website kits that you can add to your site with a single click. After choosing a kit, you can customize every part of the design using SeedProd’s drag-and-drop editor.

Since it’s the fastest and easiest method, in this guide we’ll show you how to install template kits using SeedProd.

Step 1. Install a WordPress Page Builder Plugin

First, you need to install and activate the SeedProd plugin. For more details, see our step-by-step guide on how to install a WordPress plugin.

Note: There is also a free version of SeedProd that allows you to create beautiful coming soon pages, maintenance pages, and more no matter what your budget. However, in this guide, we’ll be using the premium plugin as it has lots of different template kits. Just be aware that you’ll need a Pro plan or higher to use the template kits.

Upon activation, head over to SeedProd » Settings and enter your license key.

Adding a license to the SeedProd page builder plugin

You can find this information under your account on the SeedProd website. After entering the license key, click on the ‘Verify Key’ button.

With your license key active, you’re ready to install a template kit.

Step 2. Choose a WordPress Template Kit

SeedProd’s site kits work seamlessly with its WordPress theme builder, so head over to SeedProd » Theme Builder to get started. Here, click on the Theme Template Kits button.

The SeedProd thee builder feature

You’ll now see SeedProd’s website kit library.

To take a closer look at any template, simply hover your mouse over it and then click on the magnifying glass icon when it appears.

Previewing a website starter kit using SeedProd

This opens the template kit in a new tab.

Since it’s a complete website kit, you can see more pages and designs by clicking on the different links, buttons, and menu items.

An example of a website starter kit, installed using SeedProd

SeedProd has template kits for different industries and niches like restaurant websites, travel blogs, marketing consultancies, and more.

When you find a template kit you want to use, simply hover over it and then click on the checkmark icon when it appears.

Choosing a website template kit using SeedProd

SeedProd will now add all the different templates to the WordPress dashboard.

To take a look, go to SeedProd » Theme Builder. You may see slightly different options depending on the kit you’re using.

A list of template kit parts in the WordPress dashboard

SeedProd’s templates are disabled by default, so they won’t immediately change how your site looks by overriding your current WordPress theme.

Step 3. Customize Your Template Kit in WordPress

Before making the kit live, you need to replace the demo content. You may also want to change the kit’s branding to better match your own business. For example, you can add custom fonts, change the colors, add your own logo, and more.

The templates you see may vary depending on the kit. However, most kits have a header and footer template, so we’ll show you how to customize these templates as an example.

How to Customize a Header Template Kit in WordPress

The header is the first thing visitors see when they arrive at your site. With that in mind, it should introduce your brand and provide easy access to your site’s most important content.

To customize the header template, simply hover over it and then click on ‘Edit Design.’

Customizing a template kit using SeedProd

This loads the SeedProd editor, with the header template to the right of the screen.

On the left-hand side, you’ll see a menu with different options.

Adding blocks to a website template part

Most header templates come with a placeholder logo, so let’s start by replacing it. Simply click to select the placeholder logo and the left-hand menu will show all the settings you can use to customize the block.

Simply hover over the image in the left-hand menu and then click on the Select Image button when it appears.

Adding a logo to a website header template

Most template kits come with alternative logos and images that you can add to your WordPress website.

You can choose one of these images from the WordPress media library or upload a new file from your computer.

Adding a custom logo to a website starter kit

After replacing the logo, you can change its alignment and size, add image alt text, and more using the settings in the left-hand menu.

When you’re happy with how the logo looks, it’s a good idea to update the menu.

Most header templates come with a placeholder menu that you can easily customize by adding your own text and links. To get started, click to select the Nav Menu block.

Adding a navigation menu to a custom page design

You can either build a menu in SeedProd, or you can display any navigation menu you’ve created in the WordPress dashboard.

To build a new menu using SeedProd, simply hover your mouse over any menu item that you want to delete. Then, click on the trash can icon when it appears.

Removing items from a WordPress navigation menu

To add a new item to the menu, click on the ‘Add New Item’ button, which creates a new placeholder item.

Next, simply click on the item to expand it.

Creating a custom navigation menu using WordPress

You’ll now see some new settings where you can type in the text and link you want to use.

You can also set the link to open in a new tab, or you can mark it as no follow.

How to install a template kit using SeedProd

Simply repeat these steps to add more items to the menu. You can also rearrange items in the menu using drag and drop.

Another option is to simply display a menu you’ve already created in the WordPress dashboard. To do this, click on ‘WordPress Menu’ and choose a menu from the dropdown.

Showing a WordPress navigation menu

After making these changes, you may want to add more content to the header. For example, you might encourage visitors to follow you on social media by adding ‘like’ and ‘share’ buttons to the header.

In the left-hand menu, simply find the block you want to add and then drag it onto your layout.

Adding social icons to a website template kit

You can then customize the block using the settings in the left-hand menu.

When you’re happy with how the header template looks, click on ‘Save’ to store your settings.

Publishing a website starter kit

How to Customize the Footer Template in WordPress

The footer is the perfect place to add useful information such as a dynamic copyright date or your phone number. You can also link to important content like your contact form, blog, and social media profiles.

With that in mind, most SeedProd template kits come with a footer template. To edit this template go to SeedProd » Theme Builder and then hover over the ‘footer’ template. When the ‘Edit Design’ link appears, give it a click.

How to customize a footer template

This opens the footer template in the SeedProd editor. You can now delete unwanted blocks, replace the placeholder content, and add more blocks following the exact same process described above.

Many business owners use the footer to show their contact information, such as their business email address. However, if you’re using WPForms then you can easily add a contact form to your website’s footer. This allows people to contact you from any page or post.

Adding a contact form to a template kit using WPForms

If you’re looking for more ideas, then you can see our checklist of things to add to the footer of your WordPress website.

Most footer templates come with placeholder text that you can replace with your own content. Simply click to select each text box and then type your messaging into the small text editor that appears.

The editor has all the standard formatting options, so you can highlight important text or add links that will appear across your WordPress blog or website.

Adding text to a footer template

Many footer templates come with a ready-made Nav Menu block that contains some placeholder links.

You can replace these dummy menu items with links to your own content by following the same process described above. For example, you might include links to your site’s privacy policy, blog, online store, and other important content.

Adding a custom navigation menu to a website footer template

When you’re happy with how the footer looks, click on the Save button to store your changes.

Step 4. Edit Your Global Template Kit Settings

Often, you’ll want to change the template’s default fonts, backgrounds, colors, and more to match your branding. Instead of making these changes to each template, you can save time by editing the kit’s Global CSS settings.

In your WordPress dashboard, go to SeedProd » Theme Builder and hover over the Global CSS template. You can then click on the ‘Edit Design’ link when it appears.

Editing the global CSS settings

In the left-hand menu, SeedProd lists all the different elements you can change, such as the fonts, forms, layout, and more.

To see what changes you can make, simply click any option.

Changing a template kit's global CSS settings

You can now adjust its settings. For example, you can change the colors used for the kit’s headers, paragraph text, links, and more.

SeedProd will automatically apply these changes across the entire template kit.

Changing the colors in a website template kit

When you’re happy with the changes you’ve made, click on the ‘Save’ button.

Step 5. Enabling Your SeedProd Template Kit

You can now customize every SeedProd template by following the same process described above. When you’re happy with how the templates are set up, it’s time to make the kit live.

In the WordPress dashboard, go to SeedProd » Theme Builder and click on the ‘Enable SeedProd Theme’ toggle so that it shows ‘Yes.’

Enabling a template kit in WordPress

Now, if you visit your WordPress website you’ll see the new design live.

We hope this article helped you install template kits in WordPress. You may also want to see our guide on how to choose the best web design software, or see our expert pick of the must-have WordPress plugins.

If you liked this article, then please subscribe to our YouTube Channel for WordPress video tutorials. You can also find us on Twitter and Facebook.

The post How to Install Template Kits in WordPress (Step-by-Step) first appeared on WPBeginner.


May 03, 2023 at 02:57PM

Tuesday, May 2, 2023

How to Show or Hide Widgets on Specific WordPress Pages

Do you want to display widgets on specific pages of your WordPress website?

By default, when you add widgets to your website, they will be shown on all pages. However, sometimes you may only want to show selected widgets on certain pages can help you better customize your website and provide a personalized user experience.

In this article, we will show you how to easily show or hide widgets on specific WordPress pages.

How to show or hide widgets from WordPress pages

Why Show or Hide Widgets on WordPress Pages?

WordPress widgets allow you to add additional content to your site’s sidebar, footer, and header.

They help put important information in front of your visitors, like a contact form, social media pages, sales offers, your most valuable pages, and more.

For example, displaying a search box widget on the checkout page of your online store doesn’t provide any benefit to your visitors. On the other hand, showing discount coupons for products and services in the widget area can increase your sales.

Similarly, you may want to keep your homepage clean and reduce its distractions. Hiding widgets on the homepage will keep it clutter-free and increase user engagement on your WordPress website.

Sadly, WordPress doesn’t offer an option to show or hide widgets by default.

That said, let’s see how you can easily display widgets on specific pages using a WordPress plugin.

Showing/Hiding WordPress Widgets on Specific Pages

You can easily hide or show widgets on specific pages using Widget Options. It is a complete widget-management plugin that helps you assign and restrict widgets for different pages, posts, and devices.

Note: If you are using a block theme, then Widget Options will convert your block-based widget areas into classic widget areas. Then, you will be able to use the plugin to show/hide widgets across your site.

First, you need to install and activate the Widget Options plugin. For more details, please see our step-by-step guide on how to install a WordPress plugin.

Upon activation, you can start by visiting the Settings » Widget Options page from the WordPress admin sidebar. Here, you will find different options that the plugin offers to customize your widgets.

Make sure that the ‘Classic Widgets Screen’ option is enabled so that you can hide or show widgets on your website.

After that, simply click the ‘Configure Settings’ button in the ‘Pages Visibility’ box.

Widget options settings

From here, you can control where your widgets will be visible and choose where you don’t want to display them.

By default, the plugin will have the post types tab, taxonomies tab, and miscellaneous tab options enabled.

However, you can uncheck the box for any option to customize the visibility of widgets on different pages.

Edit page visibility options

When you have made the changes, simply click the ‘Save Settings’ button.

Next, you need to head to the Appearance » Widgets page from your admin sidebar and click on any widget that you want to show or hide. This will expand the widget settings, and you will see options for widget visibility.

Now, under the ‘Hide/Show’ dropdown menu, simply select the ‘Hide on checked page’ or the ‘Show on checked pages’ option according to your liking.

By default, widgets will be hidden on the checked pages, but you can change that to show widgets on the checked pages instead.

Choose if you want to show or hide widget on the checked pages from the dropdown menu

Next, the ‘Misc’ tab provides options to hide widgets on the home/front page, blog section, archives, 404 pages, and search page.

After that, go ahead and switch to the ‘Post Types’ tab and choose on which pages you want to hide/show the WordPress widget.

Check the pages where you want to hide or show the widget

Lastly, you can go to the ‘Taxonomies’ tab and select categories to hide or show your WordPress widgets.

This means that the widget will be displayed or hidden for the blog posts with that specific WordPress category.

Check box next to the categories where you want to show or hide the widget

Finally, don’t forget to click the ‘Save’ button to store your settings.

You can now visit your website to see it in action.

For this tutorial, we have only displayed the ‘Search’ widget on the ‘Blog’ page and hidden it on all the other pages on our WordPress website.

Preview for show/hide widgets

We hope this article helped you learn how to show or hide widgets on specific WordPress pages. You may also want to see our list of the most useful WordPress widgets and read our article on how to create a free business email address.

If you liked this article, then please subscribe to our YouTube Channel for WordPress video tutorials. You can also find us on Twitter and Facebook.

The post How to Show or Hide Widgets on Specific WordPress Pages first appeared on WPBeginner.


May 02, 2023 at 10:09PM

Welcome HeroThemes to the WPBeginner Growth Fund

Today, I’m extremely excited to announce that WPBeginner Growth Fund has taken an investment stake in HeroThemes, the parent company behind the popular WordPress knowledge base theme and plugin called Heroic KB and KnowAll Theme.

Over 26,000 smart business owners use HeroThemes’ plugins and themes to create an extensive knowledge base and offer best-in-class customer support to their customers.

WPBeginner Growth Fund invests in HeroThemes

About HeroThemes

HeroThemes is a UK based WordPress company founded by Chris Hadley and Richard Long.

They specialize in building tools that enable you to deliver great customer service on your WordPress website.

With HeroThemes’ plugins and themes, you can

  • easily manage all your support tickets and emails
  • add a fully-fledged knowledge base to your site or build one on a dedicated customer support portal
  • improve support response time with helpful FAQs

… all within your WordPress website.

In a nutshell, HeroThemes transforms your WordPress website into an excellent customer support platform.

Let’s take a detailed look at different HeroThemes products.

Heroic KB: #1 WordPress knowledge base plugin that helps you add a customer support portal to your existing business website.

heroic kb

KnowAll: It’s a dedicated knowledge base theme that enables you to build a knowledge base website and also offers deep integration with Heroic KB plugin.

knowall

Heroic Inbox: The #1 WordPress powered help desk & customer support plugin that lets you manage support tickets and customer emails right in your WordPress site.

heroic inbox

Heroic FAQs: It lets you publish frequently asked questions to improve support response time and avoid receiving repetitive customer emails.

heroic faqs

Background Story

4 years ago, I published a post celebrating WPBeginner’s 10 year anniversary. In that post, I asked our readers to share their WPBeginner story as a video and explain what they have learned from WPBeginner and its impact on their business.

I got tons of user videos, and in there one of the video responses was from Chris Hadley, so I connected with him at that point.

Chris has been a longtime follower of WPBeginner. He learned about WordPress super loop from one of our articles on WPBeginner in the early days, which played a critical role in building the HeroThemes business.

Several of our own knowledge base sites are also powered by Heroic KB plugin, and our other doc sites use a lot of the functionality that we forked from this plugin in the earlier days.

Going into 2023, we eventually decided to join forces.

I invested in the HeroThemes through the WPBeginner Growth Fund and will be advising the team on how to expand their business.

At Awesome Motive, we have years of experience building popular WordPress plugins that are used by over 25 million websites, including OptinMonsterWPFormsMonsterInsights, and many more.

Not to mention, our WPBeginner growth fund portfolio companies like MemberPressFormidable FormsPretty LinksWholesale SuiteUncanny Automator, and others have seen tremendous growth over the years.

Sharing our combined knowledge with HeroThemes will help all of us better serve the larger WordPress community.

I’m really excited to be working with Chris, Richard, and the entire team to help accelerate their growth in 2023 and beyond. They will be joining me at our next Mastermind.

As always, thank you so much for your continued support of WPBeginner.

WPBeginner and Awesome Motive would not be here without YOU, and I just want to say how much I appreciate all of you.

And I look forward to continuing serving you and the larger WordPress / web ecosystem for years to come.

Sincerely,

Syed Balkhi
Founder of WPBeginner

P.S. Want us to acquire or invest in your WordPress business? Learn more about the WPBeginner Growth Fund.

The post Welcome HeroThemes to the WPBeginner Growth Fund first appeared on WPBeginner.


May 02, 2023 at 06:00PM