Are you looking for easy and smart ways to automate tasks and increase sales in your WooCommerce store?
By automating tasks in your online store, you can save time and money while growing your business and increasing sales.
In this article, we will show you how to use WooCommerce automations to increase sales.
Why Automate Your WooCommerce Store?
If you are running a WooCommerce store, then you probably spend a lot of your time performing repetitive tasks. These can be anything from sending marketing emails for your online store to processing customer invoices.
Wouldn’t it be nice if you could automate all of those tasks and focus on growing sales and your business instead?
Luckily, you can use the best WordPress automation tools and plugins to automate WooCommerce tasks. By doing this, you will save time, offer a better user experience to your customers, and ultimately increase sales.
With that being said, here are 15 WooCommerce automations to increase sales:
- Use Automation to Personalize Your Email Marketing
- Set Up an Automated Marketing Campaign With Push Notifications
- Let Customers Track Orders With Automated Transactional Emails
- Quickly Update Your Customers With Automated SMS Messages
- Automate All Invoicing and Payment Processes
- Use Automated Store Activity Notifications to Boost Sales
- Automatically Display Your Best Product Reviews
- Use an Automated Sales Funnel to Boost Sales Conversions
- Reduce Cart Abandonment With Popups and Push Notifications
- Send Automated Coupons to Bring Back Customers
- Automate Your Social Media Channels
- Automatically Display Social Media Content in WooCommerce
- Make Your Forms Smarter Using Automation
- Automate Live Chat Using Artificial Intelligence
- Use Uncanny Automator for Even More WooCommerce Automations
- Bonus: Track Conversions to Learn How to Increase Sales
1. Use Automation to Personalize Your Email Marketing
Are you keeping in touch with your customers using an email newsletter? You may not be taking advantage of all the automation tools available in your email marketing software.
For example, the best email services like Constant Contact, Sendinblue, and Omnisend all have integrations with WooCommerce. They allow you to personalize your emails by adding the customer’s name and more.
They also let you set up a Welcome email series using a drip campaign. This is a sequence of automated emails that will go out automatically to new customers.
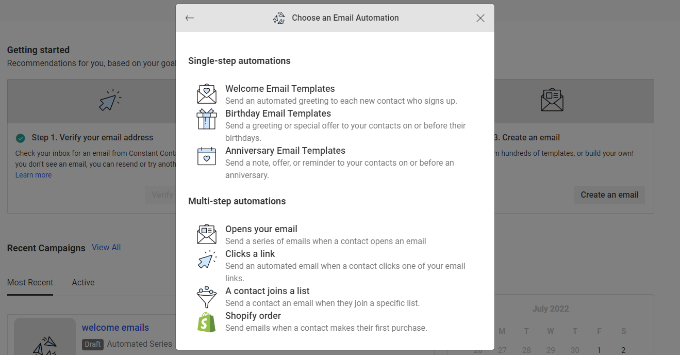
You can learn how to get started by scrolling down to the automated drip emails section of our guide on how to send automated emails in WordPress.
Additionally, if you are looking for a complete tool that offers WooCommerce email customization and automation, then we highly recommend using FunnelKit Automations.
Apart from letting you fully customize your WooCommerce emails, it also lets you set up smart, automated follow-up emails and workflows to boost your sales.
You can get started with FunnelKit Automations by selecting an automation from a library of handy templates.
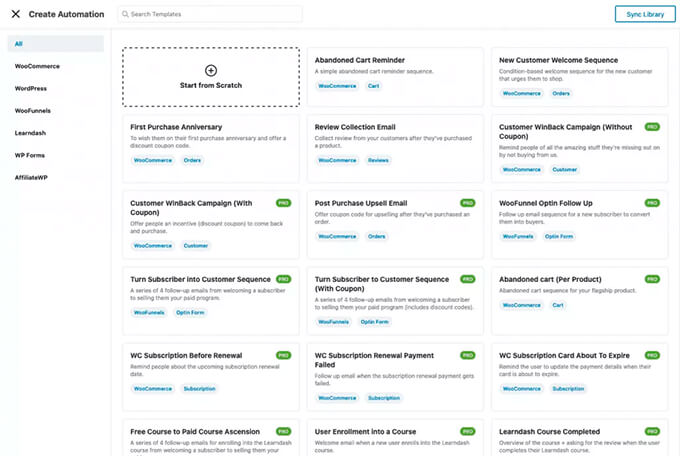
For example,
you can automatically send an email series to new customers, recover abandoned carts, send promotional emails to selected audiences, and more.There is also an option to create your own WooCommerce automation from scratch. You will then see a visual email automation builder where you can make any customizations that you need.
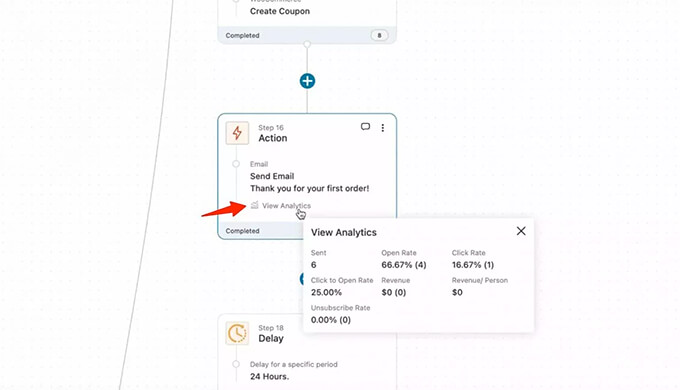
For example, the screenshot above shows the workflow for sending out a thank you email after a customer makes their first order. You can even see in-line analytics for each email.
You can learn more in our guide on how to customize WooCommerce emails. Make sure you scroll down to the section on FunnelKit Automations.
Tip: We recommend combining FunnelKit Automations with an SMTP service like WP Mail SMTP. This will make sure your emails are delivered to your customers and won’t get lost or end up in the spam folder.
2. Set Up an Automated Marketing Campaign With Push Notifications
You can also run an automated marketing campaign using push notifications instead of emails. These notifications go directly to the user’s web browser or mobile device. This means they have a much higher engagement rate, similar to SMS messages.
The easiest way to set up automated push notifications is with PushEngage. It is the best web push notification software for WordPress, and over 10,000 businesses use it to send targeted messages.

For each notification, you can change the title, message, URL, icon image, and more by expanding it.
There is also a preview of how your notifications will look in the browser.
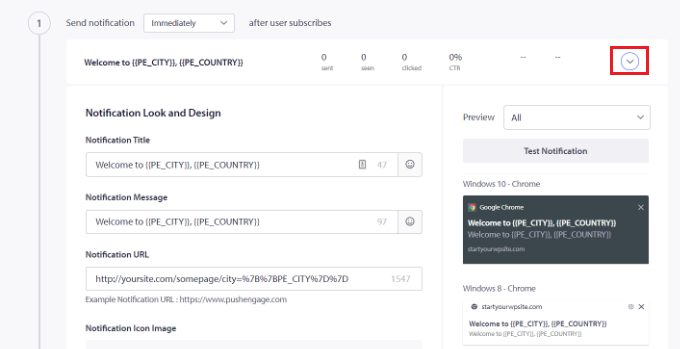
PushEngage also lets you choose when to send each notification. For example, you can immediately send the first notification and select a different time for the following one.
For more details, see our guide on how to set up automated drip notifications in WordPress.
3. Let Customers Track Orders With Automated Transactional Emails
WooCommerce will need to send different transactional emails to your customers. These help them get order confirmations, track their order status, get invoices, and find out more information about your online store.
You can customize and automate these emails using FunnelKit Automations, which is a popular WooCommerce plugin for marketing automation.
The FunnelKit Automations dashboard makes it easy to create a new automation. You can simply click on one of the plugin’s many templates.
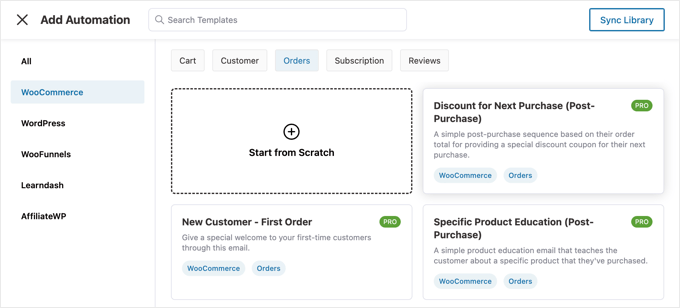
You can filter the list to quickly find the WooCommerce automation you wish to use. For example, you might want to send automatic thank-you emails to repeat customers.
You can then customize the automation using the visual automation builder, including the content of the email.
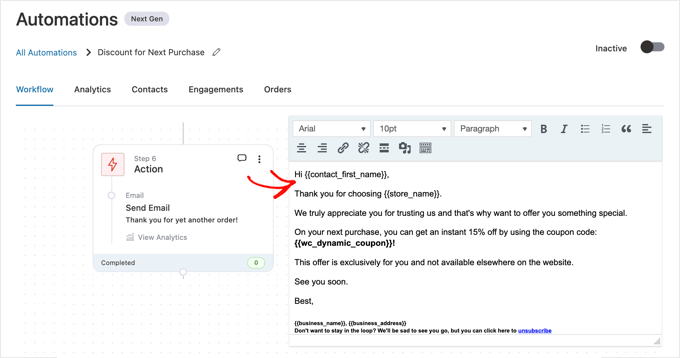
For detailed instructions, please see the section about
sending automated transactional emails with FunnelKit Automations in our guide on how to send automated emails.4. Quickly Update Your Customers With Automated SMS Messages
Many customers prefer to receive text messages to notify them about their orders. Plugins like YITH WooCommerce SMS Notifications or FunnelKit Automations will automatically send SMS messages to your customers.
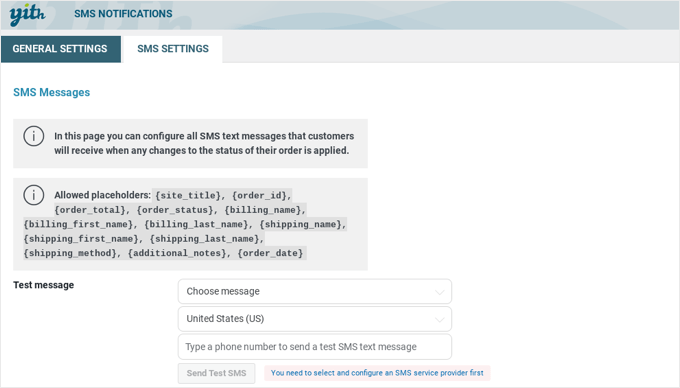
SMS messages are an effective way to keep your customers up to date. They have a 98% average open rate, with 95% of messages being read in the first 3 minutes!
You can send automatic texts to your customers when their orders are dispatched or their status changes. You can automatically send SMS notifications to your customers or let them opt in at checkout.
Learn how by following our guide on how to send SMS messages to your WordPress users.
5. Automate All Invoicing and Payment Processes
As a business owner, there is a lot to manage. If you are still creating invoices manually, then you can switch to professional invoicing software that automates all invoicing and payment processes. Then, you will be free to focus on growing your business.
A plugin like WooCommerce PDF Invoices makes it easy to automatically generate invoices, collect orders, and manage your finances.
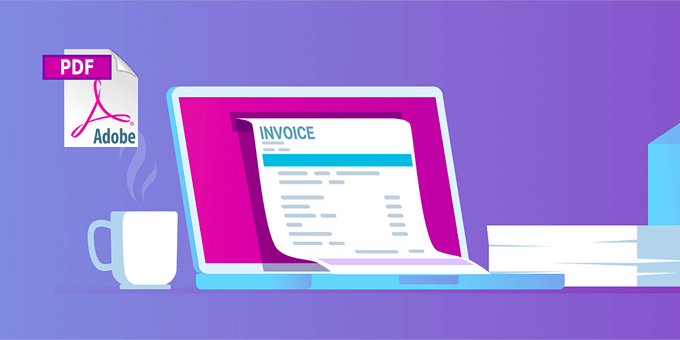
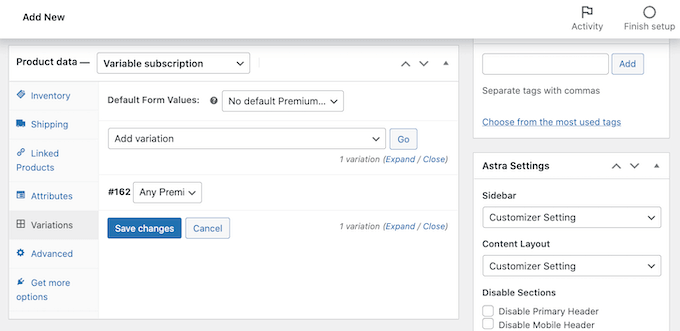
You can also save time by accepting recurring payments or adding subscriptions to WooCommerce. These WooCommerce automations will help automate the billing process and can save you time.
With automatic recurring payments, you don’t have to spend time manually sending invoices and waiting for payments from your customers.
Plus, adding subscription payments to your eCommerce business will give you a more consistent cash flow, fewer payment errors, and fewer payment delays.
6. Use Automated Store Activity Notifications to Boost Sales
Automated FOMO and social proof notifications can also increase sales in your WooCommerce store.
FOMO, short for fear of missing out, is a marketing technique used to create excitement about a product. It uses psychology to encourage customers to make buying decisions faster.
Plus, social proof shows visitors that other customers have purchased your products. This can convince users that your online store is trustworthy.
The best way to add social proof to your website is by using TrustPulse. It is one of the best social proof plugins for WordPress on the market.

TrustPulse automatically monitors activity on your site. When potential customers are close to buying something, they will see a notification showing that another customer has just made a purchase.
By simply displaying social proof, you will give your visitors a small push to complete their purchase. To learn more, see Method 1 of our guide on how to use FOMO to increase conversions.
7. Automatically Display Your Best Product Reviews
Would you like to automatically display the best reviews of your products from across the internet? You could copy and paste them manually, but that is a lot of work. Plus, there would be a delay before they appear on your website.
Luckily, Smash Balloon has a Reviews Feed Pro plugin that lets you automatically show off your best reviews from platforms like Google Reviews, Yelp, TripAdvisor, and more.
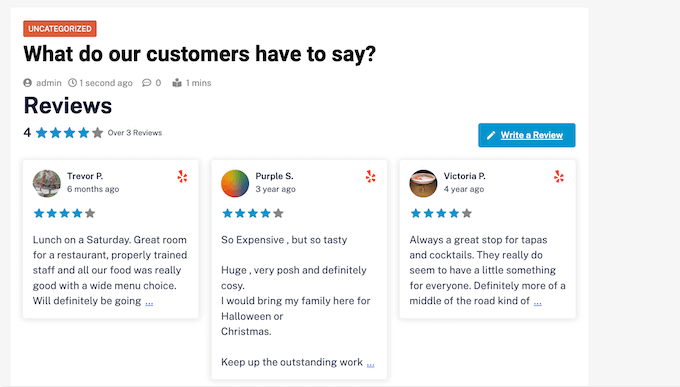
It comes with pre-designed templates, so you can display your reviews in different layouts, including showcases, carousels, grids, and more.
The Reviews Feed automatically copies your website’s design so that the reviews look like a natural part of your website rather than content embedded from another platform.
You can follow our guide on how to show Google, Facebook, and Yelp reviews to set up your own automatic review feed in WooCommerce.
8. Use an Automated Sales Funnel to Boost Sales Conversions
A sales funnel is the path a user takes on your website to become a customer. It
is made up of the specific pages a user may visit before making a purchase.For example, a new visitor might land on a blog post, then view a product page, then go through your checkout flow.
Unfortunately, only 10% of shoppers, on average, will add anything to their carts. After they do, 60-80% of them abandon their carts without completing the purchase.
Luckily, you can use
FunnelKit, the best WooCommerce sales funnel plugin, to change that. You can use the plugin to optimize each step, offer a better user experience, reduce distractions, and nudge users toward completing their purchases.For example, it comes with a one-click
Upsells feature, which allows users to add products to their carts on their way to the checkout.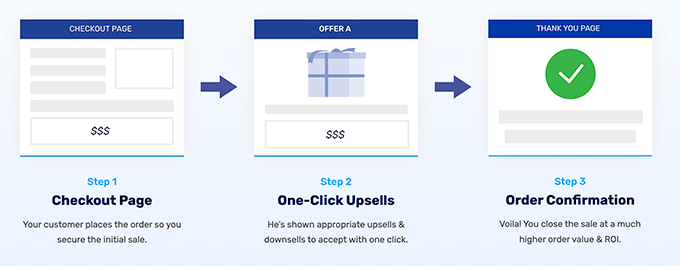
For instance, the FunnelKit Funnel Builder lets you add order bumps to boost profits if someone adds $X to their cart. You can also add one-click order bumps to your checkout page.
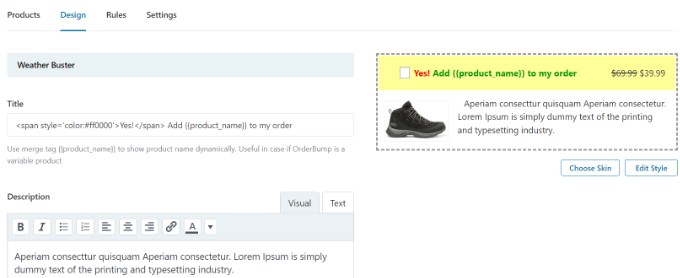
To learn more, see our guide on how to make a high-converting sales funnel in WordPress.
9. Reduce Cart Abandonment With Popups and Push Notifications
As we said earlier, 60 to 80% of people who add items to their cart don’t actually buy them. This means if you have an online store, then you are losing out on a lot of sales.
Luckily, you can use automatic push notifications to reduce cart abandonment rates. For example, you can pop up a notification when a user is about to leave your website and offer a coupon or free shipping.
Or, if the customer already has discounted items in their cart, they may just need some reassurance that they are making the right decision. Push notifications like these can help you recover 3 to 8% of abandoning cart sales.

You can learn how to use
OptinMonster to add exit-intent popups by following our guide on how to create a WooCommerce popup to increase sales.But what if the customer leaves your site before they see the popup? Push notifications can also help you connect with your visitors after they leave your website. These messages will display in your subscriber’s browser even when they are not actively browsing your store.

The easiest way to do this is with PushEngage. It is the best web push notification software on the market, and it is used to send over 15 billion push messages every month.
For more details, see our guide on how to add web push notifications to WordPress.
You can also significantly reduce cart abandonment by simply improving your online store and checkout process. We share plenty of proven tips with real examples in our guide on how to recover WooCommerce abandoned cart sales.
10. Send Automated Coupons to Bring Back Customers
It costs 5 times more to get a new customer than to keep an old one. Over time, people may lose interest in your website, forget about your products, or start shopping with a competitor.
One way to bring those customers back is to automatically send them a coupon code via email. You can use automation tools to send a coupon to customers who have become disengaged, such as when they don’t place an order for 2 months or have stopped opening emails.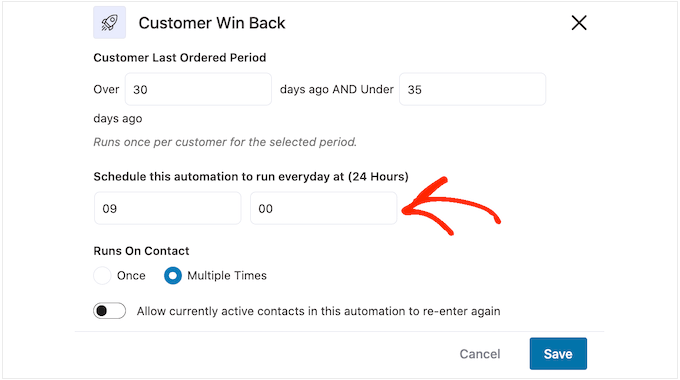
You can learn how in our step-by-step guide on how to send automated coupons in WordPress to bring back customers.
Another good use for automated coupons is recognizing and rewarding customers when they engage with your online store. For example, you might send a coupon after a customer reviews one of your products.
This builds loyalty to your store and can get you more sales. It also encourages shoppers to review more products in the future.
You can also schedule coupons in advance so that they go out automatically on popular holidays like Black Friday, Christmas, New Year’s, Mother’s Day, and Valentine’s Day. This will leave you free to focus on promoting your offers and getting as many sales as possible.
See our guide on how to schedule coupons in WooCommerce for detailed instructions.
Additionally, as we mentioned earlier, you can also offer a coupon in a popup. Showing a coupon at the right time makes a huge difference in converting your website visitors into paying customers.
There are a few ways to do this, and we give you all the details in our step-by-step guide on how to create a coupon popup in WordPress.
11. Automate Your Social Media Channels
You can also use automation to post your online store content to your social channels. This lets you keep your social followers engaged with fresh content.
Uncanny Automator has integrations with all popular social platforms. It will let you publish new blog posts on Facebook, show off your latest product images on Instagram, advertise your sales on Twitter, and more.
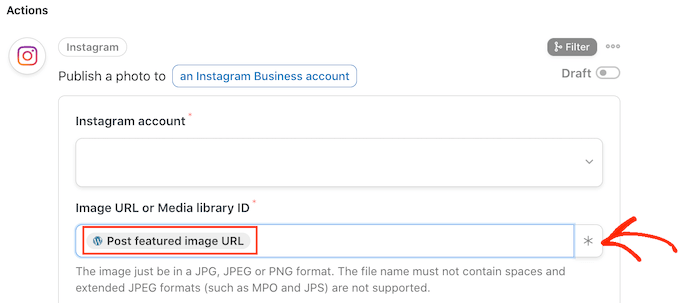
You can learn how to do this step-by-step by following our guides on how to automatically post to Facebook, Instagram, and Twitter.
12. Automatically Display Social Media Content in WooCommerce
Are you looking for ways to show fresh content without doing any extra work? One way to do that is to automatically display your latest social media activity in your WooCommerce store.
This can save you time and keep your website content fresh and engaging for visitors. Plus, it can boost social proof by displaying your social media followers, comments, and like counts.
Smash Balloon automates your website content by displaying your latest social media activity. It is a popular social media feed plugin for WordPress that is used by over 1.4 million websites.
For example, you can add a Facebook feed to WordPress, and new posts will automatically appear in real time. Your customers can also like, share, and comment on your WordPress posts, which is a great way to get more engagement on Facebook.
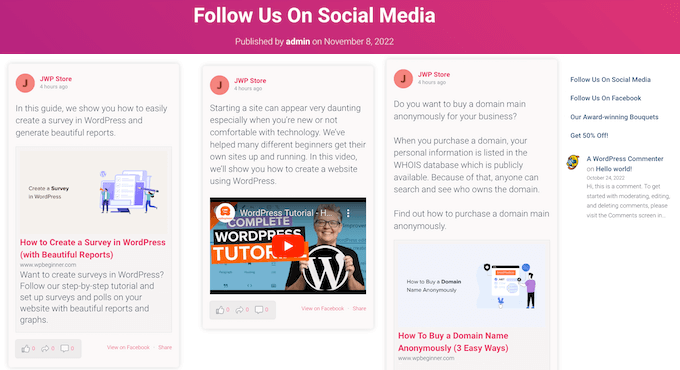
You can change the feed’s color scheme, design a custom header, add ‘like’ and ‘load more’ buttons, and much more.
If you are posting beautiful photos and engaging videos to Instagram, then it makes sense to post that content to WordPress too.
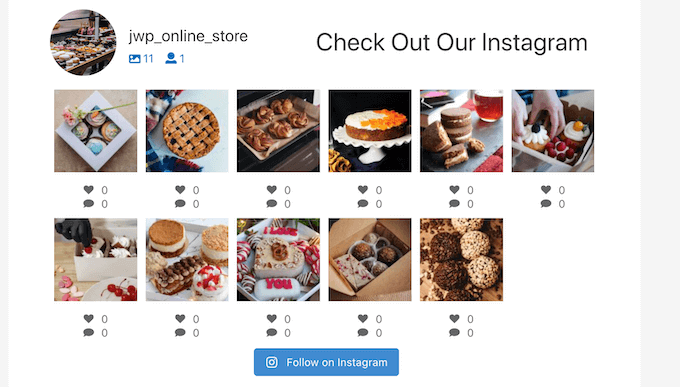
You can even show other people’s photos on your site by creating a hashtag feed or displaying the posts that other people have tagged your account in.
In the following image, you can see an example of an online store that uses a custom Instagram feed to show user-generated content.

For details, please see our step-by-step guide on how to add your social media feeds to WordPress.
Tip: For more tips on how to use social channels to grow your online store and increase sales, you can see our complete social media cheat for WordPress.
13. Make Your Forms Smarter Using Automation
You can use form plugins like
WPForms to collect all kinds of information from your customers.For example, you can use a form plugin to display a contact form, create a questionnaire, gather testimonials, or build a survey form.
The best thing is that WPForms easily integrates with many other tools and plugins, so you can easily automate any action after someone fills out your form.
For example, when someone fills in an order form, you can use conditional logic to send an email notification to the correct department, depending on the product that was purchased.
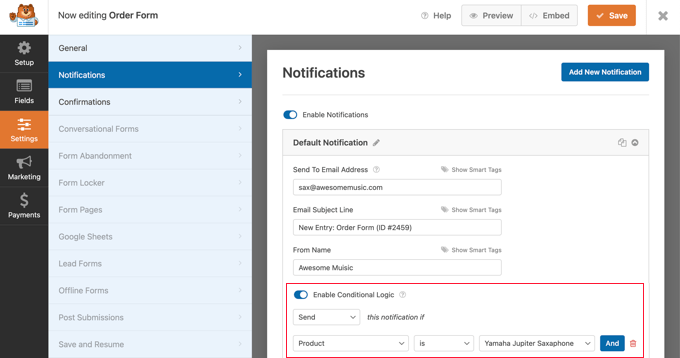
You can also send a confirmation email to the customer who filled in the form to let them know you will be in contact soon. This a nice gesture that lets your users know that you have received their information.
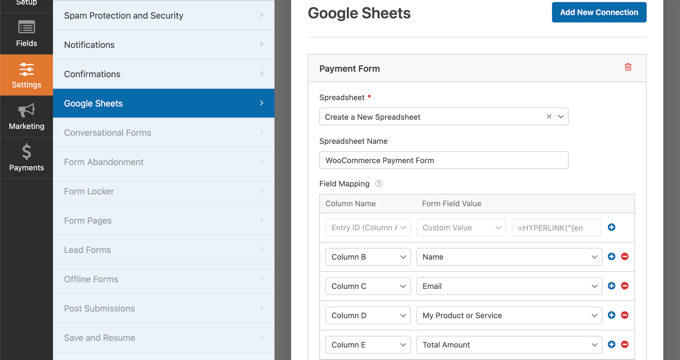
In addition, by using the Google Sheets Addon, you can send any form fields you want to a spreadsheet. This will allow you to use spreadsheet features to analyze the data and collaborate with others in your team.
To automate your forms further,
Uncanny Automator will let you connect WPForms and other form plugins to 100+ third-party services without having to pay fees to services like Zapier.For example, you can create an Uncanny Automator recipe to send customer form data to Airtable. Then, your team will be able to access and use the data easily.
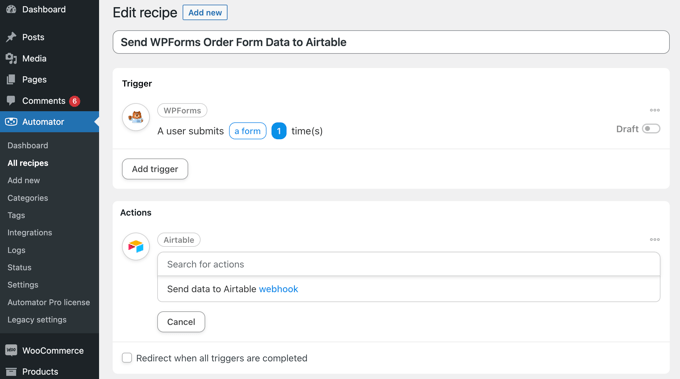
To learn more, see our guide on how to create automated workflows with Uncanny Automator.
14. Automate Live Chat Using Artificial Intelligence
Automated chatbots are the future of live chat software because they allow you to engage with your customers 24/7. They can free up time by automatically answering common customer questions, generating leads, improving user experience, and making more sales.
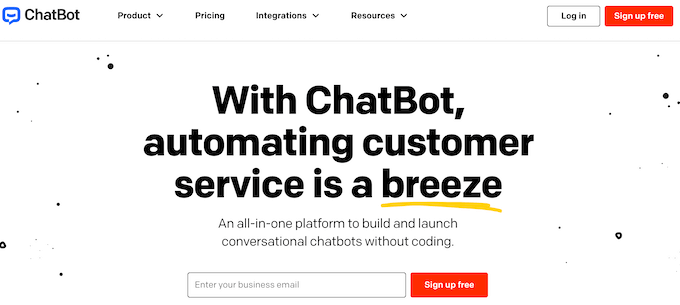
Chatbot.com is the best AI chatbot software for WordPress. It lets you easily automate live chat on your website by setting up your own chatbot using a drag-and-drop builder. You don’t need to do any coding or have any special technical skills.
It even comes with pre-built templates that you can use as a starting point to quickly get your AI chatbot up and running. These templates include different scenarios like selling products, customer service, recruitment, bookings, and more.
For example, you can use the eCommerce bot template to walk your customers through the entire buying process. There are even templates for specific industries, including a coffee shopbot, recruitment bot, and restaurant bot.
If visitors want to communicate with a real person, then you can easily forward them to your customer support agent, phone support, or any of ChatBot’s live chat software integrations, such as LiveChat.
15. Use Uncanny Automator for Even More WooCommerce Automations
This article contains many specialist tools that do specific automation jobs very well. By contrast,
Uncanny Automator is a Swiss army knife that allows you to create all types of automation workflows without having to write any code.It acts as a bridge so that you can get different WordPress plugins talking to each other, as well as loads of third-party services.
You create automation by building Uncanny Automator recipes, consisting of triggers and actions. The action will be automatically run when a user or WooCommerce triggers an event.
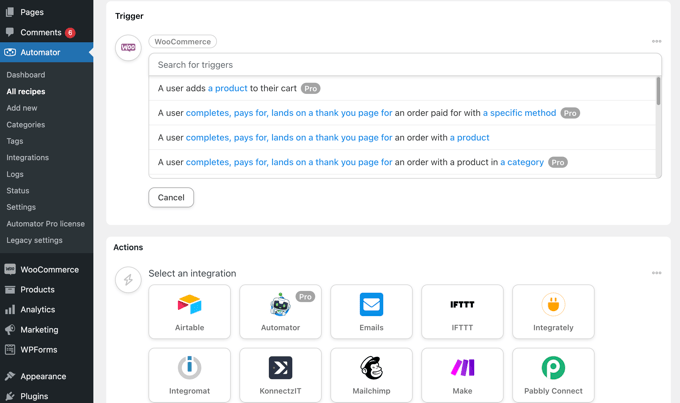
Here are some of the WooCommerce triggers you can use to run a recipe:
- A customer viewing a product
- A customer adding a product to their cart
- A customer paying for a product
- A payment failing
- A customer reviewing a product
- And much more
Then the recipe can automatically run any of these WooCommerce actions:
- Creating an order with a product
- Changing the price of a product
- Generating and emailing a coupon code
- Giving an order a specific status
There are dozens of recipes that you can create, allowing you to save hundreds of hours while running your online store more efficiently.
For instance, you can use Uncanny Automator to automatically create a new customer account when someone submits a contact form on your website, or send notifications to Slack.
Bonus: Track Conversions to Learn How to Increase Sales
To use any marketing automation platform effectively, you will need easy-to-understand reports that tell you exactly what is working for your business and what isn’t.
MonsterInsights is the best Google Analytics plugin for WordPress. It lets you get a clear picture of what is happening on your site and what you can do to bring in more sales.
It comes with WooCommerce conversion tracking, form submissions, outbound link tracking, and user tracking.
Its Reports page has an ‘eCommerce’ tab that shows your most important conversion metrics, including the conversion rate, transactions, revenue, and average order value. Below that, you will see a list of your top products with quantity, sale percentage, and total revenue.
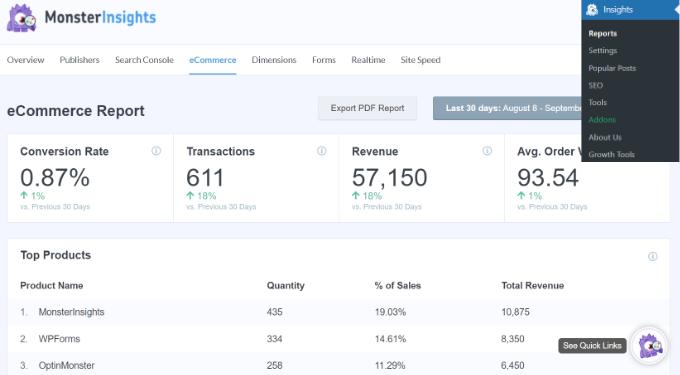
You will also see your top conversion sources. You can use this report to attract more customers and offer exclusive discounts for customers from specific sources.
For detailed instructions, see our guide on how to set up WooCommerce conversion tracking.
You can also connect Google Sheets with WooCommerce to easily record and manage your orders and customer data. Once the information is in a Google Sheet, you can easily filter it based on factors like the order total, the customer’s location, coupons used, and more.
You can then share this information with your team, even if they don’t have access to the WordPress dashboard. For example, you can easily send this data to your suppliers, marketing departments, or other team members.
You are even able to turn this data into charts and graphs. All of this makes it easier to analyze the information and then use these insights to fine-tune your business and get more sales.
We hope this tutorial helped you learn how to increase sales using WooCommerce automations. You may also want to see our guide on how to add wholesale pricing in WooCommerce or our expert picks for the best WooCommerce plugins for your store.
If you liked this article, then please subscribe to our YouTube Channel for WordPress video tutorials. You can also find us on Twitter and Facebook.
The post 15 Best WooCommerce Automations to Increase Sales first appeared on WPBeginner.
May 05, 2023 at 04:00PM

