Wednesday, October 23, 2019

Google Chrome Will Block Mixed Content – Are You Ready for It?

Recently, Google Chrome announced that they will soon start blocking mixed content also known as insecure content on web pages.

This feature will be gradually rolled out starting from December 2019. This should give website owners enough time to check for mixed content errors and fix them before the block goes live.

Failing to do so will cause poor user experience, loss of traffic, and loss of sales.

In this guide, we will explain Google Chrome’s mixed content blocking and how you can be well prepared for it.

Getting ready for mixed content block by Google Chrome

Since this is a comprehensive guide, we have created an easy to follow table of content:

What is Mixed Content?

Mixed content is a term used to describe non-https content loading on an HTTPS website.

HTTPS represent websites using a SSL certificate to deliver content. This technology makes websites secure by encrypting the data transfer between a website and a user’s browser.

Google, Microsoft, WordPress.org, WPBeginner, and many other organizations are pushing HTTPs as the standard protocol for websites.

They have been very successful in their efforts. According to Google, “Chrome users now spend over 90% of their browsing time on HTTPS on all major platforms.”

However, there are still many websites serving partial insecure content (mixed content) over HTTPs websites. Google aims to improve this situation by giving website owners a nudge in the right direction.

Why Google Chrome Wants to Block Mixed Content?

Google Chrome already blocks mixed content, but it’s limited to certain content types like JavaScript and iFrame resources.
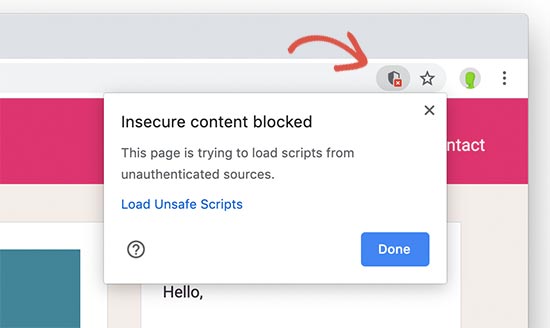
Blocked mixed content on a web page

From December 2019, Google Chrome will move forward to start blocking other mixed content resources like images, audio, video, cookies, and other web resources.

An insecure HTTP file on a secure HTTPs webpage can still be used by hackers to manipulate users, install malware, and hijack a website. This jeopardizes your website security as well as the safety of your website visitors.

It also creates a bad user experience as Google Chrome cannot indicate whether a page is completely secure or insecure.

What Will Happen if a Website is Showing Mixed Content?

Google Chrome has announced a gradual plan to implement mixed content blocking. It will be implemented in three steps spawning over the next three releases of Google Chrome.

Step 1

Starting from December 2019 (Chrome 79), it will add a new settings option to the ‘Site Settings’ menu. Users will be able to unblock the mixed content already blocked by Google Chrome including JavaScript and iframe resources.

If a user opts-out for a website, then Google Chrome will serve mixed content on that site, but it will replace the padlock icon with the insecure icon.

Step 2

Starting from January 2020 (Chrome 80), Google Chrome will start auto upgrading HTTP video and audio file URLs to HTTPs. If it fails to load them over https, then it will automatically block those files.

It will still allow images to load over HTTP, but the padlock icon will change to Not Secure icon if a website is serving images over HTTP.

Step 3

From February 2020 (Chrome 81), Google Chrome will start auto-upgrading HTTP images to load over HTTPs. If it fails to load them over https, then those images will be blocked as well.

Basically, if your website has any mixed content resources that are not upgraded to HTTPs, then users will see the Not Secure icon in their browser’s address bar.

This will create a poor user experience for them. It will also affect your brand reputation and business.

No need to panic though. You can easily prepare your website to fix all mixed content errors.

How to Prepare Your WordPress Website for Google Chrome’s Mixed Content Block

Google Chrome is the most popular browser in the world among both mobile and desktop users.

Leaving your website with incomplete HTTPS implementation or no HTTPS at all will result in loss of traffic, sales, and overall revenue.

Here is what you need to do to prepare your website for these changes.

Move Your Website to HTTPS

If your website is still using HTTP, then Google Chrome will already be showing a ‘Not Secure’ icon when users visit your website.
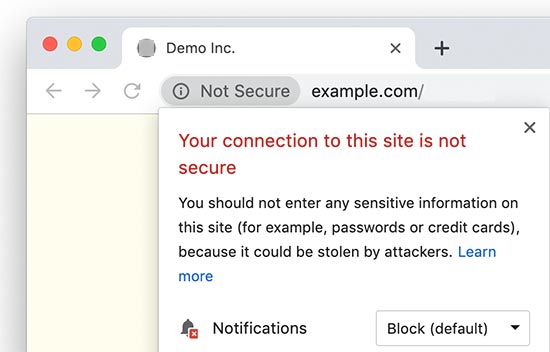
Not Secure HTTP website

It is about time to finally move your website to HTTPS.

We know that changes like these can be a bit intimidating for beginners. Some site owners postpone the move due to cost, which is no longer an issue as you can easily get a free SSL certificate for your website.

Other website owners delay it because they think it will be a complicated process and could break their website.

That’s why we have created a step by step guide to easily move your WordPress site from HTTP to HTTPS.

We will walk you through every step and show you how to get that secure padlock icon next to your website address in all browsers.

Finding Mixed Content on an HTTPS Website

If you already have an HTTPS-enabled website, then here is how you will find mixed content on your site.

The first indication of mixed content issues will be visible in Google Chrome’s address bar when you visit your website.

If Google Chrome has blocked a script on your website, then you will see the scripts blocked shield icon at the right corner of the address bar.

Blocked mixed content on a web page

Google Chrome has already blocked the insecure content and that’s why the padlock icon on the left corner of the address bar will not change.

The second indication that you should look for is the info icon. This icon will replace the padlock if the page you are viewing has mixed content that Google Chrome has not blocked.
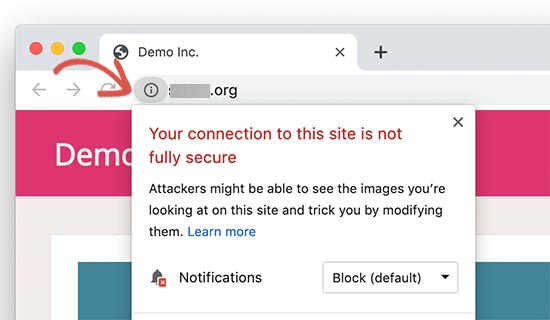
Unblocked mixed content

Clicking on the icon will show the notice that ‘Your connection to this site is not fully secure’.

Usually, this content includes images, cookies, audio, or video files. Chrome does not block those files at the moment and that’s why it shows this notice.

If your site has both icons, then this means your site is loading multiple types of mixed content files using HTTP.

Next, you need to find out which files are loaded using the insecure HTTP URLs. To do that, right-click anywhere on your website and select Inspect tool from the browser menu.
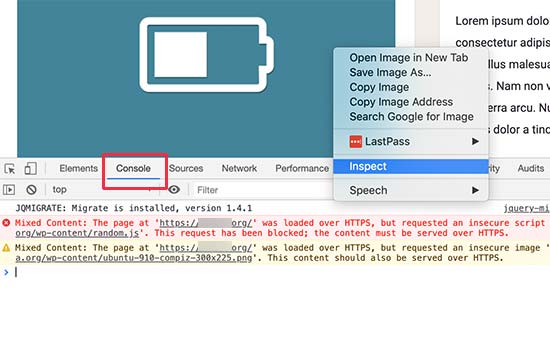
Console tool in Inspect view showing mixed content errors and warnings

Switch to the ‘Console’ table under the Inspect window to view page load errors. You’ll be looking for ‘Mixed content:’ errors and warnings to find out which files are blocked and which files are loaded using the HTTP URLs.

Fixing Mixed Content Errors in WordPress

There are two easy methods that you can use to fix mixed content warnings and errors on your WordPress website.

Method 1. Fix Mixed Content Errors and Warnings Using a Plugin

This method is easier and recommended for beginners. We will use a plugin that will find and replace HTTP URLs to HTTPs on the fly before sending it to user’s browser.

The downside is that it adds a few milliseconds to your website’s page load speed which is barely noticeable.

First, you need to install and activate the SSL Insecure Content Fixer plugin. For more details, see our step by step guide on how to install a WordPress plugin.

Upon activation, go to Settings » SSL Insecure Content page to configure the plugin settings.
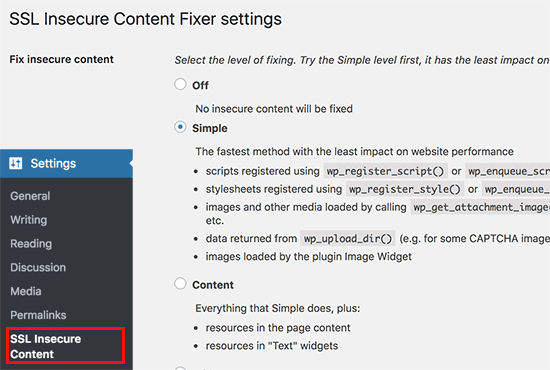
Secure Content Fixer plugin settings

Select the ‘Simple’ option and then click on the ‘Save changes’ button to store your settings.

Visit your website to look for mixed content warning errors.

For more detailed instructions, see our article on how to fix mixed content error in WordPress.

Method 2. Manually Fix Mixed Content Issues in WordPress

This method can get a bit complicated for beginners. Basically, you’ll be finding the insecure URLs across your website and replacing it with secure URLs.

We will still use a plugin to find insecure HTTP URLs on your website. However, you’ll be able to deactivate the plugin once you have changed the URLs, so this will not impact your page speed like the first option.

Let’s get started.

First, you need to install and activate the Better Search and Replace plugin.

Upon activation, you need to visit Tools » Better Search Replace page.

Under the ‘Search’ field, you need to add your website URL with http. After that, add your website URL with https under the ‘Replace’ field.
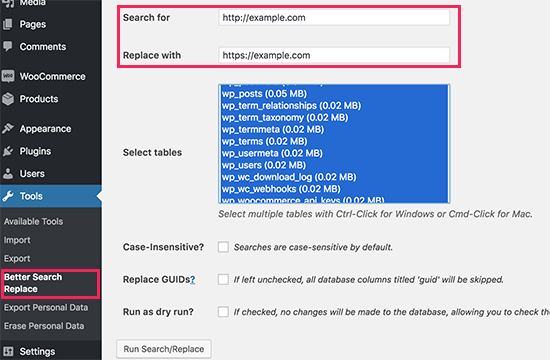
Better search and replace plugin settings

Click on Run Search/Replace button to continue.

The plugin will now run and find all instances of your website URLs starting with http and replace them with the https.

The plugin works on your WordPress database, so it will only change URLs for your content areas.

If the mixed content resources are loaded by your WordPress theme or plugin, then you will need to inform the theme or plugin developer, so they can release a fix for that.

For more details, see our complete beginner’s guide to fixing the common SSL/HTTPs issues in WordPress.

We hope this article answered your questions regarding Google Chrome’s mixed content block and helped you get ready for it. You may also want to see our guide on how to use Google Search Console to grow your website traffic, and the important marketing data you must track on all WordPress sites.

If you liked this article, then please subscribe to our YouTube Channel for WordPress video tutorials. You can also find us on Twitter and Facebook.

The post Google Chrome Will Block Mixed Content – Are You Ready for It? appeared first on WPBeginner.


October 23, 2019 at 04:47PM
Tuesday, October 22, 2019

How to Optimize Images for Web Performance without Losing Quality

Did you know that optimizing your images before uploading to WordPress can have a huge impact on your website speed?

When starting a new blog, many beginners simply upload images without optimizing them for web. These large image files make your website slower.

You can fix this by using image optimization best practices as part of your regular blogging routine.

In this article, we will show you how to optimize your images for faster web performance without losing quality. We will also share automatic image optimization plugins for WordPress that can make your life easy.

How to Optimize Your Images in WordPress (Step by Step)

What is Image Optimization? (Optimized vs Unoptimized Images)

Image optimization is a process of saving and delivering images in the smallest possible file size without reducing the overall image quality.

While the process sounds complex, it’s actually quite easy these days. You can use one of the many image optimization plugins and tools to automatically compress images by up to 80% without any visible loss in image quality.

Here’s an example of optimized vs unoptimized image:

Optimized vs Unoptimized Images in WordPress

As you can see, when optimized properly the same image can be 75% smaller than the original without any loss in quality.

How does Image Optimization work?

In simple terms, image optimization work by using compression technology like “Lossy” and “Lossless” which helps reduce the overall file size without any noticeable loss of quality.

What does it mean to Optimize Images?

If you ever received a recommendation to optimize images by your WordPress hosting support or by a speed test tool, then all it means is that you need to reduce the file size of your images by optimizing them for web.

Why is Image Optimization Important? What are the Benefits of Image Optimization?

While there are many benefits of optimizing your images, below are the top ones that you should know:

  • Faster website speed
  • Improved SEO rankings
  • Higher overall conversion rate for sales and leads
  • Less storage and bandwidth (which can reduce hosting and CDN cost)
  • Faster website backups (also reduces cost of backup storage)

Outside of video, images are the next heaviest item on a web page. According to HTTP archive, images make up on average 21% of a total webpage’s weight.

Since we know fast websites rank higher in search engines (SEO) and have better conversions, image optimization is something that every business website must do if they want to succeed online.

Now you might be wondering how big of a difference can image optimization really make?

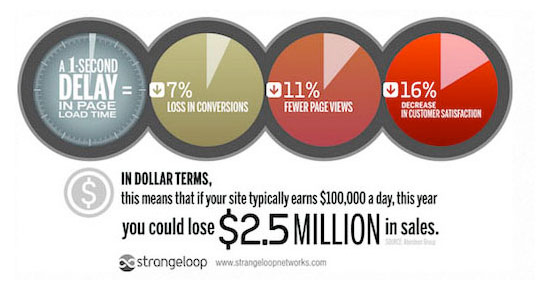
According to a Strangeloop study, a one-second delay in website load time can cost you 7% of sales, 11% fewer pageviews, and 16% decrease in customer satisfaction.

How speed affects your website

If these aren’t enough reasons to speed up your website, then you should know that search engines like Google also give preferential SEO treatment to faster loading websites.

This means that by optimizing your images for web, you can both improve website speed and boost WordPress SEO rankings.

How to Save and Optimize Images for Web Performance?

The key to successful image optimization for web performance is to find the perfect balance between lowest file size and acceptable image quality.

The three things that play a huge role in image optimization are:

  • Image file format (JPEG vs PNG vs GIF)
  • Compression (Higher compression = smaller file size)
  • Image Dimensions (height and width)

By choosing the right combination of the three, you can reduce your image size by up to 80%.

Let’s take a look at each of these in more details.

1. Image File Format

For most website owners, the only three image file formats that really matter are JPEG, PNG, and GIF. Choosing the right file type plays an important role in image optimization.

To keep things simple, you want to use JPEGs for photos or images with lots of colors, PNGs for simple images or when you need transparent images, and GIF for animated images only.

For those who don’t know the difference between each file type, PNG image format is uncompressed which means it is a higher quality image. The downside is that file sizes are much larger.

On the other hand, JPEG is a compressed file format which slightly reduces image quality in order to provide a significantly smaller file size.

Whereas GIF only uses 256 colors along with lossless compression which makes it the best choice for animated images.

On WPBeginner, we use all three image formats based on the type of image.

2. Compression

The next thing is image compression which plays a huge role in image optimization.

There are different types and levels of image compression available. The settings for each will vary depending on the image compression tool you use.

Most image editing tools like Adobe Photoshop, On1 Photo, GIMP, Affinity Photo, and others come with built-in image compression features.

You can also save images normally and then use a web tool like TinyPNG or JPEG Mini for easier image compression.

Although it’s a bit manual, these two methods allow you to compress images before uploading them to WordPress, and this is what we do on WPBeginner.

There are also several popular WordPress plugins like Optimole, EWWW Image Optimizer, and others that can automatically compress images when you first upload them. Many beginners and even large corporations prefer to use these image optimization plugins because it’s easy and convenient.

We will share more about these WordPress plugins later in the article.

3. Image Dimensions

Normally, when you import a photo from your phone or a digital camera, it has a very high resolution and large file dimensions (height and width).

Typically, these photos have a resolution of 300 DPI and dimensions starting from 2000 pixels and more. These high-quality photos are well-suited for print or desktop publishing. They are not suitable for websites.

Reducing file dimensions to something more reasonable can significantly decrease image file size. You can simply resize images using an image editing software on your computer.

For example, we optimized a photo with 1.8 MB original file size, 300 DPI resolution, and image dimensions of 4900×3200 pixels.

We chose jpeg format for higher compression and changed dimensions to 1200×795 pixels, and it reduced the image file size to 103 KB. That’s 94% less than the original file size.

Now that you know the three important factors in image optimization, let’s take a look at various image optimization tools for website owners.

Image Optimization Tools and Programs

As we mentioned earlier, most image editing software come with image optimization and compression settings.

Outside of the image editing software, there are also several powerful free image optimization tools that you can use to optimize images for web (with just a few clicks).

We recommend using these tools to optimize images before you upload them to WordPress, specially if you are a perfectionist.

This method helps you save disk space on your WordPress hosting account, and it guarantee the fastest image with the best quality since you manually review each image.

Adobe Photoshop

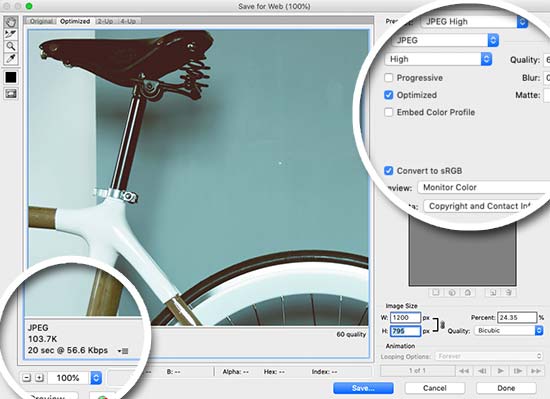
Adobe Photoshop is a premium software that comes with a feature to save images optimized for the web. Simply open your image and click on the “File » Save for Web” option.

This will open a new dialog box. On the right, you can set different image formats. For JPEG format, you will see different quality options. When you select your options, it will also show you the file size on the bottom left.

Saving images optimized for the web using Photoshop

GIMP

GIMP is a free and open source alternative to popular Adobe Photoshop. It can be used to optimize your images for the web. The downside is that it is not as easy to use as some other solutions on this list.

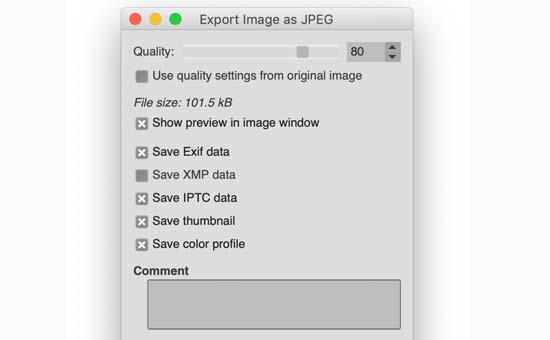
First, you need to open your image in GIMP and then select File » Export As option. This will bring up the save file dialog box. Give your file a new name and then click on the export button.

Export image in GIMP

This will bring up image export options. For jpeg files, you can select the compression level to reduce file size. Finally, click on the export button to save the optimized image file.

TinyPNG

TinyPNG is a free web app that uses a smart lossy compression technique to reduce the size of your PNG files. All you have to do is go to their website and upload your images (simple drag & drop).

Using TinyPNG to optimize images for WordPress

They will compress the image, and give you the download link. You can use their sister website, TinyJPG, for JPEG image compression.

They also have an extension for Adobe Photoshop which is what we use as part of our image editing process because it combines the best of TinyPNG and TinyJPG inside Photoshop.

For developers, they have an API to convert images automatically, and for beginners they have a WordPress plugin that can automatically do it for you (more on this later).

JPEG Mini

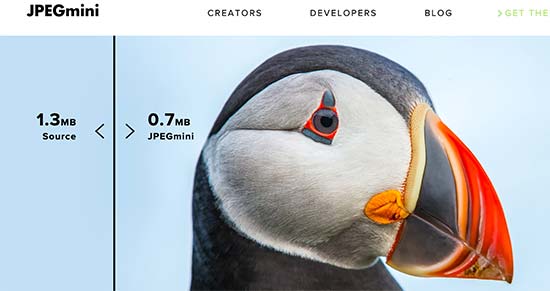
JPEGmini uses a lossless compression technology which significantly reduces the size of images without affecting their perceptual quality. You can also compare the quality of your original image and the compressed image.

JPEGMini online image compression tool

You can use their web version for free, or purchase the program for your computer. They also have a paid API to automate the process for your server.

ImageOptim

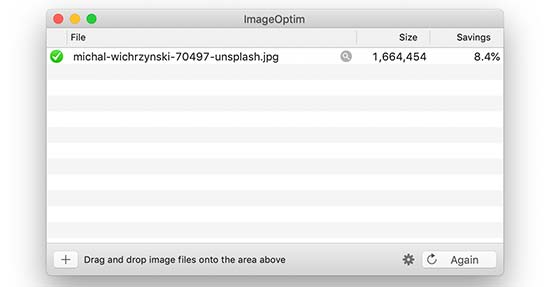
ImageOptim is a Mac utility that allows you to compress images without losing any quality by finding the best compression parameters and removing unnecessary color profiles.

ImageOptim

Windows alternative to this is Trimage.

Image Optimization Plugins for WordPress

We believe that the best way to optimize your images is by doing it before uploading them to WordPress. However, if you run a multi-author site or need an automated solution, then you can try a WordPress image compression plugin.

Below is our list of the recommended WordPress image compression plugins:

  1. Optimole – popular plugin by the team behind ThemeIsle.
  2. EWWW Image Optimizer
  3. Compress JPEG & PNG images – plugin by TinyPNG team mentioned above in the article.
  4. Imagify – plugin by the popular WP Rocket plugin team.
  5. ShortPixel Image Optimizer
  6. WP Smush
  7. reSmush.it

Using any of these WordPress image optimization plugin will help you speed up your website.

Final Thoughts and Best Practices for Image Optimization

If you’re not saving images optimized for web, then you need to start doing so now. It will make a huge difference on your site speed, and your users will thank you for it.

Not to mention, faster websites are great for SEO, and you will likely see an increase in your search engine rankings.

Outside of image optimization, the two things that will significantly help you speed up your website is using a WordPress caching plugin and using a WordPress CDN.

Alternatively, you can use a managed WordPress hosting company because they often offer both caching and CDN as part of the platform.

We hope this article helped you learn how to optimize your images in WordPress. You may also want to see our guide on how to improve your WordPress security and the best WordPress plugins for business websites.

If you liked this article, then please subscribe to our YouTube Channel for WordPress video tutorials. You can also find us on Twitter and Facebook.

The post How to Optimize Images for Web Performance without Losing Quality appeared first on WPBeginner.


October 22, 2019 at 04:00PM

Monday, October 21, 2019

How to Clear Your Browser Cache in All Major Browsers (Fast Way)

When fixing common WordPress errors, one common piece of advice that you would often receive is to “clear your browser cache”.

Since you don’t need to clear browser cache for day to day internet use, most non-techy users are not familiar with the process.

In this beginner’s guide, we will show you how to quickly clear your browser cache in all major browsers, step by step. We will also explain what is browser cache and how browser caching works.

How to clear browser cache in all top browsers

What is Browser Cache?

Browser cache is a technology used by most popular web browsers to save visited website’s data on a user’s computer. This allows the browser to quickly display a webpage on your next visit.

The logic behind it is that downloading static files from a WordPress hosting server located far away will take more time than reusing the resources from the user’s computer. This reduces the overall page load time and makes your online experience faster.

Typically browsers will not cache complete web pages unless the web developers specifically tell them to do it (via code). Instead browsers focus on static content like stylesheets, images, and JavaScript.

Why browsers cache static content?

Browser cache static content because it does not change as often as dynamic content.

For example, if you visit a WordPress website then the content of your posts and pages is more likely to change than your WordPress theme.

A typical website template includes several stylesheets, JavaScript files, and images. These files remain the same on each page, so downloading a fresh copy on every page load is simply inefficient.

This is why browsers keep a copy of these static files in a temporary storage folder on your computer, so they use that copy on your next website visit.

If you are using a WordPress caching plugin, then it may add guidelines for browsers to cache your static content along with expiration instructions for each resource type.

This improves user experience and makes the internet faster for everyone.

Why and when you need to clear browser cache?

Most popular browsers are smart about deciding which content to store in cache.

However, sometimes they are unable to figure out that the website you are viewing has changed. In that case, browsers will still load the cached version of files from local storage.

This leads you to see an outdated version of a web page, and the website may not work as intended. If you have made some changes to your website, then you may not see them appear on the live site.

This is when you need to force reload that page in other words clear your browser cache.

Forcing Browsers to Hard Refresh / Reload a Page

Before you clear your browser cache, you may want to try this step because it’s much faster and easier (this is what the Pros do).

Basically, when you click on the refresh button in your browser, it will load static content from browser cache. However by using a keyboard shortcut, you can force the browser to bypass cache and download a fresh version of the web page.

Simply press the following keys to force a hard refresh in your web browser.

  • Google Chrome on Mac: Command + Shift + R
  • Google Chrome on Windows & Linux: CTRL + F5
  • Firefox on Mac: Command + Shift + R
  • Firefox on Windows & Linux: CTRL + F5
  • Safari: Command + Option + R
  • Opera on Mac: Command + Alt + R
  • Opera on Windows: Shift + F5

Normally forcing a hard refresh will solve your problem. However if it dose not, then you need to clear your browser cache to make sure that you are seeing the live version of a web page.

Clearing Browser Cache in Google Chrome

Google Chrome is the most popular browser in the world right now. Here is how to clean the browser cache in Google Chrome.

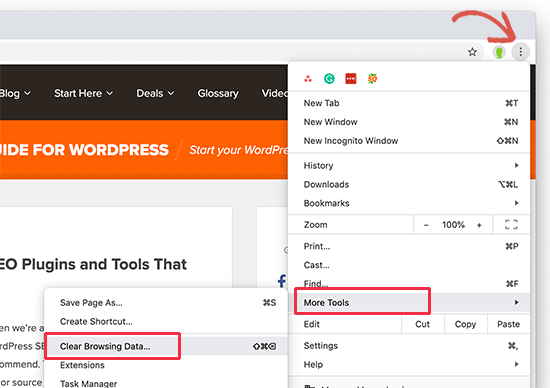
Simply launch the Google Chrome web browser on your computer and then click on the three-dot menu in the top right corner. From the menu, you need to go to More Tools » Clear Browsing Data.

Chrome clear cache tool

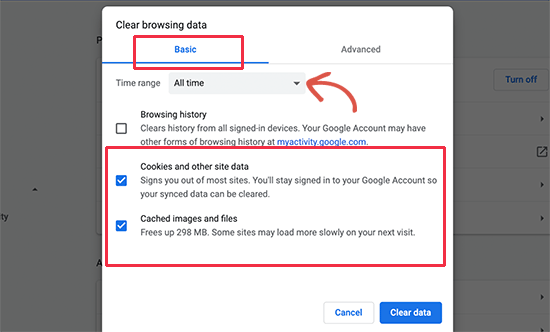
This will launch the Chrome Settings page with ‘Clear Browsing Data’ popup displayed on the screen. You need to switch to the Basic settings and then select ‘All time’ next to time-range option.

Below that, you need to check the box next to the ‘Cached images and files’ option.

You can also select ‘Clear cookies and other site data’ option. It will delete all cookies stored in your browser storage. Doing so will also log you out from all websites and end other sessions.

Next, click on the ‘Clear data’ button and Google Chrome will clear the browser cache.

Clearing Browser cache in Firefox

If you are using Mozilla Firefox, then this is how you can clear your browser cache.

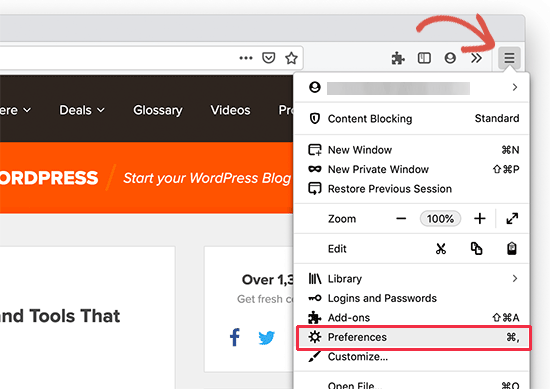
First, you need to launch the Firefox web browser on your computer. After that, you need to click on the hamburger menu on the top-right corner of the screen and select the ‘Preferences’ option.

Firefox preferences

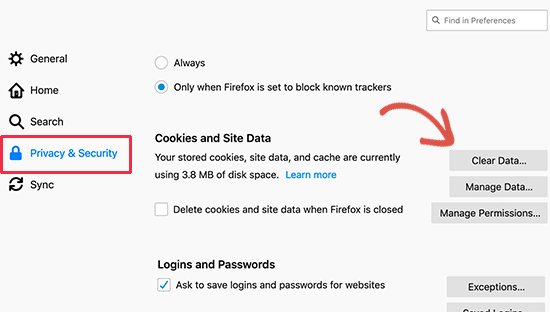
This will bring up the Firefox settings page. From here, you need to switch to the ‘Privacy and Security’ tab, and then click on the ‘Clear Data’ button.

Clear cookies and site data in Firefox

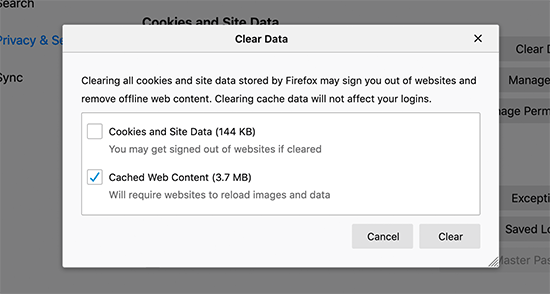
Firefox will now ask what data do you want to clear. You need to select ‘Cached Web Content’ and click on the clear button.

 Delete cached content in Firefox

Firefox will now delete cached web content from your browser storage.

Clearing Browser Cache in Internet Explorer

Internet Explorer was the default web browser on Windows computers until it was replaced by the new Microsoft Edge browser.

However, many users still use it. If you are one of those users, then this is how you’ll clear browser cache in Internet Explorer.

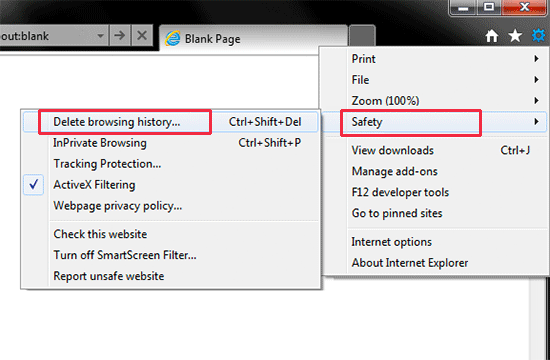
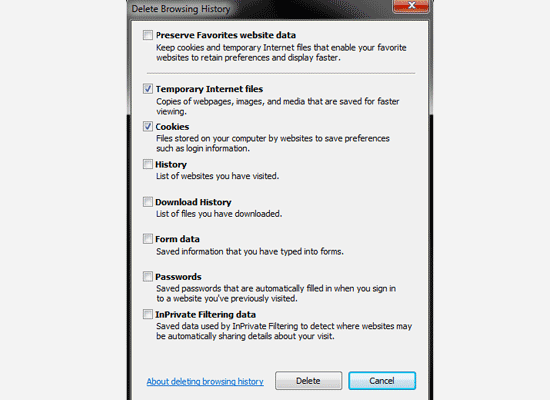
First, you need to launch the Internet Explorer on your computer. After, that you need to click on the gear icon at the top right corner and then select Safety » Delete browsing history….

Clear browsing data in Internet Explorer

Next, you need to uncheck the option to ‘Preserve Favorites website data’, check ‘Temporary internet files’, and optionally check the ‘Cookies’ option.

Clear cache in the Internet Explorer

Click on the Delete button to continue, and Internet Explorer will empty your browser cache.

Clearing Browser cache in Edge

Edge is the default browser on Windows 10 computers. Here is how you will clear browser cache in Microsoft Edge.

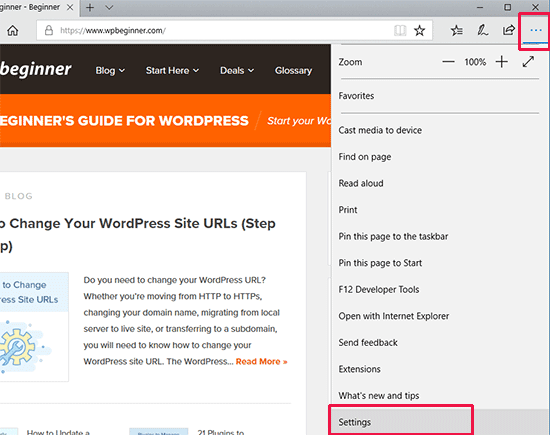
First, you need to open the Edge browser on your computer. After that, you need to click on the three-dot menu at the top-right corner of the screen and select ‘Settings’ option.

Open Microsoft Edge settings

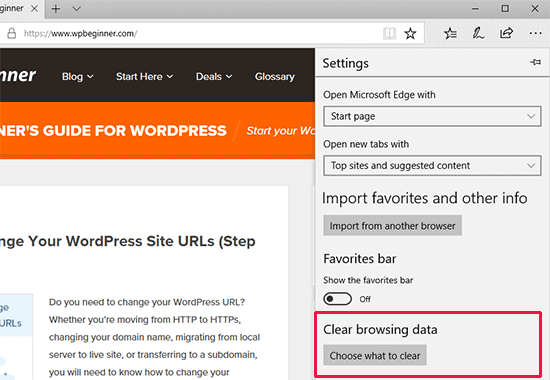
Next, you need to click on the ‘Choose what to clear’ button under the ‘Clear browsing data’ section.

Clear browsing data in Microsoft Edge

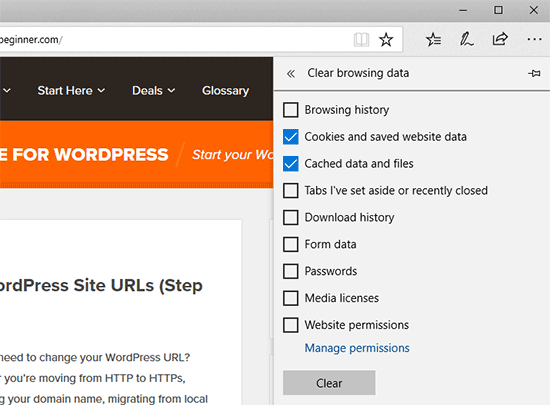
This will bring up the ‘Clear browsing data’ panel. From here, you need to select ‘Cached data and files’ and ‘Cookies and website data’ options.

Clear cache in Microsoft Edge

Click on the ‘Clear’ button and Microsoft Edge will now clear browser cache.

Clearing Browser Cache in Safari

Safari is the default browser on the Mac operating system. Here is how to clear browser cache in Safari.

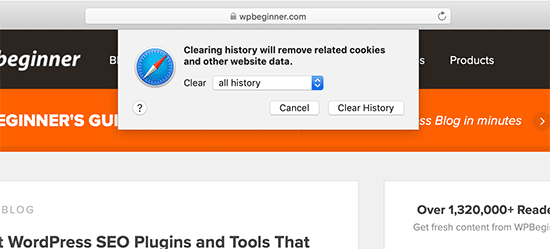
First, you need to open the Safari web browser on your computer. After that. click on the History » Clear History… option from the top menu.

Clearing history in Safari

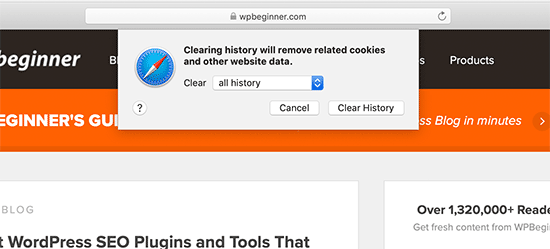
Safari will now ask you to select a time range. Select ‘All history’ from the ‘Clear’ dropdown menu and then click on the ‘Clear History’ button.

Clear all data in Safari

Safari will now delete all temporary data including cache, cookies, and all temporary website data.

If you want to empty the Safari cache without deleting cookies and other data, then you will need to enable the ‘Developer’ menu.

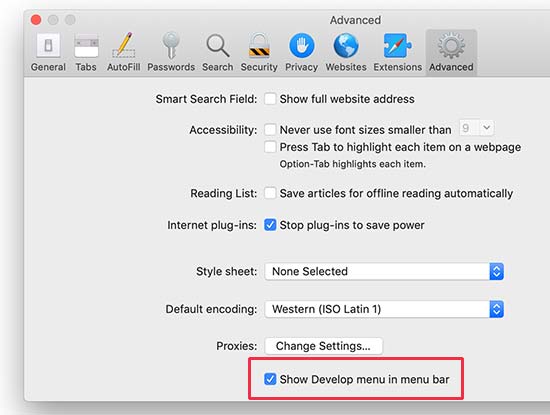
Simply click on the Safari » Preferences from the top menu. This will bring up the settings dialog box where you need to switch to the ‘Advanced’ tab.

Enable Develop menu in Safari

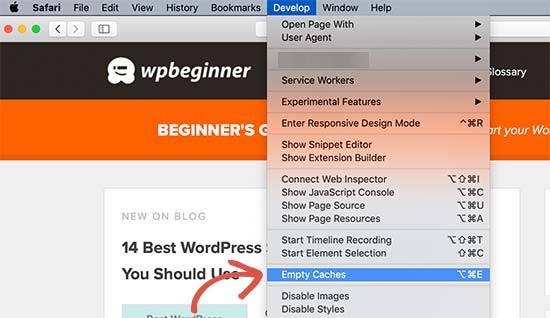
This will add the ‘Develop’ menu in your web browser’s top bar. Next, you need to click on the Develop menu and select ‘Empty Caches’ option.

Safari emptying cache in the developer mode

Safari will now only empty the browser cache without deleting cookies and other temporary data.

Clearing Browser Cache in Opera

If you are using Opera web browser, then here is how to clear your browser cache in Opera.

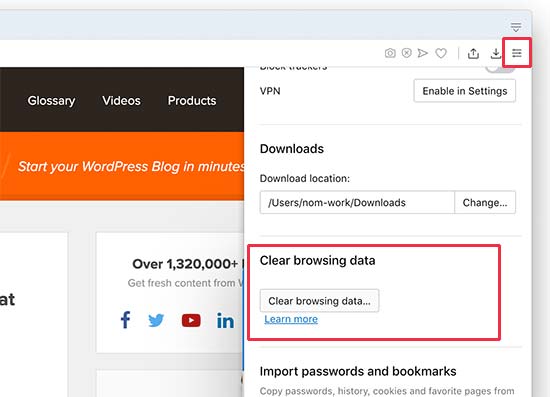
Fist, open the Opera web browser on your computer. After that, click on the menu icon on the top right corner of the screen and then click on the ‘Clear browsing data’ button.

Opera clear browsing data

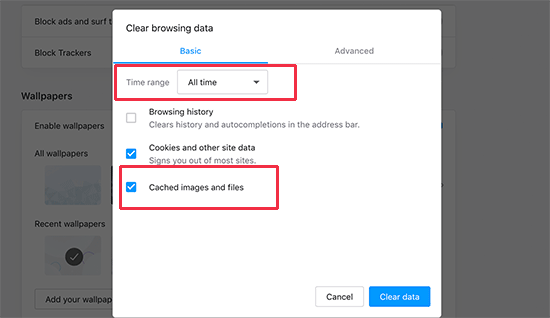
This will bring up a popup on the screen. From here, first you need to select ‘All time’ next to the time range dropdown menu. After that, check the box next to the ‘Cached images and files’ option.

Clearing browser cache in Opera web browser

You can now click on the ‘Clear data’ button, and Opera will empty your browser cache.

What to Do When Clearing Browser Cache Doesn’t Work?

It depends on what you are trying to do at the moment. Let’s take a look at some common scenarios.

1. Can’t see changes you made to your website appear on the live site

The most common culprit for this usually a WordPress caching plugin. Normally, if you are logged in to WordPress, then your caching plugin would show you a non-cached version of your website.

However, due to a plugin misconfiguration, you may end up seeing a cached version of your website.

You’ll need to empty WordPress cache to see the live version. We have a detailed guide on how to clear cache in WordPress with step by step instructions.

2. I cannot log in to my WordPress website

If you are unable to log in to your WordPress website and the login page keeps refreshing, then most likely it is a WordPress settings issue.

See our detailed guide on how to fix WordPress login page refresh and redirecting issue.

3. A third party website is not updating

If you are seeing an outdated version of a third-party website while other users can see the changes, then this could happen due to a lot of reasons.

For example, the website may be temporarily down, and their CDN server is showing a cached copy of the website. It is also possible that their website firewall is not working properly, and it’s serving the cached versions to specific geographic locations.

In that case, you can try using a VPN service. This will allow you to change your IP address and visit the website from a different geographic location.

This will help you further troubleshoot and get to the bottom of the issue.

We hope this article helped you learn how to quickly clear your browser cache in all top browsers. You may also want to see our WordPress troubleshooting tips and the complete WordPress security guide to keep your website secure.

If you liked this article, then please subscribe to our YouTube Channel for WordPress video tutorials. You can also find us on Twitter and Facebook.

The post How to Clear Your Browser Cache in All Major Browsers (Fast Way) appeared first on WPBeginner.


October 21, 2019 at 03:21PM