Wednesday, December 11, 2019

How to Add a Preloader Animation to WordPress (Step by Step)

Do you want to add a preloader to your WordPress site? A preloader is an animation indicating the progress of a page load in the background.

Preloaders assure users that the website is working on loading the page. This can help improve user experience and reduce overall bounce rate.

In this article, we’ll show you how to easily add a preloader to WordPress.
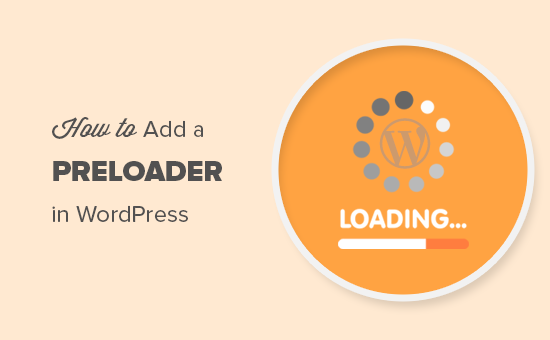
Adding a preloader to your WordPress website

What is a Preloader and When You Should Use it?

A preloader is an animation or status message indicating the progress of page load in the background.

Normally when you visit a website, your browser starts downloading different parts of the content. Some parts of the website load faster (i.e. text, HTML code, CSS) whereas others load way slower (i.e images and videos).

If most of your content is text with very few images and videos, then you don’t really need to add a preloader to your website. Instead, you should focus on improving website speed and performance for faster page loads.

On the other hand, if most of your content is images, photographs, and video embeds, then your users need to wait a while before they can actually see all the content.

During these partial downloads, your website may feel slow. Sometimes users may even think that it is broken. Adding a preloader, fills this gap and shows the user a progress indicator during the page load.

You can see a live example of a preloader by clicking on the Preview button while writing a blog post in WordPress.

WordPress will open a live preview of your blog post in a new window, and it will display a preloader before it actually shows the live preview.
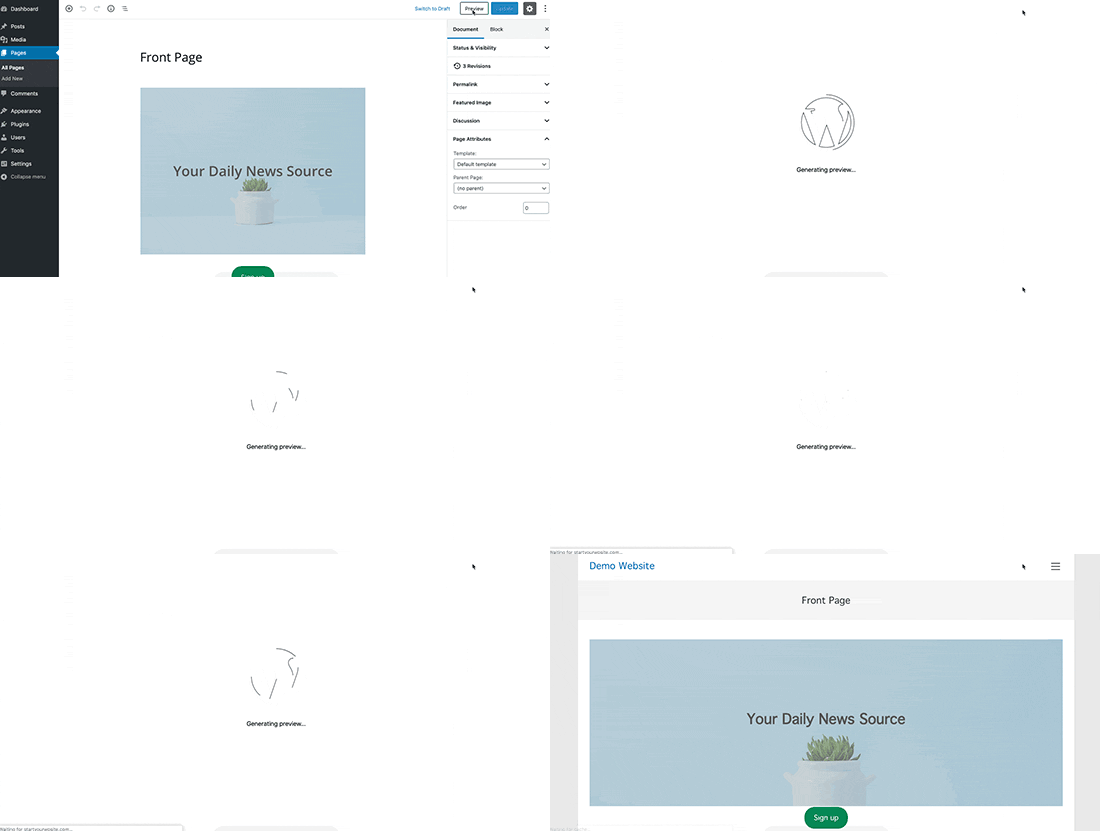
WordPress post preview preloader

That being said, let’s take a look at how you can easily add a preloader to your WordPress website.

Method 1. Adding a Preloader in WordPress using WP Smart Preloader

This method is recommended because it is easier to implement and does not require any changes to your WordPress theme.

First thing you need to do is install and activate the WP Smart Preloader plugin. For more details, see our step by step guide on how to install a WordPress plugin.

Upon activation, you need to visit Settings » WP Smart Preloader page to configure plugin settings.
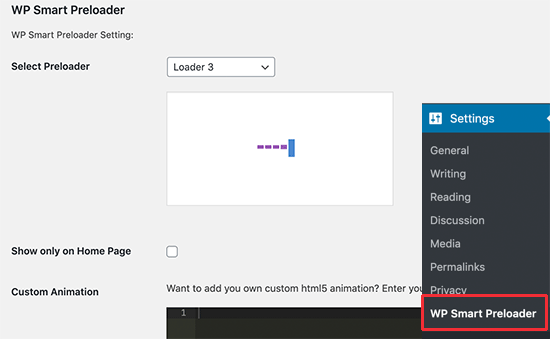
WP Smart Preloader settings

First, you need to choose a preloader style or page load animation. The plugin comes with six built-in animations to choose from. You can also upload your own custom HTML and CSS to create a custom preloader.

After that, you can make the preloader appear only on the homepage by checking the ‘Show only on Home Page’ option.

Next, you need to scroll down to the ‘Duration to show Loader’ section. You need to specify the duration for the preloader. The default option is 1500 milliseconds (1.5 seconds) which should work for most sites, but you can change that if you want.
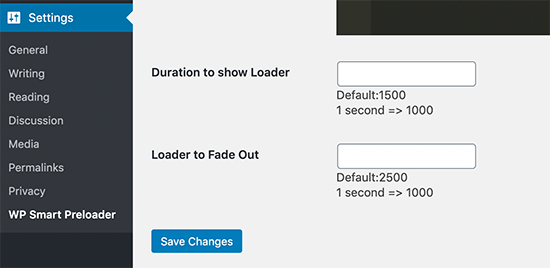
Set preloader duration and fade out

You can also set the time loader takes to completely fade out. The default option is 2500 seconds or 2.5 seconds.

Finally, don’t forget to click on the ‘Save changes’ button to store your settings.

You can now visit your website to see the preloader in action.

WP Smart Preloader Preview

Method 2. Adding a Preloader in WordPress using Preloader Plugin

This method is flexible but requires additional steps to properly implement it on your WordPress site.

The first thing you need to do is install and activate the Preloader plugin. For more details, see our step by step guide on how to install a WordPress plugin.

Upon activation, you need to visit the Plugins » Preloader page to configure plugin settings.
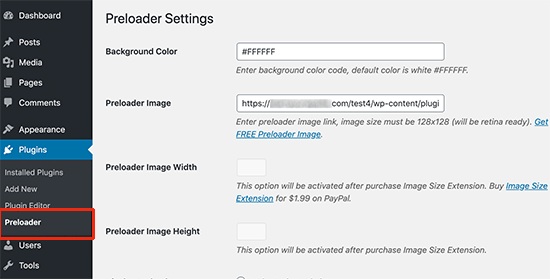
Preloader settings

First, you need to enter the Hex code for the background color you want to use for the loading screen. The default option is #FFFFFF (white). You can use an online color picker tool to find the HEX code for the color you want to use.

Next, you need to provide the URL of the preloader image you want to use. The plugin comes with a default animation image.

If you want to use other animation, then you’ll find a link to download an animated preloader image from a third-party website. You can then upload that image to your wp-content folder and paste the URL here.

Next, you need to choose where you want to display the preloader.
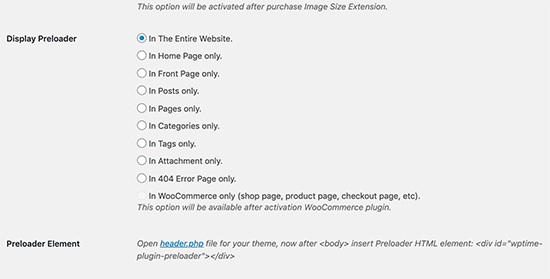
Select preloader locations

You can choose to display it on all pages of your website, or you can select a specific section.

Finally, you will see the instruction to add the following code to your WordPress theme’s header.php file.

<div id="wptime-plugin-preloader"></div>

Before you leave the page, don’t forget to click on the ‘Save changes’ button to store your settings.

We don’t recommend adding code to your WordPress theme because it will get wiped off when you update the theme.

If you are using a child theme, then it is ok to add the code to your child theme’s header.php file.

An even better solution would be to add this code using a separate Code Snippets plugin, or in a site-specific plugin.

Here’s the code you’d need to add:

function wpb_add_preloader() {
echo '<div id="wptime-plugin-preloader"></div>';
}
add_action( 'wp_body_open', 'wpb_add_preloader' );

Note: this method of adding code will only work on WordPress themes that are compatible with the wp_body_open() function added in WordPress 5.2.

This method of adding the code makes sure that your code stays there even if you update the theme.

Once you have added the code, you can visit your website to see the preloader in action.

Preloader preview

We hope this article helped you learn how to easily add a Preloader to your WordPress site. You may also want to see our list of the most useful WordPress tips, tricks, and hacks for more cool ideas.

If you liked this article, then please subscribe to our YouTube Channel for WordPress video tutorials. You can also find us on Twitter and Facebook.

The post How to Add a Preloader Animation to WordPress (Step by Step) appeared first on WPBeginner.


December 11, 2019 at 07:16PM

Tuesday, December 10, 2019

How to Monitor Your WordPress Website Server Uptime (Easy Way)

Do you want to monitor server uptime for your WordPress site? Monitoring server uptime allows you to get alert notifications when your website goes down or is inaccessible.

Keeping your website online ensures that your customers never have any issues visiting your website. An unresponsive site is not only bad for user experience, but it is also bad for your SEO rankings.

In this article, we’ll show you how to easily monitor server uptime in WordPress. We’ll share multiple uptime monitoring solutions, and you can choose one that works best for you.

Monitoring your WordPress server uptime

What is Website Server Uptime Monitoring?

Website server uptime monitoring allows you to track outages on your website. The server uptime monitoring tools notify you immediately if something goes wrong with your website, so you can get it fixed immediately.

Many WordPress hosting companies promise 99.9% server uptime. However, sometimes this is not the case.

The biggest sign of poor hosting service is that their servers go down frequently and remain down for several minutes or even hours.

Why You Need to Monitor Server Uptime?

Often users trust their web hosting companies and let their guards down. Sometimes you may not even know if your website experienced downtime specially if it happened in the middle of the night or during holidays.

Website downtime can severely affect your business, website reputation, and user experience.

  1. More Downtime Means Loss in Money: If your website remains inaccessible for a long period of time you will inevitably lose revenue.
  2. User Experience and Brand Reputation: Having your website down is sort of like closing your door in users’ faces even though you’re not doing it intentionally. It creates a bad impression and you may lose potential customers.
  3. Search Engine Influence: If your website is frequently down, then search engines might assume that your website is insignificant or lacks consistency. Often they penalize those websites that fail to maintain 24/7 uptime.

Obviously, you cannot just sit in front of a computer and keep refreshing your website to see if it is up.

There are some really excellent and free tools that you can use to automatically monitor server uptime for your website.

These services will monitor your site uptime and will also promptly alert you via email, or SMS message when your server is down.

Let’s take a look at some of the best tools for monitoring server uptime for your website.

1. Monitor Server Uptime with Uptime Robot

Uptime Robot offers both free and paid plans to monitor your server uptime.

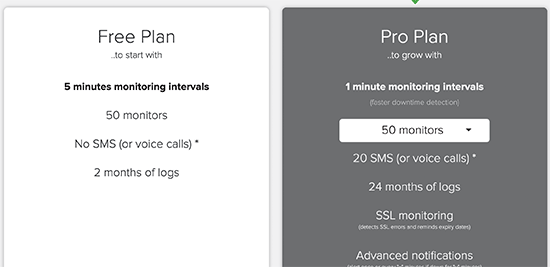
Their free plan checks your website every 5 minutes, and the paid plan every 60 seconds. Paid plan starts for $4.50 per month (billed annually), and it includes SMS, voice call, email, and other alerts.

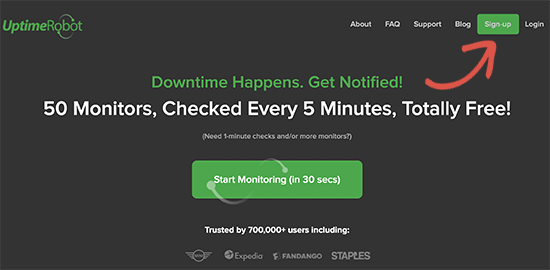
The first thing you need to do is visit the Uptime Robot website and click on the Signup button.

Sign up Uptime Robot

Next, you need to select a plan for your monitoring service.

Choose monitoring plan

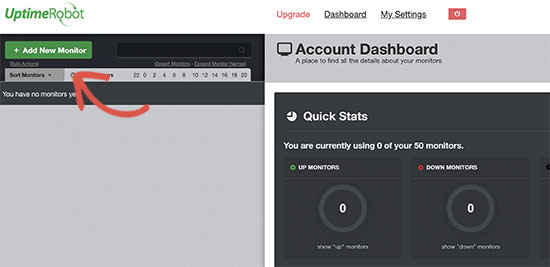
After that, finish the signup process and log in to your Uptime Robot account dashboard. From here, you need to click on the Add New Monitor button.

Add new monitor to Uptime Robot

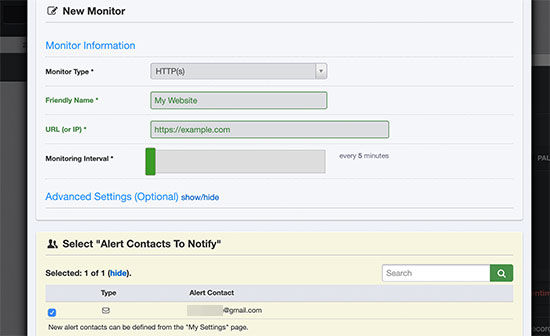
This will bring up a popup where you need to select a monitoring method (HTTP or HTTPS), and then add your website URL. In that same modal, you can also set alerts to be sent when your website is down.

Add your website

Once you are done, click on the ‘Create Monitor’ button to save your changes.

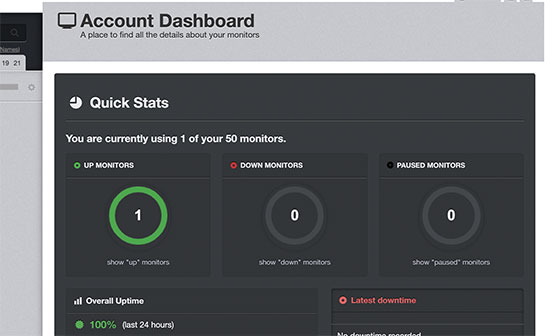
Uptime Robot will now save your website and start monitoring your server uptime. You’ll see detailed stats on your account dashboard and receive alerts when your website is down.

Uptime Robot dashboard stats

2. Setting up Uptime Monitoring Using Pingdom

Pingdom is a popular performance monitoring tool that allows you to set up server uptime monitoring for your website. Pingdom is a paid service with plans starting from $42 per month. They also have a starter plan that’s $165 / year.

Pingdom is a more robust platform offering real-time uptime monitoring service. They offer detailed stats, logs, monitoring from various geographic locations, and more.

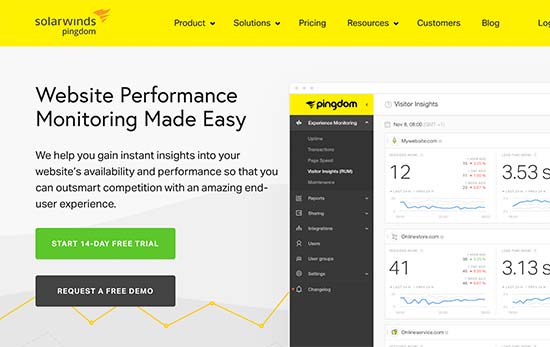
First, you need to visit the Pingdom website and click on the green button to start your free trial.

Pingdom

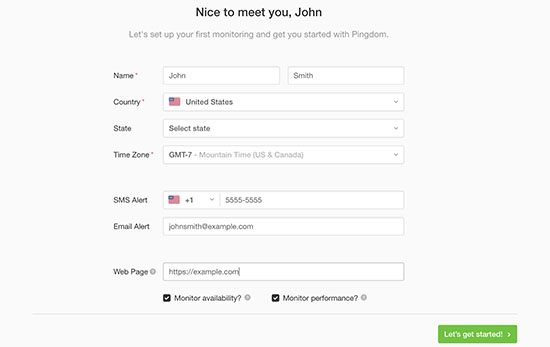
You’ll be asked to provide your email and password to create an account. After that, you will be asked to provide phone number, email, timezone, and website URL. Make sure to check performance and monitoring options, and then click on the ‘Let’s get started’ button.

Pingdom account setup

Pingdom will automatically setup monitoring and will send you a test alert to your email address. That’s all, you have successfully set up uptime monitoring for your website using Pingdom.

You can set multiple alerts and tracking for various locations. Pingdom documentation and support can help you set that up, but their interface is fairly straight forward.

Pingdom also keeps your uptime history, so you can properly evaluate your web hosting company’s performance over time.

3. Checking Your Website is Up or Down

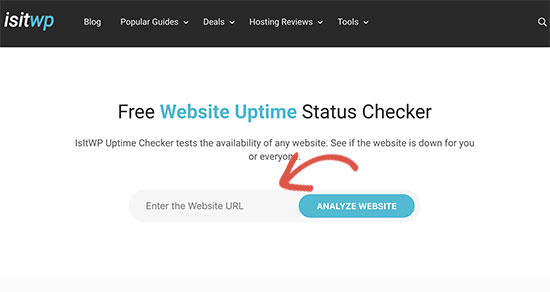
If you just want to know whether your website is really down, or you are facing internet issues, then you can do that quickly using IsItWP’s uptime checker tool.

Simply go to the IsItWP Uptime Checker tool and enter your website address.

IsItWP Uptime Checker tool

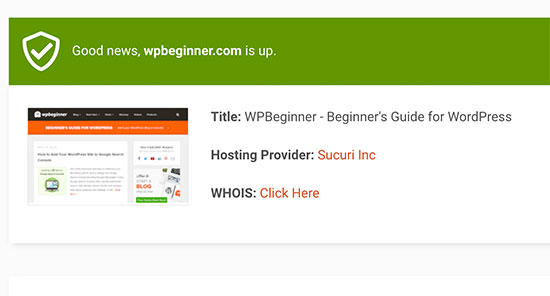
Uptime Checker tool will quickly check your website and will show you whether your website is up or down.

Uptime checker tool result

What to Do When Your Website is Down?

If your website down, and you need to figure out what to do next, then here are the step by step instructions you should follow.

Step 1. Verify that it is down for everyone and not just you

You can start by checking your site with IsItWP’s uptime checker tool. If it shows that your website is up, then it is probably just your internet.

First, clear your browser cache and DNS cache. After that reload the website.

If that doesn’t work, then see if you can access your website from a different IP address. You can do so by using a VPN service or even just using your mobile phone internet.

If you can access your website, then this means that either your ISP or your hosting company has accidentally blocked your IP address. You can contact both service providers to resolve the issue.

If you recently changed your domain name‘s DNS settings, then this could also mean that the DNS has not updated in your particular geographic location.

There is not much you can do but wait till DNS is properly updated. This may take a few hours to a day.

Step 2. If Your Website is Down for Everyone

If you have verified that your website is down for everyone, then you need to immediately reach out to your hosting provider. They may be having issues with their server and can provide you more details.

Usually, hosting companies are quick to respond to such issues, and your website will be back soon.

However, if your website is frequently down, or you don’t get a satisfactory answer from them, then proceed to the next step.

Step 3. Move to a Better Hosting Provider

Due to tough competition in the hosting industry, some lesser-known companies cut costs by using outdated technologies, unskilled staff, and inadequate customer service.

However, if your website is frequently down and you cannot do much about it, then you need to move to a better hosting provider.

Here’s our list of reliable WordPress hosting providers:

For more hosting options, see our list of the best WordPress hosting companies to choose from.

Next, you’ll need to transfer your website to a new host. We have a complete step by step tutorial on how to move your website to a new hosting provider (without losing SEO and without any downtime).

Some providers like SiteGround and WP Engine will offer free website migration service. You just need to ask their support.

We hope this article helped you learn how to monitor server uptime in WordPress. You may also want to follow our guide on how to keep your WordPress site secure to avoid any mishaps like data loss or hacking.

If you liked this article, then please subscribe to our YouTube Channel for WordPress video tutorials. You can also find us on Twitter and Facebook.

The post How to Monitor Your WordPress Website Server Uptime (Easy Way) appeared first on WPBeginner.


December 10, 2019 at 07:00PM

Monday, December 9, 2019

How to Track Link Clicks and Button Clicks in WordPress (Easy Way)

Do you want to track link clicks and button clicks in WordPress?

Tracking link and button clicks helps you uncover how users interact with your website. You can use the insights to improve your website and plan your strategy accordingly.

In this guide, we’ll show you how to easily track link clicks and button clicks in WordPress.

Easily track link and button clicks in WordPress

Why You Should Track Link and Button Clicks in WordPress?

Links and buttons are two of the most common ways users interact with any website on the internet. These are also the elements that lead website visitors to make purchases, sign up, and convert into a customer.

Tracking how your users interact with different elements on your website helps you learn what’s working on your website. More importantly, it helps you learn what’s not working and needs improvement.

For instance, If users are not clicking on the add to cart button in your online store, then you can investigate what’s stopping them from doing so.

Another great example is your affiliate links. You can track which links your users click more often than others.

These insights can help you make data-driven decisions for the success of your business.

Having said that, let’s take a look at how you can easily track links and button clicks in WordPress.

We have broken down this guide into the following sections, so you can easily follow along.

Tracking Link and Button Clicks in WordPress Using MonsterInsights

The best tool to collect marketing data on your website is Google Analytics. However, despite Google’s best efforts many beginners and even experienced marketers find it a bit intimidating.

This is where MonsterInsights comes in. It is the best Google Analytics plugin for WordPress that allows you to properly setup Google Analytics, and make the most out of it.

MonsterInsights goes beyond just adding a tracking script in the footer. It adds automatically adds proper event tracking to all links, buttons, cart areas, and more. Most importantly, it also shows you human-readable reports right inside your WordPress dashboard.

Note: Our developers built MonsterInsights for WPBeginner content team. We released it as a plugin to help other small business owners. Today, over 2 million websites use the plugin to make data-driven decisions.

MonsterInsights has a free version, but you’ll need at least the PRO plan to take full advantage of all the powerful tracking features it offers.

Setting up MonsterInsights is super easy.

First, you need to install and activate the MonsterInsights plugin. For more details, see our step by step guide on how to install a WordPress plugin.

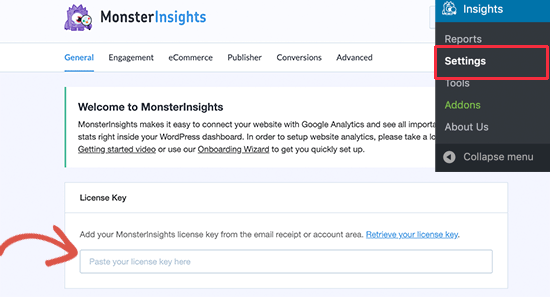
Upon activation, go to Insights » Settings page to enter your license key. You can find this information under your account on MonsterInsights website.

MonsterInsights license key

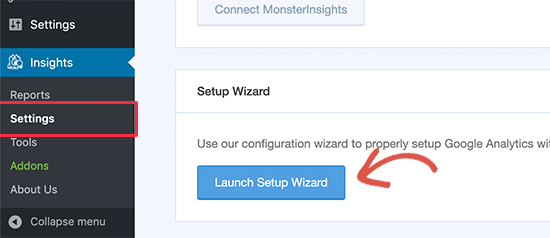
After verifying your license key, you need to scroll down a little on the settings page and then click on the ‘Launch Setup Wizard’ button.

Launch setup wizard

MonsterInsights will launch the set up wizard which will connect your website to Google Analytics.

If you need detailed instructions, then see our tutorial on how to install Google Analytics in WordPress which will walk you through the entire setup.

MonsterInsights setup wizard automatically sets up all the right settings based on the type of your website. It truly is effortless.

Once you have setup MonsterInsights, you can resume this tutorial.

Now, that everything is up and running let’s start setting up click tracking.

A lot of web publishers use affiliate marketing to make money online.

As an affiliate marketer, you’ll need to learn how your affiliate links are doing. Obviously, you can track your affiliate earnings from third-party resources, but that does not give you an accurate picture of how users interact with your affiliate links.

Most affiliate marketers use a link cloaking plugin like ThirstyAffiliates. This allows you to create shorter affiliate links and manage all your links inside WordPress. For example, https://ift.tt/2s6ANfd.

MonsterInsights makes it easy to set up affiliate link tracking in WordPress.

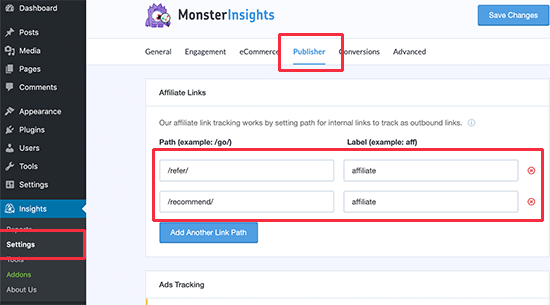
Simply go to Insights » Settings and switch to the ‘Publisher’ tab. From here, you can add your affiliate link prefix to start tracking.

Tracking affiliate links in WordPress

Don’t forget to click on the Save changes button to store your settings.

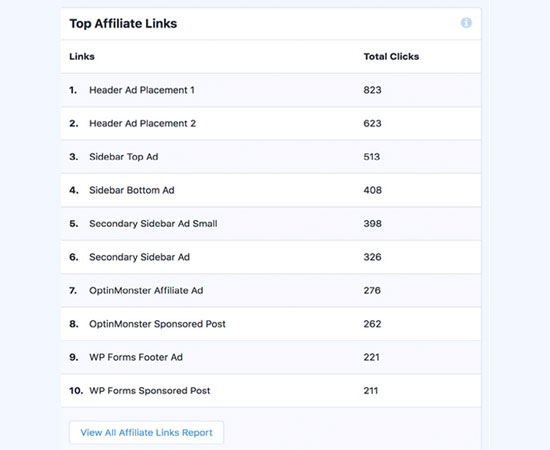
Within few hours, you will be able to see your affiliate link performance in your Publisher reports located under Insights » Reports menu in WordPress.

View top affiliate links

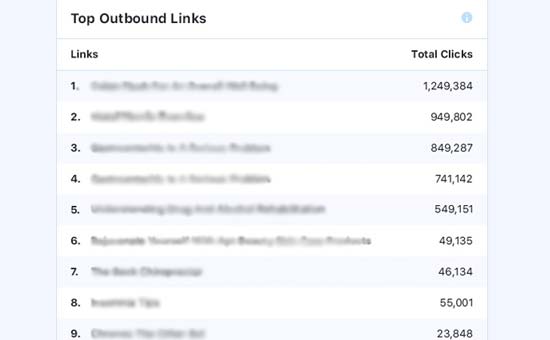
Outbound links are the links pointing to external websites. These could also be uncloaked affiliate links, links to your partner websites, or other websites owned by you.

MonsterInsights automatically tracks all clicks on those outgoing links. You can view them by visiting Insights » Reports page under Publishers report.

Outbound links report

Pro tip: If you see that you’re sending a lot of clicks to an external website, then you should contact them to work out a strategic partnership. This can be a sponsorship, cross-promotion, affiliate partnership, etc.

Ecommerce Tracking in WordPress

If you run an eCommerce business using WooCommerce or Easy Digital Downloads, then MonsterInsights comes with powerful eCommerce tracking features.

Let’s turn on eCommerce tracking on your website.

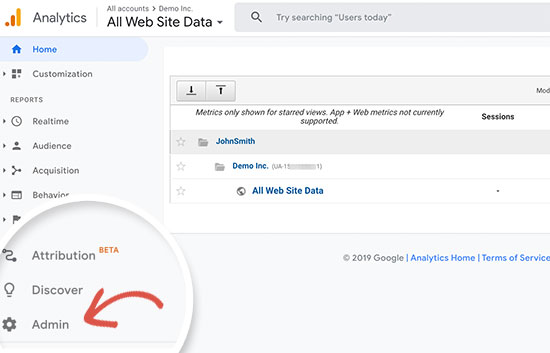
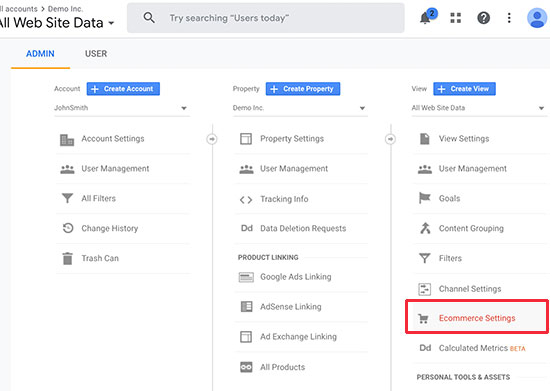
First, you need to visit your Google Analytics dashboard. From there you need to switch to the Admin view.

Google analytics admin

Next, you need to click on the eCommerce settings option.

eCommerce settings

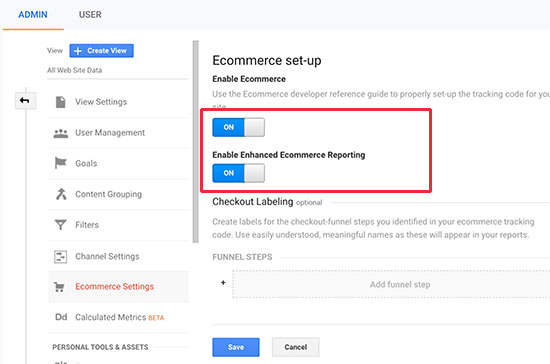
After that, you will see the options to turn on eCommerce tracking and enhanced eCommerce tracking in Google Analytics.

enable eCommerce in Google Analytics

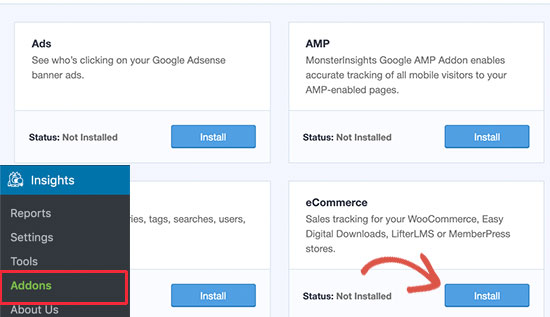
Now that you have enabled eCommerce in Google Analytics, let’s enable the MonsterInsights eCommerce addon.

First, you need to go to Insights » Addons page. From here you need to install and activate the ‘Ecommerce’ addon.

Ecommerce addon

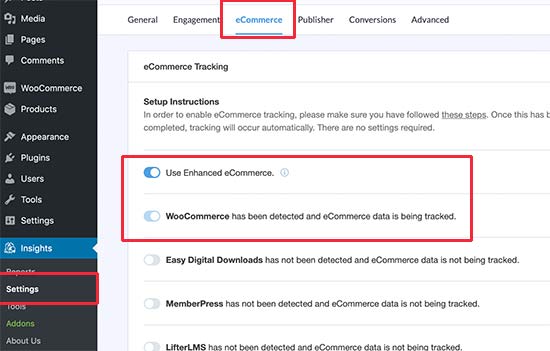
After that, you need to head over to Insights » Settings page and switch to the eCommerce tab. From here, you can turn on enhanced eCommerce tracking. MonsterInsights will automatically detect your eCommerce software and turn it on for you.

Turning on eCommerce tracking in MonsterInsights

That’s all you have successfully enabled eCommerce tracking on your website.

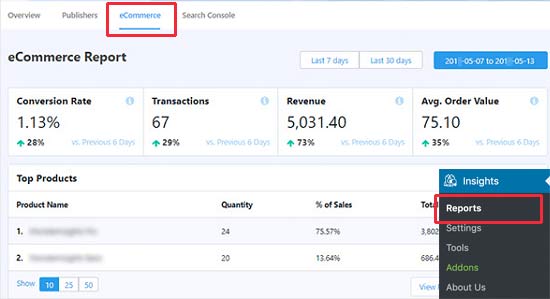
eCommerce reporting

On top, you’ll see an overview of your eCommerce conversions. Below that, you will find your top referral sources and the exact conversions and revenue for each source.

This information helps you learn which referral sources to maximize, and which one of them are not doing so well.

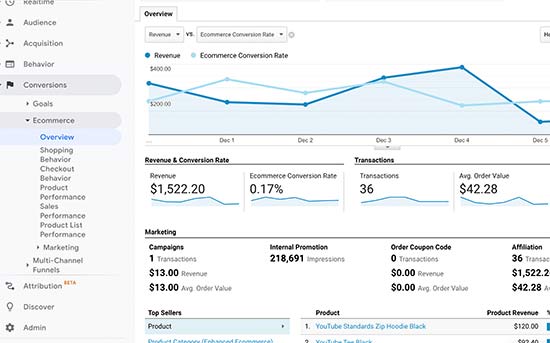
MonsterInsights also sends a lot of useful data to Google that you can see under Conversions » Ecommerce section.

Ecommerce reports in Google Analytics

Tracking File Downloads in WordPress

If you have a membership site that sells digital downloads or offer downloadable content on your website, then tracking file download buttons will help you find how users interact with those files.

MonsterInsights automatically tracks file downloads for common file types like documents, spreadsheets, presentations, PDFs, and zip files.

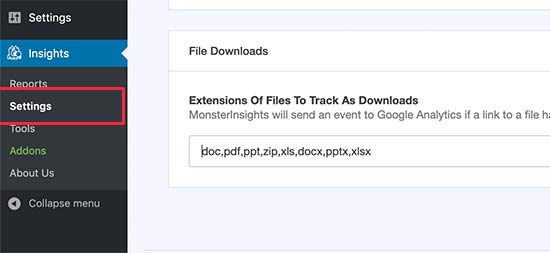
You can also add other file types that you may want to track. Simply go to Insights » Settings page and then switch to the ‘Engagement’ tab. From here, scroll down to the File Downloads to add the file type extension that you want to track.

File downloads to track

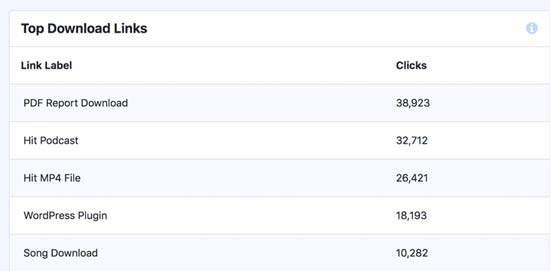
You can view your file download stats by visiting Insights » Reports and switching to the ‘Publisher’ tab.

File download clicks

Tracking Form Conversions in WordPress

Forms play an important role in the success of any website. You use forms for email newsletter, shopping cart, purchase and order forms, and all your contact forms.

It is crucial to understand how users interact with your forms, which forms get more conversions and which forms are not getting enough attention.

Let’s start tracking forms in WordPress using MonsterInsights.

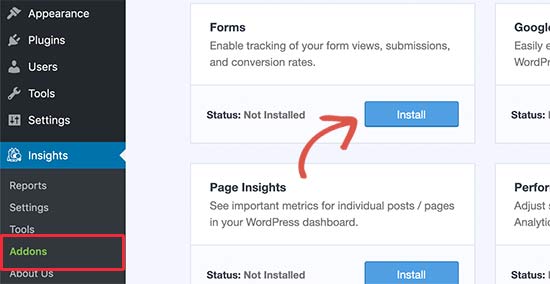
First, you need to head over to Settings » Addons page. From here, install and activate the Forms addon.

forms addon

Once enabled, MonsterInsights will automatically detect the forms on your website and start gathering interaction data. It works seamlessly with all popular WordPress form plugins like WPForms, Formidable Forms, Gravity Forms, etc.

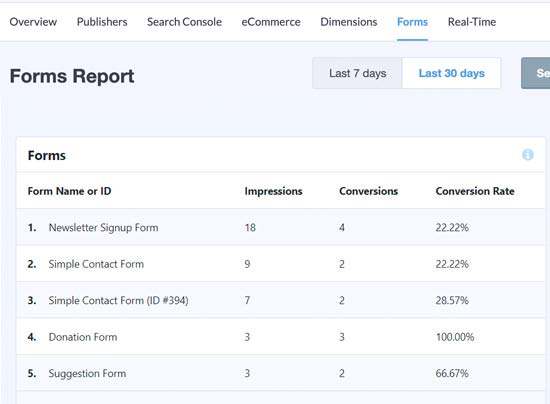
To view your form reports, you need to go to Insights » Reports page and switch to the ‘Forms’ tab.

Forms report

So far we have learned how to automatically track links and button clicks across your website. What if you wanted to track a specific link on your WordPress site, and create custom reports for it?

Luckily, MonsterInsights makes this easy as well. Its called custom link attribution feature, and here is how you can add that for any link on your website.

Simply switch to the HTML view in the block editor and add your link in the following format:

<a href="https://www.example.com" data-vars-ga-category="Call to action clicks" data-vars-ga-action="CTA link click" data-vars-ga-label="Homepage CTA clicks">My custom link</a> 

This link contains three new link attributes:

  • data-vars-ga-category : Sets a category for your link
  • data-vars-ga-action : Describes the action this link performs
  • data-vars-ga-label : A label for your link which helps you identify it

You can find your custom link tracking report under your Google Analytics dashboard Behavior » Events section.

We hope this article helped you learn how to track link clicks and button clicks in WordPress. You may also want to see our complete guide on the website marketing data you must track on all your websites, and our comprehensive guide on how to increase your blog traffic.

If you liked this article, then please subscribe to our YouTube Channel for WordPress video tutorials. You can also find us on Twitter and Facebook.

The post How to Track Link Clicks and Button Clicks in WordPress (Easy Way) appeared first on WPBeginner.


December 09, 2019 at 07:12PM