Wednesday, May 6, 2020

How to Add Custom Navigation Menus in WordPress Themes

Do you want to add custom navigation menus in your WordPress theme? Navigation menus are the horizontal list of links displayed on top of most websites.

By default, WordPress themes come with pre-defined menu locations and layouts, but what if you wanted to add your own custom navigation menus?

In this article, we’ll show you how to easily create and add custom navigation menus in WordPress, so you can display them anywhere on your theme.
Adding custom navigation menus in WordPress themes

When Do You Need this WordPress Navigation Menu tutorial?

Most WordPress themes come with at least one spot where you can display your site’s navigation links in a menu.

You can manage menu items from an easy to use interface inside your WordPress admin area.

If you’re just looking to add navigation menus on your website, then simply follow our beginner’s guide on how to add a navigation menu in WordPress.

The goal of this tutorial is to help DIY / intermediate users add custom navigation menus in their WordPress themes.

We’ll be covering the following topics in this article:

Having said that, let’s take a look at how to add custom WordPress navigation menus in your theme.

Creating Custom Navigation Menus in WordPress Themes

Navigation menus are a feature of WordPress themes. Each theme can define its own menu locations and menu support.

To add a custom navigation menu, the first thing you need to do is register your new navigation menu by adding this code to your theme’s functions.php file.

function wpb_custom_new_menu() {
  register_nav_menu('my-custom-menu',__( 'My Custom Menu' ));
}
add_action( 'init', 'wpb_custom_new_menu' );

You can now go to Appearance » Menus page in your WordPress admin and try to create or edit a new menu. You will see ‘My Custom Menu’ as theme location option.
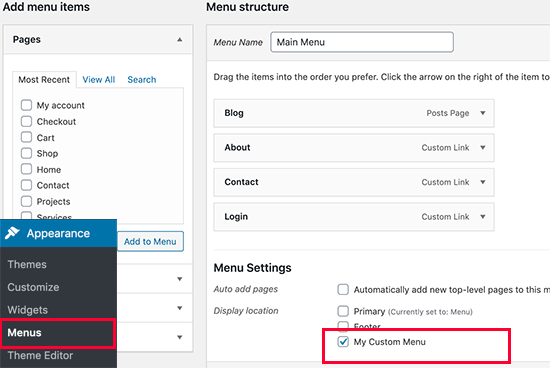
Custom navigation menu added to the theme

If you want to add more than one new navigation menu location, then you would need to use a code like this:

function wpb_custom_new_menu() {
  register_nav_menus(
    array(
      'my-custom-menu' => __( 'My Custom Menu' ),
      'extra-menu' => __( 'Extra Menu' )
    )
  );
}
add_action( 'init', 'wpb_custom_new_menu' );

Once you have added the menu location, go ahead and add some menu items in the WordPress admin by following our tutorial on how to add navigation menus for beginners.

This will allow us to move on to the next step which is displaying the menu in your theme.

Displaying Custom Navigation Menus in WordPress Themes

Next, we need to display the new navigation menu in your WordPress theme. The most common place where navigation menus are usually placed is in the header section of a website just after the site title or logo.

However, you can add your navigation menu anywhere that you want.

You will need to add this code in your theme’s template file where you want to display your menu.


<?php
wp_nav_menu( array( 
    'theme_location' => 'my-custom-menu', 
    'container_class' => 'custom-menu-class' ) ); 
?>

The theme location is the name that we selected in the previous step.

The container class is the CSS class that will be added to your navigation menu. Your menu will appear as a plain bulleted list on your website.
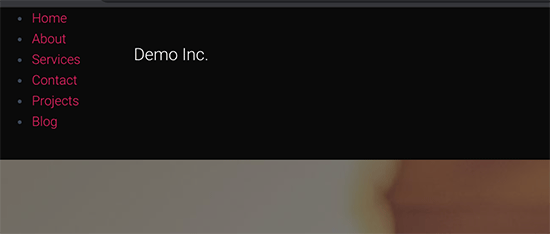
Custom displayed as plain list

You can use the CSS class .custom_menu_class to style your menus. Here is a sample CSS to help you get started:

div.custom-menu-class ul {
    margin:20px 0px 20px 0px;
    list-style-type: none;
    list-style: none;
    list-style-image: none;
    text-align:right;
}
div.custom-menu-class li {
    padding: 0px 20px 0px 0px;
    display: inline;
} 
div.custom-menu-class a { 
    color:#FFFFFF;
}

Custom menu styled

To learn more about styling a navigation menu, see our detailed tutorial on how to style WordPress navigation menus

Adding a Custom Navigation Menu in WordPress Using Page Builder

If you are creating a custom landing page or home page layout, then using a WordPress page builder plugin would make the whole thing a lot easier.

We recommend using Beaver Builder, which is the best WordPress page builder on the market. It allows you to create any type of page layout using simple drag and drop tools (no coding required).

This also includes adding a custom navigation menu to your page layout.

First, you’ll need to install and activate the Beaver Builder plugin. For more details, see our step by step guide on how to install a WordPress plugin.

Upon activation, you need to create a new page or edit an existing one where you would like to add the navigation menu. On the post editor screen, click on the ‘Launch Beaver Builder’ button.
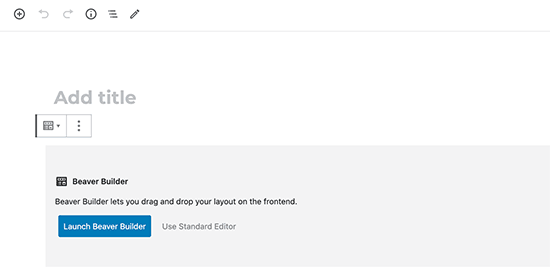
Launch Beaver Builder

If it is a new page, then you can use one of the ready-made templates that come with Beaver Builder. You can also edit your exiting page right away.
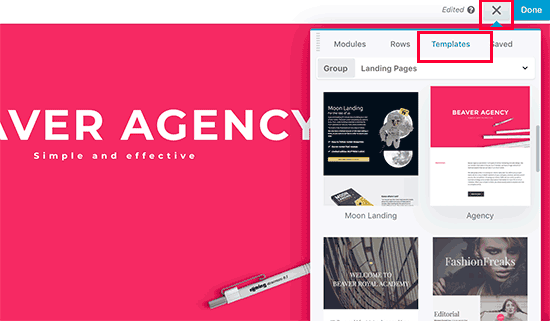
Choose a template

Next, you need to add Menus module and drag and drop it on your page to the place where you want to display the menu.
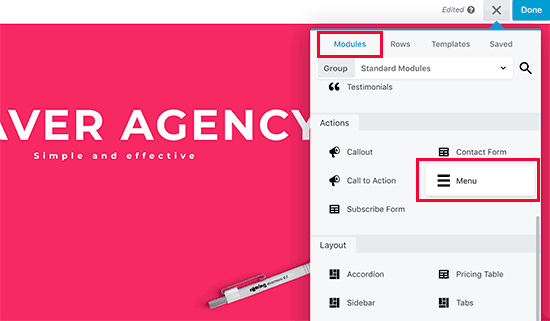
Add menu module to your page

This will bring up the Menu module settings in a popup. First, you need to select the navigation menu you want to use. You can always create new menus or edit an existing menu by visiting Appearance » Menus page in WordPress admin area.
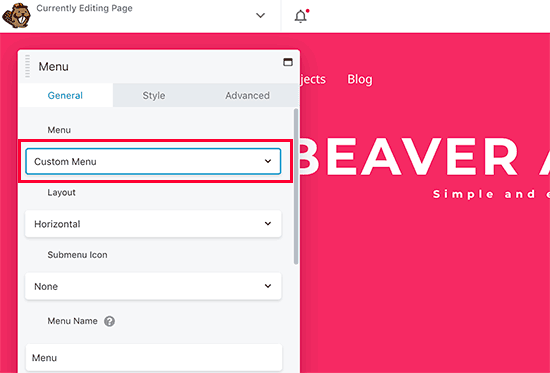
Menu module settings

You can review other settings as well. Beaver Builder allows you to choose custom colors, background, and other style properties for your menu.

Once you are done, you can click on the Save button and preview your menu.
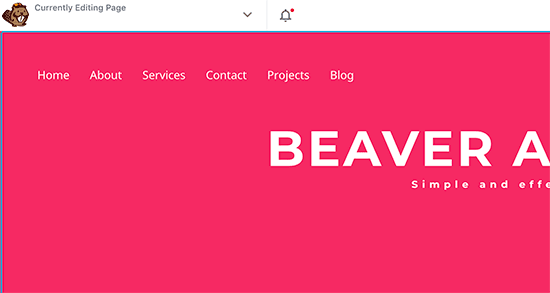
Preview of a custom navigation menu added with Beaver Builder

Creating Mobile-Friendly Responsive Menus in WordPress

With the increase in usage of mobile devices, you may want to make your menus mobile-friendly by adding one of the many popular effects.

Responsive menu example

You can add a slide-out effect (above), dropdown effect, and even a toggle effect for mobile menus.

We have a detailed step by step guide on how to make mobile-ready responsive WordPress menus.

Do More With WordPress Navigation Menus

Navigation menus are a powerful web design tool. They allow you to point users to the most important sections of your website.

WordPress allows you to do a lot more than just displaying links in your menu. Try these useful tutorials to extend the functionality of navigation menus on your WordPress site.

That’s all, we hope this ultimate guide helped you learn how to add a navigation menu in WordPress. You may also want to see our list of 25 most useful WordPress widgets, and our list of the must have WordPress plugins.

If you liked this article, then please subscribe to our YouTube Channel for WordPress video tutorials. You can also find us on Twitter and Facebook.

The post How to Add Custom Navigation Menus in WordPress Themes appeared first on WPBeginner.


May 06, 2020 at 03:40PM

Tuesday, May 5, 2020

How to Create a Free Gift Coupon in WooCommerce (Easy Way)

Do you want to offer your WooCommerce customers a free gift along with their purchase?

Offering free gifts can be a great way to drive more sales, increase average order value, and reward returning customers on your online store.

In this article, we will show you how to add a free gift coupon in WooCommerce.

How to create a free gift coupon in WooCommerce (easy way)

Why Offer Your Customers a Free Gift?

There are several reasons why you might want to offer a free gift to your customers on your WooCommerce store.

One great reason is to drive more sales and increase average order value. Many online stores, offer a free gift on spending a set amount or when buying a specific product.

For example: get a free bag on all orders above $200.

This kind of promotional campaign adds extra value to users order and encourages them to complete a purchase.

Another great benefit is that you grow your email list.

You see, more than 70% of visitors coming to your website will never come back. Getting them to sign up for an email newsletter helps you bring them back to your website.

A free gift coupon will help you capture more email addresses and ultimately grow your business.

If you want to get creative with this and add a bit of fun for your customers, you could even use a “spin to win” coupon wheel to give them the free gift coupon.

What to give away as a free gift?

Obviously, you don’t want to spend too much money by giving away free items. However, you need to offer something that is useful or valuable while still cost-effective for your business.

Many popular online stores use branded merchandise as a free gift. That way, you’ll be getting your brand in front of customers and reminding them to come back for more.

Others offer complimentary accessories as a free gift to reward customers and boost brand loyalty.

That being said, let’s take a look at how to add the free gift coupon in WooCommerce.

Creating a Free Gift Coupon in WooCommerce

For this tutorial, we’ll be using the Advanced Coupons plugin, which is the best WordPress coupon code plugin on the market.

It allows you to easily manage coupons in WooCommerce with a ton of options. This helps you boost your WooCommerce sales and grow your business.

First, you need to install and activate the Advanced Coupons plugin. If you’re not sure how to do that, just check out our step by step guide on how to install a WordPress plugin.

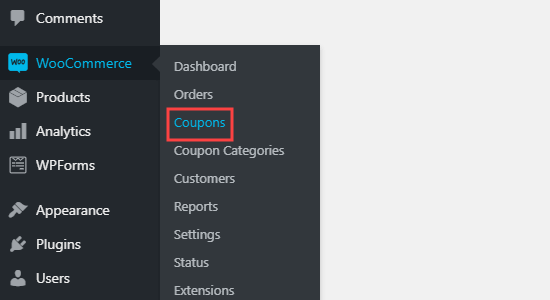
Upon activation, go to WooCommerce » Coupons page in your WordPress admin dashboard.

The WooCommerce Coupons tab in the dashboard

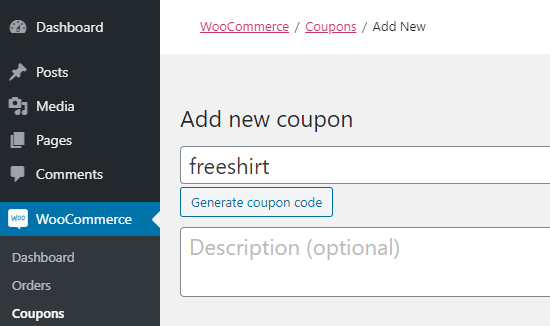
First, you need to click the ‘Add Coupon’ button to create a new coupon. On the next screen, enter the coupon code that you want to use for the offer at the top of the screen.

Entering a code for your free gift coupon - we've used 'freeshirt' for ours

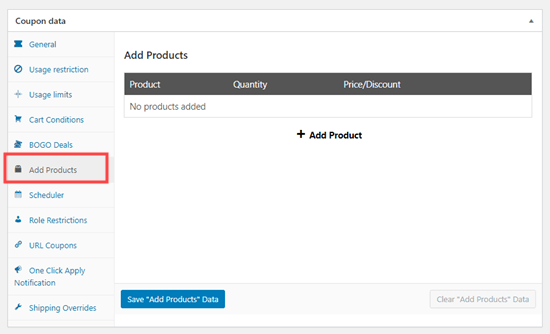
After that, scroll down to the ‘Coupon Data’ section and switch to the ‘Add Products’ tab from the left column.

Click on the 'Add Products' tab

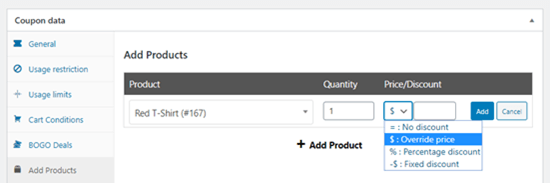
From here you need to click the ‘+ Add Product’ button to select product that you want to offer as free gift.

Using the search dropdown, find the product that you want to use. After that, select ‘$: Override price’ option under the ‘In the Price/Discount’ column.

Making your product free using the 'Price/Discount' dropdown

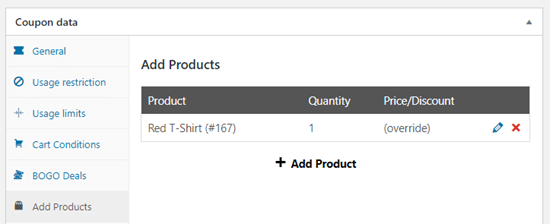
Next, click the ‘Add’ button to save your product, and you should now see it listed like this:

The free product shown in the table of products

If you want to give away more than one free gift to the customer, then you can enter other products here as well.

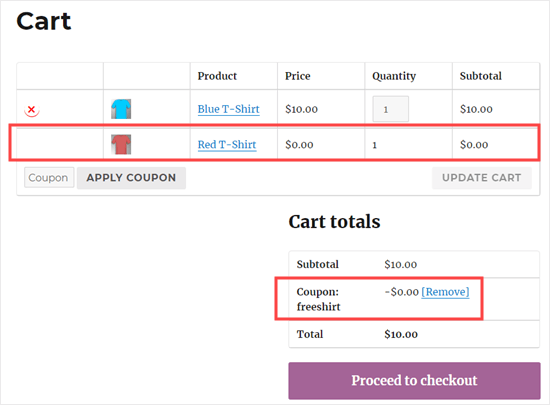
When the customer enters the coupon code, the product(s) will automatically be added to their shopping cart for free. Here’s the free red shirt, after applying the coupon:

The freeshirt coupon in action on our site

Offering a Free Gift if the Customer Spends Enough

What if you want to use a free gift to encourage your customers to spend more? You can do this too with Advanced Coupons.

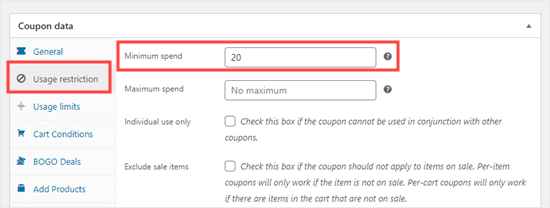
Simply set up your coupon code as mentioned above, and then click the Usage Restriction tab.

On this tab, you need to set the Minimum Spend to whatever amount you want. We’ve used $20.

Setting a minimum spend of $20

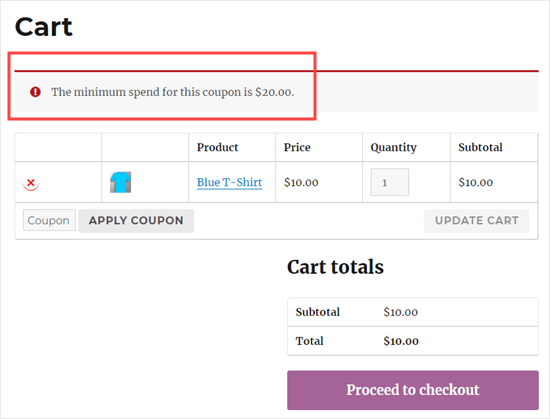
Now, the free gift coupon can only be used if the customer has $20 or more of products in their cart. If they try to use it before reaching this amount, they’ll see an error message:

The error 'The minimum spend for this coupon is $20.00' appears if the customer hasn't met the $20 minimum

That’s it! You’ve created a coupon code that gives your customers a free gift.

We hope this article helped you learn how to create a free gift coupon in WordPress. You may also want to see our list of the best WooCommerce plugins for your store, and our comparison of the best email marketing services.

If you liked this article, then please subscribe to our YouTube Channel for WordPress video tutorials. You can also find us on Twitter and Facebook.

The post How to Create a Free Gift Coupon in WooCommerce (Easy Way) appeared first on WPBeginner.


May 05, 2020 at 05:12PM

Monday, May 4, 2020

How to Open a WordPress Popup Form On Click of Link or Image

Do you want to create a popup that appears when your visitors click on a link or an image on your site?

This is a proven way to grow your email list, and it’s often used by popular sites to offer an optin incentive.

In this article, we’re going to show how to open a WordPress popup on click of a link or an image, step by step.

It’s not nearly as complicated as you might think to trigger a WordPress popup form on click. In this article, we’ll show you how.

Adding an on-click popup form to your website

What Is an “On Click” Popup Form?

On-click popup forms are lightbox popups that open when a user clicks on a link, button, or image on your website.

Normally, popups appear on websites when a user arrives or when they are about to leave. On click popup forms are triggered by the user interaction.

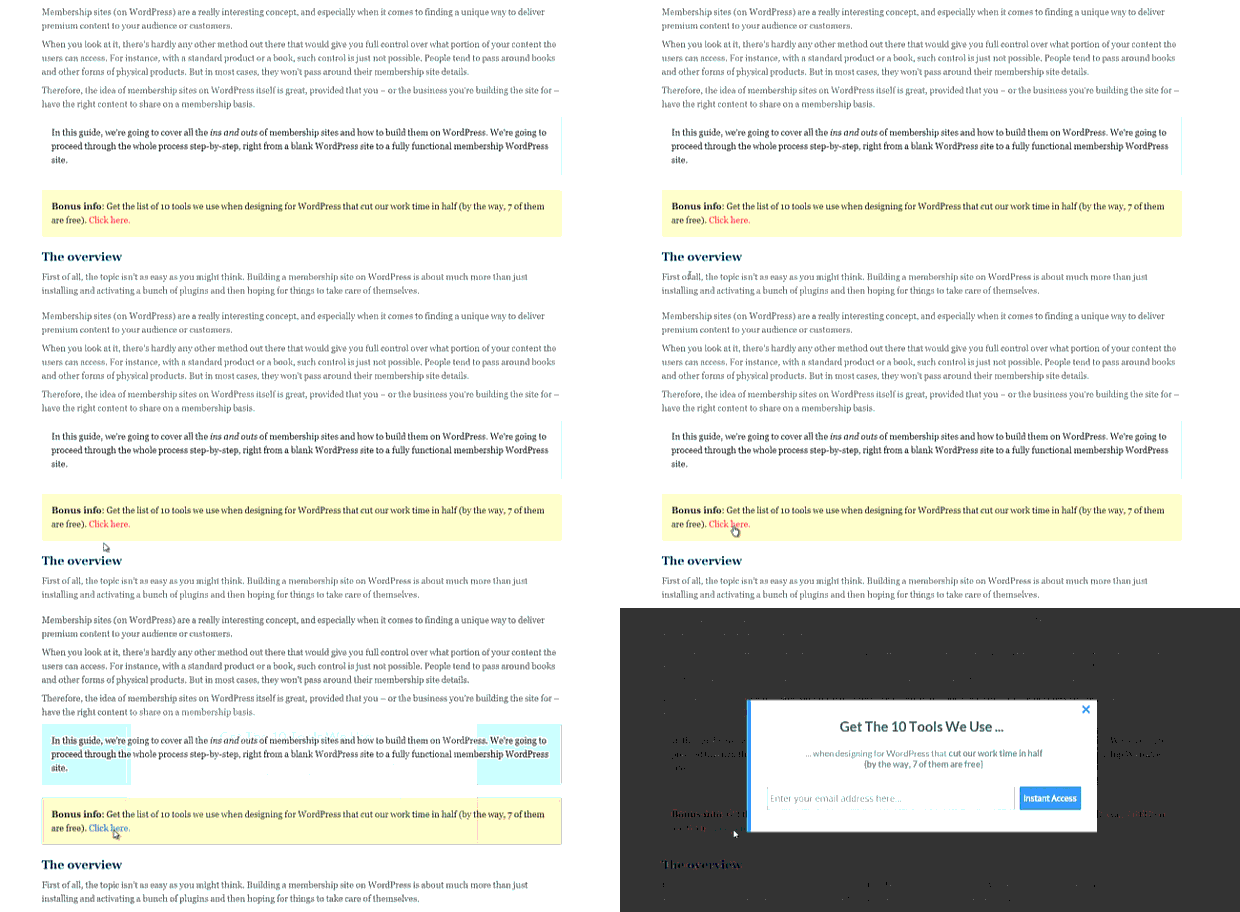
Example of an On-click popup form

We have two on-click popups on WPBeginner website that we use to grow our email list: first on the sidebar email icon which is next to all social icons, and the second below each post to download our toolkit.

The easiest way to create an on click popup is to use a popup plugin for WordPress. We’re going to use OptinMonster for this tutorial.

Why Are On Click Popup Forms So Effective?

On click popup form is effective because it uses the powerful Zeigarnik effect. This is a psychological principle that states users who start an action are more likely to finish it.

When someone clicks a link or button to trigger your popup, they’ve already shown interest. When the form popup appears, they’ll be more likely to use it.

In this tutorial, we’ll be using an on click popup to offer a lead magnet.

However, there are other ways to use on-click popups on your website. For instance, you can ask users to claim a coupon code, learn more about a product, fill-out surveys, and more.

That being said, let’s take a look at how to easily make an on-click lightbox popup for your website.

Installing and Activating OptinMonster

First, you’ll need to sign up for an OptinMonster account. You’ll need the Pro account (or higher). This gives you the MonsterLinks™ feature that lets you create on click popups.

Next, you need to install and activate the OptinMonster plugin on your WordPress website. This lets you connect your OptinMonster account to your WordPress site.

For help, see our step by step guide on how to install a WordPress plugin.

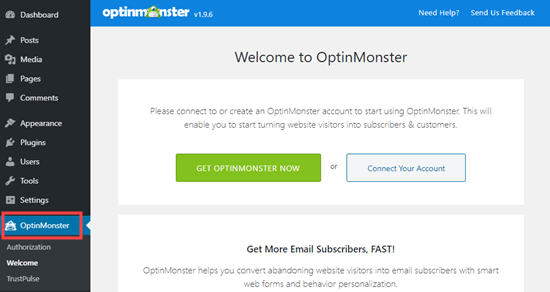
Once you’ve activated the plugin, you’ll need to connect your account. You should be taken to the Welcome page automatically. If not, just click on the OptinMonster link in your WordPress dashboard.

Click ‘Connect Your Account’ and follow the on-screen instructions.

Connect your OptinMonster account to your WordPress site

Creating Your First On Click Popup

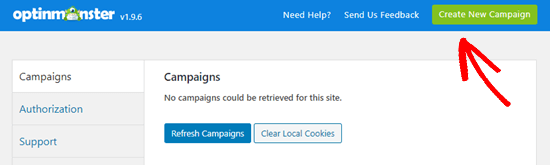
Once you’ve connected your OptinMonster account to your WordPress site, you can start creating your on click popup. Click the ‘Create New Campaign’ button at the top of the screen:

Create a new campaign in OptinMonster

You’ll be taken straight to the OptinMonster website.

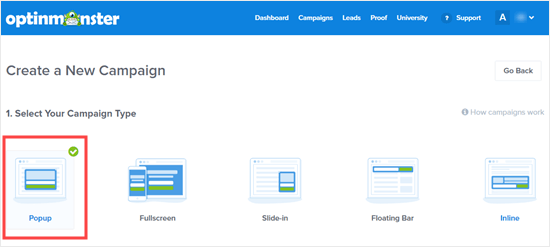
The Campaign Type should already be set to Popup. If not, just click on Popup to select it.

Leave 'Popup' selected for your campaign type

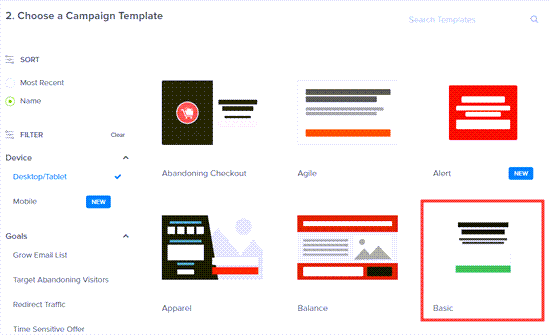
Next, choose a campaign template. You’ll be able to modify exactly how this looks later. We’re going to use the Basic template for this tutorial.

Selecting the Basic template for your on click popup

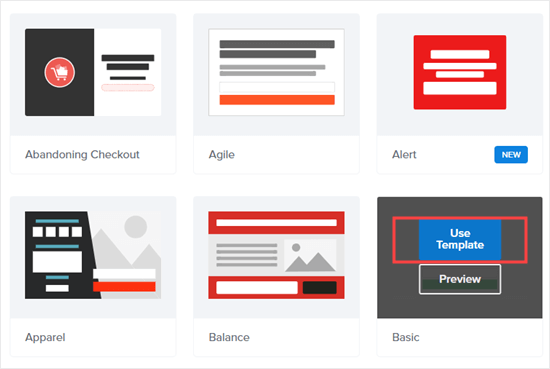
Run your cursor over the template and click the ‘Use Template’ button.

Click to use the basic template for your on click popup

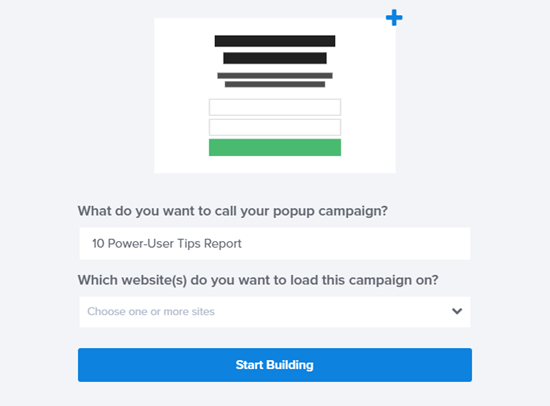
Now, you’ll be prompted to enter a name for your campaign. If you’re using OptinMonster on more than one site, then make sure you select the correct one. Enter a new website if needed. Then, click ‘Start Building’ to create your popup.

Give your campaign a name and click to start building

OptinMonster will automatically load up the template that you chose.

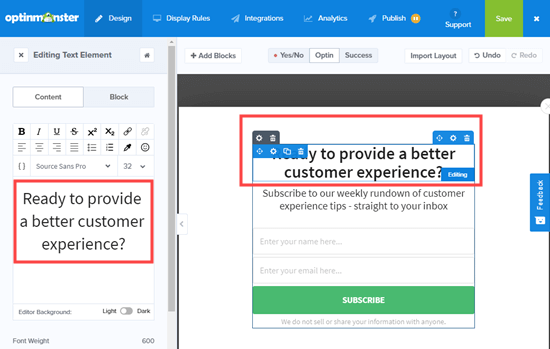
You can edit the default text and add or remove elements from your template. Just click on whatever you want to edit.

Editing the headline of your popup in OptinMonster

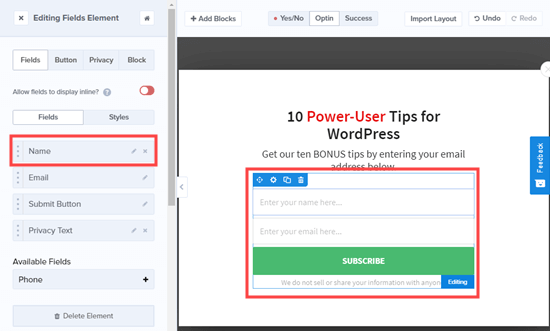
For instance, we’re going to remove the Name field from the form. Simply click on the field to select it and you’ll see field options in the left column, including the option to remove it.

Removing the Name field from the popup

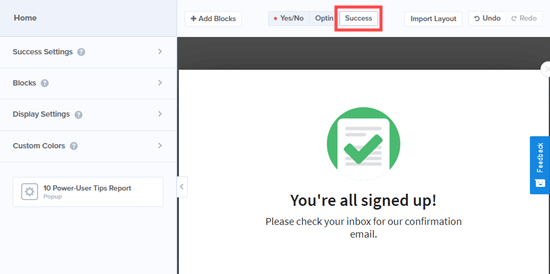
Once you have designed the popup, the next step is to design the Success view which is what people see after filling the form. Simply switch to the ‘Success’ view at the top of the screen.

The 'Success' view that visitors will see after entering their email address

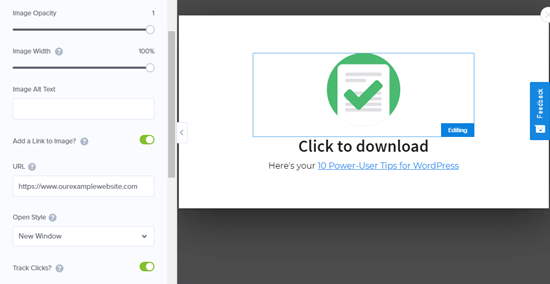
You can edit the success view just like you edited the optin view. For instance, you may want to let the user download the lead magnet straight away. You can include a link to it here.

To add a link to an image, click on the image then scroll down to ‘Add a Link to Image?’ on the left hand side.

You can toggle to enable image link and enter the link to your lead magnet in the ‘URL’ box.

Adding a link to the popup image in OptinMonster

Connecting Your Popup to Your Email List

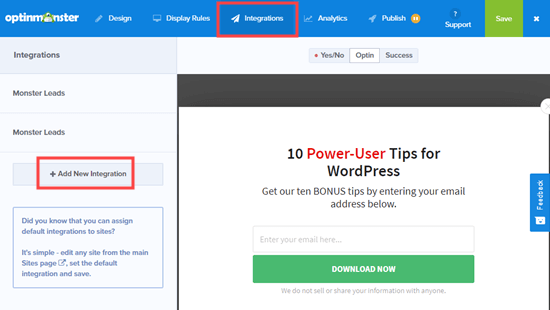
Once you’re happy with your popup, click on the Integrations tab at the top of the screen. You’ll need to link OptinMonster to your email marketing service so that you can add people to your email list.

Click the ‘+ Add New Integration’ button on the left-hand side of the screen.

Adding a new email integration in OptinMonster

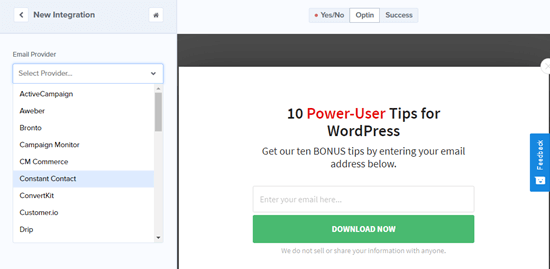
Next, select your email provider from the dropdown list and follow the instructions to connect it to OptinMonster.

Select your email service provider from the dropdown list

Note: The integration instructions are different for each email marketing service. If you get stuck, OptinMonster has a list of detailed email integration guides.

Setting Your Popup to Appear On Click

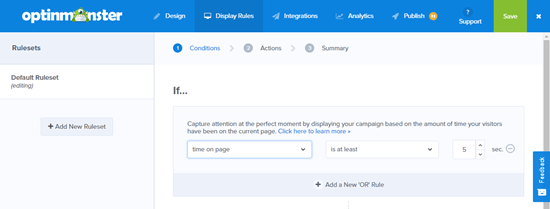
Now, you need to configure your popup so that it appears when the user clicks a link. Click on the ‘Display Rules’ tab at the top of the screen.

The default display rules in OptinMonster

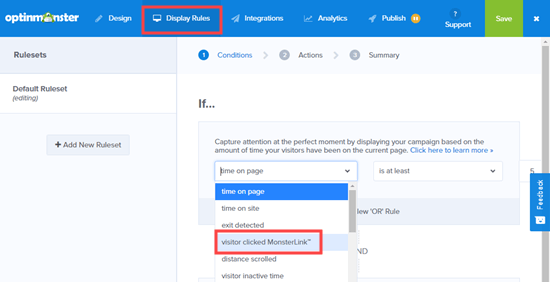
The display rule defaults to time on page. Click on the dropdown and select ‘visitor clicked MonsterLink™’ instead.

Switching the display rules so your popup uses the MonsterLink feature

Click the button to copy your MonsterLink™ Code. You’ll need this in a moment.

Making Your On Click Popup Live

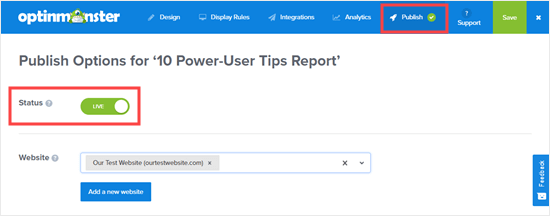
Now, go to the Publish tab and set your campaign’s status to Live. You can also check or change the website your campaign is connected to.

Switching your on click popup's campaign status to live

Once you’ve done that, click the Save button at the top of the screen.

Next, you’ll need to put your campaign live on your WordPress site itself.

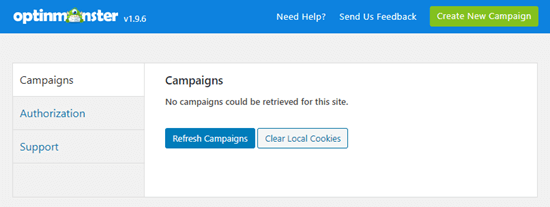
Go to your WordPress dashboard and click the OptinMonster link. Click the Refresh Campaigns button.

Refresh the list of campaigns in your OptinMonster dashboard

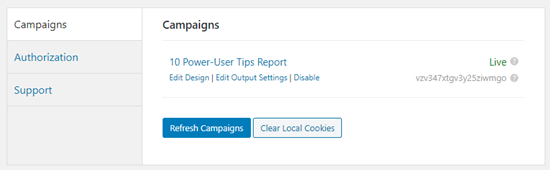
You should see your campaign, showing as Live. If you want to disable it at any point, just click the ‘Disable’ link beneath the name of your campaign.

The list of OptinMonster campaigns in the WordPress dashboard

Adding Your MonsterLink to Your Website

Now, you need to add the special MonsterLink™ to your site. If you didn’t copy this earlier, you can get it by going back to the Display Rules setting for your campaign in the MonsterInsights website.

Create a new post or page, or edit the one where you want to add your link.

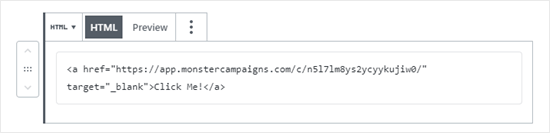
The MonsterLink is HTML code, so you need to paste it into a custom HTML block.

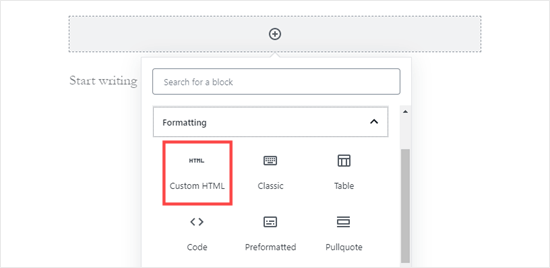
Click the (+) button to add a new block. The Custom HTML block is in the Formatting section, or you can search for it using the search bar. Click on it to create the block.

Adding a custom HTML block in WordPress

Now, copy your MonsterLink into that block. It should look something like this:

The MonsterLink in an HTML block

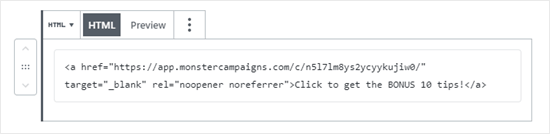
You can change the words ‘Click Me!’ to whatever text you want to use for your link. We’re going to use ‘Click to get the BONUS 10 tips!’

The MonsterLink with custom text

Once you’ve placed the link, you can preview your page or post to make sure it’s working.

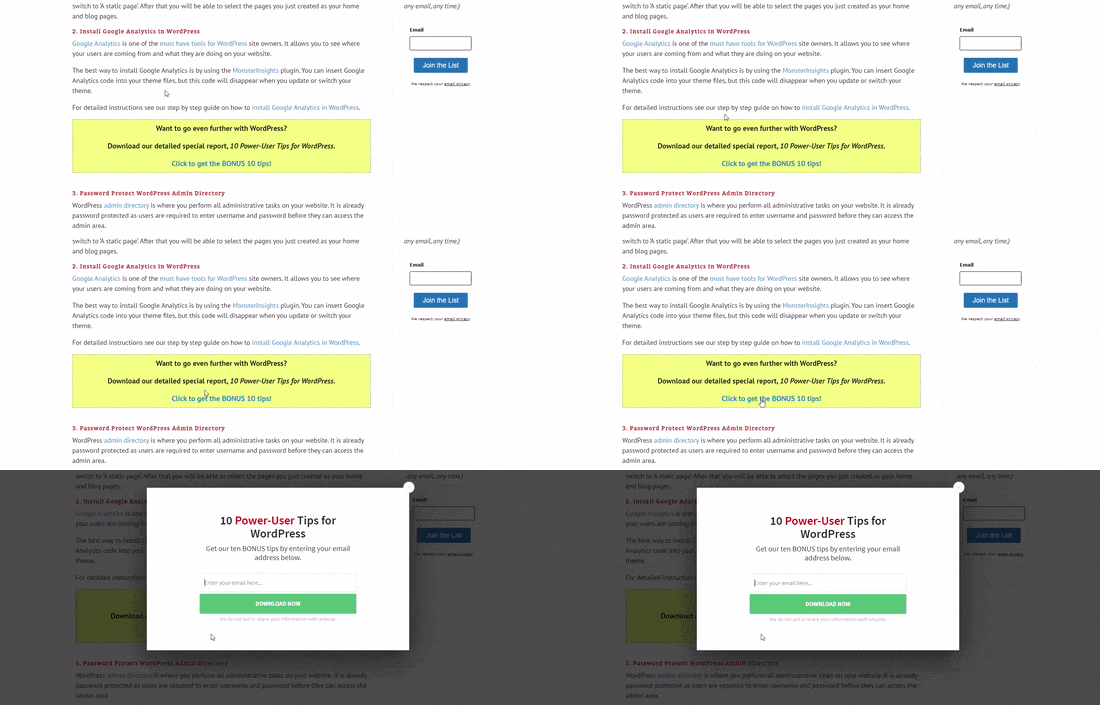
Here’s our link in action. Note we’ve applied some styling to the text to create a box with larger text to help promote the lead magnet:

The on click popup form in action

Tip: You’re not limited to just text links using MonsterLinks. You can also use the MonsterLink with call to action buttons, images, banners, or navigation menus on your website.

We hope this tutorial helped you learn how to trigger a WordPress popup form on click. You may also want to see our tutorial on how to speed up your WordPress site, and our ultimate WordPress SEO guide.

If you liked this article, then please subscribe to our YouTube Channel for WordPress video tutorials. You can also find us on Twitter and Facebook.

The post How to Open a WordPress Popup Form On Click of Link or Image appeared first on WPBeginner.


May 04, 2020 at 05:50PM