Wednesday, June 10, 2020

How to Create a Loyalty Program in WooCommerce

Recently, one of our readers asked us if it’s possible to give customers loyalty points in WooCommerce.

This might be something you’ve wondered about too, especially if you’re looking to increase sales on your online store.

In this guide, we’ll show you how to create a loyalty program in WooCommerce (without writing any code).
Creating a loyalty program in WooCommerce

Why Create a Loyalty Program in WooCommerce?

Creating a loyalty program can be a great way to increase sales on your online store.

A loyalty program encourages customers to keep coming back to your store, and it can even help boost average spend per customer.

You can use loyalty points to rewards customers for things like registering an account, placing their first order, and even get extra points for spending over a certain amount.

With that said, let’s take a look at how to add a loyalty program in WooCommerce.

Setting Up Your WooCommerce Loyalty Program

For this tutorial, we’ll be using Advanced Coupons to add a loyalty program to your WooCommerce store.

It is the best WordPress coupons plugin on the market and helps you increase sales and grow your business.

First, you’ll need to create an Advanced Coupons account, then download, install, and activate the plugin. If you’re not sure how to do that, just check out our step by step guide on how to install a WordPress plugin.

Once you’ve activated Advanced Coupons, you’ll need to enable the loyalty program module.

To do this, go to WooCommerce » Settings in your dashboard, then click on the Advanced Coupons tab.
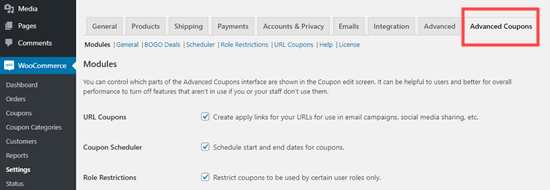
The Advanced Coupons tab in the WooCommerce settings

Once you’re on that tab, you’ll need to scroll down to the bottom of the page and check the Loyalty Program box. After that click the ‘Save changes’ button.
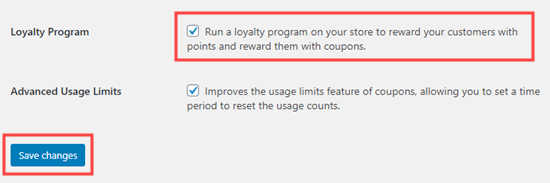
Enabling the loyalty program in Advanced Coupons

You can now start customizing your loyalty program.

First, click on the Loyalty Program link below the Advanced Coupons tab:

Creating your loyalty program using Advanced Coupons

Here, you can change how your loyalty scheme works.

The ‘Price to points earned ratio’ defaults to 1. That means the customer earns 1 point per $1 spent. You could change this, so that they earn 2 points or 10 points per $1 spent if you want it to look more impressive.

The ‘Points to price redeemed ratio’ defaults to 10. That means the customer needs to spend 10 points to get a $1 discount. You’ll likely want to change this if you’re changing how many points they earn per $1 spent.
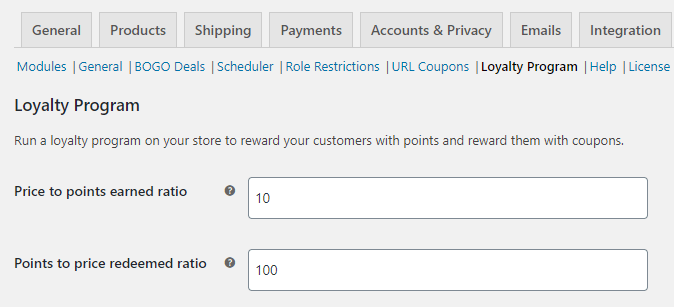
The ratio of points earned per $1 spent and points needed to get $1 off

For our loyalty scheme, we’re giving customers 10 points per $1 spent, but they’ll need to save 100 points to get $1 off.

You can also choose what to call your points. We’ve gone with ‘Reward Points’ for ours. You might want to use something more branded, like Starbucks does with their ‘Stars’.

Giving your loyalty points a name

Tip: If you change the name of your points here, you may also want to change it in the cart/checkout messages further down.
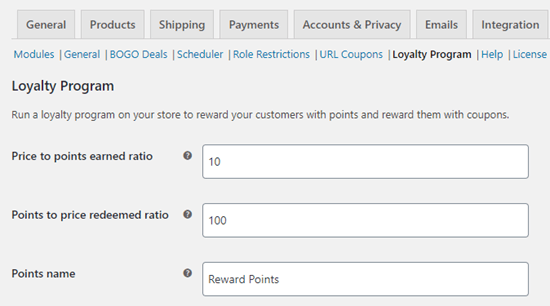
Configuring how your points work in your loyalty program

Next, you’ll need to decide how your points are calculated. For instance, if your customer has a discount code, you’ll probably want to only give them points for what they actually spend.

By default, the discount and tax are taken into account before points are rewarded. You can also choose to award points when the customer pays for shipping and/or fees.

Deciding how points are calculated in your loyalty program

There are lots of other settings on this page that you can tweak if you want to. These include things like the minimum spend to earn points, the minimum spend to redeem points, and when does the points expire.

A key setting you’ll want to look at is how customers can earn points. You can give them points for more things than just buying your products. For example, you may want to reward them with some points for registering as a customer and for completing their first order.

You can even set up a bonus reward during a certain period of time, or if your customer spends over a specific amount.
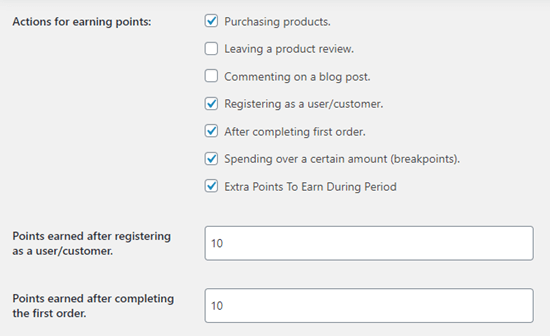
Setting what actions are rewarded with points in your loyalty program

Once you’re happy with how you’ve set things up, scroll to the bottom of the page and click the ‘Save changes’ button.

Automatically Creating Accounts for Your Customers

Your customers will need to register for an account in order to collect loyalty points. If they check out as a guest, then their points will not be saved.

However, you can setup WooCommerce so that customer accounts are automatically created for them when they complete the purchase.

First, go to WooCommerce » Settings page and click the ‘Accounts and Privacy’ tab.
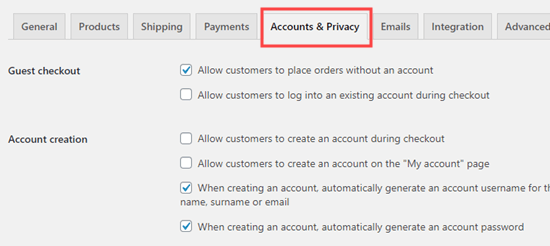
The Accounts and Privacy tab in the WooCommerce settings

We suggest you uncheck ‘Allow customers to place orders without an account’, so that customers can’t checkout as guests.

You will probably want to allow customers to:

  • Log in to an existing account during checkout
  • Create an account during checkout

Here are our settings:
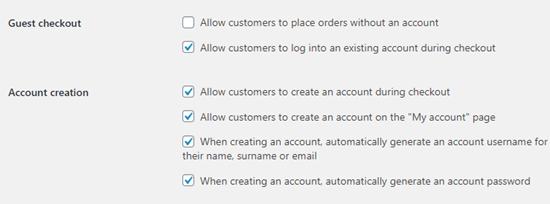
Disallowing the option to checkout as a guest in WooCommerce

Now, customers will receive an email after the checkout to let them know how to access their account.

The WooCommerce Loyalty Program in Action

Your loyalty program is up and running! When a customer adds a product to their cart, they’ll see how many points they’ll receive for the order.
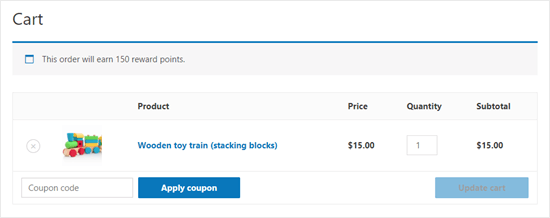
The customer will see a message in their shopping cart to let them know how many points they'll earn

Once a customer has earned loyalty points, they can turn them into coupons in order to redeem them. This is done under My Account » My Reward Points.

To redeem points, the customer can type in the number of points they want to redeem. They’ll see how much the coupon will be worth. They can then click ‘Redeem’ to create the coupon.

Here, the customer has created a $5 off coupon using 500 of their points. They still have 550 points left to redeem.
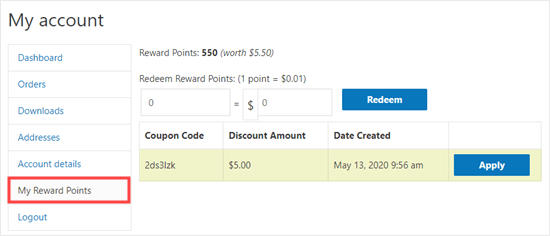
The customer can turn their earned points into coupons in their account

They can then redeem this coupon on future order as long as it meets any minimum threshold you’ve set for redeeming coupons.

We hope this tutorial helped you learn how to create a loyalty program in WooCommerce.

Now that you have Advanced Coupons for WooCommerce, you might also want to check out our guides on creating BOGO (buy one get one) coupons and scheduling coupons in advance.

If you liked this article, then please subscribe to our YouTube Channel for WordPress video tutorials. You can also find us on Twitter and Facebook.

The post How to Create a Loyalty Program in WooCommerce appeared first on WPBeginner.


June 10, 2020 at 05:00PM

Tuesday, June 9, 2020

Categories vs Tags – SEO Best Practices for Sorting your Content

Readers often ask us, what’s better for SEO: categories vs tags?

You might not be sure what WordPress categories and tags actually are, and how they’re different. Knowing this can help you use them correctly.

In this article, we’ll explain the differences between categories vs tags for organizing your content, and how they can impact SEO rankings.

Using categories and tags for sorting content in WordPress

What’s the Difference Between Categories and Tags?

Categories are meant for broad grouping of your posts. Think of these as general topics or the table of contents for your WordPress site. Categories are hierarchical which means you can create sub-categories.

Tags are meant to describe specific details of your posts. Think of these as your site’s index words. They let you micro-categorize your content. Tags are not hierarchical.

For example, this blog post on WPBeginner is in our category “Beginners Guide”. You can see all the posts in this category by going to Blog » Beginners Guide in our navigation menu.

This post has the tags: categories, categories vs tags, custom taxonomy, seo, seo best practices, sorting your content, and tags.

You won’t see these tags displaying anywhere on our article. However, they do help users find this article in relevant searches on our blog.

One of the biggest differences between tags and categories is that all WordPress posts must be filed under a category, but they don’t have to have tags.

If you don’t give your post a category, WordPress will automatically assign it to the default category. This is called “Uncategorized”, but it’s often helpful to rename the “uncategorized” category to something like “Other” or “Miscellaneous”.

Note: By default, only blog posts have categories and tags in WordPress. However, you can add categories and tags to your WordPress pages using a plugin.

How can You Add Categories and Tags in WordPress?

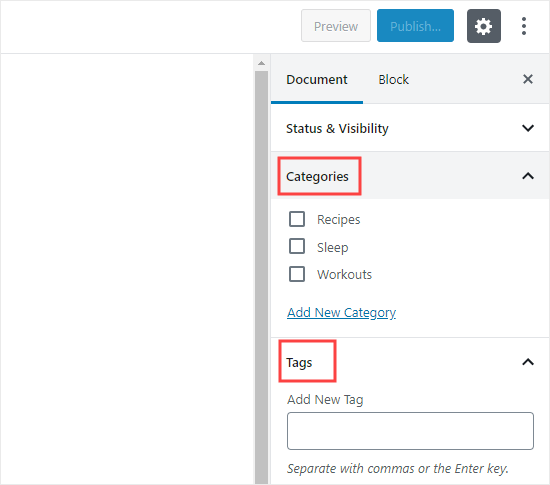
You can add categories and tags in WordPress when creating or editing a post. You’ll find them on the right-hand side under the ‘Document’ settings.

Adding categories and tags when creating a post

You can also go to Posts » Categories and Posts » Tags to add new categories and tags.

For more about the process of adding categories and tags, check out our explanations of What is a category? and What is a tag? for help and guidance.

How Many WordPress Categories Should You Have?

There’s no specific number of categories that you should have. In most cases, you’ll want somewhere between 5 and 10 in order to properly categorize your posts and make your site easy to browse.

Categories are meant to encompass a large group of posts. You can use sub-categories and tags to split your posts into smaller groups.

If you’re just starting a blog, then don’t worry about trying to come up with a perfect list of categories. Just choose 3 – 5 broad categories and add more as time goes by.

Do I have to use sub-categories?

You don’t have to use sub-categories, and many large blogs (including WPBeginner) don’t. However, sub-categories are helpful if you have a large category with a lot of posts that could be grouped into smaller sections.

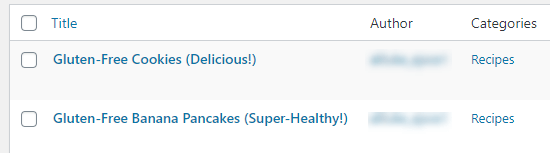
For example, you might have a “Recipes” category that contains a growing number of gluten-free recipes.

Posts in the category 'Recipes'

You can put these posts into their own sub-category, so it’s easy for readers to find them. You create a new child category for “Recipes” called “Gluten-Free” and move these posts into that category.

Using Categories in Your Posts’ URLs

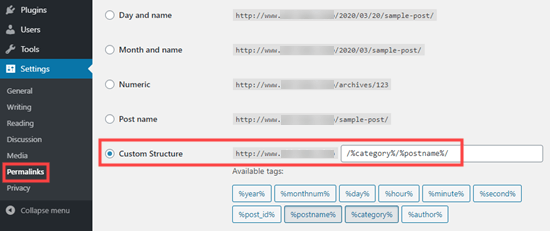
Some sites use the Category name in permalinks (post URLs), which you can set up under Settings » Permalinks.

Including your posts' categories in your URLs

If that’s the case on your site, then your post will initially have a URL something like this:
/recipes/gluten-free-pancakes/

After moving the post to a child category, it’ll have a new URL:
/recipes/gluten-free/gluten-free-pancakes/

Normally, WordPress will try to redirect the old URL to the new one. It’s definitely worth checking that your links are still working. If necessary, you can create a 301 redirect from the old URL to the new one.

Another option is to keep the post in the parent category as well as assigning it to the child category, but this can have drawbacks.

Although, WPBeginner website has categories in the URL, we always recommend users to use shorter URL structure that only contains “Post name”.

This will give you maximum flexibility to reorganize content without worrying about setting up redirects.

All of our new websites use the modern Post name URL structure. WPBeginner is over 10 years old, so it has legacy URL structure and changing URL structure is not recommended for SEO which is why we have stuck with it.

Can I Assign One Post to Multiple Categories?

WordPress lets you put a post into multiple categories. This could be several parent categories, or a parent category plus a subcategory or subcategories.

Having multiple categories won’t benefit your SEO. You should only assign posts to multiple categories if it makes the most sense for your readers.

It’s possible that having your post in multiple categories could cause some SEO issues due to duplicate content.

If you do use multiple categories, then try to avoid putting one post into two or more main (parent) categories. Each post should fit within one main category.

Is There a Limit to How Many Tags a Post Can Have?

WordPress itself doesn’t have any limit on the number of tags you can have on each post. You could potentially assign 1,000 or more tags to a post!

However, we definitely don’t recommend that.

The purpose of tags is to help link related posts together. Think of them as an index section in a book. Each tag is like a keyword in the index.

Tags are helpful for users searching your site. Some plugins that display related posts use tags to help them figure out which posts’ topics are related.

We suggest that you normally stick to 10 tags maximum per post.

Categories vs Tags: What’s Better for SEO?

Are there any WordPress SEO advantages of using categories over tags or vice versa?

The short answer is No.

Categories and tags both have different purposes. You have to use categories, but you don’t have to use tags if you don’t want to. However, we recommend using both, appropriately, to help readers navigate your site.

Ultimately, you should design your site with users in mind. All search engines want to show users the content that’ll be the most useful to them.

This means that by organizing your content for best usability will also help you get better SEO rankings.

We hope that this article helped you understand categories vs tags and the SEO best practices for sorting your content. You may also like our article on how to track WordPress category and tag analytics, and our comparison of the best keyword research tools for SEO.

If you liked this article, then please subscribe to our YouTube Channel for WordPress video tutorials. You can also find us on Twitter and Facebook.

The post Categories vs Tags – SEO Best Practices for Sorting your Content appeared first on WPBeginner.


June 09, 2020 at 05:00PM
Monday, June 8, 2020

How to Add a Horizontal Line Separator in WordPress (5 Methods)

Do you want to add a horizontal line across your post or page in WordPress?

Horizontal line dividers are a great way to break long posts into smaller sections, highlight special announcements or promotion, and clearly separate different parts of a page.

In this article, we’ll show you how to easily add a horizontal line divider in WordPress.

How to add a horizontal line in WordPress

Since this is a comprehensive guide on how to add a horizontal line divider in WordPress, you may find it helpful to use our table of content:

Adding a Horizontal Line in the WordPress Block Editor

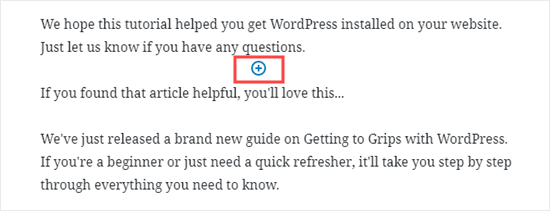
To add a horizontal line using the WordPress block editor, click the (+) icon to add a new block wherever you want the line to be.

Adding a new block where you want your horizontal line

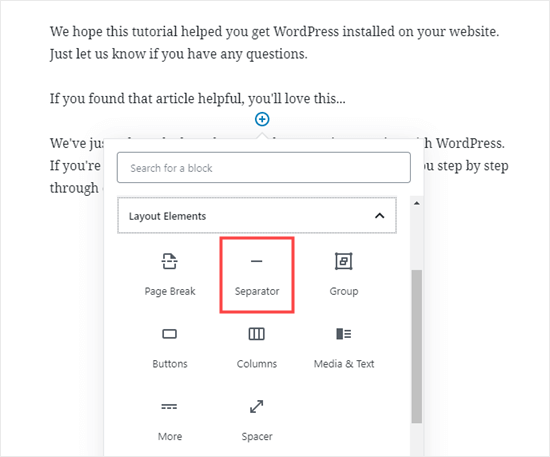
Next, select the Separator block from the Layout Elements section or search for it using the search bar.

Find and add the Separator block

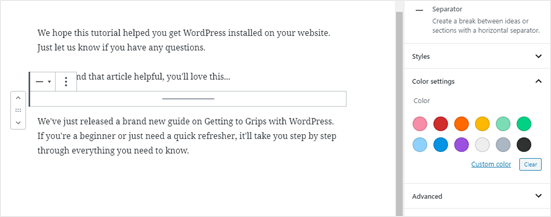
Once added, you’ll see your horizontal line divider in your content area.

Styling the Horizontal Line in the WordPress Block Editor

By default, the horizontal divider is a pale gray line across the center of your post or page.

You can change how it looks by clicking on the line to select its block. Then, the ‘Block’ editing panel will open up on the right-hand side of your screen.

Click on the Separator block to select it and edit the settings

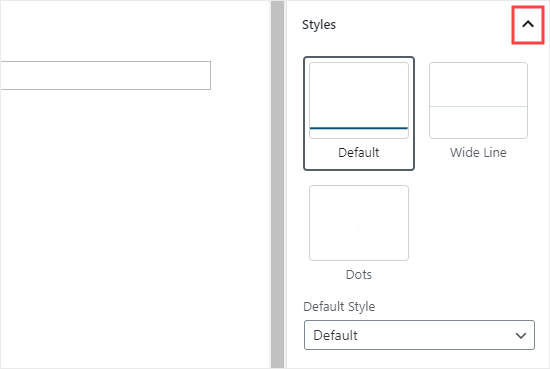
To change the style of your line, just click the little arrow next to Styles. Then, you’ll see the different options.

You can change the horizontal line to one of these, if you want:

  • A wide line that covers the full width of your post’s content.
  • Three dots that display in the center of your post.

The different styles available for the Separator block

Note: In some WordPress themes, both the wide line and the default line will cover the whole width of your post.

You can also change the color of your horizontal line under the Color settings. Simply click on one of the options displayed, or use the ‘Custom color’ link to pick any color at all.

Change the color of the horizontal line

If you want to go back to the default gray color, just click ‘Clear’ button under the color options.

Here, our horizontal line is blue and uses the “wide” style.

A horizontal line that's been modified to be wide and blue

Adding a Horizontal Line in the WordPress Classic Editor

If you’re still using the classic editor, then you can add basic horizontal lines. To do so, simply edit an existing post or page or create a new one.

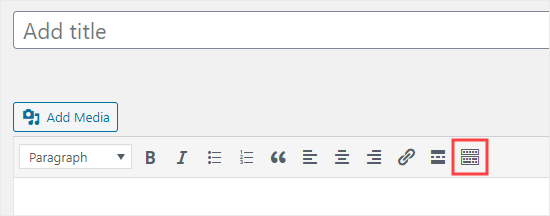
If you only see one row of buttons in the toolbar above the post editor, then click on the Toolbar Toggle icon on the right:

Click the Toolbar Toggle button to see the second row of icons

This will open up the second row of buttons, which includes the horizontal line option.

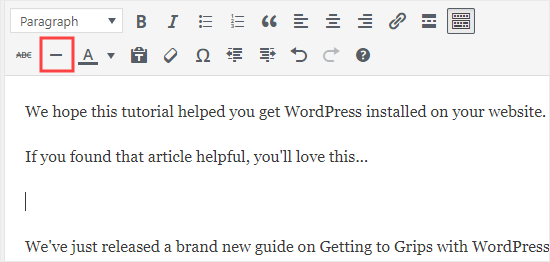
Now, go ahead and put a line break between the paragraphs where you want the horizontal line to go. You can then click the Horizontal Line button. It’s the second from the left on the second row:

The horizontal line button in the classic WordPress editor

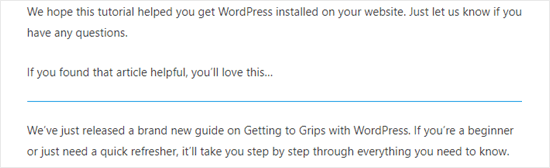
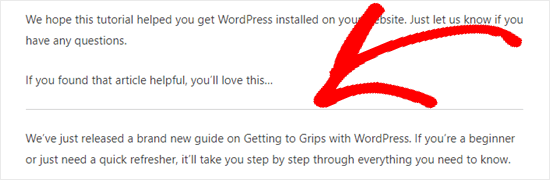
Your horizontal line will be light gray. It’ll cover the whole width of your post like this:

A horizontal rule created using the classic editor

Manually adding a Horizontal Line divider using HTML

In some rare cases, you may need to manually add a horizontal line divider in your WordPress content.

If so, you can simply do that by using the hr HTML tag in your content:

<hr>

This will add the horizontal line separator in your post content.

Other Separators You Can Use in Your Posts and Pages

The default WordPress block editor allows you to add multiple types of separators to your posts and pages.

Aside from the horizontal line separator, the other options in the Layout Elements set of blocks include the Spacer, the More link, and the Page Break blocks.

The Spacer Block

The Spacer lets you add white space between blocks. For instance, if you want a slight gap at the end of your post before a special offer, you can use the Spacer.

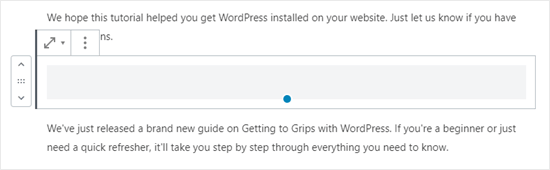
You can customize the height of the spacer. Here’s how it looks when you’re creating your post in the block editor:

The Spacer block in the block editor

And here’s how the spacer appears on your site:

How the spacer block appears in a page or post

The More Block

If your theme shows full posts (rather than excerpts) on your main blog page, then adding a ‘More’ link will break off your post at that point. The visitor can click to read more.

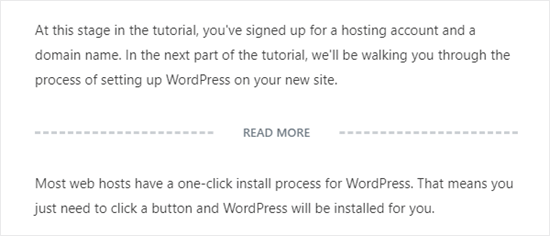
Here’s how it looks when you’re creating your post:

The More block in the post editor

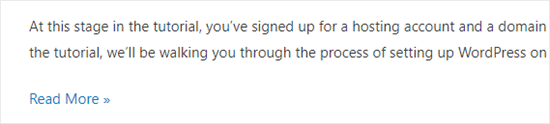
And here’s how the More link appears on your site:

The Read More block in a post on the site

You can learn more about excerpts, in our guide on how to easily customize excerpts in WordPress.

The Page Break Block

The Page Break lets you split long blog posts into multiple pages. You can’t customize it in any way. Here’s how it looks when you’re creating your post:

The page break block shown in the block editor

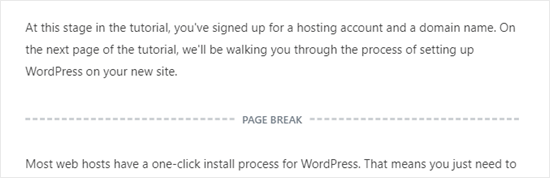
And here’s how the page break appears on your site:

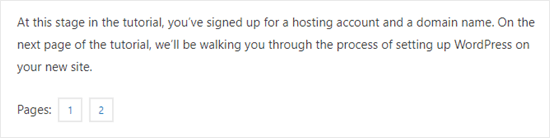
The page break as it appears on a site

Any of those could be good alternatives to adding a horizontal line in WordPress, depending on what you’re aiming to do.

Adding a Page Break in WordPress Forms Using WPForms

What if you want to put a break not in a post or page, but in a WordPress contact form? You can do that, too. We’re going to be using WPForms for this.

First, you’ll need to download, install, and activate the WPForms plugin. If you’re not sure how, just check out our step by step guide on how to install a WordPress plugin.

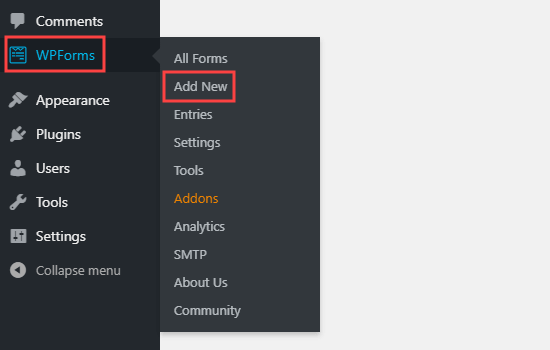
Next, go to WPForms » Add New in your WordPress dashboard.

Creating a new form using WPForms

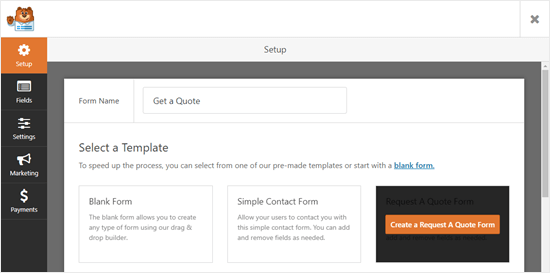
Enter a name for your form then pick a template. We’re going to use the ‘Request a Quote Form’ template for ours. Run your mouse cursor over the template and click the button to create your form.

Creating a quote form in WPForms

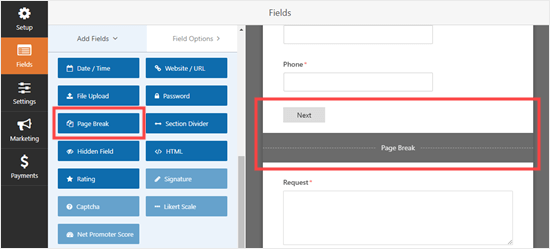
Next, scroll down the Add Fields tab on the left hand side to the Fancy Fields section. Drag and drop the Page Break to wherever you want it on the form. We’re putting it just before the Request box.

Adding a page break in WPForms

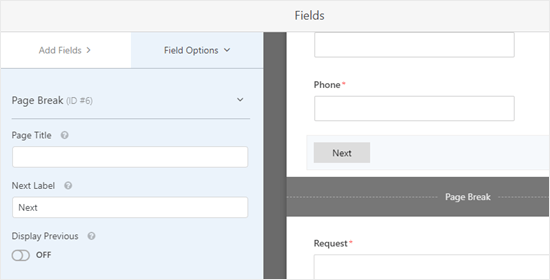
You’ll see that the form is now broken into two parts. WPForms has automatically added a ‘Next’ button, too.

You can change the ‘Next’ label if you want to and you can add a ‘Previous’ button to go on the second page of the form. Just click on the page break field to edit it.

Editing the page break field in WPForms

Save your form once you’re done, by clicking the Save button on the top right.

You can now add the form to your website. First, you’ll need to create a new post or page, or edit an existing one.

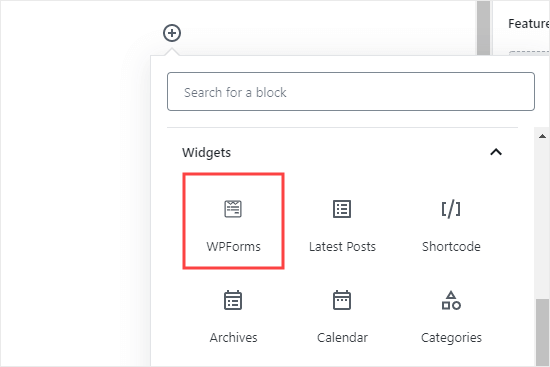
Click the (+) to add a new block to your post or page and find the WPForms block. You can use the search bar or look in the Widgets section. Add the block to your page.

Adding the WPForms block to your page or post

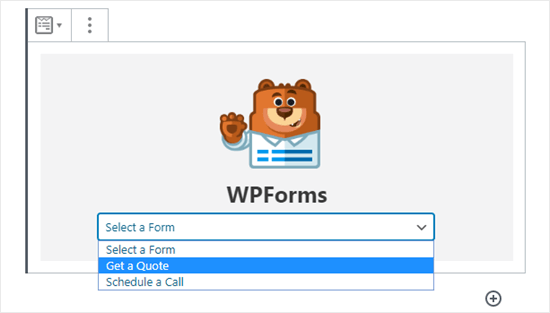
Now, select your form from the dropdown list.

Choose your form from the dropdown list

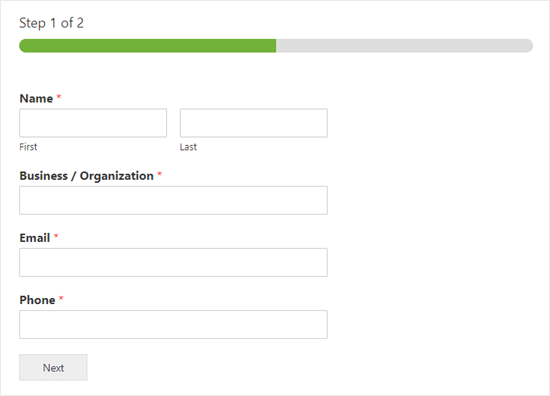
Once you’ve done that, you can publish the post or page and view how your form looks on your website.

The form with a page break on the website

We hope this tutorial helped you learn how to add a horizontal line separators in WordPress. If you want to add more design and layout elements to your posts and pages, check out our article on the best drag and drop WordPress page builders.

If you liked this article, then please subscribe to our YouTube Channel for WordPress video tutorials. You can also find us on Twitter and Facebook.

The post How to Add a Horizontal Line Separator in WordPress (5 Methods) appeared first on WPBeginner.


June 08, 2020 at 05:00PM