Tuesday, June 23, 2020

Welcome Smash Balloon to the WPBeginner Family of Products

Today, I’m extremely excited to share that Smash Balloon has joined Awesome Motive, and it is now part of the WPBeginner’s family of products.

Smash Balloon offers the most popular social feed plugins for WordPress. Over 1,300,000+ people use Smash Balloon plugins to easily display their social media content in WordPress.

Smash Balloon joins WPBeginner family of products

Smash Balloon is a combination of four plugins that makes it easy for you to create and display custom Facebook feeds, custom Instagram feeds, custom Twitter feeds, and custom YouTube feeds on your WordPress site.

Over the years what has made Smash Balloon stand out is that it’s easy to setup, and it is always reliable.

There are free versions available for all four plugins, and they offer all the essential features you’d need to create a custom social media feed.

However if you need more customization options such as displaying multiple Facebook feeds, Facebook calendar events, Facebook group timelines, custom Instagram shoppable feeds, Instagram story feeds, Instagram hashtag feeds, or just a custom grid of YouTube videos and Twitter feeds, then the Smash Balloon Pro plugins are the perfect option.

SmashBalloon Plugins

The best part about Smash Balloon is that unlike other social feed plugins, this will NOT slow down your site.

The plugin comes with a feed caching system which allows your social posts to always load super fast even when the platform API is experiencing downtime.

I’m really excited to be working with John Brackett (founder of Smash Balloon), and the entire team to add more powerful social media features that will help small businesses leverage social proof to boost engagement, sales, and conversions.

Since Smash Balloon is an established product and has been around since 2013, we’re not going to offer a lifetime deal. Instead, we’re running a special 60% off sale on all plans including the All-Access Bundle which gets you access to all Smash Balloon plugins including the future ones.

Use the coupon code: CELEBRATE

See Smash Balloon Demo and Get Started »

Background Story – Why Smash Balloon?

If you’ve been reading WPBeginner for a while, then you know that we have recommended Smash Balloon as the go-to social media feed plugin for WordPress since 2016.

That’s because it’s easy to setup and most importantly it is ALWAYS reliable.

Often when starting a blog or making a website, small business owners want to display social media feeds on their WordPress site.

This helps you get more social media followers with omni-channel marketing, and it also allows you to boost sales conversions by leveraging social proof.

As you know, our goal at Awesome Motive is to help small businesses grow and compete with the big guys.

When the opportunity presented itself to join forces with John Brackett and build the next generation of social media plugins for WordPress, I said Yes.

I’m super excited about this acquisition and am looking forward to sharing our product development & business growth playbooks with the Smash Balloon team to create more amazing features that you’ve been asking for.

What’s Coming Next?

We have already started working on our plans to build the next big feature of Smash Balloon that I know everyone will love. I’m particularly excited about it because I’ll get to use it in the next WPBeginner redesign :)

You can also expect to see deeper Smash Balloon integration with our existing plugins including but not limited to MonsterInsights (analytics), RafflePress (contests & giveaways), SeedProd (landing pages), and more.

Last but not least, we will continue to make the process of creating custom social media feeds easier through detailed tutorials, product education, and more.

If you have suggestions on features you’d like to see in the Smash Balloon plugins, then please let us know by sending us a message via WPBeginner contact form.

As always, I want to thank you for your continued support of WPBeginner. We look forward to bringing you more amazing solutions to help you grow your business.

Yours Truly,

Syed Balkhi
Founder of WPBeginner

The post Welcome Smash Balloon to the WPBeginner Family of Products appeared first on WPBeginner.


June 23, 2020 at 06:05PM

Monday, June 22, 2020

How to Restart a WordPress Site – Reset WordPress (The Fast Way)

Recently, one of our readers asked us, “How do I restart my WordPress site?”.

This isn’t something that most users will need to do, but knowing how to reset WordPress can be very helpful in some situations.

In this tutorial, we’ll show you how to restart or reset your WordPress site, the fast way.

Restarting a WordPress site

Why Restart a WordPress Site?

Restarting or resetting WordPress is a process where you restore WordPress to the default settings. Think of it as a similar process to restoring your phone to the default “factory settings”.

It will delete all your apps and customizations, so you can start over fresh.

There are several situations where you might want to restart or reset a WordPress site:

1. You’re using a demo site on your own computer. If you’ve installed WordPress on localhost, then you might want to reset after you’ve built a site and moved it from localhost to a live server. If you’re a developer and constantly test themes & plugins on your local install, then it can help to reset it every quarter to start fresh.

2. You’ve been working on a new site and want to start over. Maybe you’ve been busy creating a blog or website, but you are not happy with the customizations. Instead of undoing everything, you can simply reset WordPress and quickly start over with a new design.

3. You’re going to rework a client’s website. If they want something very different from what’s already there, then you might need to reset WordPress on staging server to start from scratch.

4. You’re learning about WordPress, hands-on. Maybe you’ve had a go at developing your own plugins or themes, or you’ve been experimenting with a starter theme. You might want to start again with a fresh installation of WordPress.

How to Restart and Reset a WordPress Site

Restarting your WordPress site might sound difficult, but it’s really not.

We’re going to walk you through the entire reset process, step by step.

Before you begin, it’s important to create a full backup of your site using a WordPress backup plugin. This is important in case you want to restore your site from the backup after restarting it.

Restart Your WordPress Site with WP Reset

Now you’re ready to move on and restart your WordPress site. We’re going to use the free version of the WP Reset plugin for this.

First, you’ll need to install and activate the WP Reset plugin. For more details, see our instructions on how to install a WordPress plugin.

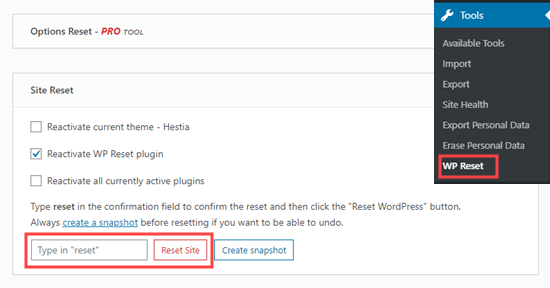
Once the plugin is activated, you need to go to the Tools » WP Reset in your WordPress dashboard and scroll down to the Site Reset section of the page.

To reset your site, you need to type the word ‘reset’ in the confirmation field before clicking the red ‘Reset Site’ button.

The button in WP Reset to restart your WordPress site

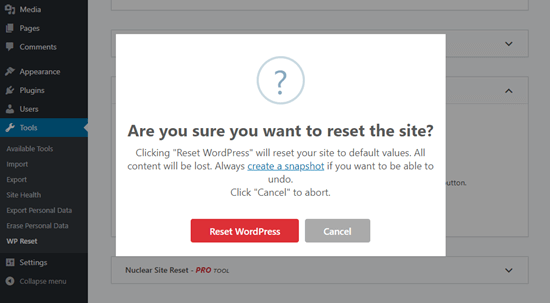
WP Reset will pop up a message asking you to confirm that you want to reset the site. Click ‘Reset WordPress’ to continue.

Confirm that you want to reset your website

You’ll see a ‘Resetting in progress’ message for a few seconds. Then, your site will be restarted.

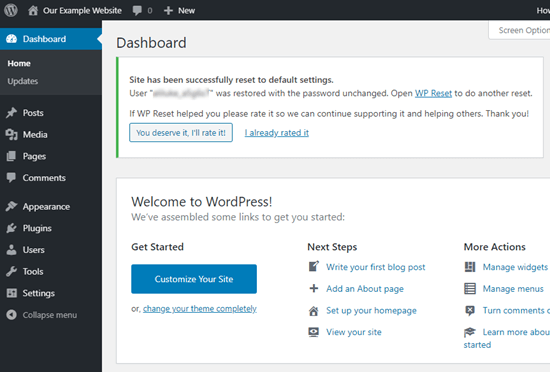
Next, you’ll see the homepage of your WordPress dashboard with a success message at the top from WP Reset.

WPReset's message confirming that you've successfully reset your WordPress site

That’s it. You’ve restarted your WordPress site.

Optional WP Reset Functions When Restarting Your Site

The above method gives you everything you need in order to restart your site.

However, there are some other options in WP Reset that you might want to use too.

Taking a Snapshot of Your WordPress Site Before Restarting

You can use WP Reset to take a snapshot of your site. A snapshot is a restore point for your WordPress database. It lets you see what changes have been made since the snapshot was taken. You can use it to roll back changes if necessary.

Important: A snapshot is not a WordPress backup. You should still make backups to restore your website.

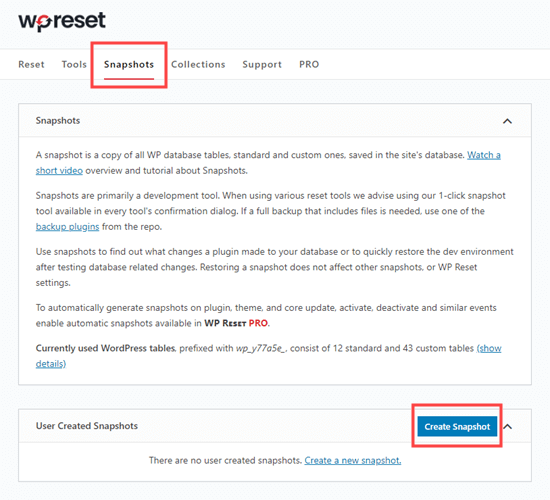
To create the snapshot, click on the Snapshots tab. Then, scroll down and click the Create Snapshot button:

Creating a snapshot of your WordPress site before restarting it

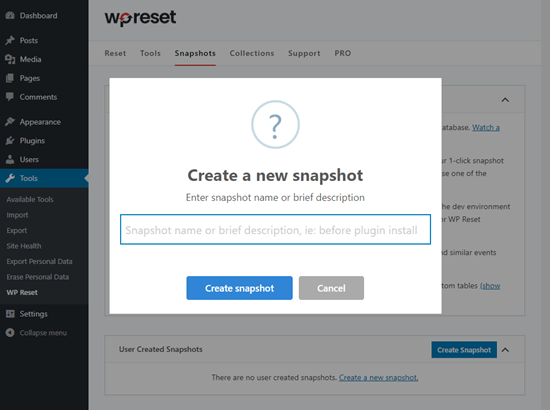
You’ll be prompted to enter a name or description for the snapshot. Type in whatever you want to use, then click the ‘Create snapshot’ button.

Name the snapshot you're creating

Deleting Themes and Plugins Using WP Reset

By default, WP Reset doesn’t delete theme and plugin files. It simply deactivates them. However, you can use it to delete these files too.

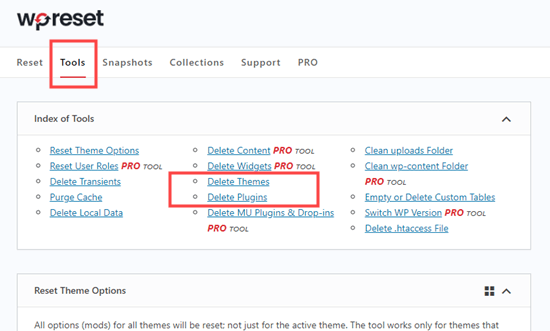
First, you’ll need to go to Tools » WP Reset and click the ‘Tools’ tab. Once there, simply click on the ‘Delete Themes’ or ‘Delete Plugins’ links to jump straight to those tools.

Click the link to delete themes and/or plugins

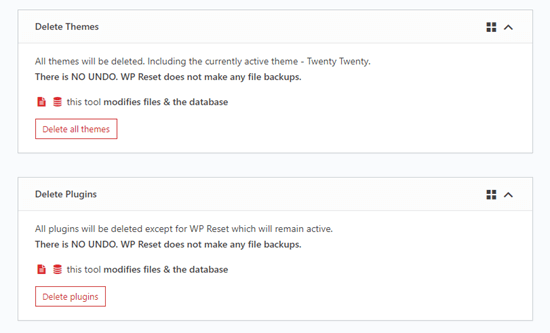
Once you click either link, you’ll be scrolled down the page to the right tool:

Click the button to delete all themes from your WordPress site (including the active one)

You can click the ‘Delete all themes’ or ‘Delete plugins’ button to delete them.

Important: WP Reset doesn’t backup your files in any way. Deleting your themes and plugins can’t be undone.

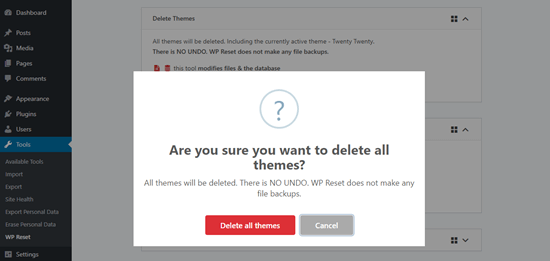
After you click the button, you’ll be prompted to confirm. Click the Delete button on the popup to continue.

WP Reset will bring up a warning before allowing you to delete all themes

You’ll then see a message telling you how many themes or plugins have been deleted.

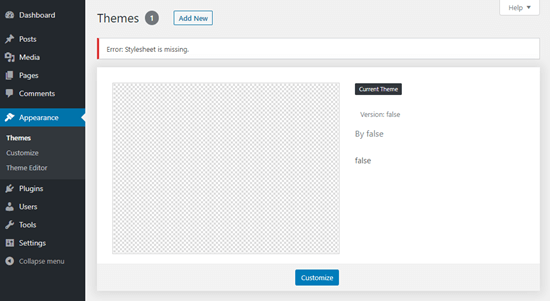
If you delete all themes, then you’ll need to install and activate a theme manually. Your site won’t work without one. If you go to Appearance » Themes, then you’ll see a screen like this:

The empty themes page with no themes installed

Go ahead and click the ‘Add New’ button and choose or upload a theme of your choice. If you need help, check out how to install a WordPress theme.

Restoring Your Data After Restarting Your WordPress Site

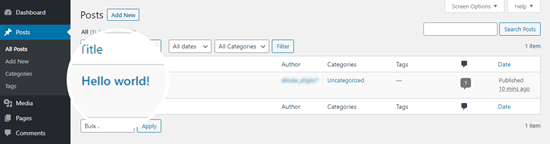
After restarting your WordPress site, any posts and pages you had will be gone. Instead, you’ll see the default pages and the ‘Hello, world’ post:

The 'Hello World' default post

To restore your old data, you will need to reinstall and activate the backup plugin that you used to create your backup.

You can then follow its instructions to restore your site from the backup.

Viewing Your Restored Content

Once you’ve restored your site from backup, your content should be back on your site.

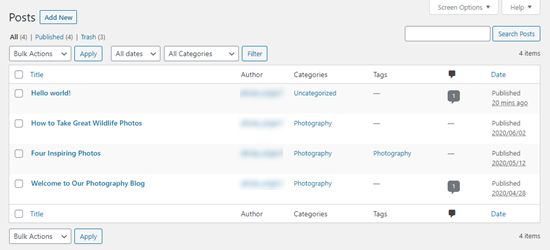
You’ll find all your posts under Posts » All Posts. They’ll have the correct time stamps, categories, tags, and comments.

Viewing the imported postsv

We hope this tutorial helped you learn how to reset a WordPress site the fast way. You might also like our ultimate guide to speeding up WordPress and our list of must have WordPress plugins for all sites.

If you liked this article, then please subscribe to our YouTube Channel for WordPress video tutorials. You can also find us on Twitter and Facebook.

The post How to Restart a WordPress Site – Reset WordPress (The Fast Way) appeared first on WPBeginner.


June 22, 2020 at 05:00PM

Friday, June 19, 2020

6 Best WooCommerce Payment Gateways for WordPress

Are you looking for the best WooCommerce payment gateways for your online store?

Choosing the right WooCommerce gateway for payments is a very important decision. It will have long term effects on the success and sustainability of your online business.

In this article, we will compare the top WooCommerce payment gateways for WordPress, so you can choose the right option for your business.
Comparing the best WooCommerce payment gateways

How to Choose The Best WooCommerce Payment Gateway

If you have just started your WooCommerce store, then you will be faced with the decision to select and set up a payment gateway.

Payment gateways are third-party service providers that enable you to accept online payments on your eCommerce store.

However, not all of them have the same polices, processing rates, and features. Choosing an unsuitable payment gateway will increase your costs and hurt your business long-term.

Following are a few important aspects you should consider when choosing your WooCommerce payment gateway.

1. Transacion Fees

Most WooCommerce payment gateways charge a fee for each transaction that takes place on your store. This fee can be vary based on your business location, customers’ card type, the payment gateway you choose, etc..

You can try to remedy this by passing the burden to your customers. However, this also means you will have to increase product prices, and your customers may find the same products elsewhere at lower costs.

Alternatively, you can compare transaction fees with other providers and try to find the right balance between transaction fees and other features.

2. Other Charges

Apart from the transaction fees, some WooCommerce payment service providers may also charge you additional fees. This could be set up fees, account maintenance fees, or charges for bank withdrawals.

These charges can be a nuisance particularly for businesses that are just starting out.

3. Recurring Payments

Many businesses sell subscription-based products, like membership plans, or an online course. In that case, you may also want to look for recurring payments feature.

Some payment gateways require customers to manually complete each transaction and don’t support recurring payments. Make sure you check for this option if your business requires automatic renewals.

4. Availability in Your Target Region

Next, you need to make sure that the payment service you choose is available in your country and in your customers’ country.

For instance, if most of your customers are based in Europe, then you may want to look for a payment service that is widely available and popular in that region.

You’ll find this information on each payment gateway’s website under ‘Supported Countries’. If you cannot find this information, then email them to be certain.

These are just the most important items to look for. You may also want to see other features that your business may need. For instance, easy refunds, extra security, verification, and regulatory compliance based on your region.

That being said, now let’s take a look at some of the best WooCommerce payment gateways for WordPress, and see how they stack up on these requirements.

Top WooCommerce Payment Gateways for WordPress

WooCommerce supports a ton of payment gateways through extensions. These extensions are WooCommerce plugins that integrate those payment services into your WooCommerce checkout process.

The following are the most popular WooCommerce payment gateways trusted by thousands of businesses around the world.

1. Stripe

Stripe

Stripe is the most popular payment gateway to accept credit card payments on your website. WooCommerce comes with built-in support to select Stripe as your payment gateway.

It supports all top credit and debit cards. Your customers can also pay using Apple Pay, Google Pay, and Alipay.

Stripe is available in 40+ countries and supports 135+ currencies. There are no setup or annual fees for Stripe, but they do charge 2.9% + 30¢ per transaction.

It also offers a better checkout experience. Your customers stay on your website during checkout, and it works smoothly on mobile as well as desktop.

Stripe supports recurring payments and can be used with any subscription or WordPress membership plugin.

Note: If you’re just looking to create a simple payment form for donations or online orders without the headache of managing a full eCommerce system, then look at WPForms which offers Stripe forms for WordPress.

2. PayPal Standard

PayPal

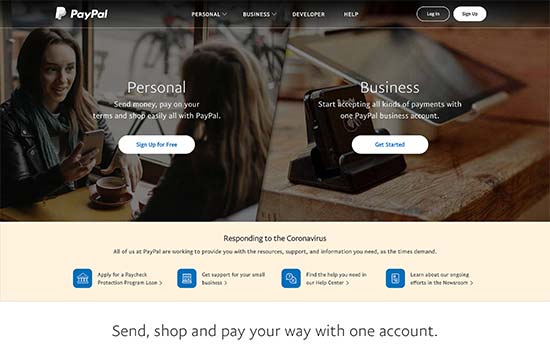
PayPal is one of the most popular payment services available for eCommerce stores. WooCommerce comes with built-in support for using PayPal on your online store.

As one of the pioneers in the payment industry, PayPal offers a variety of services suitable for personal, business, and eCommerce.

It is available in dozens of countries, but there are different restrictions on some countries. Make sure that it is supported in your country as well as your target customers.

The Standard PayPal extension for WooCommerce requires a PayPal business account. It does not offer an on-site checkout experience which means your customers will be redirected to PayPal website to complete the purchase.

PayPal charges are based on your account type, and the number/volume of sales you make. This makes a significant impact on your business, and you would want to review them beforehand.

Note: If all you need is a PayPal payment form for your business, then check out WPForms. It allows you to easily accept payments and donations via PayPal.
3. WooCommerce PayPal Pro

PayPal Pro

PayPal Pro for WooCommerce is a paid extension developed by the folks behind WooCommerce. It enables you to use PayPal with a better checkout experience allowing customers to complete the purchase without leaving your website.

It is available in UK, US, and Canada, but you’ll need a PayPal merchant account to use it. If your business is based in Australia, then you can use it with a PayPal Pro Payflow account.

It does not support recurring payments, which means it will not work for a membership website selling subscription-based products.

PayPal pro requires a monthly payment and transaction fees vary depending on the country. This makes it more expensive for a new business.

4. Square

Square

Square is another excellent payment gateway for WooCommerce stores. Particularly, for stores with physical locations, delivery, and other selling options.

Square is available in the U.S., Canada, Australia, Japan, and the UK. The transaction fee varies for each country, but it offers a fixed transaction rate.

The WooCommerce Square Extension syncs product between your website and your Square account. You can also add products to your Square account, and they will be added to your WooCommerce store.

Additionally, it supports recurring payments when used alongside the WooCommerce Subscriptions extension.

5. Authorize.Net

Authorize.Net

Authorize.Net is a popular payment gateway used by thousands of businesses. It is available for merchants located in United States, Canada, United Kingdom, Europe or Australia,

Authorize.Net for WooCommerce extension provides a seamless checkout process to your customers using credit cards. Customers don’t leave your website while transaction is securely processed in the background on Authorize.Net servers.

The extension also supports recurring payments for WooCommerce Subscriptions. It is user friendly and allows users to save their payment method and reuse it.

Note: You can create an Authorize.Net payment form with WPForms. This is perfect for websites that don’t need a full-fledged eCommerce platform.

6. WooCommerce Payments

WooCommerce Payments

WooCommerce Payments is a payment solution provided by the folks behind WooCommerce. It offers a better checkout experience and a deeply integrated payment gateway for your store.

Currently, WooCommerce Payments is only available to US-based merchants selling products in US Dollars.

It offers a pay as you go fee structure set at 2.9% + $0.30 per transaction for U.S.-issued cards. Additional 1% fee for cards issued outside the United States. This makes it slightly expensive than other solutions.

This solution is simply a white-label version of Stripe.

You’ll also need a WordPress.com account and install the JetPack plugin on your store.

Which is The Best WooCommerce Payment Gateway?

The best WooCommerce payment gateway is the one that provides you the best transaction fees, is available in your target region, and offers a better user experience for your customers.

Considering these factors, we would recommend Stripe as the best payment gateway for WooCommerce. It provides good checkout experience, competitive transaction, and is available in 40 countries.

Both PayPal Standard and Authorize.Net offer similar features. However, PayPal Standard does not provide a better checkout experience which may result in more abandoned cart sales.

Typically store owners offer multiple payment options to their users. For example, on our WooCommerce store for All in One SEO, we accept credit cards with Stripe and PayPal.

In our experience, this has proven to increase online store conversions. You can also add live chat software and an email marketing service to further boost your sales conversion.

We hope this article helped you find the best WooCcommerce payment gateway for your business. You may also want to see our comparison of the best business phone services for small businesses and online store owners.

If you liked this article, then please subscribe to our YouTube Channel for WordPress video tutorials. You can also find us on Twitter and Facebook.

The post 6 Best WooCommerce Payment Gateways for WordPress appeared first on WPBeginner.


June 19, 2020 at 05:12PM