Monday, August 17, 2020

How to Display Your Facebook Timeline in WordPress

Do you want to show your Faecbook timeline posts on your website?

By adding your Facebook updates to your website, you can keep users updated with real-time status and even boost your Facebook following.

In this article, we’ll show you how to easily display your Facebook timeline in WordPress.

Displaying your Facebook timeline in WordPress

Displaying Your Facebook Timeline in WordPress

We’re going to use Smash Balloon’s Custom Facebook Feed Pro to add our Facebook timeline to our WordPress website.

First, you need to go to the Smash Balloon website and download the Custom Facebook Feed Pro plugin.

Next, you need to install and activate the plugin on your site. For more details, see our step by step guide on how to install a WordPress plugin.

Note: There’s also a free version of the plugin, called Smash Balloon Social Post Feed. This works fine to display text and links from your timeline. However, it will not show photos.

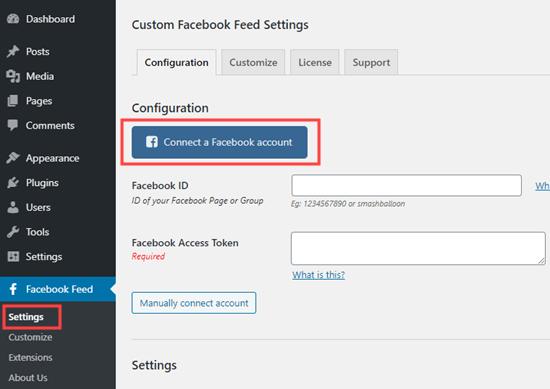
Upon activation, go to Facebook Feed » Settings in your WordPress dashboard. Here, you will need to connect your Facebook account.

Connect your Facebook account to the Custom Facebook Feed plugin

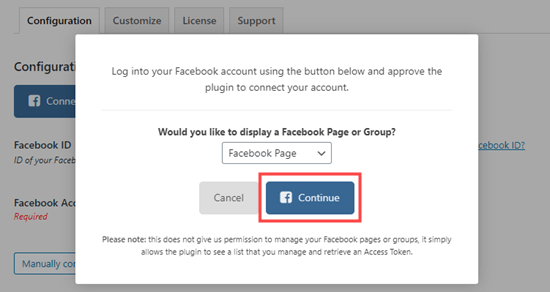
Next, you need to decide whether to display a Facebook page or group timeline. We’re going to use our Facebook page.

Note: You cannot display a timeline from your personal profile. This is due to Facebook’s privacy policy.

Continue connecting Facebook Feed Pro to Facebook

Facebook will then prompt you to agree and give Smash Balloon permission to access your Facebook account. Simply follow the on-screen prompts.

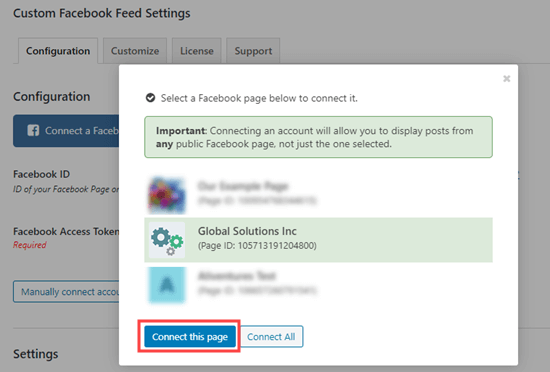
You will then see the Custom Facebook Feed Settings page again, with a popup asking you to select which page to use. Click on the page you want, and then click the ‘Connect this page’ button:

Select the Facebook page that you want to connect to your website

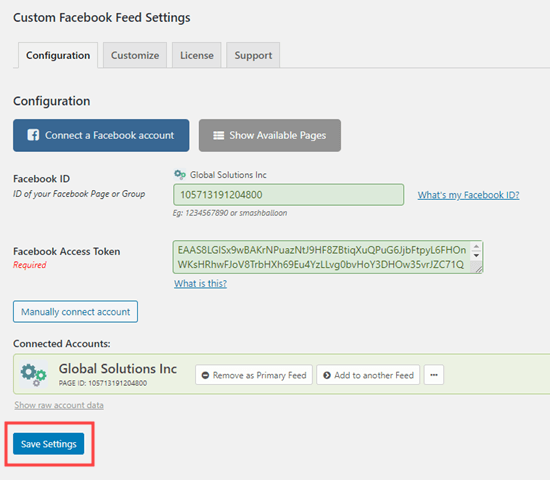
You should now see your page listed in the ‘Connected Accounts’ section of the Custom Facebook Feed configuration settings. Don’t forget to click the ‘Save Settings’ button to save it.

Make sure you click the button to save changes to your settings

Now, it’s time to go ahead and add the Facebook timeline from your page to your site. Simply open up the post or page where you want to put your timeline, or create a new post or page.

It’s also possible to add your timeline to your WordPress sidebar, which we’ll cover later in this tutorial.

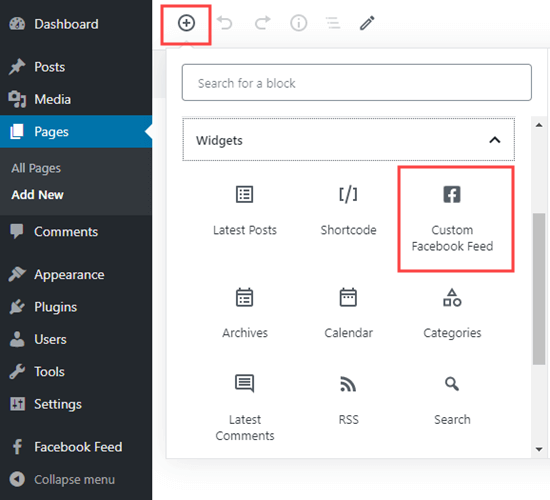
We’re going to create a new page by going to Pages » Add New. On the page edit screen, click on the (+) icon to add the Custom Facebook Feed block in the WordPress block editor:

Adding the Facebook feed block to a page

You can see the preview of your Facebook feed straight away in the content editor. Go ahead and preview or publish your page to check it out on your site. Here’s our Facebook timeline:

Our Facebook page timeline displaying on our WordPress page

We’ve added some styling to our timeline to make it look great on our site. Next, we’ll take a look at how to customize your own Facebook timeline using Custom Facebook Feed Pro.

Customizing Your Facebook Timeline with Smash Balloon Facebook Feed Pro

Custom Facebook Feed Pro lets you change all sorts of options about your timeline. Let’s go through some of the key ones.

Simply go to the Facebook Feed » Settings page in your WordPress dashboard.

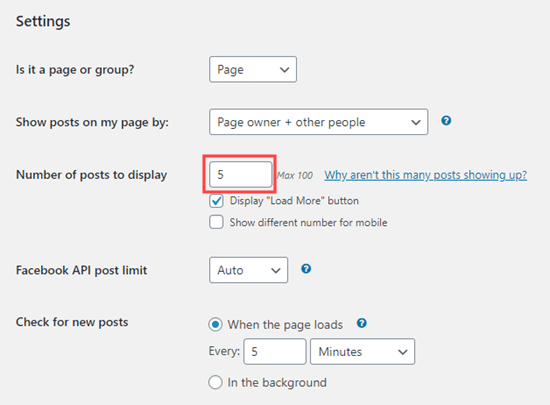
Scroll down to the ‘Settings’ section, and you’ll see a few key options. For instance, you might decide you only want to display 5 posts:

Changing the number of posts shown in the Facebook timeline on the website

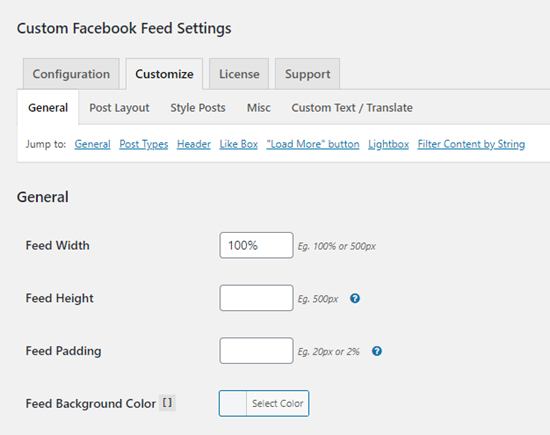
There are also lots of settings under the Facebook Feed » Customize page that you may want to try out. This page gives you lots of different options to choose from in different tabs.

The Customize options for the Custom Facebook Feed plugin

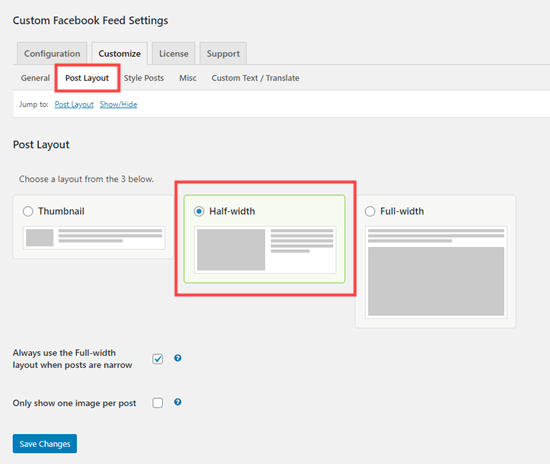
To change how your timeline is laid out, simply click the ‘Post Layout’ tab. We’ve selected the ‘Half-width’ style for our posts at the top here. Don’t forget to click the ‘Save Changes’ button after making any changes:

Using half-width posts for the Facebook timeline

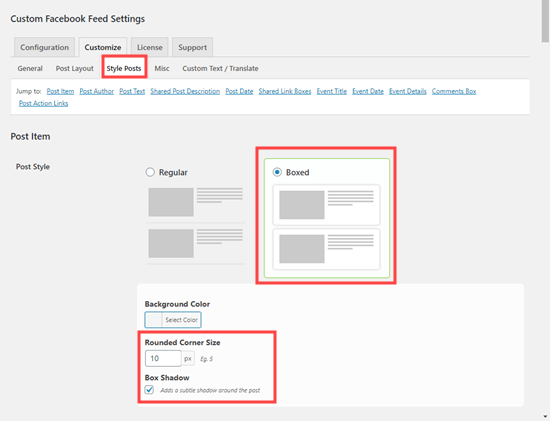
Next, go to the ‘Style Posts’ tab to change how your posts are styled. We think the ‘Boxed’ style here looks great. We’ve given our posts rounded corners plus a shadow:

Changing how the Facebook posts are styled in the timeline by adding a box and rounded corners

Again, make sure you save your changes before leaving the page.

Adding Your Custom Facebook Timeline in WordPress Sidebar

What if you want to display your Facebook timeline in your sidebar instead of in a post or page? You can easily do that with Custom Facebook Feeds.

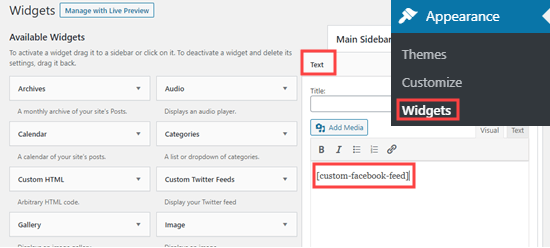
First, go to the Appearance » Widgets page in your WordPress admin area. Then, drag a ‘Text’ widget to wherever you want your timeline within your sidebar. Now, simply enter the shortcode [custom-facebook-feed] in the widget and save it.

Adding a custom Facebook feed to a widget

Your Facebook timeline will now appear in the sidebar on your website:

Viewing the Facebook timeline in your sidebar

We hope this article helped you learn how to display your Facebook timeline in WordPress. You might also want to check out our articles on easy ways to increase your blog traffic and the best WordPress plugins.

If you liked this article, then please subscribe to our YouTube Channel for WordPress video tutorials. You can also find us on Twitter and Facebook.

The post How to Display Your Facebook Timeline in WordPress appeared first on WPBeginner.


August 17, 2020 at 06:33PM

Friday, August 14, 2020

7 Best Shopify Alternatives in 2020 (Cheaper and More Powerful)

Are you comparing Shopify alternatives to weigh their pros and cons?

You might have thought about using Shopify to create an online store. While it’s a popular option, it may not be the best fit for your eCommerce business.

In this article, we’ll compare the best Shopify alternatives along with their pros and cons, so you can choose the best platform to build an online store.

Shopify alternatives to consider for your online store

Is Shopify the Right Choice for Your Online Store?

Shopify is an all-in-one eCommerce platform. It handles all the technical details that goes into running an online store, like hosting, domain name, maintenance, software updates, and more.

This makes Shopify a popular choice among business owners.

However, it doesn’t offer the same flexibility and freedoms that many other top eCommerce platforms offer. It is also more expensive than many alternatives on the market with their basic plan starting from $29/month.

That being said, let’s take a look at some of the best Shopify alternatives with the pros and cons of each option.
1. WooCommerce

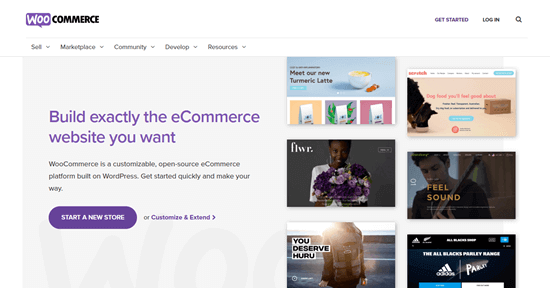
The WooCommerce website

WooCommerce is the most popular eCommerce platform in the world, and it is also our top pick for creating any type of online store.

It is beginner-friendly and incredibly easy to use. WooCommerce comes with hundreds of professionally designed website templates, and many of them are available for free.

You can also add any new feature to your eCommerce store using WooCommerce extensions (many of them are free as well).

There is also a ton of free online help and WooCommerce tutorials which makes it easier for you to learn and grow your online eCommerce business.

There are also more payment gateways extensions for WooCommerce available than any other platform. WooCommerce is used globally, so you will be able to integrate payment gateways supported in your targeted regions.

You will need to pay for web hosting and a domain to run WooCommerce. There are lots of options for WooCommerce hosting, but our top recommendation is Bluehost.

They are offering our readers a fantastic deal where you get a free domain name, free SSL certification, and hosting for $2.75/month:

→ Click Here to Claim This Exclusive Bluehost Offer ←

Price:

WooCommerce plugin itself is free.

However, you will need to pay the usual costs of running a WordPress website. This includes web hosting, your domain name, and any paid plugins you want to use for your online store.
2. MemberPress

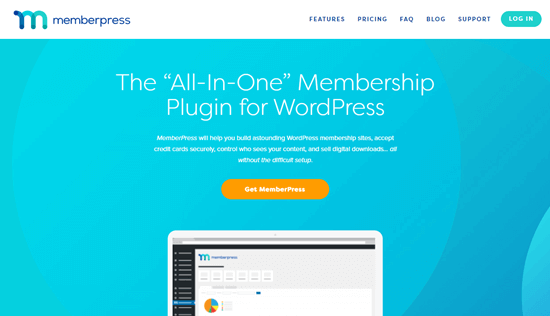
The MemberPress website

MemberPress is our top pick for creating a membership site. It’s a great option if you want to offer digital content to customers. It lets you take subscription payments, or just charge one-time fee for digital downloads.

MemberPress is easy to set up, and you can use it to protect premium content on your site in lots of different ways.

For instance, it’s easy to protect all pages with a specific parent page, so only registered users can see them. MemberPress also lets you ‘drip’ content so that members don’t receive it all at once.

You can even set up different payment levels if you want to sell several different memberships or online products.

MemberPress integrates with lots of other tools such as popular email marketing services, live chat software, etc. It also has built-in support for PayPal and Stripe payments.

Price:

MemberPress costs from $129/year for the basic plan when you use our MemberPress coupon code.

3. BigCommerce

The BigCommerce website

BigCommerce is a fully hosted all-in-one eCommerce platform. The hosting, SEO, payment features, and more are all provided for you by BigCommerce. You don’t need to set anything up separately.

There’s also a BigCommerce WordPress plugin that lets you run a full BigCommerce store on your WordPress website. You can login to BigCommerce to manage your store and use WordPress to add / edit website content as normal.

There are hundreds of third-party apps and integrations that can be added onto BigCommerce. They have both free and paid apps available in their app marketplace. This gives you plenty of ways to add features like product popups with OptinMonster, cart abandonment, and more to your store as your business grows.

BigCommerce is a particularly good option if you’re not very confident with technology. The support team is available 24/7, and you can get phone, live chat, and email support. BigCommerce will handle things like backups, updates, and security for your store.

Price:

BigCommerce costs from $29.95/month. If you make more than $50,000 in sales per year, then you’ll need to upgrade to a more expensive plan.
4. Easy Digital Downloads

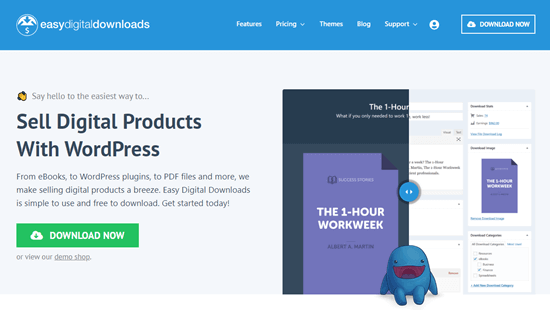
The Easy Digital Downloads website

Easy Digital Downloads lets you sell virtual (downloadable) products from your WordPress site. It’s specifically designed for selling digital products, so it’s not a good alternative to Shopify if you sell physical goods.

The Easy Digital Downloads plugin automatically protects your files. You can restrict how many times a customer can download a file. You can also let the download link expire after a set period of time. These methods prevent customers from sharing their purchased files with other people.

Easy Digital Downloads works well even if you have multiple digital products to sell. There’s a built-in shopping cart system where customers can buy several products at once. It’s also easy to make a customer account page, so that people can easily view all the products they’ve bought.

As with any WordPress plugin, you’ll need a domain name and WordPress hosting in order to use Easy Digital Downloads. It’s not a standalone solution.

There’s lots of help available through the support forums, videos, and tutorials. If you pay for the premium version, you’ll get priority support through email.

Price:

Easy Digital Downloads itself is free. There are a number of extensions available, some also free and some paid. Pricing plans start from $99/year, and these give access to email support and certain extensions.

5. Constant Contact Website Builder

The Constant Contact Website Builder website

Constant Contact is best known as an email marketing service, but the company also has a beginner-friendly website builder. You can use this to quickly and easily create an online store.

The built-in eCommerce functionality in the Constant Contact website builder lets you easily choose a layout, add products, and set up payments. There are also features that let you create a logo and analyze your website traffic.

You can try out Constant Contact’s website builder completely free of charge. Once it’s time to launch your site, you’ll need to upgrade to a paid plan.

The drag and drop interface makes this website builder really easy to use. There are over 550,000 free professional quality images to pick from for your site too.

Constant Contact also includes 24/7 support through phone and live chat, so it’s easy to get help if you need it.

Price:

Constant Contact’s website builder costs just $10/month. There’s a 30-day money-back guarantee, too.

6. Magento

The Magento website

Magento is an open source eCommerce platform, just like WordPress is an open source website builder platform.

You can use the community edition of Magento with any web host that supports it. We recommend SiteGround’s Magento hosting for this.

There’s also Magento Commerce, which is a paid platform. This includes lots of features and support, but you need to ask for an enterprise quote to get pricing.

Magento has a healthy extensions ecosystem that lets you add new functionality. Many of these are free, but a lot of them are premium extensions.

Magento is a powerful platform with lots of flexibility, but it can be tricky to get started with if you’re a beginner. It’s a good fit if you’re running a business and have developers on hand, or if you want to hire a developer to set things up.

Price:

The open source version of Magento is free. However, you’ll need to pay for web hosting that’s powerful enough to run a fully featured online store.

7. Weebly

The Weebly website

Weebly is an all-in-one website builder and eCommerce platform, so you don’t need to buy hosting separately. It comes with dozens of website designs that you can edit using drag and drop tools.

Weebly lets you easily create an online store. Their platform gives you the ability to sell digital items as well as physical ones. There are also options for selling services and taking donations.

With Weebly, you also get extra features like a mobile app to manage your store, automated abandoned cart emails, and more.

There are over 300 Weebly apps that you can add to your site to give it new features. Many of these are free, but some cost extra.

However, Weebly doesn’t have the full range of customization options that other eCommerce platforms like WooCommerce can offer.

Price:

Weebly’s business plan is $25/month. This removes the 3% transaction fee that Weebly would otherwise charge on all your sales.

There’s also a free version of Weebly, but this doesn’t include eCommerce tools.

Which is the Best Shopify Alternative for Your Online Store?

For most people, WooCommerce is the best Shopify alternative. It’s easy to use, and fairly quick to get started with. Best of all, it has lots of flexibility since WooCommerce offers the largest extension ecosystem and pre-made template library.

MemberPress is a great option if you want to offer digital products or online courses that people subscribe to. It’s easy to use and again offers lots of power and flexibility.

BigCommerce is another good alternative that offers the similar feature set as Shopify without the restriction of specific payment gateways or extra fees.

We hope this article helped you learn about the best Shopify alternatives to create an online store. You might also like our list of proven and easy to start online business ideas.

If you liked this article, then please subscribe to our YouTube Channel for WordPress video tutorials. You can also find us on Twitter and Facebook.

The post 7 Best Shopify Alternatives in 2020 (Cheaper and More Powerful) appeared first on WPBeginner.


August 14, 2020 at 05:45PM

Thursday, August 13, 2020

How to Fix WordPress Website Not Updating Right Away

Are you trying to fix your WordPress website not updating right away?

Often users ask us why some changes they make to their site like a new blog post, widget settings, don’t appear right away. It is a common issue and very easy to fix.

In this article, we’ll show you how to easily fix a WordPress website not updating right away.

Fixing a WordPress website not updating right away

Why My WordPress Site Not Updating Right Away?

The most common cause of a WordPress site not updating right away is caching.

By default, many WordPress hosting companies enable their own caching systems which store a temporary copy of your pages to improve website speed and reduce server load.

Apart from that, you may also be using a WordPress caching plugin on your own which may not be configured properly.

Last but not the least, your browser may also store a cached version of your pages in temporary storage.

Normally, when you make any change to your WordPress website those cached versions expire, and you get to see your changes right away.

However, sometimes due to some configuration error this may not happen right away. In that case you will see the old version of that page for a while.

The most common symptom of this problem is new posts not appearing on the homepage of your WordPress website.

While you can still view the single post by clicking on the view post link from the WordPress admin area, you are unable to see it on the main page.

That being said, let’s take a look at how to easily fix this issue.

Fixing WordPress Website Not Updating Issue

You’ll start by first clearing the browser cache. For most users, this should fix the issue, and you wouldn’t need to proceed to step 2.

Step 1. Force Browser to Reload or Clear Cache

Sometimes your browser (specially Google Chrome) will show you a cached copy of your website instead of showing the new one.

To resolve this issue, you need to simply hit CTRL + F5 (or Cmd + R in Mac) buttons on your keyboard to reload the page.

This will ask the browser to reload the page by fetching a fresh version. In most cases, this would fix the issue for many users.

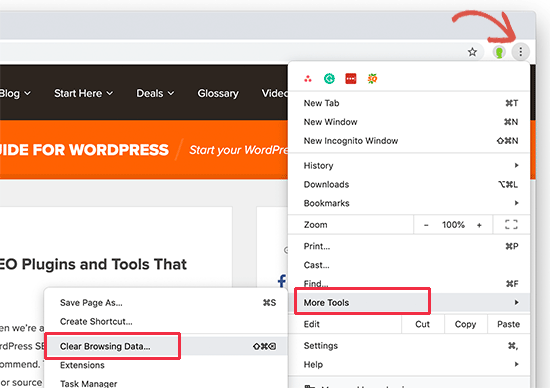
However, if that doesn’t work, then the next step is to clear your browser cache. In Google Chrome, click on the three-dot menu in the top right corner. From the menu, you need to go to More Tools » Clear Browsing Data.

Clear browser cache

For more details, see our guide on how to clear cache in all major browsers.

Step 2. Clear WordPress Cache for Your Website

The second and most likely cause of this issue is poorly configured WordPress caching plugin. Most caching plugins make it super easy to clear your cache with the click of a button.

1. WP Rocket

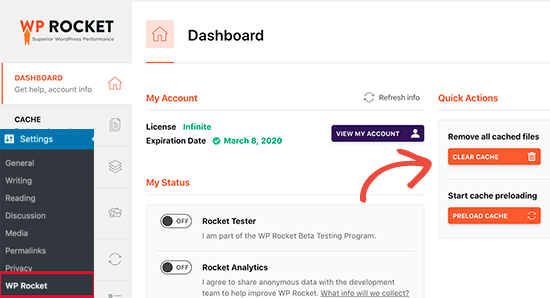
If you are using WP Rocket on your website, then simply go to the Settings » WP Rocket page and click on the ‘Clear Cache’ button under the dashboard tab.

WP Rocket clear cache

2. WP Super Cache

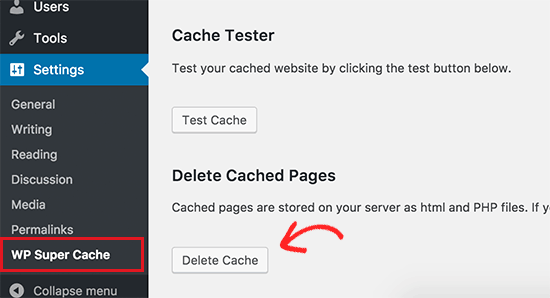
If you are using the WP Super Cache plugin, then go to the Settings » WP Super Cache page and click on ‘Delete Cache’ button.

WP Super Cache delete cache

3. Bluehost

Even if you don’t have a WordPress caching plugin installed on your website, many WordPress hosting companies deploy their own caching system by default.

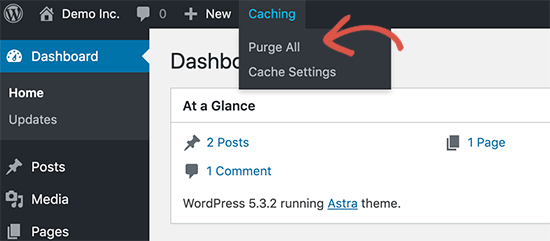
For instance, if you are on the Bluehost hosting platform, then you’ll notice a ‘Caching’ button in the admin toolbar.

Clear cache in Bluehost

Take your mouse over and you’ll see the option to ‘Purge All’ cache. This will delete all cached files from your website.

4. SiteGround

SiteGround is another top WordPress hosting company that offers its own built-in caching system.

You can manage SiteGround cache by installing and activating the SG Optimizer plugin. For more details, see our step by step guide on how to install a WordPress plugin.

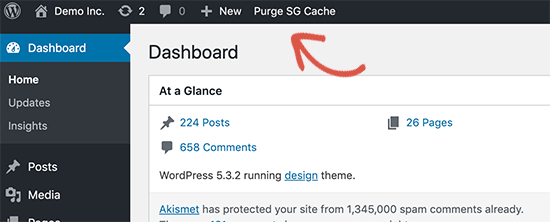
Upon activation, you need to click on the Purge SG Cache button in the WordPress admin toolbar.

Purge SiteGround cache

This will clear up SiteGround cache for your website.

For more hosting companies and caching plugins, see our complete guide on how to clear WordPress cache.

We hope this article helped you fix WordPress website not updating right away issue. You may also want check out our guide on the most common WordPress errors and how to fix them.

If you liked this article, then please subscribe to our YouTube Channel for WordPress video tutorials. You can also find us on Twitter and Facebook.

The post How to Fix WordPress Website Not Updating Right Away appeared first on WPBeginner.


August 13, 2020 at 06:00PM