Wednesday, September 9, 2020

How to Create an RSVP Form in WordPress (Easy)

Are you planning a big event like a birthday party, fundraiser, or even a wedding? Then you need an easy way to collect RSVPs from your guests.

If you run a WordPress website, then you can easily add an RSVP form without writing any code.

In this article, we will show you how to create an RSVP form in WordPress to improve your planning.
Creating an RSVP form in WordPress

Why Create an RSVP Form in WordPress?

Creating an RSVP form on your website can save you hours of time.

Normally, guests might reply in lots of different ways to your invitation. They could respond by email, text, phone call, or even by telling you at another event.

This can be very difficult to manage. It’s easy to forget who has replied.

That’s why it’s always a good idea to create an RSVP form in WordPress. This means everyone will reply in the same way. Even better, the RSVPs will be saved in your WordPress database.

Creating Your RSVP Form in WordPress

First, you will need to install and active the WPForms plugin for WordPress. For more details, see our step by step guide on how to install a WordPress plugin.

Tip: We recommend using the WPForms’ Pro version or higher. That way, you have access to useful form templates to speed up the process of creating your RSVP form. However, you can use the WPForms lite version to also create the RSVP form.

Upon activation, go to WPForms » Addons in your WordPress dashboard:
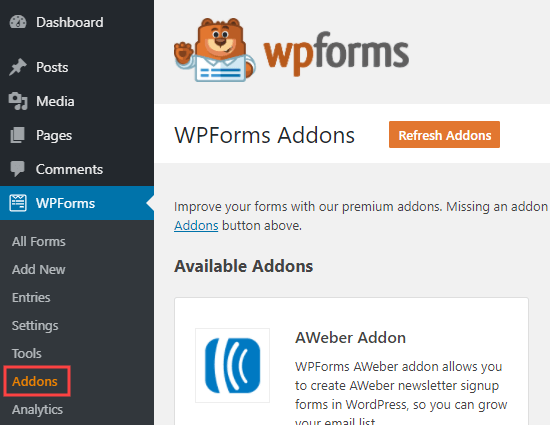
The WPForms addons page in your WordPress admin

Next, search for the Form Templates addon. Go ahead and click the ‘Install Addon’ button to install it.
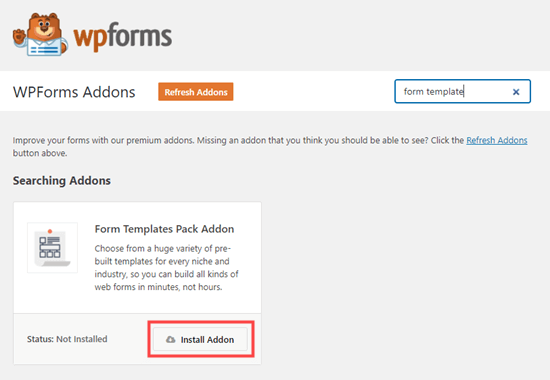
The Form Templates addon for WPForms

Now it’s time to create your RSVP form. First, go to the WPForms » Add New page. Here, you need to type in a name for your RSVP form:
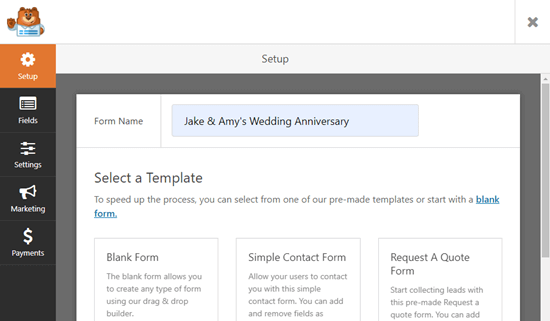
Naming your RSVP form

Below this on the page, you will see the Additional Templates section. Go ahead and type in ‘RSVP’ to see all the RSVP form templates.

We are going to use the Party Invitation RSVP Form, which is suitable for any type of party.
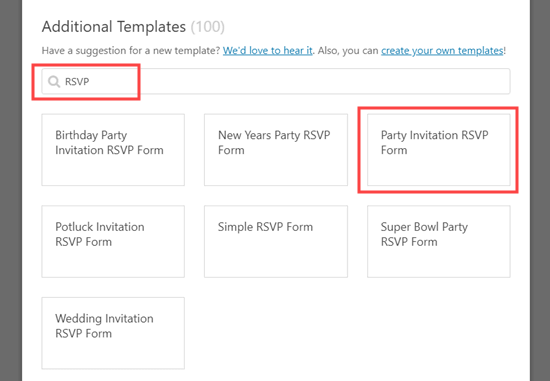
Choose one of the RSVP form templates

Once you have selected your template, WPForms will open it up in the drag and drop form builder:
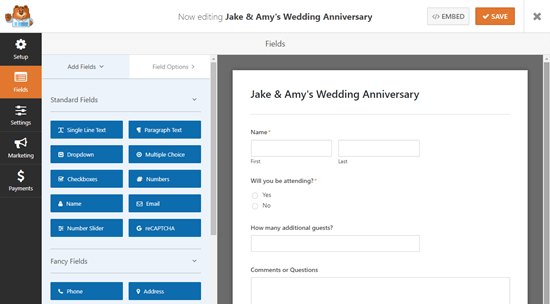
The party invite RSVP template in the WPForms form builder

Here, you can change anything you like about the form. Simply click on the part of the form you want to change and then edit it on the left hand side.

For instance, we are going to click on the ‘Name’ field and change it to the ‘Simple’ format:
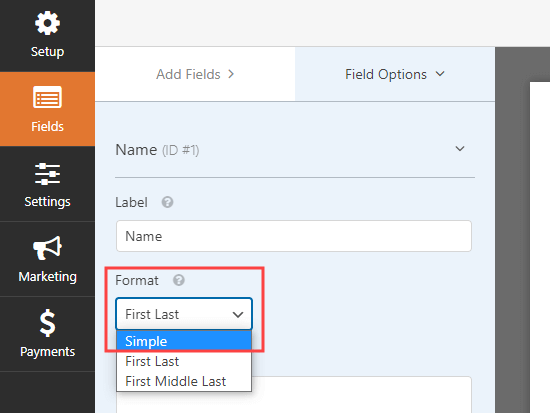
Changing the name field in WPForms

What if you want to add extra options to the ‘Will you be attending’ field? Just click on it then use the (+) button to add more choices:
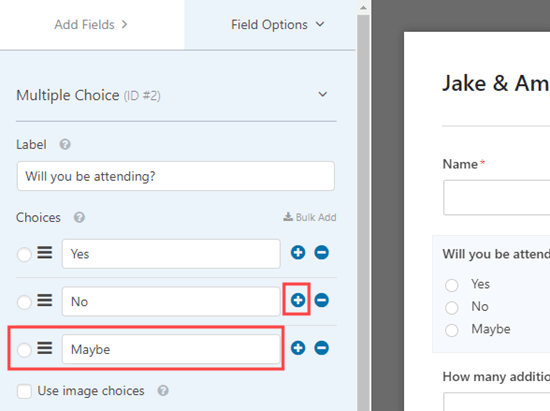
Adding more options to the multiple choice field

It’s easy to use the ‘Add Fields’ tab to drag and drop more fields onto your form, too:
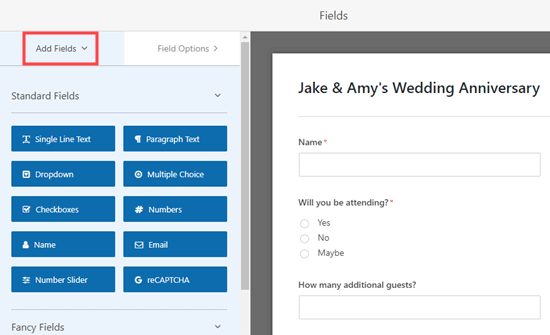
Adding new fields to the RSVP form

We have added a ‘Single Line Text’ field to ask about allergies and dietary requirements.
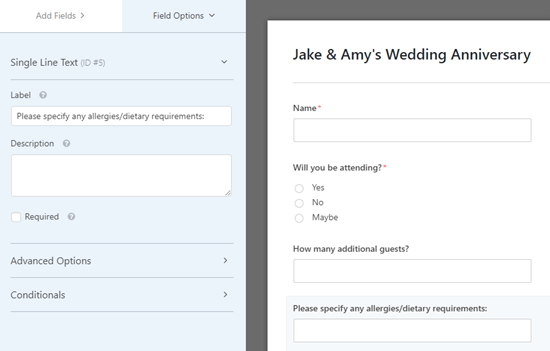
Adding a simple text field to ask about allergies and dietary requirements

Once you’re happy with your form, don’t forget to click the Save button at the top of the screen before moving on.

Make sure you save your RSVP form

Next, go to the Settings » Notifications page for your form. This lets you control where the RSVPs are sent.
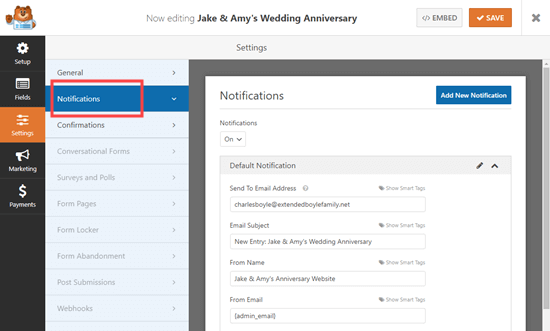
Checking the notification settings for your RSVP form

Simply change the ‘Send To Email Address’ to the email address you want to use. By default, it goes to {admin_email} which is normally the email address of whoever set up the WordPress site.
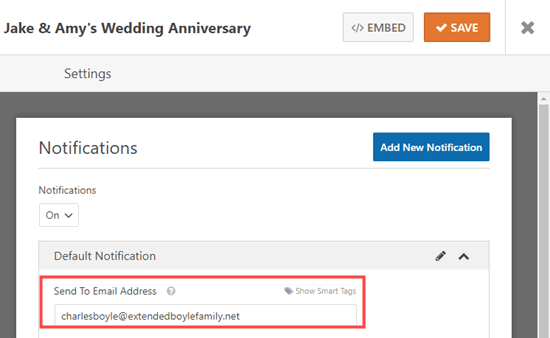
Changing the Send To email address for your RSVP form

If you want RSVPs to go to more than one person, follow our instructions to create a form with multiple recipients.

You can also change other settings here, such as the subject line of the emails.

Next, you may want to change the message that guests will see after submitting the form. To do this, click on the Confirmations tab. Simply delete the existing message and type in the message you want to use instead.
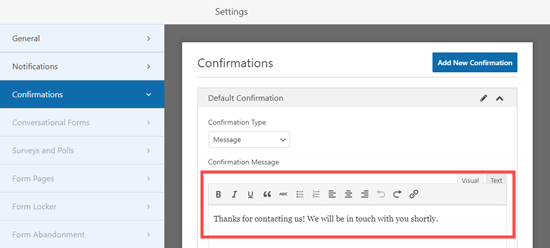
Editing the confirmation message for your RSVP form

Again, don’t forget to click the Save button before exiting your form.

Adding Your RSVP Form to a Page in WordPress

It’s easy to put your RSVP form on any post or page on your website. You can even add it to your sidebar using the WPForms widget.

We are going to create a new page for our form. To do this, just go to Pages » Add New. Then, go ahead and enter any content you want for your page.
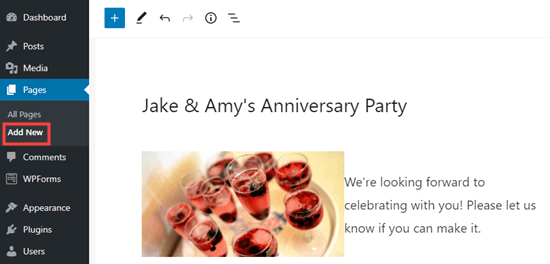
Adding a page for your RSVP form in WordPress

To add your form, simply click the + icon to add a new block. Then, search for the WPForms block.
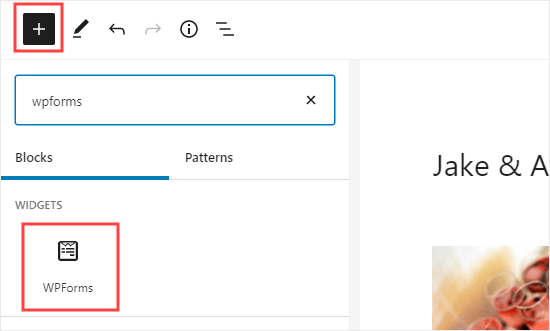
Adding a WPForms block to your page

Once you have added that block to your page, you need to select your RSVP form in the dropdown list:
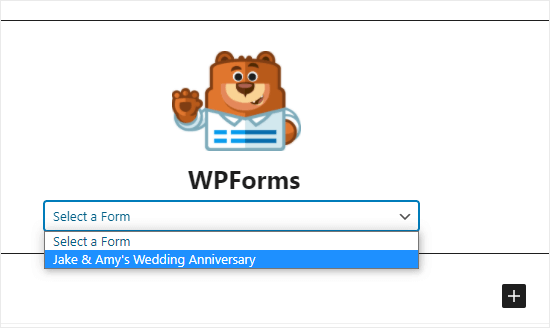
Selecting the RSVP form from the WPForms dropdown list

Finally, go ahead and publish or preview your page to see your form on your website:
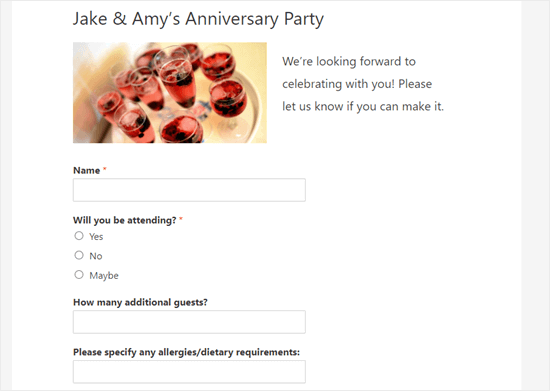
The RSVP form live on the website

Checking Your Guest List in WordPress

Once people have had a chance to RSVP, you will want to construct a guest list.

Luckily, WPForms makes this process quick and easy for you. Instead of going through all the notification emails, it’s easy to download the guest list from WordPress (this feature is only available in WPForms pro version).

First, go to WPForms » All Forms in your WordPress dashboard.
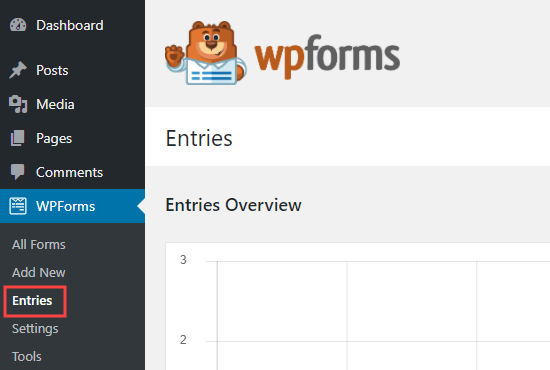
The Entries page for WPForms in the WordPress admin

Then, click on the name of your form at the bottom of this page:
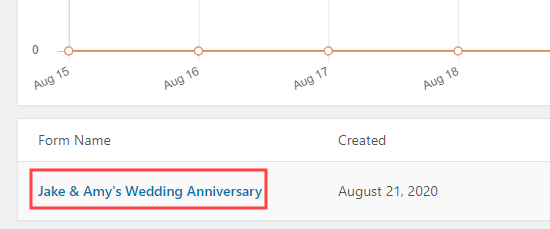
Click on the name of your form to view the entries

You will now see a table that summarizes the RSVPs. Just click ‘View’ next to any of these to see the full details.

To download the whole guest list, simply click the ‘Export All (CSV)’ button.
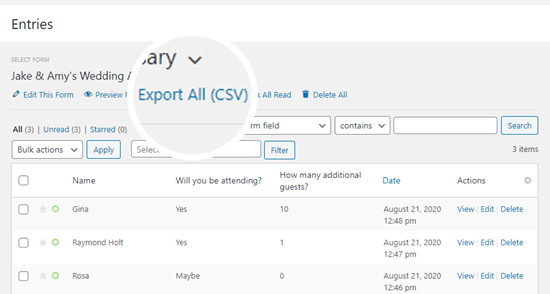
Export a CSV of your RSVP form's entries to produce a guest list

WPForms will then prompt you to confirm which fields you want to include. By default, all will be checked:
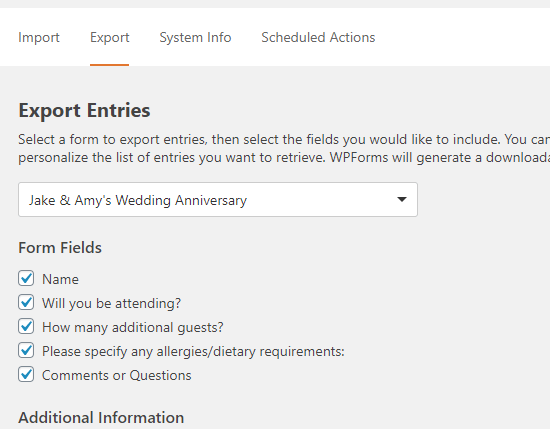
Confirm the fields you want to include in your export

Simply scroll down and click the ‘Download Export File’ button:
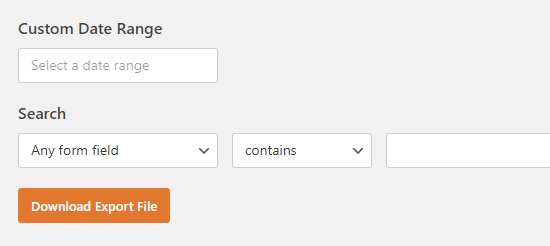
Downloading your export of RSVPs

It will now download to your computer as a CSV file. You can be open it in Excel or any spreadsheet program like Google Spreadsheet.

We hope this article helped you learn how to create an RSVP form in WordPress. You might also want to see our guide on how to create a professional business email address, and how to create a custom WordPress theme (without writing any code).

If you liked this article, then please subscribe to our YouTube Channel for WordPress video tutorials. You can also find us on Twitter and Facebook.

The post How to Create an RSVP Form in WordPress (Easy) appeared first on WPBeginner.


September 09, 2020 at 05:00PM

Tuesday, September 8, 2020

How to Change Sender Name in Outgoing WordPress Email

Do you want to change the default sender name and email address for outgoing WordPress emails?

By default, WordPress uses ‘WordPress’ as the sender name for all outgoing WordPress notification emails. This doesn’t look very professional, and you may want to change that to your business name.

In this article, we will show you how to easily change the default sender name and email address in outgoing WordPress emails.

Changing sender name and email address in outgoing WordPress emails

Why You Should Change the Default Sender Information in WordPress?

WordPress sends several email notifications to the site administrator as well as other users on your website.

This includes very important email notifications such as forgot password emails, website error and recovery emails, new user registration, and more.

By default, it uses ‘WordPress’ as the sender’s name and a non-existent email address (wordpress@yourdomain.com) as the sender email.

Many spam filters block your WordPress emails believing it to be spam. Sometimes it does not even make it to the spam folder.

For more on this topic, take a look at our guide on how to fix WordPress not sending email issue.

The outgoing email notifications are important, and you should use your own brand and email address. This increases the authenticity of your brand and increases name recognition among your users.

For instance, if you run an online store, then you would want customers to get email notifications with your store name as the sender.

See our guide on how to get a free business email address for your website in 5 minutes.

Having said that, let’s see how to change the default sender name and email address in outgoing WordPress email notifications.

Method 1. Changing Default Sender Name and Email using WP Mail SMTP

This method is easier and recommended for all WordPress users.

For this method, we’ll be using the WP Mail SMTP Pro plugin. It is the best WordPress SMTP plugin on the market, used by over 1 million website owners.

This plugin allows you to easily change the default sender name and email address for outgoing WordPress emails. It also helps you fix the WordPress email deliverability problem.

First thing you need to do is install and activate the WP Mail SMTP Pro plugin. For more details, see our step by step guide on how to install a WordPress plugin.

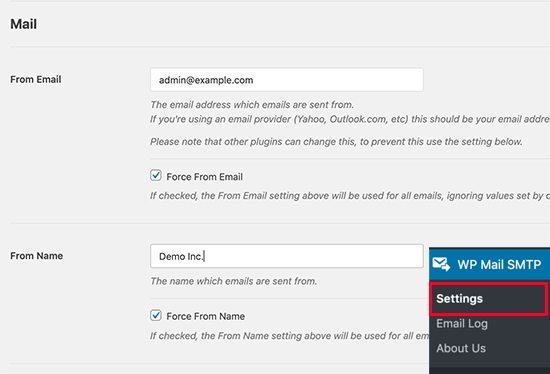
Upon activation, you need to visit WP Mail SMTP » Settings to configure plugin settings. Under the Mail section, you can simply enter the email address and the name you want to use to send WordPress emails.

Change sender name and email in WordPress using WP Mail SMTP

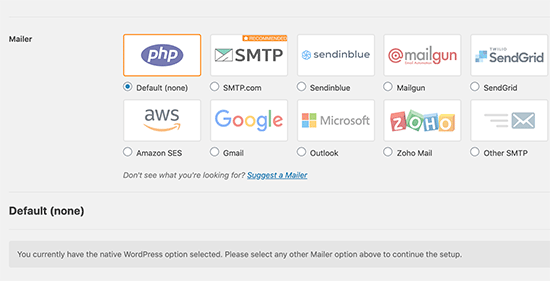
Below that you can find the options to set up an SMTP server to send WordPress emails. By default, the plugin will use PHP method provided by your WordPress hosting company which is less reliable.

We recommend using any of the listed SMTP services to properly send WordPress emails for higher guaranteed deliverability.

Select mailer

If you choose an SMTP service, then follow the on-screen instructions to connect the plugin with your SMTP service provider.

Don’t forget to click on the ‘Save Settings’ button to save your changes.

Test Your WordPress Emails

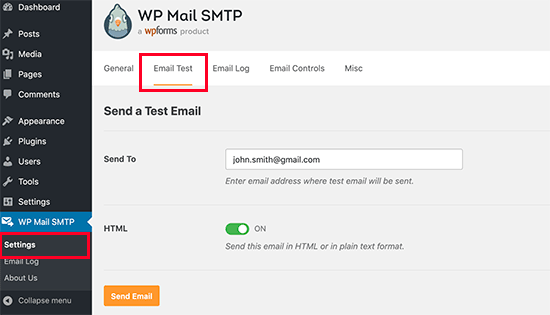
WP Mail SMTP Pro also allows you to test your WordPress email settings. Simply go to the WP Mail SMTP » Settings page and switch to the ‘Email Test’ tab.

Test WordPress emails using WP Mail SMTP

From here, you just need to provide an email address that you can access and then click on the ‘Send Email’ button.

The plugin will now send a test email to the address you provided. You can check your inbox to make sure that you can receive WordPress emails, and it has the correct sender name and sender email address.

WP Mail SMTP works with all popular WordPress plugins like WooCommerce, WPForms, and more.

For more detailed instructions, you may want to see our article on how to use SMTP to send WordPress emails.

Method 2: Changing Default Sender Name and Email using a CB Change Mail Sender

This method is only recommended if you don’t use an SMTP service, or the first method is not working for you.

Using this method does not improve your WordPress email deliverability or make it easier to troubleshoot email issues. However, if your WordPress emails are working, then it will allow you to change sender name and email address.

First thing you need to do is install and activate the CB Change Mail Sender plugin. For more details, see our step by step guide on how to install a WordPress plugin.

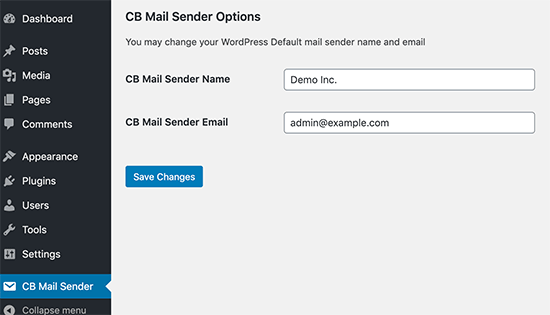
Upon activation, you will notice a new menu item labeled CB Mail Sender in your WordPress admin bar. Clicking on it will take you to plugin’s settings page.

CB Mail Sender

You will need to enter the name and email address you want to be used for outgoing WordPress emails.

Don’t forget to click on the save changes button to store your settings.

That’s all, your WordPress notification emails will now show the name and email address you entered in plugin settings.

There is no method provided by the plugin to test your email settings. You can do that by performing actions that generate WordPress notification emails like creating a new user, requesting a password reset, and more.

Method 3: Manually Change Sender Name and Email Address

This method is not recommended for beginners. This method requires you to paste code into your WordPress files. It also does not fix any email deliverability issues and is harder to troubleshoot.

If you are new to adding code in WordPress, then take a look at our beginners guide on pasting snippets from web into WordPress.

You will need to add the following code in your theme’s functions.php file or a site-specific plugin.


// Function to change email address
function wpb_sender_email( $original_email_address ) {
    return 'tim.smith@example.com';
}

// Function to change sender name
function wpb_sender_name( $original_email_from ) {
        return 'Tim Smith';
}

// Hooking up our functions to WordPress filters 
add_filter( 'wp_mail_from', 'wpb_sender_email' );
add_filter( 'wp_mail_from_name', 'wpb_sender_name' );

This code simply replaces the default WordPress sender name and email address with your custom sender name and email address.

You can test this by adding a new user, changing passwords, or any other action that sends a WordPress notification email.

We hope this article helped you learn how to change the sender’s name and email address in outgoing WordPress emails. You may also want to see our guide on the best bulk email marketing services to bulk send email to all your users, and our comparison of the best WordPress page builder plugins to customize your site without any code.

If you liked this article, then please subscribe to our YouTube Channel for WordPress video tutorials. You can also find us on Twitter and Facebook.

The post How to Change Sender Name in Outgoing WordPress Email appeared first on WPBeginner.


September 08, 2020 at 05:00PM

Monday, September 7, 2020

How to Remove the Date from WordPress URLs

Do you want to remove the date from your WordPress URLs?

WordPress comes with an SEO friendly URL structure. This includes several link formats including one that adds dates to your WordPress post URLs.

In this article, we will show you how to easily remove the date from your WordPress URLs.

Removing date from your WordPress URLs

Why Dates Appear in WordPress URLs?

By default, WordPress uses a non human-readable link structure for post and page URLs which looks like this:

https://ift.tt/1uHJSlG

It uses post ID in the URL which does not look very good or meaningful.

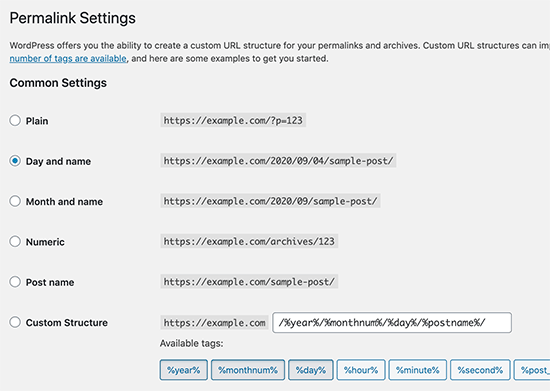
However, WordPress also allows you to easily change this to more meaningful and SEO friendly URLs. It gives you a bunch of options to choose from under Settings » Permalinks page.

Permalinks page

Choosing the ‘Month and name’ or ‘Day and name’ options will add the date parameters to your WordPress URLs. They will then look like this:

Day and name: https://ift.tt/2ZfqCCv
Month and name: https://ift.tt/3bzjVQF

These URLs are better than the default ugly URLs. They are still SEO friendly as well. However, they are unnecessarily lengthy and the dates make your articles look old.

That’s why a lot of users want to switch to just ‘Post name’ URL structure which will remove the date and just use the post slug keyword in the URL.

Name: https://ift.tt/32aI1OV

It is shorter, meaningful, SEO friendly, and doesn’t look dated as time passes.

Things You Should Consider before Removing Date from WordPress URLs

If you are starting a new WordPress blog and haven’t launched it yet, then it is safe to remove the date from WordPress URLs.

However, if your website has been around for some time, then you will need to keep the following things in mind.

Changing the URL structure may result in 404 errors for your users and search engines. This means you may see warnings and errors in your Google Search Console reports.

Your search engine rankings may also get affected as the link backs to your old articles will now lead to 404 errors.

Both of these issues can be fixed by setting up redirects, and we will show you how to do that later in this article.

Changing the URL structure will also reset your social share counts. Unfortunately, most social share count services do not track the redirected URLs and will reset share count for them.

Removing Date from WordPress URLs

First, you need to create a complete WordPress backup of your website. This will allow you to restore your website to an earlier stage in case things don’t work out as you expected.

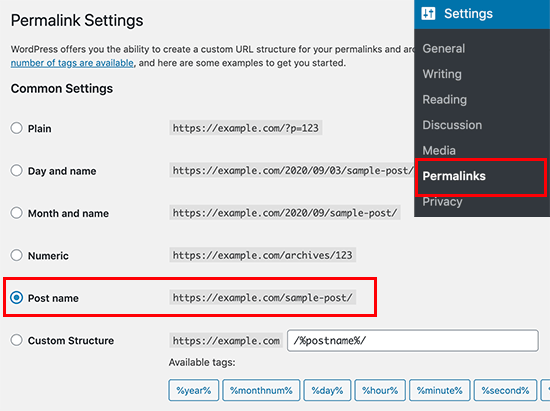
After that, you need to visit the Settings » Permalinks page and choose ‘Name’ as your permalink option.

Change permalinks

Don’t forget to click on the ‘Save Changes’ button to store your changes.

WordPress will now remove the date from your WordPress URLs and start using the name-based URL structure.

Setting up Redirects to Preserve SEO Rankings

Now that you have removed the date from your WordPress URLs. You need to set up proper redirects.

Redirects will send users to the updated URLs without showing a 404 error. This will also help search engines understand that the old URLs are now moved to these new URLs.

First, you need to install and activate the Redirection plugin. For more details, see our step by step guide on how to install a WordPress plugin.

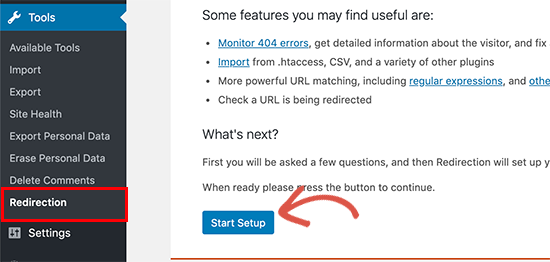
Upon activation, you need to visit Tools » Redirection page and click on the ‘Start setup’ button.

Start redirection setup

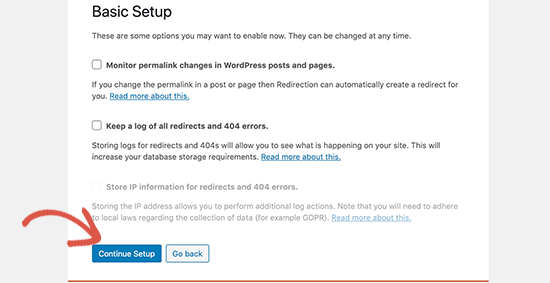
The plugin will then show you a couple of options. It can automatically detect and alert you if a posts URL is changed and keep a log of redirects. You can also leave both these options unchecked and simply click on the ‘Continue setup’ button.

Continue setup

The plugin will then run some tests and if everything looks good then you can click on the Finish setup button. After that, it will store plugin settings into the WordPress database.

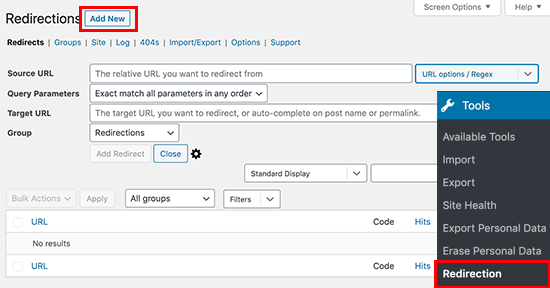
Once finished, you will see the plugin’s settings page. From here, you need to click on the ‘Add New’ button at the top or scroll down to the ‘Add new redirection’ section.

Add new redirect field

You will see a form with Source and Target fields. ‘Source’ is the field where you’ll describe your old URL structure and ‘Target’ is the location of the new URL.

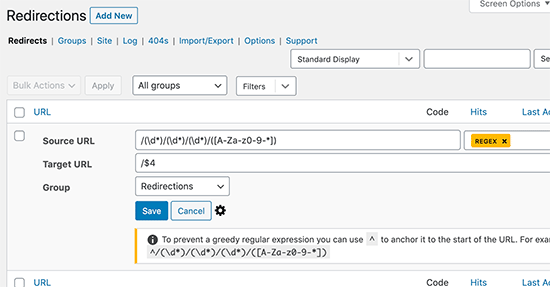
If you were using the ‘Day and name’ URLs, then you will enter the following values in the source and target fields:

Source: /(\d*)/(\d*)/(\d*)/([A-Za-z0-9-*])
Target: /$4
Redirect rules for day and name URLs

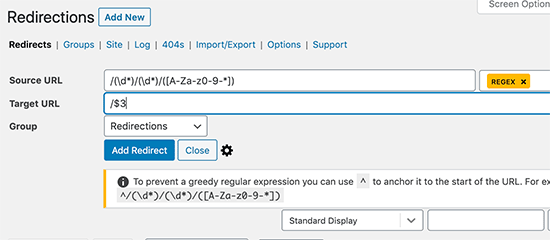
If you were using ‘Month and name’ URLs, then you’ll enter the following values:

Source: /(\d*)/(\d*)/([A-Za-z0-9-*])
Target: /$3

Month name redirects

Don’t forget to select Regex and click on the ‘Add Redirect’ button to save your changes.

The plugin will now redirect users to your new name-based URLs.

We hope this article helped you learn how to easily remove the date from WordPress URLs. You may also want to see our guide on the most common WordPress errors and how to fix them as well as our collection of the best WordPress SEO plugins.

If you liked this article, then please subscribe to our YouTube Channel for WordPress video tutorials. You can also find us on Twitter and Facebook.

The post How to Remove the Date from WordPress URLs appeared first on WPBeginner.


September 07, 2020 at 05:00PM