Thursday, October 1, 2020

How to Easily Embed Videos in WordPress Blog Posts

Do you want to embed videos in your WordPress blog posts? Videos bring life to your website, and they are a great way to increase user engagement.

WordPress makes it super easy to embed videos from video hosting sites like YouTube, Vimeo, Facebook, Twitter, and many others.

In this beginner’s guide, we will show you how to easily embed videos in WordPress blog posts, pages, and sidebar widgets.

How to easily embed videos in WordPress

How to Embed Videos in WordPress Blog Posts and Pages

WordPress comes with a great feature called auto-embeds which allows your website to automatically get the embed code from popular video hosting services like YouTube, Vimeo, etc.

All you need to do is paste the video URL into the WordPress editor.

For example, you can copy the YouTube URL for a video that you want to embed.

Next, edit the WordPress post or page where you want to add the video, and simply paste the URL in the content area.

Embedding video in WordPress post editor

As soon as you paste the video URL, WordPress will fetch the embed code and display the YouTube video inside the content editor.

You can now save your post and click on the preview button to see the embedded video in your blog post.

Video embedded in a WordPress blog post

Wasn’t that easy?

After you have added the video, you can change its settings from the block toolbar and settings column on the right.
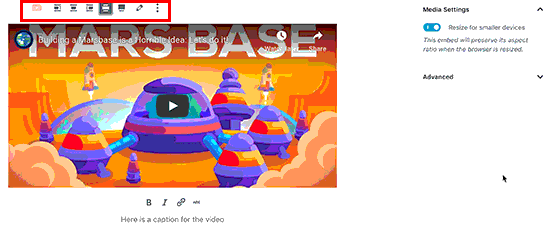
Video block toolbar and settings

You can adjust the video width, make it full-width, change alignment, and more. You can also add a caption and preserve the video’s aspect ratio on mobile devices.

WordPress can only do auto-embeds for white-listed video services. For other websites, you will still have to obtain the embed code and then paste it in your blog posts.

Here is a list of white-listed video services for auto embeds in WordPress:

  • Amazon
  • Animoto
  • Cloudup
  • CollegeHumor
  • Crowdsignal
  • Dailymotion
  • Facebook
  • Flickr
  • Hulu
  • Imgur
  • Instagram
  • Issuu
  • Kickstarter
  • Meetup.com
  • Mixcloud
  • Reddit
  • ReverbNation
  • Screencast
  • Scribd
  • Slideshare
  • SmugMug
  • Someecards
  • SoundCloud
  • Speaker Deck
  • Spotify
  • TED
  • Tumblr
  • Twitter
  • VideoPress
  • Vimeo
  • WordPress.tv
  • YouTube

If you want to add a video from a website outside this list, then you will need the full HTML embed code for the video.

Simply copy the HTML code provided by the video website and paste it inside a ‘Custom HTML’ block in the editor.
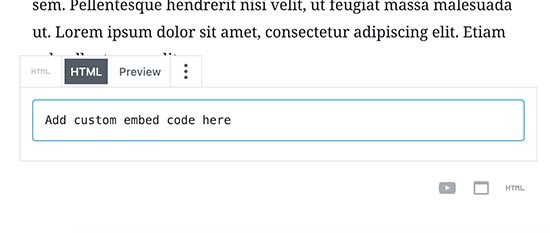
Add a custom embed code in WordPress

Embed Videos in WordPress Using Old Classic Editor

If you are still using the old WordPress classic editor, then you can embed the videos the same way.

Simply copy the URL from a video hosting service like YouTube, and paste it in the editor. If you are using the visual editor, then you will see a preview of the video.
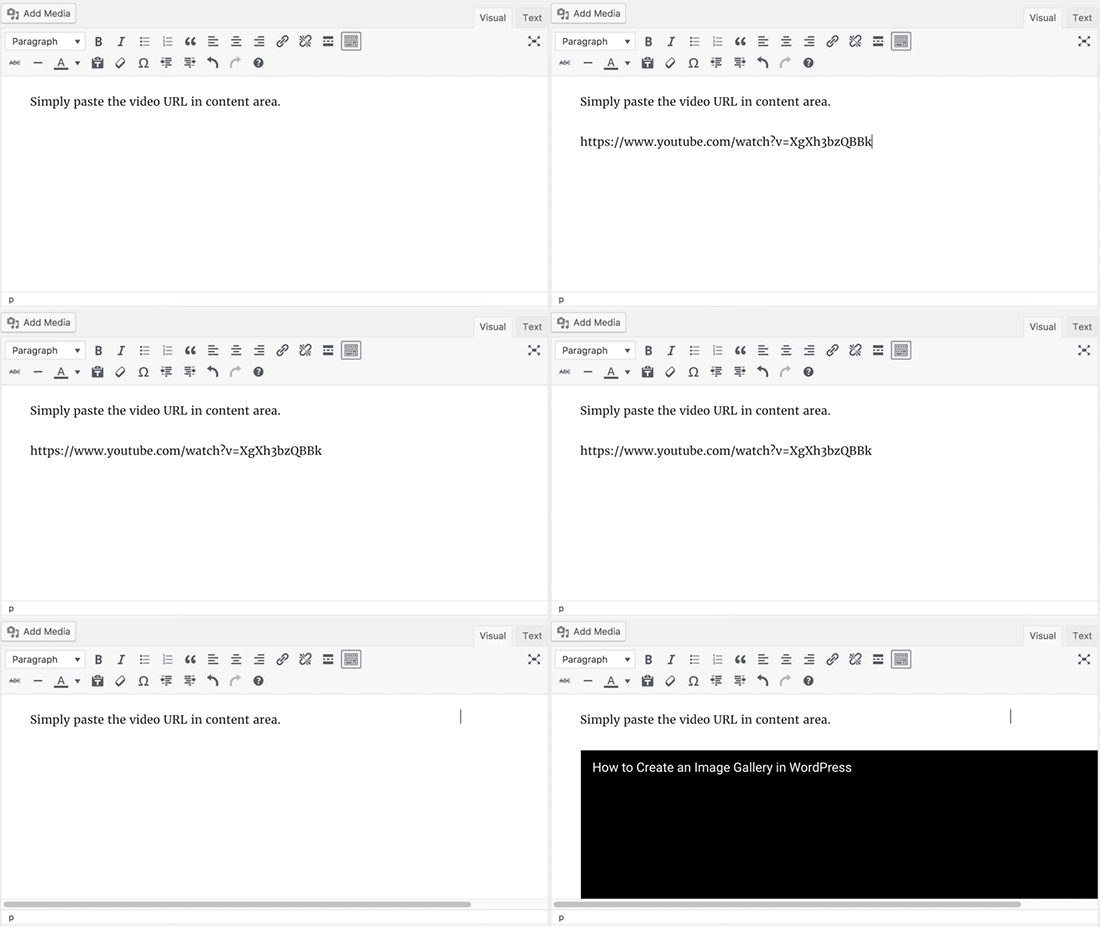
Emedding video in old WordPress editor

However, you will not be able to use the width adjustment and other options that you can use in the new WordPress block editor.

How to Embed Videos in WordPress Sidebar Widgets

Just like a WordPress page or post, you can also embed videos in WordPress sidebar widgets.

Simply go to Appearance » Widgets page and add the ‘Text’ widget to a sidebar. See our article on how to add and use widgets in WordPress.

Inside the widget settings, you need to paste the video URL in the content area. WordPress will automatically fetch the embed code and display the video preview.
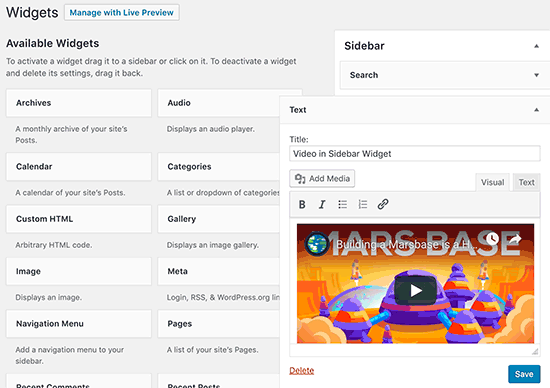
Embed videos in WordPress sidebar widget

Don’t forget to click on the ‘Save’ button to store your widget settings.

You can now visit your website to see the video embed in the WordPress sidebar widget.

WordPress Video Embed Plugins

By default, you don’t need to use a plugin to embed videos in WordPress. However, you may want to use plugins to improve video viewing experience on your website.

The following are a few plugins that you may want to try.

1. Smash Balloon YouTube Feed

Smash Balloon for YouTube home page

Smash Balloon Feeds for YouTube is one of the best WordPress video plugins. It allows you to automatically embed all of your YouTube channel videos in a customizable gallery format. It automatically imports new videos, combines feeds, add live streaming, and more.

There’s also a free version of YouTube feed plugin available by Smash Balloon, but in our demo below, we’ll be showing the Pro version.

First, you’ll need to install and activate the Smash Balloon Feeds for YouTube plugin. From there, head over to Feeds for YouTube » License page and enter your license key. You can find this information under your account on the plugin’s website.
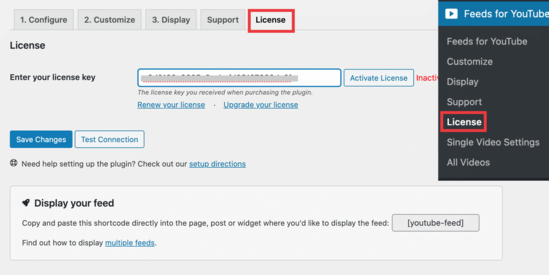
Smash Balloon license key

After activating your license key, don’t forget to click on the ‘Save Changes’ button. Next, head over to the Configure tab and click the big blue button to connect your YouTube account.
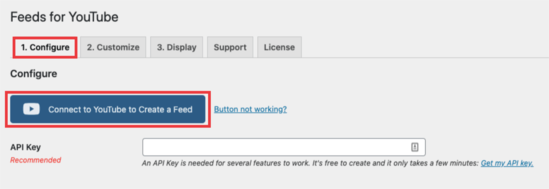
Connect your YouTube Feed

Once you’re finished, you’ll be redirected back to your WordPress dashboard to set up your YouTube feed.
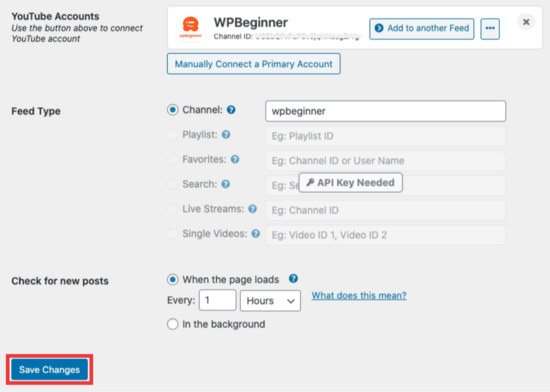
YouTube account connected

Click on the ‘Save Changes’ button and you’re ready to go.

To embed your YouTube feed into a post or page simply edit it in WordPress. On the page edit screen, click on the (+) button add a new block and select the ‘Feeds for YouTube’ block.
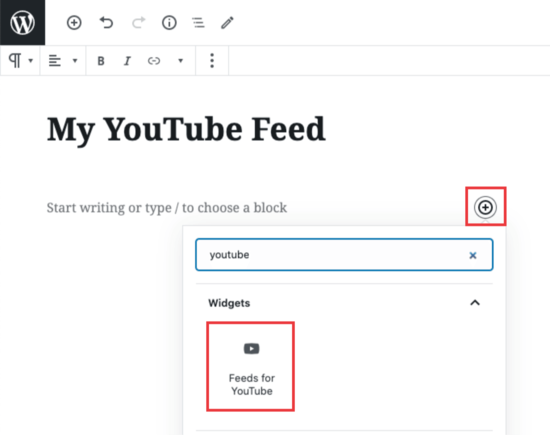
YouTube feed block

As you add the block to your post editor, it will automatically fetch and display videos from your YouTube channel.
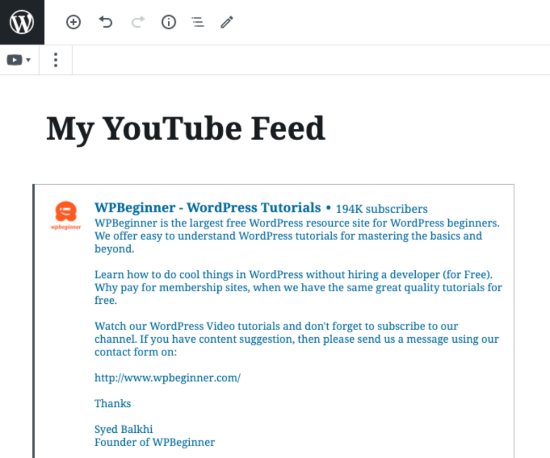
YouTube feed embedded

When you check your site, you’ll see that your feed is embedded into the page you just created.
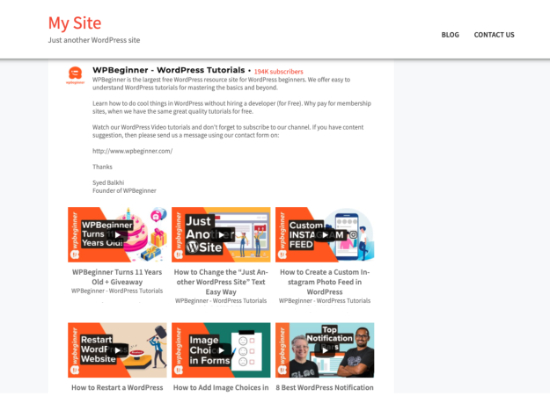
YouTube Feed on your page

Smash Balloon YouTube Feeds comes with multiple layout and style options. You can change the default style by visiting the Feeds for YouTube » Customize page.
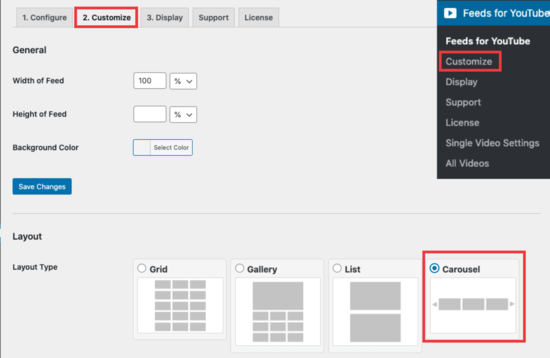
Carousel option

From here, you can choose a grid, gallery, list, or carousel layout. Don’t forget to click on the Save Changes button to store your changes.
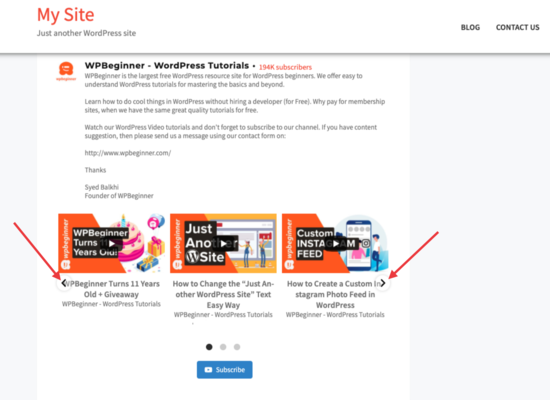
Carousel Feed on your site

You’ll see you have a Carousel of videos with navigation arrows on the right and left, along with a Subscribe button at the bottom of your feed.

If you want to further customize your feed, then click on the Display tab in plugin setting. This page lists the series of shortcodes that you can use anywhere on your site.
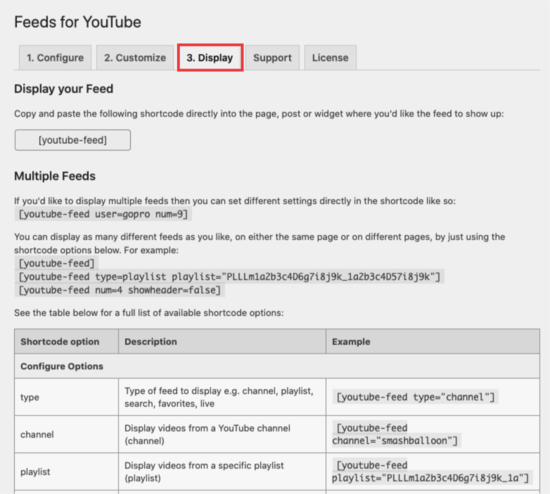
Shortcode options

To insert a shortcode into a post or page, you can use the shortcode block.
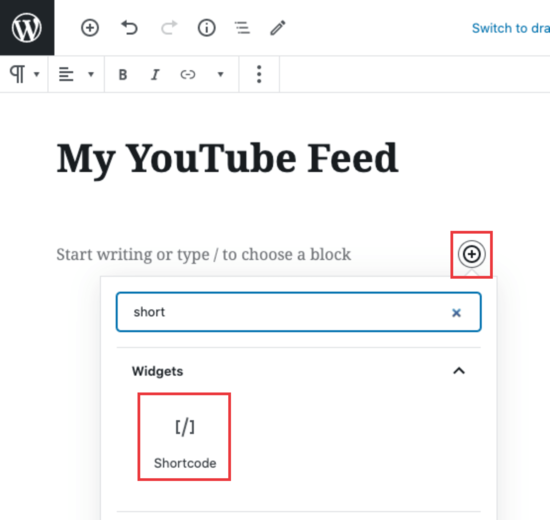
Shortcode block

Now you can add your feed shortcode [youtube-feed] (or any variation you want) into the block settings.
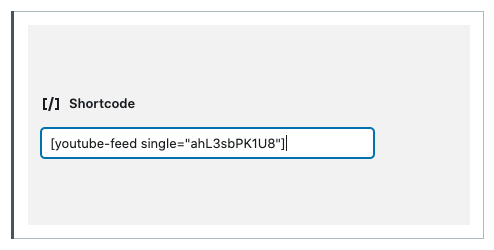
Shortcode Inserted

You can also use the Smash Balloon YouTube feed with their new Social Wall plugin that combines all of your social media content from Facebook, Instagram, Twitter, and YouTube on a single page.
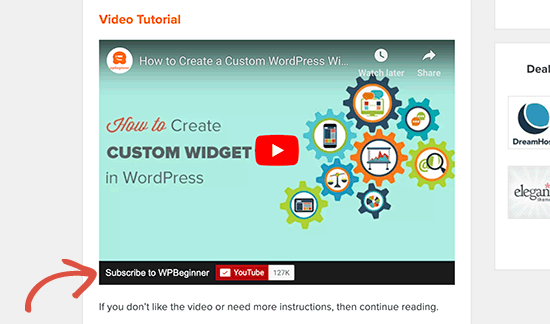
2. YouTube Subscribe Bar

YouTube Subscribe Bar in action

YouTube Subscribe Bar shows a YouTube subscribe button below your YouTube video embeds in WordPress. It also fetches your YouTube subscriber count to add social proof and encourage more users to subscribe.

We first created it to promote WPBeginner’s YouTube channel on this website. Many of our users asked us to share how we did this, so we decided to release it as a free plugin.

3. Lazy Load for Videos

Lazy load videos in WordPress

Video embeds load scripts from external websites, which has a small impact on page load speed and performance.

Lazy Load for Videos solves this problem by only loading the video image on page load. It loads embed code only when the user clicks on the play button. See our tutorial on how to add lazy load for videos in WordPress.

By the way, you won’t need this plugin if you use the Smash Balloon YouTube Feed because it has built-in caching and delayed loading for the video player.

Why can’t I upload the videos to WordPress?

Well, you can, but we do not recommend you to do so.

Most small blogs use shared WordPress hosting accounts, and videos can take up a lot of server resources. If your video got tons of traffic, then your website is more likely to crash.

Secondly, you are missing out on the traffic from YouTube users.

YouTube is not only the biggest video hosting site, but it is also the world’s second most popular search engine, and the second most popular social network right after Facebook.

If you don’t want to upload your videos to YouTube, then you can try Vimeo or DailyMotion. See our comparison of YouTube vs Vimeo to see which platform is better for your needs.

For more on this topic, take a look at our article on why you should never upload a video to WordPress.

We hope this article helped you learn how to easily embed videos in WordPress blog posts. You may also want to see our list of the must have WordPress plugins for all websites.

If you liked this article, then please subscribe to our YouTube Channel for WordPress video tutorials. You can also find us on Twitter and Facebook.

The post How to Easily Embed Videos in WordPress Blog Posts appeared first on WPBeginner.


October 01, 2020 at 04:00PM

Wednesday, September 30, 2020

How to Upload Files from a WordPress Form to Google Drive

Do you want to send files from a WordPress contact form to Google Drive?

Normally, your form plugins will upload any files directly to your WordPress site. However, you may want to automatically upload them to Google Drive as well for safekeeping and easier sharing.

In this article, we’ll show you how to easily upload files from a WordPress form to Google Drive.

Uploading files from a WordPress form to Google Drive

Why Upload Files From Your WordPress Form to Google Drive?

Normally, you can use your WordPress form builder plugin to add a file upload field and keep the uploaded files on your website.

But what if you wanted to share the uploaded files with someone who does not have access to the WordPress admin area?

This is where Google Drive comes in. Google Drive allows you to store files on the cloud and easily share them with anyone. It also allows you to easily access files from any device without logging into your WordPress site.

For instance, if you create a job application form and ask for resumes, then you can automatically upload those files directly to Google Drive and share it with others in your team.

Another scenario is when you run a contest where users upload photos or submit articles to participate.

Sending those submissions directly to Google Drive saves disk space on your website. At the same time, it keeps those files safe in a remote cloud location.

That being said, let’s take a look at how to easily send WordPress form uploads to Google Drive.

Creating and Preparing Your WordPress Form in WPForms

For this tutorial, we will be using WPForms. It’s the most popular contact form plugin for WordPress with over 3 million active installs. It comes with a simple drag and drop interface that lets you easily create any kind of form.

Then, we are going to use a tool called Zapier to connect WPForms with Google Drive.

Zapier acts as a bridge to send data between two different apps, without you needing to use any code. It seamlessly integrates with over 2000+ apps.

Note: You need the Pro version or higher to access the Zapier addon for WPForms.

Creating a File Upload Form in WPForms

First, you need to install and activate the WPForms plugin on your website. For more details, see our step by step guide on how to install a WordPress plugin.

Next, you need a form that your website visitors can use to send you files. If you don’t already have a form set up, check out our step by step guide on creating a file upload form in WordPress.

Important: This method will only work with a single file. It will not work with multiple files from one form submission.

Once you have set up your form, you need to add it to your website. To do this, simply edit the post or page where you want the form.

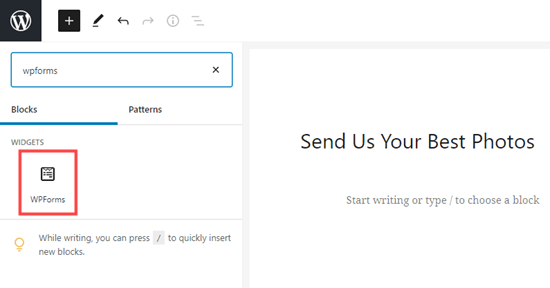
On the post edit screen, click on the + button to add a new block. After that, search for the WPForms block and add it to your content area.

Adding a WPForms block to a post or page

Then, publish your page or post to put your form live. Once you’ve done so, go ahead and create a test entry. This will be used to set up and test the connection between WPForms and Google Drive.

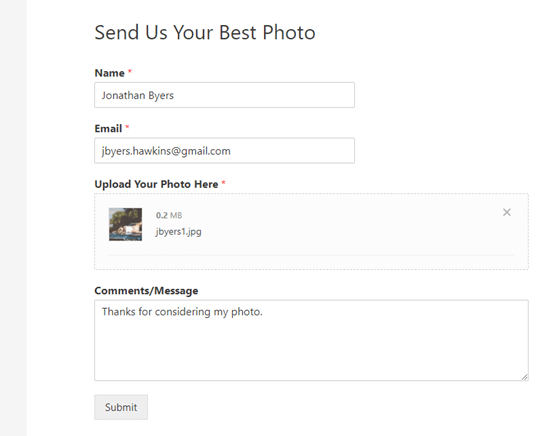
Here’s our test entry:

The completed upload form, including a photo (.jpg)

Preparing to Connect WPForms with Zapier

We are going to use Zapier as a bridge between WPForms and Google Drive. To do this, you need to install and activate the WPForms Zapier addon.

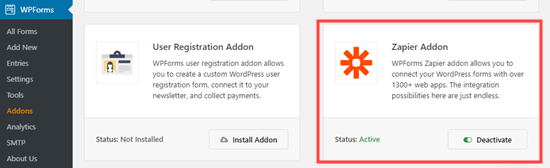
In your WordPress admin, go to the WPForms » Addons page and find the Zapier addon. Go ahead and click the ‘Install Addon’ link to install and activate it:

Installing the Zapier addon for WPForms

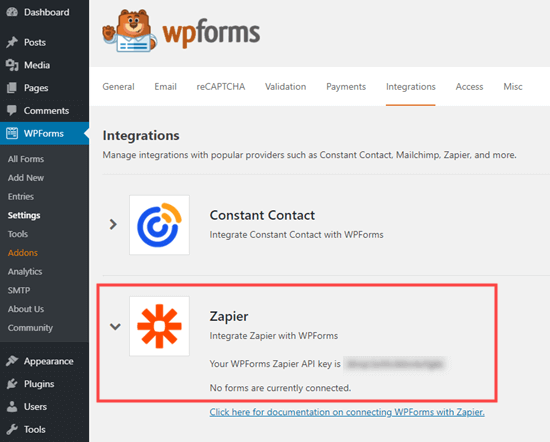
Next, you need to visit the WPForms » Settings » Integrations page. Simply click on the Zapier logo to get your Zapier API key. You will need this in order to connect Zapier with WPForms.

Getting the Zapier API key from WPForms

Copy the API key somewhere safe or keep this tab open. You will need the API key in a later step.

Creating a Zap to Send Files from Your Website Form to Google Drive

Once you have your form ready, go to the Zapier website. You need to create a free account or log in to your existing account.

In your Zapier dashboard, simply click the ‘Make a Zap’ button to get started. This will open the configuration wizard.

Note: Zapier uses the word ‘zap’ for a process with a trigger and an action. Our trigger will be a visitor filling in the form, and our action will be sending the file(s) attached to the form to Google Drive.

At the top of the screen, you need to choose a name for your zap. Once you’ve done that, it’s time to set up the trigger.

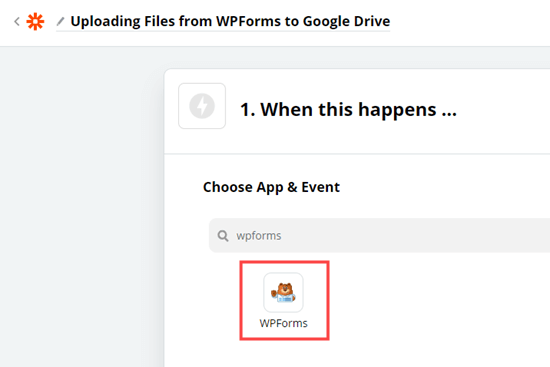
First, you need to select WPForms in the ‘Choose App & Event’ box. Just type ‘WPForms’ into the search bar to find it:

Choosing the WPForms app in Zapier

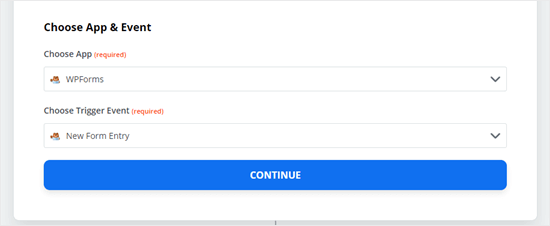
You will now be prompted to select a trigger event. This will default to ‘New Form Entry’ so all you need to do here is click the ‘Continue’ button.

Choosing a trigger event in Zapier

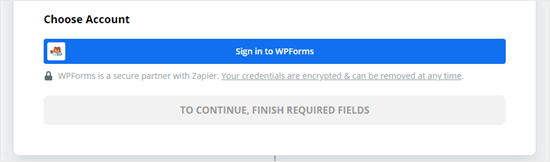
Now, Zapier will ask you to sign into WPForms. Go ahead and click the ‘Sign in to WPForms’ button.

Click the button to sign into WPForms

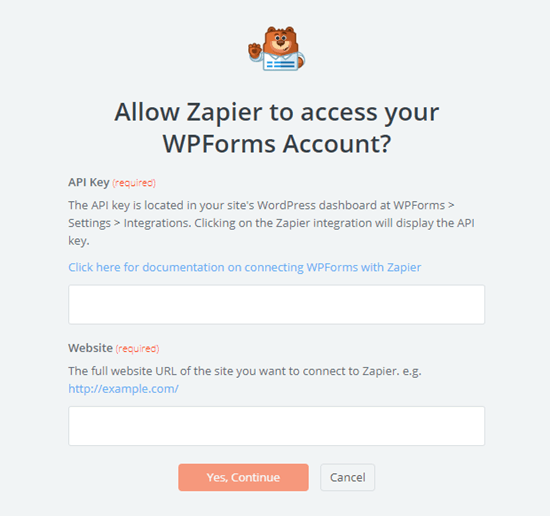
You should then see a popup window. Here, you need to enter the API key that you found earlier.

You also need to add your website’s URL (domain name).

Enter your API key from WPForms and the URL of your website

After you’ve entered those details, just click on the ‘Yes, Continue’ button to move on.

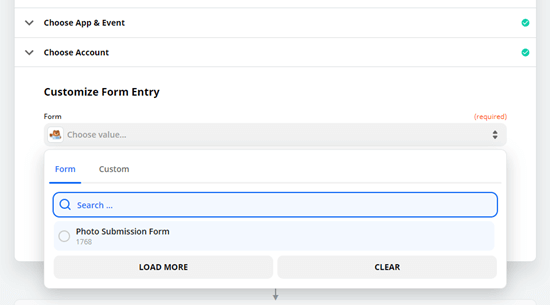
Next, Zapier will ask you to select your file upload form from a dropdown list. Go ahead and click on the name of your form:

Select your file upload form from the dropdown in Zapier

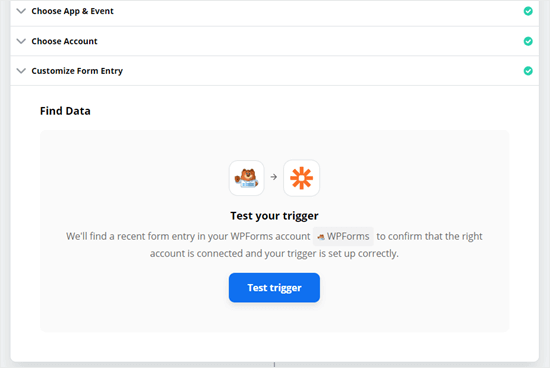
Once you’ve selected the correct form, you need to click the ‘Test trigger’ button to make sure that Zapier has connected to your form correctly.

Testing your trigger in Zapier

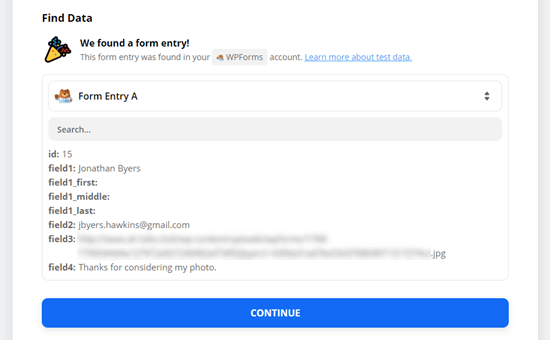
After clicking that button, you should see a message that Zapier has found a test entry. You will see the data on the screen:

Viewing the data for the test WPForms entry

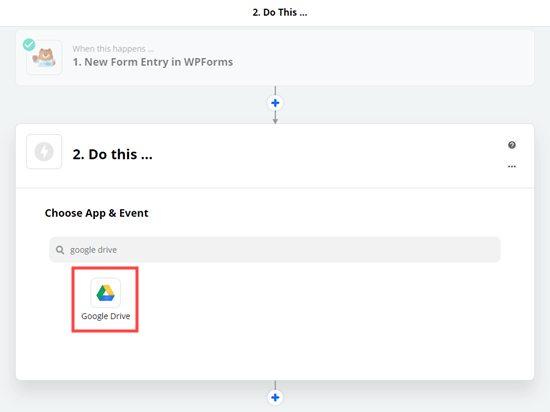
Click the ‘Continue’ button to move on to the Action part of the Zap. Here, you need to choose your second app, Google Drive.

Choosing the Google Drive app as the action for the zap

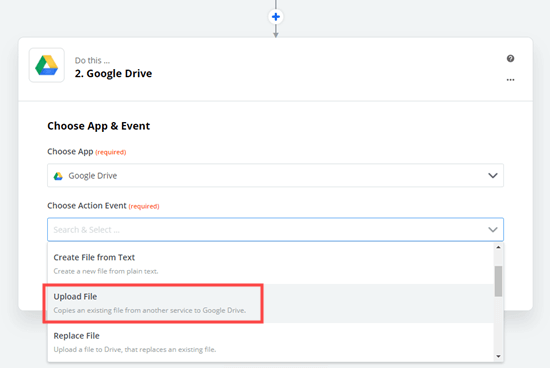
Next, you will see the dropdown for choosing an action event. Here, you need to select the ‘Upload File’ option and then click to continue.

Choosing 'Upload File' as the action for the zap

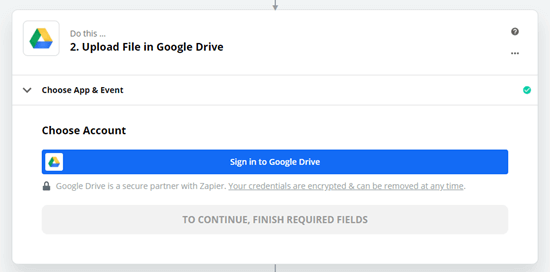
Zapier will now prompt you to sign into your Google Drive account:

Signing into Google Drive when prompted by Zapier

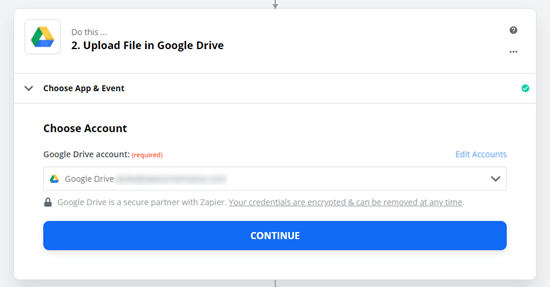
Once you’ve done so, click the Continue button to move on:

Zapier and Google Drive are now connected

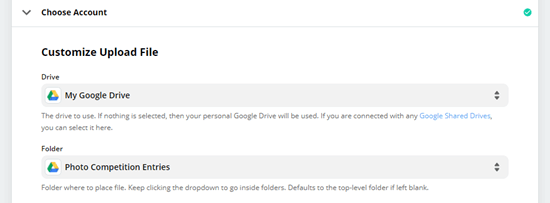
Now, it’s time to set up where you want the files to go in your Google Drive. Simply click on the Drive dropdown to select whether you want to use your personal drive or a shared drive.

Then, click on the Folder dropdown to select the folder you want to use.

Select the Google Drive you want to use plus the folder to put the uploaded files in

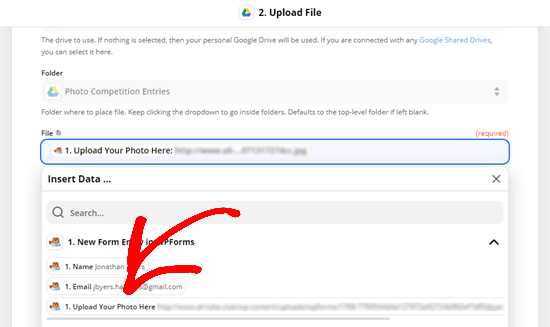
Next, you need to tell Zapier which file(s) to upload. Under the File dropdown, select the upload field on your form:

Choose the correct field (the file upload field) from your form based on the test data

After that, you can leave the other settings blank and click the continue button to move on.

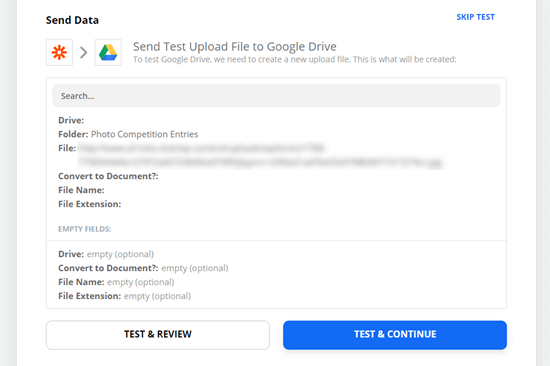
Zapier will now prompt you to test your Zap by sending an upload file to Google Drive. Simply click the Test and Continue button to do so:

Sending the test file to Google Drive using Zapier

This will send Google Drive the files you uploaded in your test form entry. Go ahead and check your Google Drive folder for the files:

Viewing the uploaded file in Google Drive

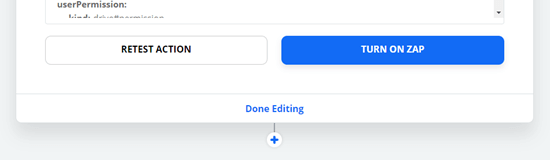
Once you’re confident that your zap is working as intended, simply click the ‘Turn on Zap’ button to make it live:

Turn on your zap once you're ready

Now, all files sent through your file upload form will automatically be uploaded to your chosen Google Drive folder.

WPForms will always keep a backup of all files on your WordPress hosting account in case the Zapier API experiences any outages.

Please keep in mind that if you get a lot of form submissions with large files, then this will take up increased storage space in your Google Drive. In our business, we use G Suite Business plan to get Unlimited storage space.

We hope this article helped you learn how to upload files from a WordPress form to Google Drive. You might also like our article on how to use user generated content to grow your business, and our collection of the must have WordPress plugins for all sites.

If you liked this article, then please subscribe to our YouTube Channel for WordPress video tutorials. You can also find us on Twitter and Facebook.

The post How to Upload Files from a WordPress Form to Google Drive appeared first on WPBeginner.


September 30, 2020 at 05:00PM

Tuesday, September 29, 2020

6 Best Email Capture Tools Compared for 2020 (+ Best Practices)

Do you want to capture the email addresses of your website visitors?

Over 70% of first time visitors will never return to your website again. Getting their email address is the smartest way to keep in touch and get them to visit again.

In this article, we’ll compare some of the best email capture tools for WordPress and share the best practices to help you get results fast.

The best WordPress tools for email capture

What is Email Capture and Why Does It Matter?

Email capture is the process of collecting email addresses from people who come to your website.

Studies show that an email list can offer as high as 4300% return on investment (ROI). But simply creating an email list isn’t enough.

You need to actively capture email addresses from the visitors of your WordPress website. This allows you to turn visitors into email subscribers and soon after into paid customers.

Of course, you can encourage people to like your page on Facebook, follow your Instagram, and other social media platforms, but all smart marketers agree that capturing an email address should be your #1 priority.

That’s because your email newsletter will reach a far higher percentage of your audience than Facebook or Instagram posts because it’s not controlled by an algorithm.

With that said, here are some of the best tools for email capture in WordPress and beyond.

1. OptinMonster

The OptinMonster website

OptinMonster is the best lead capture software on the market. It helps you convert abandoning visitors into email subscribers, so you can get more leads from your existing website traffic.

With OptinMonster, you can create a whole range of high converting dynamic lead forms including popups, floating bars, full screen welcome mats, slide-in scroll boxes, inline personalized lead forms, gamified spin to win optin forms, and more.

The best part about OptinMonster is that it lets you show the right message at the right time, so you can get the highest conversions.

For instance, you could make a lead form popup that uses OptinMonster’s Exit Intent® technology to detect when a visitor is about to leave your site.

Your popup can offer the visitor an incentive to put in their email address. This could be a coupon, free shipping, a free download, or a sample of a digital product.

There are lots of other ways to use OptinMonster on your site. You can create a gamified ‘Spin to Win’ lead form or add Yes/No multi-step optins. These campaigns can significantly increase the number of people signing up for your email list.

You can also use OptinMonster to create full-screen welcome mats, lock premium content so that visitors need to subscribe to view it, add countdown timers to leverage urgency, use smart tags to add website personalization, and more.

OptinMonster comes with dozens of pre-made templates that you can easily customize with their drag & drop builder. You can also create custom forms without writing any code.

OptinMonster makes it easy to integrate your email optin campaigns with your favorite email marketing service and analytics platforms like Google Analytics. This lets you run detailed reports and see exactly how your different email optins are performing.

Each month, OptinMonster helps optimize over 2 billion sessions for smart website owners. There’s not a tool in the market that offers more targeting and personalization options, and this is why all the top marketers prefer OptinMonster.

Price:

OptinMonster costs from just $9/month (billed annually). For powerful features like Exit Intent®, countdown timers, and Yes/No optins, you need the Pro plan. That costs from $29/month (again, billed annually).

OptinMonster is a SaaS platform, so it works on WordPress as well as other platforms like Shopify, BigCommerce, and other website builders.

2. WPForms

The WPForms website

WPForms is the best contact form plugin for WordPress. Over 3 million website owners use their drag & drop form builder to create lead capture forms.

You can use WPForms to create all sorts of different forms, including email subscription forms, payment forms, polls, surveys, and more. Each form can be setup, so it capture users’ email addresses and add it to your CRM.

WPForms lets you use conditional logic so that certain fields are shown based on options that the user has selected. For instance, if you have a survey form, you might have different questions that you show based on whether the user is interested in fashion or food.

The plugin seamlessly integrates with a range of popular email marketing services and CRM platforms including Drip, AWeber, GetResponse, Active Campaign, Salesforce, MailChimp, and more.

Their Form Templates addon comes with over 150+ pre-made form templates that you can use to create a form with literally 1-click. These templates include: online event registration, newsletter signup form, contest entries, requesting a quote, suggestions, food ordering, and more.

Even better, all the forms created by WPForms are mobile-friendly. That means they work perfectly on mobile devices as well as on computers.

Price:

WPForms costs from $39.50/year. To get features like newsletter forms and integration with popular email marketing tools, you need the Plus plan. That costs from $99.50/year.

3. LiveChat

The LiveChat website

LiveChat is one of the best live chat software in the market. It lets you add a live chat feature to your site so that visitors can easily ask questions. This can be a powerful way to boost sales.

When a visitor starts a chat, they’ll be prompted to enter their email address. This means you can easily answer their question by email if there’s no customer service agent available to answer it live.

LiveChat also integrates with a range of email marketing services. You can simply add a checkbox to the pre-chat questionnaire that lets users opt-in to receive your email newsletter.

Best of all, LiveChat integrates with other smart services such as ChatBot.com. This lets you create AI chatbots that can answer customers’ questions on the spot. Chatbots can also capture email addresses and automatically pass these onto your email marketing service or CRM.

Price:

LiveChat costs from $16/month, billed annually. There’s a 14 day free trial. WPBeginner users can get an extra 30% off and a 30 day free trial using our LiveChat coupon.

4. Bloom

The Bloom plugin on Elegant Themes' website

Bloom is a plugin from Elegant Themes that lets you create attractive popups. It has a drag and drop builder that’s easy to use.

With Bloom, you get a range of different types of popups as well as in-line forms that you can place within or below your content.

It integrates with 19 different email marketing services, including Constant Contact, Active Campaign, AWeber, Get Response, and more.

One key drawback to Bloom compared with OptinMonster is that it’s a standalone WordPress plugin that loads all the code from your website. If you have a large, busy website, this could affect your site’s speed and performance.

Price:

Bloom comes packaged with Elegant Themes’ other tools, including the Divi theme and page builder. Membership of Elegant Themes costs from $89/year.

5. ThriveLeads

The ThriveLeads plugin on the ThriveThemes' website

ThriveLeads is another lead building WordPress plugin, similar to OptinMonster and Bloom. It lets you create a range of different email optin forms, including popups, sticky ribbons that stay at the top of the screen, forms you can place within your content, and more.

It’s easy to integrate ThriveLeads with a range of popular email services. It comes with built-in basic A/B testing and analytics, too. This lets you see which of your email optins are performing well.

Like Bloom, ThriveLeads loads all the code from your website itself. This could slow your site down. It’s also not quite so beginner-friendly as OptinMonster and Bloom.

Price:

ThriveLeads costs from $67 for a single site license. Alternatively, you can get it as part of ThriveThemes membership for $19/month (paid annually). This gives you access to all ThriveThemes’ themes and plugins.

6. Formidable Forms

The Formidable Forms website

Formidable Forms is a powerful forms plugin for WordPress. It lets you create all sorts of different types of forms, including calculator forms and lead quizzes.

You can use Formidable Forms to capture email addresses and integrate with your email marketing service or CRM platform.

The easiest way to do this is to use the built-in newsletter signup template. If you want something more specialized, you could try the event registration form template or the B2B leads form template.

Formidable Forms integrates with a range of popular email services, including Constant Contact, AWeber, Get Response, Active Campaign, and more.

It also lets you style your forms to look just how you want. Formidable is extremely powerful which can be a little overwhelming if you’re a beginner, but once you familiarize yourself with the software, then it’s extremely powerful.

Price:

Formidable Forms costs from $99.38/year. For integration with some tools including Constant Contact and Get Response, you need the Business plan from $199.43/year.

Best Practices for Email Capture

Once you’ve chosen a tool for email capture, you need to make sure you’re using it effectively.

Here are 3 key best practices for email capture that you need to follow:

1. Give Your Visitors a Reward for Signing Up

If you want people to hand over their email address, you need to give them something in return.

That could be a coupon for your online store, a useful PDF, a free sample of your video course, or almost anything else that fits with your online business.

For instance, Blog Tyrant offers new readers a downloadable guide:

Blog Tyrant's ultimate blogging toolkit offer

You can take this even further by offering different rewards on different pages for your site. You might offer a coupon to people who are visiting your online store and a free download to people who are browsing blog posts.

2. Don’t Annoy Your Visitors

Sometimes, email optin popups get a bad reputation. You might have come across popups that were annoying and got in your way when you visited a website.

There are plenty of ways to use popups while also letting visitors enjoy your site. For instance, you could use OptinMonster’s Exit Intent® technology to only show a popup at the moment when a visitor is about to leave. That way, your popup isn’t interrupting them as they read your content.

Here’s the popup that appears on WPBeginner when a new visitor moves to leave the site:

WPBeginner's exit intent popup, offering videos, plugins, and more

This email capture form helped us increase our conversions by over 600%.

3. Use Multiple Optins

It’s easy to create a single popup or email sign up form and think that you’re done. But to capture more emails, you need more optin forms.

Some of the best places to put your optins are:

  • At the top or bottom of your page as a sticky bar, or in the bottom right corner of your page as an unobtrusive slide-in.
  • During your content. You could place an optin part way through a blog post, for instance.
  • At the end of your content. You could add an optin at the bottom of your posts and pages.
  • In your sidebar. This is such a common place for an email list optin that visitors will often look there for it, without any prompting from you.

For example, Smash Balloon has an email optin displayed prominently in their blog’s sidebar:

Email optin in Smash Balloon's sidebar

Remember, you can also create different popups to appear on different pages. This lets you tailor each popup to your content.

We hope this article helped you learn about the best tools for email capture in WordPress. You may also want to see our comparison of the best business phone services and our beginner’s guide on how to create a custom business email address.

If you liked this article, then please subscribe to our YouTube Channel for WordPress video tutorials. You can also find us on Twitter and Facebook.

The post 6 Best Email Capture Tools Compared for 2020 (+ Best Practices) appeared first on WPBeginner.


September 29, 2020 at 05:00PM