Monday, October 12, 2020

How to Create Custom Taxonomies in WordPress

Do you want to create custom taxonomies in WordPress?

By default, WordPress allows you to organize your content with categories and tags. But with custom taxonomies, you can further customize the way you sort your content.

In this article, we’ll show you how to easily create custom taxonomies in WordPress with or without using a plugin.
How to create custom taxonomies in WordPress

While creating custom taxonomies is powerful, there’s a lot to cover. To help you set this up properly, we have created an easy table of content below:

What is a WordPress Taxonomy?

A WordPress taxonomy is a way to organize groups of posts and custom post types. The word taxonomy comes from the biological classification method called Linnaean taxonomy.

By default, WordPress comes with two taxonomies called categories and tags. You can use them to organize your blog posts.

However, if you are using a custom post type, then categories and tags may not look suitable for all content types.

For instance, you can create a custom post type called ‘Books’ and sort it using a custom taxonomy called ‘topics’.

You can add topic terms like Adventure, Romance, Horror, and other book topics you want. This would allow you, and your readers to easily sort books by each topic.

Taxonomies can also be hierarchical, meaning that you can have main topics like Fiction and Nonfiction. Then you’d have subtopics under each category.

For example, Fiction would have Adventure, Romance, and Horror as sub-topics.

Now that you know what a custom taxonomy is, let’s learn how to create custom taxonomies in WordPress.

How to Create Custom Taxonomies in WordPress

We will use two methods to create custom taxonomies. First, we’ll use a plugin to create custom taxonomies.

For the second method, we’ll show you the code method, and how to use it to create your custom taxonomies without using a plugin.

Create Custom Taxonomies In WordPress (Video Tutorial)

If you prefer written instructions, then continue reading.

Creating Custom Taxonomies With A Plugin (The Easy Way)

First thing you need to do is install and activate the Custom Post Type UI plugin. For details, see our guide on how to install a WordPress plugin.

In this tutorial, we’ve already created a custom post type and called it ‘Books.’ So make sure you have a custom post type created before you begin creating your taxonomies.

Next, go to CPT UI » Add/Edit Taxonomies menu item in the WordPress admin area to create your first taxonomy.
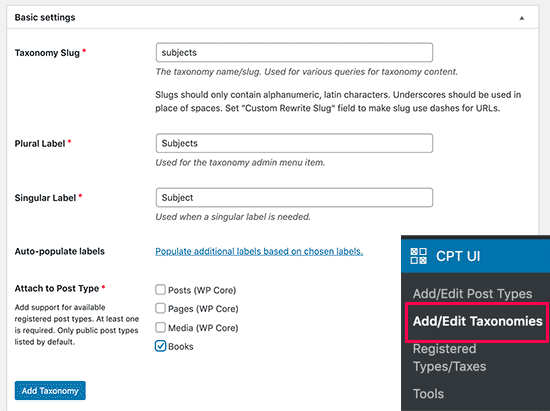
Creatig custom taxonomy using plugin

On this screen, you will need to do the following:

  • Create your taxonomy slug (this will go in your URL)
  • Create the plural label
  • Create the singular label
  • Auto-populate labels

Your first step is to create a slug for the taxonomy. This slug is used in the URL and in WordPress search queries.

This can only contain letters and numbers, and it will automatically be converted to lowercase letters.

Next, you will fill in the plural and singular names for your custom taxonomy.

From there, you have the option to click on the link ‘Populate additional labels based on chosen labels’. If you do this, then the plugin will auto-fill in the rest of the label fields for you.

Now, scroll down to the ‘Additional Labels’ section. In this area, you can provide a description of your post type.
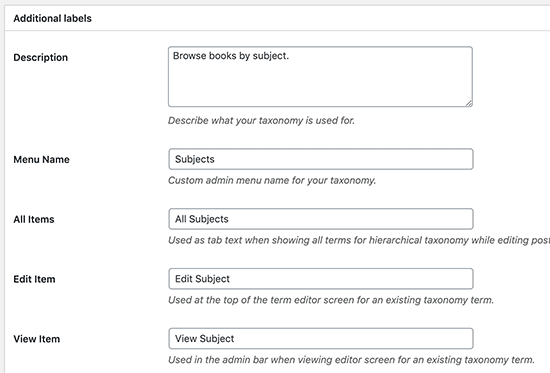
Labeling your WordPress taxonomy

These labels are used in your WordPress dashboard when you’re editing and managing content for that particular custom taxonomy.

Next up, we have the settings option. In this area, you can set up different attributes for each taxonomy you create. Each option has a description detailing what it does.
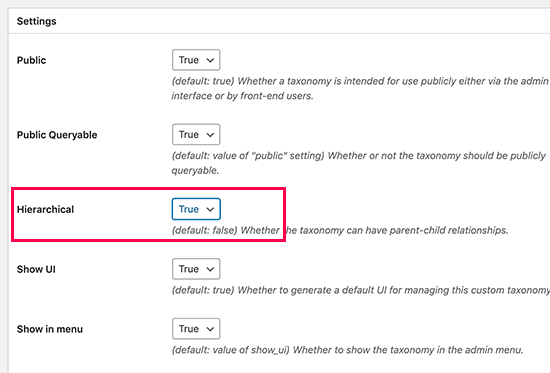
Create custom taxonomy hierarchy

In the screenshot above, you’ll see we chose to make this taxonomy hierarchical. This means our taxonomy ‘Subjects’ can have sub-topics. For instance, a subject called Fiction can have sub-topics like Fantasy, Thriller, Mystery, and more.

There are many other settings further down your screen in your WordPress dashboard, but you can leave them as-is for this tutorial.

You can now click on the ‘Add Taxonomy’ button at the bottom to save your custom taxonomy.

After that, go ahead and edit the post type associated with this taxonomy in the WordPress content editor to start using it.
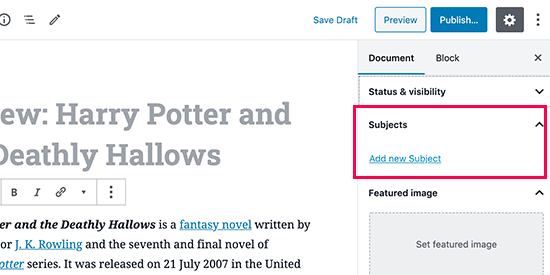
Using taxonomy in post editor

Creating Custom Taxonomies Manually (with code)

This method requires you to add code to your WordPress website. If you have not done it before, then we recommend reading our guide on how to easily add code snippets in WordPress.

1. Creating a Hierarchical Taxonomy

Let’s start with a hierarchical taxonomy that works like categories and can have parent and child terms.

Add the following code in your theme’s functions.php file or in a site-specific plugin (recommended) to create a hierarchical custom taxonomy like categories:

//hook into the init action and call create_book_taxonomies when it fires

add_action( 'init', 'create_subjects_hierarchical_taxonomy', 0 );

//create a custom taxonomy name it subjects for your posts

function create_subjects_hierarchical_taxonomy() {

// Add new taxonomy, make it hierarchical like categories
//first do the translations part for GUI

  $labels = array(
    'name' => _x( 'Subjects', 'taxonomy general name' ),
    'singular_name' => _x( 'Subject', 'taxonomy singular name' ),
    'search_items' =>  __( 'Search Subjects' ),
    'all_items' => __( 'All Subjects' ),
    'parent_item' => __( 'Parent Subject' ),
    'parent_item_colon' => __( 'Parent Subject:' ),
    'edit_item' => __( 'Edit Subject' ), 
    'update_item' => __( 'Update Subject' ),
    'add_new_item' => __( 'Add New Subject' ),
    'new_item_name' => __( 'New Subject Name' ),
    'menu_name' => __( 'Subjects' ),
  );    

// Now register the taxonomy
  register_taxonomy('subjects',array('books'), array(
    'hierarchical' => true,
    'labels' => $labels,
    'show_ui' => true,
    'show_in_rest' => true,
    'show_admin_column' => true,
    'query_var' => true,
    'rewrite' => array( 'slug' => 'subject' ),
  ));

}

Don’t forget to replace the taxonomy name and labels with your own taxonomy labels. You will also notice that this taxonomy is associated with the Books post type, you’ll need to change that to whatever post type you want to use it with.

2. Creating a Non-hierarchical Taxonomy

To create a non-hierarchical custom taxonomy like Tags, add this code in your theme’s functions.php or in a site-specific plugin:

//hook into the init action and call create_topics_nonhierarchical_taxonomy when it fires

add_action( 'init', 'create_topics_nonhierarchical_taxonomy', 0 );

function create_topics_nonhierarchical_taxonomy() {

// Labels part for the GUI

  $labels = array(
    'name' => _x( 'Topics', 'taxonomy general name' ),
    'singular_name' => _x( 'Topic', 'taxonomy singular name' ),
    'search_items' =>  __( 'Search Topics' ),
    'popular_items' => __( 'Popular Topics' ),
    'all_items' => __( 'All Topics' ),
    'parent_item' => null,
    'parent_item_colon' => null,
    'edit_item' => __( 'Edit Topic' ), 
    'update_item' => __( 'Update Topic' ),
    'add_new_item' => __( 'Add New Topic' ),
    'new_item_name' => __( 'New Topic Name' ),
    'separate_items_with_commas' => __( 'Separate topics with commas' ),
    'add_or_remove_items' => __( 'Add or remove topics' ),
    'choose_from_most_used' => __( 'Choose from the most used topics' ),
    'menu_name' => __( 'Topics' ),
  ); 

// Now register the non-hierarchical taxonomy like tag

  register_taxonomy('topics','books',array(
    'hierarchical' => false,
    'labels' => $labels,
    'show_ui' => true,
    'show_in_rest' => true,
    'show_admin_column' => true,
    'update_count_callback' => '_update_post_term_count',
    'query_var' => true,
    'rewrite' => array( 'slug' => 'topic' ),
  ));
}

Notice the difference between the 2 codes. Value for hierarchical argument is true for category-like taxonomy and false for tags-like taxonomies.

Also, in the labels array for non-hierarchical tags-like taxonomy, we have added null for parent_item and parent_item_colon arguments which means that nothing will be shown in the UI to create parent item.
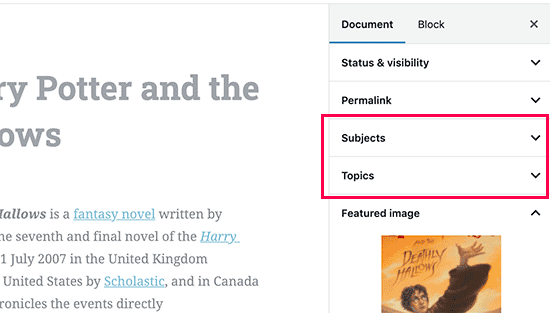
Taxonomies in post editor

Displaying Custom Taxonomies

Now that we have created custom taxonomies and have added a few terms, your WordPress theme will still not display them.

In order to display them, you’ll need to add some code to your WordPress theme or child theme.

This code will need to be added in templates files where you want to display the terms.

Usually, it is single.php, content.php, or one of the files inside the template-parts folder in your WordPress theme. To figure out which file you need to edit, see our guide to WordPress template hierarchy for details.

You will need to add the following code where you want to display the terms.

<?php the_terms( $post->ID, 'topics', 'Topics: ', ', ', ' ' ); ?>

You can add it in other files as well such as archive.php, index.php, and anywhere else you want to display the taxonomy.

Custom Taxonomy Displayed

By default your custom taxonomies use the archive.php template to display posts. However, you can create a custom archive display for them by creating taxonomy-{taxonomy-slug}.php.

Adding Taxonomies For Custom Posts

Now that you know how to create custom taxonomies, let’s put them to use with an example.

We’re going to create a taxonomy and call it Non-fiction.

Since we have a custom post type named ‘Books,’ it’s similar to how you’d create a regular blog post.

In your WordPress dashboard, go to Books » Subjects to add a term or subject.
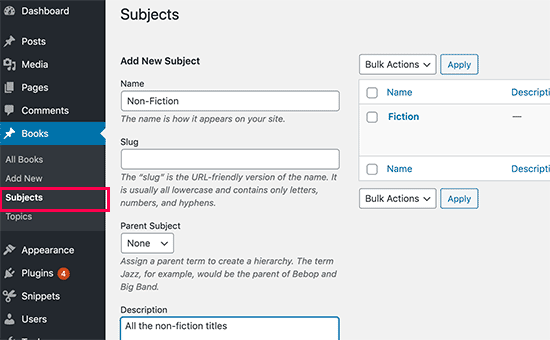
Adding a term for your newly created custom taxonomy

On this screen, you’ll see 4 areas:

  • Name
  • Slug
  • Parent
  • Description

In the name, you’ll write out the term you want to add. You can skip the slug part and provide a description for this particular term (optional).

Lastly, click the ‘Add New Subject’ button to create your new taxonomy.

Your newly added term will now appear in the right column.
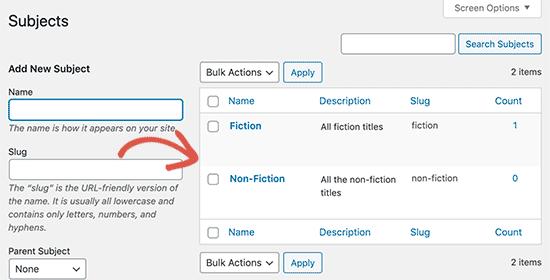
Term added

Now you have a new term that you can use in your blog posts.

You can also add terms directly while editing or writing content under that particular post type.

Simply go to the Books » Add new page to create a post. On the post edit screen, you’ll find the option to select or create new terms from the right column.
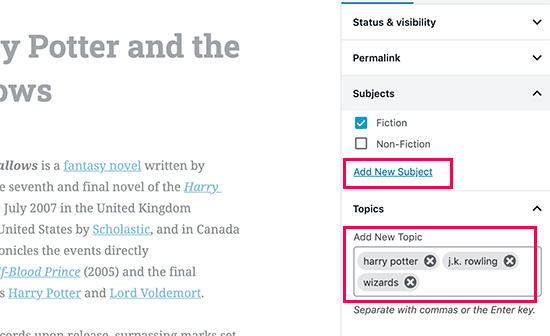
Adding new terms or select from existing terms

After adding terms, you can go ahead and publish that content.

All your posts filed under that term will be accessible on your website on their own URL. For instance, posts filed under Fiction subject would appear at the following URL:

https://ift.tt/36YaPgk

Taxonomy template preview

Now that you have created custom taxonomies, you may want to display in your website’s navigation menu.

Go to Appearance » Menus and select the terms you want to add under your custom taxonomy tab.
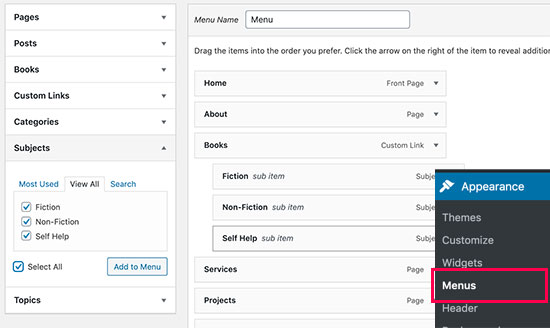
Adding terms to navigation menu

Don’t forget to click on the Save Menu button to save your settings.

You can now visit your website to see your menu in action.

Adding custom taxonomy in navigation menu

For more detailed, see our step by step guide on how to create a dropdown menu in WordPress.

Take WordPress Taxonomies Further

There are a ton of things you can do with custom taxonomies. For instance, you can show them in a sidebar widget or add image icons for each term.

You can also add enable RSS feed for custom taxonomies in WordPress and allow users to subscribe individual terms.

If you want to customize the layout of your custom taxonomy pages, then you can check out Beaver Themer or Divi. They’re both drag and drop WordPress page builder that allows you to create custom layouts without any coding.

We hope this article helped you learn how to create custom taxonomies in WordPress. You may also want to see our guide on how WordPress works behind the scenes, and how to create a custom WordPress theme without writing any code.

If you liked this article, then please subscribe to our YouTube Channel for WordPress video tutorials. You can also find us on Twitter and Facebook.

The post How to Create Custom Taxonomies in WordPress appeared first on WPBeginner.


October 12, 2020 at 06:00PM

Friday, October 9, 2020

9 Best WordPress GDPR Plugins to Improve Compliance

Are you looking for a GDPR plugin to make sure your WordPress site is in compliance with regional laws?

All websites worldwide that collect data related to people in the European Union need to be GDPR compliant. There are several WordPress plugins that can help you with that.

In this article, we will share the best GDPR plugins for WordPress that you can use to make your website GDPR compliant.

The best GDPR plugins for your WordPress site

What is GDPR and Why Does It Matter?

GDPR stands for General Data Protection Regulation. It is a European Union (EU) law that gives individuals in the EU specific rights over accessing and controlling their data on the internet.

GDPR applies to all organizations across the world that collect or process data relating to individuals in the EU. For instance, if you live in the United States and run a business website or online store with customers in Europe, then you need to comply with GDPR.

Due to the dynamic nature of websites, no single plugin can offer 100% GDPR compliance. However many of the popular plugins have added GDPR friendly options to ensure that your website abides by the law.

Disclaimer: we’re not legal experts, but we have written the ultimate WordPress GDPR guide that you can refer to for more details. When in doubt, always consult an internet law attorney.

With that said, here are the best WordPress plugins that have GDPR compliance options.

1. MonsterInsights – GDPR Friendly Google Analytics

The MonsterInsights website

MonsterInsights is the best Google Analytics plugin for WordPress. It lets you easily add Google Analytics tracking code to your site, and displays powerful reports within your WordPress admin.

With MonsterInsights, it’s easy to anonymize or even disable personal data tracking. GDPR requires you to get explicit consent before you collect or process personal identifying information from EU residents, such as IP addresses.

To automatically anonymize data, simply use the MonsterInsights EU Compliance addon.

What if you want to track personalized data using Google Analytics? Then you simply need to get consent from your users. This can also be easily done with MonsterInsights.

The MonsterInsights EU Compliance add-on integrates seamlessly with the Cookie Notice plugin. That plugin is included below at #3 on our list. This means MonsterInsights will not load the analytics script until the user gives their explicit consent.

Plus, MonsterInsights is compatible with Google Analytics’ built-in cookie opt-out system as well, and it works seamlessly with Google Analytics’ Chrome browser opt-out extension.

Pricing: MonsterInsights costs from $99.50/year. This includes the EU Compliance addon.

2. WPForms – GDPR Friendly Contact Forms

The WPForms website

WPForms is the best contact form plugin for WordPress with built-in GDPR compliance.

You can use WPForms to create all sorts of forms, including contact forms, registration forms, order forms, booking forms, surveys, and more.

To make your forms compliant, simply go to plugin’s settings page and check the box next to GDPR enhancements option. Once you’ve done this, WPForms will not collect IP addresses on any of your forms.

You can also enable extra GDPR options. These include disabling user tracking cookies and disabling storing details of the user’s browser and operating system.

Another option with WPForms is to turn on GDPR protection for individual forms instead of for all your forms. To do this, you just need to check a box in the setting for each form.

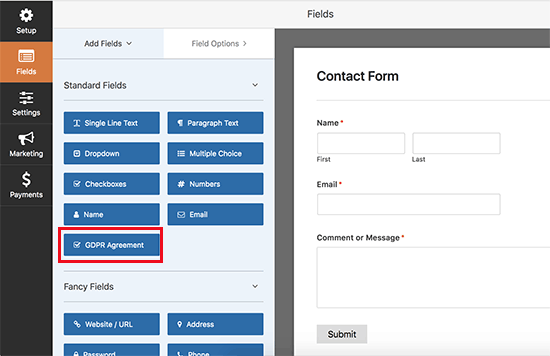
WPForms also lets you add a special ‘GDPR Agreement’ checkbox field to your forms. You can add this to your form just like any other field.

GDPR Agreement field in WPForms

Pricing: WPForms costs from $39.50/year. There’s also a free version of WPForms that’s also GDPR compliant.

3. Cookie Notice for GDPR & CCPA

Cookie Notice for GDPR & CCPA

Cookie Notice for GDPR & CCPA is a free WordPress cookie notification popup plugin that lets users give or refuse consent for you to use cookies. It helps you comply with GDPR and also with CCPA (the California Consumer Privacy Act).

You can customize the cookie notice for your users and include links to your privacy policy or legal pages. It’s very quick and easy to get Cookie Notice up and running on your site.

The plugin is SEO friendly and it’s compatible with WPML if you have a multilingual website. It also integrates seamlessly with MonsterInsights and holds on to Google Analytics code until a user gives consent.

Pricing: Cookie Notice is completely free. There’s no premium version.

4. OptinMonster – GDPR Friendly Popups and Lead Gen Forms

The OptinMonster website

OptinMonster is a lead generation tool and one of the best popup creators for WordPress. It lets you create a wide range of email newsletter signup forms and optins that you can display in different ways on your site.

With OptinMonster, you can ensure that your email signup forms are GDPR compliant. It’s easy to add a privacy policy field with a customizable checkbox. Users can then only submit the form once they’ve checked the box.

If your organization is audited for GDPR compliance, OptinMonster also has a GDPR Audit Concierge team that can help you out. Plus, their friendly customer service team is always happy to answer questions about GDPR.

Even better, OptinMonster lets you target visitors based on their location. That way, you can make sure you’re showing GDPR-compliant optins to customers in EU countries.

Pricing: OptinMonster costs from $9/month (billed annually). For geolocation targeting, you need the Growth plan, which costs from $49/month.

5. GDPR Cookie Consent (CCPA Ready)

GDPR Cookie Consent

GDPR Cookie Consent covers CCPA as well as GDPR. It lets you create an alert bar on your site with Accept and Reject options so the user can decide whether to accept or reject cookies.

With this plugin, it’s straightforward to customize the cookie notice with your choice of colors, fonts, styles, positioning, and more. You can choose to put the cookie notice bar at the top or the bottom of your website.

Note that you need to list the specific cookies that the plugin restricts. The plugin can’t automatically block all cookies, or it could break your website.

Pricing: The basic version of GDPR Cookie Consent is free. You can upgrade to the premium version from $49/year.

6. Complianz

Complianz

Complianz lets you easily create cookie notices for different regions (EU, UK, US, or Canada). You can use it to create a GDPR ‘cookie wall’ as well as other types of banner.

With Complianz, there’s the built-in option to scan your site for cookies. This lets you automatically add cookie descriptions to your site.

Complianz has a simple, user-friendly setup process. It takes you step by step through getting the plugin up and running on your site.

The premium version lets you view statistics, use A/B testing to improve your cookie accept ratio, generate legally approved documents, and more. It’s also compatible with WordPress multisite networks.

Pricing: Complianz premium starts from $55/year. There is also a limited free version.

7. WP GDPR Compliance

WP GDPR Compliance

WP GDPR Compliance lets you automatically add a GDPR checkbox to certain areas of your site. This includes WordPress comments and registration, and also WooCommerce pages.

WP GDPR Compliance also makes it easy for users to request to see their data that’s stored in your database.

It providers a special Data Request page that lets users have temporary access to their information. They can also request that you delete their information, if they want to.

Pricing: WP GDPR Compliance is free. The developers welcome donations.

8. GDPR Cookie Compliance (Moove)

GDPR Cookie Compliance (Moove)

GDPR Cookie Compliance from Moove is a plugin that lets users enable or disable cookies on your site.

The cookie consent notice is fully customizable and editable so you can use your own text, logo, colors, and fonts.

The premium version include a ‘cookie wall’ that prevents users from seeing your site until they accept or reject cookies. You can also target users based on their location, and see stats about how many users accepted your cookies.

You need to add the scripts that use cookies into the plugin’s settings. Otherwise, it can’t block them.

Pricing: The basic version of GDPR Cookie Compliance is free. The premium version offers more features and costs from £49 (GBP).

9. EU Cookie Law for GDPR/CCPA

EU Cookie Law for GDPR/CCPA

EU Cookie Law for GDPR/CCPA lets you easily create a simple customizable banner for your website with your cookie policy. Users can then click to accept the cookies or click a link to see your privacy policy.

You can use shortcodes to prevent sections of code or even text from displaying if cookies aren’t accepted.

This plugin uses responsive design, so should look good on all mobile devices. It’s also fully compatible with WPML for multilingual websites.

EU Cookie Law for GDPR/CCPA is designed to be a lightweight plugin that will not affect your WordPress site’s speed and performance.

Pricing: EU Cookie Law for GDPR/CCPA is a free, open source plugin.

Which GDPR Plugin Should You Use?

The plugins you need for GDPR depends entirely on your needs.

If you’re not sure which to pick, here are the absolute must-have plugins:

Use MonsterInsights to easily add and control your Google Analytics tracking. It’s the best Google Analytics tool for WordPress, and it makes it very straightforward for you to comply with GDPR when it comes to analytics data.

Use WPForms to create GDPR compliant contact forms, registration forms, booking forms, and more. Adding GDPR compliance to your forms is as simple as checking a box.

Use Cookie Notice for GDPR & CCPA to display a cookie notification on your site. It integrates with MonsterInsights and it has lots of different options to customize how cookie consent works on your site.

We hope this article helped you learn about the best GDPR plugins for WordPress. You may also want to see our article on the best plugins for business websites, and our comparison of the best business phone services.

If you liked this article, then please subscribe to our YouTube Channel for WordPress video tutorials. You can also find us on Twitter and Facebook.

The post 9 Best WordPress GDPR Plugins to Improve Compliance appeared first on WPBeginner.


October 09, 2020 at 05:00PM

Wednesday, October 7, 2020

How to Move a Live WordPress Site to Local Server

Do you want to move a live WordPress website to a local server on your computer?

Installing WordPress on your computer (local server) allows you to easily learn WordPress and test things. When you move a live WordPress site to a local server, it enables you to experiment with the same data as your live site.

In this article, we’ll show you how to easily move a live WordPress site to a local server without breaking anything.

Moving a live WordPress site to a local server on your computer

Why and Who Would Want to Move a live WordPress Site to Local Server?

If you have been running WordPress website for sometime, you may want to try out new themes or a plugin. However, doing this on a live website may result in poor user experience for your users.

To avoid this, many users create a copy of their WordPress website on a local server to test new themes, plugins, or do development testing.

This allows you to set up your theme with all your content and test all the features without worrying about breaking your site. Many users copy their site to a local server to practice their WordPress and coding skills with actual site data.

Even though you can do all the testing with dummy content in WordPress, real site data gives you a better visual representation of how these changes will appear on your live site.

Preparing to Move a Local Site to Local Server

First, you need to make sure that you always back up your WordPress website. There are several great WordPress backup plugins that you can use.

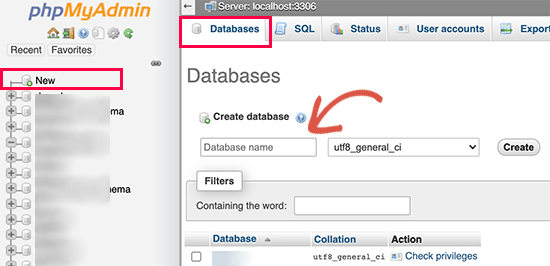
Secondly, you need to install a local server environment on your computer. You can use WAMP for Windows, and MAMP for Mac. Once you have set up the environment, you need to create a new database using phpMyAdmin.

Simply visit the following URL in your browser to launch phpMyAdmin.

http://localhost/phpmyadmin/
http://localhost:8080/phpmyadmin/

From here you need to click on ‘Databases’ tab and create a new database. You’ll need this database to later to unpack your live site data.

Create database

You are now ready to move your live WordPress site to local server.

Method 1. Moving Live WordPress Site to Local Server using Plugin

This method is easier and recommended for all users.

First thing you need to do is install and activate the Duplicator plugin. For more details, see our step by step guide on how to install a WordPress plugin.

Duplicator allows you to easily create a duplicate package of your entire website. It can be used to move your WordPress site to a new location, and can also be used as a backup plugin.

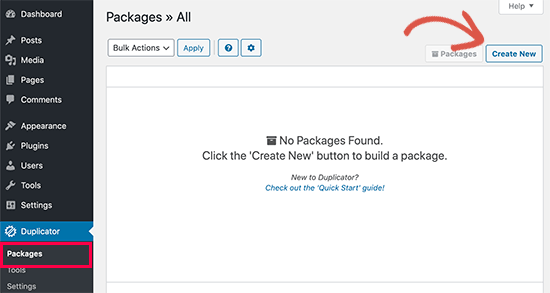
Upon activation, the plugin adds a new “Duplicator” menu item in your WordPress admin sidebar. Clicking on it will take you to the packages screen of the plugin.

Creating new package in Duplicator

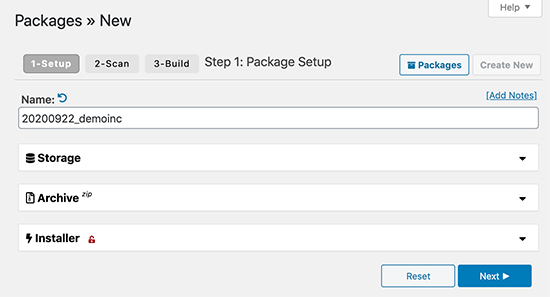
To create a new package, you need to click on the create new package button. Duplicator will start the package wizard, and you need to click on the Next button to continue.

Duplicator package set up

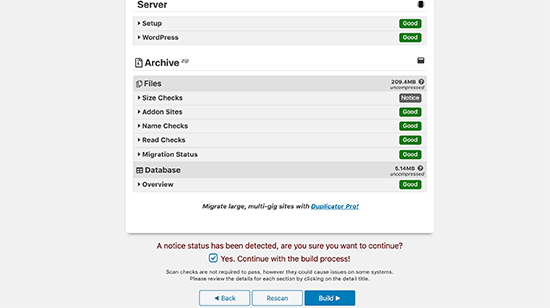
The plugin will then san your website and run some background checks. It will then show you a summary of those checks. If everything looks good, then click on the ‘Build’ button to continue.

Duplicator scan

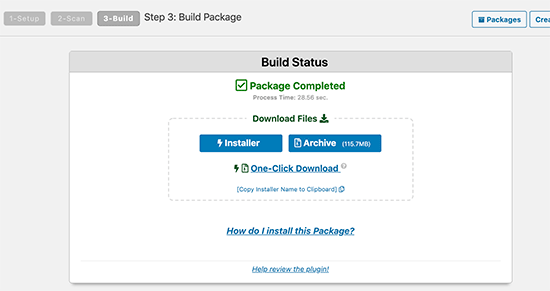
Duplicator will now create your website package.

Once finished, you’ll see an archive zip file that contains all your website data, and an installer file. You need to download both files to your computer.

Download package files

You are now ready to unpack and install these files on your local server.

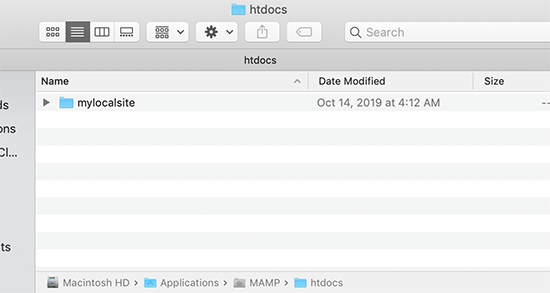
First, you need to create a new folder in your local server’s root folder. This is the folder where your local server stores all websites.

For instance, if you are using MAMP, then it will be /Applications/MAMP/htdocs/ folder. Alternatively if you are using WAMP, then it would be C:\wamp\www\ folder.

Inside this folder, you can make new folders for each new website that you want to import or create on your local server.

Creating a website folder on your local server

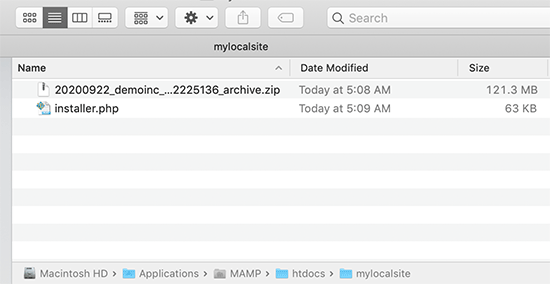
After that, you need to open the folder you created for your local website and then copy and paste both the archive zip file and the installer script you downloaded earlier.

Copy and paste Duplicator package and installer files

To run the installation, you need to open the installer.php script in your web browser.

For example if you pasted both files in /mylocalsite/ folder, then you will access them in your browser by visiting http://localhost/mylocalsite/installer.php.

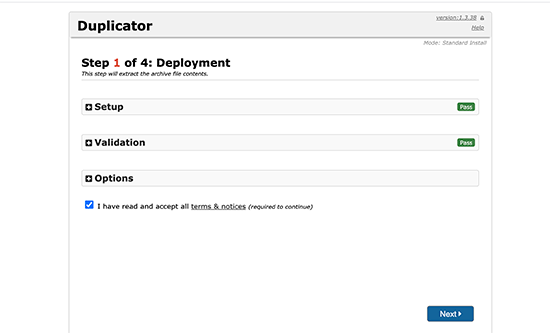
You will now see the Duplicator installation script like this:

Duplicator installer screen

Click on the Next button to continue.

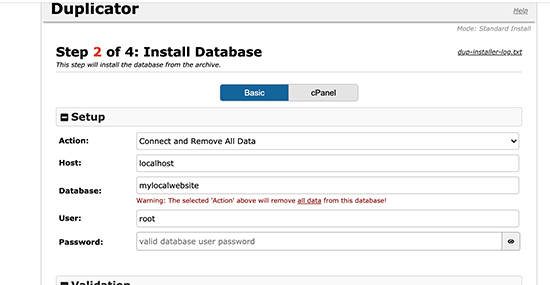
Duplicator will now unpack the archive zip file and will ask you to enter your local site’s database information. This is the database you created earlier.

Duplicator database information

The server name is almost always localhost and username is root. In most cases, your local server installation does not have a password set for root, so you can leave that blank.

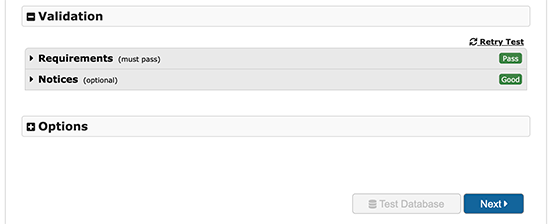
At the bottom of the page, you’ll see a ‘Test Database’ button that you can use to make sure your database information is correct.

Test database connection

If everything looks good, then click on the ‘Next’ button to continue.

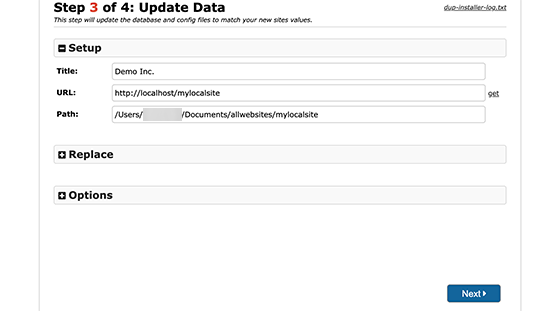
Duplicator will now import your WordPress database. After that, it will ask you to double-check the new website information that it has automatically detected.

Check local site information

Click on the Next button to continue.

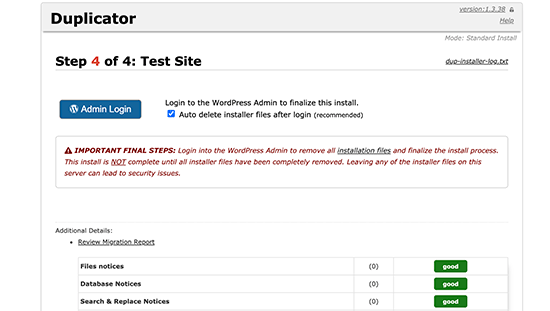
Duplicator will now finish the setup and will show you a button to log into your local site. You’ll use the same WordPress user name and password that you use on your live site.

Import finished

That’s all, you have successfully moved your live site to local server.

Method 2. Manually Move a Live WordPress Site to Local Server

In case the plugin does not work for you, then you can always manually move your live site to a local server. The first thing you would need is to back up your website manually from your WordPress hosting account.

Step 1. Export your live site’s WordPress database

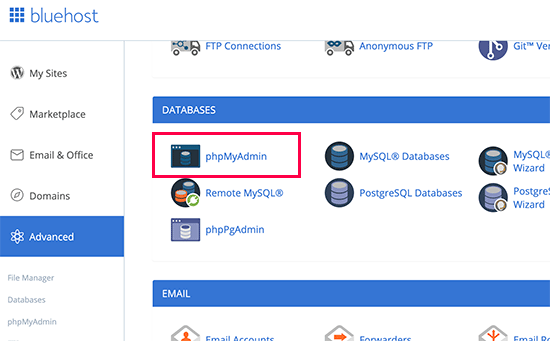
To export your live site’s WordPress database, you need to log into your cPanel dashboard and click on phpMyAdmin.

Note: We’re showing screenshots from Bluehost dashboard.

cPanel phpMyAdmin

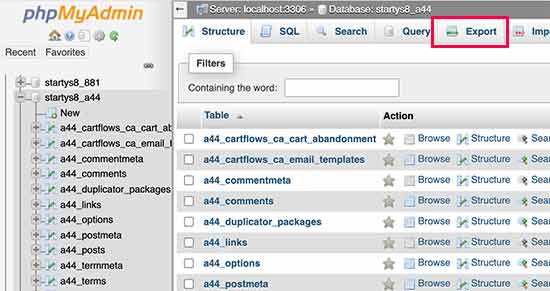
Inside phpMyAdmin, you need to select the database you want to export and then click on the export tab on the top.

Export WordPress database manually

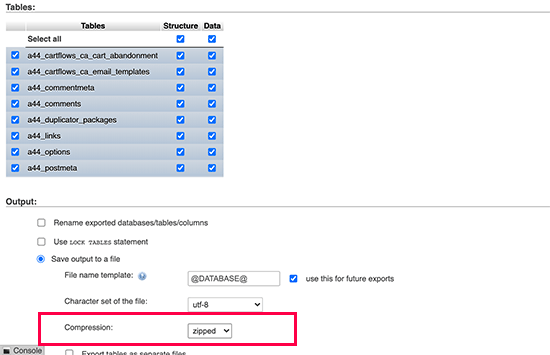
phpMyAdmin will now ask you to choose either quick or custom export method. We recommend using custom method and choosing zip as the compression method.

Sometimes WordPress plugins can create their own tables inside your WordPress database. If you are not using that plugin anymore, then the custom method allows you to exclude those tables.

Leave rest of the options as they are and click on the Go button to download your database backup in zip format.

Select export options

PhpMyAdmin will now download your database file. For more details, see our tutorial on how to backup your WordPress database manually.

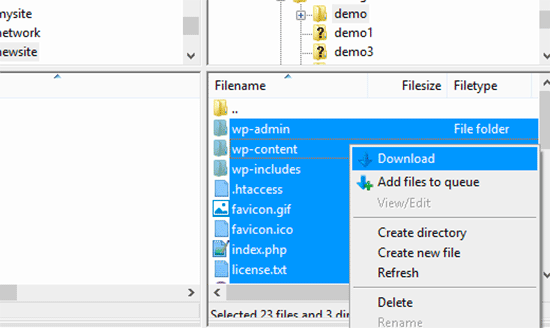
Step 2. Download all your WordPress files

The next step is to download your WordPress files. To do that you need to connect to your WordPress site using an FTP client.

Once connected, select all your WordPress files and download them to your computer.

Download all your WordPress files

Step 3. Import your WordPress files and database to local server

After downloading your WordPress files, you need to create a folder on your local server where you want to import the local site.

If you are using WAMP then you would want to create a folder inside C:\wamp\www\ folder for your local site. MAMP users would need to create a folder in /Applications/MAMP/htdocs/ folder.

After that, simply copy and paste your WordPress files in the new folder.

Next, you need to import your WordPress database. Simply open the phpMyAdmin on your local server by visiting the following URL:

http://localhost/phpmyadmin/

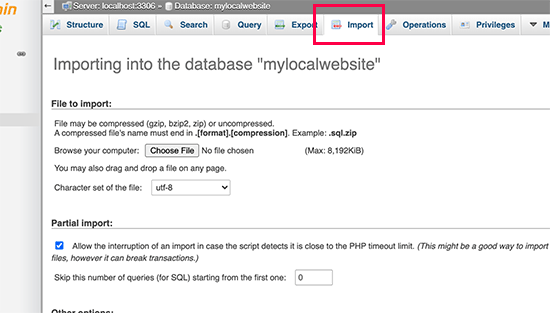
Since you have already created the database earlier, you now need to select it and then click on the Import tab at the top.

Import WordPress database

Click on the ‘Choose File’ button to select and upload the database export file you downloaded in the first step. After that, click on the ‘Go’ button at the bottom of the page.

PhpMyAdmin will now unzip and import your WordPress database.

Now that your database is all set up, you need to update the URLs inside your WordPress database referencing to your live site.

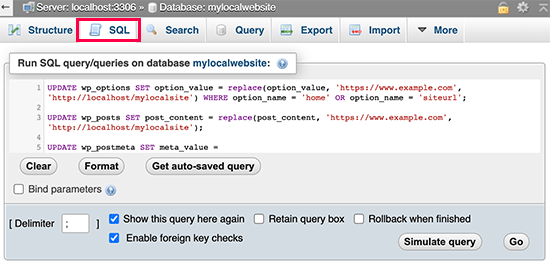
You can do this by running an SQL query in phpMyAdmin. Make sure you have selected your local site’s database and then click on SQL.

Updating URLs in database

In phpMyAdmin’s SQL screen copy and paste this code, make sure that you replace example.com with your live site’s URL and http://localhost/mylocalsite with the local server URL of your site.

UPDATE wp_options SET option_value = replace(option_value, 'https://www.example.com', 'http://localhost/mylocalsite') WHERE option_name = 'home' OR option_name = 'siteurl';
 
UPDATE wp_posts SET post_content = replace(post_content, 'https://www.example.com', 'http://localhost/mylocalsite');
 
UPDATE wp_postmeta SET meta_value = replace(meta_value,'https://www.example.com','hhttp://localhost/mylocalsite');

This query will replace refences to your live site’s URL from database and replace it with the localhost URL.

Step 4. Update wp-config.php file

The final step is to update your local site’s wp-config.php file. This file contains WordPress settings including how to connect to your WordPress database.

Simply go to the folder where you installed WordPress on your local server and then open wp-config.php file in a text editor like Notepad.

Replace the database name with the one you created in phpMyAdmin on your localhost.

After that, replace the database username with your local MySQL username, usually it is root. If you have set a password for the MySQL user root on your localhost, then enter that password. Otherwise, leave it empty and save your changes.

/** The name of the database for WordPress */
define('DB_NAME', 'database_name_here');

/** MySQL database username */
define('DB_USER', 'username_here');

/** MySQL database password */
define('DB_PASSWORD', 'password_here');

You can now visit your local site in a browser window by entering the URL like this:

http://localhost/mylocalsite/

Replace ‘mylocalsite’ with the name of the folder where you copied your WordPress files.

That’s all, your live WordPress site is now copied to your local server.

We hope this article helped you learn how to easily move a live WordPress site to local server. You may also want to see our guide on how to easily make a staging site for WordPress for testing, or how to move a WordPress site from local server to live site.

If you liked this article, then please subscribe to our YouTube Channel for WordPress video tutorials. You can also find us on Twitter and Facebook.

The post How to Move a Live WordPress Site to Local Server appeared first on WPBeginner.


October 07, 2020 at 05:00PM