Monday, December 7, 2020

How to Submit Your Website to Search Engines (Beginner’s Guide)

Recently, one of our readers asked us how to submit their WordPress site to search engines like Google?

Search engines are the largest source of traffic for most websites. That’s why it is important to ensure that they can easily find and rank your website pages.

In this article, we’ll show you how to easily submit your website to search engines and start getting traffic to your site.

Submitting your website to search engines

Since this is a comprehensive guide, please feel free to use the quick links below to jump straight to different sections in this article.

Do You Need to Submit Your Website to Search Engines?

No, you do not have to submit your website to search engines. Most search engine bots can automatically find your website if it has been mentioned on other sites.

However for WordPress websites, we recommend submitting it manually because it will help you get discovered faster.

Why you should submit your website to search engines?

If you are just starting a new business or a blog, then search engines are the most important source of free website traffic. This means you can grow your business online without a lot of money.

Unlike paid traffic from ads, organic search traffic is free, and you don’t need to pay search engines for that.

More importantly, the submission process is quite simple, free, and gives you access to several tools that will help you grow your business later on.

That being said, let’s take a look at how to submit your WordPress website to search engines.

Submitting Your Website to Google

Google is the largest and most popular search engine on the planet. For most websites, Google is often the biggest source of their traffic.

To submit your website to Google, you need to sign up for Google Search Console. It is a free tool offered by Google to help website owners see how their website is performing in search results.

Signing up is free and easy. Simply go to the Google Search Console website and click on the ‘Start now’ button.

You can use your existing Google account to sign in or create a new account.

Next, Google will prompt you to enter your website domain name. We recommend using the URL prefix option here as it’s easier to verify.
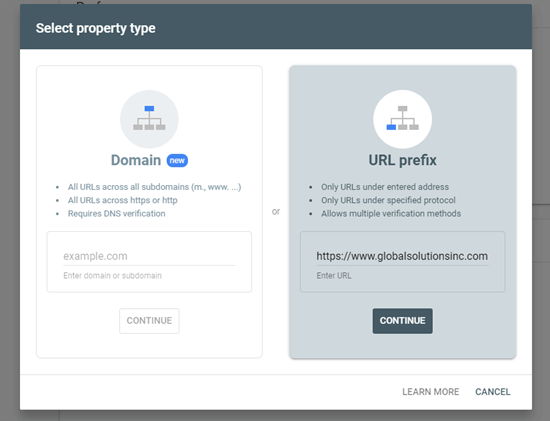
Using the URL prefix method to add your site to Google Search Console

After choosing this option, use the HTML tag method to verify your website and submit it to Google. You simply need to click on the HTML tag option to expand it, and then copy the code by clicking the ‘Copy’ button.
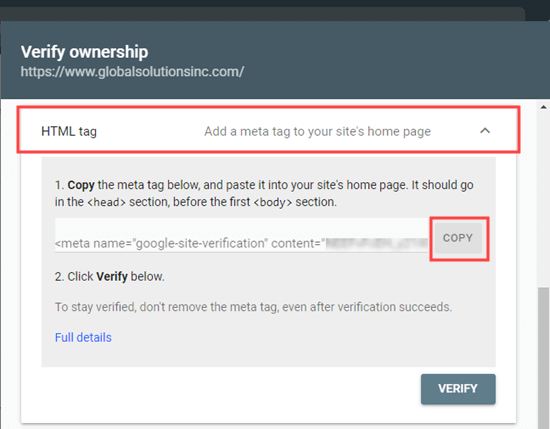
Copying the HTML meta tag from Google Search Console

Now there are multiple ways to do add this code to your website. We will show you the two easiest methods, and you can choose one that best suits you.

1. Adding Verification Code in WordPress using All in One SEO

The easiest way to do this is using All in One SEO, which is the best WordPress SEO plugin on the market. It allows you to optimize your website for search engines without learning any SEO jargon.

First, you need to install and activate the All in One SEO plugin. For more details, see our step by step guide on how to install a WordPress plugin.

Next, you need to visit the All in One SEO » General Settings » Webmaster Tools page and click on the Google Search Console option.
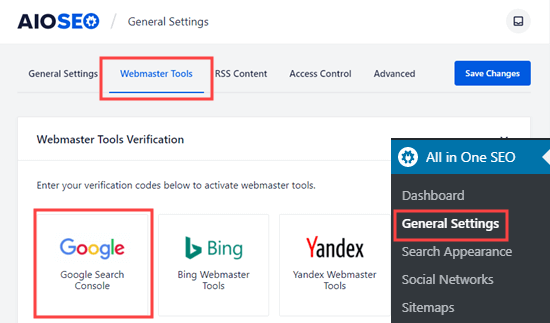
The Webmaster Tools page in All in One SEO, to select Google Search Console

After that, you need to paste the content value from your HTML meta tag into the ‘Google Verification Code’ box. The part you want is the long string of numbers and letters.

Don’t forget to click the ‘Save Changes’ button at the top of the screen.
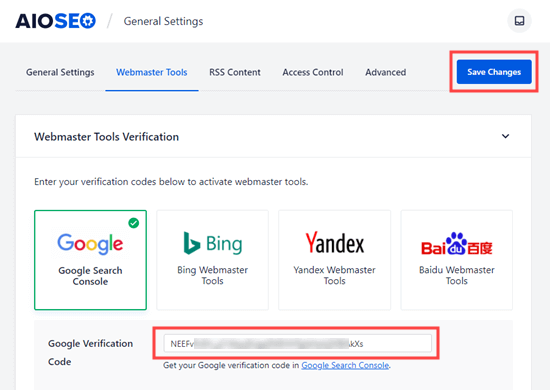
Entering your Google verification code (from the HTML meta tag) into All in One SEO

2. Adding Verification Code in WordPress using Insert Headers and Footers

If you are not using the All in One SEO plugin, then you can use this method to add Google Search Console verification code to your WordPress site.

First, you need to install and activate the Insert Header and Footers plugin. For more details, see our step by step guide on how to install a WordPress plugin.

Upon activation, go to the Settings » Insert Headers and Footers page in your WordPress admin. Then, simply paste the whole HTML meta tag into the ‘Scripts in Header’ box.
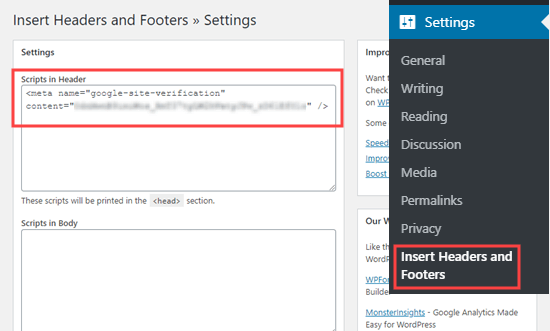
Pasting the Google meta tag into the Insert Headers and Footers header box

Then, make sure you click the Save button at the bottom of the page.

After adding the meta tag to your site through either method, go back to Google Search Console and click the ‘Verify’ button for the HTML tag method.

You should now see a success message in Google Search Console to let you know that your site has been verified.

If you need more help, check out our step by step guide on adding your WordPress site to Google Search Console.

Creating an XML Sitemap with All in One SEO

An XML sitemap in WordPress is a list of all the content on your website, including all your posts and pages. It helps search engine bots discover your content faster and start showing it in search results.

In the WordPress 5.5 update, XML sitemaps were added as a built-in feature. However, these sitemaps are very basic and can’t be easily customized.

We recommend using All in One SEO to create your sitemap.

All in One SEO is the complete WordPress SEO toolkit and includes a comprehensive sitemaps generator.

It allows you to customize your XML sitemaps by excluding unnecessary or duplicate content. They also have powerful custom sitemap for WooCommerce, news sitemap, and video sitemaps. This gives you a bonus advantage in SEO as your business grows.

First, you need to install and activate the All in One SEO plugin. For more details, see our step by step guide on how to install a WordPress plugin.

Upon activation, All in One SEO will automatically create your sitemap.

To view it, simply go to the All in One SEO » Sitemaps page in your WordPress admin. Then, click the ‘Open Sitemap’ button.
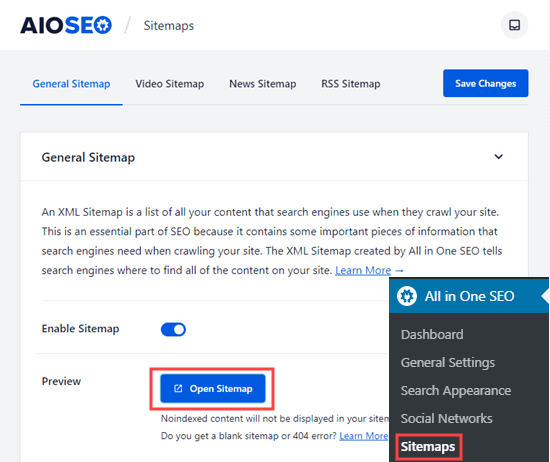
Click the button to open your sitemap, which has been automatically generated by All in One SEO

You will then see the sitemap index for your site. This links to all the sitemaps that All in One SEO has created.
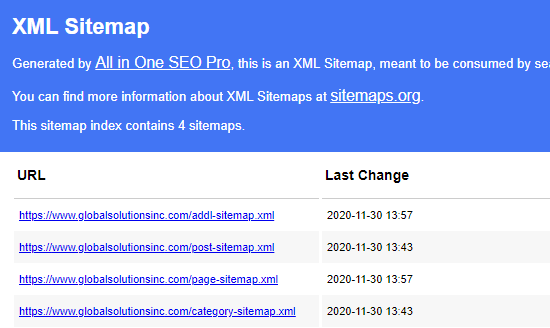
The index of sitemaps in All in One SEO

Note: All in One SEO creates multiple sitemaps because it is best practice to split up large sitemaps. By using different sitemaps for different types of content, your sitemaps will load quickly and be a manageable size even as your website grows.

Please keep this page open or save the page URL as you will need it later in the tutorial.

If you want, you can click on any of the links to see the content listed in each individual sitemap. Here is the sitemap for the pages on our demo website.
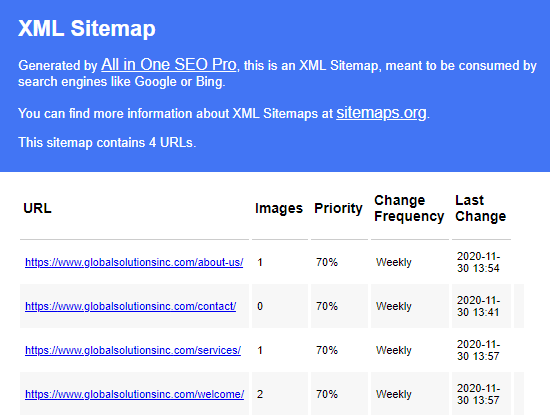
The list of pages in the All in One SEO pages sitemap

Add your XML Sitemap to Google Search Console

Now that you have generated your XML sitemap, the next step is to help Google discover it quickly.

The easiest way to do that is by using the Google Search Console.

Simply login to your Google Search Console account, and then click on the Sitemaps link in the left-hand toolbar:
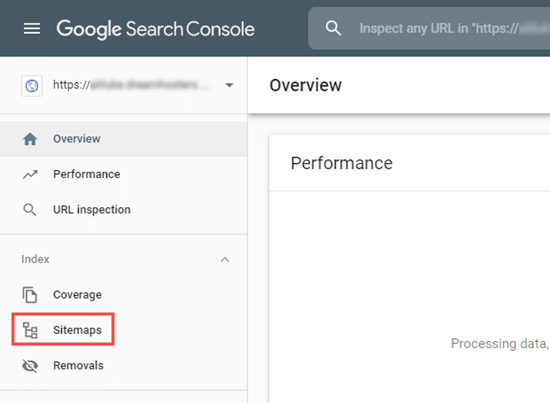
The Sitemaps tab in Google Search Console

Google Search Console has already put your website domain here. All you need to do is to type sitemap.xml into the box and click the Submit button.
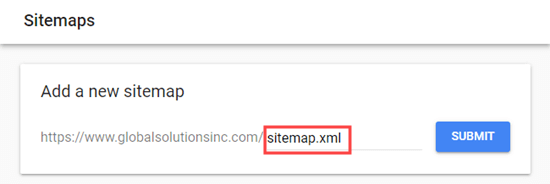
Entering your sitemap URL into Google Search Console

Search Console should show you a message to let you know the sitemap has been successfully submitted. You will also see your website sitemap in the ‘Submitted sitemaps’ list.
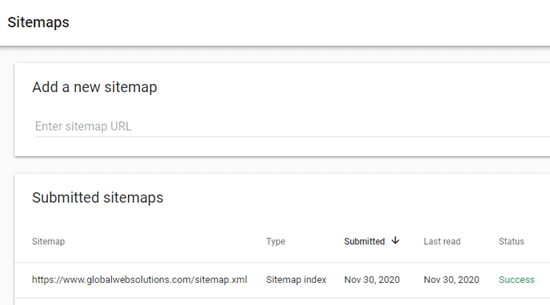
Your sitemap should appear in the table after you submit it to Google Search Console

How to Submit Your Website to Bing, Yahoo, and DuckDuckGo

Google totally dominates the search engine market with a whopping 92% market share. However, other search engines like Bing, Yahoo, and DuckDuckGo can still be a significant source of traffic for your website.

Submitting Your Website to Bing, Yahoo, and DuckDuckGo

To submit your website to Bing, you need to sign up for Bing Webmaster Tools.

Just click the Sign In button to get started. Then, sign in using your Microsoft, Google, or Facebook account.

Next, Bing will prompt you to add your site. We recommend using the ‘Add your site manually’ option. It works reliably and doesn’t require you to have verified your site with Google Search Console.

After that, simply enter your website’s domain name (URL) then click the ‘Add’ button.
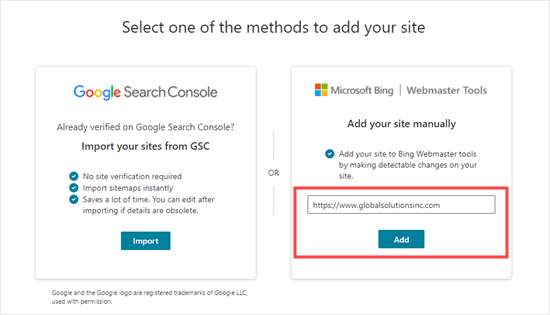
Adding your site manually to Bing Webmaster Tools

Next, you will see some verification method options. First, click on the HTML Meta Tag method. This will open up the details. Then, click the ‘Copy’ button to copy the meta tag.
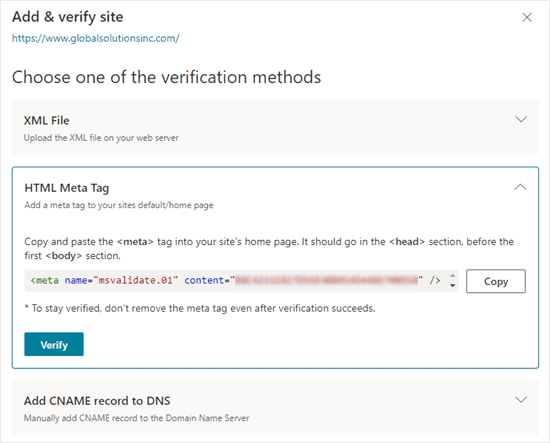
Getting the HTML meta tag from Bing Search Console

The easiest way to add the meta tag to your site is to use All in One SEO. In your WordPress dashboard, go to All in One SEO » General Settings » Webmaster Tools page.

Then, click on the Bing Webmaster Tools option.
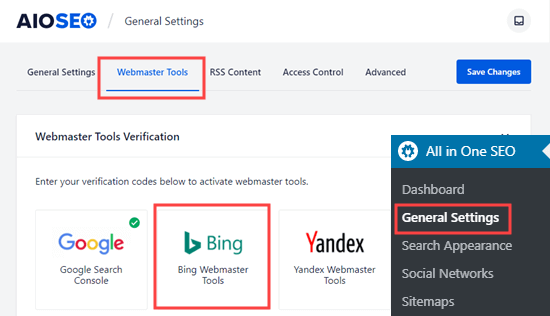
Selecting the Bing Webmaster Tools option on the All in One SEO Webmaster Tools page

This will open up the box where you can enter the Bing verification code. This is the long string of numbers and letters that forms the content value in the Bing meta tag.
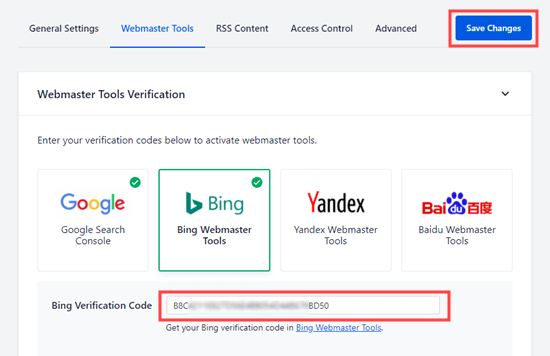
Entering the Bing verification code from your Bing HTML meta tag

Alternatively, you can install the free Insert Header and Footers plugin for WordPress.

Upon activation, go to the Settings » Insert Headers and Footers page in your WordPress admin. Then, simply paste the whole HTML meta tag into the ‘Scripts in Header’ box.
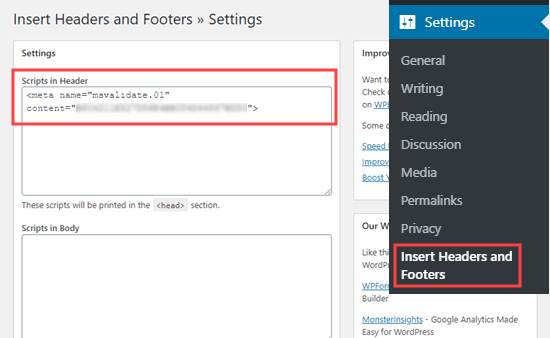
Copying the Bing meta tag into the Header section of the Insert Headers and Footers plugin

Don’t forget to click the ‘Save’ button further down the page.

After that, you need to return to Bing Webmaster Tools and click the Verify button. You should see a success message to let you know your site has been added.

Next, click on the Sitemaps tab on the left-hand sidebar. Then, click the ‘Submit sitemap’ button.
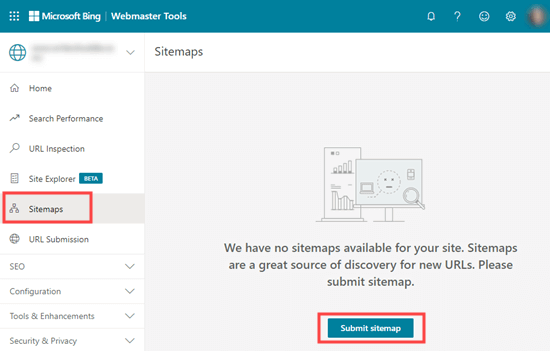
Submitting your sitemap to Bing Search Console

You need to paste in the URL of the sitemap index that All in One SEO created for you. This should be your domain name with sitemap.xml at the end.

After that, just click the ‘Submit’ button.
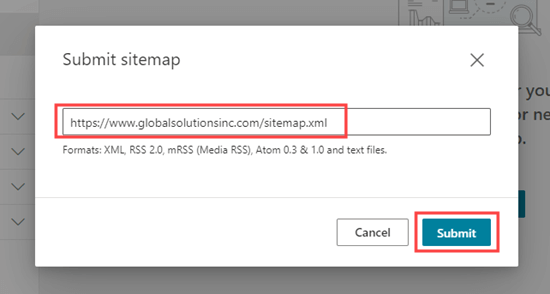
Entering your sitemap URL for Bing

You will now see your sitemap in the sitemap table in Bing Webmaster Tools.
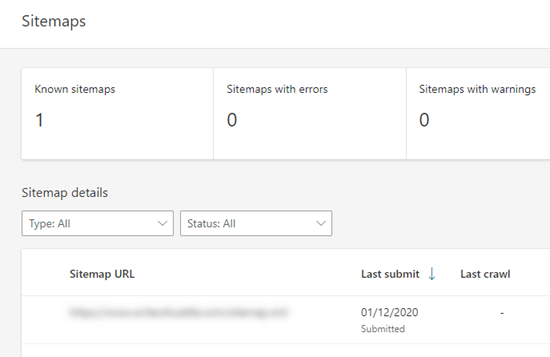
The table of sitemaps in Bing

Your Site Will Also Appear in Yahoo and DuckDuckGo’s Search Results

Now that you have submitted your website to Bing, it has also been automatically submitted to Yahoo.

DuckDuckGo also uses Bing’s search results. This means that by submitting your website to Bing, you will also get it indexed on DuckDuckGo as well.

How to Check if Your Website Has Been Indexed

The easiest way to check whether your website has been indexed is to simply go to your chosen search engine’s homepage and type in site:yoursitename.com as the search term.

For WPBeginner website, we would type site:wpbeginner.com into the search engine.

If your site has been indexed, then you should see a list of your content. Your homepage will normally be at the top.
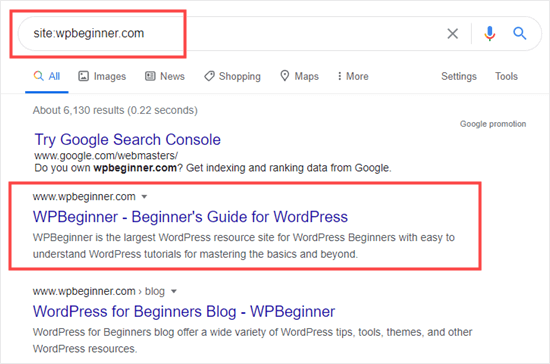
Google results showing that the WPBeginner site has been indexed

This works for all popular search engines, including Google, Yahoo, Bing, and DuckDuckGo.

Should You Use a Website Submission Service?

No, you should not use a website submission service to submit your WordPress blog or website to search engines.

There is no additional benefit to using a website submission or search engine submission services. They charge you a premium fee to do something that is free, and you can do it yourself.

More importantly, these submission services may submit your website to spammy sources which may harm your website’s SEO.

Troubleshooting and FAQs about Submitting Your Website to Search Engines

Since WPBeginner is the largest free WordPress resource site, we have heard just about every question related to this topic. Here are some common problems and FAQs we hear about submitting your site to search engines.

1. How long will it take for my site to appear in search engines?

It could take several days or several weeks for your website to appear in search engines.

It is up to search engines to index your site. You cannot force Google or any search engine to index your site faster.

However, you should follow our instructions above to help search engines find your site as easily as possible. Getting plenty of backlinks to your site can also help speed up the process.

2. I submitted my website but it isn’t showing up in search engines?

First, check that your site is visible to search engines. In your WordPress admin, go to the Settings » Reading page and make sure that the box ‘Discourage search engines from indexing this site’ is not checked.
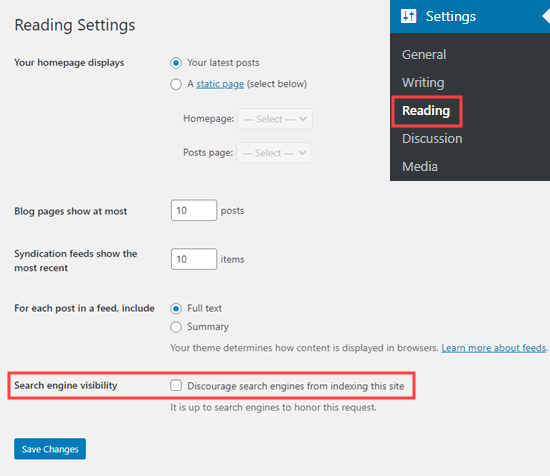
Make sure the box to discourage search engines is not checked in the Reading settings

If the box is checked, then it is stopping search engines from crawling your WordPress site. Simply uncheck it then click the ‘Save Changes’ button.

If this setting is correct, then you simply need to be patient. It can take a day or so for Google Search Console to process your sitemap.

3. My site is listed on search engines but I am not getting any traffic?

If you are not getting traffic to your site, then that could be because it is ranking very low in search engine results. You should use All in One SEO to get detailed recommendations about your site’s SEO (search engine optimization).

In particular, it’s important to use keywords appropriately in your site’s content.

You can also use these keyword research tools to write more SEO optimized content, and implement our 27 proven tips to increase your website traffic.

4. How can I submit my website to search engines for free?

All the methods we have covered above are free. We recommend that you do not pay to have your site submitted to search engines.

It is free to create accounts with Google Search Console and Bing Webmaster Tools. Neither of these charges any money.

5. How do search engines find my site?

Search engines use automated software to constantly look through the web for new web pages. This software is often called: search bots, web crawler, or spider. The process of looking for new pages is called ‘crawling’.

The web crawler goes through links to find new pages. This is why an XML sitemap is so important. It has links to all the content on your site and information about them that the web crawler can understand.

6. Is there a submissions site list I can use?

You don’t need to worry about submitting to lots of search engines. The most important one is Google.

Once you have submitted your site to Google, it’s a good idea to also submit it to Bing. This helps Yahoo and DuckDuckGo find your site too.

The other search engines you should consider submitting to are local ones. For instance, you could submit your website to Yandex if you want to get more visitors from Russia.

7. How do I track website traffic coming from Search Engines?

The easiest way to track search engine traffic is by using MonsterInsights. It is the best Google Analytics plugin for WordPress and allows you to see where your users are coming from, what pages they are viewing, and what they do while on your website.

For detailed instructions, follow our step by step guide on how to install Google Analytics in WordPress.

We hope this article helped you learn how to submit your website to search engines. You may also want to see our guide on the best email marketing services to connect with your visitors after they leave your site, and our expert list of the best WordPress plugins for all websites.

If you liked this article, then please subscribe to our YouTube Channel for WordPress video tutorials. You can also find us on Twitter and Facebook.

The post How to Submit Your Website to Search Engines (Beginner’s Guide) appeared first on WPBeginner.


December 07, 2020 at 07:33PM

Friday, December 4, 2020

14 Best WordPress SEO Plugins and Tools That You Should Use

Often we’re asked about what are the best WordPress SEO plugins and tools that we recommend.

That’s because search engines are a major source of traffic for most websites on the internet. Optimizing your website for search engines can help you rank higher in search results and significantly grow your business.

In this article, we will share the best WordPress SEO plugins and tools that you should use. Some of these tools offer similar functionalities, so we will also highlight which ones are the best for specific use-cases.

Best WordPress SEO plugins and tools

Things You Must Know About WordPress SEO Plugins & Tools

When reading SEO tips or searching for “best free WordPress SEO plugins”, you will come across articles that feature several dozen tools.

This can be quite overwhelming for beginners and non-techy users.

The truth is that you don’t need dozens of top SEO tools to get higher search rankings.

While most blog posts (including ours) will share the top most popular SEO plugins, it is extremely important for you to understand the use-cases of each tool.

For example, you never want to use more than one WordPress SEO plugin on your website. We will mention All in One SEO, Yoast SEO, SEOPress, and Rank Math. You need to pick only one to avoid plugin conflict.

We’ll mention SEMRush, Ahrefs, and few other powerful tools, but you don’t need them all when you’re first starting out since they have a similar feature set. We will share what tools we use in our business, and which features are the best among each tool.

With that said, let’s take a look at our expert pick of the best WordPress SEO plugins and tools.

1. All in One SEO for WordPress (AIOSEO)

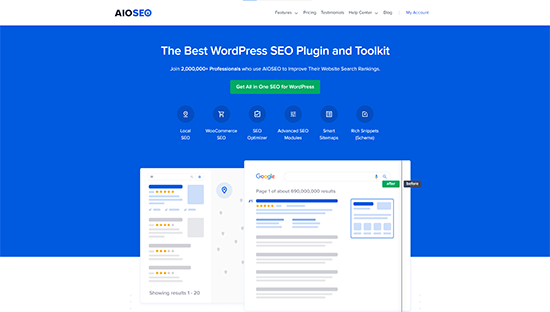
All in One SEO for WordPress (AIOSEO)

All in One SEO for WordPress (AIOSEO) is the best WordPress SEO plugin on the market. Used by over 2+ million users, it is the most comprehensive SEO toolkit that helps you improve search rankings without learning any complicated SEO jargon.

It comes with the easiest setup wizard that automatically helps you choose the best SEO settings for your business. AIOSEO shows you TruSEO on-page analysis with an actionable checklist to optimize your posts and pages.

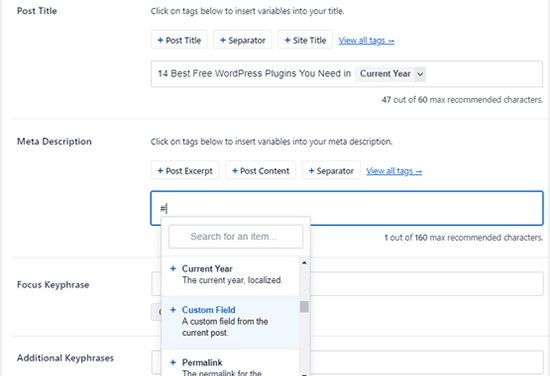
The on-page SEO checklist includes a smart meta tag generator where you can use dynamic values (current year, month, day, custom fields, author info, and much more) in your SEO title and descriptions. This means you don’t need to update a post just to change SEO titles.

All in One SEO (AIOSEO) dynamic meta title and description

AIOSEO also comes with Rich snippet schema markup, smart XML sitemaps (with advanced controls), SEO health check, and other useful features to grow your search engine visibility.

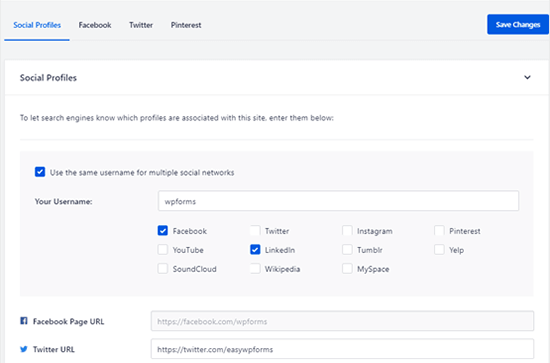
There is a built-in social media integration to add Open Graph metadata as well. This means you can choose which image or thumbnail you want to show when your pages are shared on social media websites like Facebook, Twitter, Pinterest, etc.

All in One SEO for WordPress (AIOSEO) social media profiles

AIOSEO also comes with built-in WooCommerce SEO tools for eCommerce sites. This include features like dynamic optimizations, individual product page optimizations, product image SEO, and other handy features to bring more organic traffic to your online store.

For more SEO savvy users, it includes full control of RSS feeds, Robots.txt editor, local SEO, Google News sitemaps, video SEO, and more.

For business owners, it comes with SEO user roles, so you can manage access to important SEO features without handing over control of your website.

Overall, All in One SEO (AIOSEO) is the most beginner-friendly and comprehensive WordPress SEO plugin on the market. It eliminates the need to install multiple plugins to do things on your website and works perfectly for all types of businesses, eCommerce, blogs, news, and other websites.

2. SEMRush

SEMRush

SEMRush is the best overall SEO tool on the market. Used by professional SEO experts, marketers, bloggers, and businesses of all sizes, it provides a comprehensive set of tools to grow your traffic.

You can use it to find organic keywords and search terms that you can easily rank for. It also allows you to do competitive research and see which keywords your competitors rank for, and how you can beat them.

SEMRush SEO Writing Assistant tool helps you improve your website content to beat the top 10 results for your focus keyword. It integrates with WordPress, and this will help you write more SEO friendly content.

To learn more, see our complete guide on how to do keyword research for your website.

We use SEMRush for our websites because of their competitive intelligence and SEO rank tracker features.

3. Google Search Console

Google Search Console

Google Search Console is a free tool offered by Google to help website owners monitor and maintain their site’s presence in Google search results.

It alerts you when Google is unable to crawl and index pages on your website. You also get helpful tips on how to fix those crawl errors.

Most importantly, it shows which keywords your website is ranking for, anchor texts, average position, impressions, and more. You can use this data to find keywords where you can easily rank higher by simply optimizing your content. You can also use this keyword data to come up with new blog post ideas.

For more details, see our comprehensive Google Search Console guide for beginners.

Tip: You can use MonsterInsights to track your keyword rankings inside WordPress admin area using Google Seach Console data.

MonsterInsights, another tool we’ll mention later, helps you bring the Search Console reports right inside your WordPress dashboard for easy access.

4. Yoast SEO

Yoast SEO

Yoast SEO is a popular WordPress SEO plugin that allows you to optimize your WordPRess website for search engines.

It lets you easily add SEO titles and descriptions to all posts and pages on your website. You can also use it to add Open Graph metadata and social media images to your articles.

Yoast SEO automatically generates an XML sitemap for all your website content which makes it easier for search engines to crawl your website. It also helps you easily import your SEO data if you have been using another SEO plugin.

For more details, see our complete guide on how to install and setup Yoast SEO plugin in WordPress.

5. Google Keyword Planner

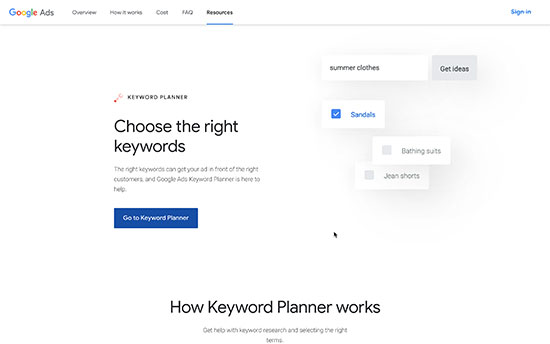
Google Keyword Planner

Google Keyword Planner tool helps you generate your own keyword ideas from Google itself.

No one on the planet has more insights into what people are searching for than the search giant Google. This free tool is offered to Google’s advertisers for free and anyone can use it. Its main purpose is to show advertisers the keywords they can bid on for their advertising campaigns.

It also helps advertisers choose the right keywords by showing them an estimate of search volume, number of results, and difficulty level.

As a content marketer or blogger, you can use this data to find keywords with high search volume, high advertiser interest, and more importantly keywords where you can easily outrank all other sites.

Bonus: See these 103 Blog Post Ideas that your Readers will Love (Cheat Sheet).

6. Ahrefs

Ahrefs

Ahrefs is an all-in-one SEO tool for marketers, bloggers, and businesses. It is a popular alternative to SEMRush and offers a lot of similar tools and features.

It allows you to do keyword research, competition analysis, backlink research, monitor keyword rankings, and more.

It also offers a detailed content analysis tool that helps you improve content while targeting specific keywords.

While there’s a huge feature overlap, what Ahrefs does really well is backlink analysis. We can use it to see which sites are linking to multiple competitors, but not us. This helps us get more backlinks and build more partnerships.

They also help us identify which content multiple of our competitors are ranking for that we aren’t, so we can create content on those subjects to get more exposure.

Last but not least, Ahrefs helps us better identify duplicate content and keyword cannibalization which helps us merge and upgrade the right content to boost our rankings.

For the reasons above, we pay for both SEMRush and Ahrefs because they’re both good for specific use-cases.

7. SEOPress

SEOPress

SEOPress is another simple yet powerful WordPress SEO plugin. It includes all the features you would expect from an SEO plugin like meta title, description, open graph support, image and content XML sitemaps, redirects, and more.

It comes with a straightforward setup for beginners and advanced controls for more experienced users. It is comparable to other top WordPress SEO plugins on the market in terms of features and options.

The paid version of the plugin is cheaper than some other premium WordPress SEO plugins on the market.

Note: SEOPress is a WordPress SEO plugin. Remember, you only need one WordPress SEO plugin on your site.

8. Rank Math

Rank Math

Rank Math is a fast-growing user-friendly WordPress SEO plugin that allows you to optimize your website for search engines and social media. It comes with a setup wizard and allows you to import data from other SEO plugins during the setup.

You can use it to easily add meta title, description, and Open Graph metadata to your blog posts. The plugin also allows you to generate an XML sitemap, connect Google Search Console, and control access to plugin features based on user roles.

Note: Rank Math is a Yoast SEO alternative. Remember, you only need one WordPress SEO plugin on your site.

9. Schema Pro

Schema Pro

Schema Pro allows you to add rich snippets to your website which makes it stand out in search results.

Rich Snippets allow you to make your website stand out in search results by showing star ratings below a review, prices below a product, image or video next to the description, and so on.

Top WordPress SEO plugins, like All in One SEO (AIOSEO) already add structured rich snippets data to your website. However, if you need more schema types or want to extend the functionality of your existing WordPress SEO plugin then Schema Pro is the way to go.

Schema Pro also allows you to use it alongside your existing WordPress SEO plugin by mapping the plugin data to Schema Pro fields.

10. KeywordTool.io

Keyword Tool

KeywordTool.io is one of the best free keyword research tools available right now. It allows you to simply generate keyword ideas by typing in a keyword. These keyword suggestions are gathered from Google’s autosuggest feature. It also shows you keyword suggestions from Bing, YouTube, Amazon, and more.

These keyword suggestions are a treasure of information. You can also get search volume, cost per click, and other data for each keyword by upgrading to their paid plan.

11. Redirection

Redirection

Redirection helps you set up SEO friendly redirects in WordPress. It is one of the most handy WordPress plugins that helps you easily fix 404 errors in WordPress by setting up redirects.

Broken links can affect your site’s SEO and create a bad experience for your users. If you have been running a blog for some time, then you should check your site from time to time for broken links and fix them.

There are multiple ways to easily find broken links in WordPress. Once you find a broken link, you may need to fix it by pointing users to the correct link or removing the incorrect link.

For more details, see our step by step guide on how to find and fix broken links in WordPress.

12. SEOquake

SEOquake

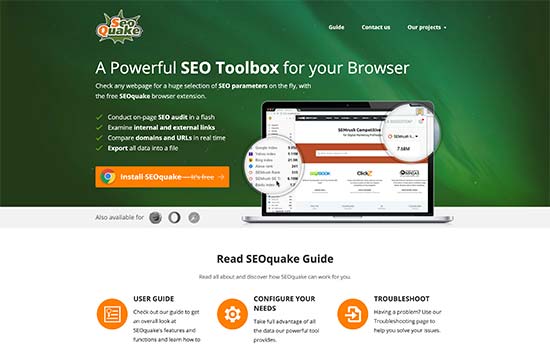
SEOQuake is a useful SEO tool for website owners. It is available as a browser add-on for Google Chrome, Mozilla Firefox, Opera, and Safari web browsers.

It provides SEO related information for any website. This data includes page health, age, last updated, Alexa rank, and many other parameters. It is one of the most downloaded browser addons by SEO professionals.

Apart from that, the SEOquake toolbar can show you all the same data search results when you type in a keyword. This information can be extremely useful if you are gauging competition for different keywords. You can even download search results in CSV format and prepare your own excel sheets of search data.

Alternative: Ahrefs SEO Toolbar

Bonus Plugins for WordPress Website Owners

These tools give you the additional advantage when optimizing your website for SEO. They do not advertise themselves as SEO tools but they are essential for every website and play a significant role in your website’s search performance.

13. WP Rocket

WP-Rocket

Site speed is a major factor in search rankings. That’s why you need to monitor your website speed & performance to make sure it’s not affecting your SEO.

The easiest way to boost your website speed is by enabling caching. WP Rocket is the best WordPress caching plugin on the market, which allows you to set up caching without diving into any technical stuff.

Alternative: WP Super Cache

14. MonsterInsights

MonsterInsights

Many beginners rely on their best guess to make their marketing decisions. You don’t need to do that when you can easily get the insights you need to improve your website’s SEO strategy.

MonsterInsights is the bets Google Analytics plugin for WordPress. It allows you to easily install Google Analytics in WordPress and shows human-readable reports inside your WordPress dashboard.

It tells you where your users are coming from, your top content, what users do on your website, and more. It also allows you to track your eCommerce SEO by seeing which products are popular and where you are losing customers.

Bonus tip: See what other marketing data you must track on your website to grow your business.

Other Powerful Growth Tools:

Aside from the above plugins, we also recommend the following tools to increase your traffic and conversions from SEO visitors:

  • PushEngage – connect and engage with SEO visitors after they leave your website with web push notifications.
  • OptinMonster – convert abandoning visitors into email subscribers & customers.
  • Constant Contact – stay in touch with SEO visitors through email marketing.
  • WPForms – get more leads from your SEO traffic with #1 WordPress form builder.
  • SeedProd – create SEO friendly custom landing pages with drag & drop WordPress page builder (no coding needed).

We hope this article helped you find the best WordPress SEO plugins and tools for your website. You may also want to see our proven tips to easily increase your website traffic, and our comparison of best chatbot software to boost conversions.

If you liked this article, then please subscribe to our YouTube Channel for WordPress video tutorials. You can also find us on Twitter and Facebook.

The post 14 Best WordPress SEO Plugins and Tools That You Should Use appeared first on WPBeginner.


December 04, 2020 at 06:00PM
Thursday, December 3, 2020

How to Easily Change Domain Nameservers (and Point to a New Host)

Do you need to change nameservers and point your domain to a new WordPress hosting provider?

Nameservers tell the global domain name system where to look for a particular website. This may sound a bit technical, but changing nameservers is actually a fairly straightforward process.

In this article, we’ll show you how to easily change domain nameservers and point to a different host or firewall, step by step.

Changing your nameservers and pointing your domain to a new host

What Are Nameservers?

Nameservers are part of the global database of domain name system. Their job is to tell other computers where to find a domain name.

If your web hosting account is the house where your website files live, then the domain name is the street address of that house.

Nameservers tell the internet where to locate the website address associated with a domain name.

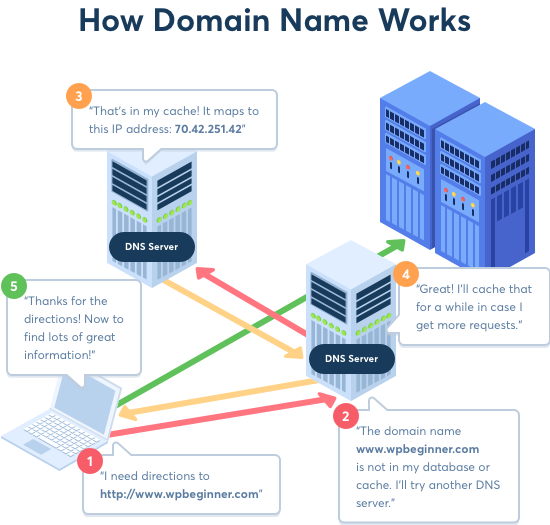
How domain names work

When you enter a domain name in your web browser, it first sends a request to a global network of servers that form the Domain Name System (DNS).

These servers then search for the respective nameservers associated with the domain and forward the request accordingly.

For example, if your website is hosted on Bluehost, then its nameserver information will be like this:

ns1.bluehost.com
ns2.bluehost.com

These name servers are computers managed by your website hosting service provider. Your hosting company will forward the user’s request to the computer, also known as server, where your website is stored.

Why and When Do You Need to Change Domain Nameservers?

There are two primary reasons why you would need to change your nameservers:

  1. You’re switching your web hosting providers
  2. You’re adding a web application firewall like Sucuri or Cloudflare to protect your website

When you move your website to a new hosting company, you will need to change the nameserver information for your domain name, so that it points to the new hosting location.

This is extremely important because often your old hosting company will delete your files after your plan expires. If you don’t change the nameserver, then your users will not be able to find your website.

When you’re implementing a web application firewall (WAF), the WordPress WAF plugins will ask you to point your nameserver to them.

This is a required step for all web application firewall like Sucuri or Cloudflare because it helps them protect your website server from attacks by blocking it at the DNS level.

Aside from these two common reasons, you will rarely ever have to change your nameservers. Although, you may need to add DNS records such as changing MX records for your professional email address, etc.

That being said, let’s take a look at how to easily change your domain’s nameservers and point them to your new host.

How to Change Your Domain’s Nameservers

Changing your nameserver is quite simple and easy. The process may look a little different to you depending on your domain name registrar, but the basic steps are the same.

We will cover the instructions for changing your nameservers on several popular domain registrars and web hosting companies. You can use the quick links to jump to the section for your host.

Before editing your nameservers, you need to know the new nameserver records to use. Your new web host should be able to tell you this.

Nameservers will usually look like ns1.bluehost.com and ns2.bluehost.com. Some web hosts use IP addresses instead.

Tip: It can take a few hours for nameserver changes to take effect. Please be patient, if your website isn’t showing up at your domain right away.

Changing Your Nameservers with Domain.com

Domain.com is one of the most popular domain registrar. It’s easy to register a domain with Domain.com and host it elsewhere.

Bonus: If you need to register a new domain name, then you can use our exclusive Domain.com coupon to get a 25% discount.

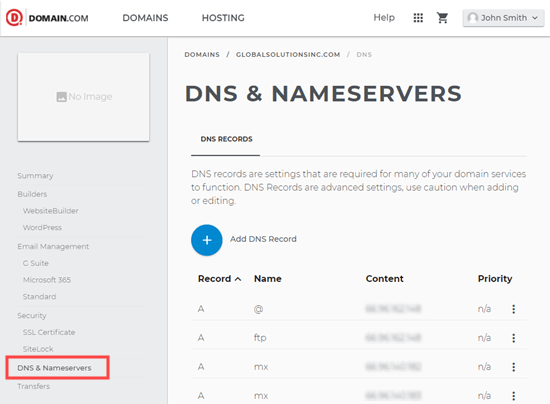
To change your nameservers, you first need to log in to your Domain.com account. After that, you must click the ‘DNS & Nameservers’ link in the left hand sidebar.

Viewing the DNS details for your Domain.com domain

This will take you to a page where you can see your DNS records.

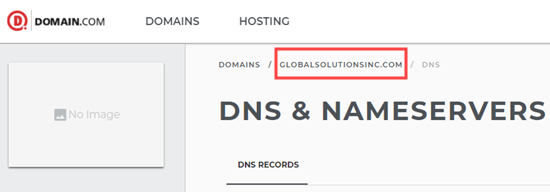
Before you start, make sure the correct domain is selected at the top of the screen in the breadcrumb navigation.

Make sure the correct domain name is selected

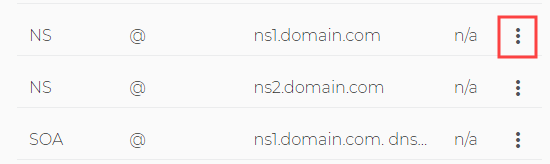
Once you have verified the domain is correct, simply scroll down until you reach the NS records. There should be 2 of these, ns1.domain.com and ns2.domain.com.

First, click the 3 vertical dots next to ns1.domain.com then select Edit.

The nameservers in the list of DNS settings at Domain.com

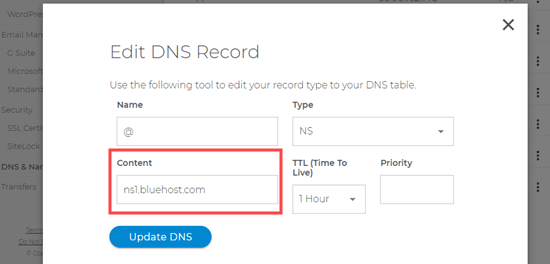
You will see a popup where you need to edit the nameserver record. Simply type the new nameserver in the ‘Content’ box then click the ‘Update DNS’ button. Here, we’re using Bluehost’s nameservers:

Updating the nameservers for your site using Domain.com

Repeat the same process for the ns2.domain.com nameserver record too.

You will see your updated nameservers in the list.

Our updated nameservers displaying in the Domain.com DNS settings list

That’s all you need to do to point your website domain to your new host.

Changing Your Nameservers with Bluehost

Bluehost is a popular WordPress web hosting company. They are also a domain registrar. If you have a domain registered at Bluehost, it’s easy to change your nameservers.

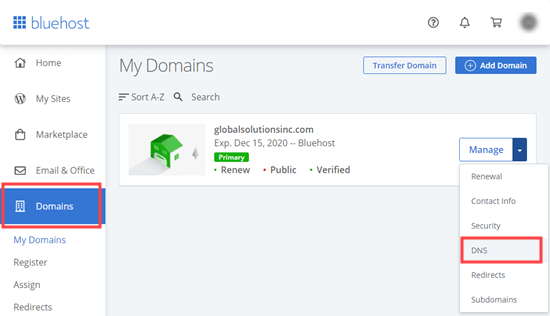
First, you need to log in to your Bluehost account. Next, click the Domains tab on the left-hand side. You should see your website domain(s) in a list. Simply click the dropdown next to your domain then select DNS.

Managing the DNS settings for your domain in Bluehost

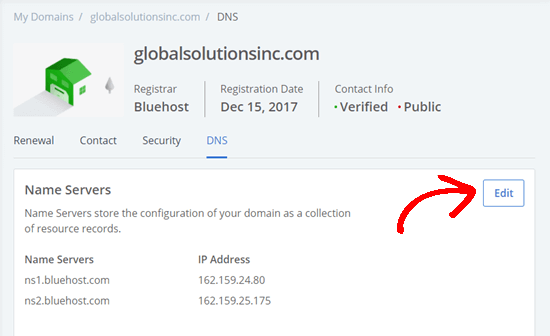
You will now see the DNS details for your domain in Bluehost. Go ahead and click the Edit button next to these.

Editing your nameservers with Bluehost

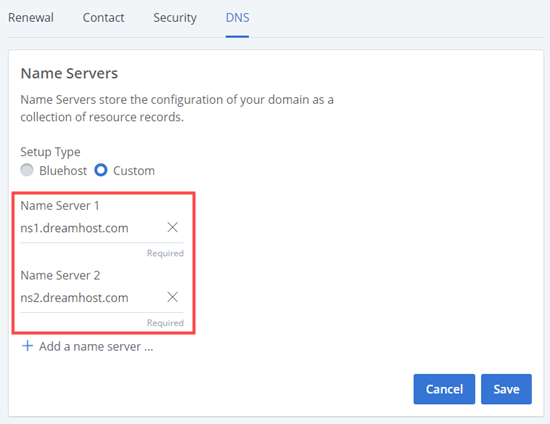
Now, you need to click the ‘Custom’ option and enter the nameservers for your new web host. Next, click the Save button.

Using custom nameservers for your Bluehost domain

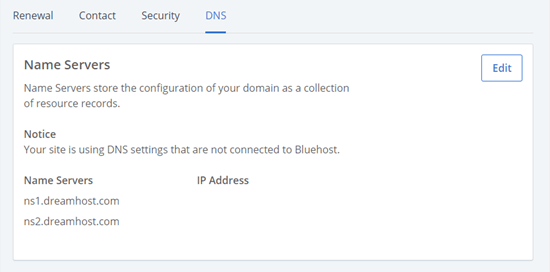
You will then see the updated nameservers in the list:

The updated nameserver details listed in Bluehost

That’s all you need to do. Your website domain is now pointing to your new web host.

Congratulations, you have successfully changed name servers on Bluehost.

Changing Your Nameservers with SiteGround

SiteGround is a well-known premium WordPress hosting company. We use them to host WPBeginner website.

They also offer domain name registration as part of their web hosting platform.

To change your nameservers in SiteGround, you first need to log in to your SiteGround account.

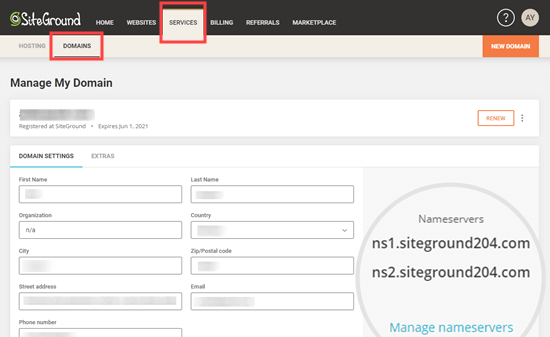
Next, click go to the Services » Domains page and click the ‘Manage nameservers’ link for your chosen domain.

Clicking the Manage Nameservers link for your chosen domain

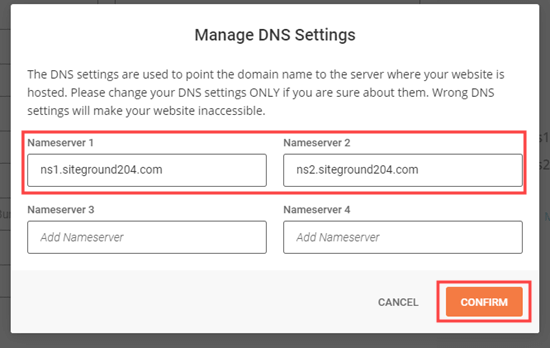
In the popup window, simply delete the existing SiteGround nameservers and enter the new ones you want to use. Optionally, you can add a third and fourth nameserver.

Once you’re ready, go ahead and click the Confirm button.

Editing your nameserver records and saving your changes

Your new nameservers will now display next to your domain name.

Bonus: Want to host your website on SiteGround just like WPBeginner? They’re offering our users 63% off their web hosting with our exclusive SiteGround coupon. Discount is auto-applied when you click our Coupon link.

Congratulations, you’ve now changed your domain name servers on SiteGround.

Changing Your Nameservers with HostGator

HostGator is another popular web hosting company and domain registrar.

To change your nameservers on HostGator, you need to log in to your HostGator account.

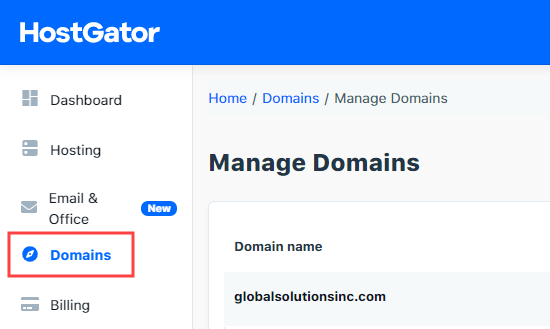
Next, you need to click the Domains tab, and then click the name of your chosen domain to see further details.

The Domains tab in your HostGator account

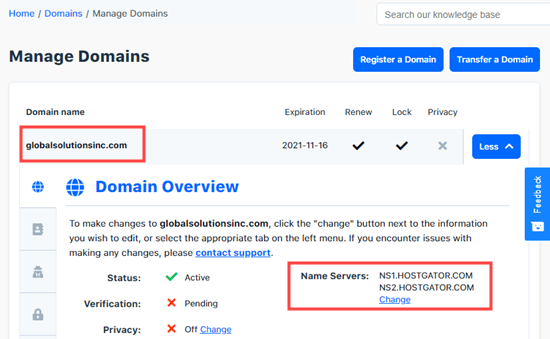
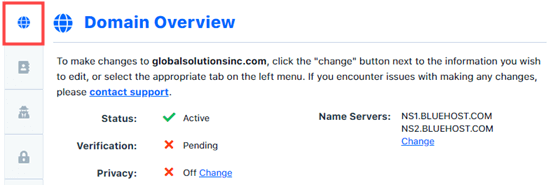
You will now see an expanded details section below your domain name. Here, you just need to click on the ‘Change’ link below your nameserver details.

Viewing the details for your HostGator domain name

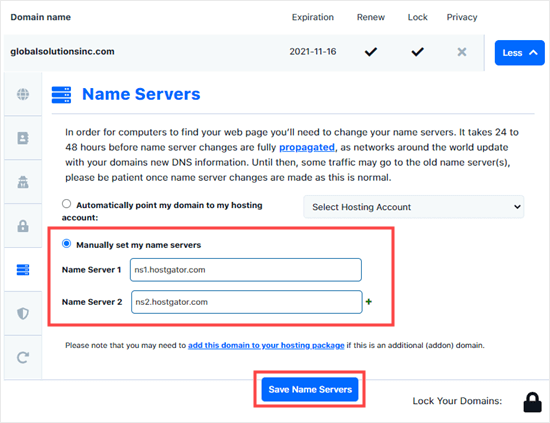
You will now see two new boxes will appear for the nameservers. You simply need to enter your nameservers in these boxes and press the ‘Save Name Servers’ button.

Entering your new nameservers in HostGator

The boxes will then turn green to indicate that the nameserver change has been saved. If you return to the domain overview, you will see your new nameservers in the list:

Your new nameservers in the HostGator list

Congratulations, you have successfully changed name servers on HostGator.

Bonus: Want to register a free domain name on HostGator? You can use our HostGator coupon to get 62% off HostGator’s hosting, plus a free domain name and SSL certificate.

Changing Your Nameservers with GoDaddy

GoDaddy is one of the best-known hosting and domain name companies.

To change your nameservers, you first need to log in to your GoDaddy account.

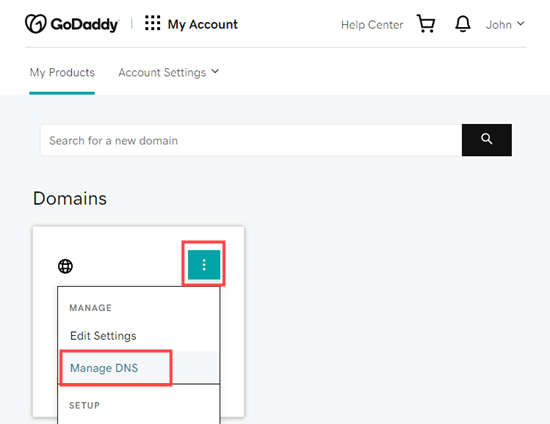
You should see your domains listed on the home page. Simply click the 3 vertical dots for your chosen domain and select the ‘Manage DNS’ option.

Selecting the 'Manage DNS' option for your domain

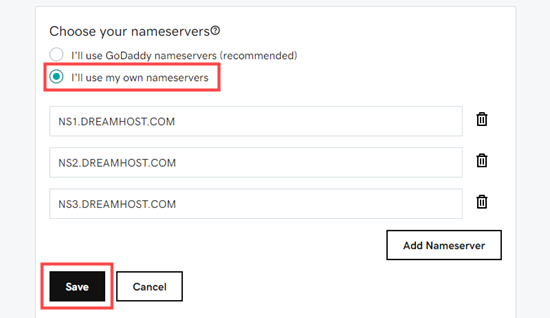
Next, you need to click the ‘I’ll use my own nameservers’ option and enter the nameservers that you want to use. You can add more than 2 by using the ‘Add Nameserver’ button.

Entering your new nameservers in GoDaddy

Once you’re done, just click the Save button.

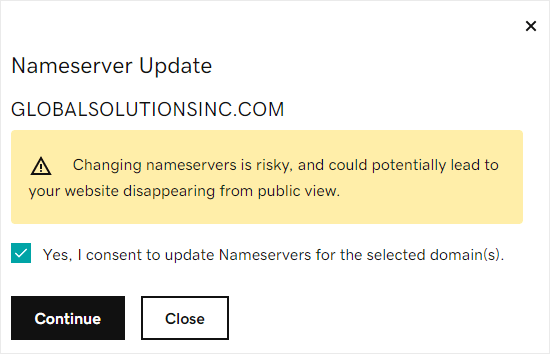
GoDaddy may bring up a warning prompt to confirm. Just check the box, and then go ahead and click the Continue button. Your nameservers have now been changed.

Checking the box below the warning message from GoDaddy

Bonus: You can get a huge 89.9% off GoDaddy hosting and get a free domain. For more details, check out our GoDaddy coupon page.

Congratulations, you have successfully changed name servers on GoDaddy.

Changing Your Nameservers with Namecheap

Namecheap is another top-rated domain name company that offers great value domains.

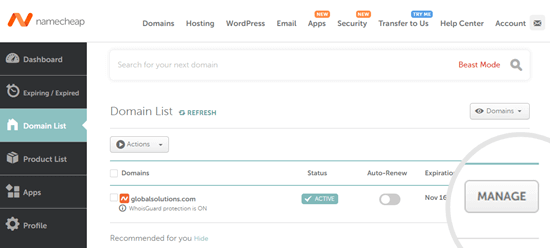
To change your nameservers, you first need to log in to your Namecheap account. Next, click the ‘Domain List’ tab and then click the Manage button next to your chosen domain.

Click the Manage link next to your domain name

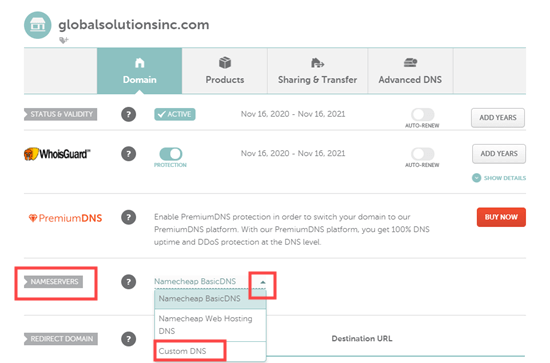
After that, you need to scroll down to the Nameservers section of the page. Here, you need to click on the dropdown list and select the ‘Custom DNS’ option.

Selecting the Custom DNS option

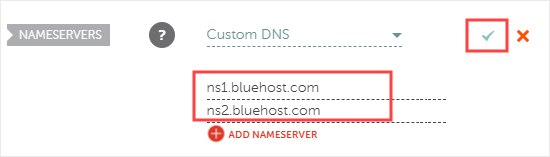
Simply add in your nameservers here, then click the check button.

Adding your nameservers in Namecheap

Your new nameservers will now display in the list.

Your nameservers are now showing in the Namecheap list

Congratulations, you have successfully changed name servers on Namecheap.

Final Steps After Setting Up Your Domain Nameservers

Any domain nameserver changes can take a few hours to take in effect worldwide. That’s because it requires each internet service provider to clear their cache history and update the IP address to new records.

If this is your first time changing nameservers, then it’s important that you exercise patience because often the changes will not reflect right away.

If it’s been a few hours, and your nameserver changes are still not showing up, then you can try to flush your DNS cache on your computer.

We hope this article helped you learn how to change nameservers and point a domain to another host. You may also want to see our list of must have WordPress plugins for all websites, and our comparison of the best email marketing services to grow your business.

If you liked this article, then please subscribe to our YouTube Channel for WordPress video tutorials. You can also find us on Twitter and Facebook.

The post How to Easily Change Domain Nameservers (and Point to a New Host) appeared first on WPBeginner.


December 03, 2020 at 06:00PM