Wednesday, December 9, 2020

How to Create a Custom Facebook Feed in WordPress

Do you want to create a custom Facebook feed on your site?

Custom Facebook feeds allows you to display Facebook posts from your business page or group on your WordPress site, so you can improve engagement.

In this article, we’ll show you how to easily create a custom Facebook feed in WordPress without slowing down your website.
How to create a custom Facebook feed in WordPress

Why Create a Custom Facebook Feed in WordPress?

Facebook is the largest social media platform in the world. As a website owner, you may already be engaging with your audience through your Facebook page or by creating a Facebook group.

However, all the posts you make on Facebook are not visible to the people visiting your website. By adding a custom Facebook feed you can show what’s happening on your Facebook page or group to your site visitors.

This will allow more of your users to see your posts and will help you get more Facebook likes. If you are using the Facebook remarketing/retargeting pixel on your website, then you can show your ads to those users on Facebook as well.

Having said that, let’s take a look at how to add a custom Facebook feed to your WordPress site.

Since this is a comprehensive, we have created an easy table of content:

Adding a Custom Facebook Feed Plugin in WordPress

The first thing you need to do is install and activate the Smash Balloon Custom Facebook Feed plugin. For more details, see our step by step guide on how to install a WordPress plugin.

For our article, we’re using the Pro version of Smash Balloon Facebook feed plugin because it offers all the powerful features. There’s also a free version available that you can use as well.

After installation, you’ll need to visit the Facebook Feed » Settings page in your WordPress admin and then go to the ‘License’ tab to enter your activation code.
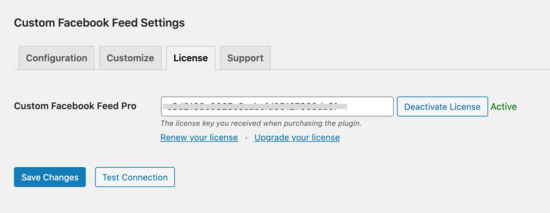
Enter smash balloon activation key

Once you have activated your license key, you are good to go.

Let’s start by adding your Facebook page to your custom feed.

Connect Your Facebook Page Feed to WordPress

SmashBalloon Custom Facebook Feed plugin allows you to create feeds for your Facebook pages and groups. You can create multiple Facebook feeds and even merge feeds to create a custom feed.

To create a feed, you need to visit your Facebook Feed » Settings page to configure the plugin. From here you need to click on the ‘Connect a Facebook account’ button.
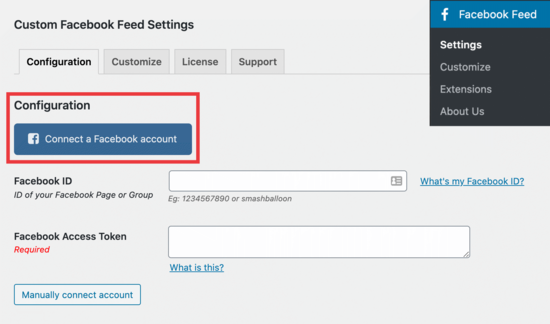
Connect your Facebook account

Next, you need to select whether you would like to connect a Facebook page or a group. After that click on the ‘Continue’ button.
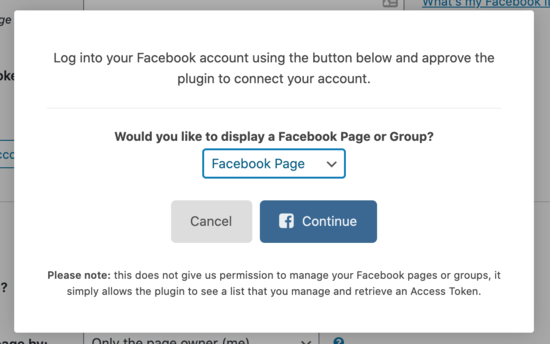
Continue Facebook connection

This will take you to Facebook website where you will be asked to continue with your Facebook account.

After that, you’ll see a list of your Facebook pages. Select the page that you want to include in your feed and then click Next.
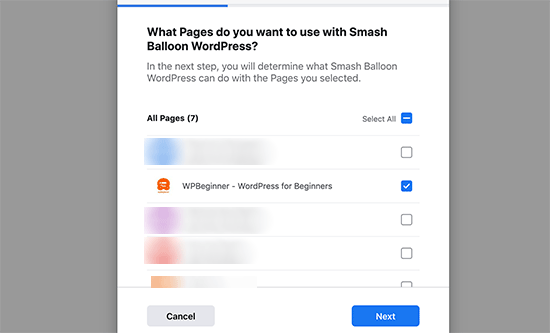
Select your Facebook page

Now Facebook will ask your permission to allow Smash Balloon to manage pages for you. Click on Done to give permission.
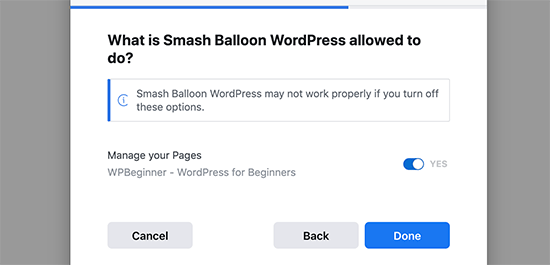
Allow plugin to manage your Facebook pages

You will now return back to your WordPress website and see the list of pages you have authorized. Select your page and then click on the ‘Connect this page’ button.

Facebook connected in WordPress

Your connected Facebook page will now appear under plugin settings.
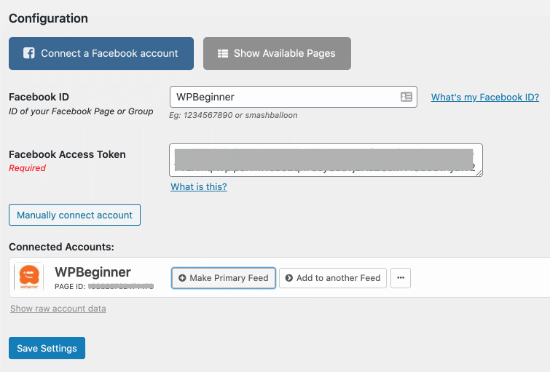
Configured Facebook page

Don’t forget to click on the ‘Save Settings’ button to store your custom Facebook feed.

We’ll show you how to add it to your blog post or pages later in this article. Before that, let’s see how to connect a Facebook group to create a custom group feed for your website.

Connect Your Facebook Group Feed to WordPress

First, you need to visit the Facebook Feed » Settings page and click on the ‘Connect a Facebook Account’ button. From drop-down menu select ‘Facebook Group’ and click ‘Continue’.
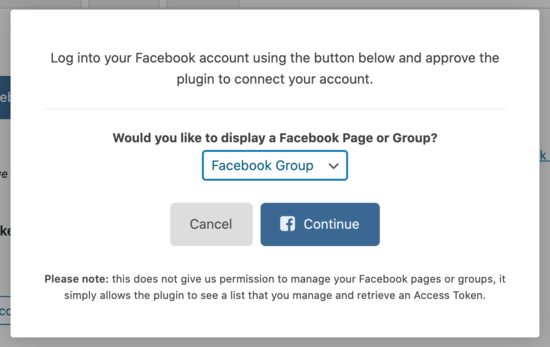
Connect Facebook group

After you click on the ‘Continue’ button, you’ll be able to select which group you want to connect.
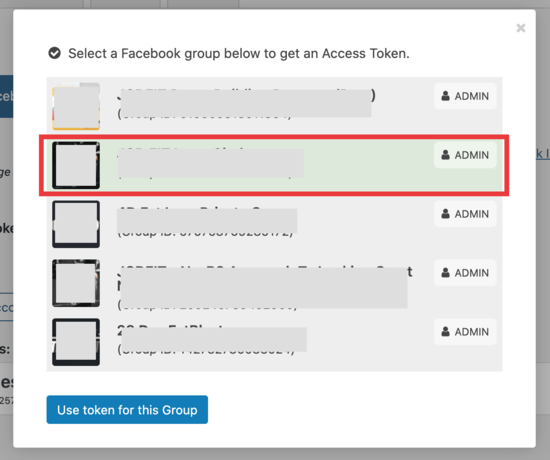
Connect your Facebook group

Click on the ‘Use token for this Group’ button and you’ll get the following message:
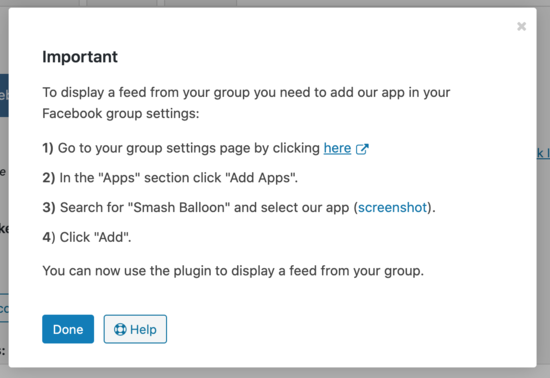
Connect Smash Balloon App

Follow step one above by clicking on the ‘here’ link and then go to the apps section on that page.

When you search for ‘Smash Balloon,’ here’s what you’ll see:

Find Smash Balloon App

Click that button to add the app, and you’re done.

Now, in the configuration section, you’ll see your page and group connected.
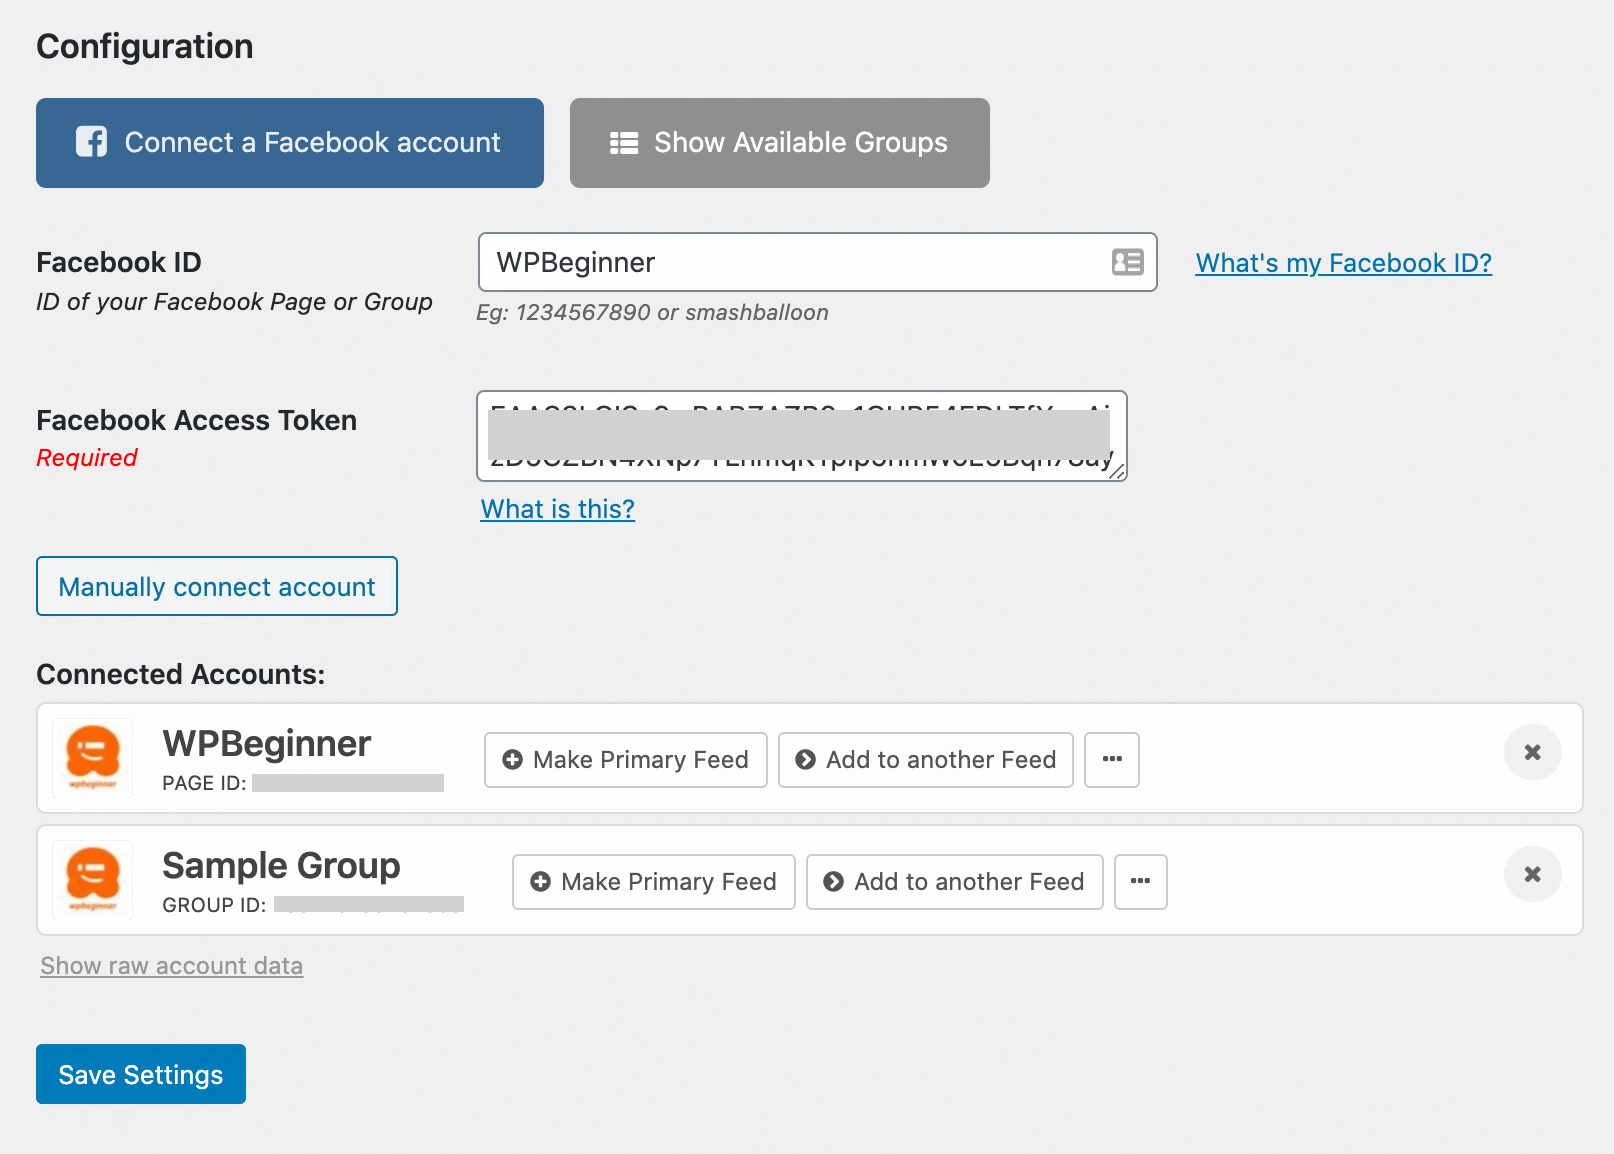
Connect Facebook group

Click on ‘Save Settings.’

Now, it’s time to embed your Facebook feed on your WordPress website.

Create & Display a Custom Facebook Feed in WordPress

Smash Balloon allows you to display custom Facebook feeds in a post, page, or in a sidebar widget. For our example, we’ll embed it in a page.

First, you need to go to your Facebook Feed » Settings page, and scroll down to see the Facebook feed shortcode:

Copy and paste Facebook feed shortcode

You need to copy the shortcode, and then open the WordPress content editor to create or edit a page where you want to embed the feed.

In the content editor, simply click the (+) icon to add a shortcode block, and then paste the shortcode in there:

[custom-facebook-feed]
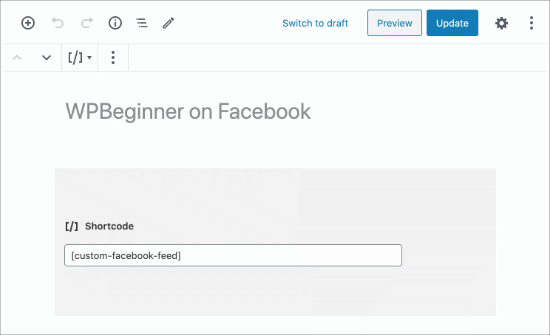
Add shortcode to WordPress page

After that you can save your page and preview it. Smash Balloon will fetch and display the latest posts from your Facebook page or group on your WordPress page.
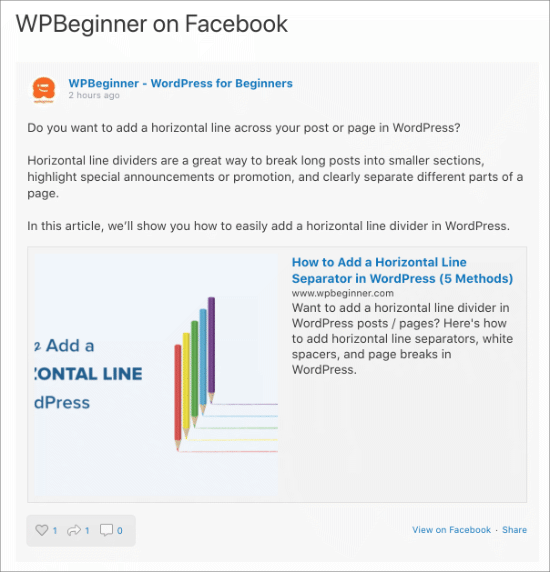
Facebook feed on WordPress page

Displaying Multiple Facebook Feeds

Let’s say you want to display more than one custom Facebook feed on your WordPress blog. The plugin’s settings only allow you to add one page or group ID.

However, you can easily use the shortcode to display any other custom Facebook feed you want.

Simply add the shortcode like this:

[custom-facebook-feed id=wpbeginner]

The plugin’s shortcode comes with a whole range of parameters. You can visit the plugin’s website to see the complete list of parameters that you can use.

Customize The Appearance of Your Facebook Feed

The plugin allows you to personalize the appearance of your custom Facebook feed on your website. You can visit the Facebook Feed » Customize page to edit the settings.

This section is divided into different tabs, giving you plenty of options to choose from.

Click on the ‘Post Layout’ tab.
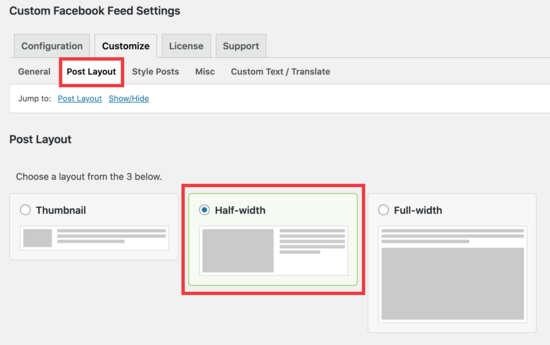
Post layout settings

We chose the ‘Half-width’ option, so the image and text will display evenly.

The next step is to select the ‘Style Posts’ tab to the right. Here, you can customize how the post looks, adding a background or box shadow for contrast.
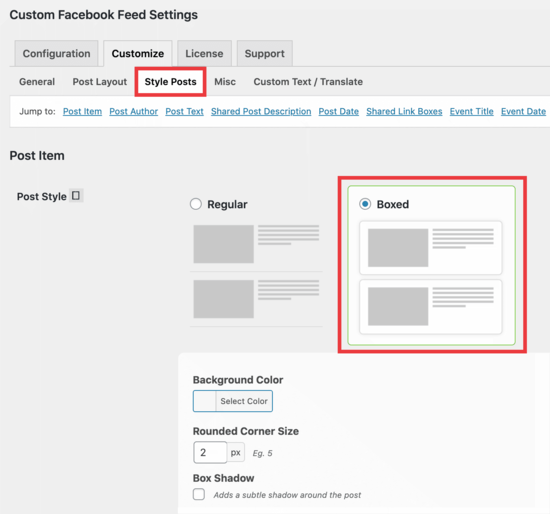
Style posts screen

Once you are satisfied with the layout, don’t forget to click on the save changes button and preview your feed.

Combine Feeds to Create a Social Wall

Want to take your social feeds even further? Smash Balloon comes with a WordPress Social Wall addon that allows you to combines your content from Facebook, Instagram, Twitter, and YouTube on a single feed.
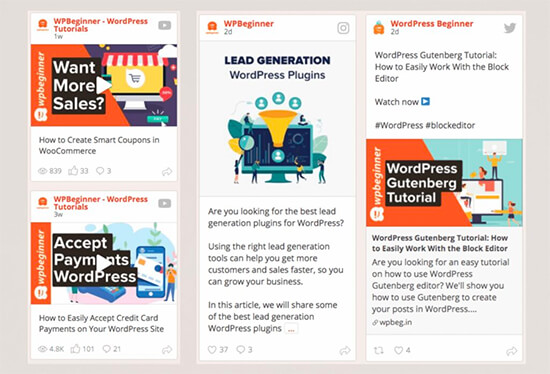
Smash Balloon Social Wall

This allows you to maximize your engagement and gain followers across all social platforms.

We hope this article helped you add a custom Facebook feed in WordPress. You may also want to see our guide on how to add web push notification on your site to get more traffic, and our comparison of the best WordPress membership plugins to create & sell courses on your website.

If you liked this article, then please subscribe to our YouTube Channel for WordPress video tutorials. You can also find us on Twitter and Facebook.

The post How to Create a Custom Facebook Feed in WordPress appeared first on WPBeginner.


December 09, 2020 at 06:00PM
Tuesday, December 8, 2020

What’s New in WordPress 5.6 (Features and Screenshots)

WordPress 5.6 was released earlier today, and it is the last major release of 2020.

This new release is packed with a lot of improvements and new features. It also includes a brand new default WordPress theme.

In this article, we’ll share what’s new in WordPress 5.6, and which features you should try after updating your websites.

Take a look at what is new in the new WordPress 5.6

WordPress 5.6 is a major release, and unless you are on a managed WordPress hosting service, you’ll have to manually initiate the update.

Important: Don’t forget to create a complete WordPress backup before initiating the update.

With that said, here’s all that’s new in WordPress 5.6.

Twenty Twenty-One – The New Default WordPress Theme

WordPress traditionally releases a new default theme each year which is usually named after the year. WordPress 5.6 comes with Twenty Twenty-One as the new default WordPress theme.

This new theme provides a canvas for the WordPress block editor and the site editing features. It is designed to be simple, aesthetically pleasing, un-opinionated, and refreshing.

New default WordPress theme Twenty Twenty-One

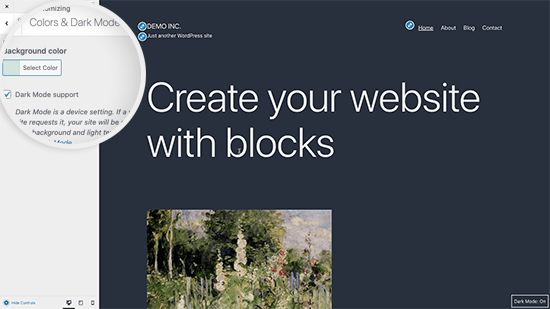
Twenty Twenty-One uses a pastel green background color, and two shades of dark grey for text. It also ships with colors for the dark mode which can be enabled by customizing the theme.

Twenty Twenty-One dark mode

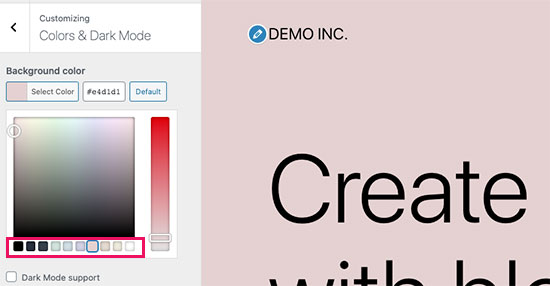
You can also change the background color by choosing from several pastel color schemes or choose your own colors. The theme will automatically adjust text color as well.

Choose a background color scheme

Here is a preview of what these built-in color combinations would look like.

 Pastel color schemes in Twenty Twenty-One

For typography, designers opted to go with the default system fonts. This means no extra font files to load and easy to build child themes that have their own typography and fonts.

If you are testing the theme with a fresh WordPress website, then you can try out the new homepage layout. Simply go to the Appearance » Customize page and click on the Publish button to generate basic website pages including a homepage.

This sample homepage gives you an idea of what you can do with the block editor. You can simply edit the page and replace it with your own content.

Earlier this year, WordPress 5.5 introduced patterns for the block editor. Twenty Twenty-One utilizes this feature by adding new block patterns that you can use in your posts and pages.

Twenty Twenty-One patterns

Overall this is a beautiful WordPress theme, that is easy to customize and can be used to make any type of website.

The Block Editor Improvements

The WordPress content editor is where users spend most of their time writing blog posts, creating pages, and making layouts. WordPress 5.6 brings several improvements to the block editor.

Here are some of the most noticeable changes to the block editor in WordPress 5.6.

Video Position Control for The Cover Block

Previously cover block only showed position controls for images. With WordPress 5.6, the cover block now allows users to set video position inside the cover block.

Cover block with video focal point picker controls

Patterns Organized in Categories

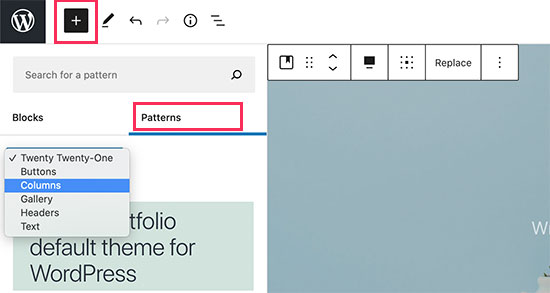
The patterns panel under the ‘Add new block’ column now has a category switcher. This makes it super easy for users to find and use a pattern they need. Users will also be able to see the patterns available with their theme and distinguish them from the default patterns.

Pattern categories in WordPress 5.6

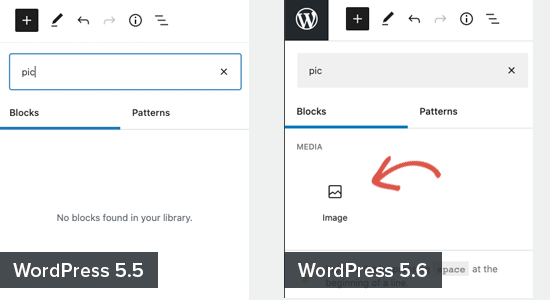
Keyword Variations to Improve Block Search

The block editor now allows developers to store keyword variations that may help users find a block. This would improve the block search feature and will allow users to discover blocks added by block libraries or third-party plugins.

Keyword variations make it easier to find common blocks

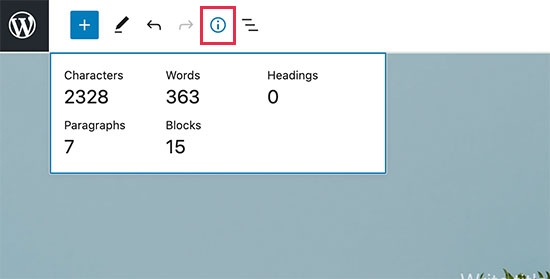
Characters in The Information Panel

The information panel will now show characters along with words, paragraphs, and blocks used in your content.

Information panel in WordPress 5.6

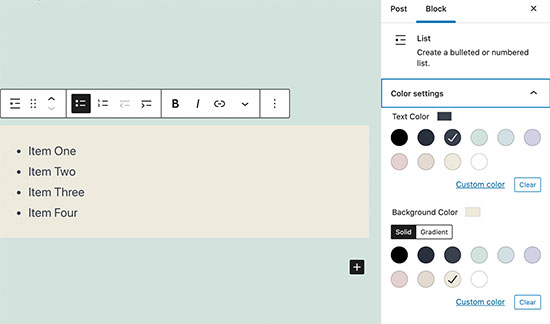
Color Support for The Lists Block

The lists block now has the option to choose text and background colors without adding the list into another block.

List block color settings

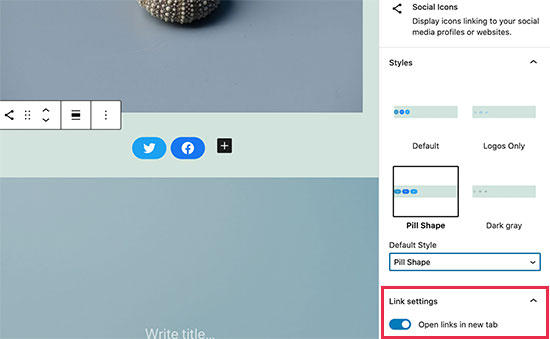
Social Icons Block

Social Icons block has two improvements. First, there is a new gray style for social icon buttons. Secondly, users can now choose to open all links in the block in a new window.

Social Icons block in WordPress 5.6

Bonus: want to add social share counts? Here’s how to add social share counts in WordPress.

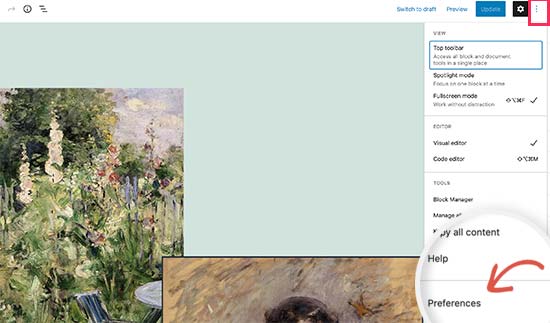
Editor Options are Now Called Preferences

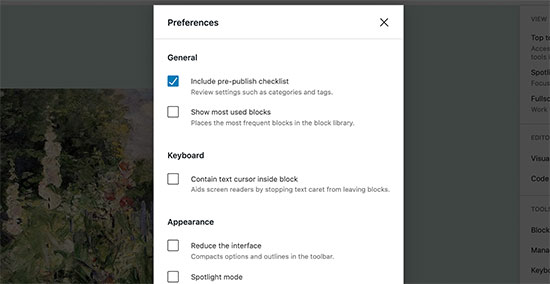
The default block editor has a settings panel where you can set up the editor to your own liking. In WordPress 5.6, this modal is now called ‘Preferences’ instead of ‘Options’.

Editor preferences setting

The modal itself now is more helpful with descriptions for different items. This would make it easier for beginners to decide which items they want to enable.

Editor preferences menu

Automatic Updates for Major WordPress Releases

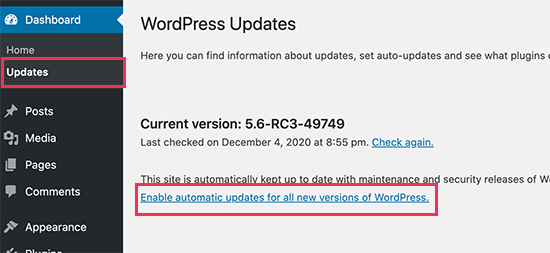
Earlier this year, WordPress 5.5 made it easier for users to turn on automatic updates for specific plugins. WordPress 5.6 extended this by adding the option to turn on automatic updates for major WordPress releases as well.

You can go to Dashboard » Updates page inside WordPress admin area and click on the ‘Enable automatic updates for all new versions of WordPress’ link.

Enable automatic updates for major WordPress releases

This is totally optional for you to decide whether you want to enable this feature or not. If you are using a managed WordPress hosting, then you don’t need to worry about that as they will automatically update WordPress for you.

Support for PHP 8

PHP 8 support in WordPress 5.6

WordPress is written mainly with the PHP programming language. Just like WordPress, PHP also releases new versions to improve performance, add features, and fix bugs.

They were expected to release PHP 8 on November 26 closer to the release of WordPress 5.6. The core team planned and worked hard to catch and fix any known compatibility issues with PHP 8.

This will ensure that users who upgrade to the latest PHP version will not face any major issues. However, theme and plugin developers may still need to test their own code for compatibility.

Application Passwords for REST API

The REST API in WordPress allows developers to communicate with a website outside the WordPress installation itself.

To keep it safe, WordPress used cookies and nonce keys to ensure that only legitimate users can access the API. For developers, these methods were not very efficient to work with.

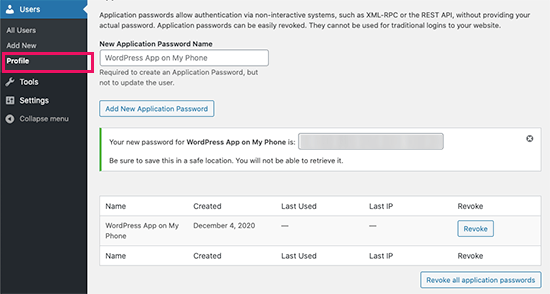
WordPress 5.6 will allow developers to use application passwords in WordPress. Just like popular platforms Facebook and Google, the users can now give apps access to their website and manage it from the Users » Profile page. Users can also revoke an app’s access at any time.

Application passwords in WordPress 5.6

Under The Hood Changes

WordPress 5.6 has arrived with tons of features and improvements targeted towards developers. The following are some of the most significant under the hood changes.

WordPress 5.6 continues the second phase of the three-step plan to upgrade the core jQuery bundled with WordPress. Theme and plugin developers relying on jQuery are already testing their code for any issues so it is not likely to affect large number of users. (See details)

The new 5.6 release also includes REST API Batch Framework for making a series of REST API calls in one request to the server. (See details)

A new action wp_after_insert_post is also available in WordPress 5.6. It allows theme and plugin developers to run custom code after a post and its terms and meta data have been updated. (See details)

WordPress 5.6 has replaced older-style PHP type conversion functions with type casts. (#42918)

WordPress 5.6 also introduced the ability to merge WP_Error objects into one another. This would allow developers to add more than one item of data to the WP_Error object. (#38777)

We hope this guide helped you explore what’s new in WordPress 5.6. We are particularly excited about the new default theme and the improvements made to the block editor.

What are you excited about? Let us know in the comments below.

If you liked this article, then please subscribe to our YouTube Channel for WordPress video tutorials. You can also find us on Twitter and Facebook.

The post What’s New in WordPress 5.6 (Features and Screenshots) appeared first on WPBeginner.


December 09, 2020 at 05:33AM

7 Best Cloud Phone Systems for Remote Teams – Compared (2020)

Are you looking for the best cloud phone system for remote teams?

Cloud-based phone systems are a great option when your team members work remotely sometimes or work from home. Choosing the best cloud phone system is a very important decision because it can impact your business and customers.

In this article, we will compare the best cloud phone systems for remote teams with their features, pros, and cons.

The best cloud phone systems for remote teams (compared)

What is a Cloud Phone System?

A cloud phone system is a business VoIP (Voice over Internet Protocol) telephone system that allows you to make and receive business phone calls through your internet connection.

Because your phone calls are managed in the cloud over the internet, you and your employees can take calls from anywhere. You don’t need to be physically connected via a landline, as you would in a traditional phone system.

Cloud phone system is perfect for remote teams. Instead of employees giving out their personal cell phone number for business calls, they can receiving business phone calls using the virtual business phone number app on their cell phone.

That being said, here are the top cloud phone systems for remote teams.

1. Nextiva

Nextiva

Nextiva offers an excellent easy-to-use cloud phone system that’s ideal for remote teams. It comes with all the features and functionality you need for your business communications, such as unlimited free domestic calls, advanced call routing, voicemail to email and text, SMS messages, auto attendant, and online faxing.

The web-based admin panel is simple to use and manage. You get a free local or toll-free number, free number porting, and all the call management features you’d expect. These include caller ID, call forwarding, custom greetings, auto-attendant, advanced IVR (interactive voice response) system, and more.

Within the US and Canada, you have unlimited VoIP calling with Nextiva. For international calls, they have very affordable rates.

The Nextiva communication platform offers additional powerful features that integrate with your phone system. These include a fully-featured CRM and live chat, making Nextiva a Unified Communications system, also called a complete cloud platform.

Nextiva also offers online surveys and call analytics. The voice analytics software gives you real-time insights into phone activity across your organization. This lets you monitor call volumes and spot potential problems.

Larger companies, contact centers, and call centers often use Nextiva to transition their existing private branch exchange (PBX) system into a powerful cloud phone system.

You can use your existing desk phones with Nextiva, or you can buy IP phones for your remote team to use instead. Netiva also offers computer apps which work as a ‘softphone’, so your team can make voice calls through their computer.

Nextiva also have a business phone app that works on iPhones (iOS), and Android smart phones.

Most importantly, Nextiva gives you great call quality and connectivity through their incredibly reliable data centers. They have had no outages at all in the last two years.

If you ever need any help with your business phone service, their customer service team is always helpful and responsive.

Price: Nextiva starts from $19.95/user/month. The price per user varies depending on how many users you have.

Editorial Note: We use Nextiva for our team at WPBeginner and Awesome Motive. We’ve been huge fans of their platform and highly recommend them.

2. RingCentral

RingCentral

RingCentral is another popular cloud phone system for remote teams. Their feature-rich system includes all the standard options you’d expect, like unlimited calling, call forwarding, caller ID, call waiting, texts, online faxing, automatic call recording, and more.

You also get video conferencing with screen sharing, plus integration with Google Workspace (formerly G Suite), Dropbox, Microsoft Office365, Salesforce and other services. This can enable RingCentral to operate as the heart of your communications platform.

Like Nextiva, RingCentral will not charge you for calls in the US and Canada, no matter how many calls you make. Your team members can take calls through the RingCentral mobile or desktop app, giving them plenty of flexibility.

RingCentral also works as a cloud PBX or virtual PBX system, meaning incoming calls can easily be routed to the right department or extension. You can also add extra virtual phone lines as needed.

You can also use RingCentral to buy vanity phone numbers like 1-800-GoFedEX.

Price: RingCentral costs from $19.99/user/month, billed annually. There’s also a free 15-day trial available. This gives you a maximum of 5 users and 50 minutes of talk time per user.

3. Ooma

Ooma

Ooma is a popular business VoIP provider that makes a great cloud communications solution for remote teams. It gives you lots of useful features like a virtual receptionist, extension dialing, hold music, a mobile app, a desktop app, and more.

You can add a toll-free number (1-800 number) for free. There are also toll-free calling plans, so you get more minutes of incoming toll-free calls per month.

It’s simple to get your cloud VoIP business phone system set up with Ooma. You have the option to keep your existing business phone number or get a new one from Ooma.

Ooma also operates as a cloud PBX or hosted PBX system. This means it’s easy to transfer calls and enable team collaboration between remote employees.

You can set up team members with their own phone, purchased from Ooma or from a third party. Alternatively, you can reduce the upfront costs by creating a new line that directs to the employee’s existing Android or iOS device.

Keep in mind that with any phone system, your team members will need a reasonable amount of bandwidth (upload speed) to make high-quality calls.

Price: Ooma costs from $19.95/user/month.

4. Grasshopper

Grasshopper

Grasshopper is a great cloud phone system for small businesses. It gives you a virtual phone number that can forward calls to any phone number or mobile device.

You get all the features you’d expect, including call forwarding, routing, hold music, voicemail to email, and more. There’s a mobile app plus a desktop app, so it’s easy for your team to use while working remotely.

With Grasshopper, you are able to get a US or Canadian local or toll-free number. You can also add custom greetings and extensions. All Grasshopper’s plans include unlimited minutes, too.

A drawback with Grasshopper is that you can’t use it to make outgoing calls. You still need your regular phone number for that. Plus, Grasshopper is only available in the USA and Canada.

Price: Grasshopper costs from $26/month, billed annually. This is for one phone number, but you can add extensions.

5. Phone.com

Phone.com

Phone.com offers a simple web interface and mobile app to manage your cloud office phone system. Like the other phone system providers we’ve covered, they offer all the standard features you’d expect. These include call forwarding, call routing, caller ID, text messaging, voicemail to email, and more.

Phone.com includes Canada plus some European countries in their local call minutes. This makes calling out to those countries much cheaper.

With Phone.com, you can also pay for extra features including call recording and more phone numbers.

The cheapest plan limits you to 300 monthly minutes and 2,000 text messages. This may be enough for your business needs if your small company doesn’t make many calls.

There’s also 24/7 live customer support, in case you need help getting set up.

Price: Phone.com costs from $12.99/user/month.

6. Google Voice

Google Voice

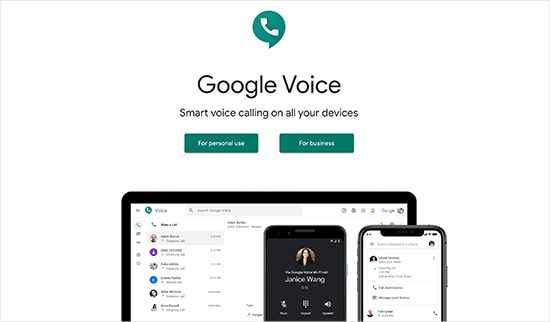
Google Voice is a cloud phone system from Google. It offers all the features you need, like free calling to US and Canada numbers, call forwarding, voicemail transcription, text messaging, call screening, and more.

With Google Voice, you also get integration with Google Calendar, Google Fi, and Google Meet.

A Google Voice number can be used through cell phones or through the desktop app with a dial pad, letting your employees work on the go. They can set their Voice number to forward to their mobile phone or other devices.

Price: Google Voice is free for personal use. The business plans pricing is from $10/user/month.

7. eVoice

eVoice

eVoice is another popular VoIP service provider. It offers unlimited calls, call routing, custom greeting, call forwarding, conference calling, text messages, voicemail to text, and more.

It’s a good option if your remote team is international or based in the UK, as eVoice offers coverage in the UK, EU, and Canada, as well as in the USA.

Note: eVoice is branded as eReceptionist in the UK.

Price: From $16.67/user/month (billed annually).

Which is the Best Cloud Phone System for Your Team?

We believe that Nextiva is the best cloud phone system for remote teams. It has lots of advanced features, and excellent support. You can easily add remote team members and set up call forwarding rules.

Nextiva’s mobile and desktop apps are easy to use. This makes it a great option for remote teams, when hands-on training is difficult.

Plus, Nextiva’s unified communication platform comes with built-in CRM and live chat features.

This is why we use Nextiva on WPBeginner and believe it’s the best cloud phone system in the market.

If you want an alternative to Nextiva, RingCentral is another excellent option. It has similar features and comes as a close second in our list.

We hope this article helped you learn about the best cloud phone systems for remote teams. You might also like our comparison of the best email marketing services and best push notification software to connect with your customers after they leave your website.

If you liked this article, then please subscribe to our YouTube Channel for WordPress video tutorials. You can also find us on Twitter and Facebook.

The post 7 Best Cloud Phone Systems for Remote Teams – Compared (2020) appeared first on WPBeginner.


December 08, 2020 at 05:52PM