Monday, December 14, 2020

How to Create a Simple Event Calendar with Sugar Calendar

Do you want to add an event calendar to your WordPress website?

There are lots of different plugins and calendar apps that can do this, but some are much too complicated or don’t work very well with WordPress.

In this article, we’ll show you how to easily create a simple event calendar in WordPress with Sugar Calendar.

Creating a simple event calendar with Sugar Calendar

How to Create a Simple Event Calendar with Sugar Calendar

Sugar Calendar is a simple and lightweight events calendar plugin for WordPress built by Pippin Williamson and the team behind Easy Digital Downloads.

Since we were looking for a lightweight event calendar plugin, we decided to give Sugar Calendar a try, and found it quite easy to use.

Here’s how to create an event calendar in WordPress with Sugar Calendar.

First thing you need to do is install and activate the Sugar Calendar plugin on your website. For more details, see our step by step guide on how to install a WordPress plugin.

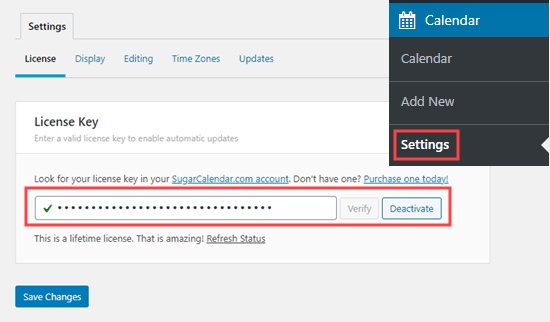
Upon activation, go to the Calendar » Settings page in your WordPress admin. Here, you need to enter your license key. You will find this in your account area on the Sugar Calendar website.

Activating your license key for Sugar Calendar

Once you’re done, click the Save Changes button to make sure your license key is saved.

Creating a Calendar in Sugar Calendar

Sugar Calendar divides the functionality into two main sections: Calendars and Events.

You can create multiple calendars, and then add different events or actvities to each calendar accordingly.

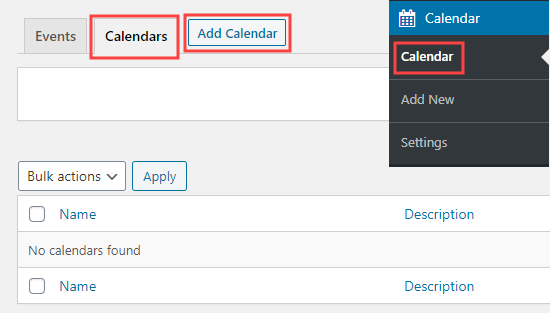
To get started, click on the ‘Calendar’ menu item page in your WordPress admin sidebar. After that, you need to select the Calendar tab then click on the ‘Add New Calendar’ button to create a new calendar.

Adding a new calendar in Sugar Calendar

You will then see a popup box for adding your new calendar.

You need to give your calendar a name and a ‘slug‘ which will become the end part of the calendar’s URL (web address).

Giving your new calendar a name and URL

There’s a box where you can describe your calendar. The description is optional, and you can leave it blank if you want.

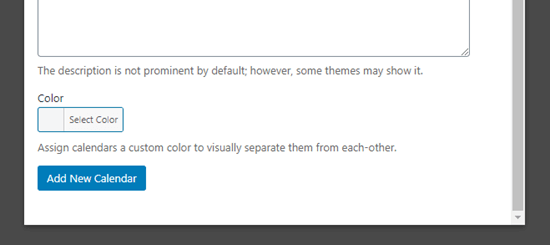
Below the description, you can select a color for your calendar. This is very useful if you’re creating multiple calendars because this will make it easier to identify different calendars on your WordPress website.

If you’re just creating one calendar, then you don’t need to set a color.

When you’re done, click the ‘Add New Calendar’ button to create your calendar.

Click the Add New Calendar button to finish creating your calendar

Adding Events in Sugar Calendar

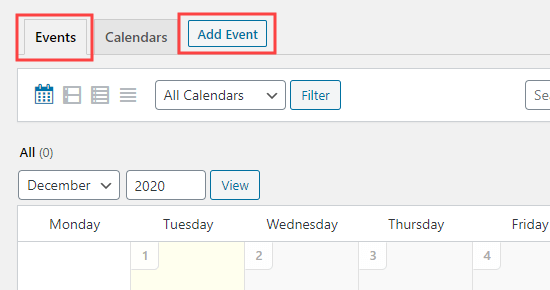
Now, it’s time to add some events to your calendar. Just click on the Events tab then click the ‘Add Event’ button to create your first event.

The Add Event button that lets you create a new event

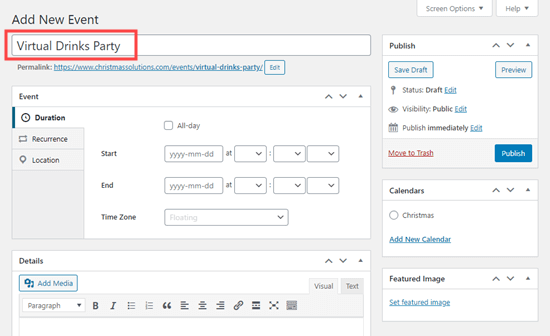
The ‘Add New Event’ screen has space for all the information about your event. Go ahead and enter the name for your event at the top.

Enter a name for your event

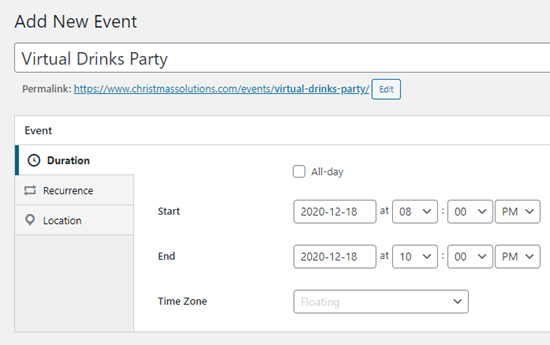
Below this, you can set the start time and end time for your event.

Your event can be on a single day or across multiple days. If it’s an all-day event, then simply check the ‘All-day’ box.

Enter a date and time for your event

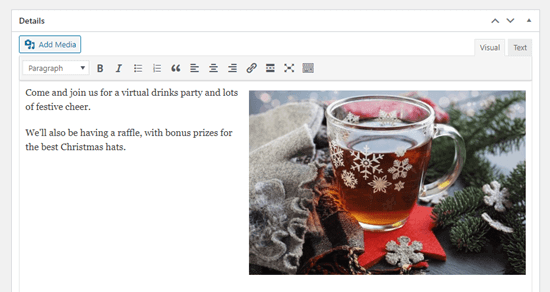
Next, go ahead and add more information about your event in the Details box. If you would like to include images or photos here, go ahead and add those using the ‘Add Media’ buttons.

Enter a description for your event

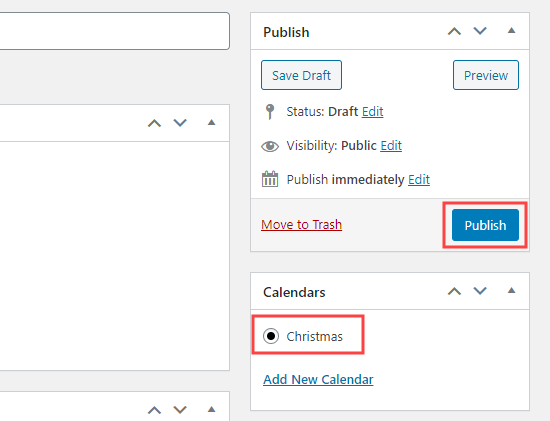
On the right-hand side of the screen, you need to click on the calendar that you want to add your event onto. You can also create a calendar here if you haven’t done so already.

When you’re ready, go ahead and click the Publish button.

Select the calendar for your event then publish the event

You can repeat this process to add more events to your calendar.

Putting Your Events Calendar on Your Website

You can add your calendar to any page or post on your website. You can even use the Sugar Calendar widget to add it to your sidebar.

We’re going to add our calendar to a new page on our demo site.

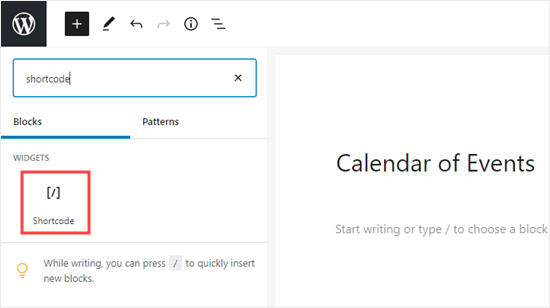
First, go to Pages » Add New. Then, enter a title for your page and add a shortcode box to your page.

Adding a shortcode block to the page

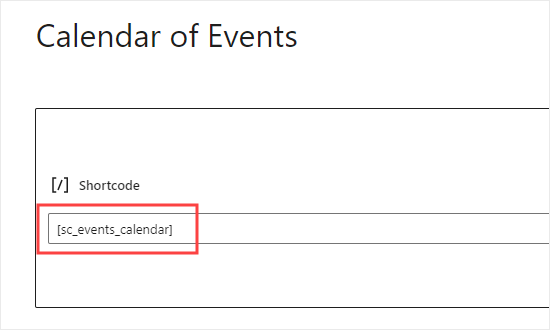
Next, copy the shortcode [sc_events_calendar] into the shortcode block.

Pasting the Sugar Calendar shortcode into the shortcode block

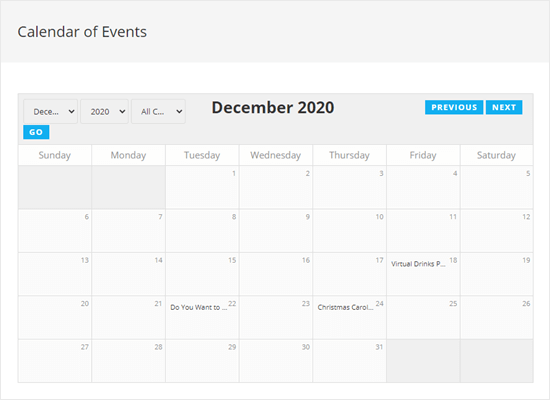
Now, it’s time to preview or publish your page. You will then see the calendar of events on your website.

Viewing the calendar of events on your website

Visitors on your website can click on an event to see the full details.

The page of details for the virtual drinks party

Note: This events page will use the fonts, colors, etc from your theme. That means it will match the posts and pages on your blog.

We hope this article helped you learn how to create a simple event calendar with Sugar Calendar. You might also like our article on the best email marketing services and best push notification software, so you can keep your users updated about new events and activities.

If you liked this article, then please subscribe to our YouTube Channel for WordPress video tutorials. You can also find us on Twitter and Facebook.

The post How to Create a Simple Event Calendar with Sugar Calendar appeared first on WPBeginner.


December 14, 2020 at 06:00PM

Saturday, December 12, 2020

How to Create a Full Width Page in WordPress (Beginner’s Guide)

Do you want to create a full width page in WordPress, so you can stretch your content across the screen?

Most WordPress themes already come with a built-in full-width page template that you can use. However if your theme doesn’t have one, then it’s easy to add it.

In this article, we will show you how to easily create a full width page in WordPress and even create fully custom page layouts without any code.

How to create a full width page in WordPress

Method 1. Use Your Theme’s Full Width Template

If your theme already comes with a full width page template, then it’s best to simply use that. Almost all good WordPress themes do.

Even the best free WordPress themes often come with a full width template, so there’s a good chance you already have one.

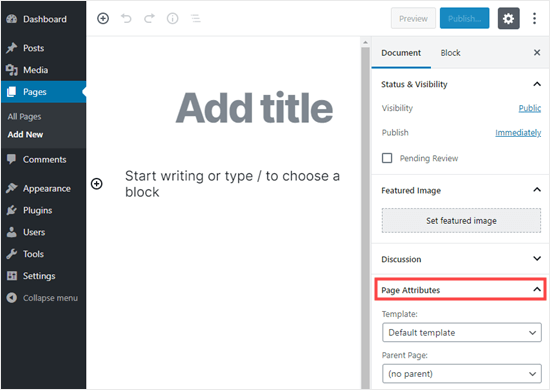
First, you need to edit a page or create a new one by going to Pages » Add New in your WordPress dashboard.

In the right hand ‘Document’ pane of the content editor, you need to expand the ‘Page Attributes’ section by clicking the downward arrow next to it. You should then see a ‘Template’ dropdown.

Viewing the 'Page Attributes' section in the 'Document' pane in WordPress

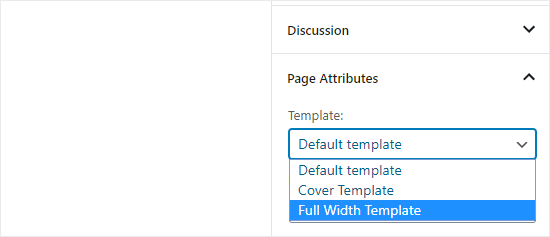
If you have a full width template for your theme, it will be listed here. It should be called something like ‘Full Width Template’:

Select the full width template from the 'Template' dropdown

The options you see here will differ depending on your theme. Don’t worry if your theme doesn’t have a full width page template.

You can easily add one using the methods below.

Method 2. Create Full Width Page Template Using a Plugin

This method is easiest and works with all WordPress themes and page builder plugins.

First, you need to install and activate the Fullwidth Templates plugin. If you’re not sure how to do that, check out our beginner’s guide to installing a WordPress plugin.

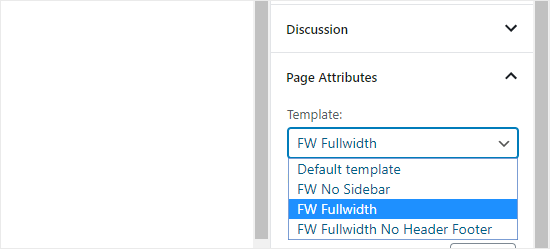
The Fullwidth Templates plugin will add three new options to your page templates:

The different options available for your page template using the Full Width plugin

These options are:

  • FW No Sidebar: removes the sidebar from your page, but leaves everything else intact
  • FW Fullwidth: removes the sidebar, title, and comments, and stretches the layout to full width
  • FW Fullwidth No Header Footer: removes everything that FW Fullwidth does, plus the header and footer

If you’re going to simply use the built-in WordPress editor, “FW No Sidebar” will likely be the best choice.

While this plugin lets you create full-width page template, you’ve limited customization options.

If you want to customize your full-width template without any code, then you need to use a page builder.

Method 3: Design a Full Width Page in WordPress using a Page Builder Plugin

If your theme doesn’t have a full width template, then this is the easiest way to create and customize a full-width template.

It allows you to easily edit your full width page and create different page layouts for your website with a drag & drop interface.

For this method, you will need a WordPress page builder plugin. In this tutorial, we’ll be using Beaver Builder. It is one of the best drag and drop page builder plugins, and it allows you to easily create page layouts without writing any code.

First, install and activate the Beaver Builder plugin. For more details, see our step by step guide on how to install a WordPress plugin.

Once you’ve activated it, either edit an existing page or create a new one.

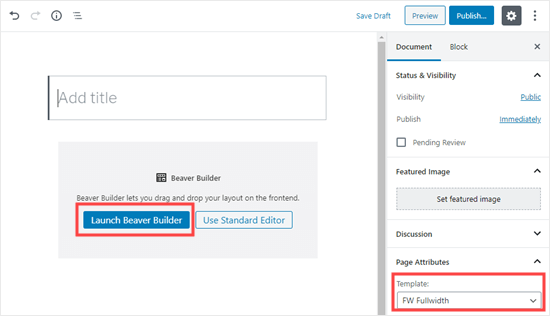
In the ‘Document’ pane on the right-hand side of your screen, go to ‘Page Attributes’ and select a full width template from the dropdown.

Next, click the ‘Launch Beaver Builder’ button in the center of your screen.

Using the Beaver Builder plugin to create your full width page

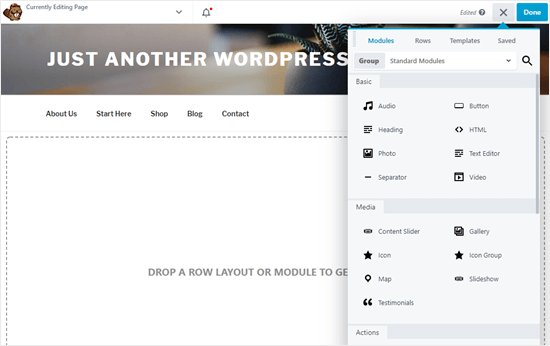
Now, use Beaver Builder’s drag and drop interface to create your page.

The Beaver Builder drag and drop interface

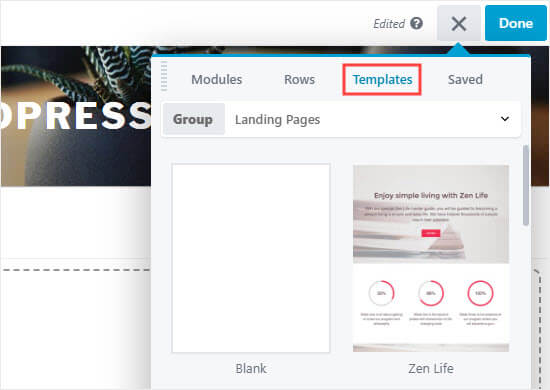
A good way to begin is by clicking on Templates tab at the top. Select one of the pre-made templates to use as the basis for your full width page.

Select one of the Beaver Builder templates

Click on a template to select it and the page builder will load it. You can then edit any of the elements, such as images, that you want to change.

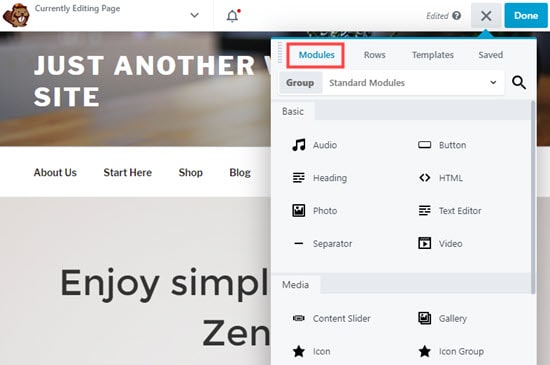
Beaver Builder layouts are built with rows and modules. Each row can have multiple columns and inside each row you can add content modules and widgets.

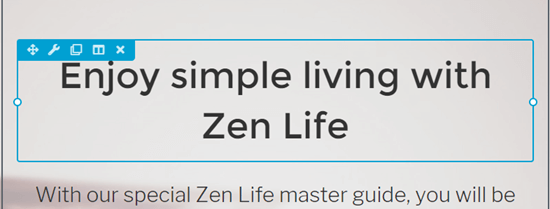
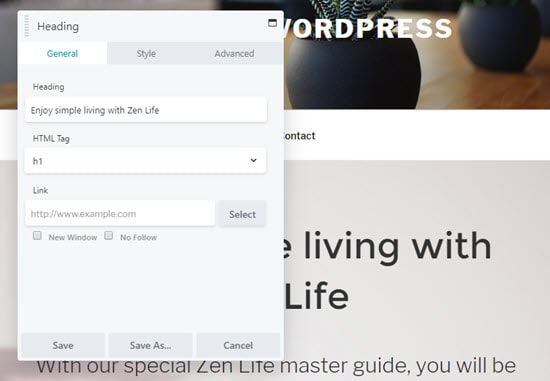
To edit a row or a module in the layout, you just need to click on it. In this case, we’re editing the Heading module:

Editing a heading using Beaver Builder

Beaver Builder will open the item details in a popup where you can edit its settings. You can change the text, change fonts and colors, add or change background images, and more.

Editing the details of an item in Beaver Builder

You can add modules and widgets at any time to your layout. Beaver Builder comes with many basic and advanced content modules that you can just drag and drop into your page.

Adding a module in Beaver Builder

Once you are finished editing, click ‘Done’ at the top of the page. You can then save your draft or publish it.

Saving or publishing your full width page in Beaver Builder

You can now visit your page to see your finished full width page.

Method 4. Create Completely Custom Full-Width Landing Pages with SeedProd

While Beaver Builder is a neat solution, it does have the potential to slow down your website.

If you’re looking to create a completely custom landing page where you want to customize the header, footer, and all areas of the page, then we recommend using SeedProd.

It is the best landing page plugin for WordPress, and it comes with a very easy to use drag & drop page builder interface.

SeedProd Page Builder

First, you need to install and activate the SeedProd plugin.

After activation, simply go to SeedProd » Pages to add a new landing page. You can simply select from one of their many pre-built templates or create a custom landing page from scratch.

The best part about SeedProd is that it is extremely fast, and it comes with built-in conversion features for Subscriber management, email marketing service integration, and more.

Method 5: Create Full Width WordPress Page Template Manually

This method is a last resort if none of the above methods work for you. It requires you to edit your WordPress theme files. You’ll need some basic understanding of PHP, CSS, and HTML.

If you haven’t done this before, then take a look at our guide on how to copy / paste code in WordPress.

Before going further, we recommend that you create a WordPress backup or at least a backup of your current theme. This will help you easily restore your site if something goes wrong.

Next, open a plain text editor like Notepad and paste the following code in a blank file:

<?php
/*
*
Template Name: Full-Width
*/
get_header(); ?>

Save this file as full-width.php on your computer. You may need to change the ‘Save as type’ to ‘All Files’ to avoid saving it as a .txt file:

Save the full-width template as a .php file

This code simply defines the name of a template file and asks WordPress to fetch the header template.

Next, you will need the content part of the code. Connect to your website using an FTP client (or your WordPress hosting file manager in cPanel) and then go to /wp-content/themes/your-theme-folder/.

Now you need to locate the file page.php. This is your theme’s default page template file.

Open that file and copy everything after the get_header() line and paste it into the full-width.php file on your computer.

In the full-width.php file, find and delete this line of code:

<?php get_sidebar(); ?> 

This line fetches the sidebar and displays it in your theme. Deleting it will stop your theme from showing the sidebar when using the full width template.

You may see this line more than once in your theme. If your theme has multiple sidebars (footer widget areas are also called sidebars), then you will see each sidebar referenced once in the code. Decide which sidebars you want to keep.

If your theme doesn’t display sidebars on pages, you may not find this code in your file.

Here is how the whole of our full-width.php code looks after making the changes. Your code may look slightly different depending on your theme.

<?php
/*
*
Template Name: Full Width
*/
get_header(); ?>

        <div id="primary" class="content-area">
        <main id="main" class="site-main" role="main">
                <?php
                // Start the loop.
                while ( have_posts() ) :
                        the_post();

                        // Include the page content template.
                        get_template_part( 'template-parts/content', 'page' );

                        // If comments are open or we have at least one comment, load up the comment template.
                        if ( comments_open() || get_comments_number() ) {
                                comments_template();
                        }

                        // End of the loop.
                endwhile;
                ?>

        </main><!-- .site-main -->

        <?php get_sidebar( 'content-bottom' ); ?>

</div><!-- .content-area -->

<?php get_footer(); ?>

Next, upload the full-width.php file to your theme folder using your FTP client.

You have now successfully created and uploaded a custom full width page template to your theme. The next step is to use this template to create a full width page.

Head to your WordPress admin area and edit or create a new page in the WordPress block editor.

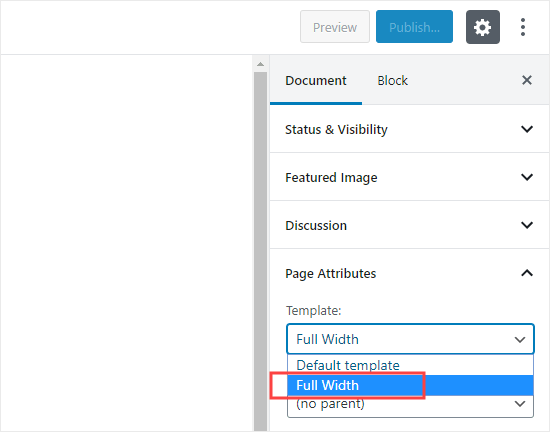
In the ‘Document’ pane on the right, look for ‘Page Attributes’ and click the downward arrow to expand that section if necessary. You should see a ‘Template’ dropdown where you can select your new ‘Full Width’ template:

Select the Full Width template you created from the Template dropdown

After selecting that template, publish or update the page.

When you view the page, you’ll see that the sidebars have disappeared, and your page appears as a single column. It may not be full width yet, but you are now ready to style it differently.

You will need to use the Inspect tool to find out the CSS classes used by your theme to define the content area.

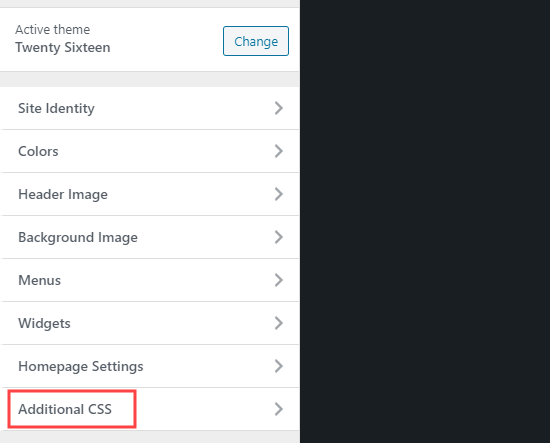
After that you can adjust its width to 100% using CSS. You can add CSS code by going to Appearance » Customize and clicking ‘Additional CSS’ at the bottom of the screen.

Adding CSS in the Theme Customizer

We used the following CSS code in our test site:

.page-template-full-width .content-area {
    width: 100%;
    margin: 0px;
    border: 0px;
    padding: 0px;
}

.page-template-full-width .site {
margin:0px;
}

Here is how it looked on our demo site using the Twenty Sixteen theme.

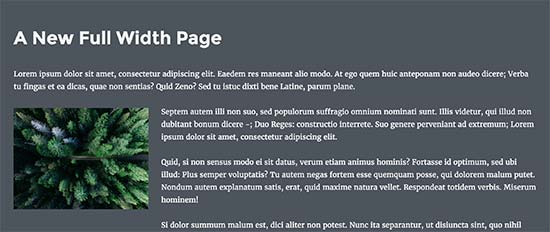
Full width page preview

If you want to use the manual method and want to make further customization, then you can also use the CSS Hero plugin which lets you modify CSS styles with a point-and-click editor.

For most users, however, we recommend using your own theme’s full width template, or using a plugin to create one.

We hope this article helped you learn how to easily create a full width page in WordPress. You may also want to see our guide on the best WordPress plugins to grow your website, and our comparison of the best WordPress LMS plugins to create & sell courses.

If you liked this article, then please subscribe to our YouTube Channel for WordPress video tutorials. You can also find us on Twitter and Facebook.

The post How to Create a Full Width Page in WordPress (Beginner’s Guide) appeared first on WPBeginner.


December 12, 2020 at 07:00PM

Friday, December 11, 2020

17 Best Gutenberg Blocks Plugins for WordPress (Super Useful)

Are you looking for the best Gutenberg block plugins for your WordPress site?

Gutenberg blocks are the editor blocks that are used to create content layouts in the new WordPress block editor aka Gutenberg. Introduced in WordPress 5.0, the Gutenberg editor is a fully block-based editor where each piece of content is a draggable block.

By default, WordPress offers a set of basic content blocks like a paragraph, image, button, list, and more. Some top WordPress plugins will add their own blocks to make it easy for you to embed their features.

However there are now an entire suite of plugins dedicated to offer custom content blocks for Gutenberg.

In this article, we’ll share some of the best Gutenberg block plugins for WordPress sites. We will start with some of the default blocks and then switch to block plugins.
The best WordPress block plugins for the Gutenberg editor

What is the WordPress Block Editor?

The WordPress block editor is the default content editor that comes with WordPress. It lets you build your posts and pages using a system of blocks. For a typical blog post, you will have lots of paragraph blogs, some heading blogs for subheadings, and some image blocks.
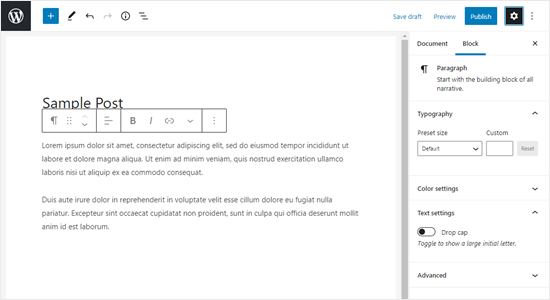
An example of a WordPress page in the block editor (Gutenberg editor)

Why Use the Block Editor in WordPress?

If you’ve been creating WordPress sites for many years, you will likely find the block editor a big change from the classic editor.

Some users have chosen to disable the block editor and keep the classic editor. However, we recommend using the block editor. It offers lots of useful features and is becoming more user-friendly with each update.

The block editor lets you add elements to your posts and pages that aren’t possible in the classic editor. For instance, you can add an FAQ section to your post or add a call-to-action button.

7 Most Useful Time-Saving Default WordPress Blocks

The Gutenberg Editor already includes built-in blocks for all types of content elements. These blocks make it easier to add common elements like buttons, cover images, tables, and more. In the older versions of WordPress, you had to install plugins to add these common web elements.

Here are some super useful default WordPress Gutenberg blocks that you can use right away.

1. Button Block: Lets you add call-to-action buttons in your WordPress pages and articles.

2. Media & Text Block: Lets you add image and text side-by-side. Doing this with the old Classic Editor was a confusing task for beginners.

3. Cover Block: Allows you to add stunning cover images in your posts and pages. See our guide on the difference between cover images vs featured images.

4. Table Block: Enables you to easily create basic tables in WordPress posts and pages. For advanced tables with search, sorting, and ordering features, we still recommend the free TablePress plugin.

5. Embed Blocks: The block (Gutenberg) editor also includes many embed blocks for popular websites. You can use them to easily embed tweets, YouTube videos, and more.

6. Columns Block: Allows you to easily create multi-column layouts for your blog posts and pages.

7. Shortcode Block: Allows you to add shortcodes in your WordPress posts and pages easily. This means that the block editor is fully compatible with plugins that provide a shortcode.

Besides these, there are many other blocks that you can explore and try without using a plugin.

With that said, let’s take a look at some of the best WordPress blocks offered by WordPress plugins. These plugins will simply add new blocks and allow you to extent the functionality of the default WordPress editor.

Best Gutenberg Blocks Plugins for Your WordPress Site

There are two types of WordPress blocks plugins available on the market. We will cover both of them:

  1. Single Purpose Block Plugins
  2. Gutenberg Block Libraries

Single-purpose plugins are mostly popular WordPress plugins. Many of them have been in the market for a long time. They specialize in one specific feature and usually provide a single powerful block to add content in WordPress.

For example, WPForms is a popular WordPress form plugin for making powerful forms in WordPress. It offers a WordPress block to add contact forms, surveys, order forms, etc in your posts and pages.
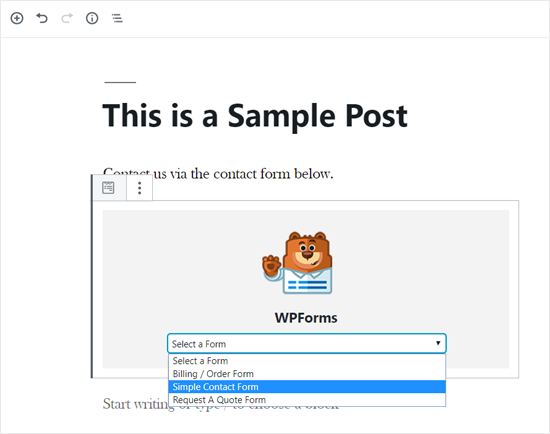
WPForms Block for WordPress Editor

On the other hand, there are block collection plugins which combine many different content elements in a single plugin. For example, Genesis Pro gives you 16 additional premium blocks. These include a pricing table block, testimonial block, profile box block, and more.

Single Purpose Block Plugins vs Block Library Plugins

Now that you know about the options, you might be wondering if one is better than the other. Here are some important points to consider.

Single-purpose block plugins add only one feature, but they offer the most comprehensive set of options and integrations. They’re often the best solution for what you’re trying to do.

Block library plugins include a collection of different blocks for different purposes. However, these blocks are not as fine-tuned as the single feature blocks. While they offer a lot of blocks, they may not be as powerful.

Another disadvantage of using block suites is that they can add unnecessary clutter to your block list.

With that said, let’s take a look at the best WordPress Gutenberg block plugins.

1. WPForms – Best Gutenberg Block for WordPress Forms

WPForms is the most user-friendly WordPress form plugin in the market. It allows you to easily create simple contact forms as well as more powerful forms like interactive polls, surveys, order forms, etc. on your WordPress site.

WPForms offers a block for adding WordPress forms on your posts and pages.

WPForms block in new Gutenberg editor

With WPForms, you can create lots of different types of forms, including survey forms, contact forms, email sign up forms, login forms, and much more.

Also, you can easily integrate your forms with email marketing tools, eCommerce plugins, and CRM software.

2. Smash Balloon – Social Feed Blocks for All Networks

Smash Balloon is the best social feeds plugin for WordPress. It makes it incredibly easy to add your social media posts to your site. For instance, you can use it to create a custom Instagram photo feed.

Smash Balloon gives you a block for adding each social media feed. For instance, you can simply drag and drop the Facebook block into a post or page to add your Facebook feed there. You don’t need to enter any shortcodes.
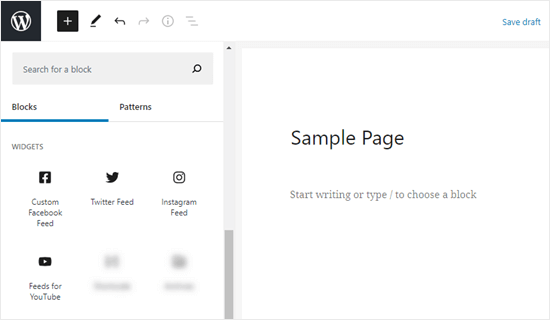
The different blocks available from different Smash Balloon social feed plugins

You can use each of Smash Balloon’s plugins separately. They cover Facebook, Instagram, Twitter, and YouTube.

Each plugin is 100% mobile responsive and looks great straight out of the box. It automatically matches your WordPress theme’s fonts and styles.

3. OptinMonster

OptinMonster is the best lead generation tool for WordPress. You can use it to create lots of different types of campaigns, including popups, slide-ins, spin to win coupon wheels, lightboxes, and inline campaigns.

The inline campaigns can be added to your posts and pages in just a couple of clicks using the special OptinMonster block.
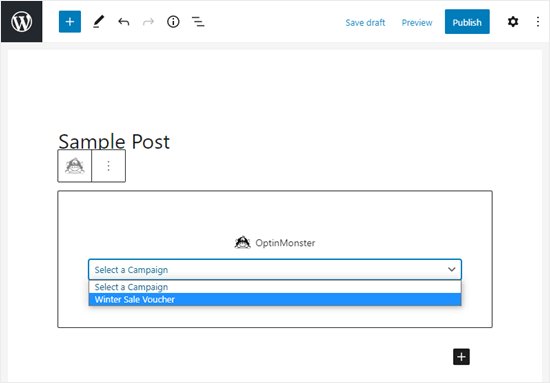
Adding an OptinMonster campaign to your page using the OptinMonster block

You can use inline campaigns to quickly and easily embed an eye-catching email signup form on your page. You could even use OptinMonster’s content locking feature to lock the content below the inline campaign.

4. Genesis Blocks

Genesis Blocks is a free Gutenberg plugin with a collection of custom WordPress blocks. It includes 14 useful Gutenberg blocks, 4 pre-built page layouts, and 8 pre-built page sections.
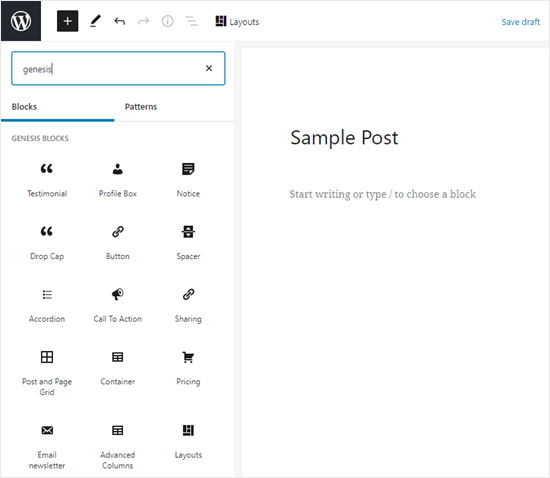
The Genesis Blocks plugin for WordPress

This library comes with some of the best WordPress blocks that you may need.

  • Advanced Columns Block – Create beautiful multi-column layouts.
  • Author Profile Block – Easily add an author profile box to posts or pages.
  • Pricing Block – Build beautiful pricing tables in WordPress.
  • Share Icons Block – Add social share buttons to your posts and pages.
  • Testimonial Block – Include customer testimonials to help drive sales.

Genesis Blocks also has a pro version, Genesis Pro. This gives you new blocks, plus 26 pre-built full-page layouts, 56 pre-built sections, and much more. If you want to create a beautiful and effective website quickly, it’s a great solution.

Genesis Blocks is owned by WP Engine, one of the leading managed WordPress hosting companies. They offer premium StudioPress themes that integrate seamlessly with the Genesis Blocks plugin.

Genesis Pro subscription will also give you access to all premium StudioPress themes.
5. WP Call Button

WordPress Click to Call Button

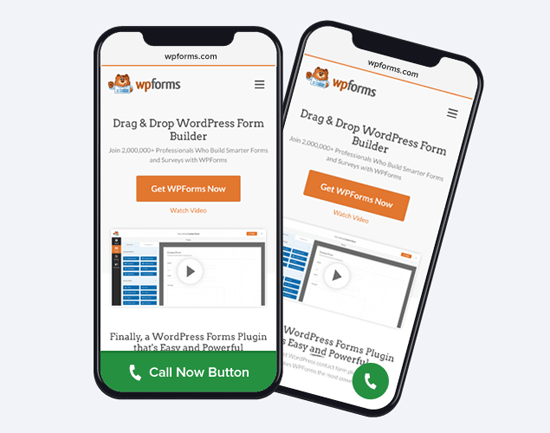
WP Call Button is a single purpose block plugin that helps you easily add a click to call button on your WordPress site.

Aside from adding clickable phone numbers on your contact page, WP Call Button also has a smart floating call button. This lets you add a highly visible click-to-call button on all pages of your website, for mobile users.

This helps you get more phone calls and close more sales for your business. It also works with any professional business phone service that you may be using.

The WP Call Button smartphone buttons have built-in click tracking with Google Analytics, so you can easily see which pages on your site are performing the best.

The phone button block comes with tons of customization options, so you can easily customize the call button to match your website design.

6. Ultimate Addons for Gutenberg

Ultimate Addons for Gutenberg is the most widely used Gutenberg blocks library plugin. Created by the people behind the popular Astra theme, this plugin is actively installed on over 100,000 websites.
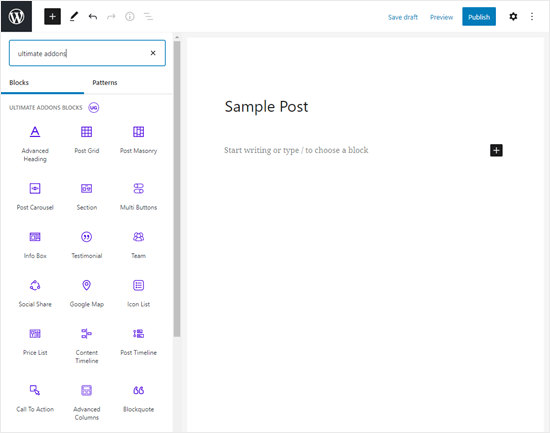
The Ultimate Addons blocks in the block editor

It includes over 15 Gutenberg blocks, including the following:

  • Info Box Block – Add an info box with an image, heading, and description.
  • Multi Buttons Block – Lets you add multiple buttons within a single block.
  • Team Block – Allows you to create a team section with photos.
  • Price List Block – Lets you create a price list like a restaurant menu easily.
  • Testimonial Block – Useful to add testimonials on your website.

An advantage of using this plugin is that it comes with built-in support for Astra Theme and all their starter sites. This means you can import a starter site and use the block editor to create beautiful layouts.

7. Envira Gallery

Envira Gallery is the most powerful WordPress gallery plugin available. It allows you to create image and video galleries on your website easily.

The default Gallery block in WordPress is quite basic and does not allow you to share the same image galleries outside the editor. Envira Gallery allows you to keep your Galleries separate and add them to any post or page. The plugin is fully compatible with the block editor and has a native block to instantly embed galleries.
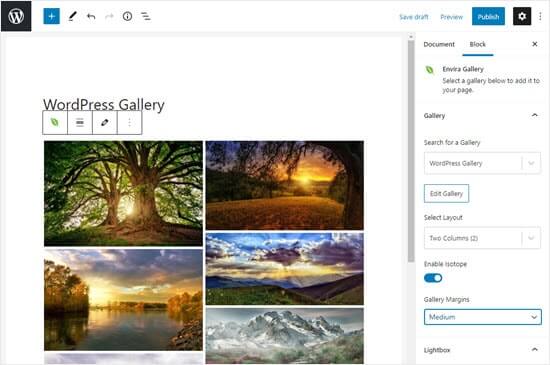
The Envira Galery block displaying in the block editor

Envira Gallery includes advanced features like watermark protection and image proofing. It also has seamless integration with WooCommerce to let you sell your photos.

8. Kadence Blocks

Kadence Blocks is another great WordPress block collection plugin. It comes with some of the most commonly used blocks and helps you add more functionality to your content editor.
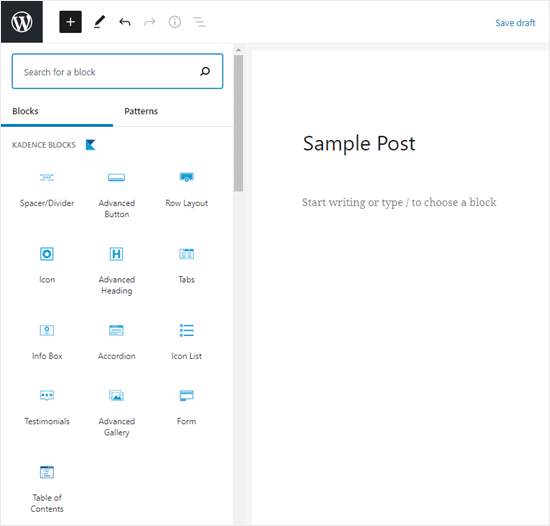
The Kadence blocks shown in the WordPress block editor

The plugin is available in both free and premium versions. The free version has 10 custom blocks, including the following:

  • Row Layout Block – Insert content blocks in one or multiple columns in a row.
  • Tabs Block – Lets you create horizontal or vertical tabs and customize them.
  • Accordion Block – Create beautiful accordions within your content.
  • Icon List Block – Lets you create attractive lists with custom icons instead of default bullets.

The plugin allows you to deactivate the blocks that you will not use. Doing so keeps your editor clean and lightweight.

If you like these blocks and want more blocks from Kadence Themes, then you can buy their pro plugin or membership plan.

9. Gutenberg Blocks and Template Library by Otter

Gutenberg Blocks and Template Library by Otter is another useful WordPress blocks plugin that adds extra Gutenberg blocks to your site.
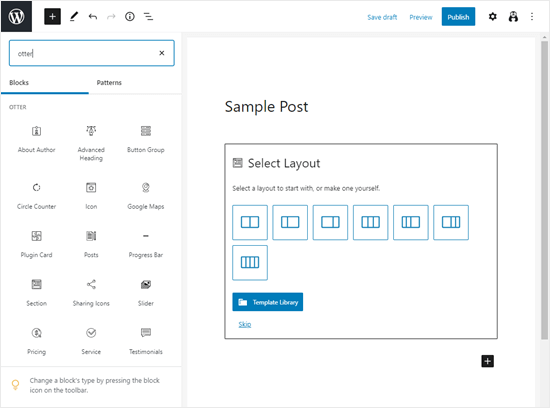
The blocks from Gutenberg Blocks and Template Library by Otter shown in the block editor

There are more than 10 WordPress blocks included in this plugin. Here are some of the useful blocks:

  • Section Block – Allows you to build layouts using columns like in page builder plugins.
  • Google Maps Block – Lets you embed Google maps on your website.
  • About Author Block – Allows you to show an author bio box on your website.
  • Sharing Icons Block – Lets you add social sharing icons on your WordPress articles easily.

In addition to the Gutenberg blocks, the plugin also includes templates and layouts to help you create stunning pages quickly. Otter is created by the same team behind ThemeIsle, a popular WordPress themes company.

10. Ultimate Blocks

Ultimate Blocks is another Gutenberg block collection plugin with several extra blocks for the block editor.
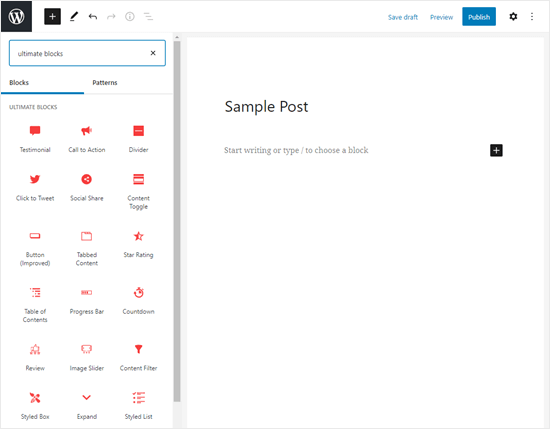
The blocks from Ultimate Blocks, shown in the WordPress block editor

Here are some of the blocks offered by the plugin:

  • Review Block – Lets you add a review with product name, features, summary, and star rating.
  • Table of Contents Block – Helps to create a table of contents from the headings in your article.
  • Call to Action Block – Lets you create a call to action box with a heading, description, and button.
  • Click to Tweet Block – Easily add tweetable content in your posts and pages.
  • Notification Box Block – Allows you to add a simple notification box in your articles.

11. Advanced Gutenberg

Advanced Gutenberg adds 20+ new blocks to your Gutenberg editor. The plugin helps you to create professional webpages easily and quickly.
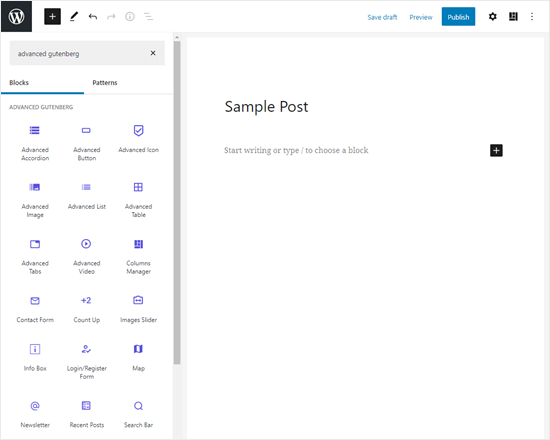
The Advanced Gutenberg blocks, shown in the WordPress block editor

Here are some of the Advanced Gutenberg blocks.

  • Columns Manager Block – Predefined responsive columns to let you add multi-column content in WordPress.
  • Map Block – Lets you embed Google maps in your posts and pages.
  • Counter Block – Allows you to showcase numbers like total sales in an attractive manner.
  • Tabs Block – Lets you add content in tabs easily.
  • Advanced List Block – Create visually attractive lists with custom list icons and styles.

The plugin also gives you advanced block control options to activate blocks as per user roles.

The Advanced Gutenberg plugin is created by JoomUnited.

12. Stackable – Beautiful Custom Blocks

Stackable is a free WordPress block library plugin with beautiful custom blocks for WordPress sites. It includes more than 20 easy to use blocks for Gutenberg.
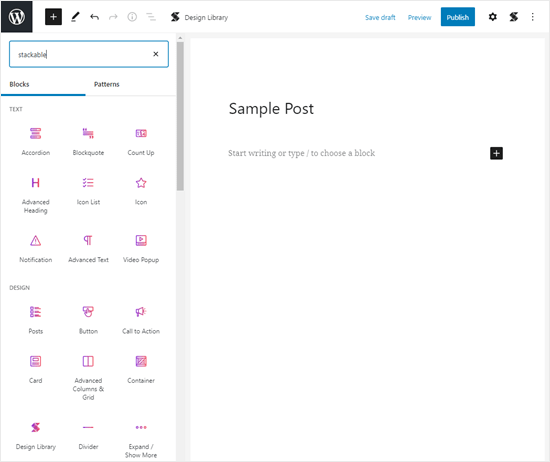
The Stackable blocks, shown in the WordPress block editor

Here are some of the cool WordPress blocks offered by this plugin.

  • Container Block – Allows you to combine different blocks in a single row.
  • Feature Grid Block – Lets you showcase your product features or portfolio in stylish grid layouts.
  • Team Members Block – Lets you showcase your team members with their position, duties, and specialties.
  • Video Popup Block – Lets you add full-screen video popups for YouTube and Vimeo videos.

Stackable also offers impressive effects and background options. You can use image and video backgrounds, fixed images, gradient background effects, and more.

13. CoBlocks

CoBlocks is a free plugin with a collection of page building WordPress blocks. Like most block collection plugins, it offers extra blocks to supercharge the block editor in WordPress.
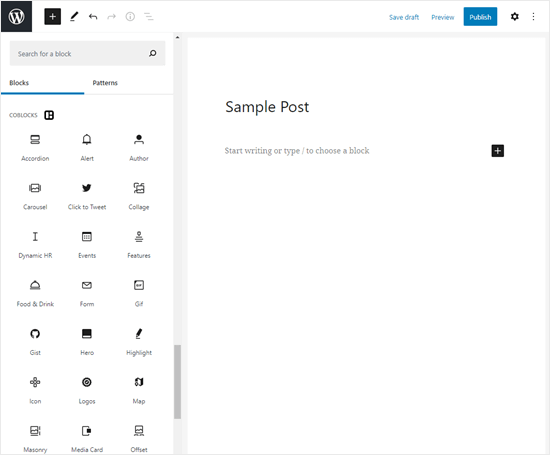
The CoBlocks blocks, shown in the WordPress block editor

Here are some useful Gutenberg blocks offered by this plugin:

  • Rows and Columns Blocks – Lets you design dynamic layouts based on a grid system.
  • Carousel Gallery Block – Enables you to create carousel galleries and showcase your images.
  • Alert Block – Create attractive alerts and insert them into your WordPress posts and pages.
  • Author Profile Block – Lets you add an author profile box in your WordPress post or page.

The plugin lets you customize your blocks with ease. You can change fonts, set the margin and padding, pick colors, and more.

14. Advanced Editor Tools

Advanced Editor Tools used to be called TinyMCE Advanced. It’s a popular plugin that enhanced the old classic editor with more formatting options. Now, it also supports the newer Gutenberg block editor.
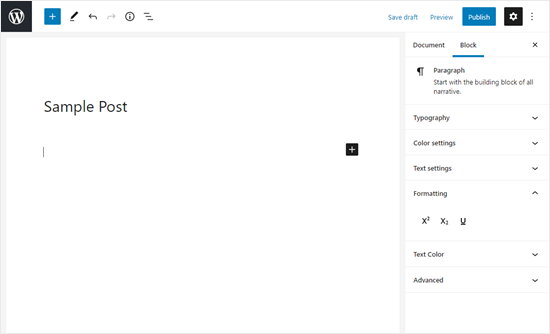
The Advanced Editor Tools plugin, with extra text formatting options shown

Advanced Editor Tools offers additional formatting and styling options in default blocks. For example, you will see new formatting buttons in the toolbars with the ability to choose fonts. You can also adjust which buttons you want to see in the toolbar.

Some Honorable Mentions

Besides the ones we mentioned above, there are many Gutenberg blocks plugins on the market. Here are some honorable mentions you can use as alternatives to the above-listed plugins.

Plus, most content-focused WordPress plugins are now Gutenberg compatible and come with their own blocks.

We hope this article helped you to find the best Gutenberg blocks for your WordPress site. You may also want to see our handpicked list of the best Gutenberg friendly WordPress themes, and our comparison of the best WordPress membership plugins to create & sell online courses.

If you liked this article, then please subscribe to our YouTube Channel for WordPress video tutorials. You can also find us on Twitter and Facebook.

The post 17 Best Gutenberg Blocks Plugins for WordPress (Super Useful) appeared first on WPBeginner.


December 11, 2020 at 06:00PM