Wednesday, December 16, 2020

How to Easily Embed iFrame Code in WordPress (3 Methods)

Do you want to embed an iFrame code in a WordPress post or page?

IFrames provide an easy way to embed video or other content to your site without uploading it. Many third-party platforms like YouTube allow users to use iframe to embed content from their website.

In this article, we’ll show you how to easily embed iFrame code in WordPress using multiple methods.
Easily embedding iFrame code in WordPress

What is iFrame?

An iFrame lets you embed videos or other content on your site. This means you can display a video on your site without actually hosting that video.

The iframe is like opening a window on your site to display external content. The actual content is still loaded from the source that you are embedding from.

To add an iframe, you need to add a special HTML code. Don’t worry if that sounds quite technical.

We’re going to show you the easiest way to embed an iFrame in your WordPress blog.

Why Use iFrames?

A key reason to use iFrames is to avoid having to host videos or other resources on your site, which will use up your bandwidth and storage space.

Also, iFrames let you avoid infringing on other people’s copyrighted content. Instead of downloading their video or other content then uploading it to your site, you simply add it to your page using an iFrame.

Another advantage is that if the original content is changed, it will automatically be updated in the iFrame too.

An image of cartoon people adding content to a website

There are also some drawbacks to using iFrames. Not all websites let you put their content into an iFrame. Also, the iFrame may end up too big or small for your page, and you will need to manually adjust it.

Another issue is that HTTPS sites can only use iFrames for content from other HTTPS sites. Similarly, HTTP sites can only use iFrames for content from other HTTP sites.

This is why many platforms like WordPress prefers oEmbed. You can use oEmbed to embed videos as well as some other types of content by simply pasting a URL into your WordPress post. The content will automatically be resized to fit, and it will be the right size even on mobile devices.

Important: WordPress doesn’t support oEmbed for Facebook and Instagram posts. For more on this, check out our full guide on the Facebook / Instagram oEmbed issue and how to fix it.

Another great alternative to iFrames is to use a social feeds plugin. We recommend using Smash Balloon‘s plugins. These let you display content from Facebook, Instagram, Twitter, and YouTube.

Having said that, let’s take a look at three different ways to add iFrames to your site.

1. Use the Source’s Embed Code to Add iFrame in WordPress

Many large sites have an Embed option for their content. This gives you the special iFrame code that you need to add to your site.

On YouTube, you can get this code by going to the video on YouTube, then clicking the Share button below it.
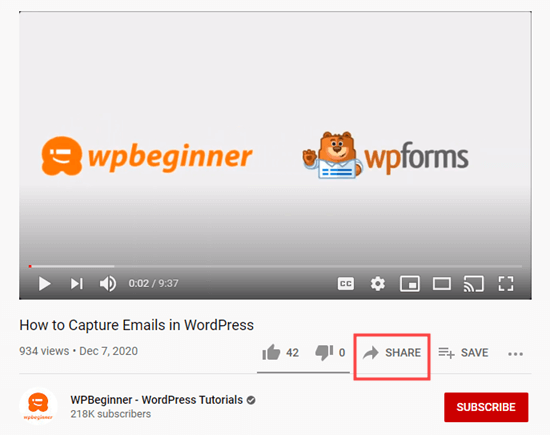
Clicking the Share button for your chosen YouTube video

Next, you will see a popup with several share options. Simply click on the Embed button.
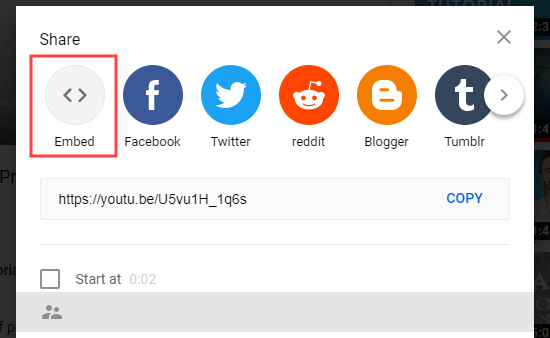
Clicking the Embed button to get the YouTube embed code

Now, YouTube will show you the iFrame code. By default, YouTube will include the player controls. We also recommend that you enable the privacy-enhanced mode.

After that, go ahead and click the Copy button to copy the code.
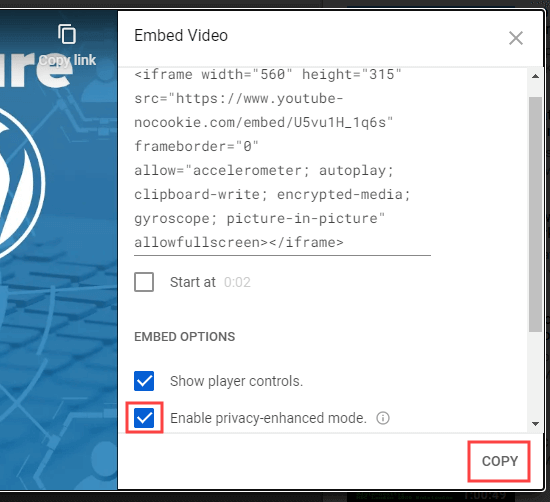
Copying the embed code for the YouTube video

Now, you can paste that code into any post or page on your site. We’re going to add it to a new page in the block editor.

To create a new page, go to Pages » Add New in your WordPress dashboard.

Then, add an HTML block to your page.
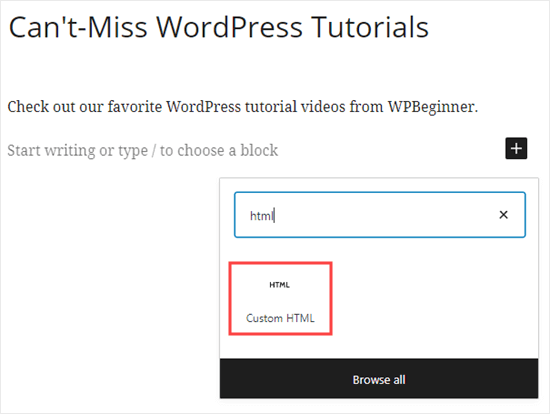
Adding a custom HTML block to WordPress

Now, you need to paste the YouTube iFrame code into this block.
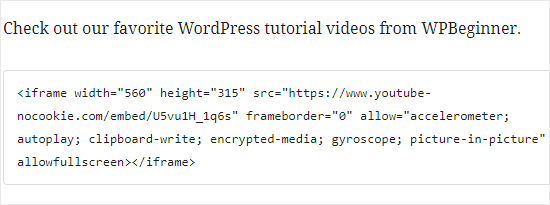
Pasting the YouTube HTML code into the iFrame block

You can then preview or publish your page to see the YouTube video embedded there.
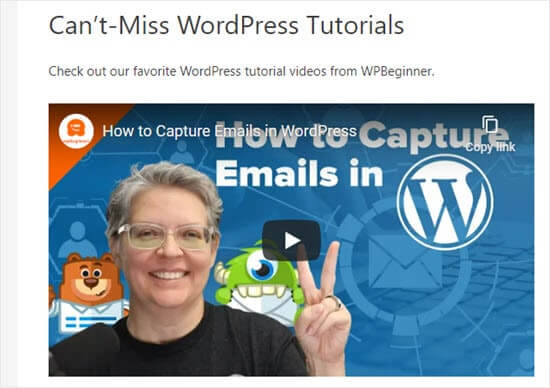
Viewing the embedded video live on your website

Tip: If you’re using the old classic editor, you can still add iFrame code. You need to do so in the Text view.
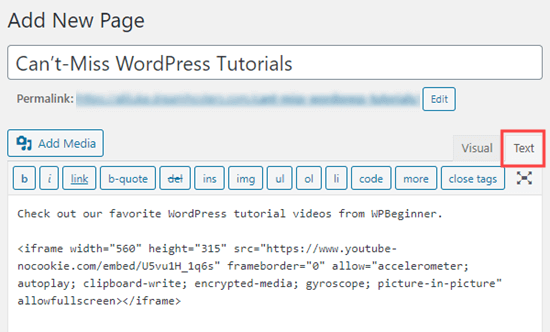
Adding the YouTube iFrame code in the classic editor

Switching between the visual and text view on the Classic Editor can cause issues with the iFrame code.

2. Using the iFrame WordPress Plugin to Embed an iFrame

This method is useful as it allows you to create an iframe to embed content from any source, even if that source doesn’t provide an embed code.

First, you need to install and activate the iFrame plugin. For more details, see our step by step guide on how to install a WordPress plugin.

Upon activation, the plugin will start working straight away with no setup needed. Go ahead and edit or create a post or page. Then, add a shortcode block.
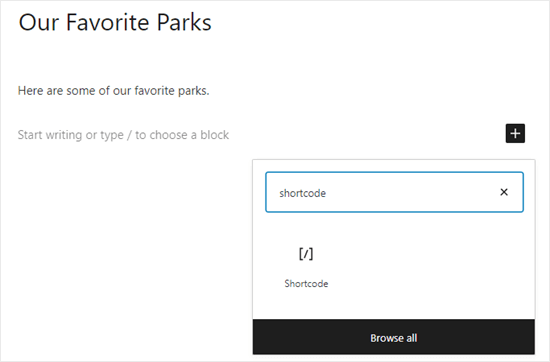
Adding a shortcode block in the block editor

After that, you can use this shortcode to enter your iFrame code.

[iframe src="URL goes here"]

Simply replace URL goes here with the URL of the content you want to embed on your site. We are embedding a Google map.

Tip: You may need to use the Embed option to get the direct URL of the content. You need to use just the URL, not the rest of the embed code.
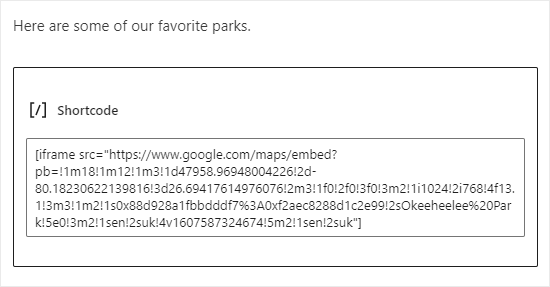
The shortcode to embed a Google map

Next, preview or publish your post. You should see the Google map embedded on your site.

The Google map embedded on the website

You can optionally add parameters to the iFrame shortcode to change how the embedded content displays. For instance, you could set the width and height, and add or remove a scrollbar or border. You can find details on the iFrame plugin’s page.

Tip: If you’re using the Classic editor, you can simply paste the shortcode into your post or page. You don’t need to switch to the Text view.
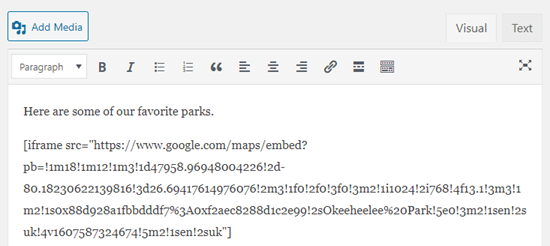
Adding the shortcode in the classic editor

3. Manually Creating the iFrame Code and Embedding in WordPress

If you prefer not to use an iFrame plugin, then you can create the iFrame code manually. To do this, you need to add an HTML block in the WordPress content editor.
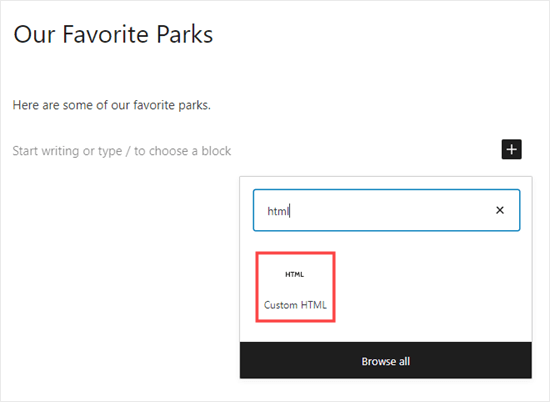
Adding a custom HTML block

First, you need to paste this code into your HTML block.

<iframe src="URL goes here"></iframe>

Simply replace “URL goes here” with the direct URL for the content that you want to embed. You only need the URL itself.

Here, we’re embedding a map from Google.
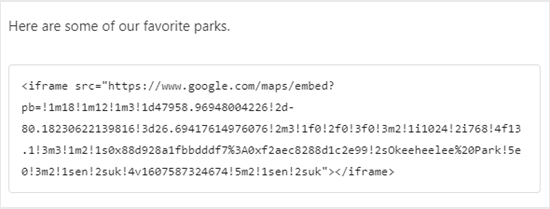
Entering the iFrame code for the Google map

You can add extra parameters to the HTML tag. For instance, you could set the width and height of your iFrame. The code below means your embedded content will display 600 pixels wide and 300 pixels high.

<iframe src="URL goes here" width="600" height="300"></iframe>

This is useful if you need to restrict the embedded content to a smaller space.
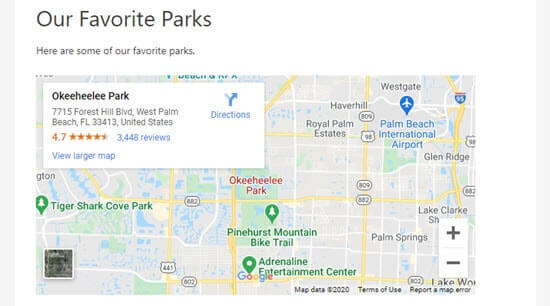
The Google map on the site with a set height and width

We hope this article helped you learn how to easily embed iFrame code in WordPress. You may also want to check out our ultimate guide on how to speed up your WordPress site, and our comparison of the best keyword research tools for improving your SEO rankings.

If you liked this article, then please subscribe to our YouTube Channel for WordPress video tutorials. You can also find us on Twitter and Facebook.

The post How to Easily Embed iFrame Code in WordPress (3 Methods) appeared first on WPBeginner.


December 16, 2020 at 06:00PM
Tuesday, December 15, 2020

How to Easily Save a Blog Post to Your Computer (5 Methods)

Do you want to save your WordPress blog posts to your computer?

Normally, you can make a WordPress backup and save it on your computer. However, these backups are not readable or easy to share without installing WordPress again.

In this article, we’ll show you how to easily save a copy of your blog content that you can read, share, or even convert to an eBook.

Saving WordPress blog posts to your computer

Why Save Your Blog Posts to Your Computer

There are several reasons to save your blog posts to your computer.

The most common reason is to create a back up of your blog, so that you can restore it later. You may want to move it to a new WordPress website or just keep it safe as a security precaution.

Or you may want to close and delete your WordPress website, but want to preserve your blog content in a readable format. Instead of saving them as back up files, you can save all of your blog posts as PDF or an eBook, so you can easily read or share your articles.

Another common reason is to move from another blogging platform to WordPress. To do this you’ll need to save your blog posts and then import them into WordPress.

There are multiple ways to save and download your blog posts. Depending on your needs, you can choose the method that best suits you.

Creating a Backup of Your Blog

This method is recommended if you just want to make a backup of your blog posts for safekeeping.

It allows you to restore your blog posts on any other WordPress website. However, it does not save your blog posts in a readable or shareable format.

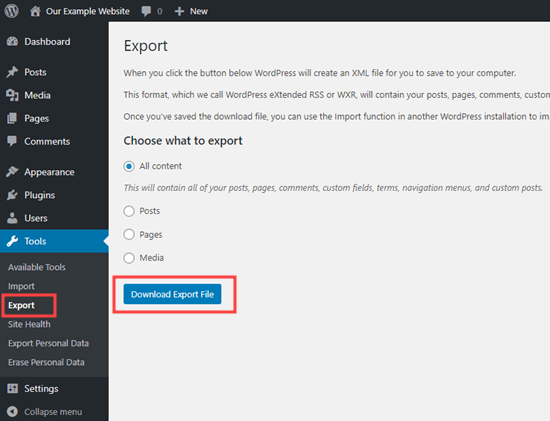
WordPress has a built-in feature to export your blog posts. Simply go to Tools » Export. page inside your WordPress admin area. Here, you can choose to download your entire site, or only your blog posts.

After that, you can click on the Download Export File button and WordPress will download all your blog posts in XML format. This file can be used to restore your site, or to migrate to another domain or a different web host.

The Export tool in the WordPress dashboard

You can also download your entire media library and save your images and videos separately.

However, if you want to keep a backup of your entire WordPress site, then the export tool is not the ideal method. It will not save any other website data, settings, your WordPress theme, or plugins.

For that, you will need to use a proper WordPress backup plugin. These plugins allow you to make a complete WordPress website backup which you can then save on your computer or upload to cloud storage like Google Drive or Dropbox.

You can also set them up, so they automatically take backups at regular intervals and save them remotely.

We recommend using UpdraftPlus, which is easy to use and supports multiple cloud storage options. For more details, see our guide on setting up WordPress backups using UpdraftPlus.

Creating a PDF or eBook of Your Blog

The problem with WordPress backup plugins or the default export method is that your blog posts will not be readable outside WordPress.

This is why many users prefer to save blog posts as PDF because it makes it easy to read, share, or republish the blog post as an eBook.

Let’s take a look at how to easily save your blog posts as PDF to your computer.

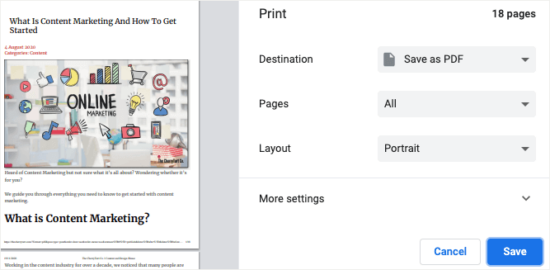
If you’re only looking to save a single blog post, then the easiest way is to open it in a browser and use the keyboard shortcut CTRL + P (for Windows) or CMD + P (for Mac). This will open the browser’s print settings window.

You can now change the Destination to ‘Save as PDF’ and click on the ‘Save’ button to download it to your computer.

Now, if you want to save all your blog posts as PDF at once, then the easiest way to do that is by using a WordPress plugin.

First, you need to install and activate the Print My Blog plugin. For more details, see our step by step guide on how to install a WordPress plugin.

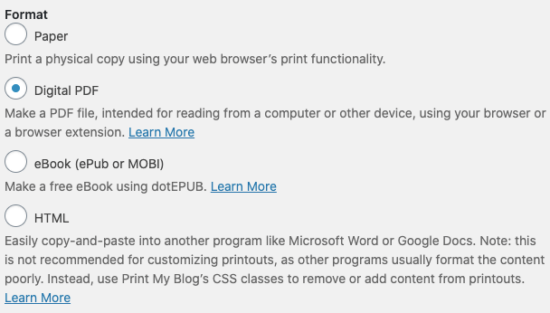
Upon activation, you need to visit Print My Blog » Print Now page to configure settings. From here, you can choose to print a physical copy, save a PDF file, create an eBook, or save it in HTML format.

Print my blog Save Options

You can select Digital PDF to create and save a readable PDF file on your computer. Alternatively, you can choose eBook if you want to create a digital book that you can publish online.

After that, click to expand the ‘Show More Print Options’ menu to customize your blog copy.

In most cases, the default settings are good enough. But you may want to go through them just to make sure the blog copy is exactly what you need.

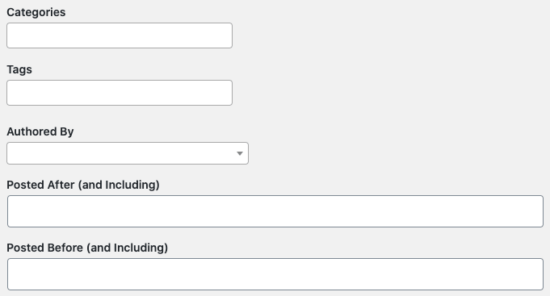
From the drop-down menu, you can apply a number of filters. For instance, you can choose to save only posts or only pages of your WordPress site.

You can also select what order you want the posts to appear, whether you want the oldest or the newest posts first.

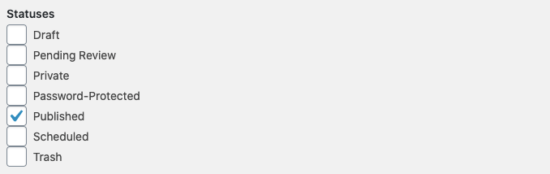
Another option is to filter the posts by their status. You can choose to download only the published posts, or include drafts and deleted posts that are in your Trash folder.

You can also filter your posts by categories, tags, authors, and dates. This is handy if you want to download only particular categories for a project, or if you want a document of every article written by a single author.

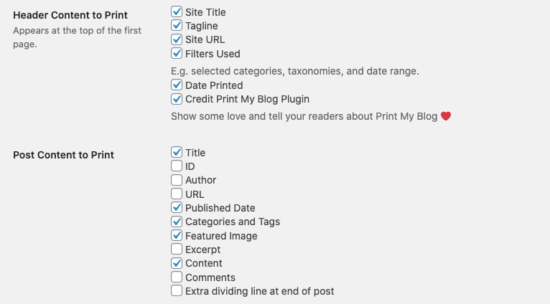
The plugin also allows you to choose what header and post content you wish to appear in your saved copy. By default, the date and the plugin’s branding is selected, but you can unselect this if you don’t want this information to appear in your PDF.

You can apply these filters to every post and choose what information you want to appear for each post such as the published date, comments, URL, and author.

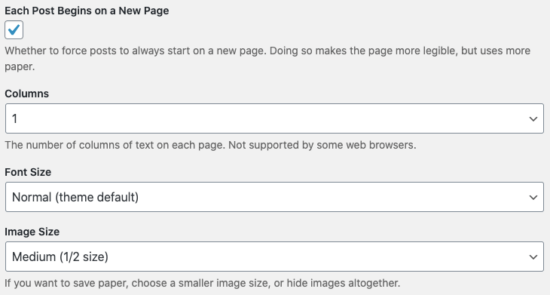
Lastly, you can determine your page layout. Print My Blog basically creates a single PDF file for all your blog content. You can choose to have each new post start on a new page to ensure there is proper separation.

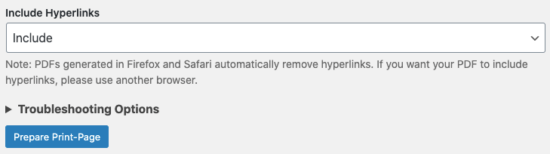
You can also customize the font size, image size, and choose whether you want to include hyperlinks.

Once you are satisfied with the settings, click on the ‘Prepare Print-Page’ button to continue. To print an eBook, you need to use the dotepub extension.

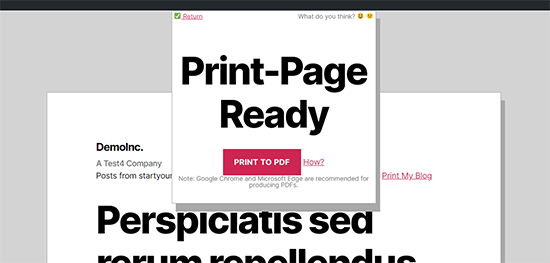
To save a PDF file, click on the ‘Print to PDF’ button to save the file.

PDF file ready to save

This will bring up your browser’s print settings. Select Save as PDF option and then click on the save button to save the PDF file to your computer.

Note: The save to PDF functionality works best with Google Chrome and Microsoft Edge browsers.

If you’ve created an eBook, you might find our guide on how to add an eBook download to your WordPress site helpful.

Printing your Blog Posts as a Book

You can also convert your blog into a physical book for distributing it among friends or at an event. You could also make an online store to sell it from your website.

Blog2Print converts your blog on WordPress, Tumblr, Typepad and Blogger into professionally bound books.

They also let you turn your Instagram feed into a book!

Blog2Print automatically formats your content. You can select what content you want to include, customize your book cover, add photos and supplemental text to make the book seem more like a published book rather than a series of blog posts.

Blog2Print

Another platform you can use is Into Real Pages. They have four formats you can choose from, along with 8 wonderful themes. You get to design your own cover and add additional text and photos. They also offer good deals on bulk printing.

Saving Your Blog Posts to Migrate Platforms

A lot of folks want to save their blog posts, so they can move to them elsewhere. Now there are two common types of blog migrations.

  • Moving a WordPress blog to another WordPress blog. This happens when a user is changing their WordPress hosting company or domain name, and they need to move their WordPress files to the new location.
  • Moving from a third-party platform to WordPress. A lot of folks start with other blogging platforms and later on want to move their blogs to WordPress.

We will talk about both user cases and will show you how to properly save your blog posts and move them over.

1. Migrating a WordPress Blog

To move to a new domain, a different host, or another top blogging platform, you need to create a copy of your blog. This copy can then be used to migrate over.

You can use a migration plugin that automatically makes a backup for you and lets you move to a new domain or new host.

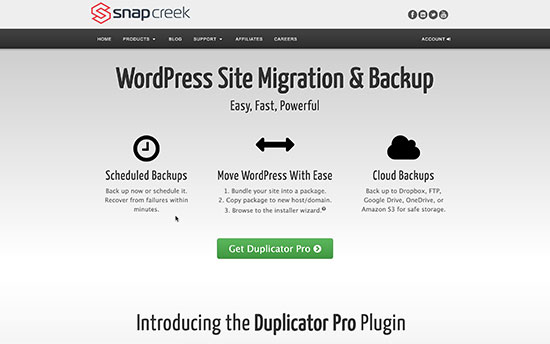
There are plenty of migration plugins to choose from, out of which Duplicator Pro is one of the best on the market.

Duplicator PRO

If you want to move your site from one domain to another, but you’re worried about losing your blog content, see our guide on how to move WordPress to a new domain. This guide also ensures you don’t lose any of your SEO efforts.

If you’ve been blogging on a subdomain and want to merge it with your main domain, the process is fairly simple. But you need to follow it step by step to make sure you don’t face errors. See our guide on moving subdomain to root domain in WordPress.

You can also move between hosts and servers but there’s a risk of downtime. Our guide on how to move WordPress to a new host or server shows you how to switch over without losing any content or having downtime.

2. Migrating a Third-Party Blog to WordPress

A lot of users want to save their blog posts, so they can move all their content to WordPress.

There are two types of WordPress blogs. WordPress.com which is a hosting service and WordPress.org which is also called self-hosted WordPress. For more details, see our guide on the difference between WordPress.com vs Wordress.org with detailed pros and cons.

You’ll need WordPress.org because it gives you instant access to all WordPress features out of the box.

To get started, you’ll need a domain name and a WordPress hosting account. The domain name is your website’s address (e.g. wpbeginner.com), and the hosting account is where all your website files are stored.

We recommend using Bluehost. They are one of the top hosting companies in the world and an officially recommended WordPress hosting provider.

They are offering WPBeginner users, a generous discount on hosting with a free domain name and SSL certificate.

→ Click Here to Claim This Exclusive Bluehost Offer ←

Once you have signed up for a hosting account, you can follow our step by step tutorial on how to start a WordPress blog for the complete setup.

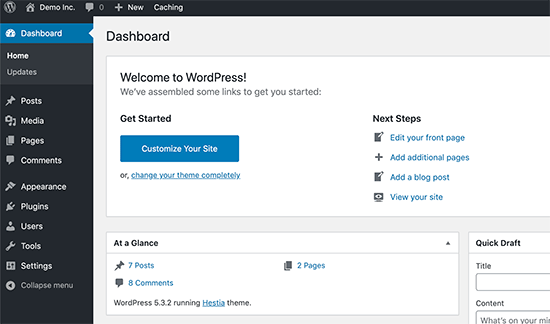
After the set up, you’ll reach your WordPress admin dashboard.

WordPress powers over 38% of all websites on the internet. This is why many users want to switch blogging platforms and use WordPress.

You can easily import your blog posts from other blogging platforms to your WordPress blog. Depending on which platform you are moving from, you can follow the step by step instructions from our guides below.

Saving Your WordPress.com Blog Posts

If you are using WordPress.com, then you can still save your WordPress.com blog posts to your computer. You can also move to WordPress.org or use the downloaded file as a backup that you can restore at any time.

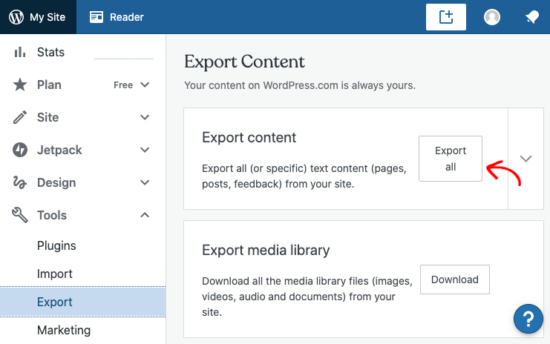
First, you need to login to your blog and then go to the Tools » Export » Export all. WordPress.com will then create an XML file and your browser will download it to your computer.

Export in WordPress.com

This file uses the same format as WordPress.org, which means you can easily use it to move your blog from WordPress.com to a WordPress.org blog.

We hope this article helped you learn how to save blog posts to your computer. You may also want to see our guide on how to increase your blog traffic by 406%, and over 30 proven ways make money blogging using WordPress.

If you liked this article, then please subscribe to our YouTube Channel for WordPress video tutorials. You can also find us on Twitter and Facebook.

The post How to Easily Save a Blog Post to Your Computer (5 Methods) appeared first on WPBeginner.


December 15, 2020 at 06:00PM
Monday, December 14, 2020

How to Create a Simple Event Calendar with Sugar Calendar

Do you want to add an event calendar to your WordPress website?

There are lots of different plugins and calendar apps that can do this, but some are much too complicated or don’t work very well with WordPress.

In this article, we’ll show you how to easily create a simple event calendar in WordPress with Sugar Calendar.

Creating a simple event calendar with Sugar Calendar

How to Create a Simple Event Calendar with Sugar Calendar

Sugar Calendar is a simple and lightweight events calendar plugin for WordPress built by Pippin Williamson and the team behind Easy Digital Downloads.

Since we were looking for a lightweight event calendar plugin, we decided to give Sugar Calendar a try, and found it quite easy to use.

Here’s how to create an event calendar in WordPress with Sugar Calendar.

First thing you need to do is install and activate the Sugar Calendar plugin on your website. For more details, see our step by step guide on how to install a WordPress plugin.

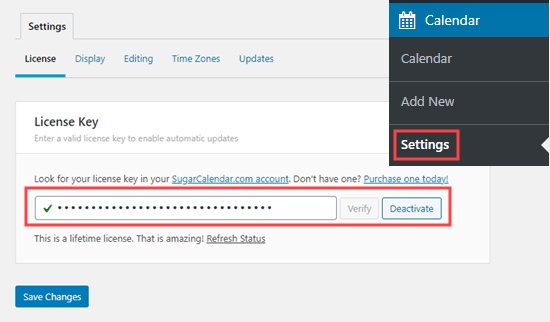
Upon activation, go to the Calendar » Settings page in your WordPress admin. Here, you need to enter your license key. You will find this in your account area on the Sugar Calendar website.

Activating your license key for Sugar Calendar

Once you’re done, click the Save Changes button to make sure your license key is saved.

Creating a Calendar in Sugar Calendar

Sugar Calendar divides the functionality into two main sections: Calendars and Events.

You can create multiple calendars, and then add different events or actvities to each calendar accordingly.

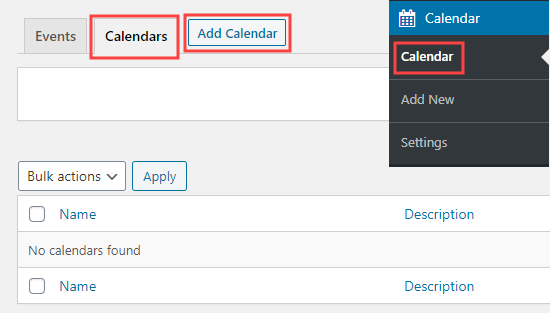
To get started, click on the ‘Calendar’ menu item page in your WordPress admin sidebar. After that, you need to select the Calendar tab then click on the ‘Add New Calendar’ button to create a new calendar.

Adding a new calendar in Sugar Calendar

You will then see a popup box for adding your new calendar.

You need to give your calendar a name and a ‘slug‘ which will become the end part of the calendar’s URL (web address).

Giving your new calendar a name and URL

There’s a box where you can describe your calendar. The description is optional, and you can leave it blank if you want.

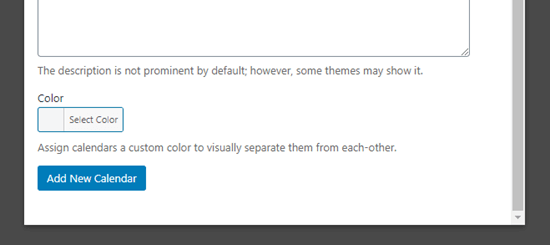
Below the description, you can select a color for your calendar. This is very useful if you’re creating multiple calendars because this will make it easier to identify different calendars on your WordPress website.

If you’re just creating one calendar, then you don’t need to set a color.

When you’re done, click the ‘Add New Calendar’ button to create your calendar.

Click the Add New Calendar button to finish creating your calendar

Adding Events in Sugar Calendar

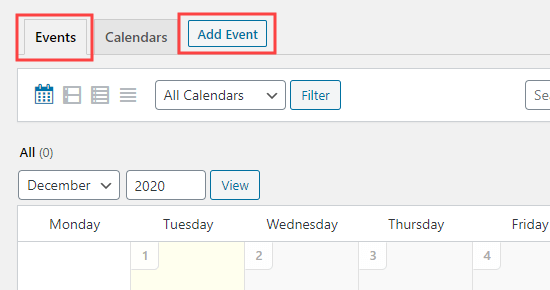
Now, it’s time to add some events to your calendar. Just click on the Events tab then click the ‘Add Event’ button to create your first event.

The Add Event button that lets you create a new event

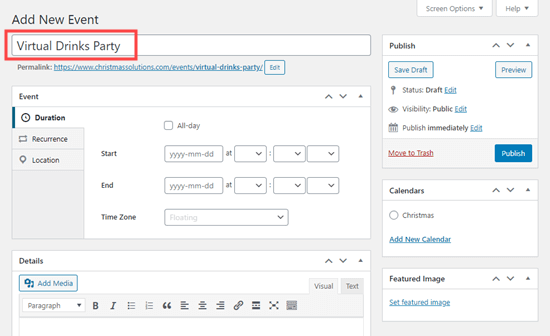
The ‘Add New Event’ screen has space for all the information about your event. Go ahead and enter the name for your event at the top.

Enter a name for your event

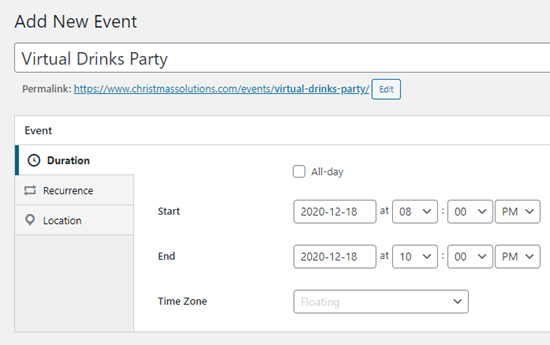
Below this, you can set the start time and end time for your event.

Your event can be on a single day or across multiple days. If it’s an all-day event, then simply check the ‘All-day’ box.

Enter a date and time for your event

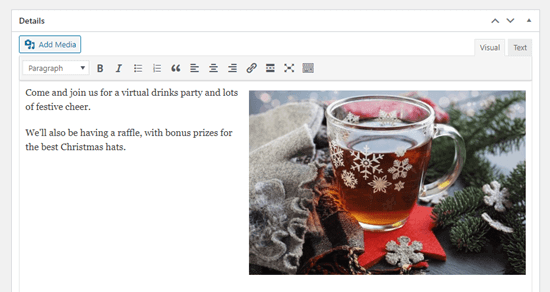
Next, go ahead and add more information about your event in the Details box. If you would like to include images or photos here, go ahead and add those using the ‘Add Media’ buttons.

Enter a description for your event

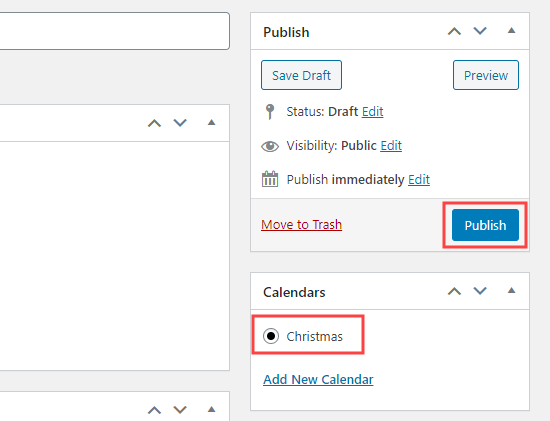
On the right-hand side of the screen, you need to click on the calendar that you want to add your event onto. You can also create a calendar here if you haven’t done so already.

When you’re ready, go ahead and click the Publish button.

Select the calendar for your event then publish the event

You can repeat this process to add more events to your calendar.

Putting Your Events Calendar on Your Website

You can add your calendar to any page or post on your website. You can even use the Sugar Calendar widget to add it to your sidebar.

We’re going to add our calendar to a new page on our demo site.

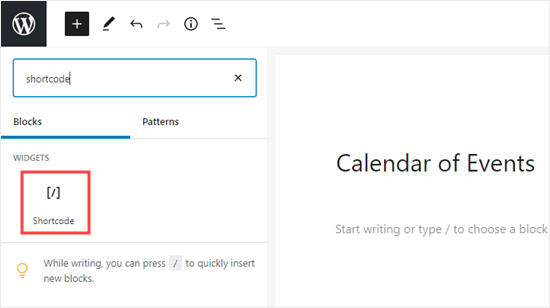
First, go to Pages » Add New. Then, enter a title for your page and add a shortcode box to your page.

Adding a shortcode block to the page

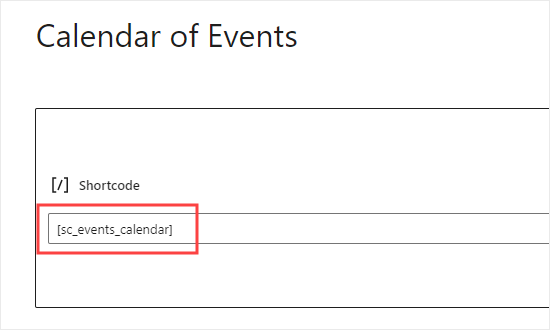
Next, copy the shortcode [sc_events_calendar] into the shortcode block.

Pasting the Sugar Calendar shortcode into the shortcode block

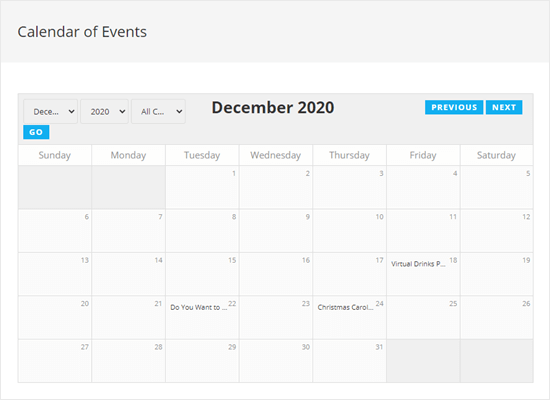
Now, it’s time to preview or publish your page. You will then see the calendar of events on your website.

Viewing the calendar of events on your website

Visitors on your website can click on an event to see the full details.

The page of details for the virtual drinks party

Note: This events page will use the fonts, colors, etc from your theme. That means it will match the posts and pages on your blog.

We hope this article helped you learn how to create a simple event calendar with Sugar Calendar. You might also like our article on the best email marketing services and best push notification software, so you can keep your users updated about new events and activities.

If you liked this article, then please subscribe to our YouTube Channel for WordPress video tutorials. You can also find us on Twitter and Facebook.

The post How to Create a Simple Event Calendar with Sugar Calendar appeared first on WPBeginner.


December 14, 2020 at 06:00PM