Tuesday, February 9, 2021

How to Disable Automatic Update Email Notification in WordPress

Do you want to disable automatic update email notifications in WordPress?

By default, WordPress sends email notifications for automatic updates of WordPress plugins, themes, and the core itself.

In this article, we will show you how to easily disable automatic update email notifications in WordPress.

Disabling automatic update email notifications in WordPress

About Automatic Update Notifications in WordPress

WordPress is open-source content management platform that is regularly maintained and updated. Some of these updates are automatically installed, and you will receive an email notification that your site has been updated.
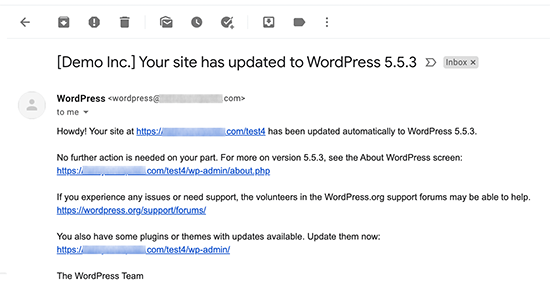
Email notification preview after an auto-update

Similarly, WordPress also allows you to enable automatic updates for WordPress plugins and themes too. This means you spend less time updating plugins and more time on growing your business.

You can enable automatic updates for plugins that you trust by visiting Plugins » All Plugins page. Simply click on the ‘Enable auto-updates’ link next to the plugin that you want to update itself.
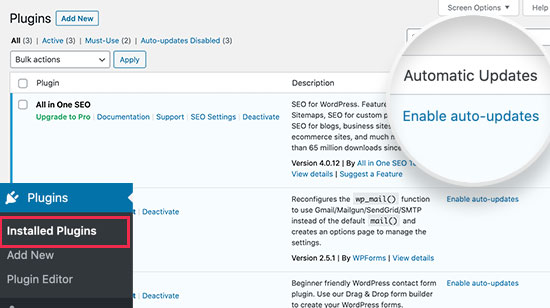
Enable automatic updates for WordPress plugins

For WordPress themes, you can visit the Appearance » Themes page and click on a theme. This will bring up theme information popup where you can click on ‘Enable auto-updates’ for that theme.
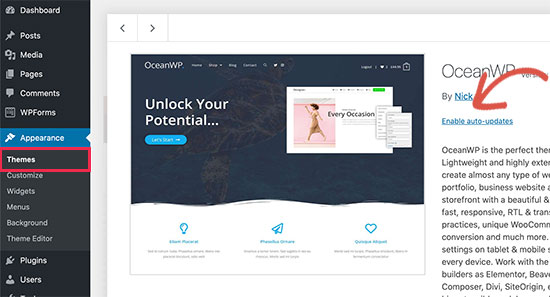
Enable theme auto-updates

WordPress will send you an email notification when any of your plugins, theme, or WordPress core is updated.

This can get annoying particularly for users who manage multiple WordPress websites. Wouldn’t it be nice if you can control and turn off these email notifications?

Let’s take a look at how to easily disable automatic update email notifications in WordPress.

Method 1: Disable Automatic Update Email Notification Using Plugin

This method is simpler and does not require you to add any code to your WordPress site. It also gives you the flexibility to select which notifications you want to disable.

First thing you need to do is install and activate the Manage Notification E-mails plugin. For more details, see our step by step guide on how to install a WordPress plugin.

Upon activation, you need to visit the Settings » Notification e-mails page. This is where the plugin allows you to manage all WordPress notification emails including auto-update notifications.
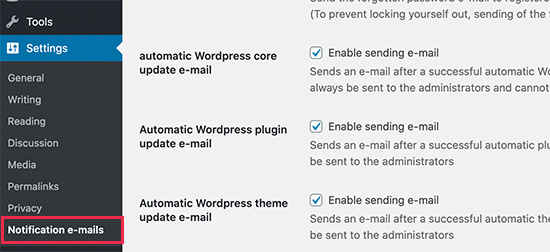
Disable email notifications

Simply scroll down to the auto-update options and uncheck the box next to the notifications that you want to disable.

Don’t forget to click on the ‘Save Changes’ button to store your settings.

That’s all, you have successfully disabled WordPress auto-update email notifications for your website.

Method 2: Disable Automatic Update Email Notification Using Code

This method requires you to add code to your WordPress files. If you haven’t done this before, then take a look at our beginner’s guide on pasting snippets from web into WordPress.

You can use Code Snippets plugin to add custom code in WordPress or manually add this code to your theme’s functions.php file or a site-specific plugin. A better approach would be to use Code Snippets plugin to add custom code in WordPress.

1. Disable Auto Update Notification Emails for Core Updates

Simply add the following code to disable notification emails for automatic updates of the WordPress core.

add_filter( 'auto_core_update_send_email', 'wpb_stop_auto_update_emails', 10, 4 );
 
function wpb_stop_update_emails( $send, $type, $core_update, $result ) {
if ( ! empty( $type ) && $type == 'success' ) {
return false;
}
return true;
}

This code adds a filter to disable email notifications after automatic core updates.

2. Disable Auto Update Notification Emails for Plugins

Add the following code to disable notification emails for automatic updates of WordPress plugins.

add_filter( 'auto_plugin_update_send_email', '__return_false' );

This filter simply disables email notifications for plugin auto-updates.

3. Disable Auto Update Notification Emails for Themes

Add the following code to disable notification emails for automatic updates of WordPress themes.

add_filter( 'auto_theme_update_send_email', '__return_false' );

This filter simply disables email notifications for theme auto-updates.

Rolling Back WordPress Updates if Something Goes Wrong

Because WordPress plugins run on various independent WordPress hosting and sever configurations, it is possible that sometimes a plugin update may result in breaking a feature on your website or making it inaccessible.

This is easy to troubleshoot and fix. First, you need to figure out which plugin has caused the issue by deactivating all WordPress plugins and reactivating them one by one.

Once you have isolated the plugin causing the issue, then you can use WP Rollback plugin. It allows you to switch to the previous version of a WordPress plugin or theme.

For details, see our guide on how to rollback WordPress plugins and themes with step by step instructions.

Improving WordPress Email Deliverability

Even if you disable WordPress auto-update emails, there are other WordPress notification emails that you may not want to miss.

For instance, if you run a WooCommerce store, then you would want to receive notifications when new order is placed.

Similarly, if you sell an online course or run a membership website, then you may want to receive email alerts when new users sign up.

You would also want to make sure that emails sent to users are delivered. Like forgot password emails, payment receipt emails, or order confirmation notifications.

To send emails, WordPress uses the PHP mail function. This function is easily misused by spammers, and your emails may end up in spam.

To make sure all your important WordPress notification emails reach user’s inbox, you need to use a proper SMTP service to send emails.

This is where WP Mail SMTP plugin comes in. It allows you to use an SMTP service to send all your WordPress notification emails.

You can use it with a paid SMTP service provider as well as a free SMTP service like Gmail combined with the free version of WP Mail SMTP plugin.

For more details, see our guide on How to set up WP Mail SMTP on your WordPress site.

That’s all, we hope this article helped you learn how to disable automatic update email notification in WordPress. You may also want to see our guide on 24 must have WordPress plugins for business websites, and our comparison of the best email marketing services to grow your sales.

If you liked this article, then please subscribe to our YouTube Channel for WordPress video tutorials. You can also find us on Twitter and Facebook.

The post How to Disable Automatic Update Email Notification in WordPress appeared first on WPBeginner.


February 09, 2021 at 03:40PM

Monday, February 8, 2021

How to Add a Custom Domain Alias for Your WordPress Landing Page

Do you want to add a custom domain alias for your WordPress landing page?

Instead of installing a separate WordPress website, wouldn’t it be nice if you could use your existing WordPress to make landing pages and point different domains to specific custom landing pages?

In this article, we’ll show you how to easily add a custom domain alias for your WordPress landing page.

Adding a custom domain for your WordPress landing page

Why Add a Custom Domain for a WordPress Landing Page?

Let’s say you have a blog where you publish cooking recipes on a domain name called mycookingrecipes.com. Now you want to sell online courses on your website.

A good way to promote your online courses business would be to have its own marketing website using a different domain name (for e.g. awesomecookingcourse.com).

Now, you can make a separate WordPress website and spend your time and money on that, or you can simply add a custom domain and point it to a landing page on your existing website.

This way you can create an awesome landing page (micro-site) that is highly optimized for conversions. At the same time, you can use the same WordPress installation for creating and selling courses.

Similarly, let’s say you are launching a new product on your WooCommerce store. You want to use a custom domain to promote that product without creating a separate WooCommerce store.

This allows you to save time on website maintenance tasks while keeping your WordPress website costs under control.

Another popular use-case for this solution is marketing agencies. If you’re creating PPC landing pages for clients and managing it through a platform like Unbounce, you can now significantly reduce your bill by doing that all from a single WordPress install while still using clients’ custom domains.

That being said, let’s take a look at how to easily add a custom domain alias to your WordPress landing page.

What Do you Need to Add a Custom Domain Alias for Your WordPress Landing Page?

First, you’ll obviously need a new domain name. We recommend using Domain.com as they are one of the best domain name registrars on the market.

They have competitive pricing and you are free to use your domain name with any WordPress hosting company.

Secondly, you’ll need to make sure that your WordPress hosting company allows you to use multiple domains pointing to the same WordPress website.

Lastly, you’ll need SeedProd. It is the best WordPress page builder plugin on the market with a built-in feature to use a custom domain for any landing page on your website.

Note: You’ll need at least their Pro plan to access the domain mapping feature.

Creating Your Landing Page in WordPress

We will start by creating the landing page on your existing WordPress website.

First, install and activate the SeedProd plugin. For more details, see our step by step guide on how to install a WordPress plugin.

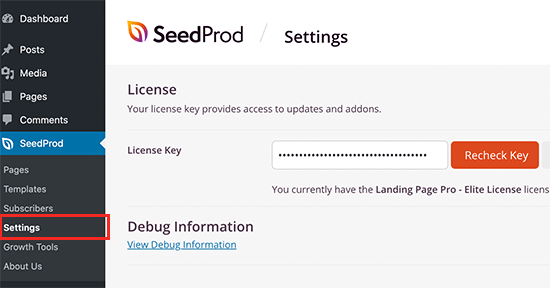
Upon activation, you need to visit SeedProd » Settings page to enter your license key. You can find this information under your account on the SeedProd website.

SeedProd License Key

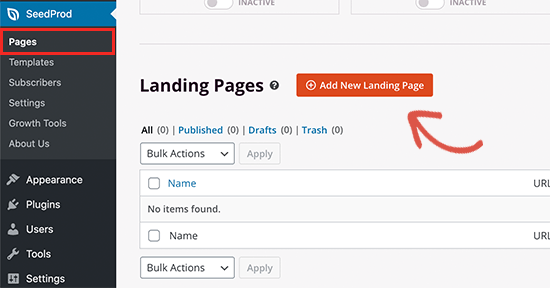
Next, you need to visit SeedProd » Pages page and then click on the ‘Add New Landing Page’ button.

Creating a new landing page

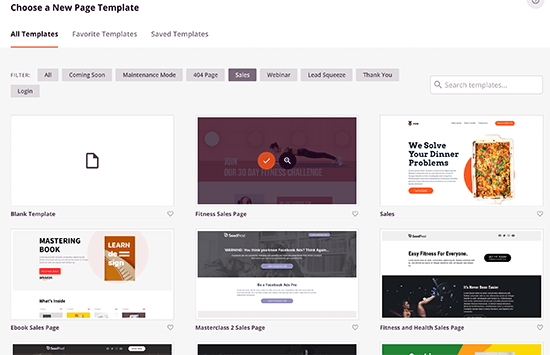
On the next screen, you’ll be asked to choose a template. SeedProd comes with several professionally designed templates that you can use as a starting point.

Choose landing page template

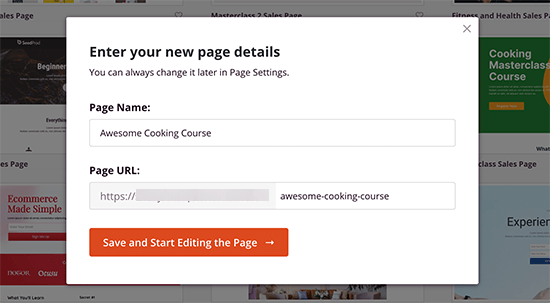
Simply click to select the template you want to use. You’ll be asked to provide a name for your landing page and choose a URL slug.

Choose page name and URL slug

After entering the required information, click on the ‘Save and Start Editing the Page’ button to continue.

This will launch the SeedProd’s drag and drop page builder interface.

SeedProd's page builder

The page builder is super easy to use. Simply point and click on any item on the page to edit and change it. You can also add new elements by adding blocks from the left panel.

It comes with all commonly used blocks needed to make any type of landing page. You can also add complete sections by switching to the sections tab.

Add complete sections to your landing page

There are common sections like header, footer, hero image, call to action, and more.

You can change any element on your landing page by changing its properties like fonts, size, colors, background images, and more.

Editing in SeedProd page builder

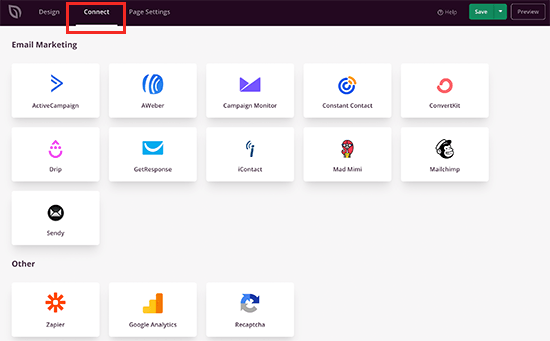
You can also connect your landing page to third-party tools by switching to the ‘Connect’ tab. SeedProd supports all top email marketing platforms, Google Analytics, and over 2000+ other apps via Zapier.

SeedProd integrations

Once you are satisfied with your landing page, you can click on the Save button to publish your landing page.

Save and publish your landing page

Adding Custom Domain to Your Landing Page

Now that your landing page is ready. Let’s tell SeedProd that this landing page will be displayed by using a custom domain alias.

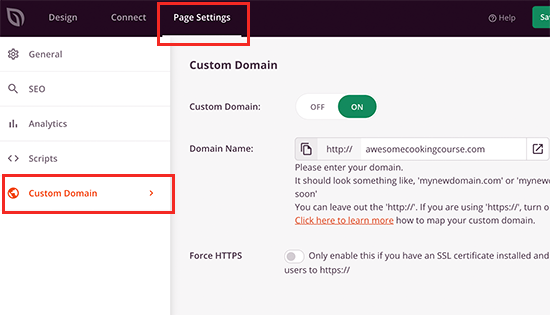
To do that, you need to simply edit the page and switch to the ‘Settings’ tab. Ther you’ll find the ‘Custom Domain’ option where you need to switch the toggle to turn ON the custom domain.

Setting custom domain for your landing page

Below that, you need to provide the domain name that you want to use.

If your custom domain name has an SSL certificate enabled for it, then you need to switch the force HTTPs option as well.

Don’t forget to click on the Save button to store your changes.

If you tried visiting your landing page now, it will show you an error. That’s because SeedProd is trying to use your custom domain name, but the domain name doesn’t point to your website yet.

Let’s change that.

Setting up Custom Domain Alias

You need to point your custom domain alias to your WordPress hosting provider. You can do that by editing the DNS nameservers under your domain registrar account.

Nameservers are part of the global database of the domain name system. Their job is to tell other computers where to find a domain name.

You can find out which nameservers to use for your hosting company by asking their support team. For instance, Bluehost uses the following nameservers for most websites:

ns1.bluehost.com
ns2.bluehost.com

Once you find out the nameservers used by your hosting provider, you need to write them down as you’ll need this information in the next step.

For the sake of this tutorial, we’ll be showing you how to do that for a domain registered at Domain.com by pointing it to Bluehost. However, the basic instructions are the same for most domain registrars.

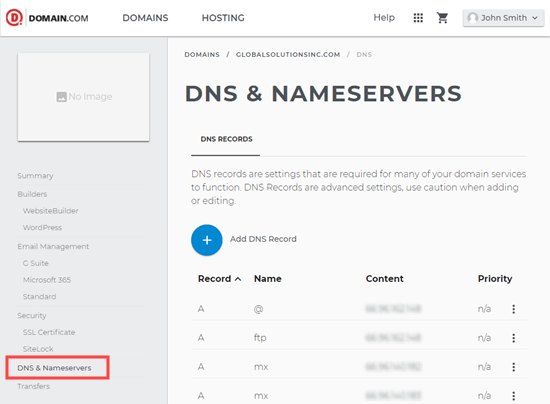
First, you need to log in to your Domain.com account. After that, you need to click on the ‘DNS & Nameservers’ link in the left-hand sidebar.

Editing DNS nameservers on Domain.com

Before you start, make sure the correct domain is selected at the top of the screen. Once you have verified the domain is correct, simply scroll down to the NS records section.

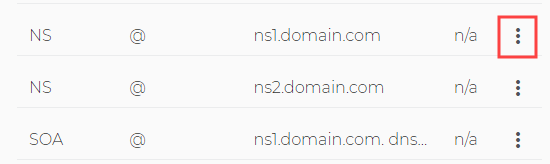
First, click the 3 vertical dots next to ns1.domain.com then select Edit.

Editing nameserver

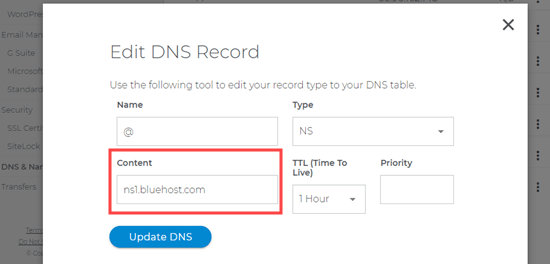
You will see a popup where you need to edit the nameserver record. Simply type the new nameserver in the ‘Content’ box then click the ‘Update DNS’ button.

Updating nameservers

Repeat the same process for the ns2.domain.com nameserver record too. You will see your updated nameservers in the list.

Nameservers updated

For more details and other domain name registrars please see our guide on how to easily change DNS nameservers.

Adding Custom Domain to Your Hosting Account

Now that your custom domain is pointing to your WordPress hosting provider, the next step is to add it to your hosting account.

We’ll show you how to add your domain name in Bluehost. However, the process is the same for most hosting providers.

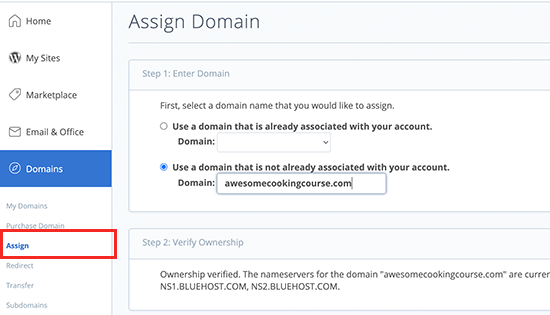
Simply login to your hosting account dashboard and then go to Domains » Assign page. Here, you need to enter the domain name that you want to add under ‘Use a domain that is not already associated with your account’.

Adding an addon domain in Bluehost

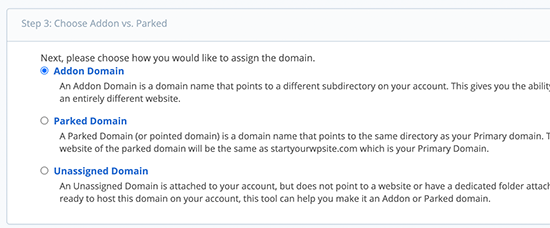
Bluehost will now check if the domain name points to their nameservers. After that, you can scroll down to ‘Addon vs Parked’ section and select ‘Addon’ option.

As an addon domain

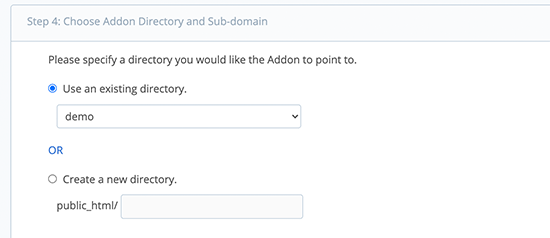
Below that, you will be given the option to select the directory (folder) you want to use for this domain. You need to choose the directory where your WordPress site is installed.

Choose directory

If you are unsure, you can simply choose public_html option below.

Finally, click on the ‘Assign this domain’ button to add your domain name.

That’s all, you can now enter your custom domain alias in a new browser tab, and it will automatically show your WordPress landing page.

Landing page preview

We hope this article helped you point your custom domain alias to your WordPress landing page. You may also want to see our guide on how to create an email newsletter, and our comparison of the best business phone services to boost your landing page conversions.

If you liked this article, then please subscribe to our YouTube Channel for WordPress video tutorials. You can also find us on Twitter and Facebook.

The post How to Add a Custom Domain Alias for Your WordPress Landing Page appeared first on WPBeginner.


February 08, 2021 at 04:22PM

Friday, February 5, 2021

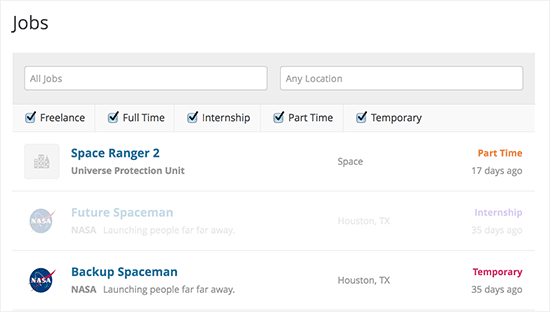
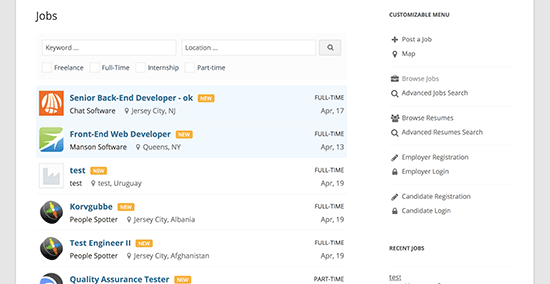
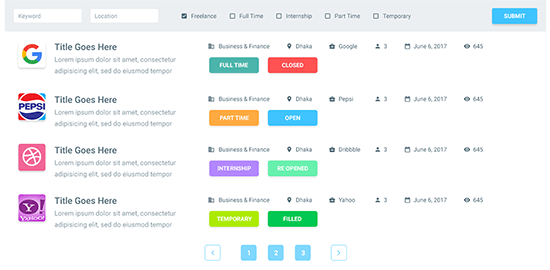
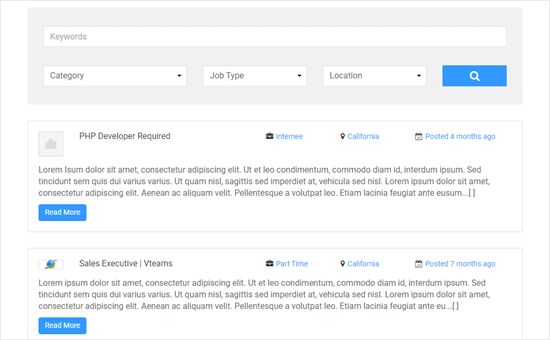
7 Best WordPress Job Board Plugins and Themes

Are you looking for the best WordPress job board plugin? There are several plugins that you can use to easily create an online job board. This can be a way to publish jobs for your own company or to charge other companies to list their jobs.

In this article, we will go through the best WordPress job board plugins and themes that you can use.

Best WordPress job board plugins and themes

Building a Job Board Website with WordPress

WordPress is currently one of the most popular website builders in the market, powering more than 39% of all websites on the internet. It can be used to build almost any kind of website including a job board website.

There are two types of WordPress websites, which often confuses new users. First, there is WordPress.com, a hosted solution. Second, you have WordPress.org, also called self-hosted WordPress. See our article on WordPress.com vs WordPress.org for a side-by-side comparison.

We strongly recommend using self-hosted WordPress.org. It gives you instant access to all WordPress features and functionality without any restrictions.

To get started, you will need a domain name and website hosting. A domain name is your site’s address on the web, like wpbeginner.com or google.com. Web hosting is the storage for all your website files.

We recommend using Bluehost. They are an officially recommended WordPress hosting provider, and one of the largest web hosting companies in the world.

The Bluehost special offer for WPBeginner readers

Bluehost is offering our readers a huge discount on their web hosting package. You also get a free domain and a free SSL certificate.

After you have purchased hosting, follow our step by step guide on how to make a website.

Once you have created your WordPress site, you can install a job board plugin or theme.

Let’s take a look at some of the best WordPress job board plugins and themes that you can use to build a job board website.

1. WP Job Manager

WP Job Manager

WP Job Manager is an extremely easy to use WordPress job board plugin from Automattic. Simply create new pages, add shortcodes, and you can have a live job portal in minutes. It allows recruiters to register on your website and post their job listings. Job hunters can also manage their listings from a simple dashboard.

You can also use it to make money online with paid job postings through premium add-ons. It also has add-ons to send email alerts, to monetize your job board using WooCommerce, add a resume manager, and more.

For detailed instructions, see our article on how to create a job board in WordPress.

2. WPJobBoard

WPJobBoard

WPJobBoard is a paid WordPress job board plugin that allows you to add a powerful job search engine to your website. It includes a front-end admin panel for employers and recruitment agencies to submit jobs and resumes. It also includes a resume database and employer portal allowing users to search for the right candidate.

The plugin integrates with all WordPress themes and comes with its own free theme as well. It also allows you to accept payments, offer coupons, discounts, and even membership packages to employers.

3. Job Board Manager

Job Board Manager

Job Board Manager is another great plugin to add a job board to your WordPress website. It’s user-friendly and comes with a shortcode that you can add to different pages for displaying job listings, adding a new job listing, showing the user dashboard, and more.

Job Board Manager is SEO friendly and uses Schema.org rich snippets markup for job listings.

It comes with free add-ons to add company profiles, locations, widgets, and breadcrumbs. You can also use paid add-ons for WooCommerce paid listings, job alerts, an applications manager, and more.

4. Simple Job Board

Simple Job Board

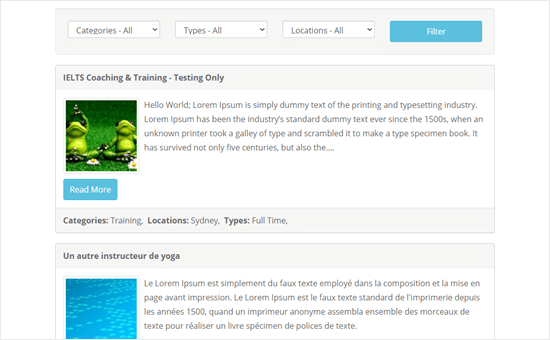
Simple Job Board is another easy to use WordPress job site plugin. It’s a simple, lightweight plugin that does not allow employers to create an account on your website or add their own job listings.

Instead, you can use it to manually enter job openings with categories and job types. There are no built-in monetization options in the plugin settings, but you can extend it by adding a simple order form in WordPress.

Simple Job Board allows you to add as many details for each listing as needed. You can display custom job application forms for job listings.

5. Apply Online

Apply Online

Apply Online is a classified ads management plugin that allows users to quickly respond to listings. It allows you to easily add a job board to your website and start accepting applications.

It has powerful features like ad categories, filters, application form fields, email notifications, and more. One disadvantage is that you cannot use it to create a paid job listings website, and you will need to add a membership plugin to create subscription plans or use a contact form plugin to accept orders.

6. JobRoller

JobRoller

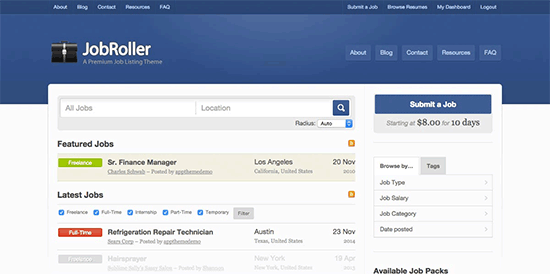
JobRoller is a powerful WordPress job board theme. It comes with excellent monetization options allowing you to get paid for job listings. It includes separate sections to create a blog page or add landing pages to your job board website.

It supports both employers and job seeker accounts, includes a resume or CV bank, has a job submission form, and comes with Ajax-powered search / filter features. It has multiple display options and a powerful theme options panel which helps you quickly set up everything.

7. JobEngine

JobEngine

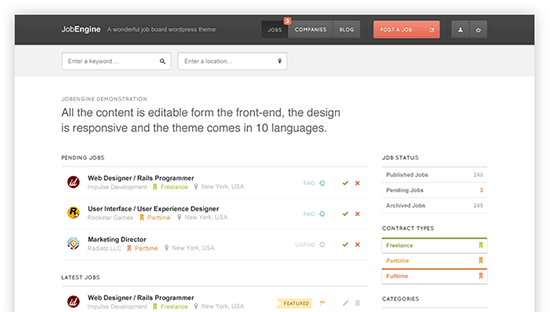
JobEngine is a WordPress app theme designed to create a powerful job board website. It has a special front page template to welcome your website visitors.

Job Engine allows your users to easily create an account and list jobs. You can charge for the job openings on a per job basis or create premium plans. You can also sell featured listings separately. It supports PayPal, Stripe, 2Checkout, and Authorize.net payment gateways.

As a theme, it has lots of color customization choices and design options to control the appearance of your job board. You can customize it on the front end using the built-in page builder. It has multiple sidebars, landing page options, and is translation-ready to support multilingual websites.

We hope this article helped you find the best WordPress job board plugins and themes for your website. You may also want to see our ultimate guide to WordPress SEO to help your job board rank well in Google and other search engines.

If you liked this article, then please subscribe to our YouTube Channel for WordPress video tutorials. You can also find us on Twitter and Facebook.

The post 7 Best WordPress Job Board Plugins and Themes appeared first on WPBeginner.


February 05, 2021 at 05:13PM