Friday, March 5, 2021

7 Best Auction Plugins for WordPress (2021)

Are you looking for the best auction plugins for WordPress?

An auction plugin allows you to run online auctions on your website and create an eBay like store using WordPress.

In this article, we’ll show you our top pick of the best auction plugins for WordPress.

Auction plugins for WordPress and WooCommerce compared

Before You Get Started

WordPress has many different auction plugins available. Some are available as standalone WordPress plugins whereas others are available as WooCommerce extensions.

Depending on the option you choose, your set up will be different.

For example, a WooCommerce plugin will require you to set up an online store. You’ll need a WooCommerce hosting provider like SiteGround.

Whereas for other plugins, you can simply create a WordPress website and install it like you would do for any other plugin.

If you’re expecting a lot of bidding in your auctions, then you may want to consider your website speed and performance issues by using a managed WordPress hosting provider. This ensures that your website does not go down during critical auction times.

With that said, let’s take a look at the best WordPress auction plugins that you can use.

1. YITH WooCommerce Auctions
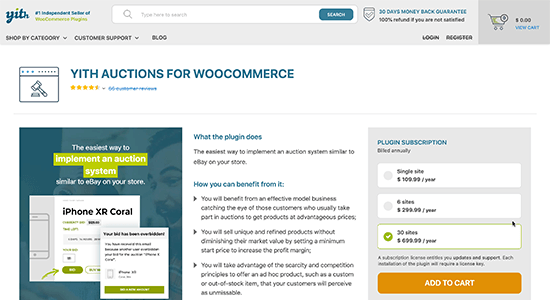
YITH Auctions for WooCommerce

YITH WooCommerce Auctions is the complete auctions plugin for WooCommerce and allows you to build an ebay-like website in minutes.

It is super easy to use and you can easily add any type of products that you want to auction. You can set up a minimum bid amount, minimum bid increment, reserve price, buy it now price, and more.

You can also choose to set a schedule for an auction, extend an auction, add a grace period, and have full control over the process.

It runs on top of WooCommerce, so you can easily set it up by setting up an online store first. After that, you can install the plugin and then add auction products like you would add any other WooCommerce product. This also makes it easier for you to accept payments and use all the powerful eCommerce features of WooCommerce.

The plugin can also be converted into a multi-vendor marketplace, which would allow other sellers to list their own products for auction on your site. Allowing you to make additional money by providing a platform to third-party sellers.

For more details, see our step by step guide on how to build an auction site in WordPress.

2. WP Auctions

WP Auctions

WP Auctions is another easy solution to run auctions on your WordPress website. It allows you to easily add auctions to your site, set starting price, date, and wait for bids to come in.

After that, you can send the winning bid to a page where they can pay via PayPal. Alternatively, you can accept payments manually or via wire transfer by emailing the user.

You can add the auction to a post, page or a sidebar widget on your website. You can also manually add it to your custom WordPress theme by adding a template tag.

The downside is that there are limited payment options, and it lacks many of the features you would get with some other plugins on the list. However, it is an excellent option if you don’t want to install an eCommerce plugin.

3. Ultimate WordPress Auction

Ultimate Auctions for WordPress

Ultimate WordPress Auction is another good way to add auctions to your WordPress website or WooCommerce store.

It allows you to add auction products, set bidding time, and manage your auctions using a simple dashboard. The free version allows you to accept payments via PayPal. The pro version allows you to accept payments via Stripe too.

Using it on WooCommerce also allows you to use a multi-vendor plugin. This enables other sellers to auction their own products on your platform.

4. WP Ebay Products Feed

WP eBay Product Feeds

WP Ebay Products Feed allows you to fetch and display your eBay auctions on your WordPress website. This is particularly useful for sellers that are already selling on eBay.

It also helps if you want to show your existing users that you are a reputable seller and have been an active seller.

The plugin is quite easy to use. Simply add the eBay ID and use a third-party service to convert it into a usable RSS feed. After that, you can set how you want products to be displayed in your feeds.

The plugin allows you to use your own Affiliate ID with eBay links. It also supports Gutenberg block editor, and you can display the auction feed anywhere on your website.

It can be used with other auction plugins for WordPress and WooCommerce, or as a standalone solution to simply send users to make the bid on your eBay profile.

5. Auctions Made Easy for WooCommerce
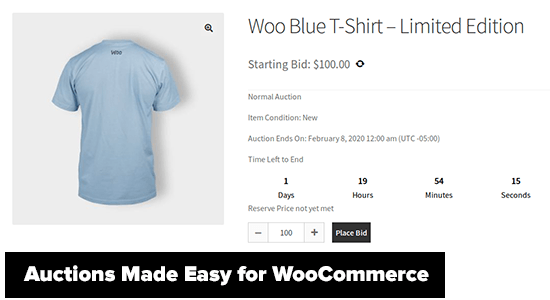
Auctions Made Easy for WooCommerce

Auctions Made Easy for WooCommerce is a WordPress auction plugin made specifically for WooCommerce stores.

The plugin supports normal, reverse auctions, sealed auctions, proxy auctions, and more. It allows customers to log in and view their own auction dashboard. Once they have won an auction, they will see a link to make the payment to complete the purchase.

Adding products to the auction works like any other product you add in WooCommerce. After you set up the product to be an auction product, you’ll see the options to set up the schedule, starting bid, and other settings.

It beautifully displays your auction products with a countdown timer to trigger the FOMO effect on the product page.

Being an extension of WooCommerce, it allows you to use multiple payment gateways and extend your site functionality using popular WooCommerce plugins and tools/

6. WP-Lister Lite for eBay
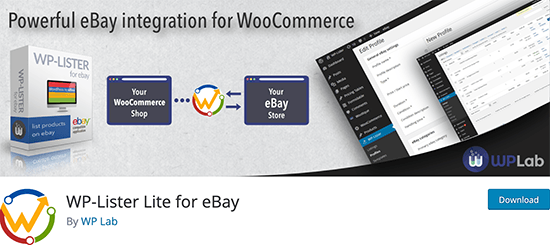
WP-Lister Lite for eBay

WP-Lister Lite for eBay is a WooCommerce plugin that allows you to easily add your WooCommerce products to your eBay store.

You can easily list products on your online store and your eBay store at the same time. It does not allow you to run an auction on your WooCommerce store.

However, you can use a different WooCommerce auction plugin or run the auction on eBay using the same product data without having to enter it again.

The plugin is a bit complicated to get used to as you need to set it up to work with an API. However, once it is set up the whole process runs quite smoothly.

7. Auction Nudge
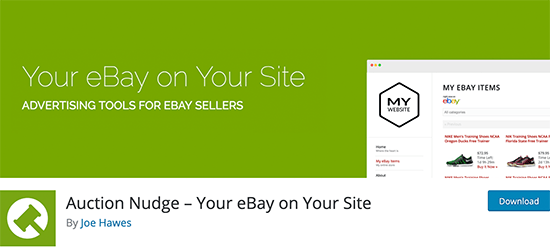
Auction Nudge

Auction Nudge allows you to bring your eBay profile to your WordPress website or WooCommerce store.

It is particularly useful when you want to show that you are a well-reputed seller or just want to promote your eBay auctions. The plugin does a good job of bringing content from your eBay account to WordPress.

It is quite simple to use and comes with flexible options to display your eBay products, profile information, and your most recent feedbacks.

You can use it alongside any WordPress auctions plugin on the list and allow users to see your past activity on the platform.

We hope this article helped you find the best auction plugins for WordPress. You may also want to see our guide on best email marketing services to improve your auction bids and best live chat software to answer questions during live auctions.

If you liked this article, then please subscribe to our YouTube Channel for WordPress video tutorials. You can also find us on Twitter and Facebook.

The post 7 Best Auction Plugins for WordPress (2021) appeared first on WPBeginner.


March 05, 2021 at 03:42PM
Thursday, March 4, 2021

How to Hide a Mobile Menu in WordPress (Beginner’s Guide)

Do you want to hide a mobile menu in WordPress?

Most WordPress themes come with built-in styles that automatically transform your navigation menus into a mobile menu. However, you may not wish to use the same menu on mobile or may want to use a different menu style.

In this article, we will show you how to easily hide a mobile menu in WordPress using a plugin or code method.

Hiding a WordPress menu on mobile

Method 1. Hide a Mobile Menu in WordPress using a Plugin

This method is easier and is recommended for beginners. We’ll use a plugin to hide your existing mobile menu provided by your WordPress theme and then use a different menu or no menu at all on mobile devices.

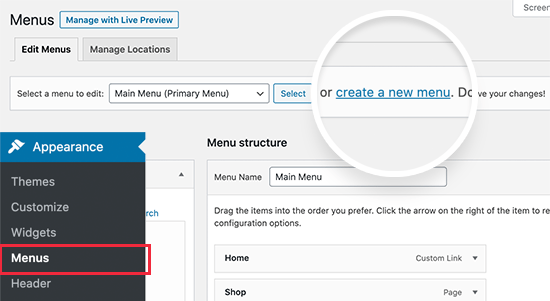
First, you need to visit the Appearance » Menus page and create a new navigation menu that you would like to display on mobile devices.

Create a new menu to be used on mobile devices

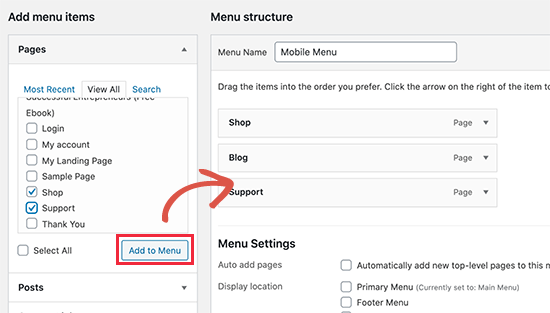
On the next screen, you need to provide a name for your new menu that helps you identify it later. We’ll call it ‘Mobile Menu’. After that, you can select the items you want to add to your menu from the left column.

Adding menu items

Once you are finished adding items to your menu, don’t forget to click on the Save Menu button to save your menu.

If you need help creating a new navigation menu, then follow our beginner’s guide to creating a navigation menu in WordPress.

Next, you need to install and activate the WP Mobile Menu plugin. For more details, see our step by step guide on how to install a WordPress plugin.

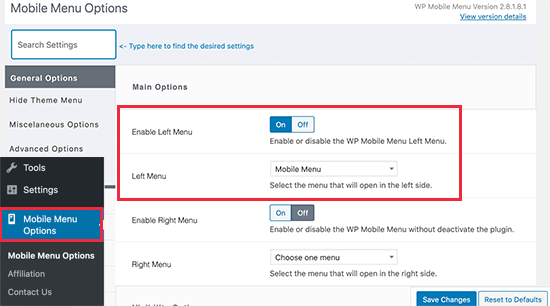
Upon activation, you need to visit Mobile Menu Options page to configure plugin settings. From here, you need to select whether you want to display your mobile menu on the right or to the left by turning the toggle On.

Choose mobile menu and its direction

From the drop-down menu, select the mobile menu you created earlier.

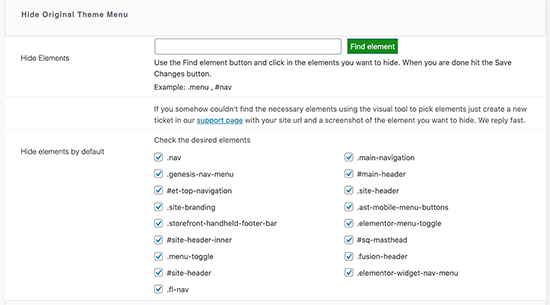
Next, you need to scroll down to the ‘Hide Original Theme Menu’ section. This is where you can tell the plugin to hide a mobile menu created by your WordPress theme.

Hide theme mobile menu in WordPress

By default, the plugin will use commonly used element identifiers used by most popular WordPress themes. Most users wouldn’t need to do anything here.

However, if the plugin fails to hide your theme’s menu, then you can come back here and click on the ‘Find Element’ button to simply point to your theme’s navigation menu.

Don’t forget to click on the Save Changes button to store your settings.

Now that we have set up the plugin, we need to tell WordPress site to display our mobile menu to the new menu location added by the plugin.

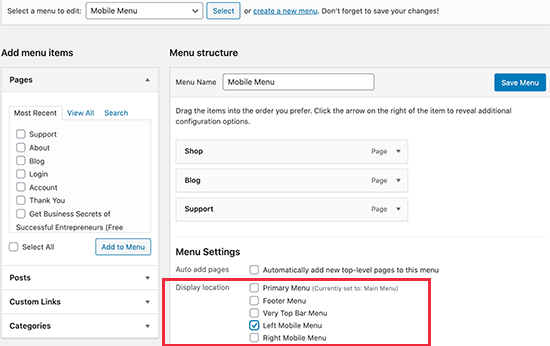
Simply, go to the Appearance » Menus page. Make sure the mobile menu you created earlier is selected in the drop down menu. Below your menu item choose the location you selected in the plugin settings (e.g. Left Mobile Menu or Right Mobile Menu).

Menu location

You can now visit your website to see your new menu in action. The plugin will now hide your theme’s mobile menu and display a custom menu instead.

Mobile menu replaced

WP Mobile Menu plugin allows you to change the color of the menu bar, change opacity, add icons, and more in the settings. Feel free to play around with those settings.

Method 2. Hide Mobile Menu using CSS Code

This method is a bit advanced and requires some custom CSS to be used.

For this method, you can choose to use two different approaches. You can just hide a complete mobile menu using CSS, or you can hide individual menu items on mobile devices.

1. Hiding a complete menu on mobile devices using CSS

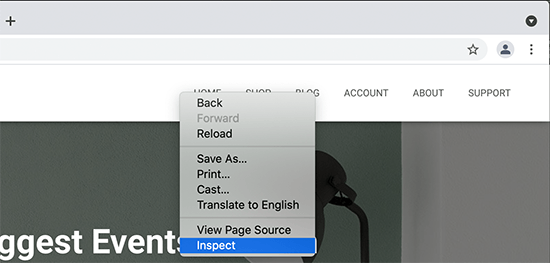
First, you need to figure out the element you need to modify using custom CSS. To do that, simply go to your website and take the mouse over to your navigation menu. After that, right click and select Inspect tool.

Inspect tool

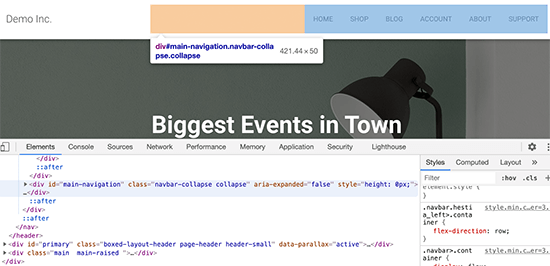
Your browser screen will split into two, and you’ll see the source code of your webpage. Now this navigation menu is not the one you need to target because it is visible on the desktop screen.

Source code while viewing your desktop menu

You need to rearrange your browser screen by dragging it from the corner to a smaller size until the desktop navigation menu is replaced by the mobile menu.

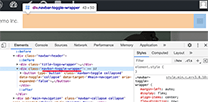
Mobile menu identifier

You need to figure out the identifier and CSS class used by your WordPress navigation menu. You can do that by moving your mouse on the source code until the menu area is highlighted.

As you can see in the screenshot above, our test theme is using the navbar-toggle-wrapper class.

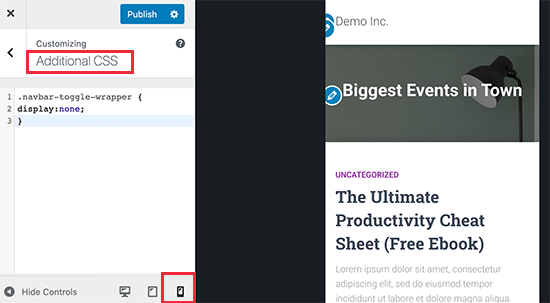
After that, you need to go to Appearance » Customize page in WordPress admin area to launch theme customizer. Here, you need to switch to the ‘Additional CSS’ tab and click on the mobile icon at the bottom right corner of the left panel.

Adding custom CSS to hide complete menu

The customizer will now show a preview of how your site will look on mobile devices. You can now enter the following CSS code and see your mobile menu disappear in the preview panel.

.navbar-toggle-wrapper { 
display:none; 
} 

Don’t forget to replace the .navbar-toggle-wrapper with the identifier used by your WordPress theme.

After that, click on the ‘Publish’ button at the top to save your changes.

2. Hiding specific menu items in mobile menu using CSS

This method allows you to create a navigation menu and then selectively show or hide items that you don’t want to display on mobile or desktop devices.

The advantage of this method is that you can use the same navigation menu for mobile and desktop and simply hide the items that you don’t want to be seen.

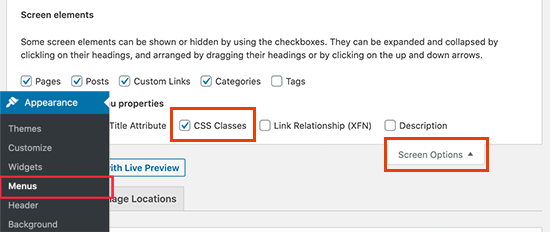
First, you need to go to Appearance » Menus page and click on the Screen Options button at the top right corner of the screen. From here, you need to check the box next to the ‘CSS Classes’ option.

Screen Options

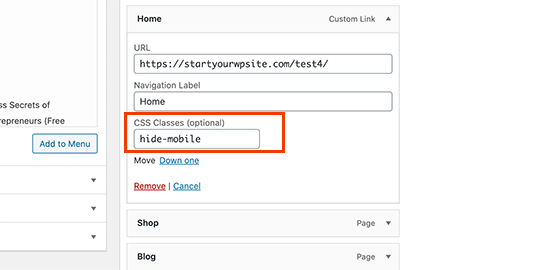
After that. you need to scroll down to a menu item that you want to hide on mobile devices and click to expand it. In the menu item settings, you’ll now see the option to add a CSS class. Go ahead and add .hide-mobile CSS class there.

Add CSS class

Repeat the process for all menu items you don’t want to show on mobile.

Similarly, you can also click on the menu items that you want to hide on desktop computers. This time, add the .hide-desktop CSS class instead.

Once you are finished, don’t forget to click on the Save Menu button to store your changes.

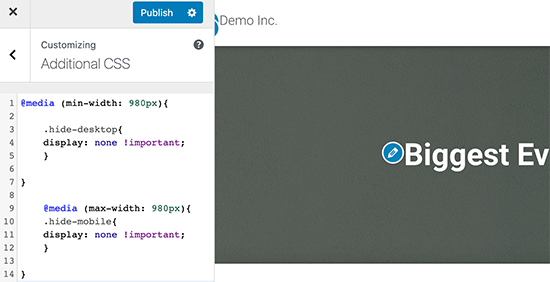
Now we will add custom CSS to hide these menu items. Simply go to the Appearance » Customize page to launch the Theme Customizer and click on the Additional CSS tab.

You need to add the following CSS code in the CSS box.

@media (min-width: 980px){

    .hide-desktop{
    display: none !important;
    }

}

    @media (max-width: 980px){
    .hide-mobile{
    display: none !important;
    }

}

Add your custom CSS

Don’t forget to click on the Publish button to save your changes.

You can now visit your website and you will notice that items that you wanted to hide on desktop are no longer visible in the menu. Adjust your browser screen to a smaller size and you will notice the same for the mobile menu as well.

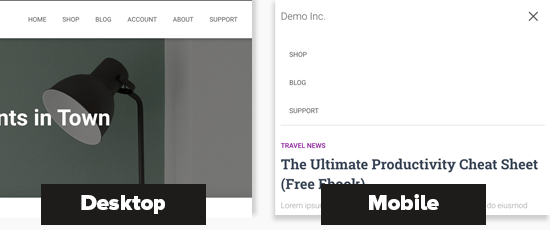
Different menus on desktop and mobile screens

We hope this article helped you learn how to easily hide a mobile menu in WordPress. You may also want to see our article on how to create custom pages in WordPress or how to create a custom theme from scratch without writing code.

If you liked this article, then please subscribe to our YouTube Channel for WordPress video tutorials. You can also find us on Twitter and Facebook.

The post How to Hide a Mobile Menu in WordPress (Beginner’s Guide) appeared first on WPBeginner.


March 04, 2021 at 06:00PM

Wednesday, March 3, 2021

How to Fix the Missed Schedule Post Error in WordPress

Do you want to fix the missed schedule post error in WordPress?

WordPress comes with a built-in feature that allows you to easily schedule posts to be automatically published at a later time. However, sometimes you may notice that scheduled posts don’t get published at all.

In this article, we’ll show you how to easily fix the missed schedule post error in WordPress. This will allow you to ensure that your scheduled posts are published on time.

Fixing the missed schedule post error in WordPress

What Causes WordPress to Miss Scheduled Posts?

Your WordPress hosting environment or plugin conflicts may cause WordPress to miss scheduled posts.

Normally, when you schedule a WordPress post to be published later, WordPress uses a technology called ‘Cron’ or ‘WordPress Cron‘ to automatically publish your post on time.

However, if your WordPress hosting server or a plugin is affecting the cron jobs, then WordPress would miss the scheduled tasks such as publishing scheduled posts.

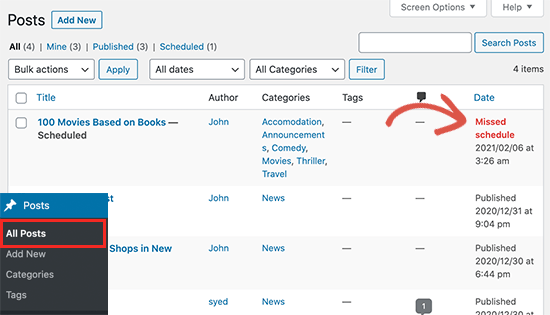
Missed schedule error for a blog post in WordPress

Your other cron jobs may still work occasionally like checking for updates or deleting auto-saved drafts. That’s because once the publishing time is missed WordPress will not publish the blog post on a different time.

For most users, it does not happen very often and for some users it can become a common WordPress issue.

That being said, let’s take a look at how to easily fix the missed schedule post error in WordPress.

Fixing The Missed Schedule Post Error in WordPress

First thing you need to do is install and activate the Missed Scheduled Post Publisher plugin. For more details, see our step by step guide on how to install a WordPress plugin.

The plugin works out of the box, and there are no settings for you to configure.

How does Missed Scheduled Post Publisher plugin work?

The plugin simply checks your website every 15 minutes to see if a scheduled WordPress post has missed schedule.

If it finds any missed schedule items, then it changes the status from scheduled to published.

It works for posts, pages, products, and any other custom post types that you may have on your WordPress website.

We built this plugin to ensure it doesn’t impact your WordPress site speed because we know speed is important for SEO. This is the plugin we’re using on our own sites.

Troubleshooting Missed Scheduled Posts Error in WordPress

If installing the plugin does not immediately fix scheduled posts error on your website, then the following are a few tips that you can try.

1. Check Your WordPress Timezone Settings

Setting your timezone is one of the first things to do after installing WordPress. However, sometimes users miss it and their WordPress timezone doesn’t match the timezone they want to use for publishing and managing their website.

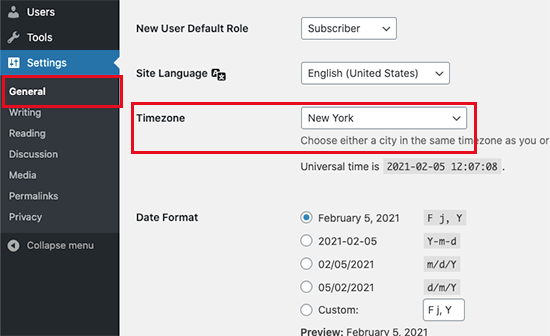
Simply go to Settings » General page and scroll down to the ‘Timezone’ section. From here, you need to select your timezone or the timezone you want to use for your WordPress website.

Set timezone in WordPress

Don’t forget to click on the Save Changes button to store your settings.

2. Clear WordPress cache

If your WordPress posts are still missing schedule, then it is likely due to a poorly configured caching plugin. Try clearing WordPress cache and make sure that your WordPress caching plugin is properly configured to automatically clear cache at regular intervals.

3. Increase WordPress memory limit

Your WordPress website may be struggling with low memory limit issue. You can fix that by allowing WordPress to use more server memory which let’s WordPress run better.

Simply add the following code to your wp-config.php file ust before the line that says ‘That’s all, stop editing! Happy publishing.’

define('WP_MEMORY_LIMIT', '500M');

For details, see our guide on how to increase memory limit in WordPress.

We hope this article helped you learn how to easily fix the missed schedule post error in WordPress. You may also want to see our guide on how to easily troubleshoot WordPress errors on your own.

If you liked this article, then please subscribe to our YouTube Channel for WordPress video tutorials. You can also find us on Twitter and Facebook.

The post How to Fix the Missed Schedule Post Error in WordPress appeared first on WPBeginner.


March 03, 2021 at 06:00PM