Thursday, March 25, 2021

WordPress Body Class 101: Tips and Tricks for Theme Designers

Are you an aspiring WordPress theme designer looking for new ways to use CSS into your themes?

Luckily, WordPress automatically adds CSS classes that you can utilize in your themes. Several of these CSS classes are automatically added to the <body> section of every page on a WordPress site.

In this article, we will explain the WordPress body class with tips and tricks for aspiring theme designers to utilize them in their projects.
Using WordPress body class for theme development
Here is a quick overview of what you’ll learn in this article.

What is WordPress Body Class?

Body class (body_class) is a WordPress function that allows you to assign CSS classes to the body element.

The HTML body tag normally begins in a theme’s header.php file, which loads on every page. This allows you to dynamically figure out which page a user is viewing and then add the CSS classes accordingly.

Normally most starter themes and frameworks already include the body class function inside the HTML body tag. However, if your theme does not have it, then you can add it by modifying the body tag like this:

<body <?php body_class($class); ?>>

Depending on the type of page being displayed, WordPress automatically adds the appropriate classes.

For example, if you are on an archive page, WordPress will automatically add archive class to the body element. It does that for just about every page.

Related: See how WordPress works behind the scenes (infographic)

Here are some examples of common classes that WordPress might add, depending on which page is being displayed:

.rtl {}
.home {}
.blog {}
.archive {}
.date {}
.search {}
.paged {}
.attachment {}
.error404 {}
.single postid-(id) {}
.attachmentid-(id) {}
.attachment-(mime-type) {}
.author {}
.author-(user_nicename) {}
.category {}
.category-(slug) {}
.tag {}
.tag-(slug) {}
.page-parent {}
.page-child parent-pageid-(id) {}
.page-template page-template-(template file name) {}
.search-results {}
.search-no-results {}
.logged-in {}
.paged-(page number) {}
.single-paged-(page number) {}
.page-paged-(page number) {}
.category-paged-(page number) {}
.tag-paged-(page number) {}
.date-paged-(page number) {}
.author-paged-(page number) {}
.search-paged-(page number) {}

As you can see, by having such a powerful resource at hand, you can entirely customize your WordPress page by using just CSS. You can customize specific author profile pages, date-based archives, etc.

That being said, now let’s take a look at how and when would you use the body class.

When to use The WordPress Body Class

First, you need to make sure that your theme’s body element contains the body class function as shown above. If it does, then it will automatically include all the WordPress generated CSS classes mentioned above.

After that, you will also be able to add your own custom CSS classes to the body element. You can add these classes whenever you need them.

For example, if you want to change the appearance of articles by a specific author filed under a specific category.

How to Add Custom Body Classes

WordPress has a filter that you can utilize to add custom body classes when needed. We will show you how to add a body class using the filter before showing you the specific use case scenario just so everyone can be on the same page.

Because body classes are theme specific, you would need to add the following code to your theme’s functions.php file.

function my_class_names($classes) {
        // add 'class-name' to the $classes array
        $classes[] = 'wpb-class';
        // return the $classes array
        return $classes;
}

//Now add test class to the filter
add_filter('body_class','my_class_names');

The above code will add a class “wpb-class” to the body tag on every page on your website. That’s not so bad, right?

Now you can utilize this CSS class in your theme’s stylesheet directly. If you are working on your own website, then you can also add the CSS using the custom CSS feature in theme customizer.
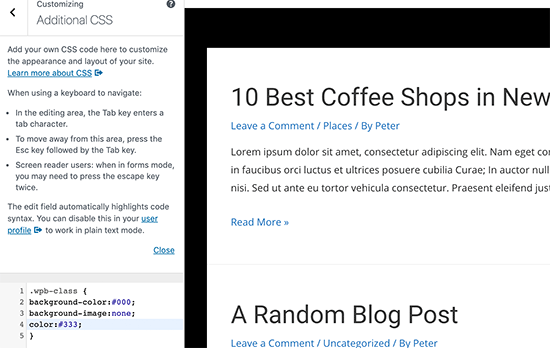
Adding custom CSS in theme customizer

Adding Body Class Using a WordPress Plugin

If you are not working on a client project and don’t want to write code, then this method would be easier for you.

The first thing you need to do is install and activate the Custom Body Class plugin. For more details, see our step by step guide on how to install a WordPress plugin.

Upon activation, you need to visit Settings » Custom Body Class page. From here you can configure plugin settings.
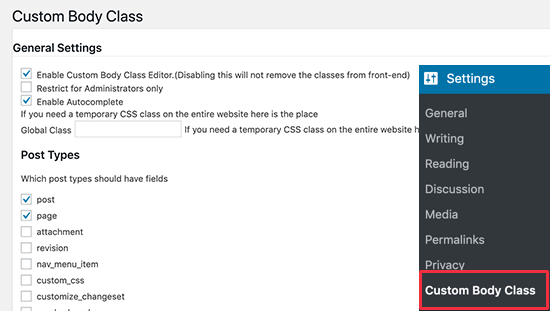
Custom Body Class settings

You can select post types where you want to enable body class feature and who can access it. Don’t forget to click on the save changes button to store your settings.

Next, you can head over to edit any post or page on your WordPress site. On the post edit screen, you will find a new meta box in the right column labeled ‘Post Classes’.
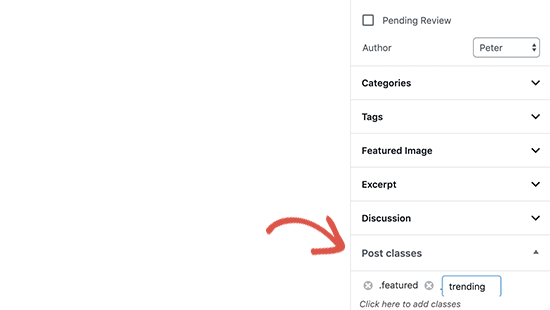
Adding body classes to a post in WordPress

Click to add your custom CSS classes. You can add multiple classes separated by a space.

Once you are done, you can simply save or publish your post. The plugin will now add your custom CSS classes to the body class for that particular post or page.

Using Conditional Tags with The Body Class

The real power of the body_class function comes when it is used with the conditional tags.

These conditional tags are true or false data types that check if a condition is true or false in WordPress. For example, the conditional tag is_home checks if the page currently displayed is the homepage or not.

This allows theme developers to check if a condition is true or false before adding a custom CSS class to the body_class function.

Let’s take a look at some examples of using conditional tags to add custom classes to the body class.

Let’s say you want to style your homepage differently for logged in users with the author user role. While WordPress automatically generates a .home and .logged-in class, it does not detect the user role or add it as a class.

Now, this is a scenario where you can use the conditional tags with some custom code to dynamically add a custom class to the body class.

To achieve this you will add the following code to your theme’s functions.php file.

function wpb_loggedin_user_role_class($classes) { 

// let's check if it is homepage
if ( is_home() ) {

// Now let's check if the logged in user has author user role.  
$user = wp_get_current_user();
if ( in_array( 'author', (array) $user->roles ) ) {
    //The user has the "author" role
    // Add user role to the body class
    $classes[] = 'author';
    // Return the classes array
    return $classes;      
} 
} else { 
// if it is not homepage, then just return default classes
return $classes; 
}
} 

add_filter('body_class', 'wpb_loggedin_user_role_class');

Now, let’s take a look at another useful example. This time we are going to check if the page displayed is a preview of a WordPress draft.

To do that we will use the conditional tag is_preview and then add our custom CSS class.

function add_preview_class($classes) { 
if ( is_preview() )  {
$classes[] = 'preview-mode';
return $classes;
}
return $classes; 
}
add_filter('body_class','add_preview_class');

Now, we will add the following CSS to our theme’s stylesheet to utilize the new custom CSS class we just added.

.preview-mode .site-header:before { 
content:'preview mode';
color:#FFF;
background-color:#ff0000;
}

This is how it looked on our demo site:
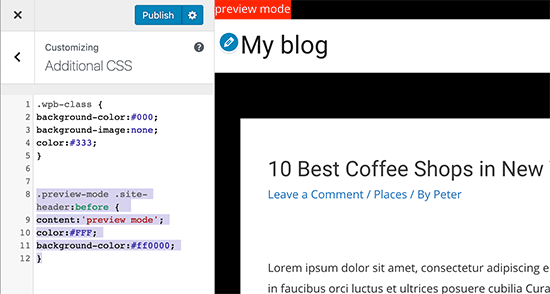
Custom preview mode CSS class added to the body class

You may want to check out the full list of conditional tags that you can use in WordPress. This will give you a handy set of ready to use tags for your code.

Other Examples of Dynamically Adding Custom Body Classes

Apart from conditional tags, you can also use other techniques to fetch information from the WordPress database and create custom CSS classes for the body class.

Adding category names to the body class of a single post page

Let’s say you want to customize the appearance of single posts based on the category they are filed in. You can use the body class to achieve this

First, you need to add category names as CSS class on single post pages. To do that, add the following code to your theme’s functions.php file:

// add category nicenames in body class
function category_id_class($classes) {
    global $post;
    foreach((get_the_category($post->ID)) as $category)
        $classes[] = $category->category_nicename;
    return $classes;
}
 
add_filter('body_class', 'category_id_class');

The code above will add the category class in your body class for single post pages. You can then use CSS classes to style it as you wish.

Adding page slug to the body class

Paste the following code in your theme’s functions.php file:

//Page Slug Body Class
function add_slug_body_class( $classes ) {
global $post;
if ( isset( $post ) ) {
$classes[] = $post->post_type . '-' . $post->post_name;
}
return $classes;
}
add_filter( 'body_class', 'add_slug_body_class' );

Browser Detection and Browser Specific Body Classes

Sometimes you may come across issues where your theme may need additional CSS for a particular browser.

Now the good news is that WordPress automatically detects browser upon loading and then temporary stores this information as a global variable.

You just need to check if WordPress detected a specific browser and then add it as a custom CSS class.

Simply, copy and paste the following code in your theme’s functions.php file:


function wpb_browser_body_class($classes) { 
        global $is_iphone, $is_chrome, $is_safari, $is_NS4, $is_opera, $is_macIE, $is_winIE, $is_gecko, $is_lynx, $is_IE, $is_edge;

if ($is_iphone)    $classes[] ='iphone-safari';
elseif ($is_chrome)    $classes[] ='google-chrome';
elseif ($is_safari)    $classes[] ='safari';
elseif ($is_NS4)    $classes[] ='netscape';
elseif ($is_opera)    $classes[] ='opera';
elseif ($is_macIE)    $classes[] ='mac-ie';
elseif ($is_winIE)    $classes[] ='windows-ie';
elseif ($is_gecko)    $classes[] ='firefox';
elseif ($is_lynx)    $classes[] ='lynx';
elseif ($is_IE)      $classes[] ='internet-explorer';
elseif ($is_edge)    $classes[] ='ms-edge';
else $classes[] = 'unknown';
        
return $classes;
}
add_filter('body_class','wpb_browser_body_class');

You can then use classes like:

.ms-edge .navigation {some item goes here}

If it is a small padding or margin issue, then this is a fairly easy way of fixing it.

There are definitely many more scenarios where using the body_class function can save you from writing lengthy lines of code. For example, if you are using a theme framework like Genesis, then you can use it to add custom classes in your child theme.

You can use the body_class function to add CSS classes for full-width page layouts, sidebar content, header and footers, etc.

We hope this article helped you learn how to use the WordPress body class in your themes. You may also want to see our article on how to style each WordPress post differently, and our comparison of best WordPress page builder plugins.

If you liked this article, then please subscribe to our YouTube Channel for WordPress video tutorials. You can also find us on Twitter and Facebook.

The post WordPress Body Class 101: Tips and Tricks for Theme Designers appeared first on WPBeginner.


March 25, 2021 at 03:06PM

Wednesday, March 24, 2021

How to Easily Find and Remove Stolen Content in WordPress (5 Ways)

Are you looking for a way to find and remove stolen content in WordPress?

You’ve worked hard on your website, but now your content has been stolen, published, and is taking traffic away from your brand.

In this article, we’ll show you how you can find and remove stolen content in WordPress, no matter if it’s a single post or your entire site has been copied.

5 ways to find and remove stolen content in WordPress

How and Why is Website Content Stolen?

One widespread method for stealing content is blog content scraping. This is where content is taken from your site, usually via your RSS feed, and republished on another site.

Sometimes your content will be simply copied and pasted directly to another website, including your formatting, images, videos, and more.

Other times, your content will be reposted with attribution and a link back to your website, but without your permission. Although this can help your SEO, you may want to keep your original content hosted on your site only.

Usually, the main motivation for content theft is to profit off of your hard work.

Having your content stolen is a stressful experience that a lot of WordPress site owners unfortunately experience.

Just know that you’re not alone, and it’s a problem that can be fixed.

Here are the 5 most common ways to find and remove stolen content in WordPress.

1. Set Up Automatic Content Theft Notifications

Sometimes your loyal visitors will alert you that your content has been stolen, or they saw it somewhere else on the web.

Luckily, you don’t have to wait for a helpful reader to notify you.

Google Alerts is often used for brand name notifications. You enter the name of your website and get email notifications whenever you’re mentioned online.

But, this same feature can be used to alert you of content that’s being used without your permission.

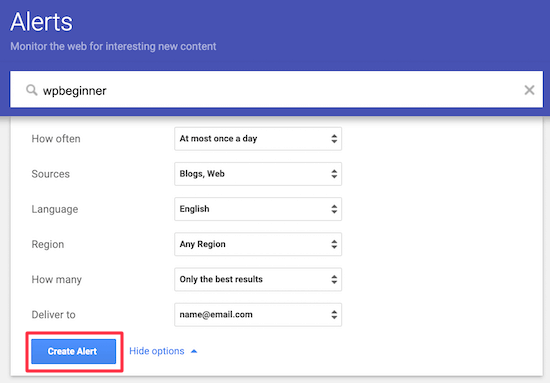
Simply navigate to Google Alerts. Next, enter the name of your website, your URL, or use a portion of your article.

For example, if you end every blog post with the same CTA, then you can get notifications whenever this appears online.

Set up Google Alerts stolen content

After that, you’ll choose the ‘Sources’. Select ‘Blogs’ and ‘Web’ from the drop-down list. Then, click ‘Create Alert’.

Now, you’ll receive an email whenever your content appears on the web or your website is mentioned.

2. Manually Search for Stolen Content

Copyscape is a plagiarism checker tool that can also be used to find stolen content published elsewhere across the web.

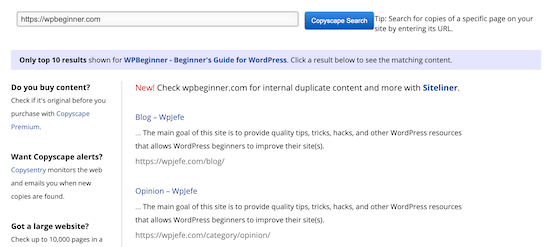
All you have to do is navigate to Copyscape and enter your website URL. You can also enter a page or post URL to see if one of your blog posts or site pages have been copied and stolen.

Copyscape stolen content results

The free version of the tool gives you the top 10 results, which should be enough for smaller WordPress blogs.

If you have a bigger website, or you want results of every single mention of your copied text, then you’ll need to upgrade to the premium version.

The paid version of the tool lets you check up to 10,000 pages with a single click. If you publish a lot of content on your WordPress website, then this could be very useful.

Another manual tool you can use is Grammarly. Grammarly is a popular online grammar checking tool.

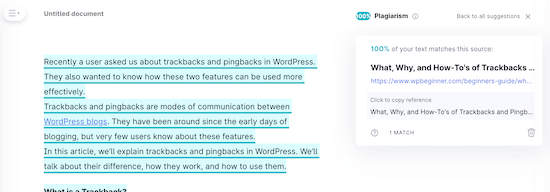
The premium version of Grammarly has a built-in plagiarism checker. You can copy and paste your content into the tool, and it’ll run a scan to see if any matches turn up online.

Grammarly plagiarism check

3. Contact the Offending Host or Registrar

So, you’ve found stolen content, now what?

The simplest way to take down stolen content is to file a DMCA complaint against the website.

Usually, if it’s a spam website, or a site that’s scraping your content from your RSS feed, then it can be difficult to find contact information.

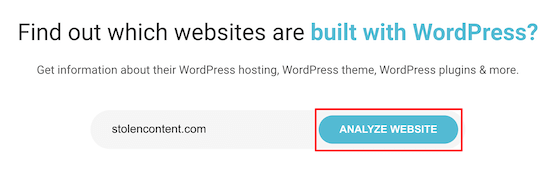
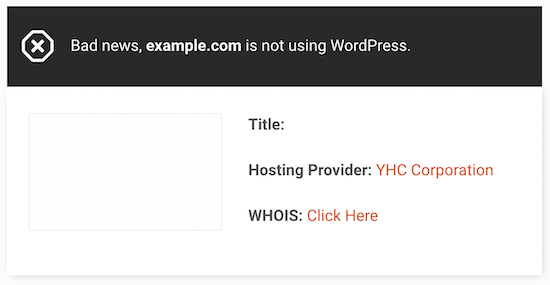
However, you can use the IsItWP lookup tool to find out where the domain and website are hosted.

IsItWP website lookup tool

Simply enter the domain that’s published your stolen content and click ‘Analyze Website’.

The tool will pull up any available information, including the web hosting company and registrar.

IsItWP website lookup results

You’ll notice that the host and registrar are shown, even if the website isn’t using WordPress. You can contact the host and registrar directly to try and get the site taken down.

Since stealing content is an illegal activity, web hosting companies don’t want to host websites that are breaking the law.

Most reputable web hosting companies take DMCA requests seriously and will work with you to resolve the situation including removing the pages in violation.

4. Submit a Takedown Notice to Google

Another way to remove stolen content is to contact Google directly.

You need to be careful using this method because it requires a lot of proof, and if you do false reports, then it can get your account in trouble.

There are a few different ways to file a DMCA complaint with Google, but we recommend using the one inside Google Search Console.

First, you’ll need to have your site linked with Google Search Console. If you haven’t done this yet, then see our guide on how to add your WordPress site to Google Search Console.

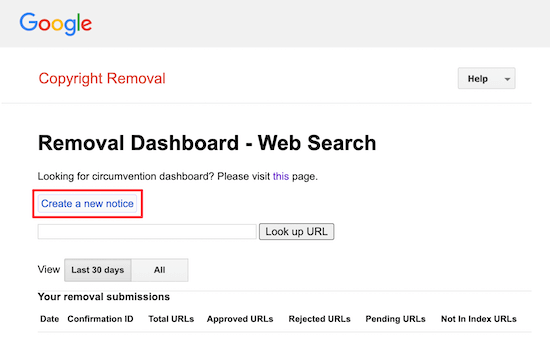
Then, you can use the Google Search Console Copyright Removal Tool.

Simply click ‘Create a new notice’.

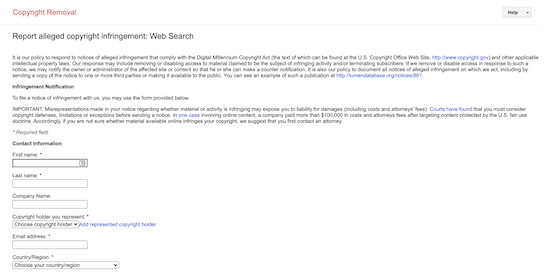
This will bring up a screen where you can enter all of the relevant information including your contact information, what posts were stolen, and the location of the stolen material.

Google Search Console stolen content report

The more detailed information you’re able to provide, the better the chances of the offending site getting taken down.

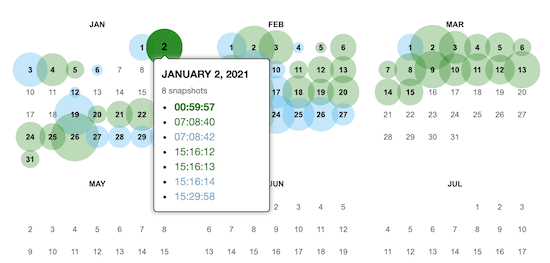
If you need to gather more information for your complaint, then you can use a tool like Wayback Machine.

Wayback Machine compare content dates

This tool takes takes snapshots of your website at different points in time.

So, you can compare the date you published the article to the offending site who later stole your content.

5. Use an All in One Scanner and Takedown Tool

You can also use the Digital Millennium Copyright Act (DMCA) tool to help you find duplicate content across the web.

Just enter your URL into the tool and it’ll scour the web for sites that have stolen your content.

DMCA tool request takedown

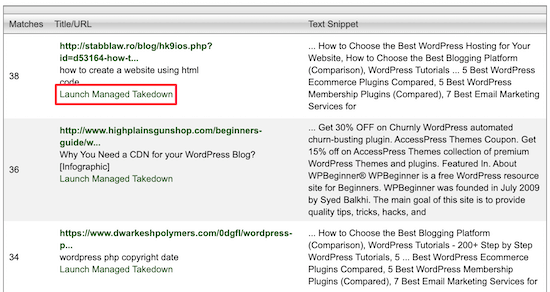
Once you’ve found a site that plagiarized or stolen your content you can click ‘Launch Managed Takedown’ to start the takedown process.

Note that the results won’t always be stolen content. Sometimes it’ll be infographics, backlinks, unlinked brand mentions, and more.

The discovery and takedown process is similar to the tools above, but instead of having to use multiple tools, you can take care of everything in one place.

DMCA offers premium takedown tools and templates for $10 per month. Or, you can purchase a full service takedown for $199, where their team of experts will get your stolen content removed for you.

Final Thoughts on Dealing with Content Theft

Content theft is a real problem that every website owner deals with. Unfortunately the larger your website gets, the more people will copy you.

Some will do blatant content theft by using automated content scraping tools while others will take inspiration from your content and paraphrase.

As a website owner, it’s extremely frustrating to have your content stolen. We deal with this regularly on WPBeginner. The automated bot sites are easy enough to take down with DMCA complaints.

However since we’re the largest WordPress resource site, many other WordPress bloggers, theme companies, and even some hosting companies routinely copy our headline word-for-word. They may paraphrase the content to make it unique, but we know that inspiration was driven from our articles.

We take this imitation as a form of flattery, and it further validates that we’re continuing to lead in the right way.

If you have a competitor that’s always copying ideas from you, but it’s not blatant copy, then there’s not a lot you can do about it. Don’t let that bring you down, but rather continue to focus on your mission to serve your audience.

We hoped this article helped you learn how to find and remove stolen content in WordPress. You may also want to see our guide on how to prevent image theft in WordPress and learn how to trademark and copyright your blog’s name and logo.

If you liked this article, then please subscribe to our YouTube Channel for WordPress video tutorials. You can also find us on Twitter and Facebook.

The post How to Easily Find and Remove Stolen Content in WordPress (5 Ways) appeared first on WPBeginner.


March 24, 2021 at 03:30PM

Tuesday, March 23, 2021

How to Disable Image Attachment Pages in WordPress

Do you want to disable image attachment pages in WordPress?

Image attachment pages can look like incomplete pages on your site. If a visitor views these, then it can leave a poor impression.

In this article, we’ll show you how to disable image attachment pages in WordPress and redirect it to the parent post.

How to disable image attachment pages in WordPress

Why Should You Disable Image Attachment Pages in WordPress?

By default, WordPress creates a single page for every media attachment you have on your site.

This includes images, audio/video files, pdfs, and more. Some users might find this functionality useful, however, most WordPress websites don’t need it.

For example, a photography theme could use the attachment page to display EXIF data. This could show the camera model used, the camera settings, and even the image’s location data.

Often we get complaints from users who accidentally linked their images to the attachment pages, and they don’t like the way it looks.

This is a big issue because many themes don’t have special templates for the image attachment pages.

Sometimes an image on your website can become popular, and people might start landing on the attachment page directly from Google.

Ideally, you want visitors to land on your post and see the image in the context you have used it.

This is why we always recommend users to disable image attachment pages on their WordPress blog.

How to Disable Image Attachment Pages in WordPress (2 Methods)

There are two ways to disable image attachment pages in WordPress.

The first approach uses WordPress plugins, while the second involves adding custom code to WordPress.

You’ll want to choose the method that’s best suited for your skills.

Method 1: Disable Image Attachment Pages in WordPress (with a Plugin)

The easiest way to disable image attachment pages is to use a WordPress plugin. This method is beginner friendly and requires no coding.

We recommend using All in One SEO. It’s the best SEO plugin for WordPress used by over 2 million sites.

The first thing you’ll need to do is install and activate the plugin. To do this, see our guide on how to install a WordPress plugin.

Once the plugin is installed and activated, you’ll have a new menu item called ‘All in One SEO’.

Navigate to All in One SEO » Search Appearance. Next, click the ‘Media’ navigation tab.

All in One SEO search appearance media setting

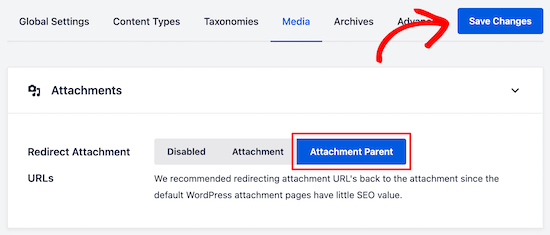
The first setting is ‘Redirect Attachment URLs’. You can disable the setting entirely, redirect to the attachment page, or the attachment parent page.

We recommend redirecting to the ‘Attachment Parent’ page. That way, when a user lands on the image attachment page, they’ll be redirected to your article instead.

All in One SEO select attachment parent

Once you select your preferred setting, make sure to click ‘Save Changes’ before exiting the screen.

If you aren’t using the All in One SEO plugin, you can still disable image attachment pages and redirect users to a parent post using a plugin called Attachment Pages Redirect.

All you have to do is install and activate the plugin. It’ll automatically start redirecting users that land on attachment pages to the parent post.

If no parent post is found, then users will be redirected to your homepage.

This plugin works out of the box and has no settings page. Simple and easy.

Method 2: Disable Image Attachment Pages in WordPress (with Code Snippet)

Another option is to add a code snippet to WordPress that accomplishes the same goal as the plugin above.

If you don’t want to use a plugin or feel that you’re already using too many WordPress plugins, then you can use this method.

First, you’ll need to create a new file in your WordPress theme folder and name it image.php. If your theme already has an image.php file, then you’ll need to edit that file instead.

After that, all you have to do is add the following code as the first line in your image.php file:

<?php wp_redirect(get_permalink($post->post_parent)); ?>

Next, you need to save the image.php file and upload it to your theme directory using FTP or your WordPress hosting control panel.

Now, when a user lands on your image attachment page, they’ll be redirected to the parent post.

We hope this article helped you disable image attachment pages in WordPress. You may also want to see our beginner’s guide to image SEO and our guide on how to fix common image issues in WordPress.

If you liked this article, then please subscribe to our YouTube Channel for WordPress video tutorials. You can also find us on Twitter and Facebook.

The post How to Disable Image Attachment Pages in WordPress appeared first on WPBeginner.


March 23, 2021 at 05:00PM