Thursday, April 1, 2021

How to Integrate Slack with WordPress (Beginner’s Guide)

Do you want to integrate Slack with your WordPress website or WooCommerce store?

Slack is a powerful team communication suite that allows you to stay collaborate with your team and optimize your workflow.

In this article, we’ll show you how how to easily integrate Slack with WordPress and WooCommerce to directly receive push notifications in your Slack channels.

How to Integrate Slack With WordPress

Slack offers real time messaging between teams with the ability to archive and search all messages. It is a great tool for bloggers, businesses, and remote teams.

We use Slack for our own team, and we have many Slack integrations that help us improve our workflow.

You can use Slack as a centralized communication hub to receive automatic notifications and alerts when:

  • A writer updates a blog post on your site
  • A new lead form is submitted, so your sales team can act on it
  • A new customer purchases something from your online store
  • A student signs up to a new course on your membership website
  • A visitor registers to your online webinar
  • … and so much more.

Below is an example screenshot of what an automated Slack notification looks like:
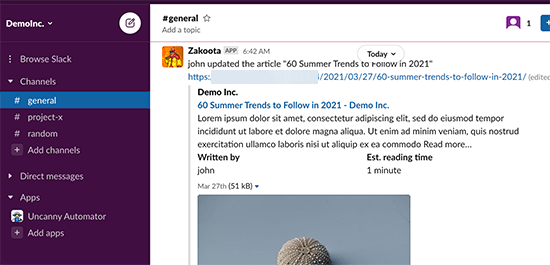
A WordPress notification displayed in a Slack channel

Now, let’s take a look at how to add automatic WordPress notifications in Slack like the screenshot above.

Here is a quick overview of the topics we’ll cover in this guide:

Connecting Slack to WordPress

The easiest way to connect Slack with WordPress is by using Uncanny Automator. It s the best WordPress automation plugin that helps you create automated tasks and workflows without writing any code.

It acts as a bridge by helping you integrate different WordPress plugins and allow them to talk with each other. You can also use it to connect your website to hundreds of online tools including Slack.

To learn more, see our article on how to create automated workflows in WordPress with Uncanny Automator.

First thing, you need to do is install and activate the Uncanny Automator plugin. For more details, see our step by step guide on how to install a WordPress plugin.

Upon activation, you will also be asked to install the free version of Uncanny Automator core plugin. This light version of the plugin is limited in features but is used as the base for the pro version.

Next, you need to head over to Automator » License Activation page to enter your license key. You can find this information under your account on the Uncanny Automator website.
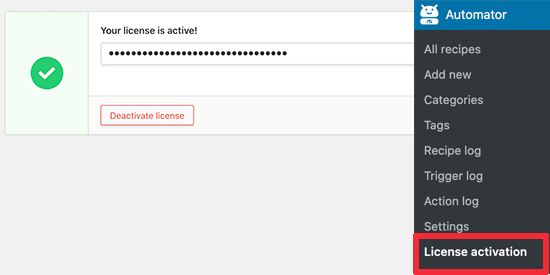
Uncanny Automator License

Now that Uncanny Automator is set up, let’s connect it to your Slack Workspace.

Simply go to Automator » Settings and switch to the Slack tab. Here you can provide a name for the bot and a profile photo.
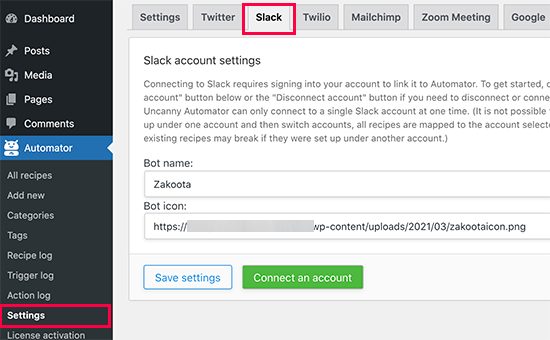
Connect your Slack account

After that, click on the ‘Connect an account’ button to continue.

This will take you to the Slack website where you will be asked for permission. Click on the Allow button to continue.
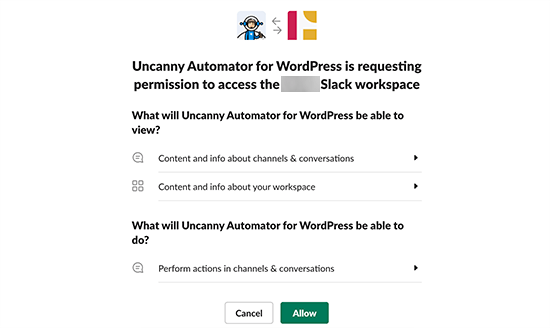
Allow Slack access

This will take you back to the Slack settings page on your WordPress website with a success message.
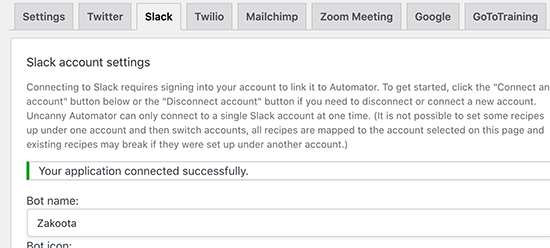
Successfully connected Slack to WordPress via Uncanny Automator

That’s all, you have successfully connected your WordPress website to Slack using Uncanny Automator.

If you visit your Slack workspace now, you’ll see Uncanny Automator as an app in the sidebar. Cliking on it will open the App window where you need to click on the More button under the Details panel.
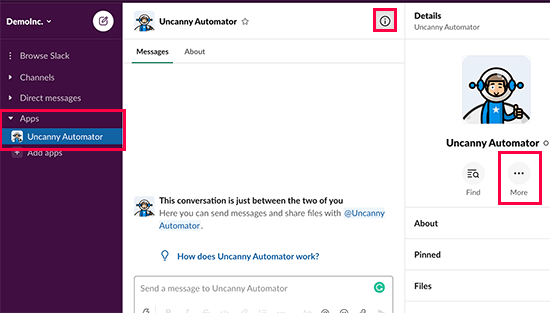
Uncanny Automator app in Slack

Under the ‘More’ drop down menu, you need to select the option ‘Add this app to a channel…’. This will allow you to send notifications and messages to that particular channel via Uncanny Automator.
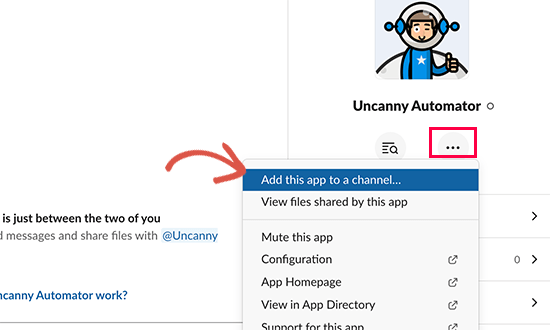
Add your app to a Slack channel

When you click on it, it will bring up a popup where you need to select a channel and then click on the Add button.
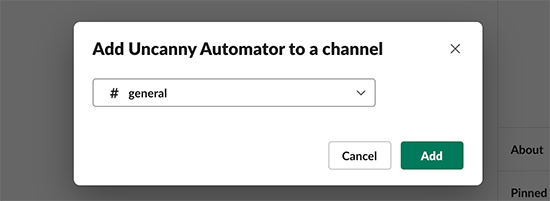
Select channel

Uncanny Automator will now be able to broadcast messages and interact in your selected channel.

Now that, we have set up Slack and integrated it with WordPress, let’s see some of the neat things you can do with this Uncanny Automator integration by connecting Slack with WordPress.

Creating Automation Recipes for Slack in WordPress

The first thing, you need to do is go to Automator » Add New page to create your first recipe.
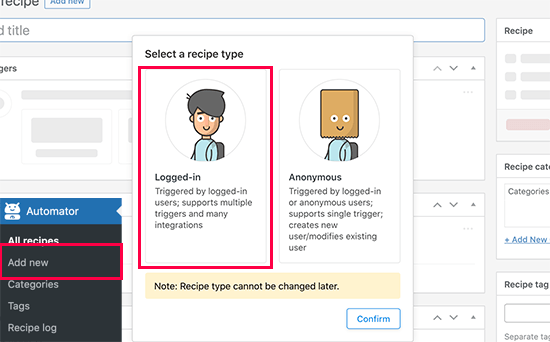
Create new recipe

You’ll be asked to select whether you want to create a ‘Logged-in’ recipe or an ‘Anonymous’ recipe.

Logged-in recipes can be triggered by logged in users only, and anonymous recipes can be triggered by any user.

You need to choose a recipe type based on your workflow needs, and then click on the confirm button.

For the sake of this tutorial, we will be creating a recipe that sends a Slack message to a channel when a post is updated on your WordPress blog.

Next, you will need to provide a title for your recipe. This title will not be publicly visible to the users because it’s only there to help you identify a recipe.

Each recipe in Uncanny Automator has two parts called Triggers and Actions.
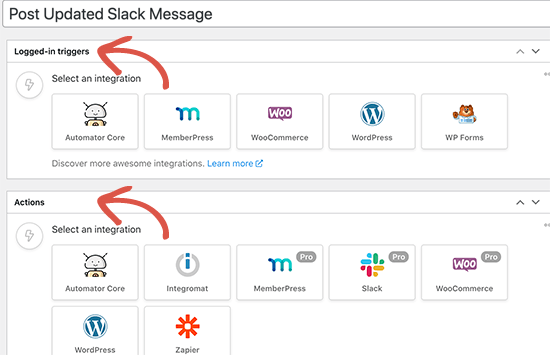
Actions and Triggers in Automator

Triggers are the events that will start the recipe and run the processes you define. Actions are the tasks that you want to perform when the recipe runs.

First, you need to set the trigger part of the recipe by choosing an integration.

The Automator will detect any existing integrations that you may have installed on your site. As you can see in the screenshot, it automatically detected WordPress Core, WooCommerce, MemberPress, and WPForms.

Click on WordPress as your integration to continue.
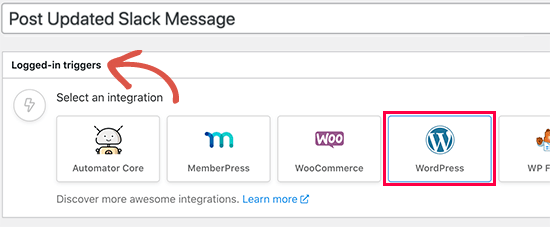
Select WordPress as the Trigger

Next, you will be asked to select the event that will trigger this recipe. Go ahead and choose ‘A post is updated’ as the trigger event.
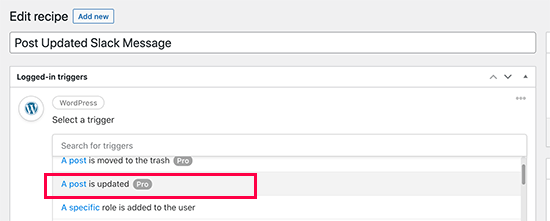
Trigger event

Next, you will be asked to select which post type. If you only want to receive updates for blog posts then select Post. After that, you can leave the Post option to Any Post and click on the Save button.
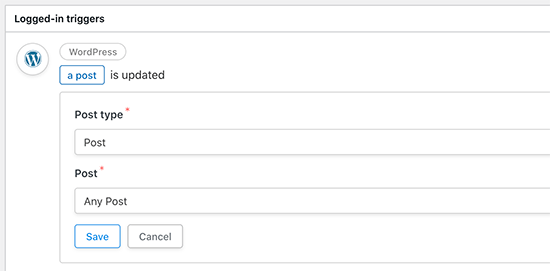
Set your trigger event options

Now that your trigger event is set, the next step is to configure the action. Simply click on the Add action button button to continue and select Slack as your integration.
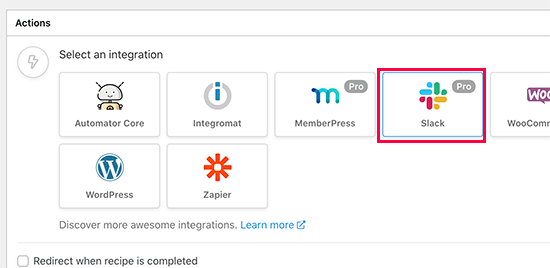
Select Slack as your action integration

After that, you will need to select an action event. This is the action that you want to perform on Slack. For instance, send a message to a channel.
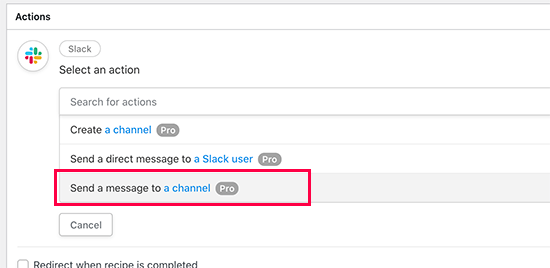
Choose the action even for your recipe

This will bring you to the action event options. From here, you can select the channel where you want to send the message and type in the message you want to send.
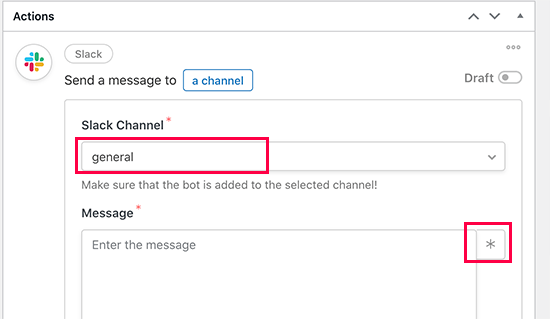
Channel and message

You can also click on the star button and add dynamic values to your message. For instance, you can add the user name and a post URL tags with your message.
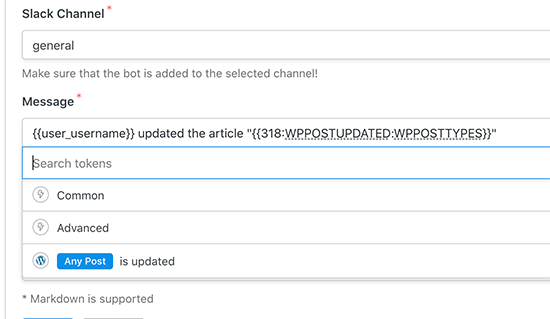
Add dynamic values to your message

After that don’t forget to click on the Save button to store your action settings.

Once you are finished editing, you need to switch your recipes from Draft to Live mode and it will became effective on your website immediately.
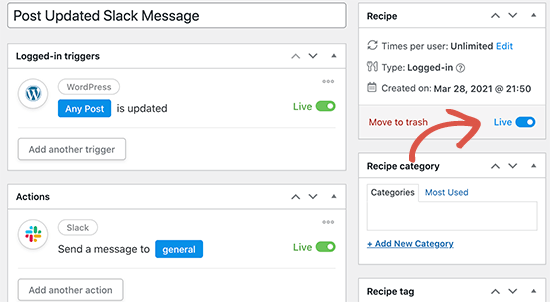
Publish your recipe

You can now edit any blog post and click on the Update button to trigger this recipe. As the recipe runs, you’ll see a message from your Uncanny Automator bot in your selected channel.
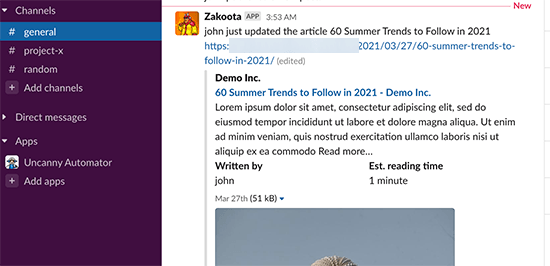
Message preview in Slack

Integrating Slack with WooCommerce

Uncanny Automator works with all top WordPress plugins including WooCommerce. This means if you run an online store, then you can easily integrate it into your Slack workspace.

Simply head over to Automator » Add New page to create your recipe. Choose the logged-in option for your recipe type and then select WooCommerce as your Trigger Integration.
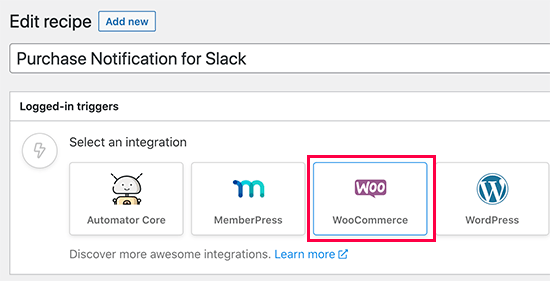
WooCommerce integration

For the Trigger event, select ‘A user purchases a product’.
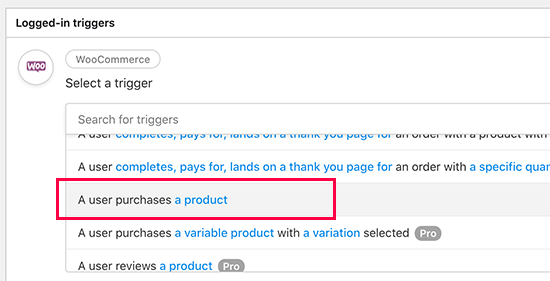
Select product purchase as your trigger

Next, you need to select ‘Any Product’ and then click on the Save button.

After that, you can move on to the Action tab. Simply click on the Add Action button and select Slack as your integration.
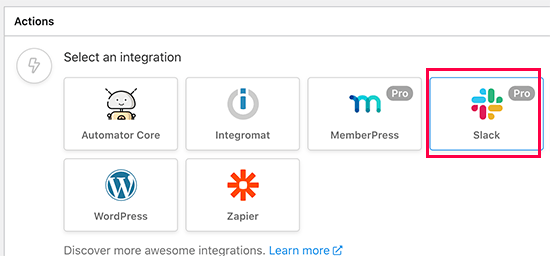
Select Slack as your action integration

After that, you need to choose the action event. For instance, we’ll choose ‘Send a message to channel’ here.
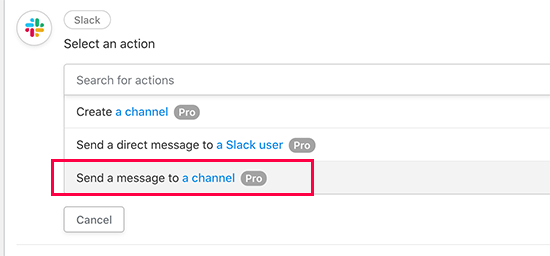
Woo Action event

Next, you will be able to select the channel where you want to send the message and compose your message. You can use dynamic tags to insert data by clicking on the Star button.
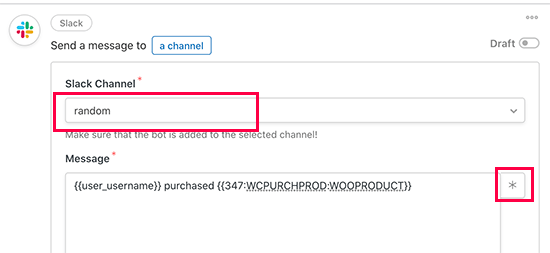
Compose Slack message

Don’t forget to click on the Save button to store your changes.

You can now go ahead and switch your recipe from draft to Live mode.
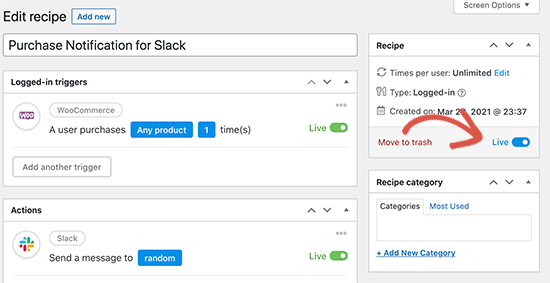
Publish recipe for your WooCommerce Slack Integration

After that, you can test the recipe by making a free purchase on your WooCommerce store to trigger the recipe. You’ll see a message from the Uncanny Automator bot in your selected channel on Slack.
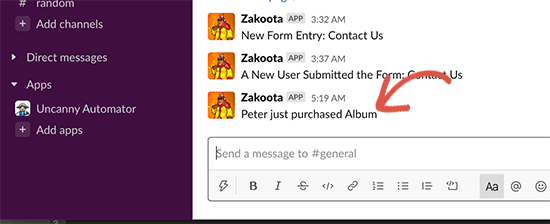
WooCommerce purchase message in Slack

Other Slack Integration Ideas for WordPress via Uncanny Automator

The Uncanny Automator allows your WordPress website and your plugins to speak with Slack. This opens doors to countless things you can do by combining your apps together.

Following are just a few recipes that you can create to bring WordPress activity directly on to your Slack workspace:

  • Send a message to Slack when a new user joins your WordPress website.
  • Send content update messages to Slack and keep an eye on drafts, published posts, and page changes
  • Get alerts for new orders on your online store directly in Slack
  • Get a message when someone purchases your online course using MemberPress
  • Get new lead notifications when someone submits your WordPress contact form

Apart from Slack, Uncanny Automator also allows you to create countless other recipes for all different plugins and thousands of other apps.

We hope this article helped you learn how to integrate Slack with WordPress. You may also want to see our list of the most useful tools to grow your WordPress blog and our comparison of the best WordPress page builder plugins to create custom site layouts.

If you liked this article, then please subscribe to our YouTube Channel for WordPress video tutorials. You can also find us on Twitter and Facebook.

The post How to Integrate Slack with WordPress (Beginner’s Guide) appeared first on WPBeginner.


April 01, 2021 at 04:00PM

Wednesday, March 31, 2021

How to Add Amazon Ads to Your WordPress Site (3 Methods)

Do you want to add Amazon ads to your WordPress site?

Amazon ads can be a great way to make money online. Plus, they have a faster and simpler approval process compared to other ad networks.

In this article, we’ll show you how to add Amazon ads to your WordPress site, step by step.

How to add Amazon ads to your WordPress site (3 methods)

What are Amazon Ads?

Amazon ads are display ads from the Amazon network. These ads operate similar to Google AdSense and other ad networks. However, these ads will display related products from Amazon.

You can add Amazon display ads throughout your content or at the end of your posts to encourage readers to click.

Native display ads will show relevant products to your visitors based on the content and their search history.

The setup process is very easy. All you need to do is add the code to your site once, and it’ll automatically display ads across your site. This means you earn more revenue without having to do any additional work.

There are 3 different types of native shopping ads you can add to your site:

  • Recommendation ads show products based on the content and user’s search history
  • Search ads let users search Amazon products directly from your website
  • Custom ads let you display your favorite products to your readers

Why Add Amazon Ads to WordPress?

Amazon ads have a much faster approval process, which means you can quickly start earning money with display ads and affiliate marketing.

Display advertising is one of the most popular ways WordPress blogs earn money.

However, a lot of advertising networks have strict approval processes, and it can take a while to get your site approved specially if you’re new.

Amazon ads can shortcut this waiting period. If you get approved by other networks in the future, then you can add these alongside your existing Amazon ads.

Depending on the type of site you have, these ads can convert pretty well too.

How to Add Amazon Ads to your WordPress Site

There are a handful of ways you can add Amazon ads to to your WordPress website.

Before you can ad Amazon ads to your site, you’ll need to join the Amazon.

Head over to the Amazon Associates program website and click the ‘Sign Up’ button.

Amazon Associates sign up

Next, you’ll be asked to log in to your existing Amazon account using the email and password associated with that account.

If you don’t have an Amazon account, then go ahead and create one now.

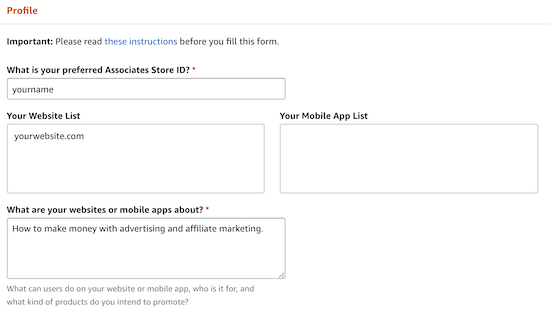
After you’ve logged in to your account, you’ll need to add additional account information and answer questions about your website. Follow the instructions to complete your profile.

Amazon Associates account information

Once you’ve finished, your application will be reviewed by Amazon. The approval process is pretty fast and much more accessible than other networks like Google AdSense.

Create Your Amazon Ads Code

Before you can add Amazon ads to WordPress, you’ll need to create your Amazon ad code.

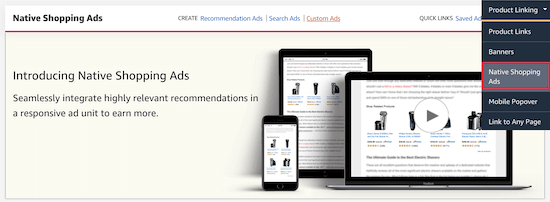
To do this, open up the Amazon Associates ad editor. Then, navigate to Product Linking » Native Shopping Ads.

Amazon Native shopping ads

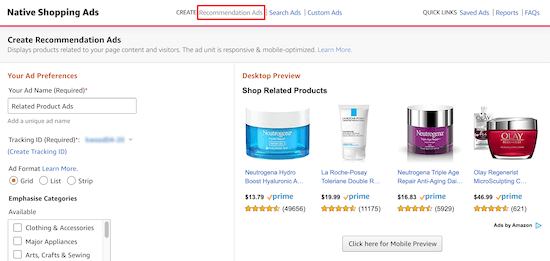
After that, click on ‘Recommendation Ads’.

You can also create ‘Custom Ads’ or ‘Search Ads’, but for this tutorial we’ll focus on recommended product ads.

Create recommendation ads

Here you’ll name your ad, choose your ad format, and select the product categories that products will display from.

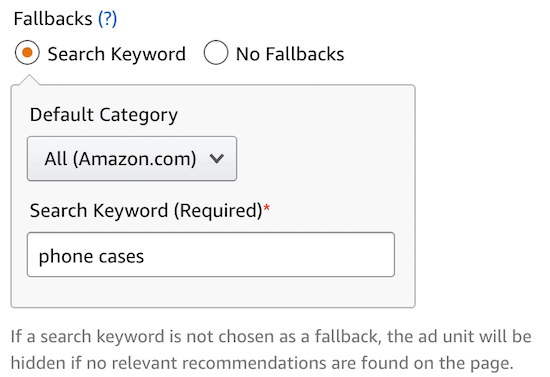
You can also set a keyword fallback.

Add product keyword fallback

If there are no relevant products to display, then Amazon will pull a product related to that keyword.

You can also preview your ad on both desktop and mobile.

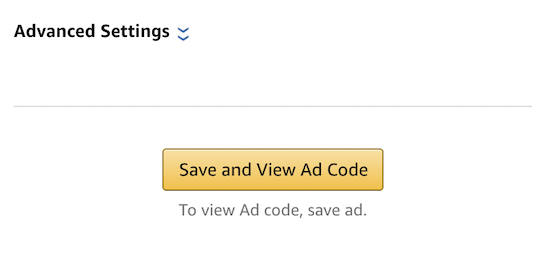
Save Amazon ad code

After you make your changes make sure to click ‘Save and View Ad Code’.

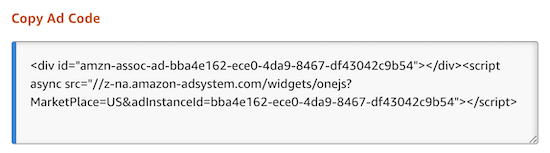
Then, you’ll need to copy the ad code and paste it into a text editor. You’ll need this code later to embed your ads into WordPress.

Copy Amazon ad code

Now, you’re ready to add Amazon ads to your WordPress site.

Method 1. Add Amazon Native Display Ads in WordPress

Adding Amazon display ads to WordPress is pretty simple.

You’ll have a variety of different display options and ad types to choose from.

For example, let’s say you’re writing an article about how to improve your posture. You could include Amazon Native display ads at the end of your post that feature posture correctors and other mobility tools.

Amazon ads example

The easiest way to add Amazon Ads is by using a WordPress plugin.

We recommend using the WP Advanced Ads plugin. It’s easy to use and lets you quickly embed multiple ad types into your website, including Amazon ads.

First, you need to install and activate the plugin. For more details, see our guide on how to install a WordPress plugin.

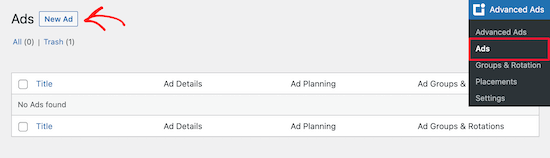
WP Advanced Ads add new

Once the plugin is installed and activated, you’ll have a new menu item called ‘Advanced Ads’. Navigate to Advanced Ads » Ads and click ‘New Ad’.

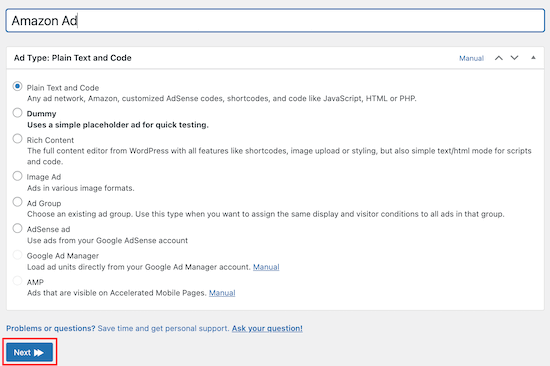
Next, add your title and select ‘Plain Text and Code’, then click ‘Next’.

WP Advanced Ads settings

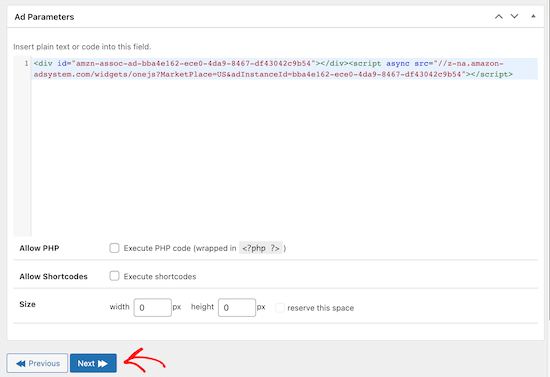
After that, paste your Amazon ad code that you created earlier.

Then, click ‘Next’.

Add Amazon ad code to WP Advanced Ads

On the next screen, you can choose to hide the ad from some users and pages. However, we’ll leave the default settings. After that, click ‘Next’.

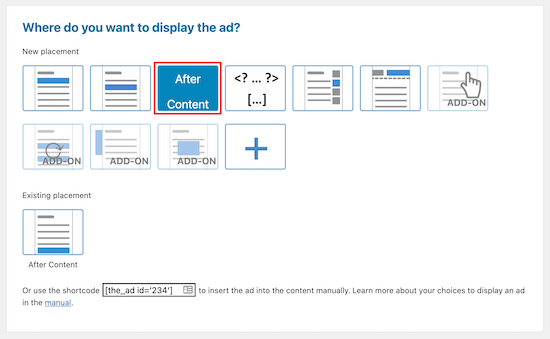
Now, we’re going to choose where our Amazon ads will display. You have multiple options to choose from including, before, after, and within your content. You also have the option to display Amazon ads in your sidebar.

We’re going to select ‘After Content’. However, you can choose the option that works best for your site.

Display Amazon ads after content

Once you select your display option, your ad will now be visible on the front end of your site.

Method 2. Add Amazon Affiliate Links in WordPress

Do you want to create an Amazon affiliate site? Affiliate websites operate a little differently than sites monetized by display ads alone.

With affiliate marketing, you’ll earn a commission whenever a visitor clicks on your link and purchases a product.

Adding Amazon affiliate links to your site is easy with the help of the right plugin. We recommend using Pretty Links or Thirsty Affiliates. These are two of the best affiliate marketing plugins for WordPress.

First thing you’ll need to do is install and activate the plugin. We’re going to use Pretty Links. However, you can choose Thirsty Affiliates as well. For more details, see our guide on how to install a WordPress plugin.

Upon activation, you’ll have a new menu item in your WordPress dashboard labeled Pretty Links.

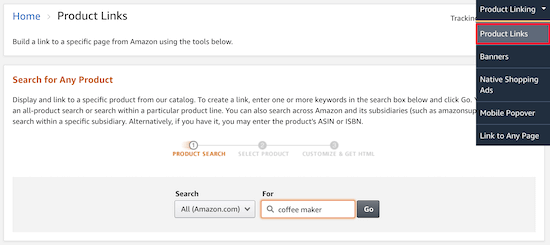
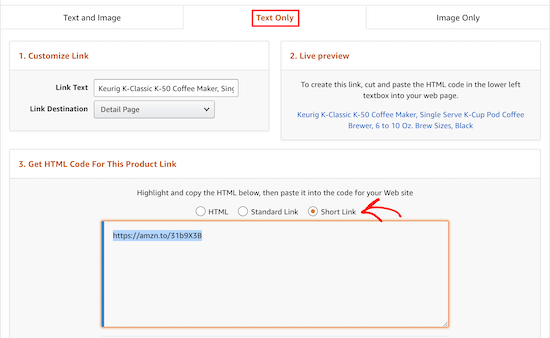
Before you create an affiliate link in Pretty Links, you’ll need to go to your Amazon Associates dashboard and create a link. Once you’re in your dashboard, navigate to Product Linking » Product links.

Amazon product links

Here you can search for the product that you want to create a link for.

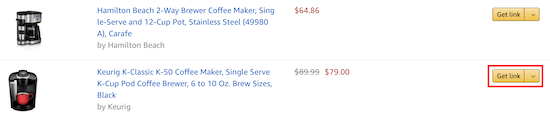
Once you’ve found the product, click ‘Get Link’.

Get Amazon affiliate link

Next, you’ll need to copy the link code.

To do this, click the ‘Text Only’ navigation item, then click the ‘Short Link’ radio button.

Amazon affiliate link copy

This will bring up the affiliate link you need to copy.

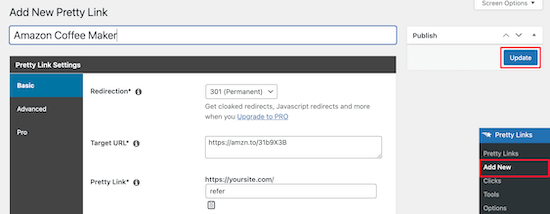
Now, go back to your WordPress dashboard and navigate to Pretty Links » Add New.

Pretty Links add new

Next, you’ll need to name your link, add your target URL, and create your link.

Your target URL is the link you copied from your Amazon Associates account. The ‘Pretty Link’ is the shortened URL you want to use instead.

Also, make sure you choose a 301 redirect. After you’ve made your changes click ‘Update’ to save the link.

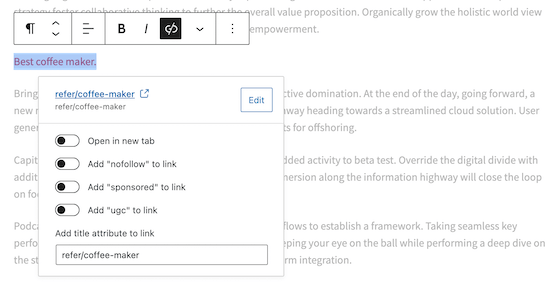
Now, you can add your affiliate link to your content.

Open up a WordPress page or post. In the post editor, highlight the text you want to link and copy your affiliate link from above.

Add Amazon affiliate link

Now, when your readers click the link they’ll be taken to the product in the Amazon store. If they purchase the product, then you’ll receive a commission.

To learn more about affiliate marketing, see our ultimate affiliate marketing guide for beginners.

Method 3. Add Amazon Popup Ads in WordPress

Another unique way to add Amazon ads to your site is with a popup. You’ll have complete control over when and how the popup displays on your website.

You can even personalize the popups based on user behavior, their location, the page they’re viewing, and more.

The easiest way to add Amazon popup ads is by using OptinMonster. It’s one of the best WordPress lead generation plugins in the market used by over 1.2 million websites.

It allows you to add all kinds of popups to your WordPress site easily.

First, you’ll need to install and activate the OptinMonster plugin on your WordPress site.

The plugin acts as a connecter between your WordPress website and the OptinMonster software.

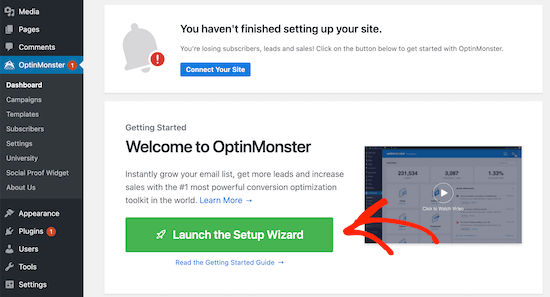
Once you’ve activated and installed the plugin, click on the ‘OptinMonster’ menu item in your WordPress admin bar.

OptinMonster main menu

After that, you’ll need to connect your site to OptinMonster by clicking ‘Launch the Setup Wizard’.

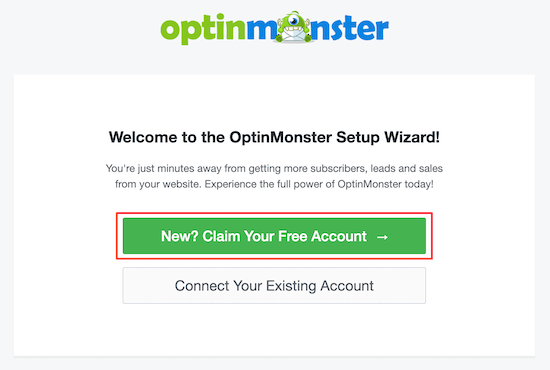
Here, you can connect to an existing account or claim your free account.

OptinMonster setup wizard

After you’ve finished going through the setup wizard, your WordPress site will be connected to OptinMosnter.

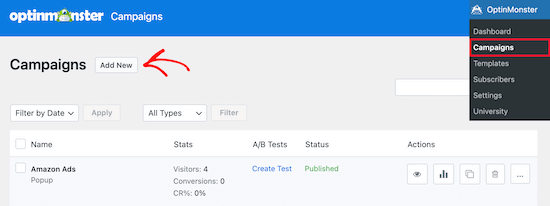
To start creating a popup ad, navigate to OptinMonster » Campaigns.

Then click ‘Add New’ to create a new campaign.

Add new OptinMonster campaign

After that, select the ‘Popup’ campaign type.

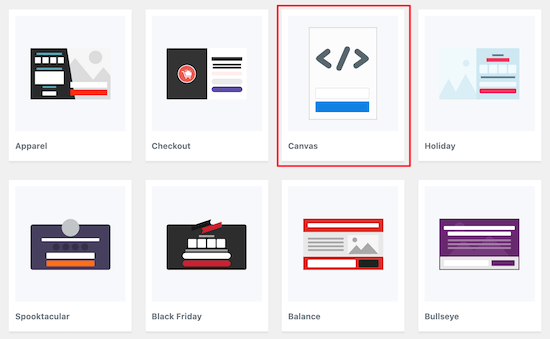
Next, choose the campaign template. We will select the ‘Canvas’ template since this gives us a blank template to add our Amazon ad code.

OptinMonster canvas template

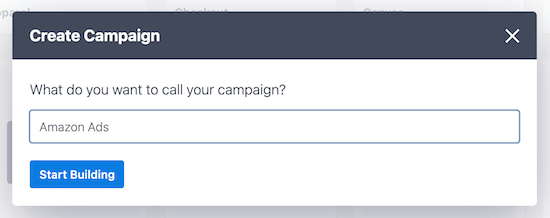
Then, enter the name of your campaign name and click ’Start Building’.

The name of your campaign won’t appear in your design but instead is to help you remember.

Name OptinMonster campaign

This will open up the OptinMonster app, where you can customize the appearance of your popup.

You won’t be making that many visual changes. Instead, you will copy and paste the Amazon ad code you generated earlier.

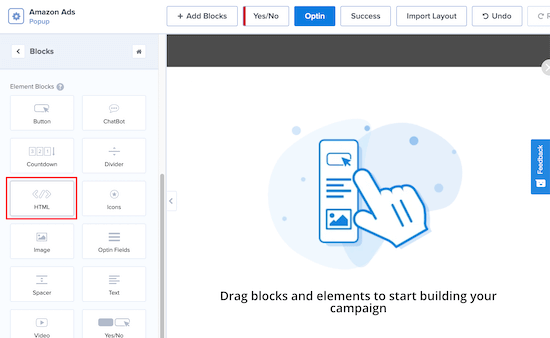
OptinMonster HTML block

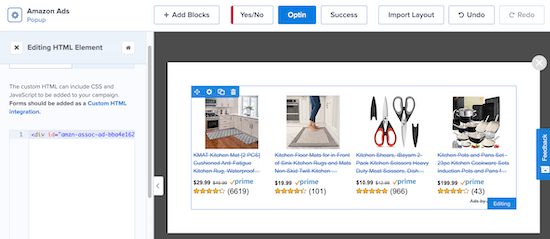
First, click on ‘Blocks’, then select the ‘HTML’ block and drag it over.

In the ‘Editing HTML Element’ box, paste your Amazon ad code. It’ll automatically appear in the editor.

Add Amazon HTML code

You can further customize your popup by adding new blocks, headings, text, and more.

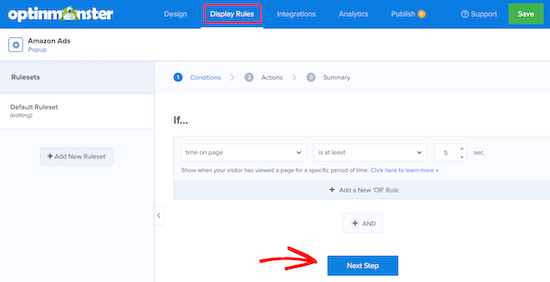
Once you’re satisfied with the look of your popup, make sure to click ‘Save’, then click on the ‘Display Rules’ tab.

OptinMonster popup display rules

This is where we’ll set your popup display options.

The default setting is for the popup to display when a visitor has been on the page for at least 5 seconds. However, you can adjust this if you want the period to be shorter or longer. After that, click ‘Next Step’.

You can leave the default options on the next screen. Feel free to add animation or sound effects if you’d like. Once you’re done, click ‘Next Step’.

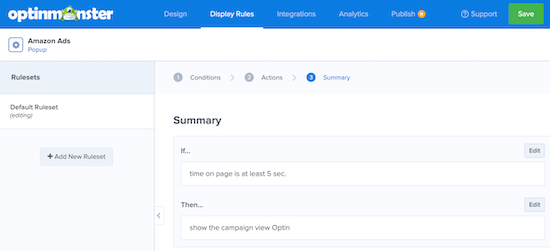
On the ‘Summary’ page, you can double check that your display settings are correct.

OptinMonster popup summary page

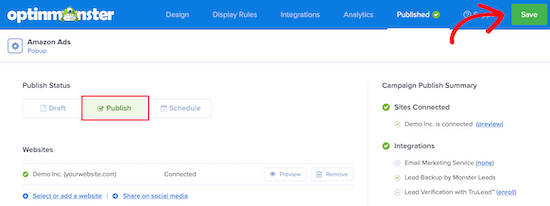
After that, go to the ‘Publish’ tab and switch the ‘Publish Status’ from Draft to Publish.

Then, click ‘Save’ and exit the screen.

Publish OptinMonster popup

Your Amazon ad popup will now be live on your site and display for visitors after the time period you set earlier.

The best part about OptinMonster is that it’s one of the few WordPress popup plugins that can give you complete control over personalization. Their display rules are extremely powerful, and you can use it to display multiple Amazon ads targeted towards different sections of your website.

We hoped this article helped you add Amazon ads to WordPress. You may also want to see our expert picks of the 24 must have plugins for WordPress and our list of the best email marketing services to grow your website revenue.

If you liked this article, then please subscribe to our YouTube Channel for WordPress video tutorials. You can also find us on Twitter and Facebook.

The post How to Add Amazon Ads to Your WordPress Site (3 Methods) appeared first on WPBeginner.


March 31, 2021 at 04:00PM
Tuesday, March 30, 2021

How to Add HTTP Security Headers in WordPress (Beginner’s Guide)

Do you want to add HTTP security headers in WordPress?

HTTP security headers allow you to add an extra layer of security to your WordPress website. They can help block common malicious activity from affecting your website performance.

In this beginner’s guide, we’ll show you how to easily add HTTP security headers in WordPress.

Adding HTTP security headers in WordPress

What are HTTP Security Headers?

HTTP security headers are a security measure that allows your website’s server to prevent some common security threats before it affects your website.

Basically, when a user visits your website, your web server sends an HTTP header response back to their browser. This response tells browsers about error codes, cache control, and other statuses.

The normal header response issues a status called HTTP 200. After which your website loads in the user’s browser. However, if your website is having difficulty then your web server may send a different HTTP header.

For example, it may send a 500 internal server error, or a not found 404 error code.

HTTP security headers are a subset of these headers and are used to prevent websites from common threats like click-jacking, cross-site scripting, brute force attacks, and more.

Let’s have a quick glance at what HTTP security headers look like and what they do to protect your website.

HTTP Strict Transport Security (HSTS)

HTTP Strict Transport Security (HSTS) header tells web browsers that your website uses HTTPs and should not be loaded using insecure protocol like HTTP.

If you have moved your WordPress website from HTTP to HTTPs, then this security header allows you to stop browsers from loading your website on HTTP.

X-XSS Protection

X-XSS Protection header allows you to block cross-site scripting from loading on your WordPress website.

X-Frame-Options

X-Frame-Options security header prevents cross-domain iframes or click-jacking.

X-Content-Type-Options

X-Content-Type-Options blocks content mime-type sniffing.

That being said, let’s take a look at how to easily add HTTP security headers in WordPress.

Adding HTTP Security Headers in WordPress

HTTP security headers work best when they are set at the web server level (i.e your WordPress hosting account). This allows them to be triggered early on during a typical HTTP request and provides maximum benefit.

They work even better if you are using a DNS-level website application firewall like Sucuri or Cloudflare. We’ll show you each method, and you can choose one that works best for you.

Here are quick links to different methods, you can jump to the one that suits you.

1. Adding HTTP Security Headers in WordPress using Sucuri

Sucuri is the best WordPress security plugin on the market. If you are using their website firewall service too, then you can set HTTP security headers without writing any code.

First, you will need to sign up for a Sucuri account. It is a paid service that comes with a sever level website firewall, security plugin, CDN, and malware removal guarantee.

During sign up, you will answer simple questions, and Sucuri documentation will help you set up the website application firewall on your website.

After signing up, you need to install and activate the free Sucuri plugin. For more details, see our step by step guide on how to install a WordPress plugin.

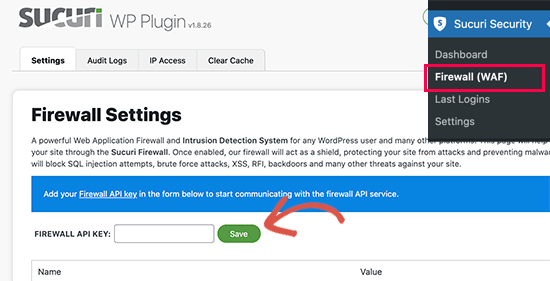
Upon activation, go to Sucuri Security » Firewall (WAF) page and enter your Firewall API key. You can find this information under your account on Sucuri website.

Sucuri WAF API key

Click on the Save button to store your changes.

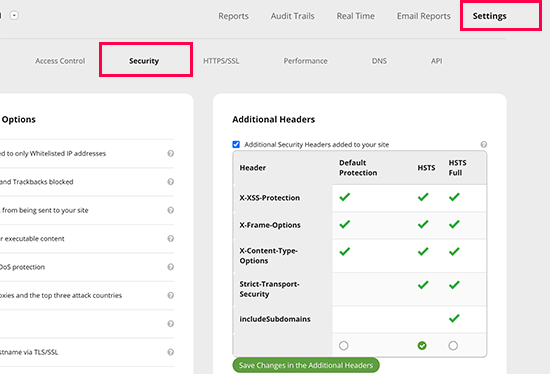
Next, you need to switch to your Sucuri account dashboard. From here, click on the Settings menu on top and then switch to the Security tab.

Setting HTTP security headers in Sucuri

From here you can choose three sets of rules. The default protection, HSTS, and HSTS Full. You will see which HTTP security headers will be applied for each set of rules.

Click on the ‘Save Changes in The Additional Headers’ button to apply your changes.

That’s all, Sucuri will now add your selected HTTP security headers in WordPress. Since it is a DNS level WAF, your website traffic is protected from hackers even before they reach your website.

2. Adding HTTP Security Headers in WordPress using Cloudflare

Cloudflare offers a basic free website firewall and CDN service. It lacks advanced security features in their free plan, so you will need to upgrade to their Pro plan which are more expensive.

To add Cloudflare on your site, see our tutorial on how to add Cloudflare free CDN in WordPress.

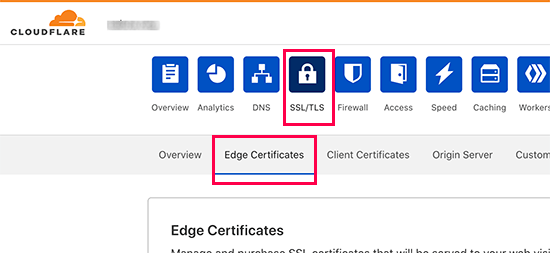
Once Cloudflare is active on your website, go to the SSL/TLS page under your Cloudflare account dashboard and then switch to the Edge Certificates tab.

Setting up HTTPS security headers in Cloudflare

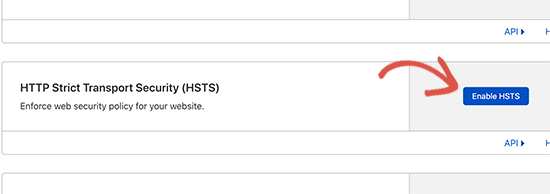
Now, scroll down to the HTTP Strict Transport Security (HSTS) section and click on the ‘Enable HSTS’ button.

Enable HSTS on Cloudflare

This will bring up a popup with instructions telling you that you must have HTTPS enabled on your WordPress blog before using this feature. Click on the Next button to continue, and you will see the options to add HTTP security headers.

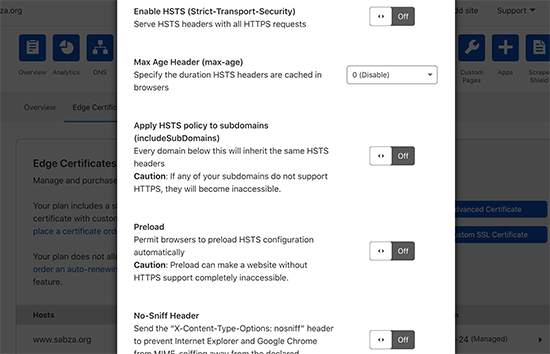
Enable HTTPS security headers in Cloudflare

From here, you can enable HSTS, no-sniff header, apply HSTS to subdomains (if they are using HTTPS), and preload HSTS.

This method provides basic protection using HTTP security headers. However, it does not let you add X-Frame-Options and Cloudflare doesn’t have a user interface to do that.

You can still do that by creating a script using the Workers feature. However, creating an HTTPS security header script may cause unexpected issues for beginners which is why we wouldn’t recommend it.

3. Adding HTTP Security Headers in WordPress using .htaccess

This method allows you to set the HTTP security headers in WordPress at the server level.

It requires you to edit the .htaccess file on your website. It is a server configuration file used by the most commonly used Apache webserver software.

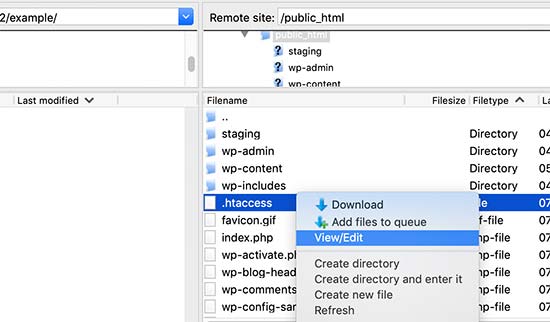
Simply connect to your website using an FTP client, or the file manager app in your hosting control panel. In the root folder of your website, you need to locate the .htaccess file and edit it.

Edit the .htaccess file in WordPress

This will open the file in a plain text editor. At the bottom of the file, you can add the code to add HTTPS security headers to your WordPress website.

You can use the following sample code as a starting point, it sets the most commonly used HTTPs security headers with optimal settings:

<ifModule mod_headers.c>
Header set Strict-Transport-Security "max-age=31536000" env=HTTPS
Header set X-XSS-Protection "1; mode=block"
Header set X-Content-Type-Options nosniff
Header set X-Frame-Options DENY
Header set Referrer-Policy: no-referrer-when-downgrade
</ifModule>

Don’t forget to save your changes and visit your website to make sure that everything is working as expected.

Note: Incorrect headers or conflicts in .htaccess file may trigger 500 Internal server error on most web hosts.

4. Adding HTTP Security Headers in WordPress using Plugin

This method is a little less effective as it relies on a WordPress plugin to modify the headers. However, it is also the easiest way to add HTTP security headers to your WordPress website.

First, you need to install and activate the Redirection plugin. For more details, see our step by step guide on how to install a WordPress plugin.

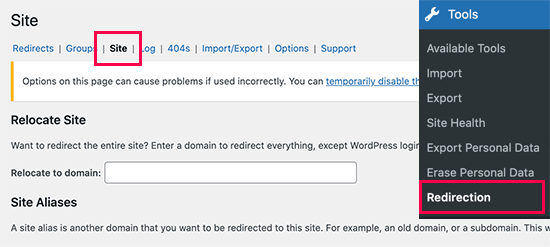
Upon activation, the plugin will show a set up wizard that you can just follow along to set up the plugin. After that, go to Tools » Redirection page and switch to the ‘Site’ tab.

Site settings in Redirection plugin

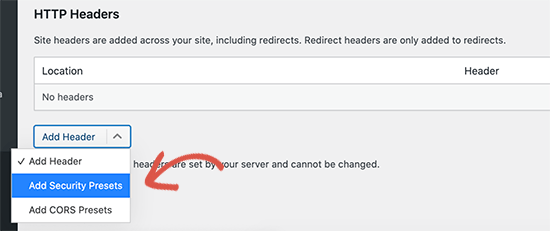
Next, you need to scroll down to the bottom of the page to the HTTP Headers section and click on the ‘Add Header’ button. From the drop-down menu, you need to select ‘Add Security Presets’ option.

Adding header presets using Redirection

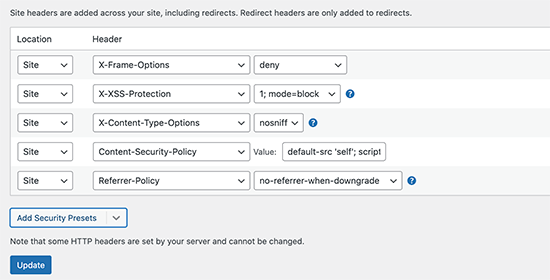
After that, you will need to click on it again to add those options. Now, you will see a preset list of HTTP security headers appear in the table.

HTTP security header presets

These headers are optimized for security, you can review them and change them if needed. Once you are done, don’t forget to click on the Update button to save your changes.

You can now visit your website to make sure that everything is working fine.

How to Check HTTP Security Headers for a Website

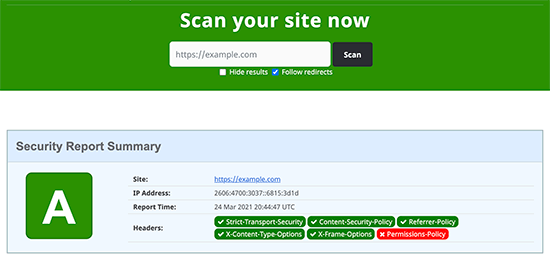
Now that, you have added HTTP Security headers to your website. You can test your configuration using the free Security Headers tool. Simply enter your website URL and click on the Scan button.

Checking your WordPress security headers

It will then check HTTP security headers for your website and will show you a report. The tool would generate a so-called grade label which you can ignore as most websites would get a B or C score at best without affecting user experience.

It will show you which HTTP security headers are sent by your website and which security headers are not included. If the security headers that you wanted to set are listed there, then you are done.

That’s all, we hope this article helped you learn how to add HTTP security headers in WordPress. You may also want to see our complete WordPress security guide, and our expert pick of the best WordPress plugins for business websites.

If you liked this article, then please subscribe to our YouTube Channel for WordPress video tutorials. You can also find us on Twitter and Facebook.

The post How to Add HTTP Security Headers in WordPress (Beginner’s Guide) appeared first on WPBeginner.


March 30, 2021 at 04:00PM