Tuesday, April 20, 2021

Beginner’s Guide on How to Add Business Hours in WordPress

Do you want to display your business hours on your WordPress site?

Displaying your open hours on your website can help customers plan their visits accordingly. With location search growing every day, this helps grow your business.

In this article, we’ll show you how to add your business opening hours in WordPress. .

Adding business hours to your WordPress website

Why Add Business Hours to Your WordPress Site?

Adding business hours to your WordPress website helps customers find out when you’ll be open for business. More importantly, it also helps you appear in local search results.
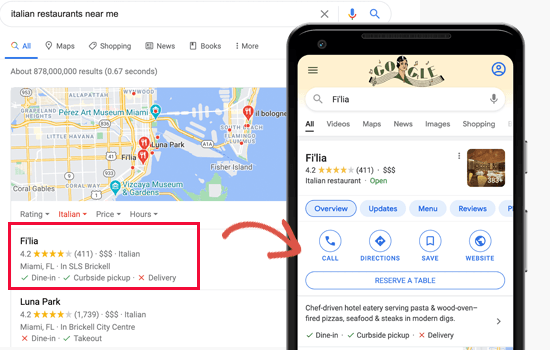
Preview of local search results in mobile and desktop

Nearly 46% of all searches on Google have local intent. For businesses, these searches are highly valuable as they bring in customers already looking for the products and services they offer.

Users can see your open hours on your website as well as search results. This helps them make a purchase, visit your store, restaurant, or office.
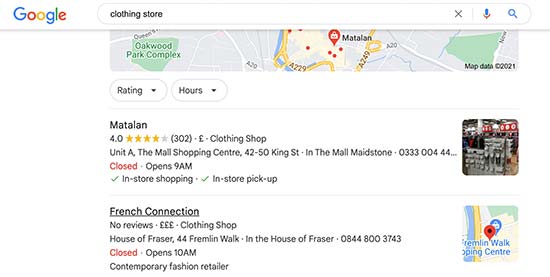
Local search results

That being said, Let’s take a look at how to properly add your business hours in WordPress.

Method 1. Adding Business Hours in WordPress using All in One SEO

This method is easier and recommended for all users.

It gives you more control over how your website appears in search results. You can easily display your business hours anywhere on your website, and it also the ability for managing multiple locations.

For this method, we’ll be using All in One SEO for WordPress. It is the best WordPress SEO plugin on the market and helps you bring more free traffic from search engines to your website.

Note: You’ll need at least their Plus plan to access the Local SEO feature needed for this tutorial.

First, you need to install and activate the All in One SEO for WordPress plugin. For more details, see our step by step guide on how to install a WordPress plugin.

Upon activation, the plugin will run a set up wizard. Follow the on-screen instructions to set it up. If you need more help, then please take a look at our article on how to set up All in One SEO for WordPress.
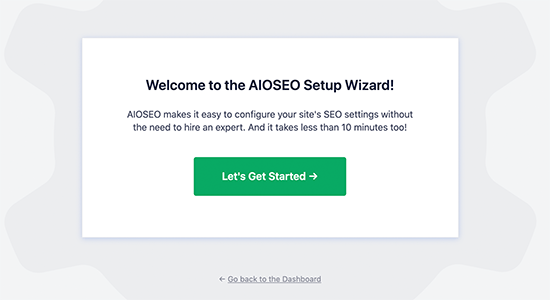
All in One SEO set up wizard

Next, you need to visit All in One SEO » Local SEO page to set up your business information.
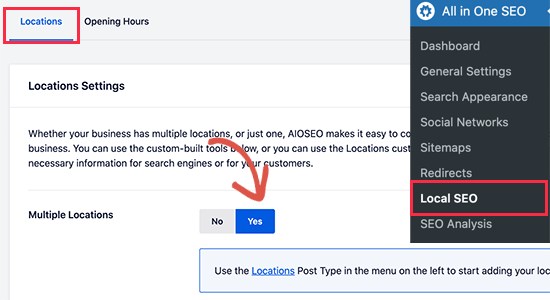
Enable locations

First, you need to switch the ‘Multiple Locations’ toggle to ‘Yes’. You can do this even if you only have one location to add.

After that, switch to the ‘Opening Hours’ tab to enter your business hours. These business hours will be used as default for all locations. You’ll also be able to set different business hours for each location if needed.
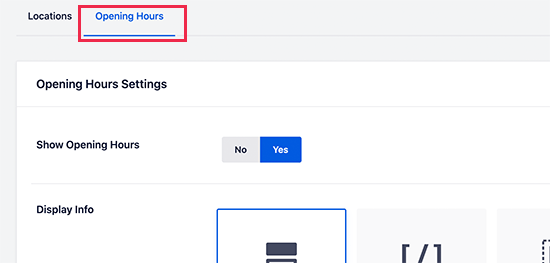
Add opening hours defaults

You need to scroll down on the page to provide labels and business hours information. You can set open for 24 hours, or manually set time for each day.
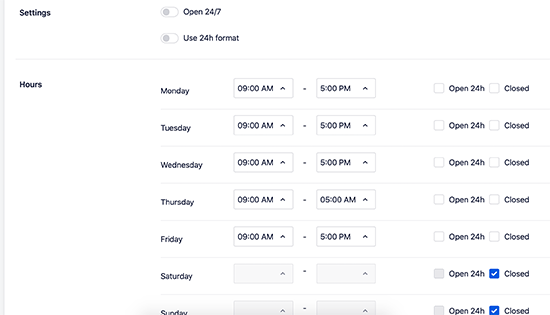
Business hours information

Once finished, click on the ‘Save Changes’ button to store your settings.

Now that we have set up local SEO, let’s add your location information.

You need to start by going to Locations » Add New page to add your location and business information.
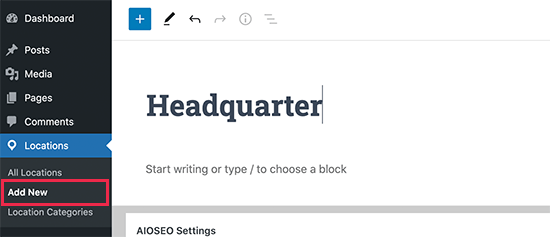
Adding a new location

Provide a title for your location and then scroll down to the ‘AIOSEO Local Business’ section.
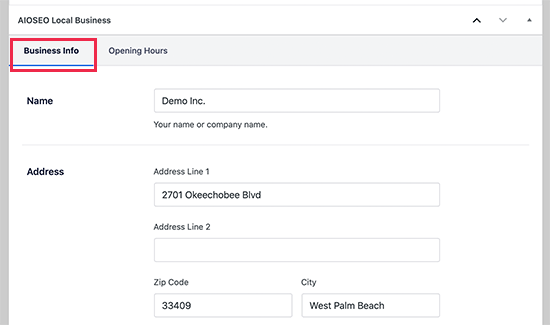
Local business information

Under the Business Info tab, fill out the form to provide business and location information. You can provide business name, address, phone number, payment methods, area served, and more.

After that, you need to switch to the Business Hours tab. From here, you can add business hours or use the default business hours you entered earlier.
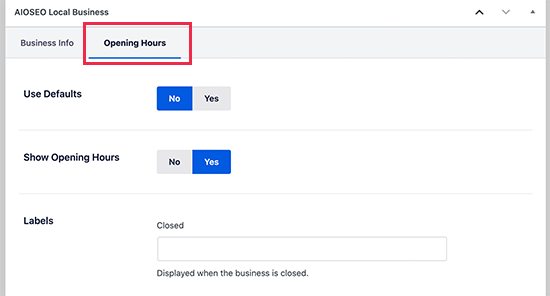
Setting business hours for each location

Once you are finished, don’t forget to click on the Publish button to save your location.

You can repeat the process to add more locations if needed.

Display Business Hours information in Post or Page

All in One SEO allows you to easily display business hours anywhere on your website.

It comes with many pre-built WordPress blocks that you can add to any post or page on your site.

Simply edit the post or page and look for AIOSEO blocks. The plugin provides AIOSEO Local Open Hours, AIOSEO Local Business Info, and AIOSEO Local Locations blocks.

You will need to add the ‘AIOSEO Local Open Hours’ block to display business hours.
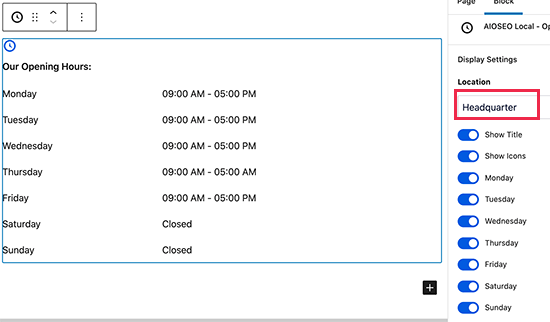
Adding business hours to a post or page in WordPress

After adding the block, you can select the location you want to display from the block settings.

Don’t forget to click on the Publish / Update button to save your changes.

You can now visit your website to see your business hours displayed on the page.
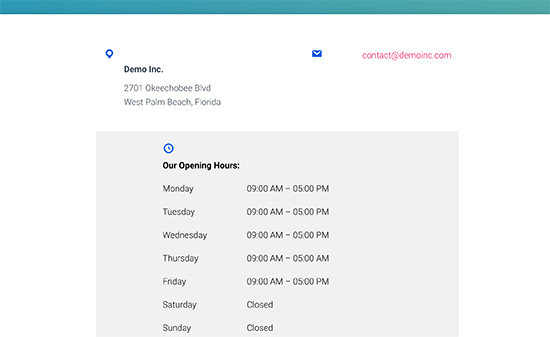
Business hours displayed in WordPress

Generally, we recommend adding the business hours on your contact page along with a contact form and your business phone number.

Display Business Hours information in Sidebar

All in One SEO also allows you to easily display business hours in your WordPress sidebar or any widget ready area.

Simply, head over to Appearance » Widgets page and add ‘AIOSEO Opening Hours’ widget to your sidebar.
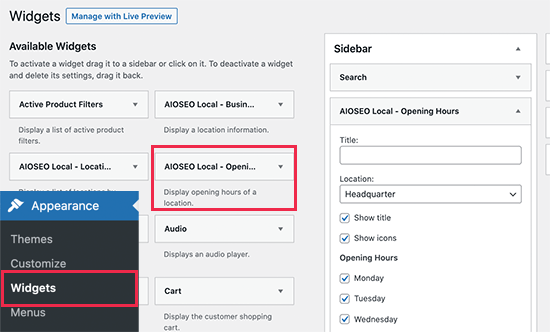
Open hours widget

Select a location that you want to display and review the widget settings. Don’t forget to click on the Save button to store your changes.

You can now visit your website to view your business hours in the sidebar.
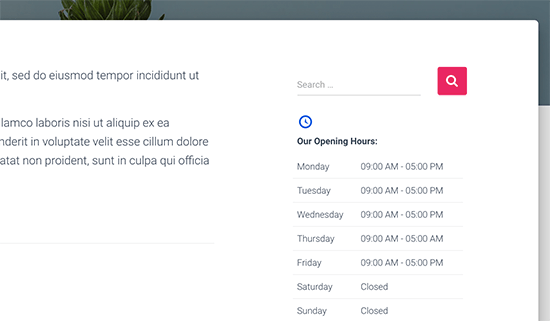
Business hours displayed in sidebar

Display Business Hours Anywhere Using Shortcode

All in One SEO for WordPress also allows you to use shortcodes to display business hours anywhere.

Simply add the shortcode [aioseo_local_opening_hours] to display your default business hours.

Alternately, you can also use [aioseo_local_opening_hours location_id="1"] to display any specific location. You can find the location ID by editing the location.
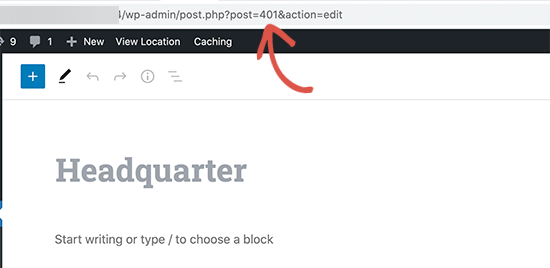
Finding your location ID

The best part about AIOSEO is that it not only adds your business information in the schema markup code, but it also allows you to display it to users on your website.

Aside from business hours, AIOSEO is a comprehensive SEO plugin that will help you rank higher.

Method 2. Adding Business Hours in WordPress using Business Profile

This method is for users who only want to add business information schema to their WordPress website. It lacks all the other SEO features offered by a comprehensive SEO plugin like All in One SEO.

First thing you need to do is install and activate the Business Profile plugin. For more details, see our step by step guide on how to install a WordPress plugin.

Upon activation, go to Business Profile » Settings page to set up your business profile.

From here, you need to select your business type as Organization and then fill out the other required information.
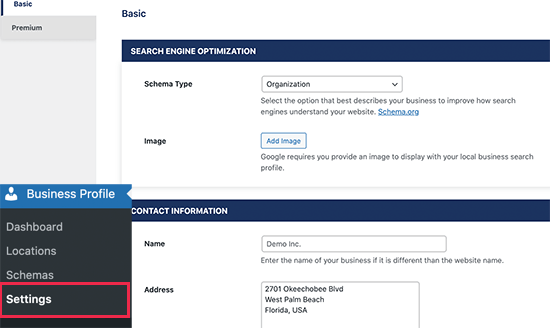
Business Profile basic information

After entering the address information, the plugin will ask you to provide a Google API key with a link to instructions. However, we recommend leaving this field blank.

Below that, you can set your business hours. The plugin also allows you to add multiple sets of schedules, and you can also add exceptions for holidays and special events.
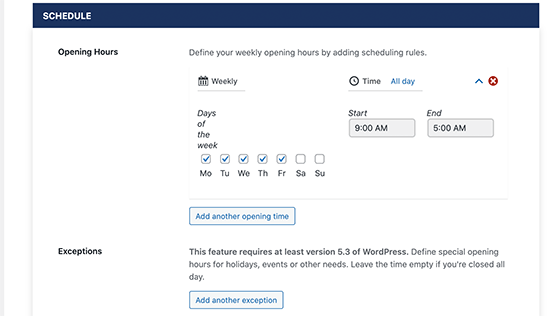
Adding business hours

If your business has multiple locations, then you can also turn on the Multiple Locations feature.
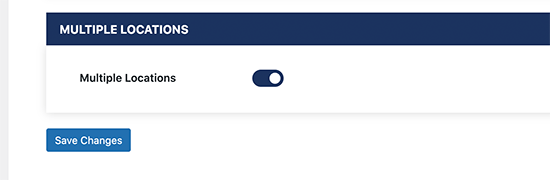
Enable multiple locations

Don’t forget to click on the ‘Save Changes’ button to store your changes.

Adding Business Hours in WordPress Using Shortcode

The plugin uses shortcode to display business hours on any page of your WordPress blog or website.

Simply edit the post or page where you want to display the business hours and then add the shortcode [contact-card] .
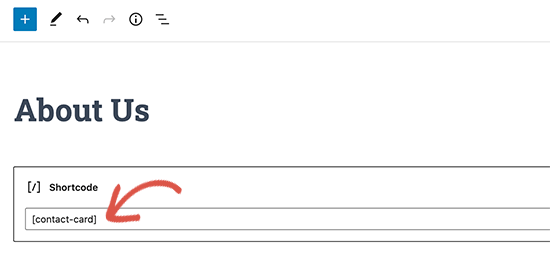
Contact Card shortcode

You can now save your changes or publish your page and then preview it. This is how it looked on our test website.
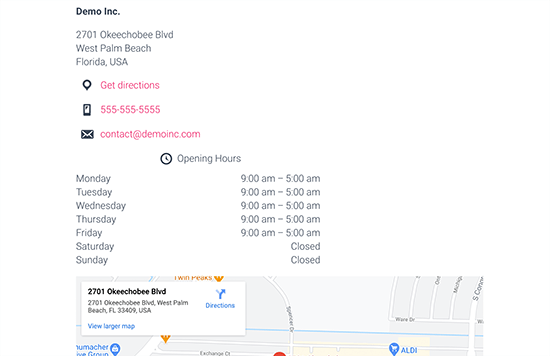
Business hours preview

Adding Multiple Locations in Business Profile

The plugin also supports multiple locations. If you have enabled the multiple locations option on the settings page, then you can manage locations by visiting Business Profile » Locations page.
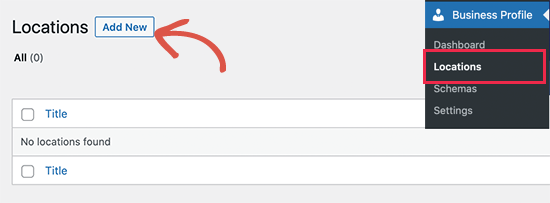
Add new location

On the next screen, you need to provide a name for your new location and then scroll down to ‘Opening Hours’ box at the bottom.
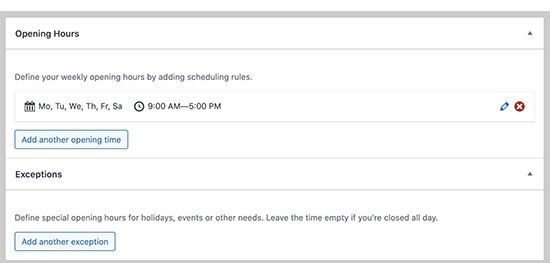
Business hours for location

From here, you can add your business hours information.

On the left column, you can add your location information such as address, phone number, email, and more.
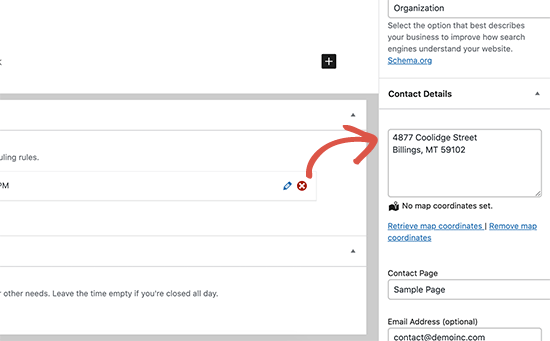
Add contact information

Once you are finished, you can go ahead and ‘Publish’ your location.

Repeat the process to add more locations as needed.

Displaying Multiple Locations in Business Profile

The plugin uses the same shortcode to display any location with business hours.

Simply edit the post or page where you want to display location information. After that, add the shortcode in the following format.

[contact-card location="34"]

Don’t forget to replace location value with your actual location ID. You can find it by editing the location and copying the post id from the address bar.

[Finding your location ID

This is how single location information looked on our test website.
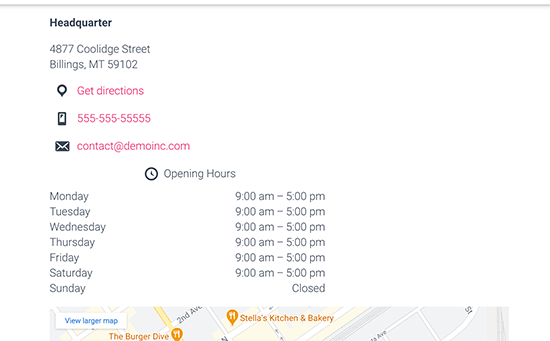
Single location business hours

Managing Business Information in Google Search Results

Google uses Schema.org Rich Snippets to fetch and display rich search results from your website.

Schema.org is a structured data markup language. It appears in the source code of your website and is not visible to regular visitors.

This helps search engines add additional information in search results, like your business hours and location, review scores, recipe information, and more.

To manage your business information in search results, you should also sign up for a Google My Business account. This helps you add your business location and other information.
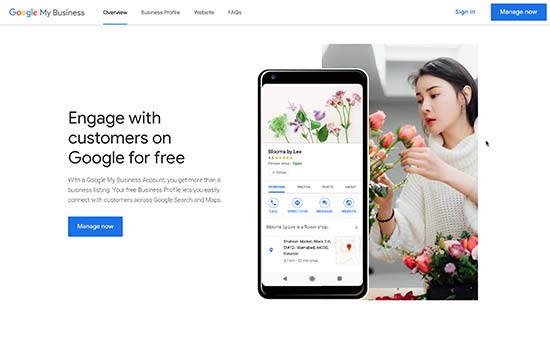
Google My Business

After verification, you’ll be able to provide additional business information and manage its appearance in search, Google Maps, and Places.

Both WordPress plugins that we demonstrated above will help you add the business hour data in SEO-friendly Schema format to your website.

We hope this article helped you add your business hours to your WordPress site. You may also want to see our expert pick of 24 must have WordPress plugins for business websites, and our comparison of the best email marketing services to grow your sales.

If you liked this article, then please subscribe to our YouTube Channel for WordPress video tutorials. You can also find us on Twitter and Facebook.

The post Beginner’s Guide on How to Add Business Hours in WordPress appeared first on WPBeginner.


April 20, 2021 at 03:00PM
Monday, April 19, 2021

How to See Old Versions of Any WordPress Site (3 Tools)

Do you want to see old versions of any WordPress site?

Seeing an old version of a WordPress site is not only fun, but it can provide you with design inspiration and give you access to content and media that are no longer available online.

In this article, we’ll show you how you can simply see older versions of any WordPress website.

How to see old versions of any WordPress site (3 tools)

Why See Old Versions of WordPress Sites?

The internet moves at hyperspeed. Beyond strolling through memory lane, there are many good reasons to view an older version of a WordPress website.

Most website elements will change over time. Websites go through redesigns, content gets deleted, and sometimes entire sites will go offline.

Being able to lookup an older version of a website can be very useful in a lot of situations.

  • You need to retrieve older content from a website
  • You want to recreate a resource that’s no longer online
  • You need screenshots for a before and after website redesign
  • You’re looking for design inspiration from old websites

With that said, let’s take a look at how to see older versions of any website.

How to See Old Versions of Any Website (3 Tools)

There are a few different online tools that create archives of websites. These tools take snapshots at different points in time and archive those website pages.

It works similar to your own WordPress backups except these are accessible to the entire internet.

Usually, these tools do archives by popularity and traffic. Some sites will have thousands of copies stored over time, while others might be impossible to find.

That being said, here are the 3 different tools you can use to find old versions of any website on the internet.

1. Wayback Machine

The Internet Archive is a digital library of the internet. It has a tool called Wayback Machine, which has over 554 billion archived web pages.

Wayback machine is a web archive that lets you find screenshots of old websites at different points in time.

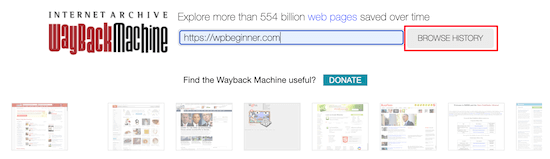
To use this tool, navigate to the Wayback Machine website, enter the website URL you want to check, and click ‘Browse History’.

Wayback Machine browse site history

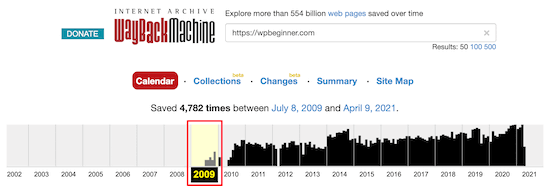
Then, it’ll show you a graph of the different dates where website copies were made.

You can click the top bar to sort by different years.

Wayback Machine sort by years

Below that, you’ll see a month by month calendar breakdown.

Next, click on a particular day, and there will be a popup to select the time.

You need to click the time you want, and it’ll load a cached copy of the website. You can right click to view the site in a new tab.

Wayback Machine calendar view

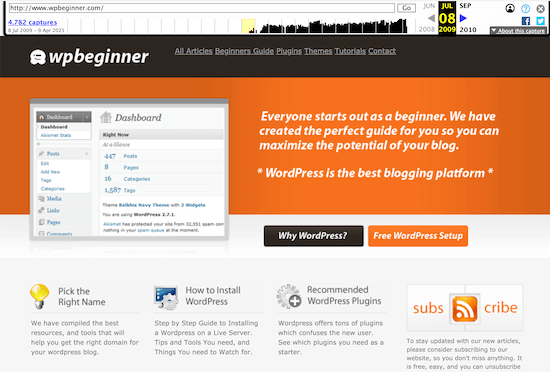
Once the page loads, you’ll be able to interact with it normally.

You can navigate from page to page, view images, click links, and more.

Wayback Machine old website

Keep in mind that not every link will work, and you won’t be able to navigate to every page since not every page will be cached.

This is generally an issue when sites are very large and have thousands of pages of content.

2. Oldweb.today

Oldweb.today is a unique tool that lets you browse old versions of websites using old web browsers that were around during that time.

This gives you a similar experience to what it was like using certain websites back in the day.

This tool pulls copies of websites from third-party archives like the Internet Archive and national digital libraries from around the globe.

Keep in mind, this tool will take some time to load older websites. It emulates old school browsers like Internet Explorer and Netscape navigator, but it has to find and load the websites first.

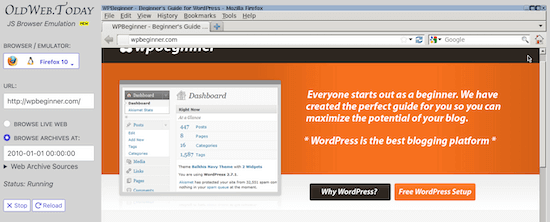
To use this tool, navigate to the oldweb.today website. Then, select a ‘Browser’ from the drop-down list and enter the URL of the website.

Make sure the ‘Browse Archives At’ radio box is checked and enter the date.

Oldweb.today enter website URL

Once you click enter, the tool will automatically start generating results.

Then, after it has loaded, you’ll be able to view and navigate the WordPress blog as if it was frozen in time.

Oldweb.today website result

You can navigate around, click links, and even copy the text.

3. Library of Congress Web Archive

The Library of Congress has a massive digital collection of newspapers, books, audio recordings, and websites.

They also have a website archive search tool that operates similar to the Wayback Machine mentioned above. However, the results will be a bit different than the other two tools.

If you can’t find an old version of the website before, then give this tool a try.

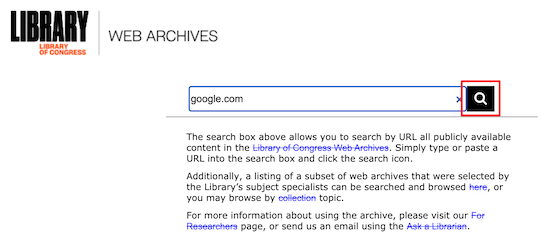
To use this tool, navigate to the Library of Congress Web Archives. After that, enter the URL for the website and click the search icon.

Library of Congress web archive

The results page is similar to the Wayback Machine as well.

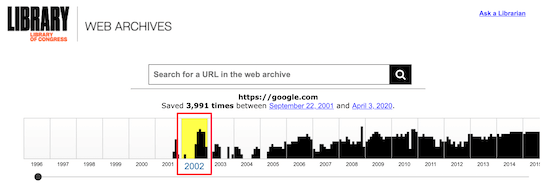
First, you will select the year from the top menu.

Library of congress web archive select year

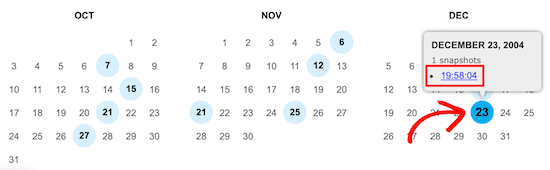
Next, select the date and click the time for the available snapshot.

This tool typically only gives you a single time to choose from.

Library of Congress select month and day

When you click the date, it’ll bring up the archived website.

You can also right click to open the page in a new tab.

Library of Congress website result

Hopefully, one of these three tools above has helped you find the old website you were looking for.

If you want to recreate an older page on any site, the best tool for the job is SeedProd. It’s the best drag and drop page builder for WordPress that lets you easily create any kind of website without editing any code.

We hoped this article helped you learn how to see old versions of any WordPress site. You may also want to see our guide on how to create an email newsletter to grow your traffic, and our comparison of the best WordPress membership plugins to create & sell online courses.

If you liked this article, then please subscribe to our YouTube Channel for WordPress video tutorials. You can also find us on Twitter and Facebook.

The post How to See Old Versions of Any WordPress Site (3 Tools) appeared first on WPBeginner.


April 19, 2021 at 03:00PM

Friday, April 16, 2021

6 Best WooCommerce CRM to Grow Your Store in 2021 (Compared)

Are you looking for the best WooCommerce CRM for your online store?

A WooCommerce CRM can help you manage your customers, improve business decisions, and create a better experience for your customers overall.

In this article, we’ll share the best WooCommerce CRM in the market today.

Best WooCommerce CRM compared

Why Use a WooCommerce CRM?

Using a WooCommerce Customer Relationship Management (CRM) tool will help you manage your customer data, send personalized marketing messages, and make better overall decisions about your business.

Most eCommerce stores need a way to manage new contacts and customers. In the early days of your online business, you might only use a spreadsheet to analyze customer information, order status, and order data.

But, as your online store grows, it’s easy for orders to slip through the cracks and customers to get mismanaged.

A WooCommerce CRM software helps to solve the problem of managing customer relationships as your eCommerce business scales.

You’ll be able to easily manage, store, and analyze your customer and purchasing data. This data can be used by your sales, marketing, and support teams for marketing automation and personalization.

Overall, WooCommerce CRM systems can help your online store increase sales, build customer relationships, and deliver a better experience across the board.

They can also improve your customer retention since your customers will be happier and stay with you longer.

That being said, let’s take a look at the best WooCommerce CRM solutions that you can use along with your WordPress website.

1. Drip

Drip WooCommerce CRM

Drip is a powerful eCommerce CRM platform that has a great WooCommerce CRM integration. The goal of this CRM is to help you increase your WooCommerce sales with marketing automation.

Even though it’s incredibly feature-rich, it’s still easy to use. Drip has intelligent marketing campaign tools and advanced email segmentation features. There are even automated workflows pre-built for WooCommerce store owners.

You’ll get contact management features, eCommerce user tracking, actionable reports, and support for one-on-one conversations with your customers.

There are various customer support options available via live chat, webinars, beginner-friendly documentation, and in-depth online courses.

Finally, you can grow your store with bundled social media workflows to help you generate leads from Facebook and Instagram.

Pricing: For those just getting started, there’s a 14-day free trial. Once the trial is up, the paid Drip plans start at $19 per month for up to 500 subscribers, $39 per month for up to 2,500 subscribers, and up.

2. HubSpot for WooCommerce

HubSpot WooCommerce CRM

HubSpot for WooCommerce lets you easily connect the powerful Hubspot CRM to your WooCommerce store.

With the WooCommerce plugin, you can automatically sync your users, products, and orders with Hubspot in real-time.

Some useful CRM features include customer tracking, contact segmenting, shopping cart abandonment emails, email templates, and in-depth store analytics data.

There are also built-in ad management tools for Facebook, Instagram, LinkedIn, and Google that you can use to grow your WooCommerce store.

You’ll also find 7 different eCommerce reports that will give you detailed data about your customer profiles, market trends, traffic, onsite behavior, and more.

Pricing: You can access the HubSpot CRM and the HubSpot WooCommerce plugin for free.

If you need access to more features, you can upgrade to individual service plans, or upgrade the Growth Suite bundle that starts at $50 per month.

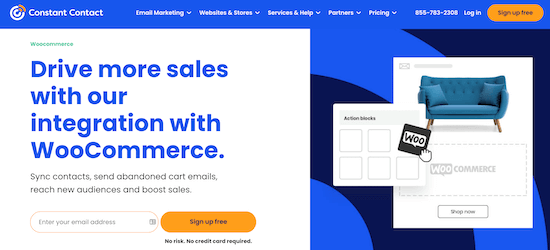
3. Constant Contact

Constant Contact WooCommerce CRM

Constant Contact is a popular email marketing and CRM provider. It lets you store your contacts, manage your customer data, and track your customer activity, all from a single dashboard.

Once you connect Constant Contact to WooCommerce, your contacts will be automatically synced.

There are a ton of unique features built specifically to improve your WooCommerce store and make more sales.

For example, you can drag and drop your products from your catalog directly into your emails, segment your contacts and send targeted offers, send trackable coupons and promo codes, and more.

You can create various automated email campaigns like welcome sequences, follow up emails, and abandoned cart emails.

There are even social media marketing and advertising tools you can use to reach new customers.

There are a ton of integrations available with third-party apps. This means you can simply integrate Constant Contact with tools you’re already using, like WPForms.

Pricing: Constant Contact pricing is based on the number of contacts, starting at $20 per month. If you want to add team members to your account, then you’ll need the Plus plan that starts at $45 per month.

WPBeginner readers can take advantage of our free 60 day trial and 20% off your plan using our Constant Contact coupon code.

4. Sendinblue

Sendinblue WooCommerce CRM

Sendinblue is one of the best email marketing software in the industry. Beyond the advanced email tools, there’s a free WooCommerce CRM plugin that will automatically sync your WooCommerce store with Sendinblue.

With Sendinblue, you’ll be able to synchronize all of your WooCommerce customer data instantly and manage all of your contacts with a single tool.

You can segment your customers based on purchasing behaviors, use the collection of email templates to send email newsletters, and more.

This tool allows you to create custom automated email sequences that can trigger automatically. For example, you can send an automated email when a customer adds an item to their cart but doesn’t complete the purchase.

One stand out feature is the ability to send marketing and transactional text messages (SMS) straight from your WooCommerce dashboard.

The WooCommerce plugin also integrates with other marketing features that SendInBlue offers like, custom sign up forms, Facebook ads, retargeting features, and more.

You can also use Sendinblue as a SMTP service to send your transactional emails like order receipts, password reset emails, and more with high email deliverability rate. You just need to use the WP Mail SMTP plugin to connect Sendinblue to WordPress.

Pricing: Sendinblue has a free account for sending up to 300 emails per day.

If you need to send unlimited daily emails, then the Lite plan starts at $25 per month, while the Premium plan adds advanced marketing automation features starting at $65 per month.

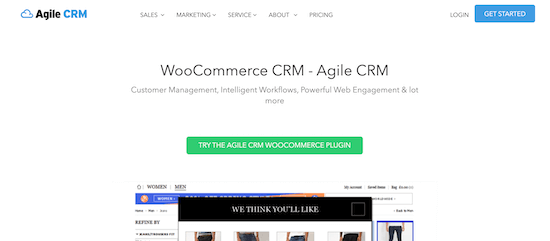
5. Agile CRM

Agile CRM for WooCommerce

Agile CRM is an all-in-one WooCommerce CRM that’s built for small to medium sized businesses.

This WooCommerce CRM has tools to manage customers, create intelligent workflows, improve store engagement, track your visitor’s store activity, and more.

The tool gives you a 360-degree view of your customers. It includes everything your sales, marketing, and helpdesk departments need in a single dashboard.

You’ll also find unique marketing features that let you generate and capture leads, send out emails, create landing pages, and more.

If you’re on one of the paid plans, then you’ll also get access to social media monitoring and tools that let you create automated marketing workflows.

Pricing: There’s a free version for up to 10 users, so if your company has 10 team members or less, you can use the free plan forever.

The paid Agile CRM plans start at $9.99 per user per month when billed annually or $8.99 per user when billed for 2 years.

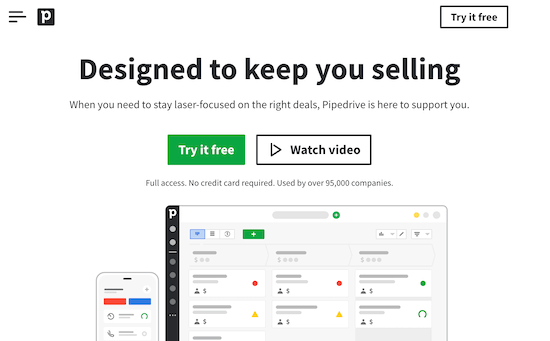
6. Pipedrive

PipeDrive WooCommerce CRM

Pipedrive is a sales CRM designed to help you manage your leads and deals and track communication with your customers. This CRM will help to streamline your sales and marketing process.

You can use a tool like Zapier or Automate.io to integrate Pipedrive with your WooCommerce store.

Once you set up the WooCommerce integration, all of your lead and order data will automatically be sent to Pipedrive.

Since Pipedrive is designed for sales teams, you’ll find all kinds of advanced functionality like sales reporting, forecasting, customizable pipelines, detailed activity log, and email integrations.

The built-in reporting tools will help you improve your conversion rates and see how your store performs across the board.

There’s also a growing library of integrations and addons, so you can connect your CRM to any other marketing tools you’re already using.

Pricing: Pipedrive starts at $12.50 per month when billed annually. The Advanced plan starts at $24.90 per month for users who need advanced marketing automation features.

We looked at many other WooCommerce CRM tools like Metrilo, Salesforce, WP ERP, Zero BS CRM, Ninjodo, Woosync, Magento and others. But, we decided not to list them here to make your decision as easy as possible.

Bonus: Conversion Tools for WordPress

The WooCommerce customer relationship manager tools above will help you streamline your customer relationship, sales, and marketing efforts.

However, there are additional tools you can use to improve conversions, get more leads, add popups to your site, and more.

7. OptinMonster

OptinMonster

OptinMonster is the best email capture tool for WordPress used by over 1.2 million websites. It helps you convert website visitors into subscribers and customers.

With the WooCommerce integration, there are all kinds of features that’ll help you add leads to your WooCommerce CRM of choice.

For example, you can use high-performing templates to collect leads, send personalized messages, run split-tests, and much more.

8. WPForms

WPForms

WPForms is the best contact form plugin for WordPress used by over 4 million WordPress sites. It lets you create drag and drop optin and contact forms simply.

You can use all kinds of custom field options to collect the exact customer information you require.

You can use WPForms to collect leads to send directly to your WooCommerce CRM of choice.

You can use WPForms as a connector to link your leads with CRM providers like Drip, SendinBlue, Constant Contact, Mailchimp, and more.

Or, you can use the Zapier integration to link your forms and optins with Agile CRM and PipeDrive.

9. MonsterInsights

MonsterInsights

MonsterInsights is the best analytics solution for WordPress used by over 3 million sites. It allows you to simply install Google Analytics in WordPress and shows your analytics stats right in your WordPress dashboard.

It also comes with an eCommerce analytics addon, so you can track your customer activity to see what’s working for your new and existing customers.

After you set up WooCommerce user tracking in WordPress, you’ll be able to see your conversation rate, revenue, transactions, average order value, and more.

You can use this data to improve your online store and convert more visitors into customers.

We hoped this article helped you find the best WooCommerce CRM for WordPress. You may also want to see our list of the must have WordPress plugins for business websites and the best business phone services for small business owners.

If you liked this article, then please subscribe to our YouTube Channel for WordPress video tutorials. You can also find us on Twitter and Facebook.

The post 6 Best WooCommerce CRM to Grow Your Store in 2021 (Compared) appeared first on WPBeginner.


April 16, 2021 at 03:56PM