Friday, April 23, 2021

13 Best WordPress Multisite Plugins You Should Use (Expert Pick)

Are you looking for the best WordPress multisite plugins?

WordPress multisite plugins can help extend your multisite network’s features and make it much easier to manage your network of websites.

In this article, we’ve hand picked the best WordPress multisite plugins for your WordPress multisite network.

Best WordPress multisite plugins (super useful)

For those who’re new, WordPress multisite network allows you to run and manage multiple WordPress sites or blogs from a single WordPress installation.

There are many benefits to using a multisite network such as, you can install plugins & themes for multiple sites from a centralized dashboard.

If you haven’t created your WordPress multisite network yet, then we have a step by step guide on how to install and set up a WordPress multisite network.

It walks you through the process of choosing the right WordPress hosting, setting up your network, launching your network of sites, and more.

Having said that, let’s take a look at the best WordPress multisite plugins that you should use.

Note: Most WordPress plugins work seamlessly with WordPress multisite environments. However there are always few that aren’t compatible. Below is our list of the most useful plugins for all multisite networks.

1. MonsterInsights

MonsterInsights

MonsterInsights is the best Google Analytics solution for WordPress used by over 3 million websites. It lets you easily add Google Analytics to WordPress and view your traffic data directly from your WordPress admin dashboard.

With easy access to this data you can grow your traffic, email list, and revenue.

On a WordPress multisite network, all your subsite analytics is available in one place. This lets you see which sites are performing well at a glance.

When you set up MonsterInsights, you get to choose which sites you want to enable or disable the analytics feature.

We have several guides that’ll show you how to set up Google Analytics in WordPress and how to track user engagement.

There is a free version of MonsterInsights available, however the premium version unlocks the true power of this tool.

2. WP Mail SMTP
WP Mail SMTP

WP Mail SMTP is the best WordPress SMTP plugin in the market used by over 2 million WordPress sites. An SMTP plugin will ensure that any emails sent from your WordPress site will reach your users.

Most WordPress hosting companies don’t have the function set up to send emails through WordPress properly. Some even block this functionality entirely.

WP Mail SMTP fixes this problem by letting you send emails through an SMTP service provider like Amazon SES, Gmail, Mailgun, etc. This ensures your emails will actually get delivered and not end up in spam.

With WP Mail SMTP multisite, you can specify different email accounts for each WordPress blog or site on your network.

The free version of WP Mail SMTP will work for most multisite networks.

However, the paid WP Mail SMTP Pro offers white glove set up and support to configure the plugin to work for you.

3. AIOSEO

All in One SEO

All in One SEO is the best SEO plugin for WordPress in the market used by over 2 million WordPress sites.

It’s a comprehensive SEO solution that offers all the features you need to improve your onsite SEO across your network of websites.

The plugin can help you optimize your meta title, meta descriptions, create sitemaps, optimize for social media, connect your sites to Google Search Console, and more.

For more details, see our guide on how to set up All in One SEO for WordPress correctly.

There is a free version of All in One SEO available. However, the pro version has additional features like local SEO, WooCommerce SEO, image SEO, and much more.

If you have a variety of different types of sites on your multisite network, then this can help you optimize them perfectly.

4. Multisite Enhancements

Multisite Enhancements

Multisite Enhancements is a powerful multisite plugin that’ll help you customize your entire multisite network’s WordPress admin area.

The plugin will display information about the sites on your network including, the resources the sites are using, the active plugins, themes, child themes, and more.

It also lets you optimize the admin dashboards for your subsites. This allows you to show the information that’s useful for each admin and hide the unnecessary details from the backend.

5. User Switching
User Switching

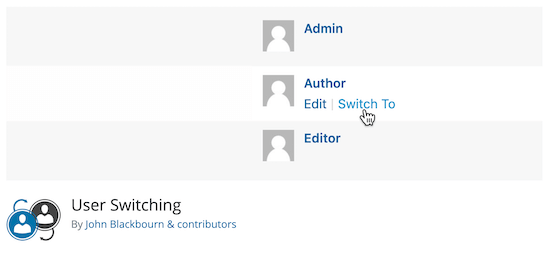
User Switching is a plugin that’ll let you switch between different user roles with a couple of clicks.

For example, maybe you need to switch between different user roles to troubleshoot or test a site? This plugin lets you instantly switch from one account to another with a single click.

The plugin maintains high security levels, and it’ll never reveal account passwords. Users are only allowed to switch between accounts that have already been authorized.

If you’re running an online store using WooCommerce, then this plugin integrates and allows you to manage these users as well.

6. InfiniteWP

InfiniteWP

InfiniteWP is one of the best tools for managing multiple WordPress sites. It lets you simply manage WordPress plugin, theme, and core updates from a single dashboard.

It’s a great solution for freelancers and agencies who manage websites for clients.

The free version gives you control over site updates. However, the premium plugin unlocks more features like on-demand backups, migrations, staging sites, post and page publishing, malware scanning, and more.

This plugin gives you ultimate control over all of the sites on your multisite network.

7. Members
Members - User Role Editor Plugin

Members is a user role editor plugin that lets you simply create, manage, and change user roles across your entire network of WordPress sites.

If you’re running a network of sites with a large number of WordPress users, then this plugin makes it super easy to oversee and manage access & permissions.

Often administrators use this plugin to create custom user roles with specific permissions to enhance security.

This plugin is maintained by the team behind MemberPress which is the best WordPress membership plugin that lets you create and sell online courses, premium content, and more.

8. OptinMonster

OptinMonster

OptinMonster is one of the best lead generation tools in the market. It’s trusted by over 1.2 million sites, including ClickBank, Pinterest, Patreon, and more.

This tool lets you create high converting popups modals and lead generation forms across your entire network of WordPress sites. There’s a network activation feature that lets you create different campaigns for every site on your network.

OptinMonster has a large template library and an extensive drag and drop builder to create custom popups, slide-ins, content upgrades, and more.

The Exit-Intent® technology helps you convert visitors who are leaving your sites into subscribers and customers.

With a multisite installation, all of your campaign data is available in one place. This lets you see the results of your lead generation efforts and improve your conversions across multiple websites.

9. Duplicator
Duplicator

Duplicator is the best WordPress migration plugin. It allows you to easily migrate your WordPress blog between different servers and WordPress hosting accounts.

The plugin is very easy to use. It lets you simply download all of your website files and upload them to your new server.

There is a free version of the plugin, but to migrate a network of sites, you’ll need the plugin’s premium version. Migrating an entire WordPress multisite network might seem stressful, but this plugin simplifies most of the process.

You can copy your entire multisite network on all plans, but to easily reinstall new sites, you’ll need a premium plan.

10. WPForms

WPForms

WPForms is the best WordPress contact form plugin in the market. Over 4 million WordPress sites use it.

It’s very easy to create simple contact forms, user registration forms, multi-page forms, and more.

Running a multisite network means you’ll have various form needs. This plugin can help you meet all of them.

Even though it’s packed with features, it’s very easy to use. They have a drag and drop form builder to help you quickly build advanced contact forms and customize them to match your website.

There’s a large template library to help you add a variety of forms to your sites quickly.

The free version WPForms Lite can be used if you only need to add simple contact forms to your sites.

11. WP Rocket

WP Rocket

WP Rocket is one of the best WordPress caching plugins in the market.

A caching plugin can help boost your WordPress website speed and performance with no technical skills.

Once the plugin is installed and activated on your site, it’ll automatically improve your loading speeds. There are all kinds of advanced features you can customize depending on the type of website you run.

It’s one of the few caching plugins equipped with lazy loading, minification, page caching, cache preloading, static file compression, font loading, and more.

WP Rocket lets you improve your site speed without impacting your pages and posts on any site.

12. UpdraftPlus

UpdraftPlus

UpdraftPlus is the best backup plugin for WordPress. You can simply backup your WordPress sites with a couple of clicks.

Your WordPress multisite network could have dozens or even hundreds of subsites, so you must use a backup plugin to keep every site on the network safe.

This plugin helps you create automated backups for every site on your network.

You can save your backups to your computer or integrate with other cloud storage services. There’s a great feature to restore a site with a single click.

For more details, see our guide on how to backup and restore your WordPress site with UpdraftPlus.

There’s a free version of the plugin available, but the paid plans offer you priority support and even more features.

13. Multisite Language Switcher
Multisite Language Switcher

Multisite Language Switcher adds multilanguage capabilities to your WordPress multisite network.

There are various plugins you can use to create a multilingual WordPress site. But, this plugin is dedicated to WordPress multisites.

It allows you to manage translations across multiple sites. You can oversee translations for pages, posts, taxonomies, and tags across all your properties.

With this plugin, managing translations for entire websites or translating individual pieces of content across your entire network is easy.

Final Thoughts + More WordPress Multisite Plugins

There are over 58,000 WordPress plugins available, and most of them will work on a multisite network.

Depending on your needs, you may want to see our following expert picks:

We hope this article has helped you find the best WordPress multisite plugins for you. You may also want to see our ultimate guide on how to create a business email address, and how to get virtual a business phone number for your website.

If you liked this article, then please subscribe to our YouTube Channel for WordPress video tutorials. You can also find us on Twitter and Facebook.

The post 13 Best WordPress Multisite Plugins You Should Use (Expert Pick) appeared first on WPBeginner.


April 23, 2021 at 02:48PM
Thursday, April 22, 2021

How to Change the Author of a Post in WordPress

Do you want to change the author of a post in WordPress?

Sometimes you may need to change a post to a different author than the user who first uploaded the post. You can do this without having to copy and paste the post with a different account.

In this article, we’ll show you how to simply change the author of a post in WordPress with just a few clicks.

How to change the author of a post in WordPress

Before You Change the Author of a WordPress Post

If you just want to show your own name on a post written by another user on your WordPress site, then you’re ready to follow the instructions in this article.

But, if you want to show a different user as the author, then you need to make sure this user exists on your WordPress site first. See our guide on how to add new users and authors in WordPress for detailed instructions.

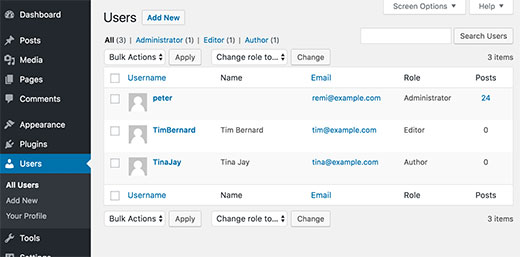
You can view and manage all the users on your WordPress site by visiting the ‘Users’ menu item when logged in with your WordPress administrator account.

Managing users in WordPress

If you only want to change the way your name is displayed, then check out our guide on how to add or change your full name in WordPress.

Having said that, let’s look at how to quickly and easily change the author of a post in WordPress.

Video Tutorial

If you don’t like the video or need more instructions, then continue reading.

How to Change the Author of a Single WordPress Post

First you need to open the post or page where you want to change the author name.

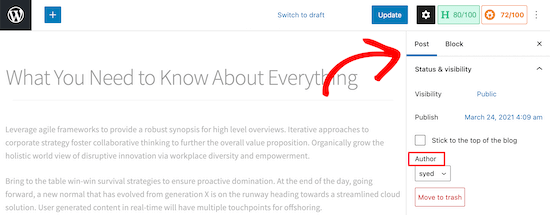
On the post edit screen, you need to make sure ‘Post’ is selected in the right-hand sidebar.

Then, locate ‘Author’ under the ‘Status & Visibility’ section.

Locate post then author section

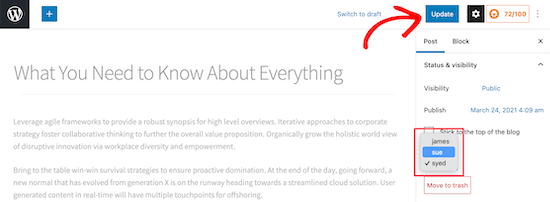
Next, select the new author name from the drop down menu.

You’ll see a list of available authors to choose from.

Select new author drop down

Once you’ve done that, make sure you click ‘Update’ or ‘Save Draft’ to save your changes.

That’s it, you have successfully changed the author of a post in WordPress.

How to Change the Author of Multiple WordPress Posts

Changing the author by editing a single post is easy.

However, if you want to change the author for multiple posts, then this would take a lot of time.

Luckily, there’s an easier way to quickly change the author for multiple WordPress posts at once.

To bulk update authors, click on the ‘Posts’ menu item from your WordPress admin menu. This will list all the posts on your WordPress site.

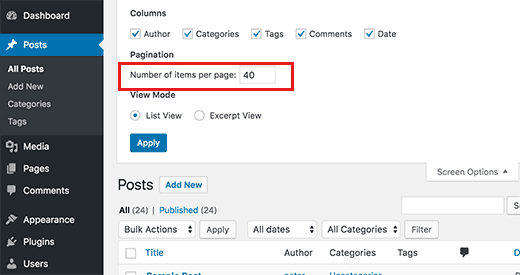
By default, WordPress shows 20 posts per page. If you want to display more posts, then you need to click on ‘Screen Options‘ and change the number of posts you want to display.

Show more posts in admin area

Now you need to select the posts where you want to change the author.

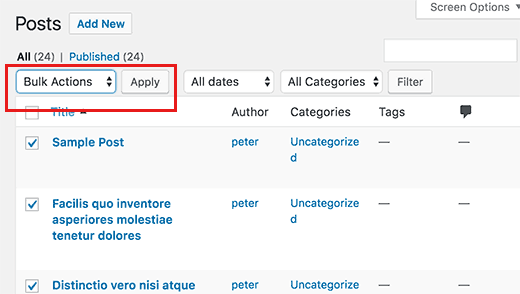
After selecting posts, select ‘Edit’ from ‘Bulk Actions’ dropdown menu and then click the ‘Apply’ button.

Bulk edit posts in WordPress

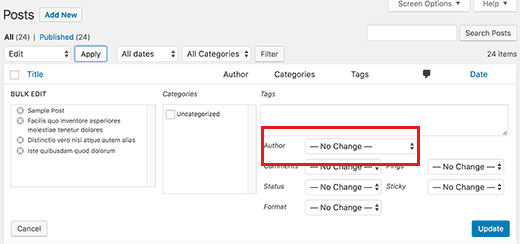
WordPress will now show you ‘Bulk Edit’ metabox.

You need to select the new author by clicking on the dropdown menu next to Author option.

Bulk edit author for multiple posts in WordPress

Don’t forget to click on the ‘Update’ button to save your changes.

That’s it, you have successfully changed the author for multiple WordPress posts without editing them individually.

How to Optimize Your Author Profiles for SEO

Finally, you may want to optimize your author profile pages to improve your SEO rankings.

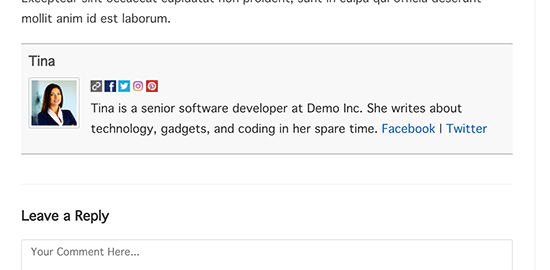
The author profile is what appears at the bottom of blog posts published under your name.

Author info box plugin preview

Here you can add a brief bio, links, and even your social media profiles.

By showcasing your author bio, you can build more credibility and give your readers a chance to learn more about you and the authors on your site.

WordPress allows you to add a brief author bio, but to add social media links you’ll need to use a WordPress author bio plugin.

Aside from that, you’ll also want to improve your Author archive pages where WordPress displays a list of posts written by that author.

To optimize author pages for SEO, we recommend using All in One SEO. It’s the best SEO plugin for WordPress used by over 2 million websites.

For more details, see our guide on how to install a WordPress plugin.

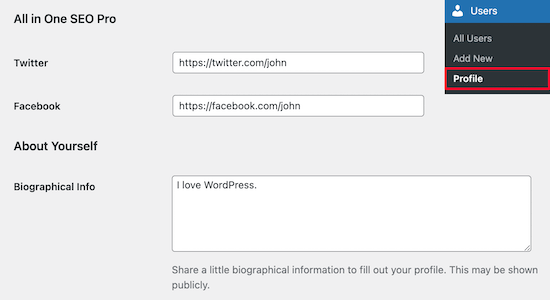
Upon activation, simply navigate to Users » Profile to edit your author profile.

Next, scroll down to the ‘All in One SEO Pro’ section where you can add links to your Facebook and Twitter profiles and create an author bio.

Author profile SEO

Once you’ve made the necessary changes, make sure you click ‘Update Profile’ at the bottom of the page.

Users will now see your new author bio at the bottom of any post you publish or change to your name.

We hope this article helped you learn how to change the author of a post in WordPress. You may also want to see our expert list of the best WordPress plugins for websites, and our comparison of the best online course platforms.

If you liked this article, then please subscribe to our YouTube Channel for WordPress video tutorials. You can also find us on Twitter and Facebook.

The post How to Change the Author of a Post in WordPress appeared first on WPBeginner.


April 22, 2021 at 04:17PM

Wednesday, April 21, 2021

How to Add a Custom Product Builder in WooCommerce

Do you want to add a custom product builder in WooCommerce?

A custom product builder in WooCommerce allows customers to design products and customize them to their own requirements. This interactive way of customizing product orders can boost sales conversions.

In this article, we will show you how to easily add a custom product builder in WooCommerce without hiring any developers or writing any code.

Adding a custom product builder in WooCommerce

Why Add a Custom Product Builder in WooCommerce?

Adding a custom product builder in WooCommerce allows your customers to customize the products before placing an order.

For instance, you can add print-on-demand products and allow customers to add their logos, images, and text to the products.

A custom product designer for WooCommerce can be used to sell your own products that you can customize for the customers before shipping.

Alternatively, you can also start a dropshipping business and let a third-party vendor take care of customization and shipping.

That being said, let’s take a look at how to add a custom product builder to your WooCommerce store.

Adding Custom Product Builder to a WooCommmerce Store

For this tutorial, we will be using Zakeke. It is a product customizer tool for WooCommerce and offers a seamless product builder experience for your users. The product designer is really easy to use for customers as well as store owners.

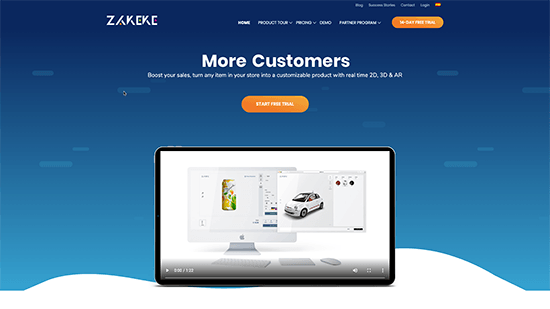
First, you need to sign up for a Zakeke account.

Zakeke website

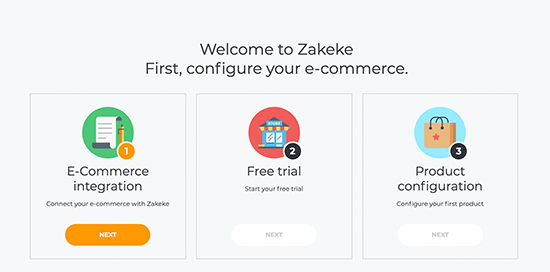
After that, you will be asked to choose your eCommerce integration. Simply click on the Next button to continue.

Zakeke wizard

Zakeke works with most popular eCommerce platforms including WooCommerce.

To connect your store to Zakeke, switch back to your WordPress website admin area.

Next, you need to install and activate the free Zakeke plugin. For more details, see our step by step guide on how to install a WordPress plugin.

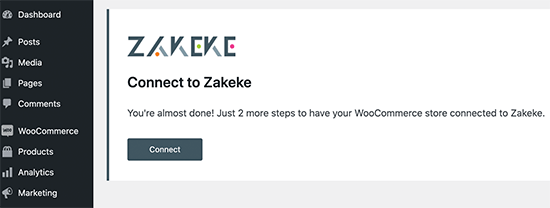
Upon activation, you’ll be asked to connect your WooCommerce store to your Zakeke account. Simply click on the Connect button to continue.

Connect Zakeke account

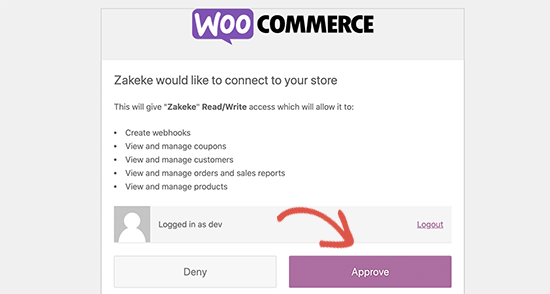
You’ll be then asked to allow Zakeke access to perform actions on your WooCommerce store. Click on the Approve button to move forward.

Approve connection

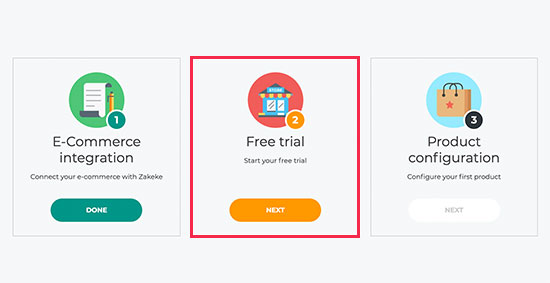
This will bring you back to Zakeke website to start your free trial or choose a pricing plan. Click on the next button to continue.

Activate free trial

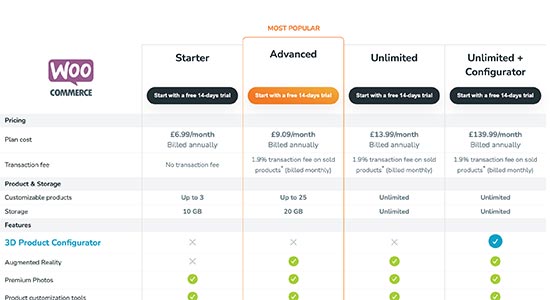
On the next page, you will see pricing options for different plans. Each plan comes with a free 14-day trial and does not require a credit card.

Apart from the Starter plan, all other plans charge an additional 1.9% transaction fee on sold products.

Choose a plan

Click to choose your plan and you are good to go.

Adding Your First Customizable Product

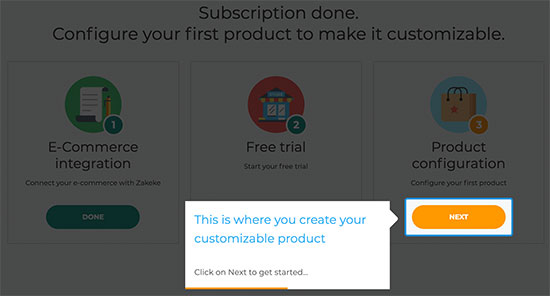
You can now click on the Next button to launch the Product configurator and start adding your products.

Launch Product Configurator

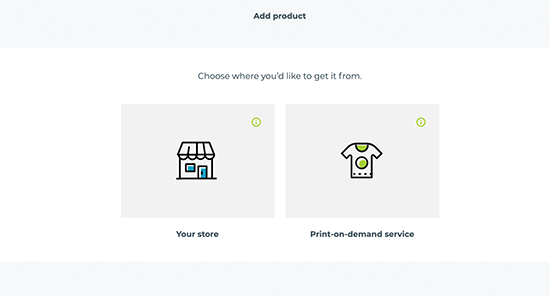
You can then choose a product from your own store, or you can select a print-on-demand service.

For the sake of this tutorial, we will choose to add products from our own demo store.

Choose product type

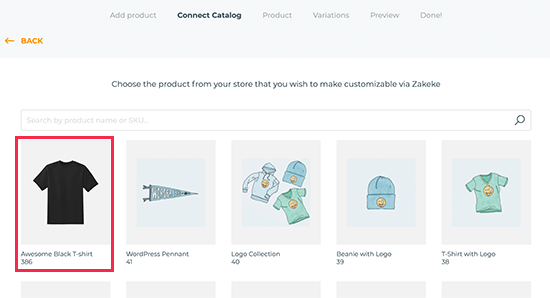
Next, Zakeke will load products from your store, and you need to choose the product that you want to configure.

Choose product

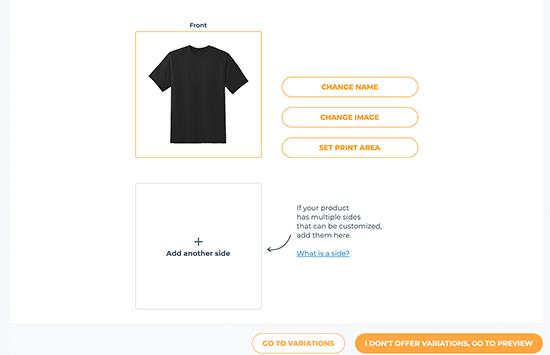
After that, it will choose your product image from your store. If you want to use a different image, then you can upload it. You can also add a back side of the product image or add variations.

Add product image or variations

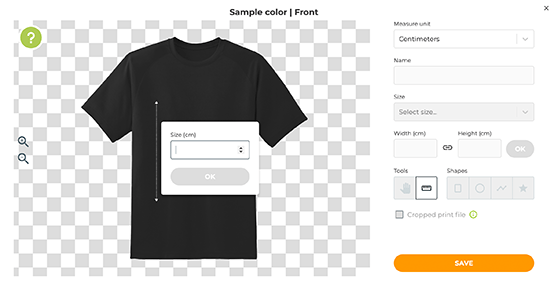
Once you are satisfied with the product images, click on the ‘Set print area’ button. This will bring up a popup where you need to set a ruler by simply drawing a line with your mouse and providing a measurement.

Setting the print area

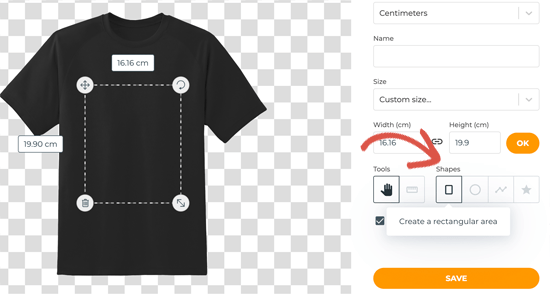
Next, you need to select a shape for the print area and then draw it on the product image.

Choose area shape

Once you are satisfied with your selection, click on the Save button to continue.

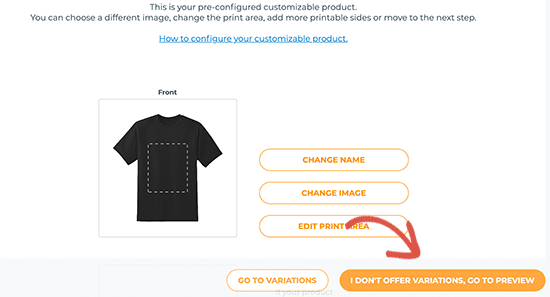
Next, you need to click on the Proceed to preview button to finalize your changes.

Finalize changes

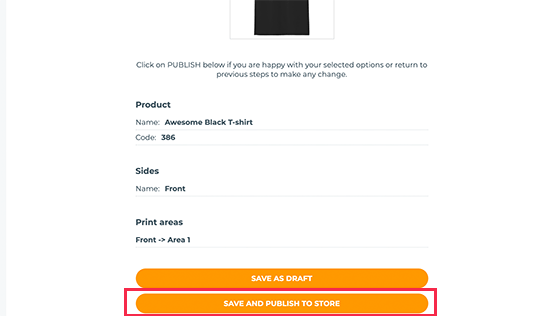
You’ll now see your product details. Don’t forget to save your changes as draft or publish it to your store.

Publish your product

Setting The Print Methods

The next step is to set print methods. This is where you can choose how you want the design files to be formatted for printing.

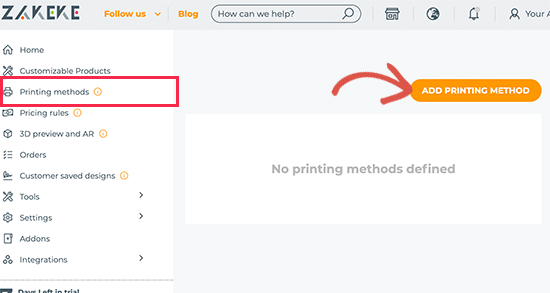
From your Zakeke account dashboard, go to the Printing Methods from the left column and then click on the Add Printing Method button.

Adding a print method

From here, you can choose what printing features you want to allow to your customers. You can also choose the file types, resolution, and format.

At the bottom, you can choose the existing products that this method would apply to.

Don’t forget to click on the Save Print Method button to store your changes.

Using The Custom Product Builder in WooCommerce

Zakeke will take care of adding the product customization option to all the products that you have added using the product configurator.

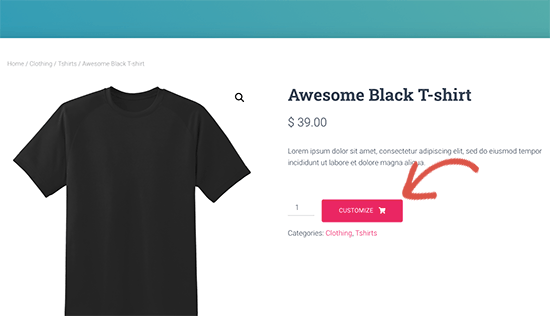
You can simply visit the product in your store, and you will see the option to Customize the product.

Customize product button

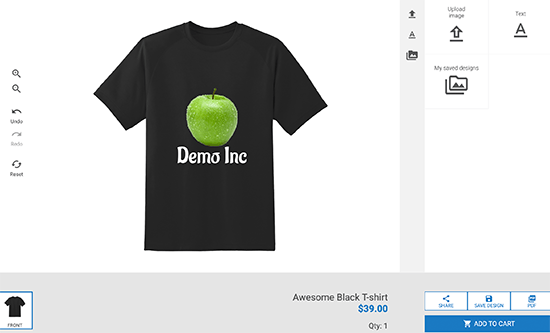
This will open up the product designer interface with a preview of the product image design tools on the right. Users can add text or upload images from their devices.

Product designer preview

Users can adjust the image or text to the print area by simply dragging the corners. They can choose different fonts, colors, and styles.

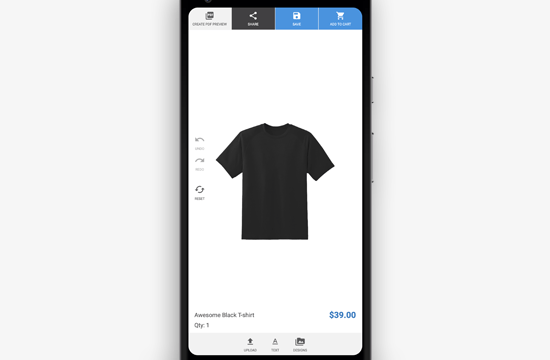
The product designer also works on mobile devices and automatically adjusts to match the user’s screen size.

Mobile preview of the custom product builder for WooCommerce

Once finished, they can download a copy of their design as PDF, save it, or simply add it to the cart.

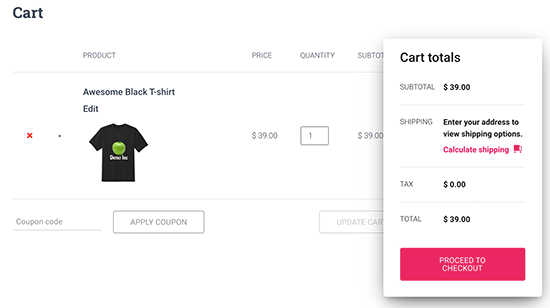
After that, customers can check out as they would normally do with a preview of their customized product in the cart.

Check out product page

Processing the Custom Product Order in WooCommerce

Zakeke makes it really simple to get the customization files for each order.

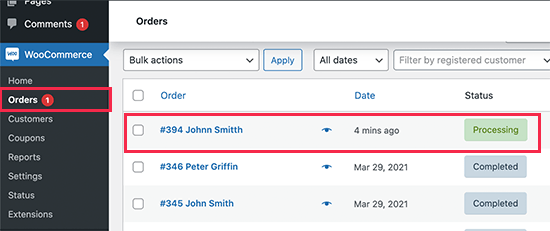
Simply go to the WooCommerce » Orders page and click on an order for your customizable product.

Viewing orders in WooCommerce

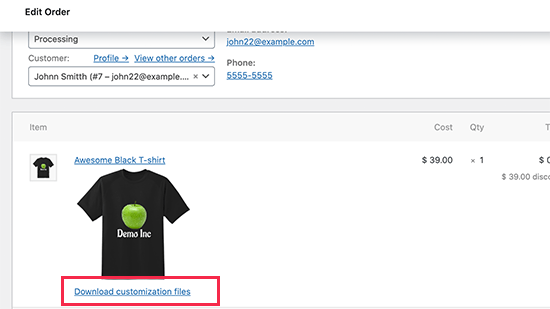
On the Order details page, you’ll see a preview of the custom design created by the customer with a link to download the customization files.

Download print files for customer design

You can then download the print files and send them for print or to your dropshipping vendor.

Bonus Tip: Selling More Customizable Products in WooCommerce

Customizable products and a sleek product designer would help you make more sales. However, customers may not know that they can customize and design their products.

This is where OptinMonster comes in.

It is the best conversion optimization software on the market and allows you to easily convert WooCommerce visitors into paying customers.

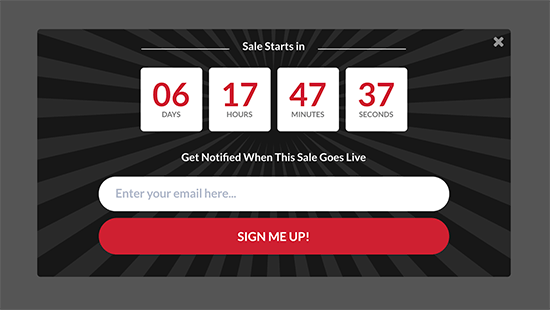
OptinMonster comes with lightbox popups, slide-in popups, notification bars, countdown timers, and more. All these tools help you display the right message to your customers at the precise time.

With its powerful display rules, you can target customers and show them personalized campaigns.

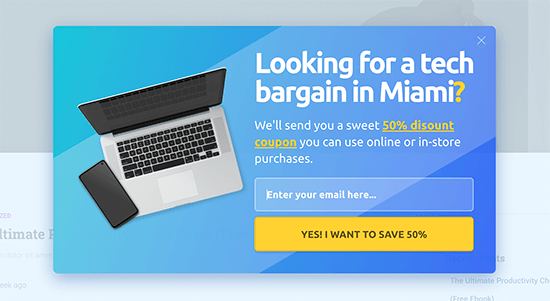
GeoTargetted Popups in WooCommerce

For instance, you can offer free shipping to customers in a particular area, show a slide-in popup for customizable products, or give a limited-time coupon to recover abandoned cart sales.

OptinMonster popup preview

We hope this article helped you learn how to easily add a custom product builder in WooCommerce. You may also want to see our guide on how to track conversions in WooCommerce to grow your business, and our comparison of best WooCommerce hosting providers.

If you liked this article, then please subscribe to our YouTube Channel for WordPress video tutorials. You can also find us on Twitter and Facebook.

The post How to Add a Custom Product Builder in WooCommerce appeared first on WPBeginner.


April 21, 2021 at 04:00PM