Tuesday, April 27, 2021

How to Create a WordPress Multisite with Different Domains (4 Steps)

Do you want to create a WordPress multisite with different domains?

WordPress multisite allows you to use a single WordPress installation to create multiple websites. You can even give each site its own domain name.

In this article, we’ll show you how to easily create a WordPress multisite with different domains, step by step.
Creating WordPress multisite with different domains

Why Create a WordPress Multisite with Custom Domains?

The easiest way to make a website is by using WordPress.

However for each website that you set up, you’ll need to manage updates, keep backups, and secure all separate WordPress installations separately. Plus some hosting providers limit their basic plans to a single WordPress install.

An easier workaround to this website management issue is to create a WordPress multisite network.

WordPress multisite is a core WordPress feature that allows you to easily create multiple sites using the same WordPress installation.

The best part is that you can use different domains for each of your websites.

This allows business owners to quickly launch websites without worrying about managing multiple WordPress installations.

From a development perspective, this also gives you flexibility in sharing customers, similar design elements, and more.

The downside is that all your websites use the same resources. This means that if your hosting service ever goes down, then all your websites will be down at the same time.

What Do You Need to Create a WordPress Multisite with Custom Domains?

You’ll need the following items to create a WordPress multisite with custom domain names.

  • A WordPress hosting company that supports multiple domains and WordPress multisite.
  • Domain names that you want to use.

We recommend using SiteGround. They are one of the officially recommended WordPress hosting provider and support WordPress multisite domain mapping out of the box.

This can work on the Starter plan too since technically you’re creating 1 site. This is a creative way to get around the hosting plan limits as long as your sites are low traffic.

For more hosting recommendations, see our comparison of the best WordPress hosting companies.

Next, you need to register the domain names that you want to use for your root site as well as your child sites.

We recommend using Domain.com. They are the best domain registration company on the market with a better domain search, easy to use control panel, and simpler DNS management.

You can use our Domain.com Coupon to get 25% off on your purchase of new domain names.

Step 1. Installing WordPress Multisite

If you are creating a WordPress multisite on a brand new website, then you may need to install WordPress first.

Most WordPress hosting companies, including SiteGround, come with 1-click WordPress installer. If you need help, then follow our WordPress installation tutorial for step by step instructions.

Once you have installed WordPress, the next step is to enable WordPress multisite functionality.

Enabling WordPress Multisite Feature

WordPress multisite functionality comes built-in with WordPress, but it is turned off by default. You’ll need to enable it in order to set up your WordPress multisite.

For that, you’ll need to edit the wp-config.php file. It is the WordPress configuration file that contains all the important settings for your WordPress installation.

You can edit it by using an FTP client or the File Manager app in your hosting account control panel. The wp-config.php file is located under the root folder of your website.
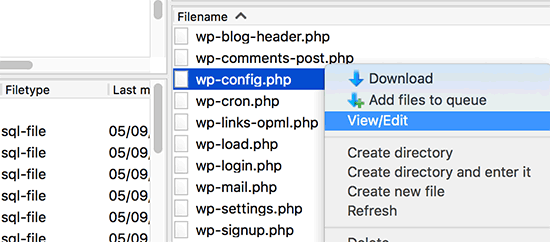
Editing wp-config.php file via FTP

Inside this file, you will need to add the following line just above the line that says ‘That’s all, stop editing! Happy publishing’.

define( 'WP_ALLOW_MULTISITE', true );


After that, don’t forget to save your changes and upload the file back to your website.

Now you need to switch back to your WordPress admin dashboard and reload the admin dashboard page. After that, you need to visit the Tools » Network Setup page to configure your WordPress multisite network.
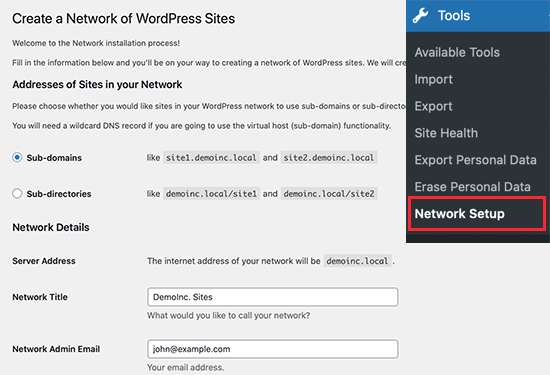
Network setup for WordPress multisite

First, you need to choose subdomains as ‘Addresses of Sites in your Network’ provide a title for your multisite network and network admin email address.

Click on the ‘Install’ button to continue.

On the next screen, WordPress will ask you to add two pieces of code.
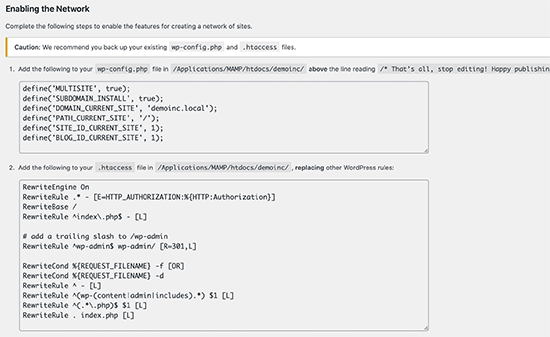
Configuration code required for enabling WordPress multisite

The first one goes into your wp-config.php file just above the line reading ‘That’s all, stop editing! Happy publishing’.

Apart from the code shown by WordPress, you also need to add the following line to your wp-config.php file. This line ensures that users can login to each site.

define('COOKIE_DOMAIN', $_SERVER['HTTP_HOST'] );

The second piece of goes into your WordPress .htaccess file replacing the default WordPress .htaccess rules.

Once you have added both codes to the respective files, you’ll need to login to your WordPress admin dashboard.
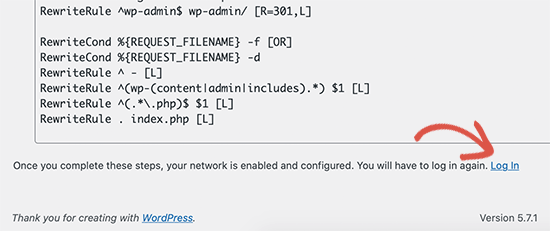
Login link

After login, you will see a new menu item in the admin bar titled ‘My Sites’. Take your mouse over it and then select ‘Network Admin » Dashboard’ link.
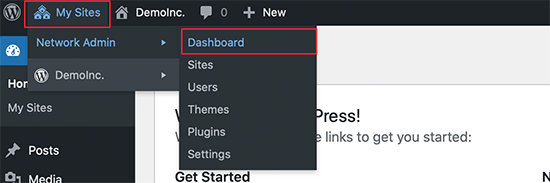
Network admin dashboard

Step 2. Creating New Sites Using Custom Domains in WordPress Multisite

Now that everything is set up, let’s create your first site using a different domain name.

From your multisite’s network admin dashboard, click on the Sites » Add New page.
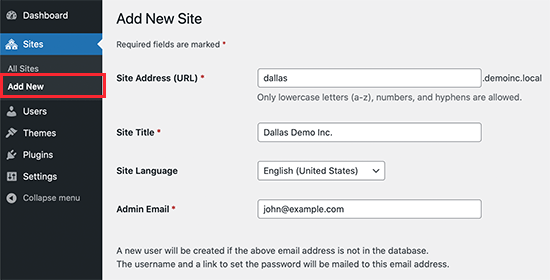
Create new site

Simply provide a Site Address, Title, select language, and then enter the admin business email address. As for site address, you can add anything here for now because we will change it to your custom domain in the next step.

Click on the ‘Add Site’ button to create your site.

Next, you need to go to Sites » All Sites page and click on the ‘Edit’ link below the site you just created.
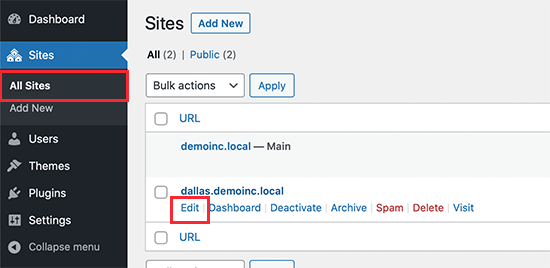
Edit your site

On the site edit screen, you need to add the custom domain name that you want to use for this website under the Site Address field. WordPress comes with built-in domain mapping which will automatically map your custom domains to your Site Address.
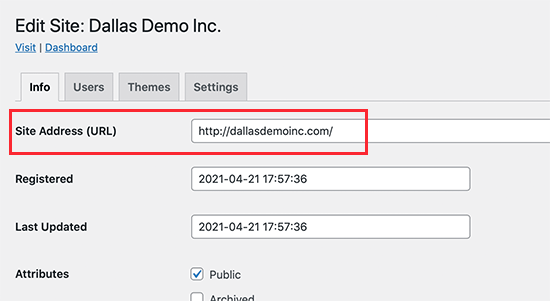
Use custom domain as your site address

Don’t forget to click on the Save Changes button to store your settings.

Repeat the process to Add more sites and then change their site address to the custom domain you want to use. Here we have created a few sites with different custom domains.
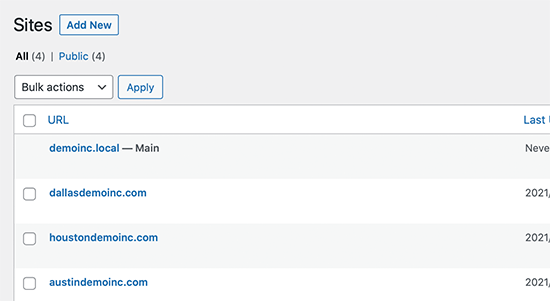
Custom domains for WordPress sites on a multisite network

However, none of these websites will be accessible as your custom domains don’t point to your WordPress hosting company. Let’s change that.

Step 3. Adding Custom Domains to Your Hosting Account

Most WordPress hosting providers allow you to easily add multiple domains to your hosting account.

If you are using SiteGround, then click on the Site Tools under your hosting account.
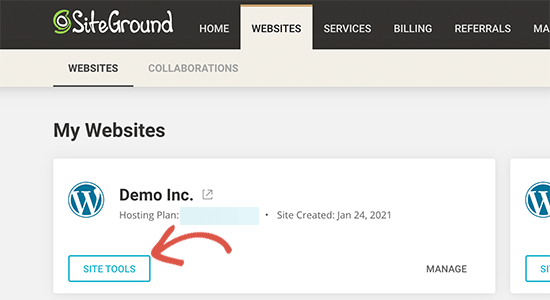
Site Tools in SiteGround

After that, you need visit Domains » Parked Domains and then add your custom domain here.
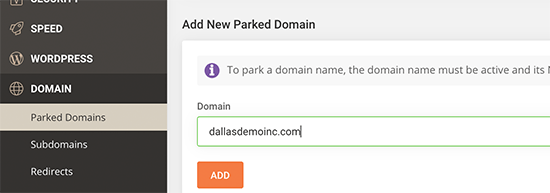
Add parked domain

Repeat the process if you need to add more custom domains.

If you are using another hosting service, then the process is still the same. You’ll find the parked domain option under the Domains section of your hosting dashboard. Here is how it looks on Bluehost.
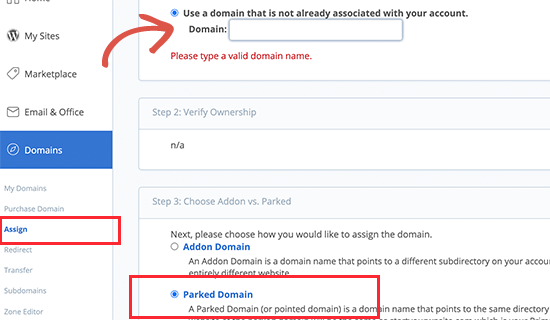
Adding parked domain in Bluehost

If you are using your hosting provider as your domain registrar, then you may not need to update the DNS servers.

However, if you have registered your domain name elsewhere, then you will need to update the DNS information and point it to your hosting account.

First, you’ll need the DNS information for your hosting provider. You can find it under your hosting control panel or you can ask their support staff. Usually, it looks like this:

ns1.siteground204.com
ns2.siteground204.com

Once you have the DNS information, you need to login to your domain registrar website and click on the DNS & Nameservers section.
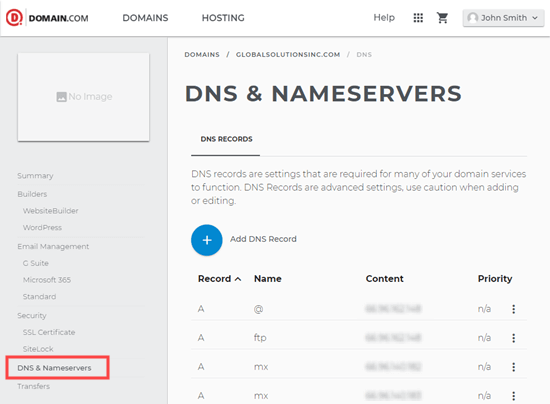
DNS management in Domain.com

Simply select your domain and edit name server information to replace it with your hosting provider’s DNS.
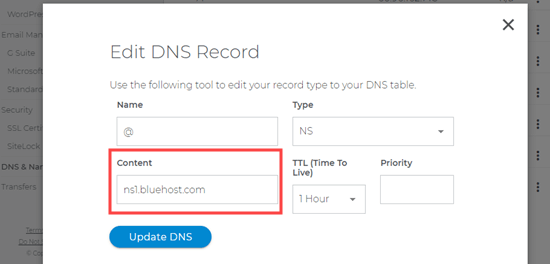
Changing DNS information in Domain.com

For more details, see our guide on how to change DNS name servers for popular domain name registrars.

Note: DNS information may take a while (2-48 hours) to fully update across the internet.

As DNS information is updated, you will be able to see your WordPress multisite’s childsite for each domain.

Step 4. Managing and Login to WordPress Multisite on Custom Domains

You can perform most administrative tasks like installing plugins, themes, and updates from your root site’s dashboard.
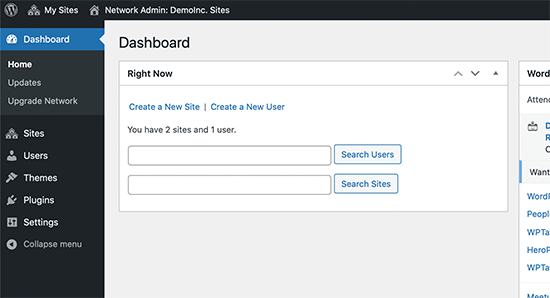
Network admin dashboard

Related: See our pick of the best WordPress multisite plugins.

To work on individual sites, you need to visit Sites » All Sites page and click on the Dashboard link below the site you want to work on.
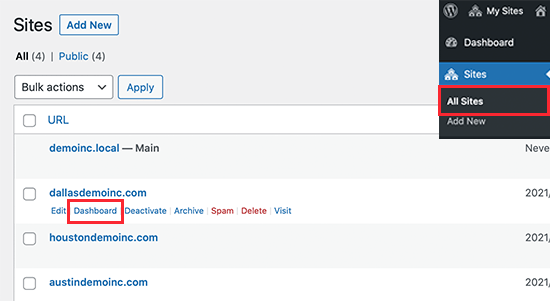
Manage sites

This will take you to that particular site’s admin area, and you may be required to login again. From here, you can create pages, write blog posts, and manage that individual site.
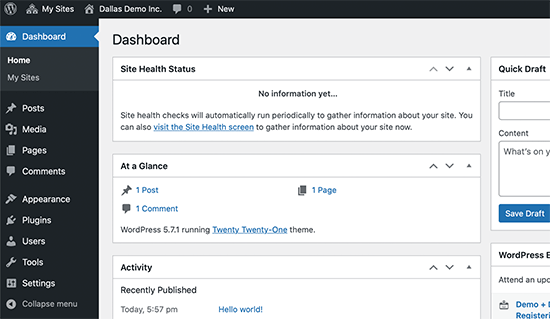
Individual site dashboard

We hope this article helped you learn how to create a WordPress multisite with different domains. You may also want to see our WordPress security guide to keep your WordPress multisite secure, and our pick of the best WordPress page builder plugins to customize your website design.

If you liked this article, then please subscribe to our YouTube Channel for WordPress video tutorials. You can also find us on Twitter and Facebook.

The post How to Create a WordPress Multisite with Different Domains (4 Steps) appeared first on WPBeginner.


April 27, 2021 at 05:00PM

Monday, April 26, 2021

How to Properly Setup Video SEO in WordPress (Step by Step)

Do you want to learn how to do video SEO in WordPress?

Video SEO is the process of optimizing your videos to rank higher in search engines. This can help you get more traffic from your video content back to your WordPress website.

In this article, we’ll show you how you can set up a video sitemap in WordPress to improve your video SEO, step by step.

How to do video SEO in WordPress

What is Video SEO?

Video SEO is the process of optimizing the videos on your site, so they’ll rank higher in the search results pages.

This is similar to general WordPress SEO best practices except it’s geared towards your video content.

There’s a lot you can do to optimize your videos before you embed them in your WordPress blog posts, like choosing the best video hosting.

However, once they’re live on your website, you need to make sure they’re going to bring you maximum traffic.

The best way to do this is by adding a video sitemap to WordPress.

A video sitemap is an XML sitemap that has information about the video content on your site.

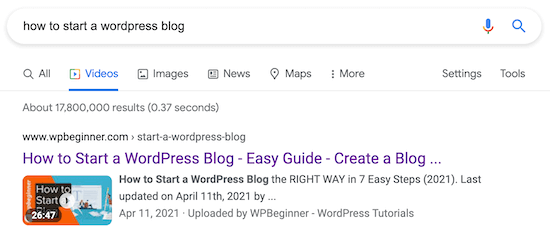
This can help you generate rich snippets that appear in the Google video search results, and increase your blog traffic across the board.

WordPress video SEO search results page

By creating a video sitemap, Google and other search engines will index your posts with the embedded video content. That way, your video can rank in the search engines and bring more traffic to your posts.

Note: if you use a third-party video host like YouTube, then your YouTube videos and embedded videos can both rank in the search results together.

If you regularly add videos in your posts and pages, then this is a must have feature.

A WordPress video sitemap plugin will automatically detect when a video is embedded in your blog content, and add that to the sitemap, so search engines like Google can prioritize it.

How to Setup Video SEO Sitemap in WordPress with AIOSEO

The best way to add video sitemaps to WordPress is with the All in One SEO plugin. It’s the best SEO plugin for WordPress used by over 2 million sites.

Google makes formatting these video sitemaps hard, but with the AIOSEO plugin it only takes a couple of clicks.

First thing you need to do is install and activate the plugin. For more details, see our guide on how to install a plugin in WordPress.

Note, there is a free version of All in One SEO available. But you need the premium version to enable and create video sitemaps.

After the plugin is activated, you’ll have a new All in One SEO menu item in your WordPress dashboard.

Navigate to All in One SEO » Sitemaps.

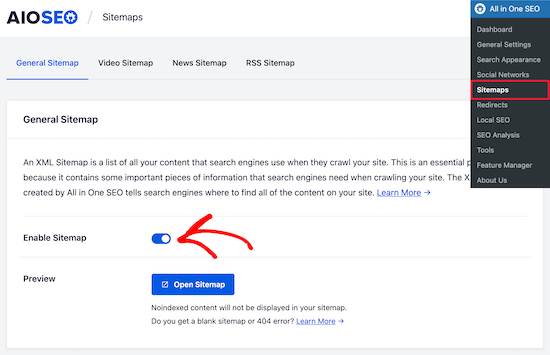
On the home screen, make sure that sitemaps are enabled. Click the ‘Enable Sitemap’ slider to turn on sitemaps.

AIOSEO enable sitemap

After that, select the ‘Video Sitemap’ menu option at the top of the screen.

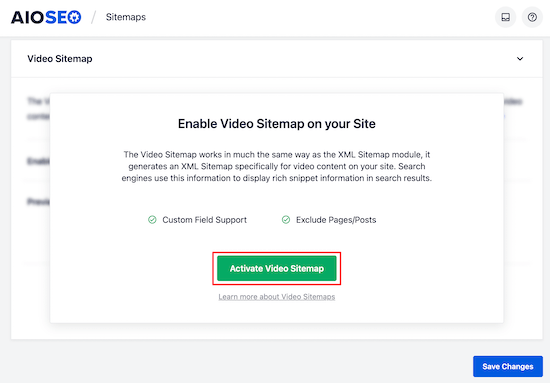
Next, click the ‘Activate Video Sitemap’ button to enable the video sitemap module.

Activate video sitemap module

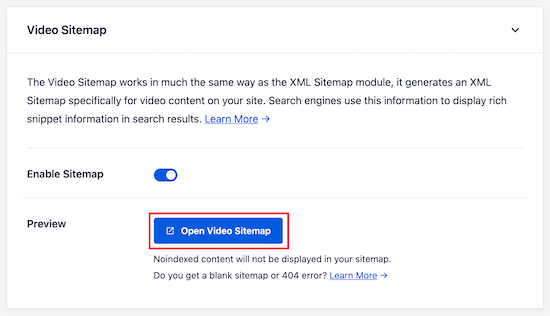
Once you’ve done that, you can view your video sitemap by clicking the ‘Open Video Sitemap’ button.

The index page will list all of your available video sitemaps.

Open video sitemap

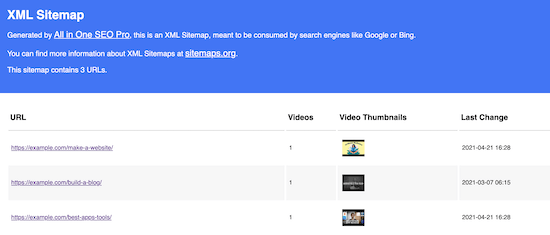
When you click on the sitemap link, it’ll show the list of available video content.

Here we can our example WordPress video sitemap contains a list of all blog posts that have an embedded video.

Video sitemap video list

You can further configure your video sitemap settings in the ‘Video Sitemap Settings’ box.

The default settings will be enough for most WordPress blogs, however, you can adjust these depending on your video content needs.

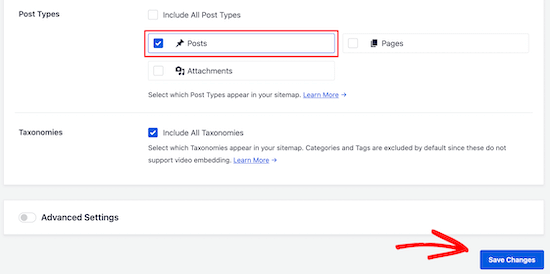
The most common change webmasters make is adjusting the ‘Post Types’ and ‘Taxonomies’ settings.

For example, if you only want the embedded videos from your blog posts to appear in your sitemap, then uncheck the ‘Pages’ and ‘Attachments’ boxes in the ‘Post Types’ box.

Customize video sitemap post types

Make sure you click ‘Save Changes’ if you’ve made any changes to the settings here.

You’ve now successfully added video sitemaps to WordPress, which will improve your video SEO and help you get more traffic from the search engines.

You may also want to see our comparison of the best email marketing services and our expert picks of the 24 must have WordPress plugins for business websites.

If you liked this article, then please subscribe to our YouTube Channel for WordPress video tutorials. You can also find us on Twitter and Facebook.

The post How to Properly Setup Video SEO in WordPress (Step by Step) appeared first on WPBeginner.


April 26, 2021 at 05:00PM

Saturday, April 24, 2021

How to Fix Error Too Many Redirects Issue in WordPress

Are you trying to fix the ‘Error Too Many Redirects’ issue on your WordPress website?

It is a common WordPress error that may be caused by a plugin or incorrect settings. However, it leaves users locked out of their WordPress websites which makes it particularly troublesome.

In this article, we’ll show you how to easily fix the ‘Error too many redirects’ issue in WordPress. We will also cover how to regain access to your website and troubleshoot the error.

Fixing too many redirects error in WordPress

What Causes The Error Too Many Redirects Issue in WordPress?

The ‘Error too many redirects’ is caused by a misconfigured redirection issue in WordPress.

As you know that WordPress uses an SEO-friendly URL structure feature that uses the redirect function.

Similarly, many popular WordPress plugins use this feature to set up temporary redirects, permanent 301 redirects, and for fixing the 404 errors.

If you are using a plugin to fix the SSL insecure content issue or a WordPress caching plugin, then they may also affect redirects and cause this error.

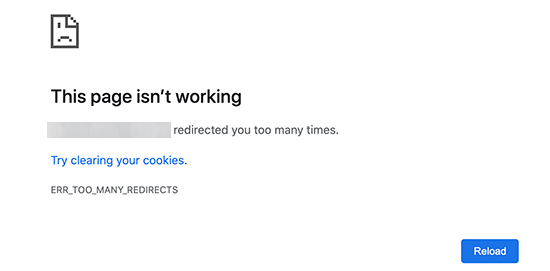
Error Too Many Redirects in Google Chrome

However, this error doesn’t tell you what’s causing the conflict and forcing the redirect loop in WordPress.

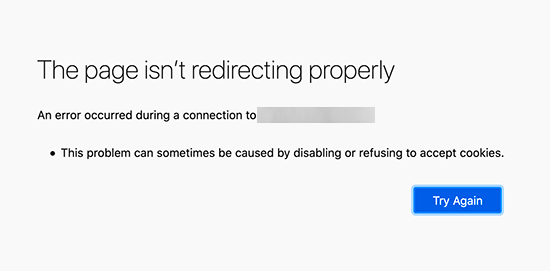
This is how the error looks in Firefox with the message ‘The page isn’t redirecting properly’.

Too many redirects error in Firefox

That being said, let’s take a look at how to fix the error too many redirects issue in WordPress.

We will walk you through step-by-step troubleshooting, getting access to your WordPress site, and fixing the error from reoccurring.

1. Clear Browser Cookies and Cache

A common cause of the error could be your web browser cookies. Try accessing your website using a different web browser like Firefox, Safari, Opera, Microsoft Edge, etc.

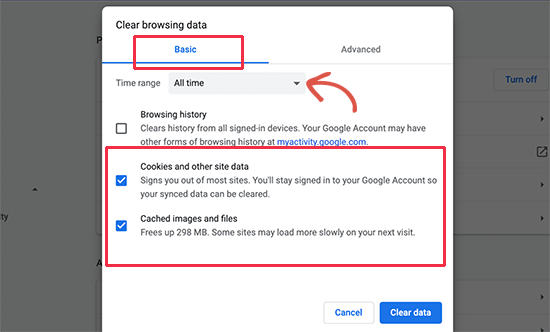
If you are able to access your website normally using a different browser, then you need to clear browser cookies and cache on your regular browser.

Clear cookies and cache in Google chrome

We have a detailed guide on how to clear browser cache in all major browsers that will help you do that.

On the other hand, if changing the browser doesn’t fix the issue then you can move on to the next step.

2. Deactivate All WordPress Plugins

The most common cause of the WordPress redirect loops or ‘Too many redirects’ issue is a plugin conflict. A plugin trying to set up a redirect in a way that conflicts with default WordPress redirects would end up causing this error.

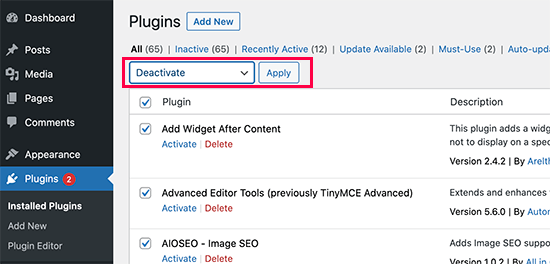
To fix this, you need to deactivate all WordPress plugins on your website. Now, normally you can just go to Plugins » All Plugins page inside the WordPress admin area and deactivate plugins from there.

Deactivate all plugins

However, we are assuming that due to the redirect error you may not be able to access the WordPress admin area.

In that case, you will need to deactivate WordPress plugins using an FTP client, or the File Manager app in your WordPress hosting control panel.

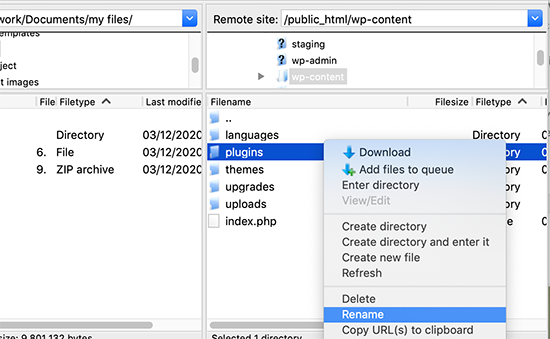
Simply connect to your website using an FTP client and go to the /wp-content/ folder.

Renaming the plugins folder using FTP

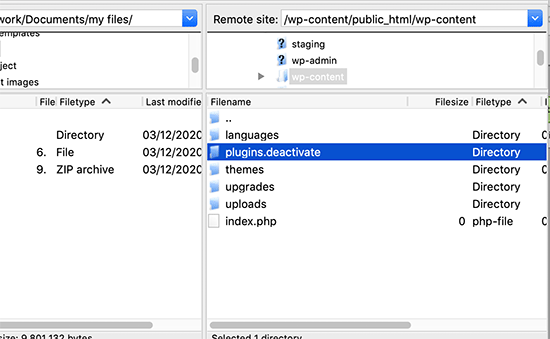
There you’ll find the plugins folder, which you need to rename to ‘plugins.deactivate’ which will deactivate WordPress plugins.

Renamed plugins folder

Basically, WordPress looks for a folder called plugins to load the plugin files. When it does not find the folder, it automatically disables the active plugins in the database.

Now you can try visiting your WordPress website. If you are able to login to your WordPress admin area now, then this means one of the plugins was causing the error.

To figure out which plugin was the culprit, you need to switch back to the FTP client or File Manager app and rename your plugins.deactivate folder back to ‘plugins’.

After that, switch to the WordPress admin area of your website and go to the Plugins » All Plugins page. From here, you can activate your plugins one by one, and then visit your website to see if you can reproduce the error.

Once you find the plugin that is causing the error, you can find an alternative to that plugin or report the issue to the plugin’s support forum.

3. Fix WordPress URLs

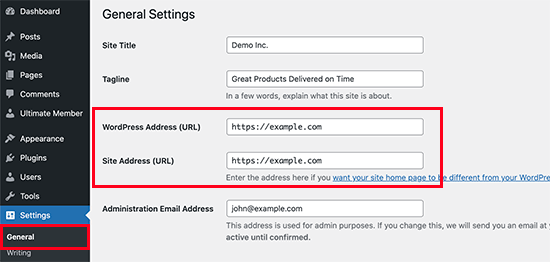
Another major cause of this error is a misconfiguration in WordPress URL settings. Normally, you can view these options under Settings » General page.

WordPress URL settings

For most websites, the URLs in the WordPress Address and Site Address field have to be the same. However, some users may end up using www in one URL and non-www URL in the other.

Since you may not have access to the WordPress admin area, you may need to fix the WordPress URLs using an FTP client or the File Manager app.

Simply connect to your WordPress site using an FTP client and go to /wp-content/themes/your-theme-folder/.

Edit functions.php file

From here you need to locate the functions.php file and edit it using a plain text editor like Notepad or TextEdit.

Next, you need to add the following code at the bottom:

update_option( 'siteurl', 'https://example.com' );
update_option( 'home', 'https://example.com' );

Don’t forget to replace https://example.com with your own site URLs. You can now save your changes and upload the file back to your website.

After that, you can try visiting your website to see if this resolves the error.

For more methods, see our tutorial on how to easily change WordPress URLs.

4. Reset WordPress .htaccess File

The .htaccess file is a special file that is used by website server to manage redirects and other server settings. WordPress also uses this file for SEO friendly URLs and other redirects.

Sometimes WordPress plugins may make changes to your website’s .htaccess file which may trigger this error. It is also possible that dectivating a plugin will not remove those changes form your .htaccess file.

In that case, you’ll need to manually reset your WordPress .htaccess file.

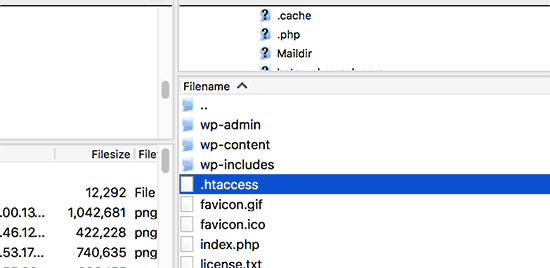
Again, you will need to access your website using an FTP client or the File Manager app in your hosting dashboard. Once connected, you’ll see the .htaccess file in the root folder of your website.

Editing .htaccess file via FTP

Note: If you cannot find your .htaccess file, then see our guide on how to find .htaccess file in WordPress.

First, you need to download a copy of your .htaccess file to your computer as a backup.

After that, you can go ahead and delete the file from your website. You can now try visiting your WordPress blog, and if everything works normal, then this means your .htaccess file was causing the redirect error.

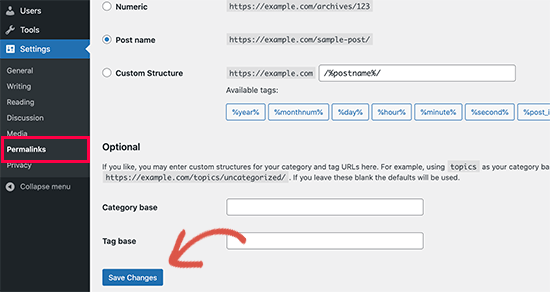
Now, since we deleted the .htaccess file you need to recreate it. Normally, your WordPress website can do it on its own but to make sure you can go to Settings » Permalinks page and click on the ‘Save changes’ button at the bottom.

Refresh permalinks to create .htaccess file

5. Preventing Error Too Many Redirects in WordPress

Hopefully, the above mentioned steps would have fixed the redirect issue on your website. If they did not fix the issue, then you may need to talk to your WordPress hosting company to make sure that it is not due to a server issue.

Once they fix the issue on your site, you should also figure out what caused the issue.

If it was a plugin, then you need to report the issue to plugin’s support forum. See our guide on how to ask for WordPress support. However, if you are unable to get help then you can always find an alternative plugin that does the same thing.

If the error was caused by a WordPress site misconfiguration, then you can make a note of it and ensure that your site settings are properly set up.

For more tips, see our detailed tutorial on how to troubleshoot WordPress issues on your own like a total WordPress pro.

We hope this article helped you resolve the error too many redirects issue on your website. You may also want to bookmark our ultimate handbook of common WordPress errors and how to fix them.

If you liked this article, then please subscribe to our YouTube Channel for WordPress video tutorials. You can also find us on Twitter and Facebook.

The post How to Fix Error Too Many Redirects Issue in WordPress appeared first on WPBeginner.


April 24, 2021 at 03:00PM