Tuesday, May 18, 2021

How to Split WordPress Posts into Multiple Pages (Post Pagination)

Are you looking for a way to split long WordPress posts into different pages?

Splitting lengthy content into several pages makes it easier for your visitors to read articles and navigate different sections.

In this article, we will show you how to split WordPress posts into multiple pages, step by step.

How to Split WordPress Posts

Why Split WordPress Posts into Multiple Pages?

If you have blog posts or guides that are lengthy, then setting up post pagination can improve the readability of your content.

It helps to break down the article into different sections and split them into multiple pages. This way, visitors can easily digest your content and read any section they are interested in.

Another benefit of splitting WordPress posts is that it can help increase pageviews and boost ad revenues.

That being said, let’s take a look at how to split WordPress posts into multiple pages. We will cover how to break your WordPress posts into multiple pages without a plugin and using a WordPress plugin.

Method 1. Split WordPress Posts without a Plugin

The easiest way of setting up post pagination is by using the ‘Page Break’ block in your WordPress content editor. You don’t need a WordPress plugin to break up your articles into multiple pages.

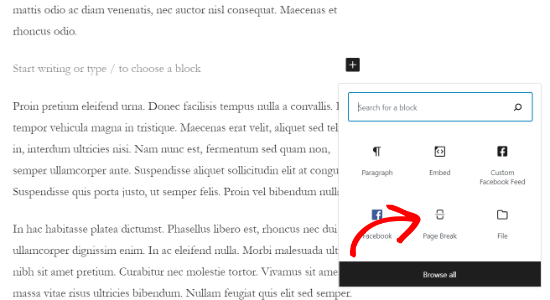
First, edit or add a new post on your WordPress website. After that, click the plus (+) button where you want to split your content and add a ‘Page Break’ block.

Add a page break block

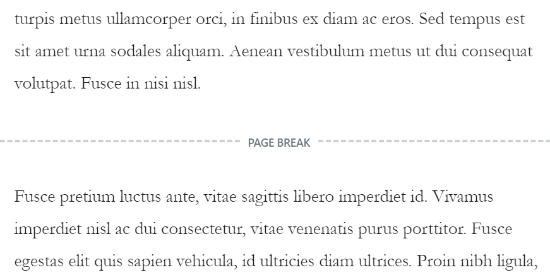
You should now see a page break line in your content to indicate where the pagination will appear.

See page break in your content

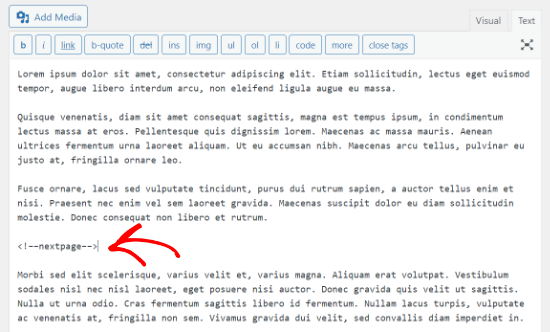
If you are using the classic editor, then use the <!––nextpage––> tag to split your content.

Just edit any blog post and go to the ‘Text’ view to enter the tag where you would like to split the content.

Insert next page tag in the classic editor

You can also use the Alt + Shift + P keys on your keyboard to insert page breaks. To do that, go to the ‘Visual’ view and press the keyboard shortcut keys where you would want to add a page break.

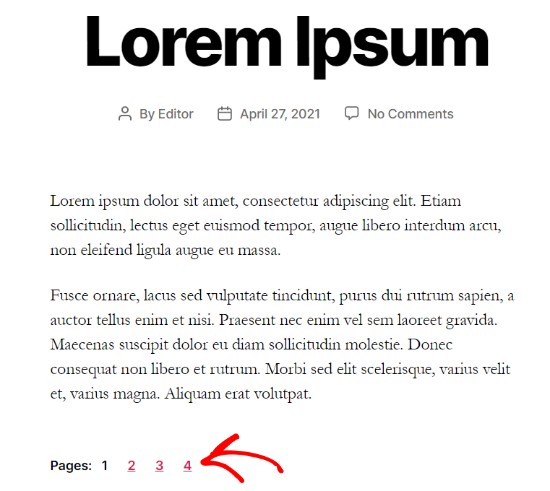
After that, you can preview and publish the blog post. You will now see post pagination at the bottom of the content.

Post pagination example

Method 2. Split WordPress Post into Multiple Pages Using a Plugin

Another way to break lengthy content into various pages is by using a WordPress plugin. The benefit of this method is that it will automatically paginate posts when it meets certain criteria.

For this method, we will use the free Automatically Paginate Posts plugin, as it’s easy to use and works with any WordPress theme.

First, install and activate the Automatically Paginate Posts plugin on your WordPress website. For more details, go through our tutorial on how to install a WordPress plugin.

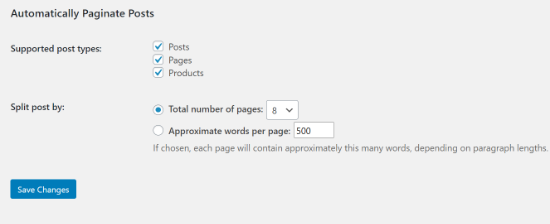
Once the plugin is active on your site, go to Settings » Reading and scroll down to the ‘Automatically Paginate Posts’ section.

You can select the post types to split into different pages. After that, choose whether to split posts by the total number of pages or approximate words per page.

Automatically Paginate Posts section

Next, click the ‘Save Change’ button to store your settings.

The plugin will automatically split your content based on your settings. However, you can also add page breaks manually to your content while using the plugin.

We hope this article helped you learn how to split WordPress posts into multiple pages. You may also want to see our guide on the best WordPress page builders to create custom layouts, and our tutorial on how to add web push notifications in WordPress to grow your website traffic.

If you liked this article, then please subscribe to our YouTube Channel for WordPress video tutorials. You can also find us on Twitter and Facebook.

The post How to Split WordPress Posts into Multiple Pages (Post Pagination) appeared first on WPBeginner.


May 18, 2021 at 03:05PM

Monday, May 17, 2021

How to Increase Ad Impressions in WordPress with Ad Refresh (2 Ways)

Do you want to increase ad impressions in WordPress with ad refresh?

Ad refresh lets you rotate ads in the same location as visitors browse your website. This simple change can increase your total ad impressions and overall ad revenue.

In this article, we’ll show you how to increase your ad impressions in WordPress by using ad refresh in your ad spots.
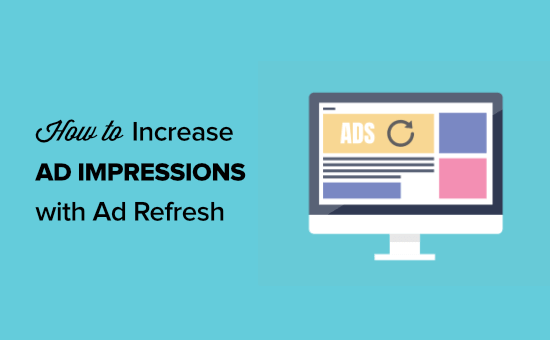
How to increase ad impressions in WordPress with ad refresh (2 ways)

Why Use Ad Refresh to Increase Ad Impressions in WordPress?

Ad refresh lets you display multiple ads in the same location, which can get your ads more impressions and clicks. This also lets you show new ads to your visitors without reloading the page.

Traditional display advertising will show a single ad in a single location. If you’ve found that one spot has better ad performance, then you can earn more revenue by showing multiple ads in that location.

Ad refresh can be a useful part of your advertising strategy beyond increasing ad impressions.

  • You can test different ads in the same location to see which performs better
  • You can reduce ad blindness by showing new unique advertisements

However, there are a few important things to mention before adding the ad refresh feature to your WordPress website.

  • When you enable ad refresh, the total number of visible ads on your site may be limited by ad networks
  • Counting impressions for rotating ads can potentially slow down your website speeds
  • This type of ad can go against Google AdSense guidelines, so you need to be careful or use other advertising networks

That being said, we’re going to share two different WordPress ad plugins that can help you add the ad refresh feature to WordPress. Simply use the quick links below to choose the WordPress plugin you want to use.

Method 1: Increase Ad Impressions with Ad Refresh Using Advanced Ads

We recommend using the Advanced Ads plugin to add ad refresh to WordPress. It’s very easy to use and lets you simply set up ad refresh for specific ad locations.

Note: there is a free version of the plugin available, but we’re going to use the premium version since it has the ad refresh features we need.

First thing you need to do is install and activate the Advanced Ads plugin. For more details, see our step by step guide on how to install a WordPress plugin.

Upon activation, you’ll have a new menu item called ‘Advanced Ads’ in your WordPress admin menu.

You need to enter the license key for the pro version of the plugin. To do this, navigate to Advanced Ads » Settings and then click the ‘Licenses’ menu option.

Once you’ve done that, enter your license key into the ‘Pro’ box and click ‘Update License’.
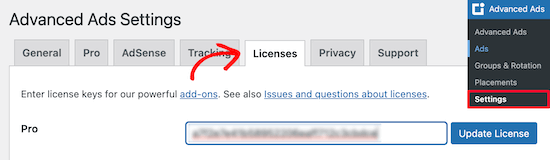
Enter advanced ads license key

Next, click the ‘Pro’ menu option. On this screen, you need to enable the ‘Cache Busting’ option. This will turn on the refresh rate for your ad groups.

All you have to do is click the ‘Activate module’ checkbox next to ‘Cache Busting’. You also need to check the ‘Force passive cache-busting’ checkbox as well.

Once you’ve made these changes make sure you save your settings.
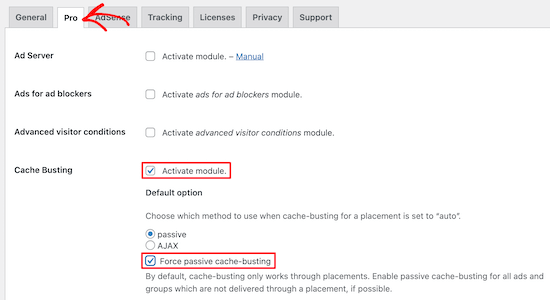
Activate cache busting in Advanced Ads plugin

Following that, you need to create an ad group that will rotate your ads.

Navigate to Advanced Ads » Groups & Rotation and then click the ‘Add New Ad Group’ button, give your ad group a name, and click save.
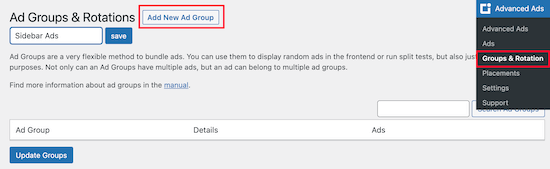
Create new ad group

Then, you need to add individual ads to your ad group. First, navigate to Advanced Ads » Ads and click ‘New Ad’.

Next, add your title and select ‘Plain Text and Code’, then click ‘Next’.
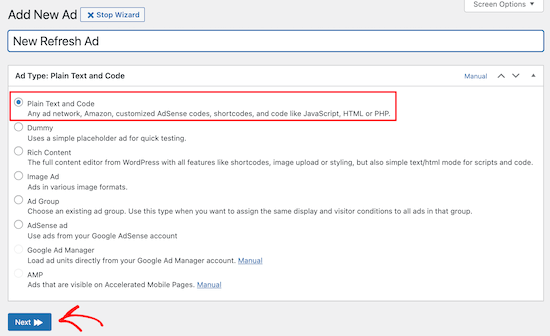
Select plain text and code

Once you’ve done that, you can add your ad code. This can be from a third party advertising network like Mediavine or Ezoic, or code from the ads you sell on your WordPress blog.

Then, click ‘Next’.
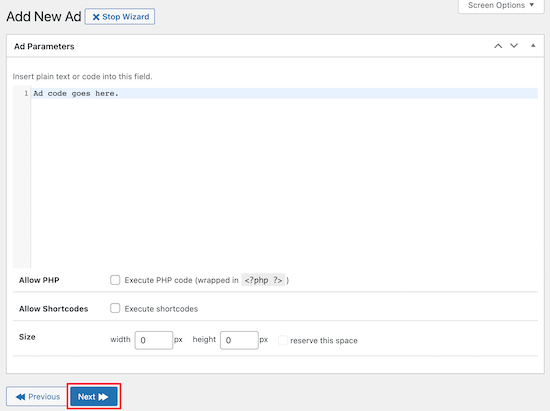
Add your ad code

On the next screen, you can choose to hide the ad from some users and pages. However, we’ll leave the default settings since we want our ads to display to all visitors. After that, click ’Next’.

Now, you have the option to choose where to display your ad. We won’t select a placement option here, because we’re going to use the included ad widget.

You can review your ad parameters and display settings on this page as well.

Next, you need to add this ad to the ad group you created earlier. Locate the ‘Ad Groups & Rotations’ meta box and click the checkbox for the ad category.

Then click ‘Update’ to save your changes.
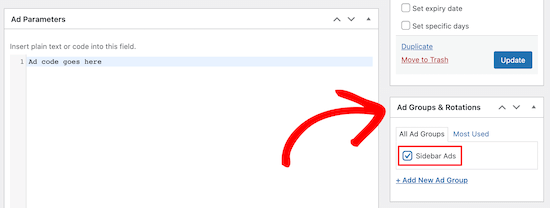
Select ad group category

You need to repeat the process above for every ad you want to add to your ad group. These ads will rotate for your WordPress blog visitors.

Now you’re ready to change the display settings for how your ads will refresh. Navigate back to Advanced Ads » Ad Groups & Rotations and click on the name of the ad group you created earlier.

This will bring up a drop-down menu where you can customize how the ad group will display.

Ad refresh ad group settings

You can display random ads, ordered ads, an ad grid, or an ad slider. We will select the ‘Ad Slider’ option since this will slide through our ads simply.

Next, you need to set the amount of time each ad will pause before sliding to the next ad.

After that, choose the ads that you want to add to your ad group. Once you’re finished, make sure you click ‘Update Groups’ to save your changes.
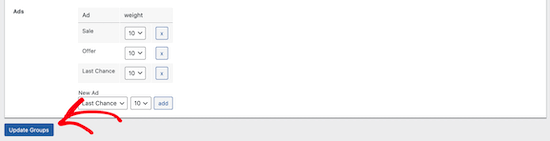
Save ad refresh ad group settings

Add Refresh Ad Groups to WordPress

To add your rotating ads to your sidebar, or other widget area, navigate to Appearance » Widgets.

Then locate the ‘Advanced Ads’ widget.
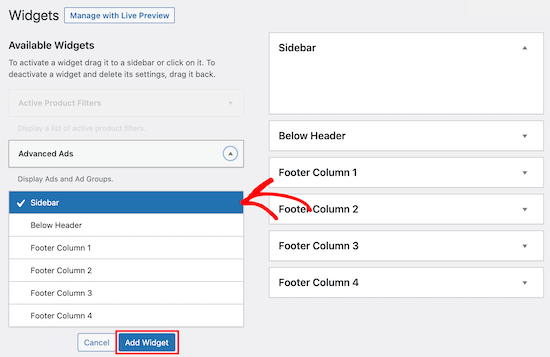
Select advanced ad widget

Choose the widget area where you want the ad group to display and then click ‘Add Widget’.

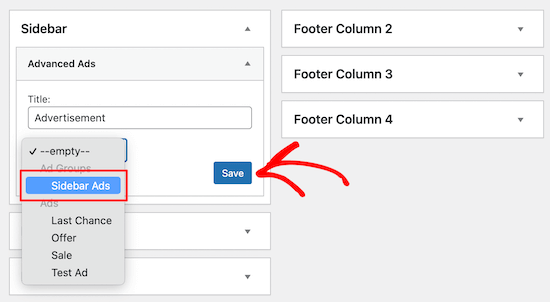
After that, give your widget a name, select your ad group from the drop-down list, then click ‘Save’.
Choose refresh ads group

The rotating ad unit is now live on your website.

Your visitors will see the ad unit refresh based on the time limit you set earlier.

Ad rotation example

You can also use the following shortcode to add your rotating ad group to WordPress. Simply copy and paste the shortcode into any page or post where you want the ads to appear.

[the_ad_group id="4"]

For more details, see our beginner’s guide on how to add a shortcode in WordPress.

You need to change the ‘id’ in the shortcode to your ad group.

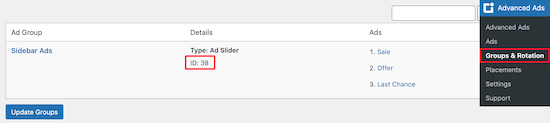
You can find your ad group ID by going to Advanced Ads » Ad Groups & Rotations and your ID will be listed under the ‘Details’ column.
Find ad group ID

Method 2: Increase Ad Impressions with Ad Refresh Using Ad Refresh Control

This method involves using the free Ad Refresh Control plugin. This plugin simply adds the ad refresh feature to your existing ad slots.

Keep in mind, this plugin is not an ad management plugin. You need to use a separate plugin to add your ads to WordPress.

You can use the Advanced Ads plugin highlighted above or another ad management plugin. For help finding the right plugin, see our list of the best ad management plugins and solutions for WordPress.

Once you add your ad units to WordPress, you can add the ad refresh feature to your ad units.

First thing you need to do is install and activate the plugin. For more details, see our step by step guide on how to install a WordPress plugin.

Upon activation, navigate to Settings » Ad Refresh Control.

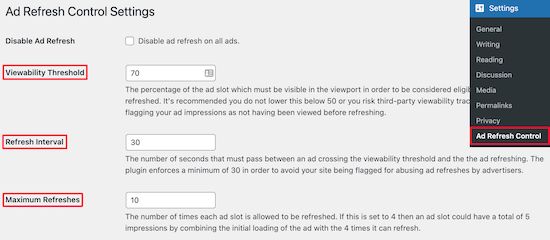
On this screen, you will set your ad refresh settings. These settings are global and will apply to all of the ad units on your website.

The most important plugin settings are ‘Viewability Threshold’, ‘Refresh Interval’, and ‘Maximum Refreshes’.
Ad Refresh Control plugin settings

The ‘Visibility Threshold’ refers to how much of the ad needs to be viewable to be considered an impression.

The ‘Refresh Interval’ is how long an ad will be displayed before refreshing.

The ‘Maximum Refreshes’ will set the number of times an ad slot can be refreshed.

You can change these numbers, however, we will leave the default settings since they comply with most existing ad network guidelines.
Save Ad Refresh Control settings

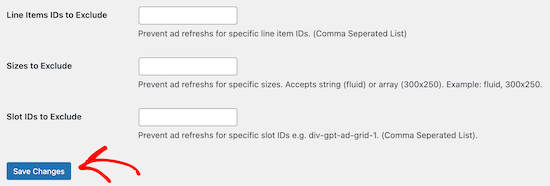
The final plugin settings can be left empty. However, if you want to exclude specific ad units or ad sizes, then you can add the add unit sizes or ad unit IDs.

Once you’re finished making changes, click the ‘Save Changes’ button.

Your ad units will now automatically refresh for your visitors based on the settings above.

Bonus: Set Up Tracking to See How Your Refresh Ads Are Performing

After you set up ad refresh in WordPress, you’ll want to monitor how your ads are performing. This will tell you which ad units are converting the best and if your ad refresh units are getting more impressions.

The best way to do this is by using Google Analytics. However, it can be difficult to set up analytics properly.

We recommend using MonsterInsights, it’s the best analytics solution for WordPress used by over 3 million websites.

It lets you simply set up conversion tracking in WordPress, so you can create unique ad tracking codes and see how your ads are performing across your WordPress blog.
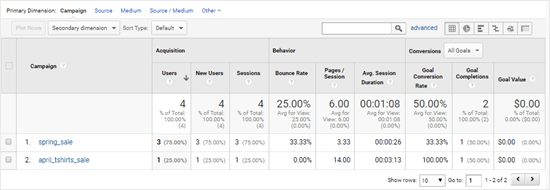
Google Analytics ad tracking data

For more details, see our step by step guide on how to set up conversion tracking in WordPress.

We hoped this article helped you learn how to increase ad impressions in WordPress with ad refresh. You may also want to see our list of the best email marketing services for WordPress, and our expert picks of the must have WordPress plugins for business websites.

If you liked this article, then please subscribe to our YouTube Channel for WordPress video tutorials. You can also find us on Twitter and Facebook.

The post How to Increase Ad Impressions in WordPress with Ad Refresh (2 Ways) appeared first on WPBeginner.


May 17, 2021 at 03:34PM
Friday, May 14, 2021

9 Best Quiz Plugins for WordPress (2021)

Are you looking for the best quiz plugins for your WordPress website?

Many popular websites like BuzzFeed use quizzes to create viral content and boost user engagement on their websites.

In this article, we have hand-picked the best quiz plugins for WordPress that will help you engage your users and increase time spent on your site.

Best quiz plugins for WordPress

1. Formidable Forms

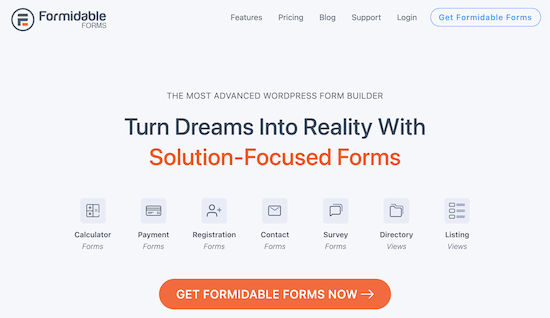
Formidable Pro

Formidable Forms is the most advanced WordPress form builder plugin in the market. It comes with a simple but very powerful drag and drop form builder that helps you create forms that go beyond simple contact forms.

It’s equipped with powerful form templates, or you can start with a blank form and build your quiz from scratch.

You can create quizzes that are scored automatically or create your own grading scale. Once a user submits a quiz, there’s the option to email the score or display it in a success message.

Plus, there are multiple ways to format the quiz score, including the total answer count, letter grade, percentage of correct answers, and more.

Note: you’ll need to get at least the ‘Business’ plan, which includes the useful Quiz Maker addon.

For more details, see our guide on how to easily create a quiz in WordPress.

2. LearnDash

LearnDash

LearnDash is one of the best WordPress LMS plugins in the market. It comes with a powerful quiz feature which allows you to create any type of quiz that you need.

It has multiple question types including: single choice, multiple choice, free text, sorting, matching, essay, fill-in-the-blank, and survey.

Some of the other features include: timed quizzes, randomized questions, question bank, multi-page quizzes, limit attempts, and more. You can even add media into any of the question and answer choices.

Post quiz options include redirects, messages, quiz result displays in multiple styles, leaderboard, certificates, and levels.

Whether you are selling online courses or creating viral content, LearnDash is one of the most flexible WordPress quiz plugins for all types of quizzes.

3. Interact Quiz Maker

Interact Quiz Maker

Interact Quiz Maker is a powerful web-based app to generate viral quizzes and use them to generate leads, build social media following, generate traffic, and improve conversions.

It allows you to create highly interactive quizzes with a nifty drag and drop quiz builder.

You can choose different styles, colors, designs, and more than 800 ready-to-use quiz templates.

It supports quiz branching which allows you to show questions based on user’s answers to previous questions. You can use their scoring system to easily show results at the end.

It can be easily added to your site using a simple shortcode and integrates beautifully with your email marketing and CRM software.

4. WP Quiz

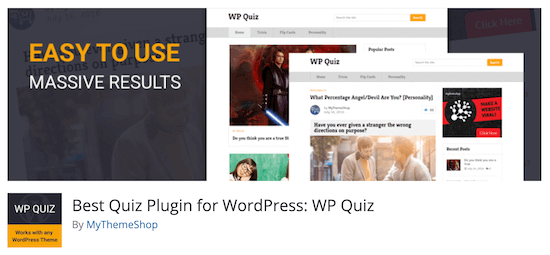
WP Quiz

WP Quiz is a flexible and easy to use quiz plugin for WordPress. It comes with 3 quiz types: trivia, personality, and flip cards.

You can add images to your questions and answers, allow users to restart quiz, show results at the end, and more.

WP Quiz comes with two styling options: multi-page or single page quiz. You have the ability to auto-scroll and add social sharing buttons.

The pro version of the plugin allows you to force users to perform an action to view results, randomize questions and answers, countdown timer, and display ads.

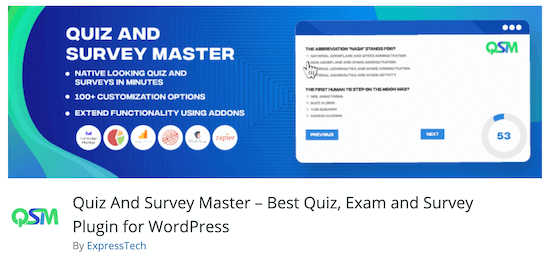
5. Quiz And Survey Master

Quiz and Survey Master

Quiz and Survey Master is a flexible quiz and WordPress survey plugin. This powerful two-in-one plugin may look a bit rough around the edges, but it makes up for it with excellent features and extensive documentation.

It supports multiple types of questions including multiple choice, true and false, fill the blanks and more.

It also allows you to create multiple result pages, so you can customize them based on user score. It comes with email support, certificates, leaderboards, hints, comment boxes, and more.

The pro version of the plugin comes with all kinds of addons that give you reporting and analysis, email marketing integration, funnel optimization, and more.

6. Quiz Cat

Quiz Cat

Quiz Cat is a free WordPress quiz plugin with an easy to use interface and great options to create viral quizzes for your website.

It allows you to add images to each question and answer. You can also create a start and finish screen for your quiz.

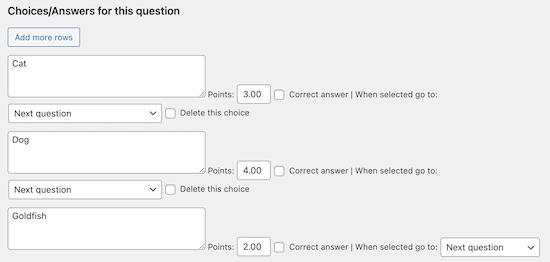
Each answer can be given a rating and assigned an amount of points. If you’re creating a right and wrong quiz for visitors, then this can be useful.

7. HD Quiz

HD Quiz

HD Quiz is another awesome free quiz plugin for your WordPress blog. It has a responsive design and allows you to create unlimited quizzes with as many questions and answers as you need.

You can also use GIF images with your questions and answers to make them more interactive and fun.

Other notable features include quiz timer, question tooltips for hints, social sharing, use images as answers, scoring, and more.

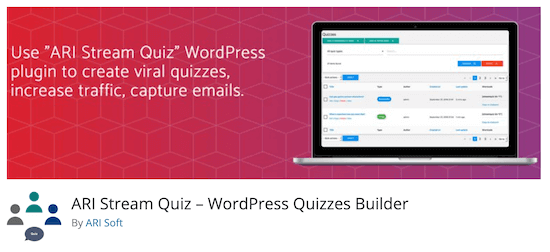
8. ARI Stream Quiz

ARI Stream Quiz

ARI Stream Quiz allows you to use quizzes for lead generation by collecting user email address and name.

It supports integration with MailChimp and other email marketing service providers. Apart from lead generation, the actual quiz builder features an easy to use interface to build your quizzes.

It uses AJAX for faster performance, has multiple themes, social media integration, Open Graph support, and more.

9. Chained Quiz

Chained Quiz

Chained Quiz is a WordPress quiz plugin with the conditional logic feature where the next question in the quiz depends on user’s answer to the previous question.

This allows you to create highly interactive personality quizzes that change dynamically.

It supports multiple choice, single choice, and essay answers. You can assign scoring to each correct answer and decide what to do when the user selects an answer.

Which is the Best WordPress Quiz Plugin?

After reviewing each of these plugins, we believe that Formidable Forms, LearnDash, and TryInteract are the most comprehensive quiz building solutions in the market.

If you’re looking for a solution to add quizzes to WordPress and advanced form building features, then we highly recommend you go with Formidable Forms.

If you want a simple way to create interactive quizzes on a course website, then LearnDash is a great option.

If you’re looking to create viral Buzzfeed style quizzes, then TryInteract is a great option for that because it comes with many ready-to-use templates.

We hope this article helped you find the best quiz plugin for WordPress. You may also want to see our list of the must have WordPress plugins for businesses and our expert picks of the best webinar software including free options.

If you liked this article, then please subscribe to our YouTube Channel for WordPress video tutorials. You can also find us on Twitter and Facebook.

The post 9 Best Quiz Plugins for WordPress (2021) appeared first on WPBeginner.


May 14, 2021 at 04:06PM