Wednesday, June 23, 2021

How to “Easily” Create Custom WooCommerce Thank You Pages

Do you want to easily create a custom WooCommerce thank you page?

A custom thank you page for order confirmation is a great way to connect with your new customers and even get additional sales.

In this article, we’ll show you how to create a custom WooCommerce thank you page, step by step.

How to easily create custom WooCommerce thank you pages

Why Customize a WooCommerce Thank You Page in WordPress?

Creating a custom WooCommerce thank you page gives you a way to connect with your customers when they make a purchase.

The order confirmation or thank you page may seem like a small part of your online store, but it can actually be a very valuable part of your sales process.

The problem is that default WooCommerce thank you page isn’t really optimized for conversions.

This is why smart business owners build a well-designed and high-converting thank you page to replace the default option.

Thank you page example

There are a lot of ways you can use WooCommerce thank you pages:

  • Recommend upsell products and make more sales
  • Offer coupon codes for repeat purchases
  • Highlight your best selling products
  • Direct customers to your most useful content

With that said, let’s show you how to easily create a custom WooCommerce thank you page, step by step.

How to Easily Create Custom WooCommerce Thank You Pages

SeedProd is the best drag and drop WordPress page builder used by over 1 million websites. It lets you easily create a custom WooCommerce thank you page to boost sales and grow your customer relationships.

The first thing you need to do is install and activate the plugin. For more details, see our step by step guide on how to install a WordPress plugin.

Note: there is a free version of SeedProd available, but we’re going to use the Pro version since it includes the WooCommerce blocks we need.

Once the plugin is activated, you need to go to SeedProd » Settings and enter your license key.
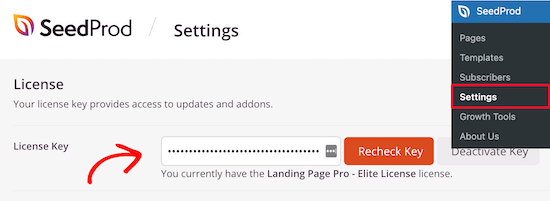
Enter SeedProd license key

If you don’t have this ready, then you can find your key in the account section of the SeedProd website.

After that, navigate to SeedProd » Pages and click the ‘Add New Landing Page’ button to create your new thank you page.
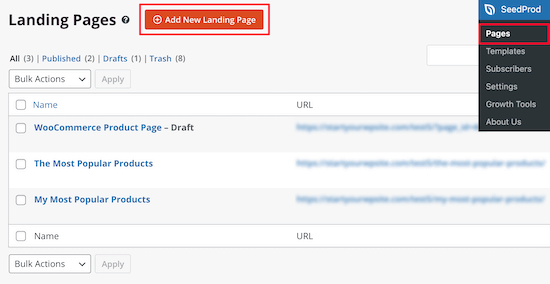
Add new SeedProd landing page

On this page, you’ll need to choose a template. You’ll find dozens of professionally designed thank you page templates to choose from.

Simply select the’ Thank You’ page filter and find the ‘Order Completed Thank You Page’ template.
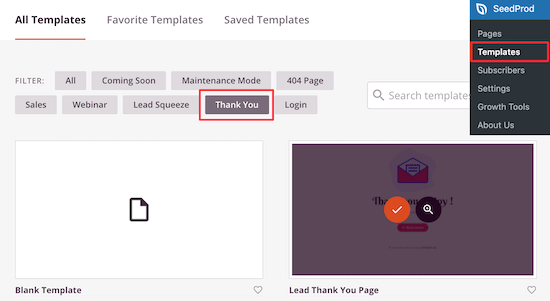
Select thank you page filter

Then, hover over it and click the ‘Checkmark’ icon.

After that, you need to name your new thank you page and then click ‘Save and Start Editing the Page’. The name you give the page will also be the URL.
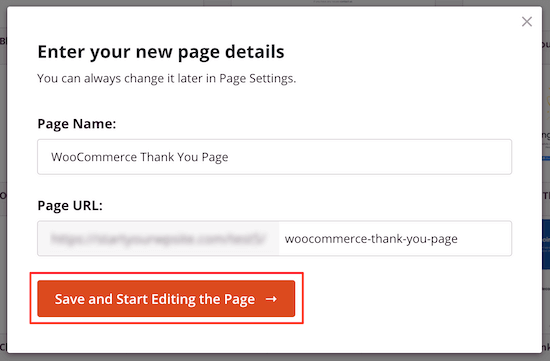
Name thank you page

Now, it’s time to start editing your thank you page with the drag and drop builder.

You’ll see a live preview of your page on the right. To edit the page element, simply click on the item, and an editing menu will appear on the left.

The left hand options panel has elements you can drag and drop onto your order confirmation page.
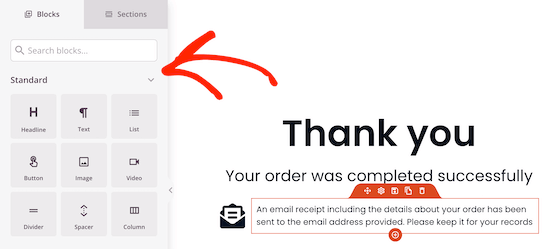
Thank you page editor

Now, we’ll start adding a few blocks and making some customizations to make it more like a WooCommerce thank you page.

First, we’ll add an upsell block to cross-promote another product. This is a great way to generate more sales for your store.

When someone completes a purchase, they’re more likely to buy again, especially if it’s related to what they just bought.

To do this, click on the ‘Section’ option in the left hand menu. This will bring up a screen that has different content sections. Select the ‘Hero’ option and then choose ‘Hero 2’ by clicking the ‘Plus’ icon.
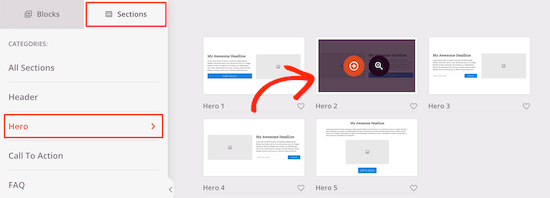
Select hero 2 block

This will insert the section into your page.

Now, click the image icon and insert an image of the product you want to promote.
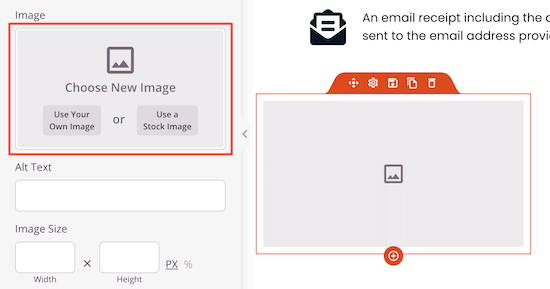
Insert image upsell

Then, do the same for the product title and the product copy.

After that, delete the button by hovering over it and clicking the ‘Delete Block’ icon.
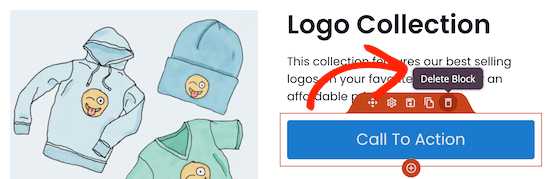
Delete button block

Next, drag over the ‘Add To Cart’ block in the ‘WooCommerce’ section.

This replaces the old button with one that connects to your WooCommerce product.
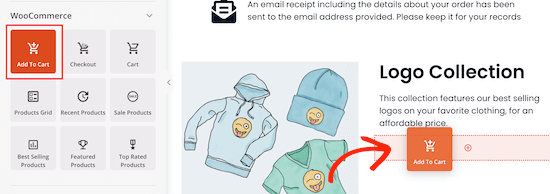
Drag add to cart block

After that click the ‘Add To Cart’ button to bring up the editing menu. You need to enter your ‘Product ID’, so it will automatically be added to your customer’s cart.

If you don’t know your product ID, then you can find it by navigating to Products » All Products and locating your product.
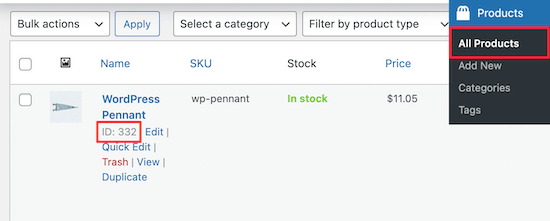
Locate product ID

Then, navigate back to the editor, enter your product ID, and turn on the ‘Direct to Checkout’ slider.

You can also fully customize the button’s appearance, add sub text, change the color, and more.
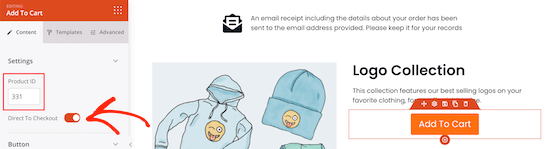
Enter product ID to checkout

After that, add a heading to promote your upsell product.

Click on the ‘Headline’ block and drag it above your upsell product. Then, add your enticing tagline.
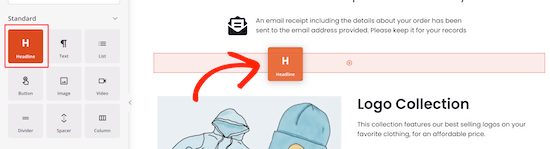
Add headline block

Once you’re done making changes make sure to click ‘Save’, or the drop down to ‘Publish’, if you want to make your page live.
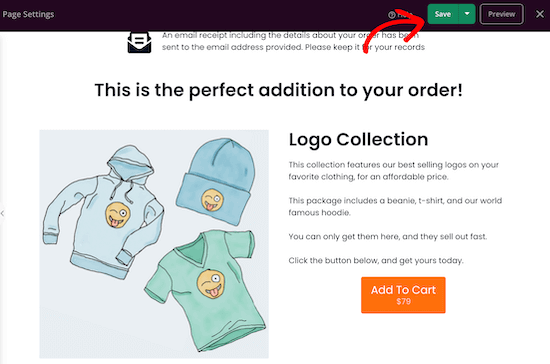
Save or publish changes

Add a Repeat Purchase Coupon Code in WooCommerce

You can give your customers a unique coupon code that offers them a discount for rebuying the product.

Coupon codes are one of the best ways to get your customers to make another purchase. WooCommerce has standard coupons, but they’re pretty limited.

We recommend using the Advanced Coupons plugin. It’s the best WordPress coupon code plugin for your online store and is very beginner-friendly.

For more details on setting up the plugin, see our guide on how to create smart coupons in WooCommerce.

Upon activation, navigate to Coupons » License and enter your product license key and activation email, then click ‘Activate’.
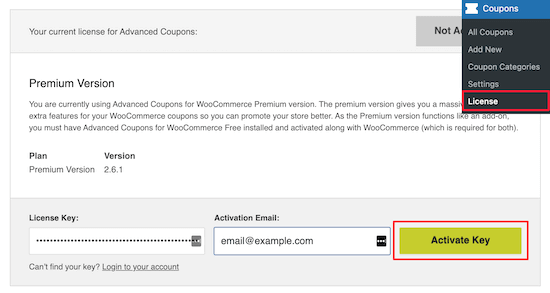
Activate Advanced Coupons

Then, navigate to Coupons » Add New to create a new coupon.

First, you can click ‘Generate coupon code’ or create your own coupon code name.
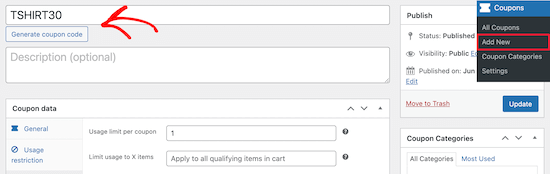
Add new coupon code

Once you’ve done that, locate the ‘General’ tab, here you’ll create your discount.

Select the ‘Percentage discount’ option and enter the percentage discount.
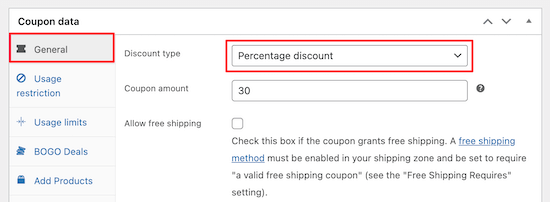
Choose percentage discount

Next, you need to click on the ‘Usage restriction’ tab.

Then, select the product you want the discount to apply in the ‘Products’ box.
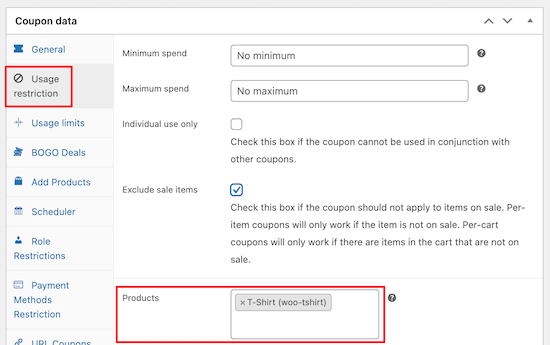
Select coupon product

After that, click the ‘Usage limits’ tab.

In the ‘Usage limit per coupon’ box, enter 1. This limits how many times the coupon can be used.
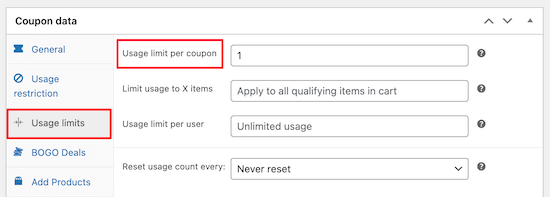
Limit coupon use

Make sure you click ‘Publish’ or ‘Save’ before exiting the screen.

Once you’ve done that, go back to the SeedProd editor.

You can add the coupon code to your existing WooCommerce thank you page or create a new thank you page.

We will add the coupon code to our existing thank you page to give our customers another bonus.

In the page editor, click on the new block section and then choose your layout.

Choose block layout

Next, select the ‘Text’ block and drag it onto the page.

Here is where you’ll enter your coupon code text.
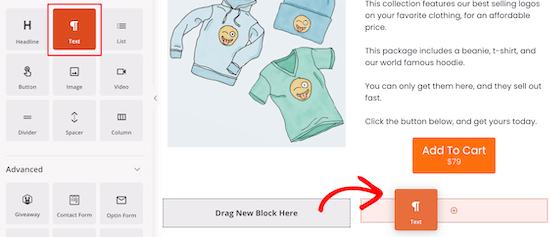
Select text block

In the other block, you can add an image of the product they just purchased.

Simply drag the ‘Image’ block into the page editor and then upload your product image.
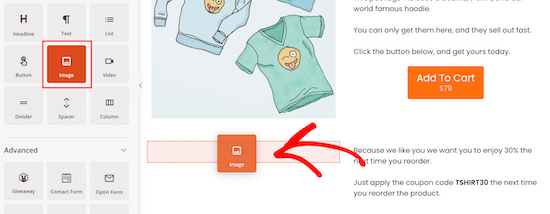
Select image block

After that, you need to add a headline block so your customers know about the coupon code.

Just drag over the headline block and add your headline.
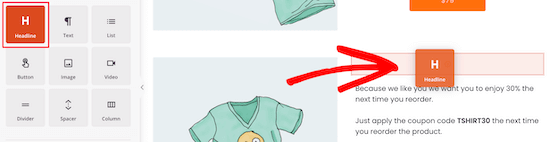
Select headline block

Here’s how the coupon code will display.

You can continue to customize this as much as you’d like.

Display coupon code

Add a Best Selling Products Grid in WooCommerce

By adding your best selling products to your thank you pages, you can make more sales easily.

These products are proven to sell, so there’s already a good chance your customers are ready to buy.

To do this, simply drag over the ‘Best Selling Products’ block from the ‘WooCommerce’ section.
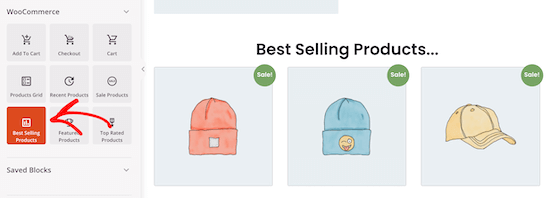
Select best selling products block

There are many other types of product grids you can add, like sale products, top rated products, recent products, and more.

For more details on adding best selling products in WooCommerce, see our guide on how to display popular products in WooCommerce.

Pro tip: you can setup WooCommerce conversion tracking to monitor clicks and conversions to make even more sales from your WooCommerce thank you pages.

Redirect the Default WooCommerce Thank You to Your New Page in WordPress

Once you’ve published your thank you page live you need to redirect this page in WooCommerce.

That way, when your visitors complete a purchase they will actually be redirected to your new page.

You can do this by modifying your WordPress theme files. However, the easiest way is using a WordPress plugin.

We recommend using the free Thanks Redirect for WooCommerce plugin, it’s very simple to use and will help you add the redirect simply.

First thing you need to do is install and activate the plugin. For more details, see our step by step guide on how to install a WordPress plugin.

Upon activation, navigate to WooCommerce » Settings and then click on the ‘Products’ tab.
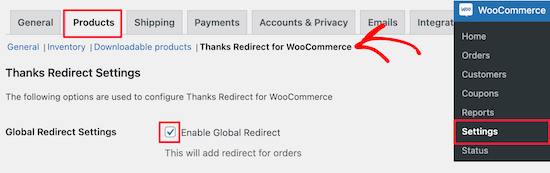
Go to thanks redirect options

After that click the ‘Thanks Redirect for WooCommerce’ link.

Once you’ve done that, click the ‘Enable Global Redirect’ box and enter your new WooCommerce page URL into the ‘Thanks Redirect URL’ box.

Enter URL and save new page

Then, click ‘Save Changes’ and your new thank you page will redirect when your customers complete an order.

We hoped this article helped you create custom WooCommerce thank you pages. You may also want to see our list of the best WooCommerce plugins for your store and our WooCommerce SEO guide to get more traffic.

If you liked this article, then please subscribe to our YouTube Channel for WordPress video tutorials. You can also find us on Twitter and Facebook.

The post How to “Easily” Create Custom WooCommerce Thank You Pages appeared first on WPBeginner.


June 23, 2021 at 04:00PM
Tuesday, June 22, 2021

How to Connect Microsoft Outlook to WordPress (Step by Step)

Are you looking for a way to use your Microsoft Outlook account to send emails from your WordPress website?

Connecting Microsoft Outlook with WordPress helps improve email deliverability by making sure that your emails reach your subscriber’s inbox, even if you’re sending a lot of them.

In this article, we’ll show you step by step how to connect Microsoft Outlook to WordPress.

Connect Microsoft Outlook to WordPress

Why Use Microsoft Outlook to Send WordPress Emails?

Using Microsoft Outlook is a great option for business owners who regularly use Office 365. You can use your existing account to send emails to your subscribers from your WordPress website.

The best part about using Outlook is that it allows you to send a lot of emails at once. You can send up to 10,000 emails per minute, which is a much higher limit than other mailing services.

If you have a busy online store, then this will help you with sending receipts, tracking info, and abandoned cart emails to all your customers.

Another benefit that Microsoft Outlook provides is that you don’t have to use the default WordPress PHP mail() function to send emails.

There are many issues with the default mailing method. Many WordPress hosting services don’t have PHP mail properly configured, which leads to email deliverability problems.

Your emails can end up in the spam folder because email service providers like Gmail can’t detect where the email is coming from.

However, you can easily overcome this issue by using an SMTP service provider to send emails in WordPress through your Outlook account.

What is SMTP?

SMTP or Simple Mail Transfer Protocol is an industry-standard technology for sending emails.

It uses proper authentication, ensuring that your emails reach the inbox of your users and don’t end up in the spam folder.

You can connect popular services like Microsoft Office 365, G Suite (Gmail), SMTP.com, SendinBlue, or Amazon SES to send your emails.

That being said, let’s see how you can connect your Microsoft Outlook account to WordPress.

Connect Outlook to Your WordPress Site

The easiest way to add Microsoft Outlook to WordPress is by using the WP Mail SMTP plugin. It lets you securely use the Microsoft API to authenticate your site’s email.

For this tutorial, we will be using the WP Mail SMTP Pro version because it includes Office 365 / Outlook.com integration.

There is also a free version of WP Mail SMTP that has 6 integrations, but it doesn’t have the feature to connect your Outlook account with WordPress.

First, you will need to install and activate the WP Mail SMTP plugin on your WordPress website. You can refer to our step-by-step guide on how to install a WordPress plugin.

Note: An important thing to remember is that the Outlook mailer will only work if you have an SSL certificate on your website. You can check out our guide on how to set up SSL on a WordPress site.

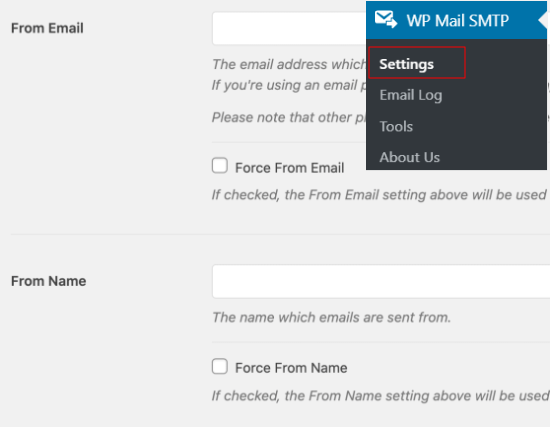
Upon activation, you can connect your Outlook account by going to WP Mail SMTP » Settings from your WordPress admin area.

On the settings page, you’ll see the ‘From Email’ and ‘From Name’ settings options. You can skip these settings as your Outlook account’s settings will override them.

From Email and Name in WP Mail SMTP settings

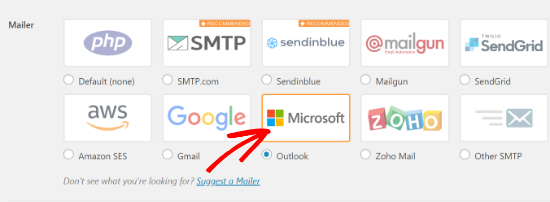
Below that, you’ll see different options next to the Mailer settings. Go ahead and select ‘Outlook’ as your Mailer option.

Select the Outlook Mailer Option

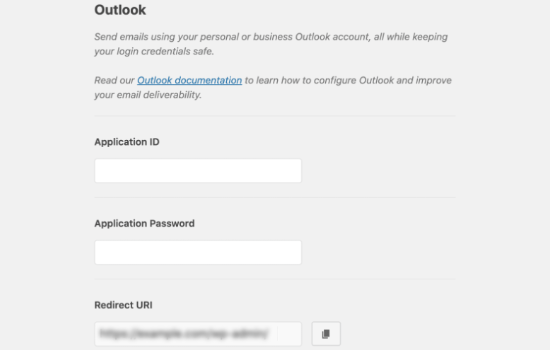
Next, WP Mail SMTP will show a new section with settings for your Outlook account.

Outlook Settings in WP Mail SMTP

To find the Application ID, Application Password, and Redirect URI, you’ll need to create a web application within a Microsoft Azure account. Don’t worry, we’ll walk you through how to do this step by step.

We recommend that you keep the WP Mail SMTP Outlook settings open in a separate tab or window, as you’ll need to return to this page to enter the information.

You can use your existing Microsoft email account (Live, Outlook, Hotmail, Office 365, etc.) to log into Microsoft Azure. Keep in mind that if you do so, then all your WordPress emails will be sent from that email address.

If you don’t have a Microsoft Outlook account, or if you prefer to send from a different email address, then you can go to the Microsoft Azure website and create your account. Just make sure that the account you create includes the permissions to send emails.

The account is free to create, and you don’t need any paid services to set up the mailer. However, Microsoft will ask you to enter your credit card information to reduce spam signups.

After that, you can log into the Microsoft Azure Portal using the email address you want to use.

Create an Application ID

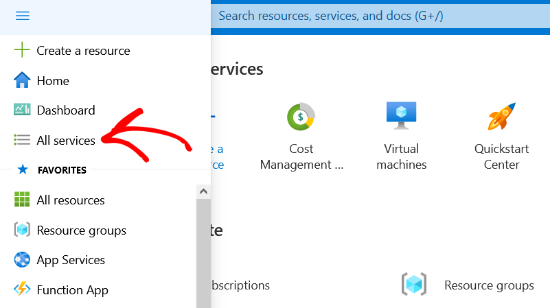
Once you have opened the Azure Portal, go ahead and click the ‘All Services’ option from the sidebar on your left.

Click All Services option in Azure Portal

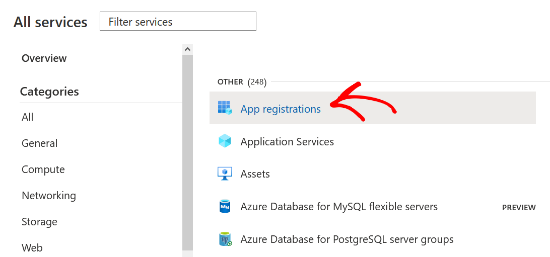
On the next screen, you’ll see different services offered by Microsoft Azure. You can scroll down to the ‘Other’ section and click on the ‘App registrations’ option.

Select App Registrations

After that, you’ll need to click the ‘+ New Registration’ button to create your application.

Create a new registration

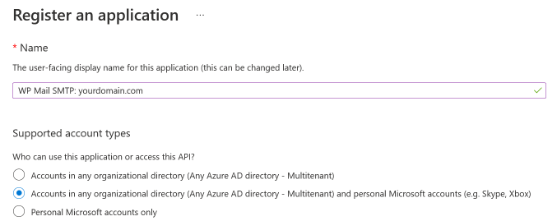
Now, enter a name for your application. This is for your own use, so you can change the name whenever you want. For example, you can name it something like ‘WP Mail SMTP: yourdomain.com.’

As for the ‘Supported account types’ section below, it is a best practice to select the ‘Accounts in any organizational directory (Any Azure AD directory – Multitenant) and personal Microsoft accounts (e.g. Skype, Xbox)’ option.

However, if you don’t see this option under your account types, then you can also select the ‘Accounts in any organizational directory (Any Azure AD directory – Multitenant)’ option.

Enter a name and select supported account types

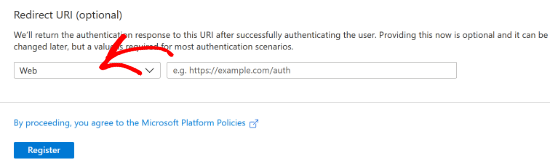
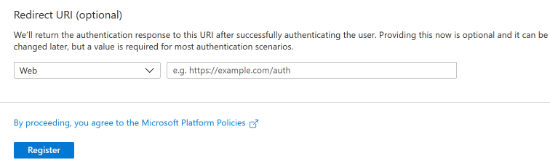
After that, scroll down to the Redirect URI settings. You can leave the dropdown settings to Web for the first field in the form.

Keep Redirect Settings to Web

For the second field, you will have to enter the redirect URI address given in the WP Mail SMTP Outlook settings.

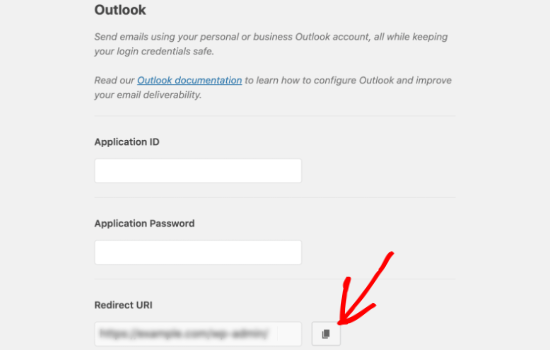
To find the Redirect URI, simply return to the WP Mail SMTP settings tab or window from your browser. Then copy the web address that is given in the Redirect URI field.

Copy the Redirect URI

Next, you can paste the URL into the Microsoft Azure app registration form and click the Register button.

Redirect URI Settings

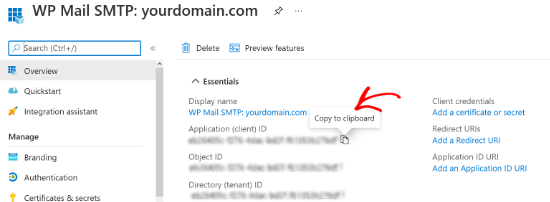
Microsoft Azure will now take you to another screen where you’ll see the Application (client) ID. Simply click the ‘Copy to clipboard’ button to copy your application ID.

Copy the Application ID

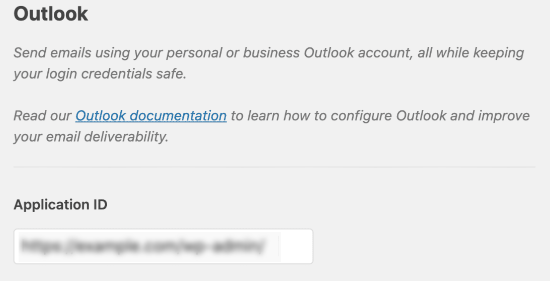
After that, you can enter the copied application ID in the WP Mail SMTP settings. To do that, simply head over to your WP Mail SMTP settings window and paste the value in the Application ID field.

Paste the copied Application ID in WP Mail SMTP settings

Create an Application Password

Once you have entered the application ID, the next thing to do is create an application password.

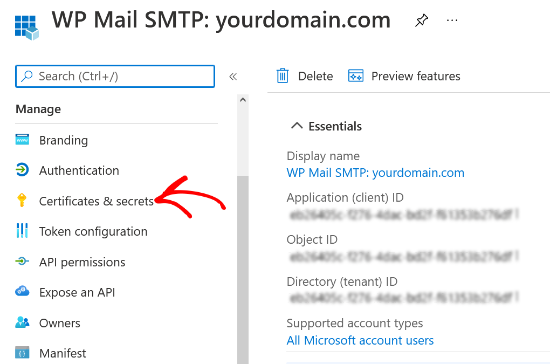
You can start by clicking the ‘Certificates & secrets’ option in the sidebar on your left.

Click the Certificates and Secrets option

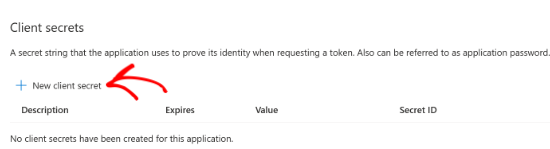
On the next screen, you can skip the Certificates section and scroll down to the Client Secrets section. Then click the ‘+ New client secret’ option to add a client secret.

Select the New client secret option

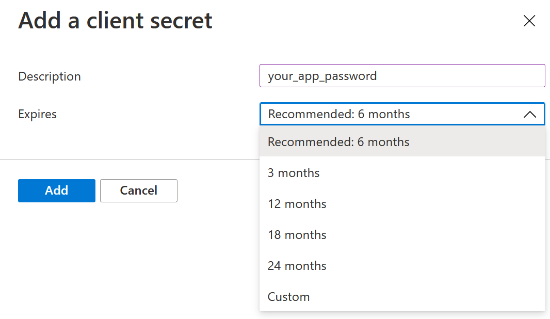
You’ll now see a new overlay window slide in from the right. In this window, you can enter a description and select a time period for the app password to expire.

Microsoft Azure lets you select a preset expiry time (3 months, 6 months, 12 months, etc.), or you can set a custom timeframe.

We recommend selecting one of the preset settings when you are first starting out. You can always change the password expiry time to custom settings in the future.

Enter a description and set password expiry time

When you are satisfied with the settings, click the Add button.

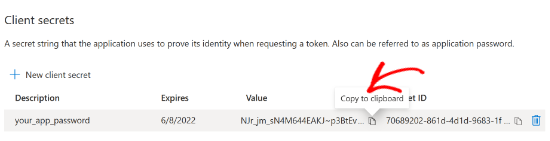
As soon as you click the Add button, Microsoft Azure will generate an application password. You can go ahead and click the ‘Copy to clipboard’ button to copy the password that is given under the Value column.

Copy the application password under the Value column

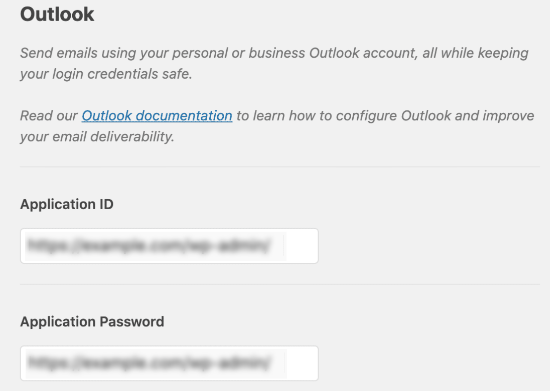
Next, you’ll need to enter this password in your WP Mail SMTP settings. To do that, return to the WP Mail SMTP settings and then paste the password under the Application Password field.

Paste the value in the Application Password field

Set Up API Permissions

After setting up the Application ID and Application Password in WP Mail SMTP, the next step is to add API permissions.

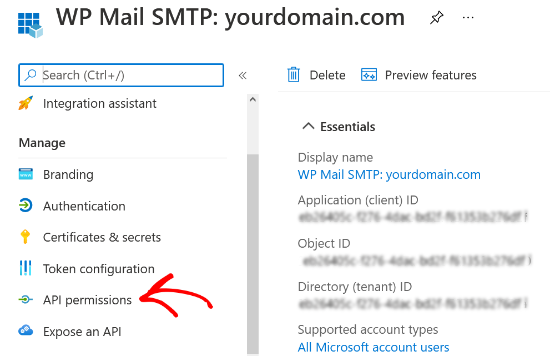
To get started, you can click on the API permissions option from the menu on your left.

Click the App Permissions option

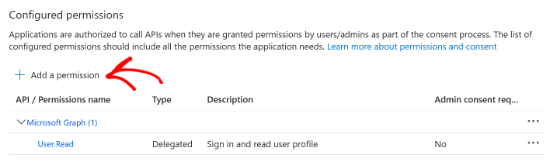
Next, go ahead and click the ‘Add a permission’ button.

Select the Add a permission option

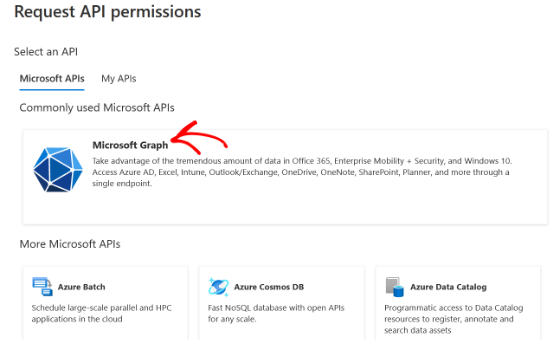
When you click the button, a new window will slide in from the right to request API permissions. You’ll have to select the Microsoft Graph option to set up API permissions.

Select the Microsoft Graph option

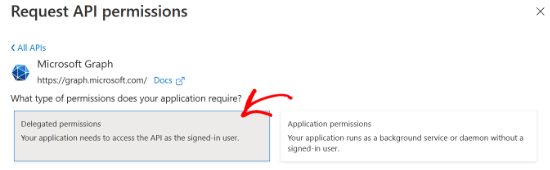
On the next screen, Microsoft Azure will ask what type of permissions does your application requires. You can select the ‘Delegate permissions’ option.

Select delegate permissions

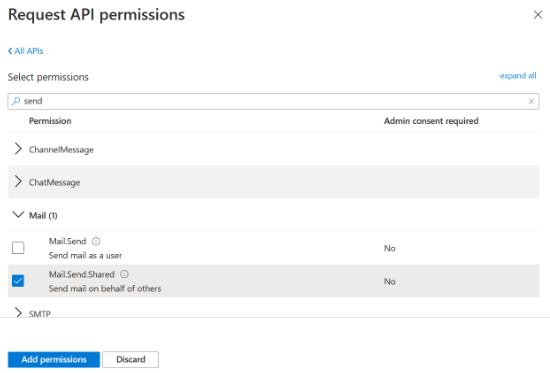
Next, you’ll see multiple options to select permissions. However, an easier way to find the right settings is by entering the term ‘send’ in the search bar located under the ‘Select permissions’ heading.

After that, you’ll have to select the Mai’ tab from the options that appear and then click the checkbox for Mail.Send.Shared.

Search send in the search bar and go to the Mail tab

When you are ready with the settings, click the ‘Add permissions’ button at the bottom.

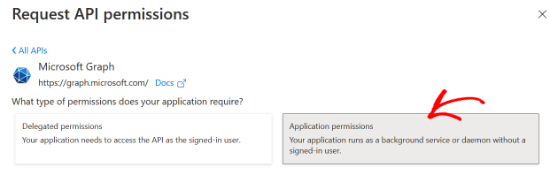
You’ll have to repeat the API permission steps again by clicking on the ‘+ Add a permission’ button and again selecting ‘Microsoft Graph.’ However, this time select the ‘Application permissions’ option.

Select application permissions

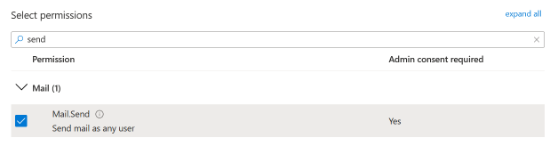
Now, you can enter the same search term ‘send’ in the Select permissions search bar. When you see the Mail tab, click on it and then select the checkbox for Mail.Send.

Search for send and select mail send option

Next, go ahead and click the ‘Add permissions’ button.

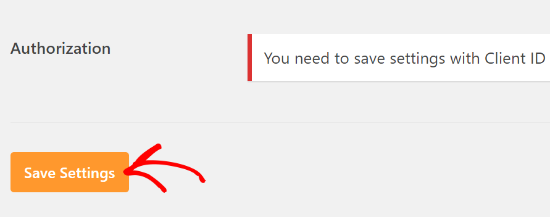
After setting up the API permissions, you’ll have to go back to the WP Mail SMTP settings and then click the Save Settings button to finish up the Outlook mailer configuration.

Save settings in WP Mail SMTP

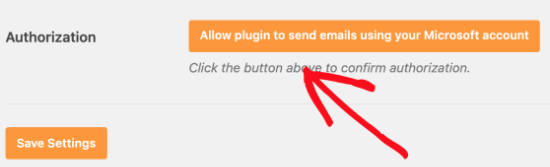
When you save the settings, you’ll have to scroll down to the Authorization section in the WP Mail SMTP settings and click the ‘Allow plugin to send emails using your Microsoft account’ button.

Allow the plugin to send emails using your Microsoft account

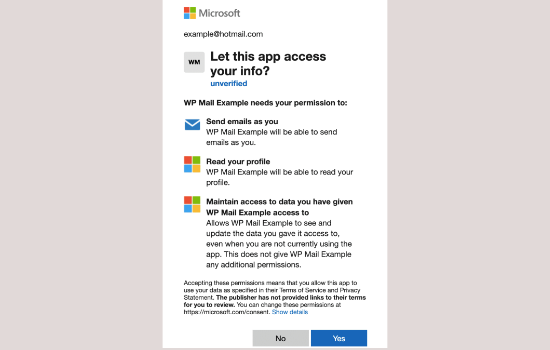
As soon as you click the button, you’ll be redirected to the Microsoft permissions form. All you have to do is click the Yes button at the bottom. This will allow WP Mail SMTP to connect to your Microsoft account.

Give permission to connect to your Microsoft account

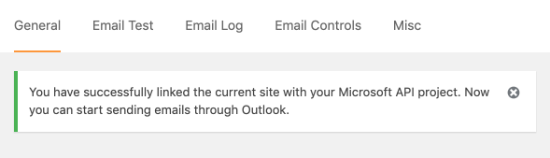
After that, you will be redirected back to the WP Mail SMTP settings page, and a notice will appear at the top showing that you are ready to send emails through Outlook.

Notice for successfully adding Microsoft API

You can now send a test email to check if everything is working properly.

To send a test email, simply go to WP Mail SMTP » Settings and then click on the Email Test tab at the top. When you are satisfied with the settings, just click the Send Email button at the bottom.

Go to the Email Test tab

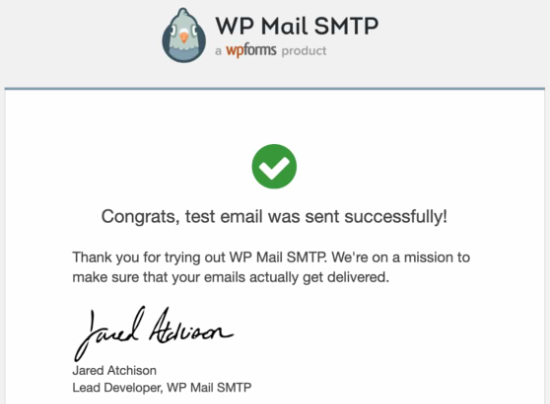
After sending the email, you can go to your inbox and check whether you received the test email.

Test email from WP Mail SMTP

We hope this article helped you learn how to connect Microsoft Outlook to WordPress. You may also want to check out our comparison of the best email marketing services for small businesses, and our complete guide on how to add web push notifications in WordPress.

If you liked this article, then please subscribe to our YouTube Channel for WordPress video tutorials. You can also find us on Twitter and Facebook.

The post How to Connect Microsoft Outlook to WordPress (Step by Step) appeared first on WPBeginner.


June 22, 2021 at 04:00PM
Monday, June 21, 2021

What’s Coming in WordPress 5.8 (Features and Screenshots)

WordPress 5.8 beta is out with an expected release date of July 20th, 2021. It will be the second major release of the year and comes with lots of new features and improvements.

We’ve been following the development closely and trying out the new features on our test sites.

In this article, we’ll show you what’s coming in WordPress 5.8 with features and screenshots.

A sneak peak into upcoming WordPress 5.8 release

Note: You can try out the beta version on your computer or on a staging environment by using the WordPress Beta Tester plugin.

Introducing Template Editor

WordPress 5.8 will ship with the new template editor. It is a step towards creating a full site editing tool using the block editor, which means you can expect it to get better with future releases.

The template editor allows you to create and save templates for your WordPress website and use them later for any post or page.

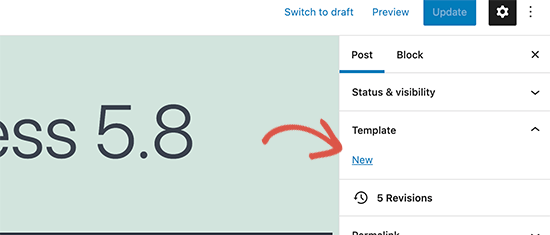
Create a new template

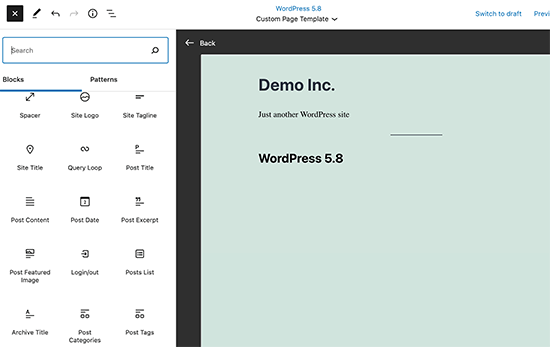
Switching to the template editor will allow you to add Site Editing blocks. A number of essential blocks are available including:

  • Site Logo
  • Site Tagline
  • Site Title
  • Query Loop
  • Post Title
  • Post Content
  • Post Date
  • Post Excerpt
  • Post Featured Image
  • Post Categories
  • Post Tags
  • Login/out
  • Page List

Several site wide editor blocks are introduced in WordPress 5.8

The feature is optional, theme developers and users will be able to easily disable it.

The template editor still relies on your WordPress theme and inherits its styles.

For a more flexible approach, you can try SeedProd which allows you to create custom landing pages regardless of which WordPress theme you are using.

Blocks As Widgets

Another big step towards full-site editor experience is the new blocks as widgets interface.

Users will be able to access the new widget experience by using the Customizer or by visiting the Appearance » Widgets page.

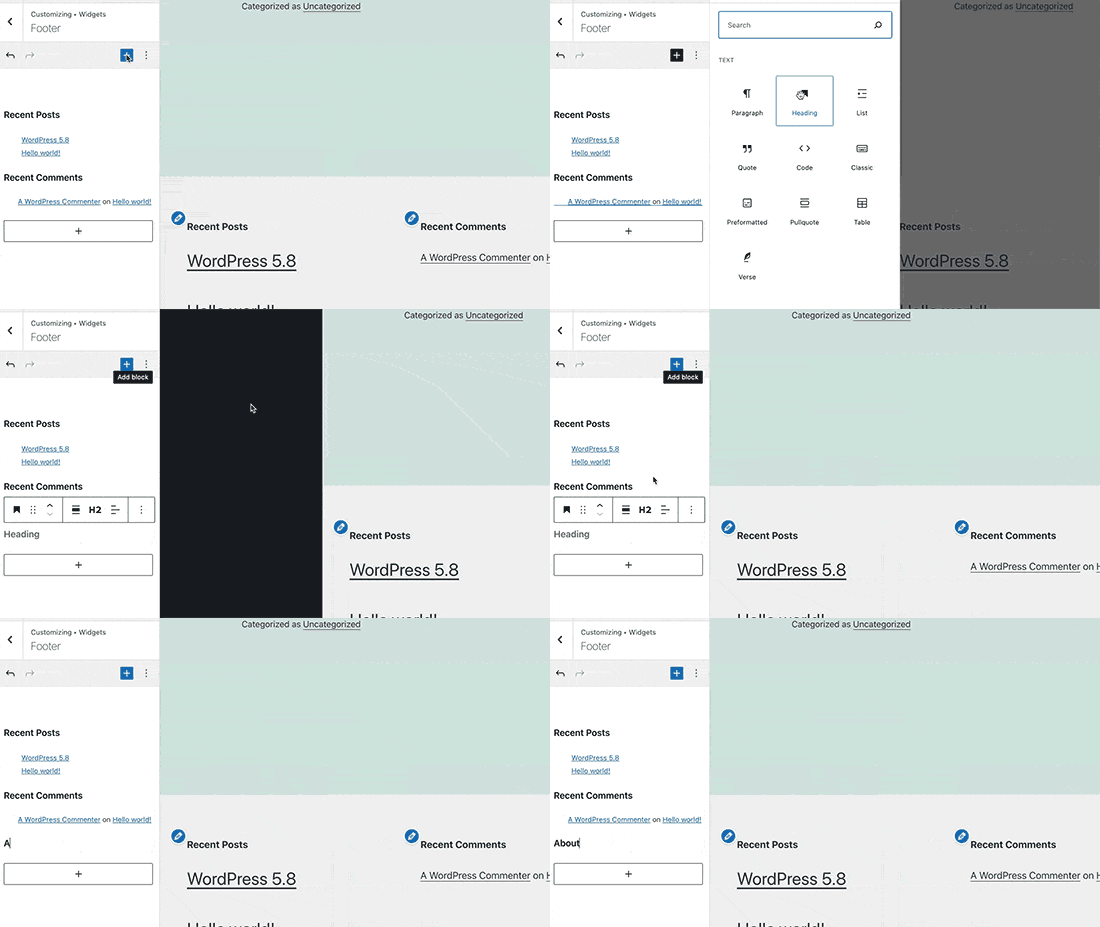
Adding blocks as widgets in WordPress 5.8

Blocks as widgets will bring the flexibility of the block editor to your WordPress sidebar widgets. You’ll be able to use colors, spacing, typography, and other design tools without installing any plugins.

New widgets page

There is even a Widgets block that will let you use the classic widgets that are not available as blocks yet.

Not ready to make the move yet?

Don’t worry, you can turn off this new feature by using the Classic Widgets plugin. Simply install and activate the plugin and it will disable the new Widget Blocks feature.

WebP Images Are Coming to WordPress

WebP is a new file format for images to be used on the web. By using the WebP image format, your images will be 25-34% smaller in file size than PNG and JPEG without losing quality.

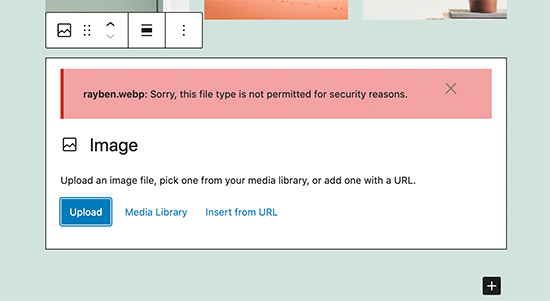
Currently, WordPress doesn’t support WebP images and users see an error when they try to upload a WebP image.

WebP image upload error

With WordPress 5.8, you’ll be able to upload WebP images to your WordPress website without using any plugins.

However, one downside is that it will not automatically replace the image with JPEG or PNG if a user is on an unsupported browser.

If majority of your users are using an unsupported browser, then you may still want to use an image compression plugin.

For more details, see our article on how to properly add WebP images in WordPress.

Editor Improvements in WordPress 5.8

The block editor screen is where users spend most of their time creating content. Each WordPress release comes with many improvements, bug fixes, and new features to improve the editing experience.

Following are some of the editor improvements coming in WordPress 5.8.

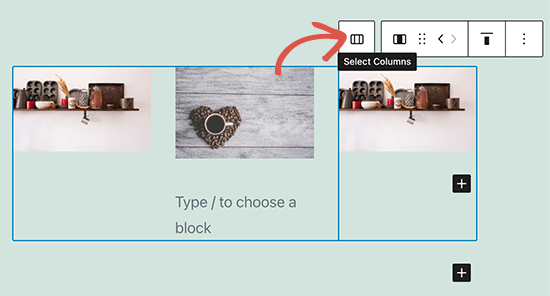
Easily Select Parent Block in Nested Blocks

Nested blocks like columns and groups allow you to easily group blocks. However, it sometimes becomes difficult to select the parent block inside a nested block.

WordPress 5.8 will now show an always visible parent block button in the toolbar.

Parent block button in the toolbar

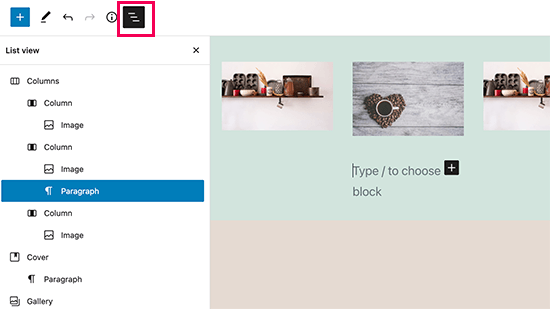
Improved List View

WordPress 5.8 will come with an improved list view panel. It will show you the complete list of blocks in your post or page.

This would make it easier for users to move to a specific block in more complex layouts. For instance, if you have multiple paragraphs in a specific column then you can navigate using the list panel.

Improved list view panel in WordPress 5.8

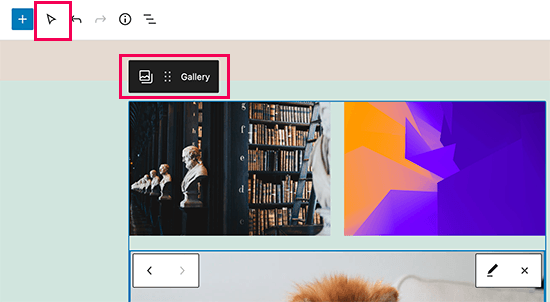
Improved Select Tool with Block Handles

The select tool will now show a better block outline with a handle to move blocks up and down.

Better Select tool with block handles

In WordPress 5.8, you’ll also notice better block highlighting as you move your mouse around different blocks.

New Duotone Filters for Images and Media Blocks

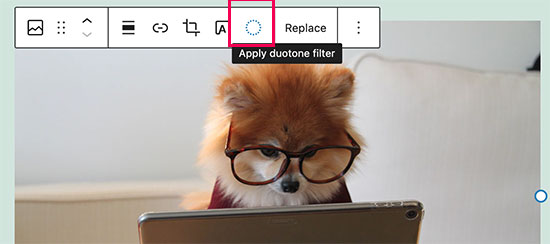
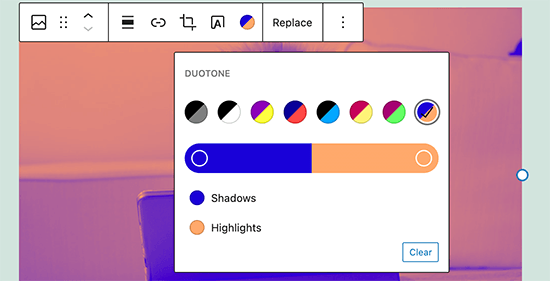
Another exciting upcoming feature in WordPress 5.8 is the Duotone filters. You’ll be able to use these filters over your media blocks like images, galleries, and cover images.

Using duotone filters in WordPress 5.8

It comes with a few presets and you can create your own presets as well by choosing the colors you want to apply.

Duotone filters applied on an image in WordPress 5.8

WordPress themes will also be able to add their own presets to match theme color schemes.

Pattern Suggestions in Add Block Panel

Using the add block panel if you search for a block, the editor will also suggest patterns that you can instantly add. There are some new patterns available and initial work has been laid for integration with the WordPress.org pattern directory.

Pattern suggestions

Improvements to Existing Blocks

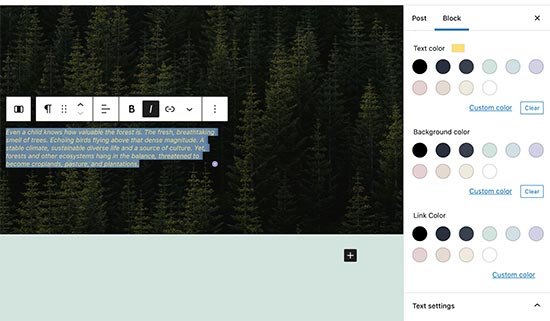
There are several improvements to existing blocks. For instance, more color options to choose text, background, and link colors.

More color options

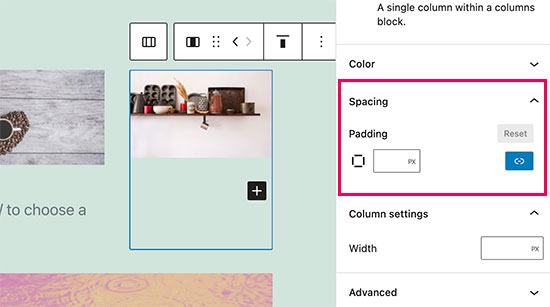
There is a new option to adjust padding among columns.

Adjust column spacing

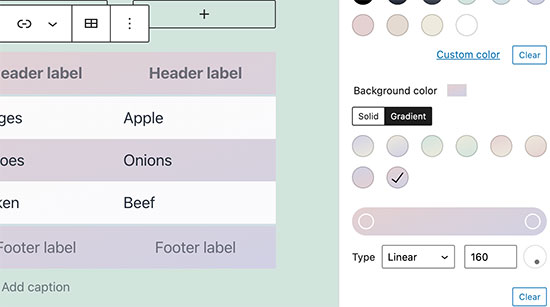
You can also choose gradient background for table block.

Gradient background color option for tables

Under The Hood Changes

WordPress 5.8 will also bring many changes for developers to explore and use in their own themes, plugins, and projects.

Following are some of these under the hood changes.

WordPress will end support for Internet Explorer by the end of this year. 5.8 has merged most of the changes needed for that. (See details)

Context aware filters to use block editor APIs on multiple WordPress admin screens. (#52920)

WordPress recovery mode email message will now only be shown when email can be sent. (#52560)

We hope this article gave you a glimpse into what’s coming in WordPress 5.8. Let us know what features you find interesting and what you’d look to see in a future WordPress release.

If you liked this article, then please subscribe to our YouTube Channel for WordPress video tutorials. You can also find us on Twitter and Facebook.

The post What’s Coming in WordPress 5.8 (Features and Screenshots) appeared first on WPBeginner.


June 21, 2021 at 04:00PM