Wednesday, July 7, 2021

Welcome SearchWP to WPBeginner Family of Products

Today, I’m extremely excited to share that SearchWP has joined Awesome Motive, and it is now part of the WPBeginner family of products.

SearchWP is a powerful WordPress search plugin that helps you improve your site search to deliver more relevant results. Over 30,000 websites use SearchWP to improve their content discoverability, reduce website abandonment, and increase sales.

Welcome SearchWP to WPBeginner Family of Products

Introduction to SearchWP – Quick Overview

SearchWP makes it easy for your website visitors to search everything by relevance, so they can quickly find what they’re looking for.

Unlike default WordPress search, SearchWP goes beyond just the post content and indexes everything on your site including custom fields, ACF fields, text files, PDF document content, custom tables, custom taxonomies, WooCommerce product attributes, and more.

It gives you the flexibility to create your own relevance scale and adjust the algorithm without writing any code.
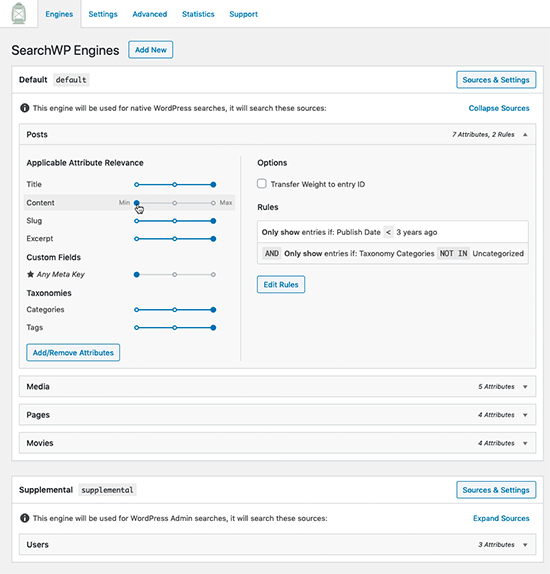
SearchWP Custom Engines

The Metrics feature helps you see what your visitors are searching for, what they’re finding or not finding, so you can leverage these actionable insights to improve your content and grow your business.
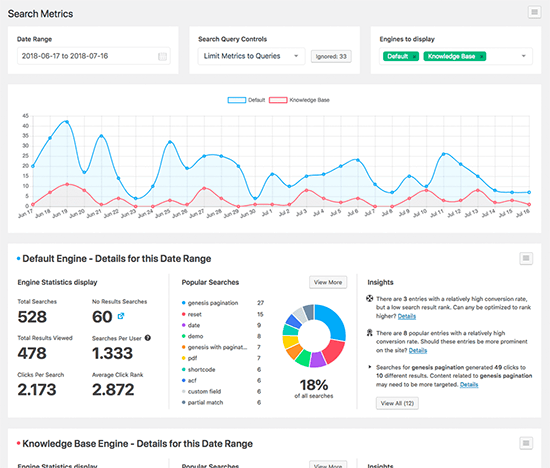
SearchWP Metrics

SearchWP automatically integrates with every popular WordPress theme and page builder. This means you can instantly activate SearchWP and improve your website search (no coding needed).

Aside from that, SearchWP also integrates with all major WordPress plugins including but not limited to WooCommerce, Advanced Custom Fields (ACF), Meta Box, Toolset, BigCommerce, Easy Digital Downloads, bbPress, and more.
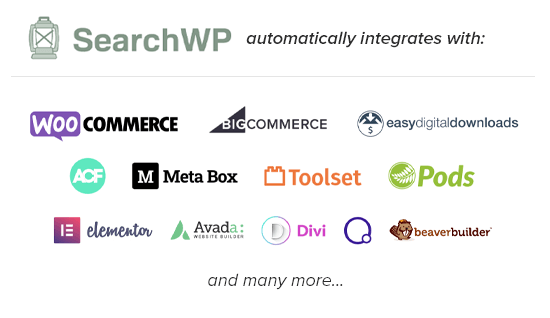
SearchWP Integrations

If you want to create a AJAX live search for WordPress or WooCommerce, then you can easily do that with SearchWP.

SearchWP Ajax Live

It also comes with dozens of other powerful features like ability to redirect users to a specific page when certain searches are performed, ability to include & exclude specific content from search, keyword stemming, multiple search engines for different areas of your website, ability to index content from PDF, office, and other text documents, and a whole lot more.

And if you’re a developer, SearchWP comes with custom integrations, hooks, and REST API that you can use to build next generation search solutions for your clients.

Background Story – Why SearchWP?

As you already know, I’m a huge fan of WordPress. I believe it’s the most powerful website builder in the world that makes it easy for anyone to build any type of website.

But there’s always been one big drawback … the search functionality is a bit limited.

That’s because search is a really hard problem to solve.

While there are SaaS on-site search solutions in the market, most are either crazy expensive, or they don’t integrate well with WordPress.

When SearchWP was first released in 2013, I wrote a detailed tutorial about it on WPBeginner blog.

Since then, I’ve secretly admired Jon Christopher, founder of SearchWP, and all the amazing work he has done to create the most powerful WordPress search solution. Over the last 8 years, we have recommended SearchWP in dozens of our tutorials.

Just about everyone whom I referred to SearchWP loved how powerful this plugin really is and the impact it had on their business.

So naturally when WPBeginner readers survey showed that y’all wanted me to build a search plugin to help improve WordPress and WooCommerce search, I reached out to Jon with a partnership proposal.

Jon and I have met several times in the past at various WordCamp events, so the conversation progressed quickly.

We are both located in Florida, so he drove down to my house, and shortly after we agreed to an acquisition deal, so SearchWP can join the WPBeginner family of products.

What’s Coming Next?

Our work is just starting.

We will be leveraging the scale and knowledge of the Awesome Motive team to build more innovative solutions to help you maximize the full power of your website search.

We have built a lot of internal tools to improve our website search that I’m really looking forward to sharing with the WordPress community.

We will be combining Jon’s vision with our own experience, so we can make the BEST WordPress search plugin even better.

This is truly going to be a game changer!

Whether you’re a publisher (blogger) or an eCommerce site owner, you should enable SearchWP to improve your website search and grow your business.

If you have suggestions on features you’d like to see in the SearchWP plugin, then please let us know by sending us a message via WPBeginner contact form.

As always, I want to thank you for your continued support of WPBeginner. We look forward to bringing you more amazing solutions to help you grow your business.

Yours Truly,

Syed Balkhi
Founder of WPBeginner

P.S. Want to join our team and work alongside me in helping small businesses grow and compete with the big guys? We’re hiring.

We’re a fully remote team of over 170+ amazingly talented team members across 31 countries.

P.P.S Are you a WordPress product owner looking for an investment or an exit (on fair, founder friendly terms)? Learn more about my WPBeginner Growth Fund.

The post Welcome SearchWP to WPBeginner Family of Products appeared first on WPBeginner.


July 07, 2021 at 09:36PM

7 Best Free Author Bio Box Plugins for WordPress Compared (2021)

Are you looking for the best free author bio box plugins for WordPress?

Adding an author bio box can help you connect with your readers, boost authority, and even attract new writers to your site.

In this article, we’ll highlight the best free author bio box plugins for WordPress.

7 best free author bio box plugins for WordPress compared (2021)

Why Use an Author Bio Box Plugin for WordPress?

An author bio box plugin lets you customize and display an author bio section at the end of your WordPress posts.

Many WordPress themes have this feature built-in. However, a plugin lets you change how the author bio is displayed, add social media links, and much more.

Author bio example

Adding a custom author bio box section can benefit your WordPress blog in many ways.

  • Improve author credibility and authority with your readers
  • Build a connection between readers and authors
  • Help persuade guest authors to write for your website

With that said, let’s take a look at some of the most popular author bio box plugins for WordPress that you can use on your WordPress website.

1. Simple Author Box

Simple Author Box

Simple Author Box is the best author bio box plugin. What started as a simple way to add a clean author box to your WordPress posts has grown into a very feature rich plugin.

This plugin lets you customize nearly every aspect of your author bio box. You can add an author bio, social media links, and a custom Gravatar.

You also have complete control over the colors, typography, background, and more. There’s an option to show the author’s email address, so your readers can get in touch directly.

The real-time preview box lets you see the changes to your author bio box as you customize it.

If you want even more features, then there’s a pro version that lets you display an author box before or after content, add website links, get more social icon styles, include guest and co-authors, and more.

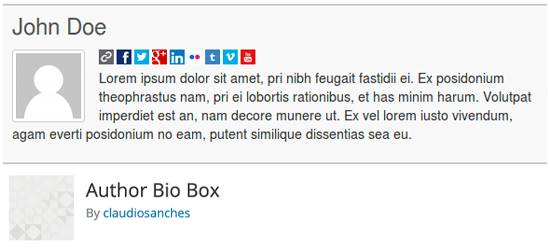
2. Author Bio Box

Author Bio Box

Author Bio Box is an incredibly simple author bio box plugin that will display an author bio beneath your blog posts.

The author profiles can include an image, social media links, and a short description.

The design of the author profile box is very minimalist, so it won’t distract from the blog content. However, you do have control over the text and title color, background color, and border size.

For more details, see our guide on how to add an author info box in WordPress posts.

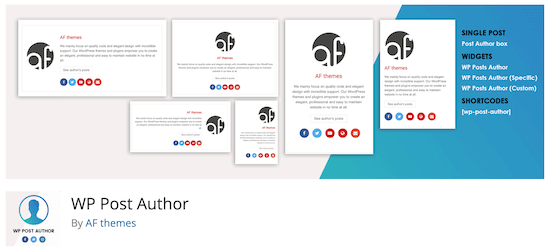
3. WP Post Author

WP Post Author

WP Post Author is a simple and easy to use author bio plugin. It seamlessly integrates with your site’s design and will blend into your content.

This plugin will display the author’s avatar, name, company role, a short bio, and social media icons.

You have control over which elements of the author bio will display, along with the alignment of the text and author image.

There are 3 different widgets and a shortcode you can use to display your author bio in your sidebar and other areas of your website.

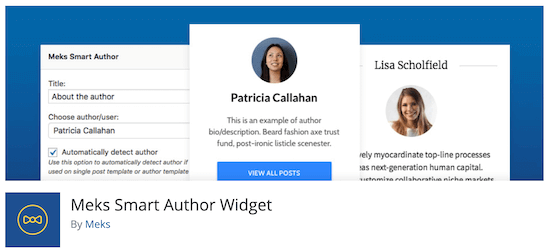
4. Meks Smart Author Widget

Meks Smart Author Widget

Meks Smart Author Widget lets you add an author bio to any widget area of your site.

You can display an author avatar, a short bio, links to social media, and a link to the author profile page that lists all their articles.

This can be a great way to add a good looking author bio widget to your WordPress sidebar. The plugin set up is fairly straightforward, and it uses an auto-detect feature to find the correct post author and display their bio instantly.

Since the plugin will fetch author information from their WordPress profile, you need to make sure that all authors fill out their author information by editing their profiles.

5. Starbox

Starbox

Starbox is a feature rich and easy to use author bio box plugin. The goal is to make it as easy as possible to create a custom author bio box.

You’ll find a few different themes you can use to customize your author bios.

With this plugin, you can create unique author bio boxes for every author on your website. You have control over social media profiles, name, job or role, image, and more.

There’s even the option to add a tabbed author bio that includes the latest posts from that author.

If you’re running an online store, then this plugin can integrate with WooCommerce to display unique author bios as well.

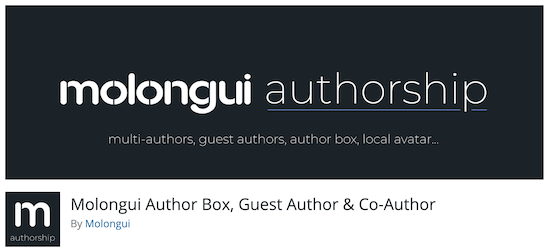
6. Molongui Authorship

Molongui Authorship

Molongui Authorship is a great WordPress author bio box plugin that lets you display an author box, co-authors, and guest contributors.

This plugin makes it easy to create author bios and guest author bios without creating a WordPress account.

If you want to add additional authors and co-authors to WordPress, then see our guide on how to add new users and authors to your WordPress blog.

There are many customization options, including multiple layouts, colors, typography, author avatars, social media icons, and more. You can also control whether the author bio displays above or below the content.

Plus, you can fully customize the author bio using the WordPress Customizer, which makes things easy.

7. All in One SEO

AIOSEO

All in One SEO is the best WordPress SEO plugin in the market used by over 2 million websites.

It’s the most comprehensive SEO toolkit and will help you improve your search engine rankings without having to learn the ins and outs of SEO.

The setup wizard will help you pick the perfect SEO settings for your WordPress website, and you can start optimizing with the built-in SEO checklist.

You’ll also find a feature that will help you improve your author profile pages. By default, your author profile pages display a list of posts from respective author’s on your site.

These can help your readers find more content from their favorite author, and it can also help you get more search engine traffic.

AIOSEO add Twitter and Facebook

AIOSEO expands the default WordPress author profile and lets you add social media links in the meta data.

You can connect your Facebook and Twitter profiles to make your author profiles and author bio more engaging.

Author profile links

For more details, see our guide on how to display author’s Twitter and Facebook on the profile page.

Note: there is also a premium version of the AIOSEO available that offers even more advanced SEO features to help your website get more traffic from the search engines.

We hope this article helped you find the best free author bio box plugin for WordPress. You may also want to see our guide on how to change the author of a post in WordPress and our expert picks of the must have WordPress plugins for business websites.

If you liked this article, then please subscribe to our YouTube Channel for WordPress video tutorials. You can also find us on Twitter and Facebook.

The post 7 Best Free Author Bio Box Plugins for WordPress Compared (2021) appeared first on WPBeginner.


July 07, 2021 at 02:40PM

Tuesday, July 6, 2021

How to Connect Google Sheets with WooCommerce (in 5 minutes)

Do you want to connect Google Sheets with WooCommerce?

Connecting Google Sheets with WooCommerce lets you easily manage order and customer data and share it with the rest of your team.

In this article, we’ll show you how to connect Google Sheets with WooCommerce, step by step.

How to connect Google Sheets with WooCommerce (in 5 minutes)

Why Connect Google Sheets with WooCommerce in WordPress?

Google Sheets is a very popular free spreadsheet software from Google. Connecting Google Sheets and WooCommerce lets you simply manage and analyze your store order and customer data.

You can also share this data with your team without having them login to your WordPress dashboard.

Integrating Google Sheets and WooCommerce can help your online store in a lot of ways.

  • Easily analyze and sort customer order data
  • Quickly present store data in charts and graphs
  • Sort and filter data by total, location, coupons used, and more
  • Give team access to data without creating a separate login

That being said, let’s take a look at how to connect Google Sheets with WooCommerce, in 5 minutes.

Setup Your WooCommerce Store and Google Sheets

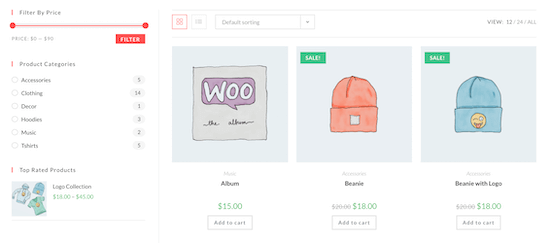
First thing, you need to have a fully functioning WooCommerce store set up. If you’re still building your store, then see our step by step guide on how to start an online store.

Note: you’ll also want to make sure you’re using high quality WooCommerce hosting and a WooCommerce theme to ensure your store looks great and loads fast.

WooCommerce store example

Next, you’ll need to create a Google Sheets spreadsheet that you’ll send WooCommerce store data to.

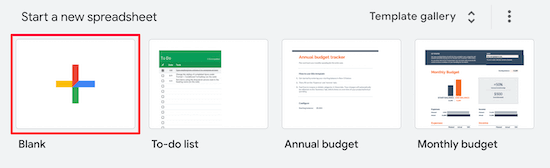
Head over to the Google Sheets website and click ‘Blank’ to add a new spreadsheet.

Add new Google Sheet

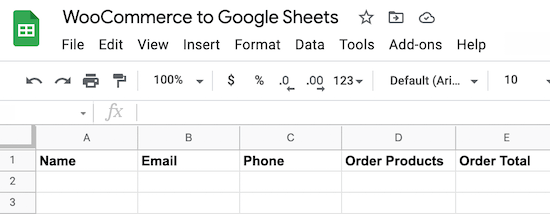
Then, when adding columns to your spreadsheet, you want these to match the type of WooCommerce data you want to collect.

In this case, we have a spreadsheet with the customer’s name, email, phone, the products they ordered, and the total price.

WooCommerce to Google Sheets spreadsheet

You can import all kinds of WooCommerce data, including location, coupons used, the status of the order, time of the order, and much more.

Install and Activate the Uncanny Automator Plugin for WordPress

To connect Google Sheets to WooCommerce, we’re going to be using an automation plugin.

The best WordPress automation plugin is Uncanny Automator. It acts as a connector between your WordPress website and other apps, so they can talk to each other without you writing any code.

Uncanny Automator Plugin

It’s like Zapier for WordPress websites without the high costs of Zapier.

Uncanny Automator is very easy to use and comes with all kinds of automated workflows that you can set up in a couple of clicks (no coding needed).

Note: there is a free version of the plugin available, but we’ll use the Pro version for this tutorial since it has the Google Sheets integration we need.

For more details, see our guide on how to create automated workflows in WordPress with Uncanny Automator.

Connect Your Google Account with Uncanny Automator

Upon activation, you need to connect Uncanny Automator to your Google account.

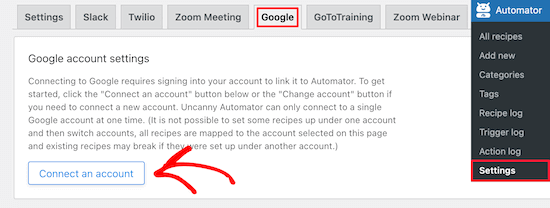
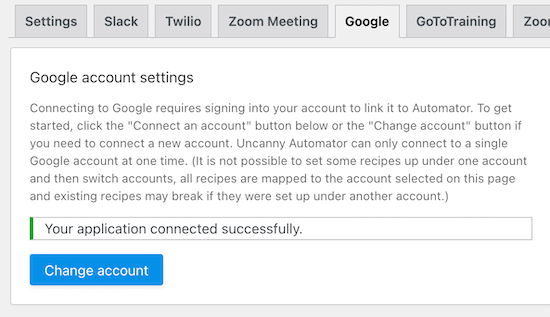
First, navigate to Automator » Settings and click on the ‘Google’ menu item.

Connect Google Account

Next, click on the ‘Connect an account’ button. This takes you to a screen where you can authorize your Google account.

Then, select the Google account you want to connect and click the ‘Allow’ button.

Give Uncanny Automator permission

After that, you need to click ‘Allow’ one more time to authorize your account and confirm your choices.

This will take you back to the Google settings page in your WordPress admin panel.

Google Account connection success

That’s all, you have successfully connected your WordPress site to Google Sheets using Uncanny Automator.

Connect WooCommerce to Google Sheets with Uncanny Automator

Now, you’re ready to connect your online store to the Google Sheets spreadsheet you created earlier.

Uncanny Automator uses “recipes” to create automations and link apps and plugins together.

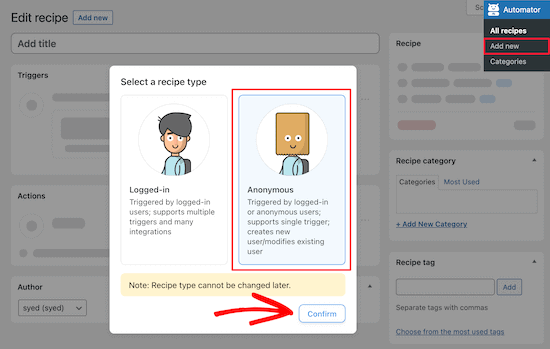
The first thing you need to do is navigate to Automator » Add new, click the ‘Anonymous’ option, then click ‘Confirm’.

Select anonymous recipe

Anonymous recipes can be triggered by any user, while logged-in recipes can only be triggered by logged in users.

You need to choose the type of recipe based on your needs and then click the ‘Confirm’ button.

For the sake of this tutorial, we’ll be creating an anonymous recipe that automatically sends WooCommerce order data to Google Sheets the moment an order is completed.

After that, you need to give your recipe a name. This won’t be visible to your users, but it will help you identify the different recipes you create.

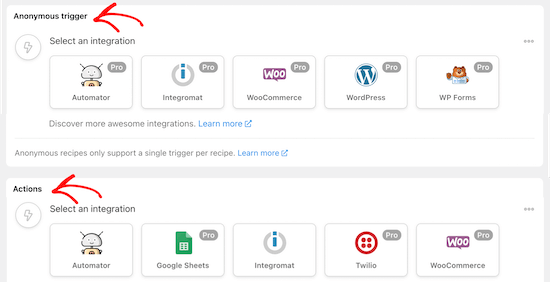
There are two different parts to each recipe, the trigger, and the action.

Anonymous triggers and actions

The trigger is the event that will start the recipe, and the action is the task that will run when the action is triggered.

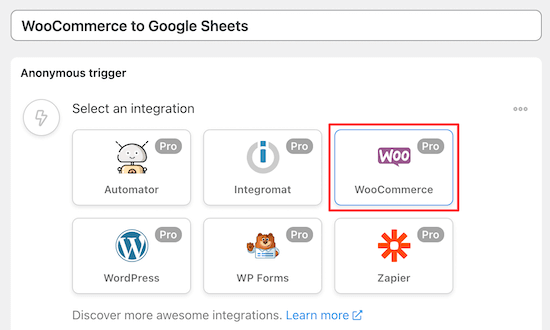
First, you need to select ‘WooCommerce’ in the ‘Anonymous trigger’ meta box.

Select WooCommerce trigger

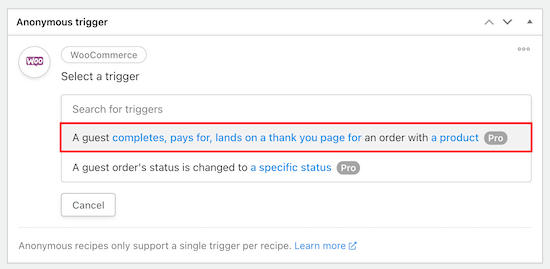
Then, you can choose the trigger.

We’ll select the first option from the drop-down menu since this lets you send WooCommerce data once an order is complete.

Select first WooCommerce trigger

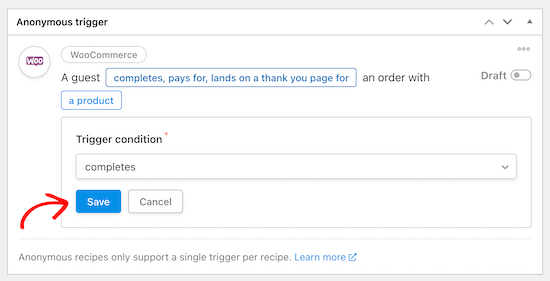
After that, you need to choose the trigger condition.

Select the ‘completes’ option from the drop-down menu to trigger the automation when a customer completes a purchase and then click ‘Save’.

Completes order trigger condition

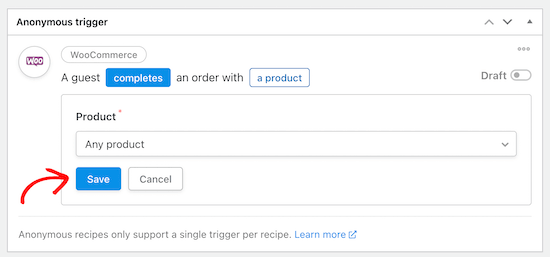
Now, you can choose a specific product or any product from your WooCommerce store to run the trigger on.

To choose any product in your store, select the ‘Any product’ option and then click ‘Save’.

Trigger any product in store

Now, you can move onto the Actions section. You’ll see different options depending on if you chose an anonymous or logged-in recipe.

If you chose an Anonymous recipe above, then you need to create a new subscriber user in WordPress first. This new user will be used to send the form data through.

For more details, see our guide on how to add new users and authors to your WordPress blog.

Now, select the ‘Existing user’ option in the ‘Actions’ meta box.

Select existing user

This brings up a popup to choose the new subscriber user role you just created and enter the user ID.

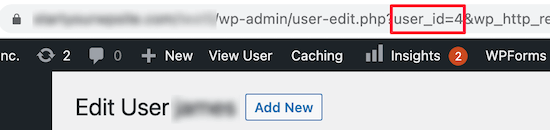
If you don’t know the user ID, then you can find this by going to Users » All Users and editing the user profile.

Then, in the URL you can find the user ID.

Find user ID

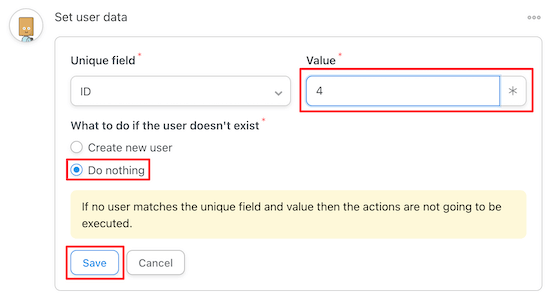
After that, select ‘Subscriber’, enter the ID, and select ‘Do nothing’ for existing users.

Then, click the ‘Save’ button to continue.

Select do nothing and save

Next, click the ‘Add action’ button.

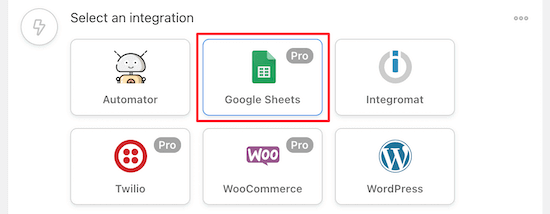
Then, select ‘Google Sheets’ from the list of integrations.

Select Google Sheets

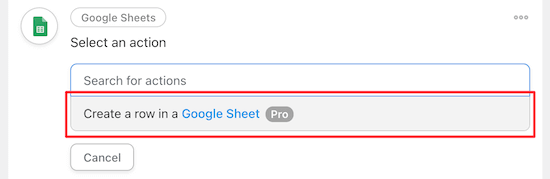
Once you’ve done that, choose the ‘Create a row in a Google Sheet’ option located in the ‘Select an action’ box.

Create a row in Google Sheets

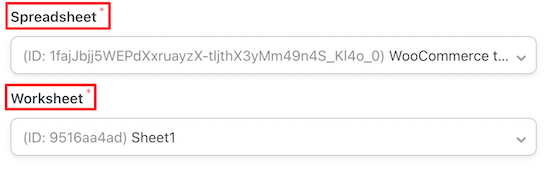
This will bring up a drop-down menu where you can select the spreadsheet you created earlier.

Then, select the ‘Spreadsheet’ and ‘Worksheet’.

Select spreadsheet and worksheet

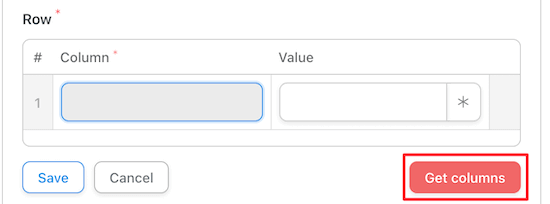
Next, you need to click the ‘Get columns’ button.

This will import the rows from your spreadsheet.

Select get columns

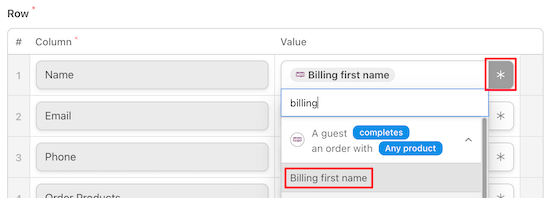
You need to map your spreadsheet columns to the WooCommerce order data by clicking the ‘Asterisk’ icon and selecting the WooCommerce field from the drop-down list.

Match order and spreadsheet columns

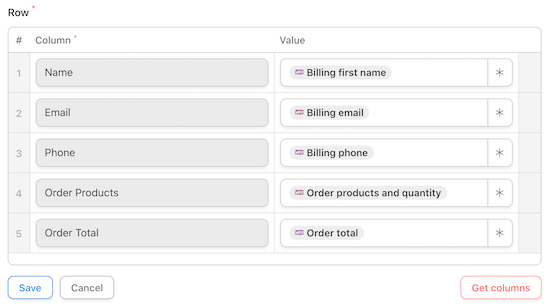
After you’ve matched up all of your fields, it will look similar to the settings below.

You can choose WooCommerce shipping information, however we decided to use the WooCommerce billing information since the contact information can be more accurate.

WooCommerce to Google Sheets columns

Make sure you click ‘Save’ once you’re done creating your recipe.

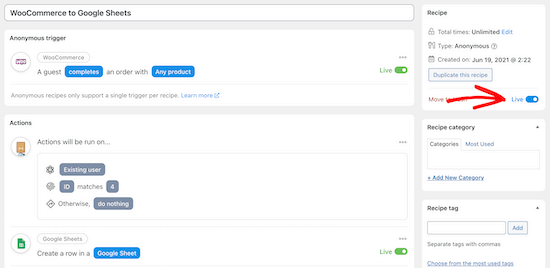
Now, you can view the full automation summary to make sure it looks right. After that, it’s time to make your recipe live.

At the top of the recipe editor, in the’ Recipe’ box, switch the Draft toggle to ‘Live’.

Review recipe and make live

Your new recipe will now be active, and you’ll automatically send new WooCommerce order data to Google Sheets once a purchase is complete.

Make sure to test your automation to see that the recipe is triggered and the correct action is performed.

If you want to add even more automations to your WooCommerce store, then see our guide on how to send Twilio SMS notifications from WooCommerce.

We hope this article helped you learn how to connect Google Sheets with WooCommerce. You may also want to see our expert picks of the best WooCommerce plugins for your store and our ultimate WooCommerce SEO guide to get more traffic.

If you liked this article, then please subscribe to our YouTube Channel for WordPress video tutorials. You can also find us on Twitter and Facebook.

The post How to Connect Google Sheets with WooCommerce (in 5 minutes) appeared first on WPBeginner.


July 06, 2021 at 02:30PM