Thursday, July 15, 2021

How to Add Drop Caps in WordPress Posts

Are you looking for a way to add drop caps in WordPress?

Drop caps are a great way to start a paragraph. They help you to capture your reader’s attention and get them interested in reading your content.

In this article, we will show you how to add drop caps in WordPress posts without writing any CSS code.
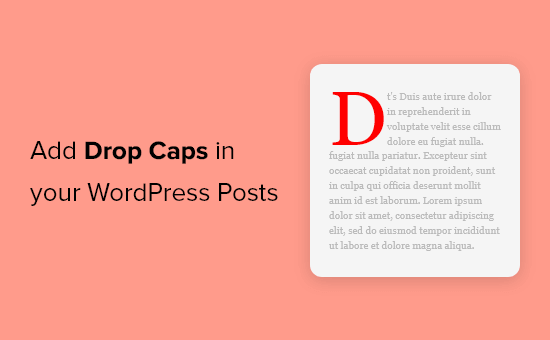
Add Drop Caps in a WordPress Post

What is a Drop Cap?

A drop cap is a styling technique commonly used in print books and magazines that feature longer reads. The first letter of the starting paragraph in each chapter uses a large font size.

Normally the large capital letter extends downwards to drop below the first few lines, which is why it’s called a “drop cap”.
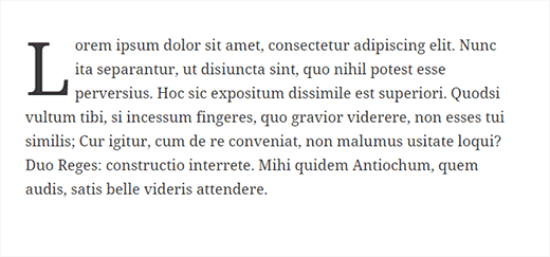
Floating drop caps example

Adding drop caps helps your content to stand out and catch your visitor’s attention. They add a more formal and traditional touch to your site’s design.

There are several ways to add drop caps to a WordPress website. You can use the built-in option in the WordPress block editor or use a plugin.

We’ll show you how to use drop caps in the WordPress block editor (Gutenberg) and the classic editor. You can click the link below to jump ahead to your preferred section:

Add Drop Caps in WordPress Block Editor (Gutenberg)

The WordPress block editor has a built-in option to enable drop caps for the initial letter in the paragraph.

With a click of a button, you can increase the font size and wrap text under the first letter to create a drop caps effect.

To start, you can create a new post or edit an existing one. After that, click the plus (+) sign to add a paragraph block to your article.
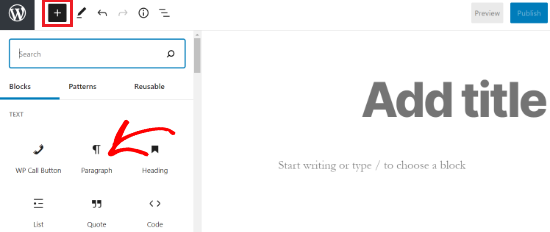
Add a paragraph block

Next, you can enable the drop cap option from the menu on your right. Simply click the toggle for Drop cap under ‘Text settings’ to show a larger initial letter.
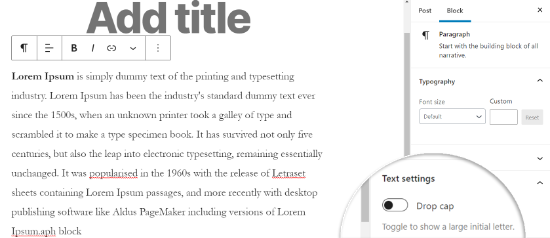
Enable the drop cap option in the block editor

Once you’ve enabled the option, the first letter in your paragraph will be larger than the rest of the text and drop underneath the first few lines.

You can now publish your WordPress blog post to see the drop caps in action.
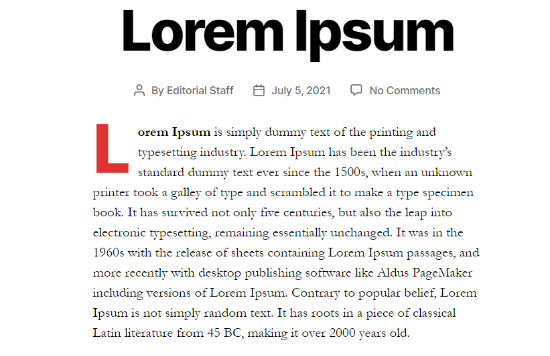
Drop caps example in WordPress

You will notice that the built-in drop caps option will use your WordPress theme’s styling for the color, font, and size of the first letter.

If you want to change the style of your drop caps in the WordPress block editor, then you’d have to enter custom CSS code or use a plugin.

Since writing CSS code requires technical knowledge, you may want to use the Initial Letter WordPress plugin to edit the styling of your drop caps in the block editor, instead of using the built-in option.

In the next section, we’ll show you how to use the Initial Letter plugin to create customized drop caps.

Add Drop Caps in WordPress Classic Editor

The easiest way to add drop caps in the classic editor is by using a WordPress plugin.

If you want to add drop caps to the classic editor without a plugin, then you’d have to write CSS code and add it to your Theme Editor. This can be tricky for beginners, and making a mistake could break your WordPress website.

For this tutorial, we will be using the Initial Letter plugin as it’s easy to use and is absolutely free. The plugin offers multiple options to customize your drop caps and it also works with the WordPress block editor.

First, you will need to install and activate the Initial Letter plugin on your website. For more details, you can refer to our guide on how to install a WordPress plugin.

Once the plugin is active, you can go to Settings » Initial Letter from your WordPress dashboard and change the settings of your drop caps.
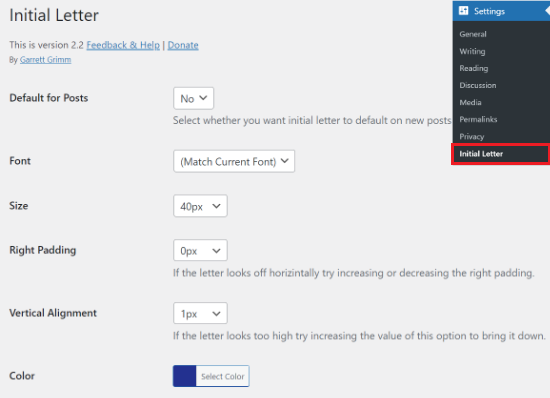
Initial Letter settings

The plugin allows you to edit the font, size, color, alignment, and padding of your drop caps. You can also select the options to show drop caps in the excerpt and only have the first paragraph to have a large initial letter.

After you’re done with the settings, don’t forget to click the ‘Save Changes’ button at the bottom.

If you don’t want to show drop caps on some posts or pages, then you can disable Initial Letter inside the WordPress classic editor.

Just edit your existing post, scroll down to the Initial Letter metabox, and change the option from Yes to No.
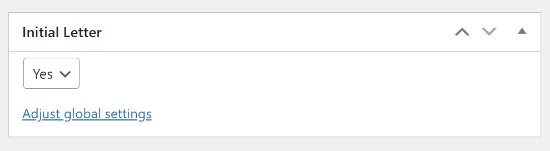
Change Initial Letter settings in the classic editor

Next, you can preview and publish your article to see the drop caps in action.
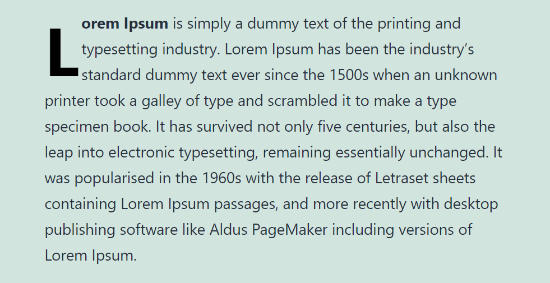
Drop caps example for classic editor

We hope this article helped you add drop caps in WordPress posts. You may also want to check out how to choose the best web design software and best email marketing services for small businesses.

If you liked this article, then please subscribe to our YouTube Channel for WordPress video tutorials. You can also find us on Twitter and Facebook.

The post How to Add Drop Caps in WordPress Posts appeared first on WPBeginner.


July 15, 2021 at 04:00PM
Wednesday, July 14, 2021

How to Easily Fix Leverage Browser Caching Warning in WordPress

Do you want to learn how to easily fix leverage browser caching warning in WordPress?

By fixing the leverage browser caching warning, you’ll quickly speed up your WordPress site and deliver a better experience to your website visitors.

In this article, we’ll show you how to easily fix leverage browser caching warning in WordPress.

How to fix leverage browser caching warning in WordPress

What is Browser Caching in WordPress?

Browser caching is a way to improve your website loading speeds. When a web page loads, all of the files will be loaded separately.

This creates multiple requests between the browser and your WordPress hosting server, which increases the web page loading time.

When browser caching is enabled, your web browser stores a copy of your web page locally. This allows browsers to load common files like stylesheets, logo, images, etc faster when the user visits a second page on your site.

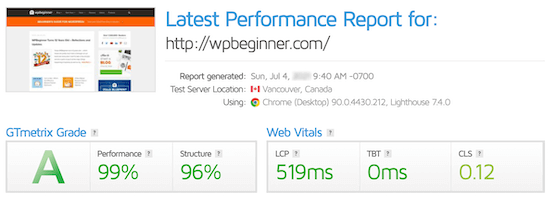
Site speed test results

This reduces the overall server load because fewer requests will be made to the actual server, and your website performance will improve as a result.

Where will You See the Leverage Browser Caching Warning for WordPress?

The leverage browser caching warning means that you don’t have browser caching enabled, or your caching could be set up the wrong way.

When you’re running a website speed test, you’ll get a report that shows you what you can fix to speed up WordPress.

If your website isn’t currently using browser caching, then you’ll get a warning to enable browser caching.

This is how it can look when looking at your results from a page speed insights tool.

Leverage browser caching warning

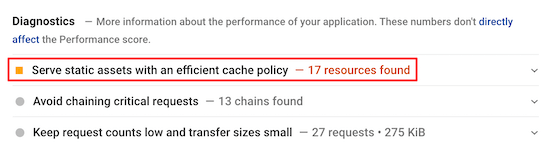
Sometimes you’ll get a warning that says your efficient cache policy isn’t working.

Both of these warning refers to an error with your browser caching set up.

Efficient cache policy warning

Leveraging browser caching means activating and customizing the caching rules to speed up your site.

That being said, let’s take a look at how to easily fix leverage browser caching warning in WordPress using two different methods.

Simply use the quick links below to choose how you want to fix the leverage browser caching warning in WordPress.

Method 1. Fix Leverage Browser Caching Warning with WP Rocket WordPress Plugin

WP Rocket is the best WordPress caching plugin in the market. It’s very beginner friendly and can help you optimize your site for speed, even without knowing complex caching and speed terms.

WP Rocket

Right out of the box, all of the recommended caching settings will really speed up your WordPress website.

To fix the leverage browser caching warning with WP Rocket, all you have to do is install and activate the plugin.

That’s it.

For more details, see our guide on how to properly install and setup WP Rocket in WordPress.

WP Rocket will automatically enable browser caching and modify your .htaccess file with the right rules.

Note: if you’re using SiteGround web hosting, then you can use the free SiteGround Optimizer plugin instead.

It has nearly the same features as WP Rocket, and it will automatically enable browser caching for you.

Method 2. Fix Leverage Browser Caching Warning by Adding Code to WordPress

The second method involves adding code to your WordPress files. If you haven’t done this before, then see our beginner’s guide to pasting snippets from the web into WordPress.

This method is not as beginner friendly, so please only follow this if you know exactly what you’re doing. For most business owners, we recommend using Method 1.

With that said, let’s take a look at how to fix leverage browser caching warning by adding code to WordPress.

Note: before you customize your WordPress code, we recommend backing up your WordPress site. For more details, see our guide on how to backup and restore your WordPress site.

Determine if Your Website is Running Apache or Nginx?

First, you need to figure out if your website is using Apache or Nginx servers.

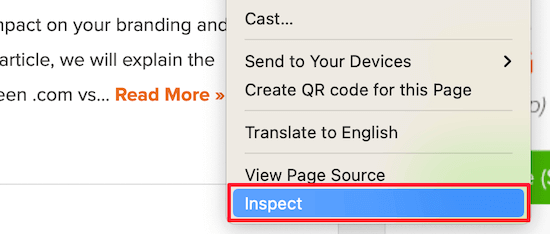
To do this, open up your website in a new tab or window. Then, right click and select the ‘Inspect’ option.

Right click and inspect

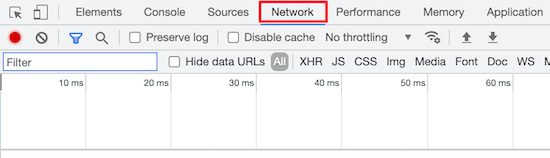
Next, click the ‘Network’ tab at the top of the page.

You may need to refresh the page for the results to load.

Click network

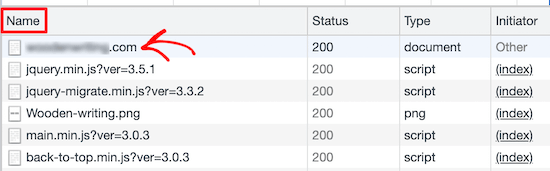
After that, click your domain name in the ‘Name’ column.

It should be at the top of the page.

Click website URL

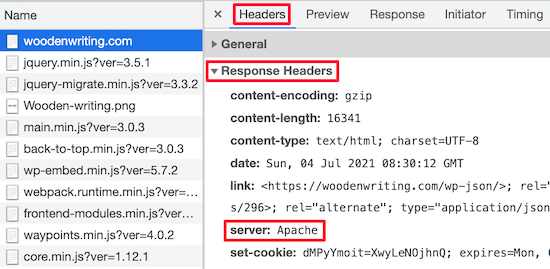
Then, in the ‘Response Headers’ section, you’ll see an item called ‘server’ where the type of server is displayed. In this case, the site is running on an Apache server.

Find type of server

Add Cache-Control and Expire Headers in Apache

To fix the leverage browser caching warning with an Apache server, you’re going to be adding code to your .htaccess file.

To edit this file, you need to connect to your WordPress hosting account with an FTP client or your host’s file manager tool.

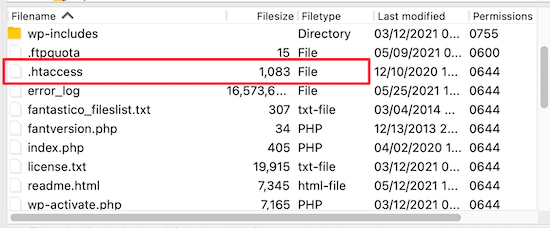
After you’re connected, you can see your .htaccess file in your website’s root folder.

htaccess FTP

If you can’t find it, then don’t worry. Sometimes this file can be hidden. For more details, see our guide on why you can’t find .htaccess file on your WordPress site.

Next, you need to add cache-control and/or expire headers to turn on browser caching. This tells the web browser how long it should store your website resources before they are deleted.

The cache-control header gives specific details to the web browser about how caching should be done.

The expires header enables caching and tells the web browser how long it should store specific files before being deleted.

You can add the following code to your .htaccess file to add expire headers:

## EXPIRES HEADER CACHING ##
<IfModule mod_expires.c>
ExpiresActive On
ExpiresByType image/jpg "access 1 year"
ExpiresByType image/jpeg "access 1 year"
ExpiresByType image/gif "access 1 year"
ExpiresByType image/png "access 1 year"
ExpiresByType image/svg "access 1 year"
ExpiresByType text/css "access 1 month"
ExpiresByType application/pdf "access 1 month"
ExpiresByType application/javascript "access 1 month"
ExpiresByType application/x-javascript "access 1 month"
ExpiresByType application/x-shockwave-flash "access 1 month"
ExpiresByType image/x-icon "access 1 year"
ExpiresDefault "access 3 days"
</IfModule>
## EXPIRES HEADER CACHING ##

This code set different cache expiration dates based on the type of file.

After that, you can add the following code to enable cache-control:

<filesMatch ".(ico|pdf|flv|jpg|jpeg|png|gif|svg|js|css|swf)$">
    Header set Cache-Control "max-age=96000, public"
</filesMatch>

This code sets the time for when the cache will expire. In the example above, the cache will expire in 90,000 seconds.

After that, the web browser will request new versions of the files.

Add Cache-Control and Expire Headers in Nginx

If you’re using an Nginx web server to host your WordPress blog, then you can edit the server configuration file to fix the browser caching error.

How you edit and access this file depends on your host, so you can reach out to your hosting provider if you need help accessing the file.

Then, you need to add the following code to add expire headers:

  location ~* \.(jpg|jpeg|gif|png|svg)$ {
    expires 365d;
  }

  location ~* \.(pdf|css|html|js|swf)$ {
    expires 3d;
  }

This code will set the expiration times for the different file types. Notice that images are cached longer than HTML, CSS, JS, and other file types since images usually stay the same.

After that, you can add the following code to add cache-control headers:

location ~* \.(js|css|png|jpg|jpeg|gif|svg|ico)$ {
 expires 14d;
 add_header Cache-Control "public, no-transform";
}

This code sets the time for when the cache will expire. It tells your server that the file types above won’t change for 14 days.

If you’re looking to speed up WordPress even more, then make sure to check out our guide on how to boost WordPress speed and performance.

We hope this article helped you learn how to easily fix leverage browser caching warning in WordPress. You may also want to see our ultimate list of the most common WordPress errors and how to fix them, and our expert picks of the best SEO tools and plugins to get more traffic.

If you liked this article, then please subscribe to our YouTube Channel for WordPress video tutorials. You can also find us on Twitter and Facebook.

The post How to Easily Fix Leverage Browser Caching Warning in WordPress appeared first on WPBeginner.


July 14, 2021 at 03:50PM

Tuesday, July 13, 2021

How to Add a Custom Login URL in WordPress (Step by Step)

Do you want to add a custom login URL in WordPress?

Adding a custom login URL in WordPress can help improve your WordPress security and offer your visitors a better experience.

In this article, we’ll show you how to add a custom login URL in WordPress, step by step.

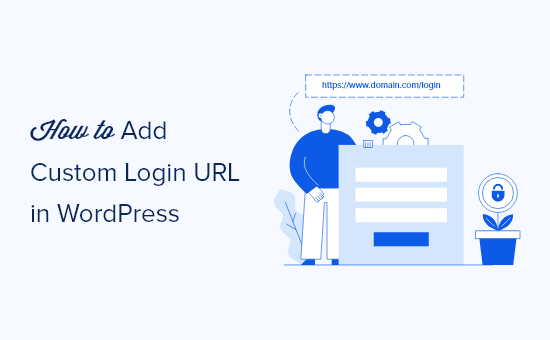
How to add a custom login URL in WordPress (step by step)

Why Add a Custom Login URL in WordPress?

WordPress is the most popular CMS platform and powers over 40% of websites. Because it’s so popular, it’s often a target of hackers who use techniques like brute force attacks to try to log in to your dashboard.

Bots and hackers trying to get into your site know the common login URLs like wp-admin and wp-login and will try to get access to your site using these URLs first.

By changing the WordPress login page URL, you improve your site’s security and make it more difficult for hackers to get access to your WordPress website.

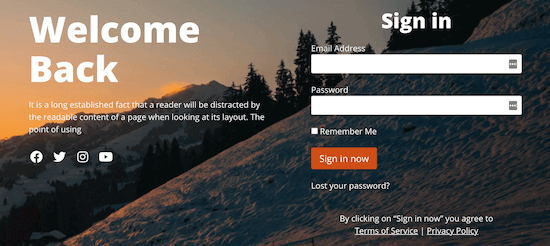
Sample login page

Another reason to add a custom login link in WordPress is to offer a better user experience. You can customize the URL and design of your login page so it matches your branding and existing WordPress theme.

With that said, let’s show you how to add a custom login URL in WordPress in just a few simple steps.

How to Add a Custom Login URL in WordPress Using SeedProd

The simplest way to add a custom login URL in WordPress is by using a WordPress plugin. This lets you simply change your WordPress login URL without editing any core WordPress files.

We recommend using the SeedProd plugin. It’s the best drag and drop WordPress page builder used by over 1 million sites. With this plugin, you can easily customize your SeedProd login page and change the URL.

The first thing you need to do is install and activate the plugin. For more details, see our step by step guide on how to install a WordPress plugin.

Note: There is a free version of SeedProd, but we’ll be using the premium version for this tutorial since it has the login page templates we need.

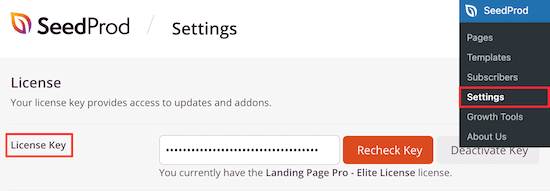
Upon activation, first you’ll need to go to SeedProd » Settings and enter your product license key.

Enter SeedProd license key

You can find your product license key under your account information on the SeedProd website.

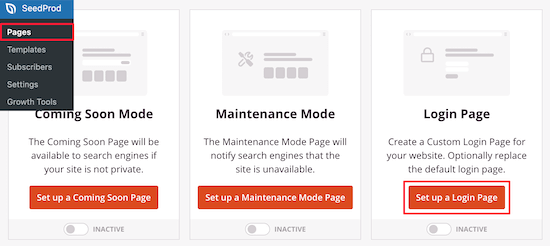
After that, navigate to SeedProd » Pages and click the ‘Set up a Login Page’ button.

Setup SeedProd login page

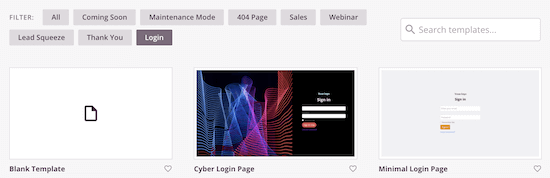
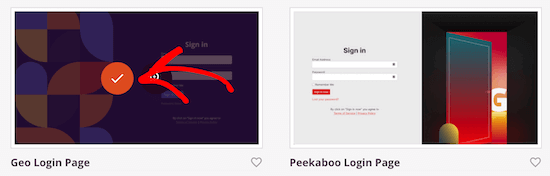
Then, you’ll be taken to a screen that has all of the login page templates.

You can choose one of the pre-made professional templates or select the ‘Blank’ template to build a login page from scratch.

Login page templates

For this tutorial, we’ll choose the ‘Geo Login Page’ template.

Simply hover over the template you want to use and click the check icon.

Select login page template

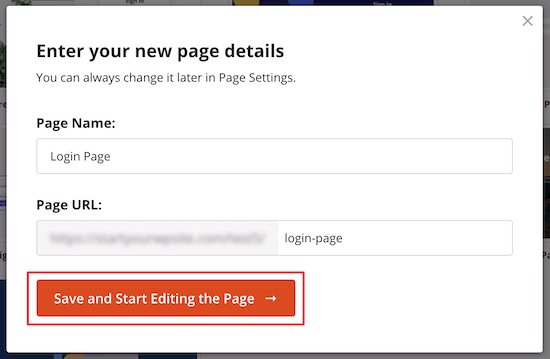
This brings up a popup where you can name your new login page and enter a custom login page URL.

Next, click the ‘Save and Start Editing the Page’ button.

Name login page and URL

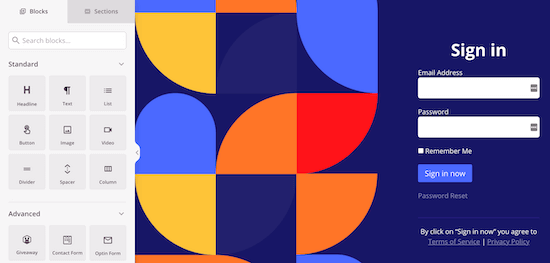
This will take you to the page editor screen.

You can customize every element of the page with the drag and drop builder.

SeedProd page editor example

The left side has blocks and sections you can add to the page, and the right side shows a real time preview of what it looks like.

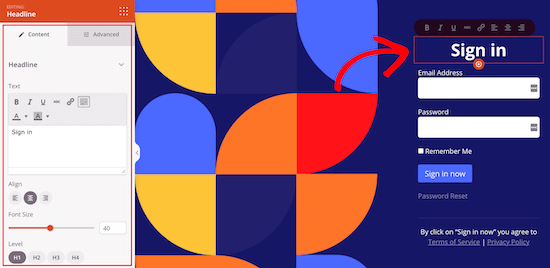
When you click on any page element, it will bring up a menu to customize it further.

Customize login page

You can customize your login page as much as you want, but we’ll leave the default settings for this tutorial.

For more details on all the customization options, see our ultimate guide on how to create a custom WordPress login page.

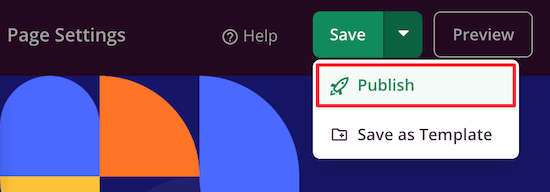
Next, you need to click the arrow next to the ‘Save’ box and select ‘Publish’ from the drop down.

Publish login page

Now, it’s time to change the default login URL to your new login page.

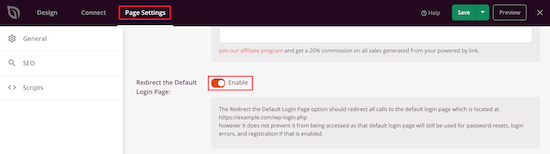
First, click the ‘Page Settings’ menu option at the top of the page.

Then, scroll down the page until you see the ‘Redirect the Default Login Page’ option. Simply click the ‘Enable’ toggle, and you’ll see it turn orange.

Enable login redirect

This will redirect the default WordPress login page to the new page you just created.

Don’t forget to click the ‘Save’ button again to make sure all of your changes are now live.

Change WordPress Login Page URL with a Free Plugin

We recommend using the SeedProd plugin above because it also lets you easily customize your login page to match the design of your site.

However, some users will want to keep the default WordPress login page and only change the login page URL.

To do this, you can use the free plugin called WPS Hide Login. This plugin lets you simply change the login URL without customizing the page.

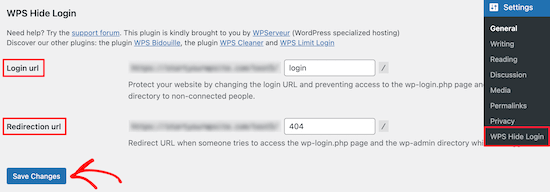
Once the plugin is installed and activated, navigate to Settings » WPS Hide Login.

Then, add your new login page URL in the ‘Login url’ box.

WPS Hide Login add redirect

You can also add a redirect URL in the ’Redirection url’ box.

This will redirect people to another page on your WordPress blog when they try to access the default wp-login.php page, and they aren’t logged in.

After that, click ‘Save Changes’.

Now, all visitors will automatically be sent to your new login page URL.

We hope this article helped you learn how to add a custom login URL in WordPress. You may also want to see our guide on how to choose the best web design software, and our list of the best email marketing services for small businesses.

If you liked this article, then please subscribe to our YouTube Channel for WordPress video tutorials. You can also find us on Twitter and Facebook.

The post How to Add a Custom Login URL in WordPress (Step by Step) appeared first on WPBeginner.


July 13, 2021 at 04:00PM