Tuesday, July 20, 2021

6 Best Dropbox Plugins for WordPress

Looking for the best Dropbox plugins for WordPress?

Dropbox is one of the most popular free cloud storage providers. Using cloud storage to save your WordPress backups, media files, and other important documents is a great strategy. Your documents and files will remain safe no matter where you are and what device you are using.

There are several WordPress plugins that allow you to integrate your WordPress site with a Dropbox account.

In this article, we’ll share some of the best Dropbox plugins for WordPress to upload your website backups.

Best Dropbox Plugins for WordPress

What is Dropbox?

Dropbox is a modern solution to keep your files and documents secure on cloud storage. It offers a file synchronization feature to provide easy access to your files on your devices and apps, plus file sharing with other people.

The basic free plan comes with 2 GB storage. If you want more storage space, you should look for their premium plans.

Dropbox is a great tool for teams as well as individuals. You can set up permissions to provide access to certain files to specific team members.

By using the right WordPress Dropbox plugins, you can backup your entire WordPress site on the cloud and also restore the complete files when you need them.

Let’s look at the best Dropbox plugins for WordPress.

1. UpdraftPlus

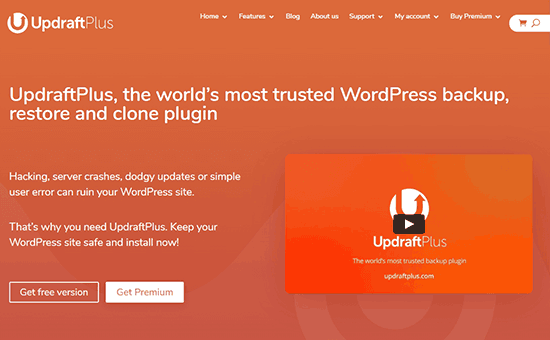
UpdraftPlus

UpdraftPlus is one the most popular Dropbox plugins for WordPress. It allows you to backup WordPress files, databases, external databases, and more.

It manages a log for all your backups in the WordPress admin area, and displays an error or warning message to update you about the status of your backups. Once the backup is completed, it sends you a complete report so you can monitor the events that occurred during the backup process.

UpdraftPlus is also a multisite-compatible plugin. The backup panel will be available in the network dashboard, and you can backup or restore your individual websites without having to restore all sites at once.

UpdraftPlus also offers a Dropbox Sub-Folders addon to extend the cloud storage functionality. If you’re using WordPress multisite, then this addon will manage your files in the right folders to provide easy access to restoration.

2. BackupBuddy

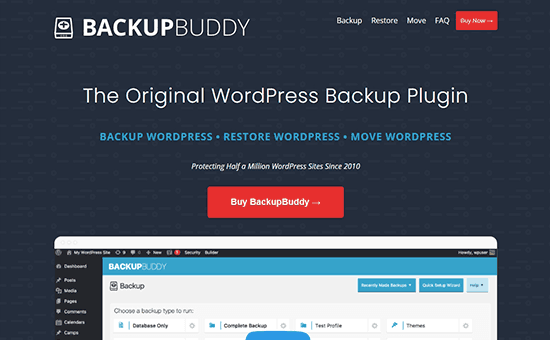
BackupBuddy

BackupBuddy is one of the most popular and reliable WordPress site backups and restoration plugins. It comes with the ability to automatically create backups on a given schedule and save them to any location you want, including your Dropbox account.

Once you connect your website with Dropbox, you don’t have to do it again and the plugin will keep storing your backups to Dropbox automatically.

For more details, you should check out our complete guide on how to keep your WordPress content safe with BackupBuddy.

3. BackWPup

BackWPup

BackWPup is a free WordPress Dropbox plugin. It allows you to create a complete backup of your WordPress site and store it on your Dropbox account.

You can also schedule your backups based on how frequently you update your website. BackWPup will automatically take care of storing them on your Dropbox cloud storage.

For more details, you should check this tutorial on how to create complete WordPress backup for free with BackWPup.

4. WPForms

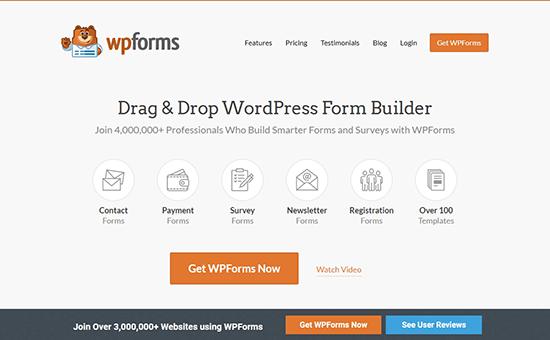
WPForms

WPForms is a beginner-friendly WordPress contact form plugin. It comes with a drag and drop form builder to create a contact form, user registration form, file upload form, and other useful forms.

It integrates with Zapier to connect thousands of apps to your WordPress website, including Dropbox. This allows you to upload user-submitted files directly to Dropbox cloud storage.

All files are accessible in your WordPress admin dashboard. You can view and delete any file without downloading it on your computer. WPForms with Dropbox is a perfect solution to store your files.

5. Duplicator

Duplicator

Duplicator is a premium Dropbox plugin for WordPress. It offers website migration service with complete website backups on the Dropbox cloud storage.

Using this plugin, you can move your WordPress site to a new host or server with no downtime. It keeps a backup of your original site for quick recovery.

Duplicator also allows you to create a copy of your live site to a staging site. You can move or backup your entire website, including the database, without losing any files.

6. BlogVault

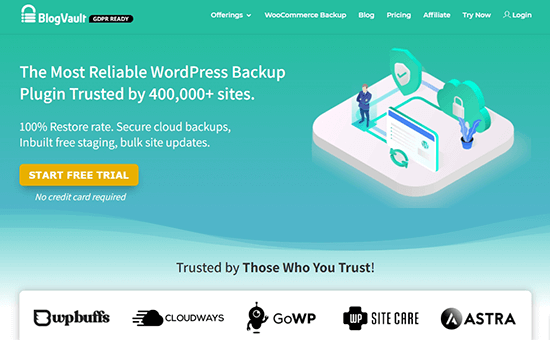
BlogVault

BlogVault is a reliable backup plugin for your WordPress blog. It allows you to create a complete backup of your website with databases and upload it to your Dropbox cloud storage account.

The backups are secure with encryption. However, it doesn’t offer a website restoration option from a Dropbox backup. You need to use a decryption tool to use the backups stored in your Dropbox account.

We hope this article helped you find some of the best Dropbox plugins for WordPress. You may also want to check out our guide on how to create a free business email address, or our comparison of the best managed hosting for WordPress.

If you liked this article, then please subscribe to our YouTube Channel for WordPress video tutorials. You can also find us on Twitter and Facebook.

The post 6 Best Dropbox Plugins for WordPress appeared first on WPBeginner.


July 20, 2021 at 02:00PM

Monday, July 19, 2021

How to Change Background Color in WordPress (Beginner’s Guide)

Are you looking for an easy way to change the background color of your WordPress website?

The background color of your website plays an important role in your design and branding, and in making your content more readable.

In this article, we will show you how to easily change the background color of your WordPress site.

How to Change Background Color in WordPress

Why Change the Background Color in WordPress?

A WordPress theme comes with a default background color. Changing the background color can help personalize your website design and improve readability.

For instance, you can make a specific section of a page prominent using a different background color. This helps in highlighting your call to action (CTA) and increase conversions.

You can use different background colors for different posts on your WordPress blog based on authors, comments, or categories. This helps in differentiating articles from other content on your website.

There is also a way to add videos backgrounds to instantly capture your visitors’ attention and boost engagement.

That being said, let’s take a look at how to change background color in WordPress. We’ll show you different ways to customize the background color, so you can jump ahead to any section you prefer:

Change Background Color using WordPress Theme Customizer

Depending on your theme, you may be able to change the background color using the WordPress Theme Customizer. It lets you edit the appearance of your site in real-time and without the need to edit code.

To access the WordPress Theme Customizer, you can log in to your website and then go to Appearance » Customize.

This will open the Theme Customizer, where you’ll find multiple options to modify your theme. This includes the menus, colors, homepage, widgets, background image, and more.

The specific options available will depend on which WordPress theme your site is using. For this tutorial, we’re using the default Twenty Twenty-One theme.

To change the background color of your website, go ahead and click on the ‘Colors & Dark Mode’ settings tab from the menu on your left.
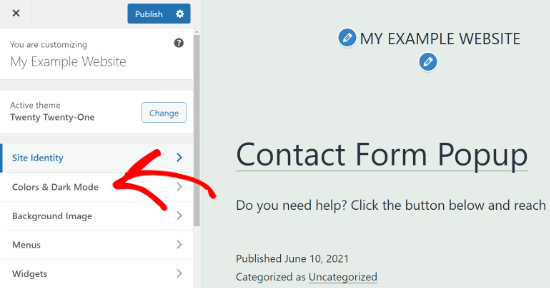
Go to Colors and Dark Mode settings

Next, you’ll need to click the ‘Background Color’ option and choose a color for your website. You can use the color picker tool or enter a Hex color code for your background.
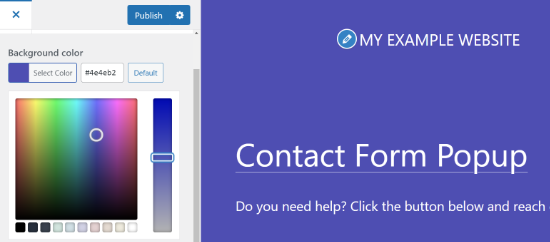
Choose a background color

When you’re done with the changes, don’t forget to click the ‘Publish’ button. You can now visit your website to see the new background color in action.
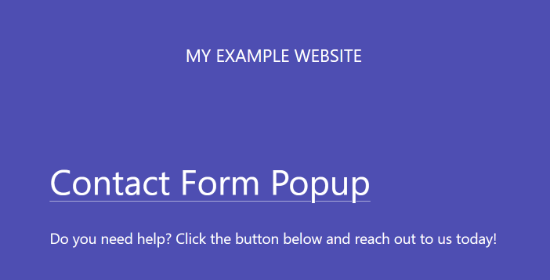
New background color example

Your theme may not have this option available in the Theme Customizer. In that case, you can try one of the methods below.

Change Background Color by Adding Custom CSS

Another way you can change the background color of your WordPress website is by adding custom CSS in the WordPress Theme Customizer.

To start, head over to Appearance » Customize and then go to ‘Additional CSS’ tab.
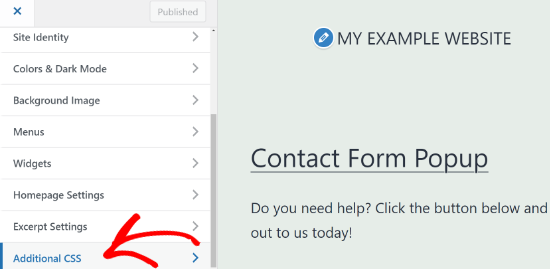
Add custom CSS in WordPress Theme Customizer

Next, you can enter the following code:

body {
 background-color: #FFFFFF;
}

All you have to do is replace the background color code with the color code that you want to use on your website. Next, go ahead and enter the code in the Additional CSS tab.
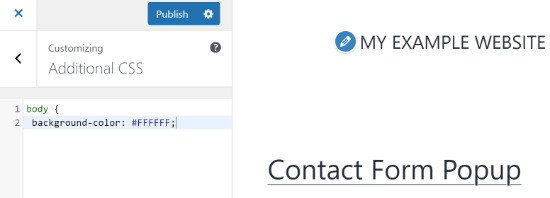
Enter background color custom CSS

When you’re done, don’t forget to click the ‘Publish’ button. You can now visit your website to view the new background color.

For more details, please refer to our guide on how to easily add custom CSS to your WordPress site.

Randomly Change Background Colors in WordPress

Now, are you looking for a way to randomly change the background color in WordPress?

You can add a smooth background color change effect to transition between different background colors automatically. The effect goes through multiple colors until it reaches the final color.

To add the effect, you’ll need to add code to your WordPress website. We’ll walk you through the process below.

The first thing you’ll need to do is find out the CSS class of the area where you’d like to add the smooth background color change effect.

You can do this by using the Inspect tool in your browser. All you have to do is take your mouse to the area you want to change the color and right-click to select the Inspect tool.
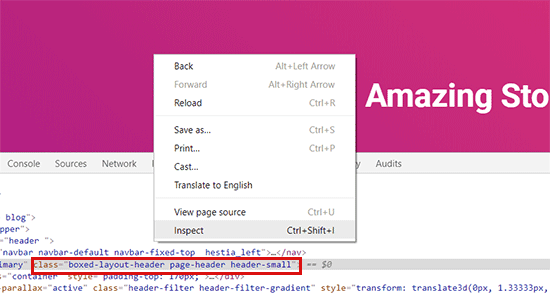
Find CSS class

After that, you’ll need to write down the CSS class you want to target. For example, in the screenshot above, we want to target the area with a CSS class ‘page-header.’

Next, you need to open a plain text editor on your computer like a notepad and create a new file. You’ll have to save the file as ‘wpb-background-tutorial.js’ on your desktop.

Once that’s done, you can add the following code to the JS file you just created:

jQuery(function($){
        $('.page-header').each(function(){
            var $this = $(this),
            colors = ['#ec008c', '#00bcc3', '#5fb26a', '#fc7331'];
 
            setInterval(function(){
                var color = colors.shift();
                colors.push(color);
                $this.animate({backgroundColor: color}, 2000);
            },4000);
        });
        }); 

If you study the code, then you’ll notice that we used the ‘page-header’ CSS class as it’s the area we want to target on our website.

You’ll also see that we used four colors using the hex color code. You can add as many colors as you want for your background. All you have to do is enter the color codes in the snippet and separate them using a comma and single quotes, like the other colors.

Now that your JS file is ready, you’ll need to upload it to your WordPress theme’s JS folder using a file transfer protocol (FTP) service.

For this tutorial, we’re using FileZilla. It’s a free FTP client for Windows, Mac, and Linux, and it’s very easy to use.

To start, you’ll need to log in to your website’s FTP server. You can find the login credentials in the email from your host provider or in your hosting account’s cPanel dashboard.

After you’re logged in, you’ll see a list of folders and files of your website under the ‘Remote site’ column. Go ahead and navigate to the JS folder in your site’s theme.
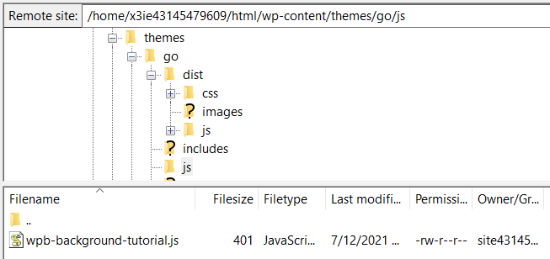
Upload JS file using a FTP service

If your theme doesn’t have a js folder, then you can create one. Simply right-click your theme’s folder in the FTP client and click the ‘Create directory’ option.
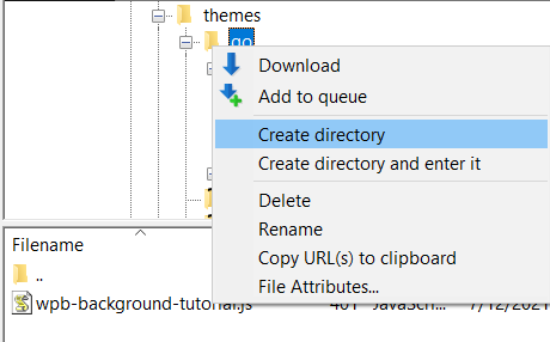
Create a directory and name it

Next, you’ll need to open the location of your JS file under the ‘Local site’ column. Then right-click the file and click the ‘Upload’ option to add the file to your theme.
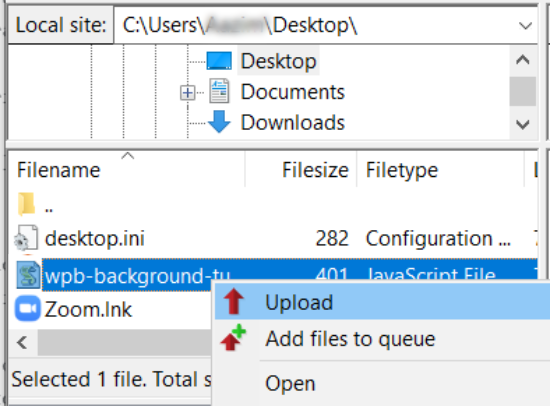
Click the Upload option

For more details, you can follow our tutorial on how to use FTP to upload files to WordPress.

Next, you’ll need to enter the following code into your theme’s funtions.php file. This code properly loads the JavaScript file and the dependent jQuery script that you need for this code to work.

function wpb_bg_color_scripts() {    
wp_enqueue_script( 'wpb-background-tutorial',  get_stylesheet_directory_uri() . '/js/wpb-background-tutorial.js', array( 'jquery-color' ), '1.0.0', true ); 
 } 
add_action( 'wp_enqueue_scripts', 'wpb_bg_color_scripts' ); 

We recommend using the Code Snippets plugin to safely add the code to your site. For more details, see our guide on how to paste snippets from the web into WordPress.

You can now visit your website to see the randomly changing colors in action in the area you targeted.

Color change effect animation

Change Background Color for Individual Posts

You can also change the background color of each individual blog post in WordPress instead of using a single color throughout your website using custom CSS.

It allows you to change the appearance of specific posts and personalize their backgrounds. For example, you can customize the style of each post based on authors or show a different background color for your most commented post.

You can even change the background color for posts in a particular category. For example, news posts can have different background colors compared to tutorials.

The first thing you’ll need to do is find the post ID class in your theme’s CSS. You can do that by viewing any blog post and then right-click to use the Inspect tool in your browser.
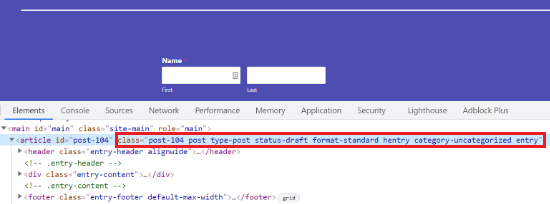
Default CSS for specific post in WordPress

Here is an example of what it would look like:

<article id="post-104" class="post-104 post type-post status-publish format-standard hentry category-uncategorized"> 

Once you have your post ID, you can change the background color of an individual post by using the following custom CSS. Just replace the post ID to match your own and the background color code that you want.

.post-104 { 
background-color: #D7DEB5;
color:#FFFFFF; 
} 

To add the custom CSS, you can use the WordPress Theme Customizer. First, make sure that you’re logged in to your WordPress website. Then, visit your blog post and click the ‘Customize’ option at the top.

After that, head over to the Additional CSS tab from the menu on your left.
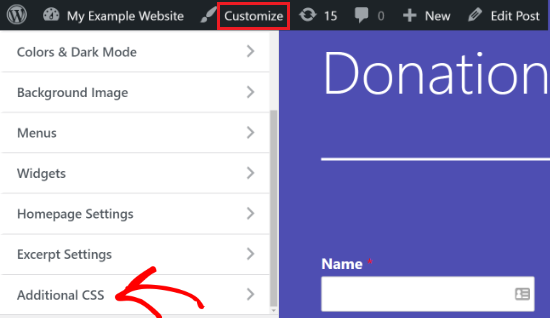
Go to Additional CSS option

Next, enter the custom CSS and then click the ‘Publish’ button.
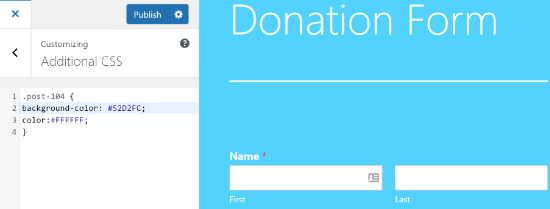
Enter custom CSS for individual post color

You can now visit your blog post to see the new background color.

If you want to change the background color based on author, comments, or category, then check out our detailed tutorial on how to style each WordPress post differently.

Use a Video in the Background

Using videos as your website background is a great way to capture your visitors’ attention and increase user engagement.

The easiest way to add a video in the background is by using a WordPress plugin. For this tutorial, we’ll use mb.YTPlayer for background videos.

It’s a free plugin that lets you play YouTube videos in the background of your WordPress website. There is also a premium version available that lets you remove the mb.YTPlayer watermark and offers more customization features.

First, you’ll need to install and activate the plugin on your website. For more details, you can follow our tutorial on how to install a WordPress plugin.

Upon activation, you can head over to mb.ideas » YTPlayer from your WordPress admin area.

On the next screen, you’ll need to enter the URL of your YouTube video and activate the background video.
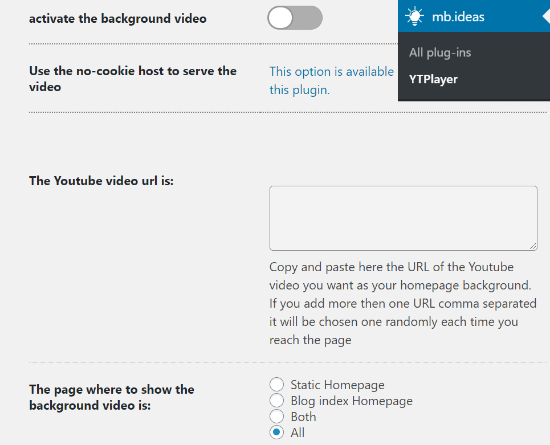
Enter your YouTube video URL

Besides that, the plugin lets you select the location to show your background video. You can choose a static homepage, blog index homepage, or both. There is also an option to show the video on your entire site if you select ‘All.’

Once you’ve entered the video URL and activated the background, go ahead and visit your website to see the video background in action.
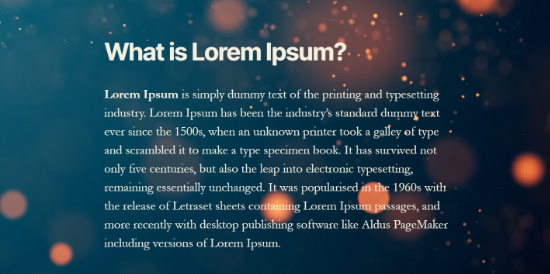
Video background preview

Create a Custom Landing Page

Creating custom landing pages in WordPress allows you to generate leads and boost sales for your business. You have complete control over the background color and design of the page.

The easiest way to create a highly engaging custom landing page is by using SeedProd. It’s the best landing page plugin for WordPress and offers an easy-to-use drag and drop page builder to create pages without editing code.

The first thing you’ll need to do is install and activate SeedProd on your website. You can refer to our guide on how to install a WordPress plugin.

Note: We’ll be using the SeedProd Pro version as it offers more powerful features, templates, and customization options. However, there is also a free version available on WordPress.org.

Once the plugin is active, you’ll be asked to enter your license key. You can find the key in your SeedProd account area. After entering the key, click the ‘Verify Key’ button.

SeedProd license key

Next, you can head over to SeedProd » Pages and click on the ‘Add New Landing Page’ button.
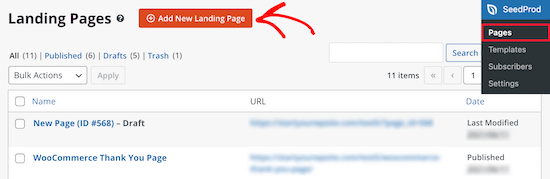
Add new SeedProd landing page

After that, you’ll need to select a theme for your landing page. SeedProd offers lots of beautiful landing page templates to get started.

You can also use a blank template to start from scratch. However, we suggest using a template as it’s an easier and faster way to create a landing page.
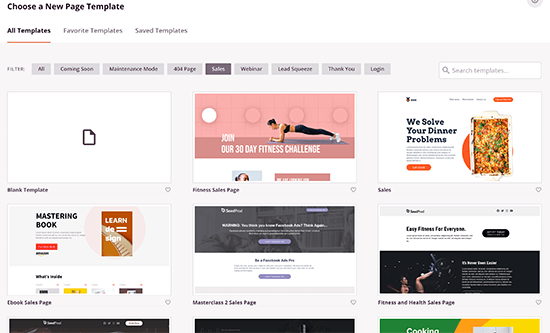
Choose a template for your page

When you select a template, you’ll be asked to enter a Page Name and choose a URL.
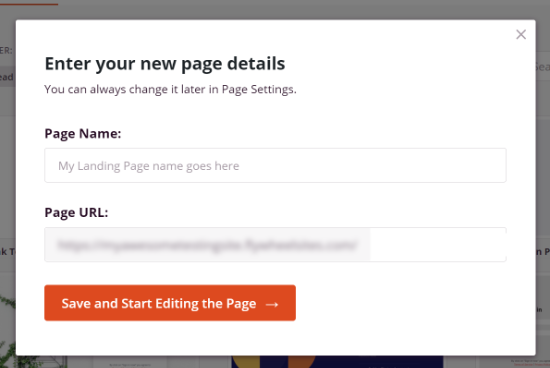
Enter a Page Name and Page URL

On the next screen, you’ll see the SeedProd page builder. Here you can use the drag and drop builder to add blocks from the menu on your left. You can add a headline, video, image, button, etc.

When you scroll down, there are more blocks under the Advanced section. For example, you can add a countdown timer to create urgency, show social profiles to increase followers, add an option form to collect leads, and more.
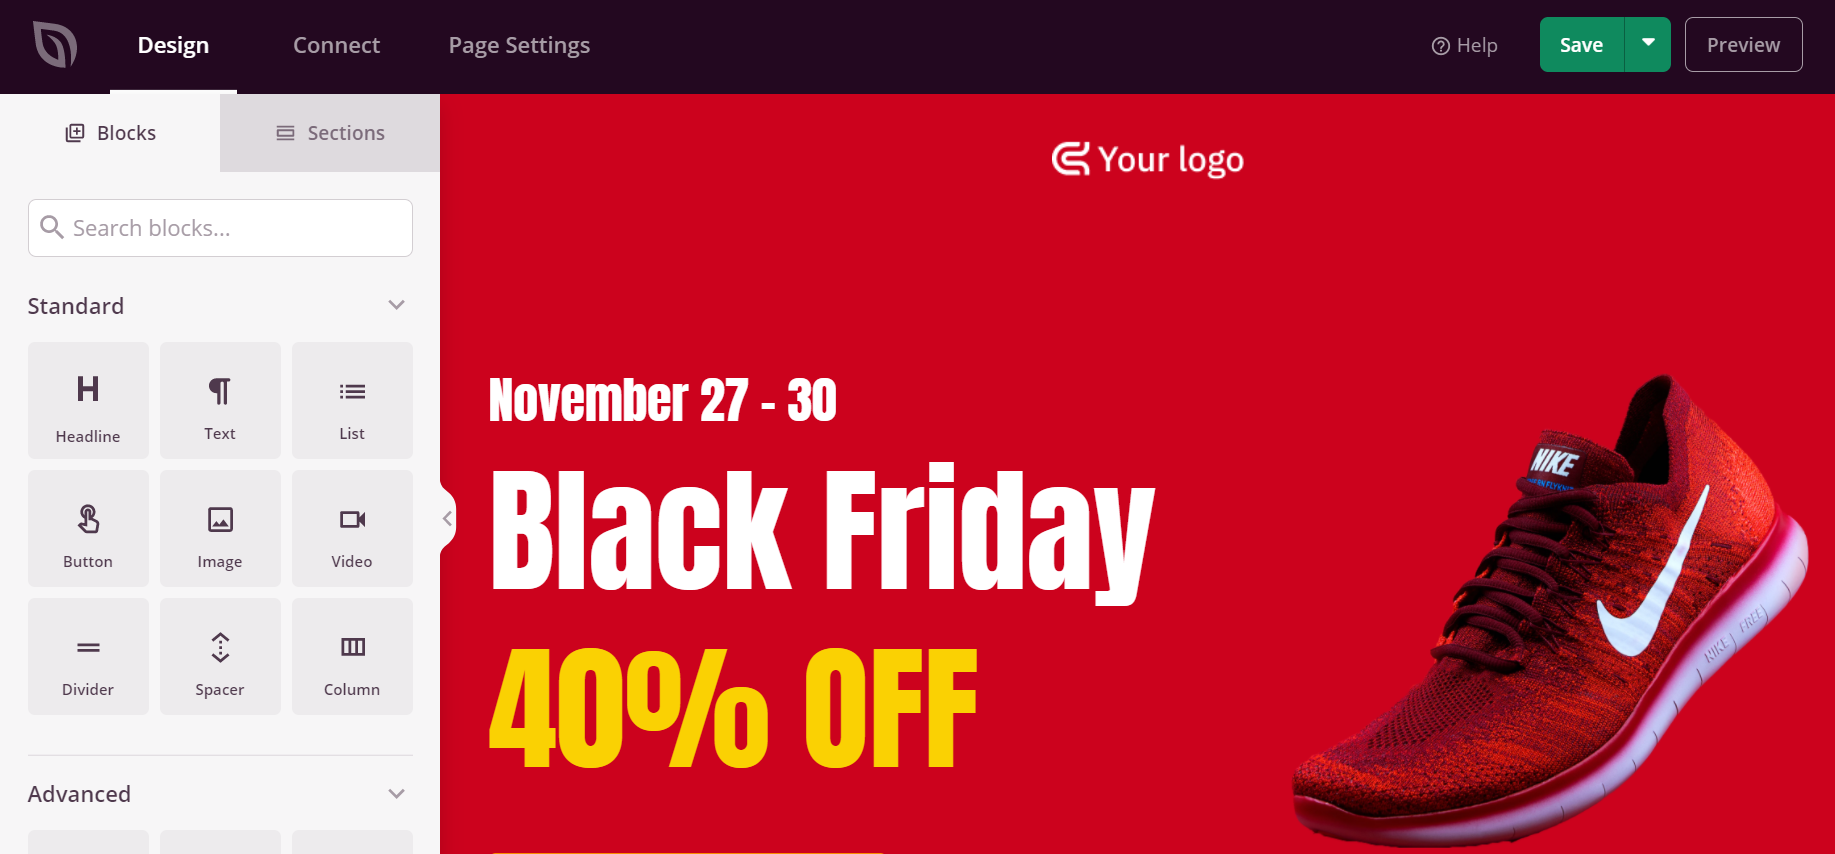
SeedProd landing page builder

Using the drag and drop builder, it’s effortless to change the position of each block on your landing page. You can even change the layout, size, color, and font of the text.

To change the background color of your landing page, simply select any section of the page. You’ll now see options in the menu on your left to edit the background style, color, and add an image.
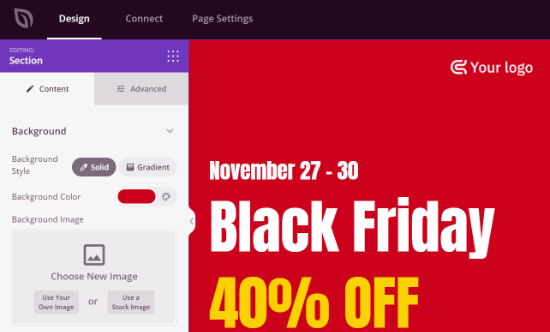
Change background color of landing page

After you’re done editing your landing page, don’t forget to click the ‘Save’ button at the top.

Next, you can head over to the ‘Connect’ tab and integrate the page with different email marketing services. For example, you can connect to Constant Contact, SendinBlue, and others.
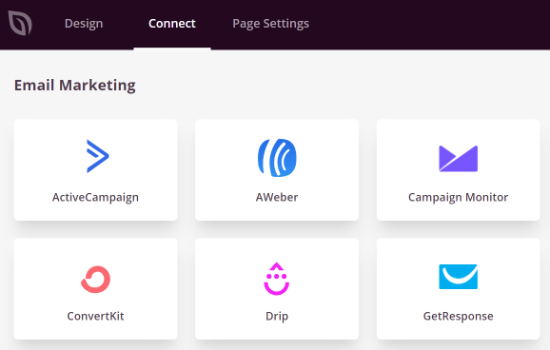
Connect email marketing services

After that, go ahead and click on the ‘Page Settings’ tab. Here you can change the Page Status from Draft to Publish to take your page live.
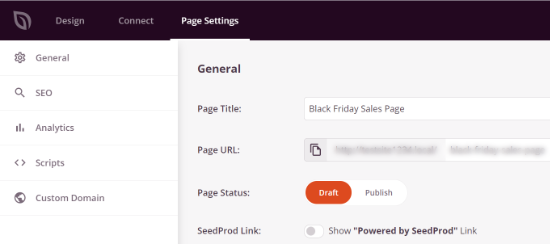
SeedProd page settings

Other than that, you can also change the SEO settings of the page, view the analytics, add custom code under Scripts, and enter a custom domain.

Once you’re done, you can exit the SeedProd page builder and visit your custom landing page.

Custom landing page preview

We hope this article helped you learn how to change the background color in WordPress. You may also want to check out our guide on how to choose the best website builder, or our comparison of the best web design software.

If you liked this article, then please subscribe to our YouTube Channel for WordPress video tutorials. You can also find us on Twitter and Facebook.

The post How to Change Background Color in WordPress (Beginner’s Guide) appeared first on WPBeginner.


July 19, 2021 at 05:28PM

Friday, July 16, 2021

7 Best WordPress Real Estate Plugins Compared (2021)

Are you looking for the best WordPress real estate plugins?

WordPress is used by many real estate websites to showcase listings and get new customers.

In this article, we have hand-picked the best WordPress real estate plugins that you can use to grow your business.

7 best WordPress real estate plugins compared (2021)

How to Make a Real Estate Website Using WordPress?

WordPress is the most popular website builder in the world. It’s widely used by real estate companies, realtors, and property management companies to showcase their listings and make more sales.

There are two different types of WordPress that often confuse beginners. First, there is WordPress.com which is a hosted solution. Second, you have WordPress.org, also known as self-hosted WordPress.

For more details, see our comparison on WordPress.com vs WordPress.org.

We recommend using WordPress.org because it allows you to use all WordPress features out of the box without any restrictions.

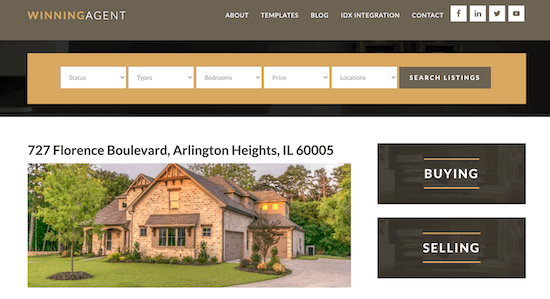
WordPress real estate website

You will need the following things to build your own real estate website using WordPress:

First you need to get a domain name and web hosting.

We recommend using Bluehost for your web hosting. Their hosting plans are officially recommended by WordPress.

Bluehost special offer for WPBeginner readers

WPBeginner readers can currently get a big 60% discount on hosting, plus a free domain name and SSL certificate.

Simply click on the Bluehost button below, and the discount will automatically be applied.

→ Click Here to Claim This Exclusive Bluehost Offer ←

Once you have purchased hosting, make sure to check out our ultimate guide on how to make a website.

That being said, let’s take a look at the best WordPress real estate plugins that you can use. These plugins will allow you to easily add your real estate listings and attract more customers.

1. IMPress for IDX Broker

IMPress IDX Broker Plugin

IMPress for IDX Broker is one of the best WordPress real estate plugins. It is easy for beginners to get started, and flexible for advanced users to create powerful real estate websites.

You can add as many details for each listing as you want with images and video support. Listings are beautifully displayed in a grid layout, and a single listing page allows users to get all the information they need including maps.

There’s also support for automated social media posts, email capture and lead management features, a real estate agent directory, and more.

It also allows you to import listings from your MLS database and supports IDX integration. It comes equipped with contact forms so that interested buyers can directly contact you.

2. Formidable Forms

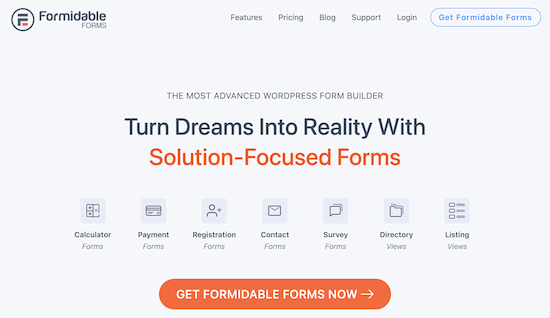
Formidable Forms

Formidable Forms is the most advanced WordPress form builder plugin in the market.

It has a simple but advanced drag and drop form builder that helps you create forms that go beyond simple contact forms.

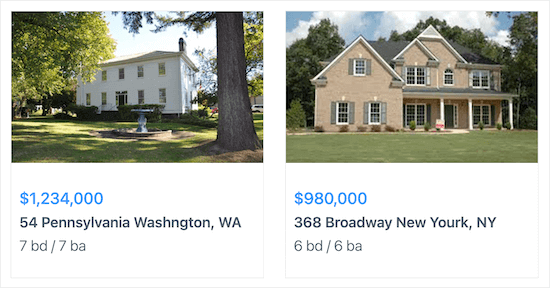
Formidable Forms comes with a real estate listings form template so you can allow your website visitors to submit listings to your website, and then display them in a grid.

Formidable Forms listings

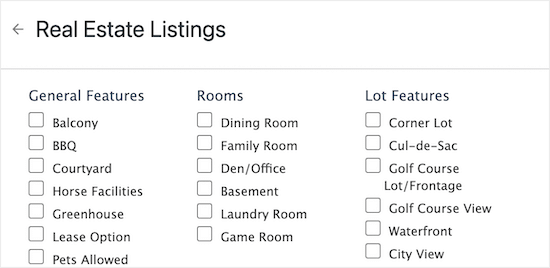
There are all kinds of form fields for you to customize and add information about your real estate listings.

Formidable Forms real estate listing form

Note: You’ll need at least the ‘Plus’ plan to get access to the real estate listing form template.

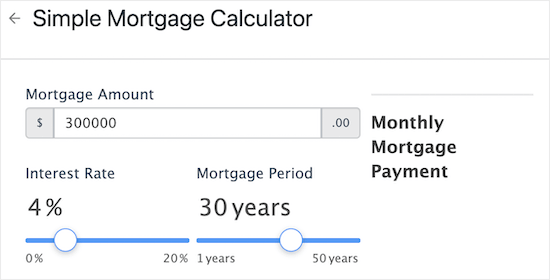
You’ll also find other helpful real estate tools you can use to enhance your website. For example, there are templates for mortgage calculators, mortgage application forms, rental applications forms, and more.

Formidable Forms mortgage calculator

For more details, see our step by step guide on how to add a mortgage calculator in WordPress.

3. WP-Property

WP-Property

WP-Property is another all-in-one WordPress real estate management plugin. It includes an easy to use interface to add and manage all your listings.

You can add detailed information with tons of fields to add rooms, bathrooms, location, features, and more.

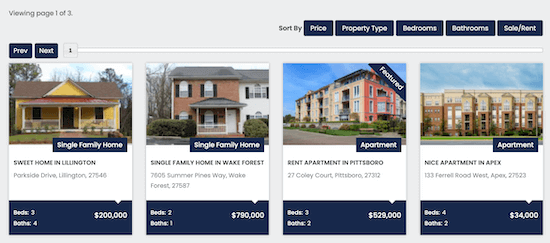
WP-Property listings

Listings are beautifully displayed on your website, and there are also free themes and addons that you can use to customize the design.

WP-Property includes Google Maps support, a powerful search feature with filters, SEO friendly URLs, featured listings, and more.

You can even add a neighborhood walkscore to your listings, and downloadable PDFs.

It is available in multiple languages and can be easily translated into any other language. It also comes with sidebar widgets and shortcodes that allow you to display listings throughout your website.

4. Estatik

Estatik

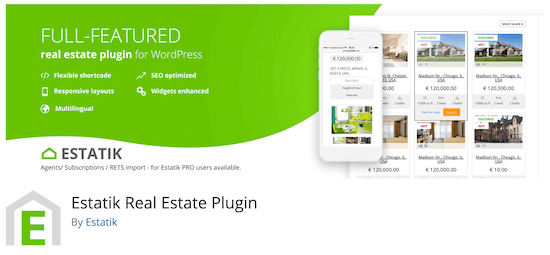
Estatik is another excellent plugin to manage your real estate listings in WordPress. This powerful plugin comes with an easy to use property management system allowing you to easily add listings to your website.

It includes photo gallery, property search widget, Google Maps support, built-in social sharing, and multilingual support. It also includes a custom fields builder which allows you to easily add new fields to your listings.

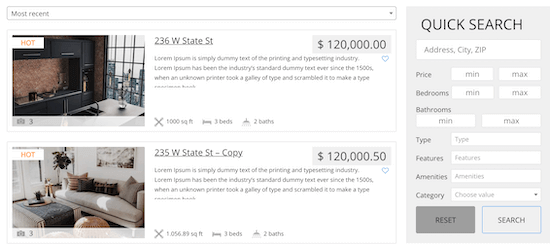
Estatik listings

It has an ajax powered search feature with auto-complete. Users can also sort listings by price, date, popularity, and more.

There’s a pro version of the plugin available that has even more features like saved search, email notifications, and much more.

5. Easy Property Listings

Easy Property Listings

Easy Property Listings is another powerful and highly customizable WordPress real estate plugin. It allows you to easily build a real estate website without touching code and without changing WordPress themes.

The beginner friendly listing management interface makes it super easy to manage your properties. It also comes with mobile-friendly listing templates to display your properties in a grid layout or a single listing page.

Advanced features include support for REAXML, JUPIX, worldwide MLS systems, translations / multilingual support, advanced maps, and more.

Paid addons and extensions allow you to add many other features including a real estate agent directory and management system, agent ratings, and more.

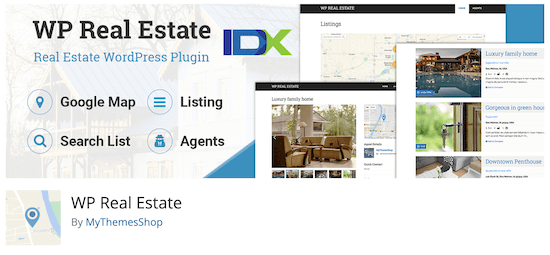
6. WP Real Estate

WP Real Estate

WP Real Estate is an easy to use real estate plugin for WordPress with tons of cool features. It can be used for buying, selling, and rental properties as well.

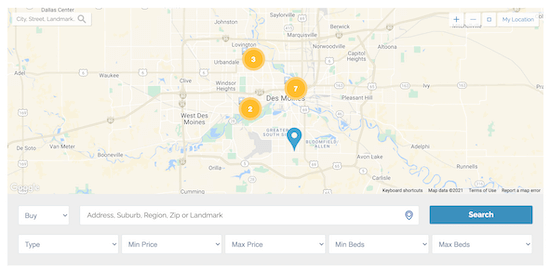
It includes an advanced search feature, Google Maps, IDX/MLS integration, contact forms, custom fields, and list or grid layout views.

WP Real Estate map view

It also comes with shortcodes and widgets so that you can display different real estate listings throughout your website or create your own landing pages for different properties.

7. Realtyna WPL

Realtyna WPL

Realtyna WPL is flexible and powerful WordPress real estate management plugin. You can easily add your listings with a filterable search feature for the front-end.

It has real estate agent profiles, Google Maps, different listing views, and a powerful custom fields feature to add property features.

The pro version of the plugin can also be integrated with MLS/IDX services.

Plus, it works well with some of the best WordPress themes in the market.

We hope this article helped you find the best WordPress real estate plugins for your website. You may also want to see our expert picks of the best business phone services for small business and our must have WordPress plugins for business websites.

If you liked this article, then please subscribe to our YouTube Channel for WordPress video tutorials. You can also find us on Twitter and Facebook.

The post 7 Best WordPress Real Estate Plugins Compared (2021) appeared first on WPBeginner.


July 16, 2021 at 05:00PM