Wednesday, August 18, 2021

Instapage vs Leadpages vs Unbounce vs SeedProd (2021 Comparison)

Are you looking for a comparison of Instapage vs Leadpages vs Unbounce vs SeedProd?

These are the top landing page builders on the market because they allow you to quickly create high-converting landing pages for your business.

In this article, we’ll compare Instapage vs Leadpages vs Unbounce vs SeedProd with pros and cons. The goal is to find out which one is the best landing page software for your business needs.

Landing Page Builders: Instapage vs Leadpages vs Unbounce vs SeedProd (Compared)

Why You Need Landing Page Software?

All businesses need to create pages for their websites. Some pages are easy to create, like an about us page or a contact form page.

However, other pages need to convince users to take the desired actions such as making a purchase, joining an email list, filling out a lead form, and more.

These marketing pages are called landing pages. They need to look professional and be optimized for higher conversion rates.

Landing page software allows you to easily create personalized landing pages for your business without writing any code. They include ready-made templates that you can modify using a simple drag and drop interface.

They also work with your existing tools like email marketing services, eCommerce platforms, CRM software, live chat services, and more.

Instapage, Leadpages, Unbounce, and SeedProd are the top contenders for the best landing page software platform. Each one of them offers different features, integrations, and pricing.

That being said, let’s compare Instapage vs Leadpages vs Unbounce vs SeedProd to find out which one is better.

1. SeedProd
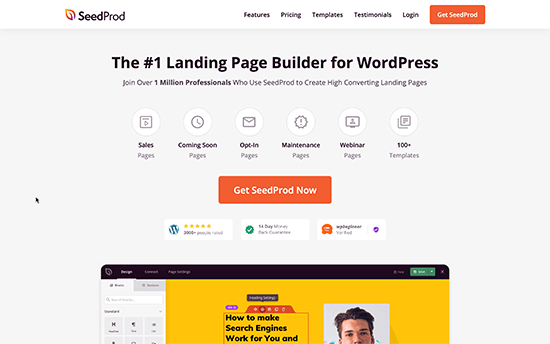
SeedProd website

SeedProd is the best WordPress landing page plugin on the market. It allows you to easily create any type of landing page without writing any code.

It is a WordPress plugin that comes with dozens of beautiful page templates and a simple yet powerful interface to edit those templates.

SeedProd Features:

SeedProd is a powerful landing page builder tool. It is super easy to use and very beginner-friendly. It uses a block-based editor with all the useful design blocks that you’ll need to create an effective landing page.

You also get access to a searchable library of over 2 million stock photos, which you can add to your landing pages with just a few clicks.
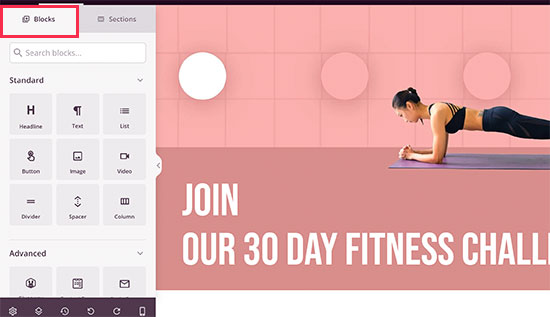
SeedProd blocks

Simply drag and drop blocks to your page and click on any block to edit it. There are advanced editing options for each block, so you can customize the spacing, colors, backgrounds, and more.

This gives you more control over how your landing page looks.
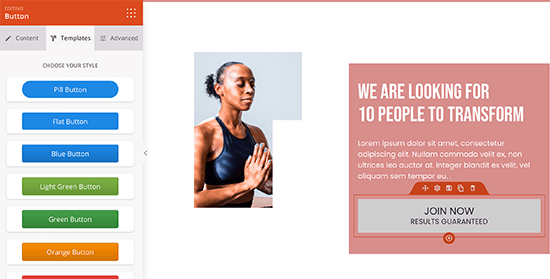
Edit each item with more details

Each template and design that you create is mobile responsive out of the box. You can instantly see the mobile preview as you work on your landing page.

It also comes with powerful integrations with top email marketing software and 3000+ third-party apps via Zapier.

SeedProd works with WooCommerce natively, which means you can easily create custom product pages with a shopping cart and buy now buttons.
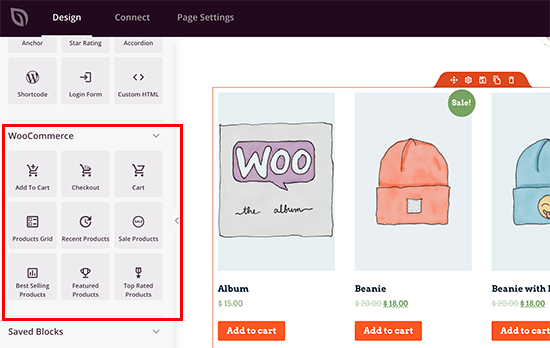
WooCommerce blocks in SeedProd

It includes many more WooCommerce blocks, so you can create product grids, product category landing pages, checkout pages, ad landing pages, and more.

Want to create a landing page for a different domain name?

SeedProd also lets you use a custom domain for any landing page. You can instantly create a landing page for a domain name that you bought without installing a separate website builder for it. This feature is great for marketing agencies and larger websites.

Last but not least, SeedProd allows you to add dynamic content for better personalization with their dynamic text replacement feature.
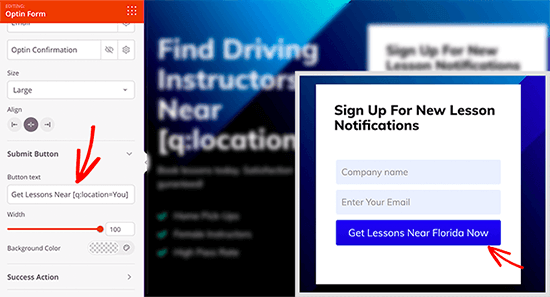
SeedProd Dynamic Text Replacement

Pros of using SeedProd

SeedProd is the best landing page software for small businesses. Following are a few of the benefits that you get when using SeedProd as your landing page tool.

  • Powerful landing page software with unlimited pages, conversions, and sales at a fraction of the price of other solutions.
  • Blazing fast landing pages because speed is crucial for conversions.
  • Balances powerful features with ease-of-use, for landing page software that just works.
  • Ability to add dynamic content for better personalization.
  • Built-in conversion tools such as countdown timers, alert bars, and more.
  • Use any domain to display your landing page with domain mapping.
  • Out of the box integrations with WooCommerce, and other popular WordPress plugins like OptinMonster, WPForms, MemberPress, and more.
  • Doesn’t matter which WordPress theme you are using, it won’t affect your landing pages. You can even switch your WordPress theme without affecting the style of your landing pages.
  • Also includes ability to create custom WordPress pages like 404 pages, login pages, coming soon page, maintenance mode, and more.

Cons of using SeedProd

  • It needs a WordPress website to run. You can use our Bluehost coupon to start your WordPress website for $2.75 per month.
  • It doesn’t offer some of the advanced features that some of the more expensive and complex software offer.

SeedProd Pricing: Starting from $39.50 per year (that’s $3.29 per month). Plus there is a free version to try if you want to see how it works.

Our Rating: A+

We believe that SeedProd is the best landing page software on the market for both beginners as well as advanced users. It’s easy to use and has beautiful templates for almost every type of use case.

SeedProd is also ideal for customizing WooCommerce sites, and great for creating landing pages across domains with its custom domain mapping feature. It also has all the third-party integrations that you’ll need.

Most importantly, you can get started with SeedProd for a much lower cost than any other landing page software on this list.

2. Instapage
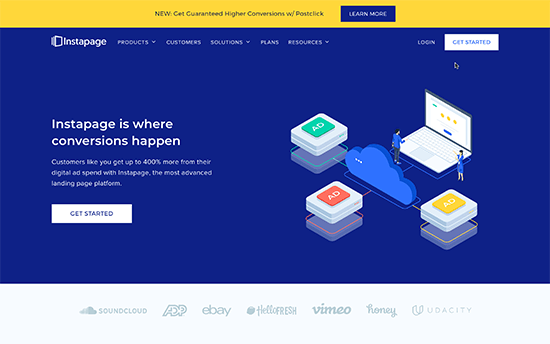
Instapage website

Instapage is one of the top landing page builders on the market. It offers an easy to use page builder, dozens of ready to use templates, and integrations.

Instapage Features:

Instapage offers a block-based page builder to create landing pages. This intuitive drag and drop interface uses blocks for common design elements like paragraphs, headers, buttons, images, and more.
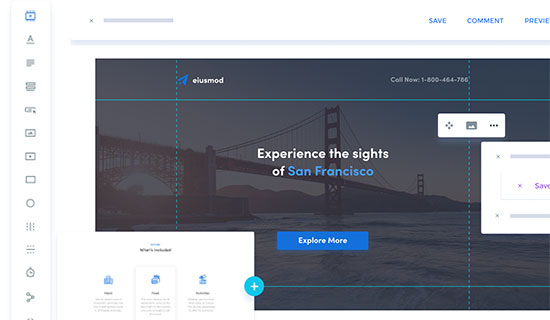
Instapage editor

You can simply point and click anywhere to edit or add new blocks.

To get started, you can choose from dozens of professionally designed starter templates. The templates are optimized to boost conversions for your pages.
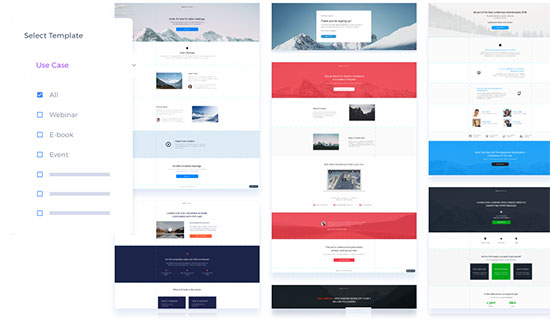
Instapage templates

You can share a page with coworkers or clients without publishing it to a live website. Team members can collaborate with real-time edits and feedback.
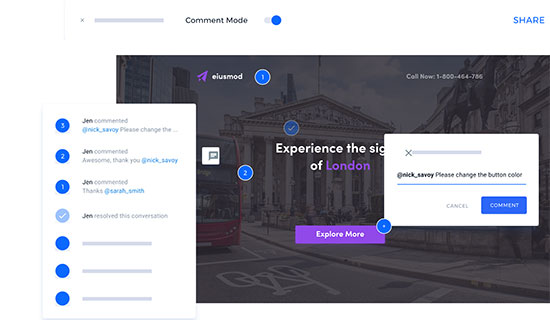
Instapage collaboration

Instapage allows you to create a Google AMP version of your landing page as well.

Pros of using Instapage:

Following are a few advantages of using Instapage as your landing page software.

  • An easy to use page builder with simple interface
  • Dozens of beautiful templates to instantly make pages
  • Works with any website builder including WordPress
  • Integrations available for many third-party services
  • Team feedback and editing tools

Cons of using Instapage:

Instapage is excellent but there are also some disadvantages that you may want to keep in mind.

  • Expensive compared to other page builder options
  • Fewer integrations are available under the Builder plan
  • Pricing is not mentioned for the custom plan
  • Fewer stock images available

Instapage Pricing: The builder plan starts at $299 per month. The Custom plan pricing is not mentioned on the website.

Our Rating: A

Instapage offers a powerful landing page tool for businesses. It has beautiful templates and an easy-to-use interface to create custom landing pages.

However, it may not be the best solution for everyone due to limited integrations and higher pricing.

3. Leadpages
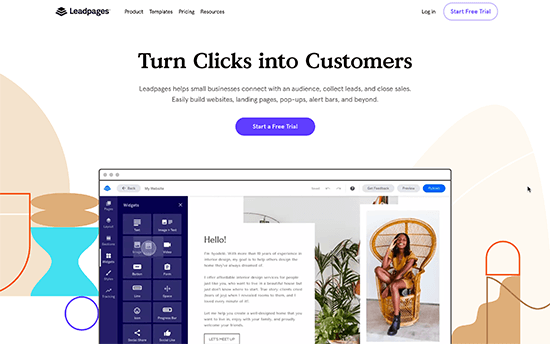
Leadpages

Leadpages is another popular option to create landing pages for your website and marketing campaigns. It comes with an easy to use page builder and templates to quickly create any type of page you need.

Leadpages Features:

Leadpages is designed to help you generate more leads and boost sales and conversions. Each of their templates is professionally designed with these goals in mind.

The page builder itself is extremely easy to use. You can simply drag and drop items or complete sections to your page. Plus, you can just point and click on any item to edit it.

Editing a page in Leadpages

Leadpages also comes with a conversion toolkit that includes lightbox popups, alert bars, countdown timers, and more. All of them encourage your visitors to take action.
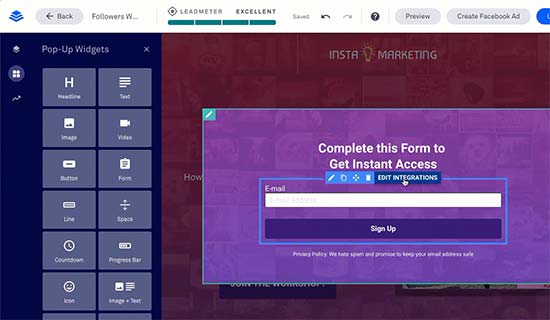
Add a popup in Leadpages

The shopping cart functionality can be used to design a complete online store as well.

Pros of using Leadpages:

Here are some of the advantages of choosing Leadpages as your landing page tool.

  • Very easy to use and extremely beginner friendly
  • Built-in checkout and payment features
  • Tons of integrations make it work with your existing tools
  • Conversion tools like popups, countdown timers, and alert bars give you more tools to boost conversions and sales

Cons of using Leadpages:

  • The editor is easy to use but it is very limited.
  • In WordPress, it saves landing pages as custom post types instead of pages.
  • Online sales and payments features are not available for standard plan

Leadpages Pricing Starting from $27 per month billed annually.

Our Rating B+

Leadpages is a fantastic tool to create landing pages for lead generation and ad campaigns. It is easy to use for beginners and comes with all the integrations you’ll need.

However, the editor itself is very limited in functionality which is a bit frustrating.

4. Unbounce
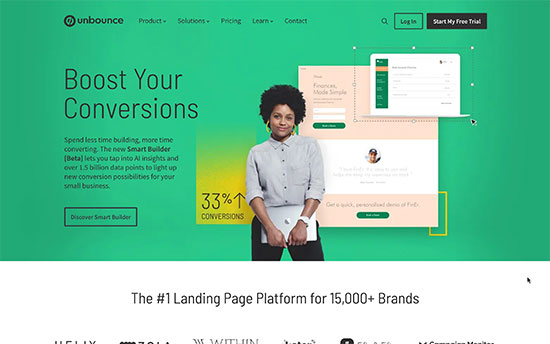
Unbounce

Unbounce is another great landing page software that can be used to launch beautiful marketing campaigns, sales pages, and more.

It offers an AI-powered smart page builder that can reduce page creation time and generate a page based on information you provide. It also offers a classic page builder with drag and drop tools to make your page.

Unbounce Features:

Unbounce offers a conversion-focused platform for marketers, advertisers, and businesses. It includes a landing page builder that comes in two variations: a smart AI-powered template generator and a regular classic page builder.
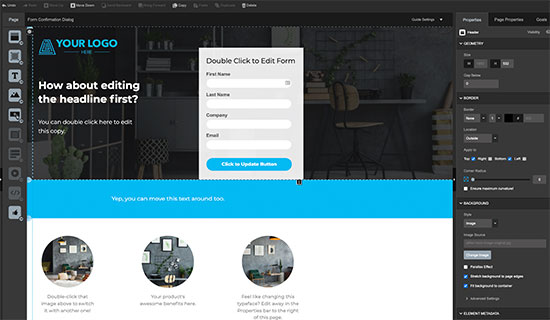
Classic Unbounce page builder

There are beautiful templates for both variations, and you can edit the templates as much as you like.

Unbounce includes all the popular integrations for email marketing, CRM software, Google Analytics, and more. It also includes basic conversion optimization tools like popups, banners, and A/B testing.
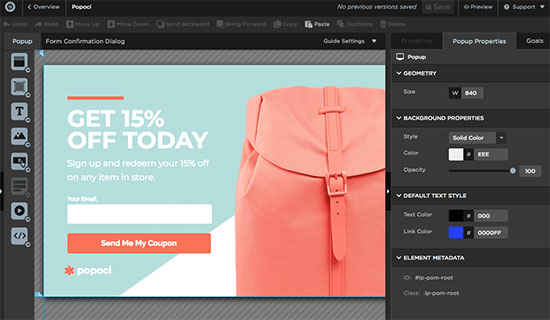
Creating popups in Unbounce

Pros of using Unbounce

Following are some of the notable advantages of using Unbounce.

  • A simpler, easy to use page builder with beautiful templates
  • AI-powered page builder to quickly generate complete pages
  • Conversion tools built-in

Cons of using Unbounce

Just like other platforms on this list, Unbounce has its own cons that may be a deal-breaker for some users.

  • Unbounce plans limit your conversions and page views
  • The landing page software is quite basic
  • Can be made to work with Shopify or WooCommerce, but doesn’t offer a good experience for eCommerce product pages

Pricing: Starting from $80 per month (up to 500 conversions per month)

Our Rating: B

Unbounce makes it easy to create pages and could be a good option for a beginner website, if it wasn’t for the expense. Their page builder is quite basic and very limited in functionality.

Unbounce also puts limits on conversions and pageviews, which means that if you have high converting pages, then you’ll be asked to upgrade to a more expensive plan.

Instapage vs Leadpages vs Unbounce vs SeedProd – Which One is Better?

We believe that SeedProd is the clear winner for the title of the best landing page software on the market. It is easy to work with, super-flexible, and has all the integrations to any third-party marketing tool that you may want to use.

Domain mapping, native WooCommerce support, and the ability to work with WordPress plugins make SeedProd much more effective in improving conversions and sales.

The best part is the pricing is far more affordable than any other solution in the market.

Among other options, Instapage has an intuitive page builder which gives it an edge. However, considering the pricing it may be a little too expensive for many users.

We hope this article helped you compare SeedProd vs Instapage vs Leadpages vs Unbounce. You may also want to see our article on how to track conversions on your website and which marketing data you should start tracking on your site.

If you liked this article, then please subscribe to our YouTube Channel for WordPress video tutorials. You can also find us on Twitter and Facebook.

The post Instapage vs Leadpages vs Unbounce vs SeedProd (2021 Comparison) appeared first on WPBeginner.


August 18, 2021 at 04:00PM
Tuesday, August 17, 2021

How to Add a Post Creation Limit for WordPress Users

Are you looking for a way to limit the number of posts a user can publish or submit for review?

Limiting post creation is helpful if you’re running a multi-author website or have many members submitting content. It allows you to control the number of articles a user can submit, so you can easily manage content on your site.

In this article, we will show you how to add a post creation limit for users on your WordPress site.

How to Add a Post Creation Limit in WordPress

Who Needs to Limit Post Creation in WordPress?

There are several use-cases where you may want to limit the number of posts created by authors within a specific period of time.

A common scenario is if you run a multi-author blog, then you may want to limit the number of posts each author can submit per day, per week, or even by month.

Limiting posts per author makes it easier for you to manage the content on your website and improve the editorial workflow. You’ll have more time to review multiple articles and assign topics to different authors.

Or, let’s say you have a WordPress membership site that gives its members the ability to promote their content through announcements.

In that case, you may want to limit the number of announcements each member can post per week or month.

Another great use case is a listing directory of some kind. For example, you may have a real-estate website where you allow agents to add properties. You can limit the number of properties each agent can add per day or month.

That being said, let’s take a look at how to limit post submissions and creations by users in WordPress.

How to Limit Posts by Users in WordPress

You can easily limit posts for different users using a WordPress plugin without having to touch a single line of code.

For this tutorial, we’ll be using the User Post Limit plugin. It’s a free plugin, and you can use it to set up post limits in just a few clicks.

First, you’ll need to install and activate the User Post Limit plugin on your website. For more details, you can follow our guide on how to install a WordPress plugin.

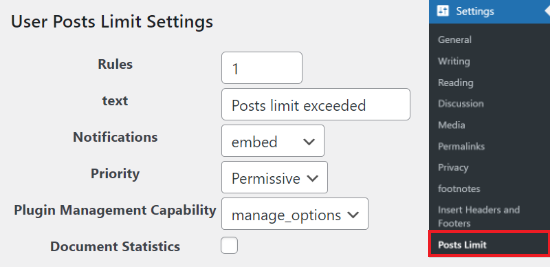
Once the plugin is active, simply head over to Settings » Posts Limit from your WordPress dashboard. From there, you’ll see options to set post limits based on different user roles.

In the ‘text’ field, the plugin lets you edit the notification that a user will receive when they exceed the limit. There are more advanced options you can change, but the default settings will work for most users.

User Posts Limit settings

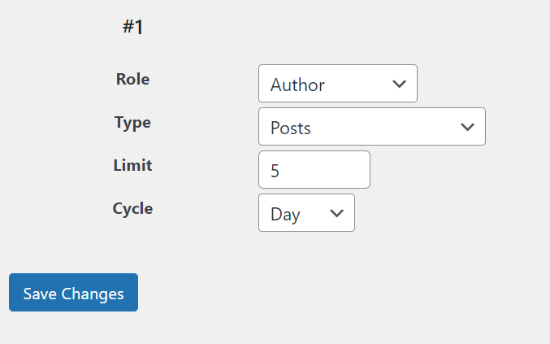
Next, you can select a user role for which you’d like to set up a post limit. For example, you can select Author, Editor, Administrator, or any other roles from the dropdown menu.

After selecting the user role, go ahead and choose which type of content you’d like to limit. You’ll see multiple options in the dropdown menu like posts, pages, media, revisions, and more.

Once that’s done, enter a limit for the number of posts a user can submit and select a cycle, such as days, years, months, or weeks. When you’re done, don’t forget to click the ‘Save Changes’ button.

Change post limit settings

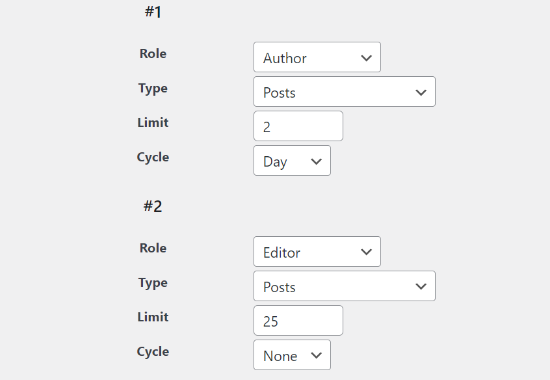
If you want to set up post limits for different user roles on your WordPress website, then change the Rules number and repeat the steps.

For example, you can set a post limit for authors, and then create a higher post limit for editors.

To create a new rule, simply change the Rules number to 2 and select a user role, such as Editor. Next, select the content type and enter the limit and cycle.

When you click the Save Changes button, you’ll see your new rule added under the first rule. You can go ahead and create as many post limit rules as you want for each user role.

Two different rules for post limits

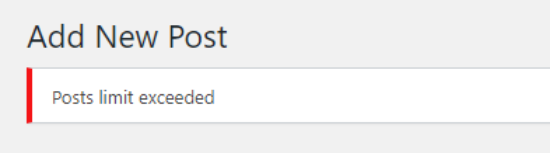
That’s all. When users try to create more posts than the set limit, they will receive a notification like this:

Post limit notification

We hope this article helped you to add a post creation limit for WordPress users on your site. You may also want to check our guide on how to improve your editorial workflow in multi-author blogs and the best email marketing services.

If you liked this article, then please subscribe to our YouTube Channel for WordPress video tutorials. You can also find us on Twitter and Facebook.

The post How to Add a Post Creation Limit for WordPress Users appeared first on WPBeginner.


August 17, 2021 at 03:20PM

Monday, August 16, 2021

How to Fix the “Sorry, You Are Not Allowed to Access This Page” Error in WordPress

Are you frustrated by the “Sorry, you are not allowed to access this page” error in WordPress?

This error usually displays when you’re trying to see a page in your WordPress dashboard that your user role doesn’t have permission to see.

However, you might see the error sometimes even when you’re supposed to have access to that page. This error can be caused by lot of different reasons which makes it tricky for beginners to troubleshoot.

In this article, we’ll show you how to fix the “Sorry, you are not allowed to access this page” error in WordPress.

How to Fix the 'Sorry, You Are Not Allowed to Access This Page' Error in WordPress

What Causes the “Sorry, You Are Not Allowed to Access This Page” Error in WordPress?

WordPress user roles and permissions define what your users can and can’t do in WordPress. For example, an author on your site wouldn’t be able to edit the post of another author, only their own posts.

If someone gave an author the link to edit someone else’s post, then they would see the “Sorry, you are not allowed to access this page” WordPress error when following the link.

However, sometimes you might see “Sorry, you are not allowed to access this page” when you should have access to view the page.

If you’re not the site owner or administrator, and you’re seeing this error, then you should contact the site owner or admin to let them know. They can explain why you don’t have access to the page, or they can change your role to grant you access.

If you are the site owner or have an admin role, but you’re still seeing the “Sorry, you are not allowed to access this page” error when trying to log in to your own website, then something has gone wrong with the permissions.

Maybe there was an issue with a WordPress update. Maybe there was a problem when a theme or plugin was updated. Or maybe something has gone wrong with your configuration.

If you’re seeing this error when you try to log in, then you won’t be able to fix the error by changing your WordPress settings in the dashboard. You’ll have to work with the files and databases directly.

This can be tricky for beginners and making a mistake could make things worse. As a precaution, we recommend you first make a complete backup of your WordPress website.

You could also start by contacting your hosting provider. They may be able to fix the problem for you.

That being said, here are some steps you can follow to troubleshoot and fix the “Sorry, you are not allowed to access this page” error in WordPress.

Checking You Have the Correct WordPress Role

If you’re able to log in to the WordPress dashboard, but can’t access specific pages, then the issue could be that your WordPress user role was changed, and you’re no longer an admin.

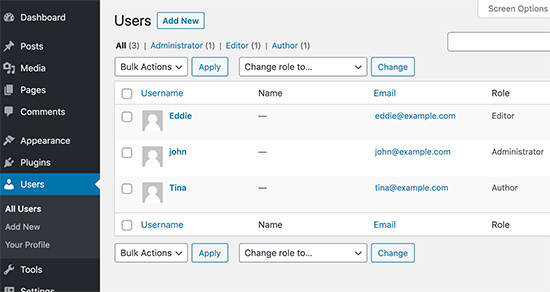
From the WordPress dashboard, you can see your user role by visiting the Users » All Users page, and looking under the ‘Role’ column.

View all users and user roles in WordPress

If you don’t have access to the Users page, then this means that you are not an administrator.

If you or someone else accidentally deleted your administrator account or changed your user role, then you can add a new admin user with phpMyAdmin.

Checking for a Corrupt .htaccess File

If you have an admin user role, and you’re still seeing the “Sorry, you are not allowed to access this page” error, then it could be caused by a corrupt .htaccess file. We can check this by renaming the file.

You will need to use an FTP client or the file manager feature in your WordPress hosting account. If you haven’t used FTP before, then you may want to see our guide on how to use FTP to upload files to WordPress.

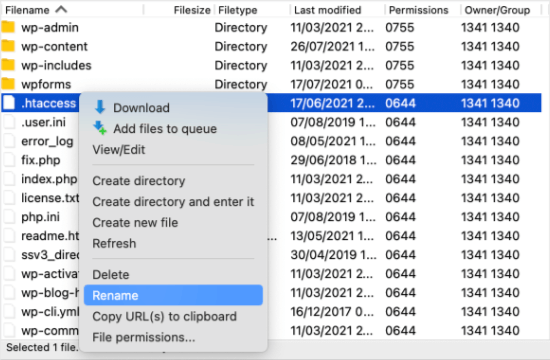
Using your FTP client, you need to navigate to the root folder containing all your WordPress files. Once you find the .htaccess file you need to rename it to something else, such as .htaccess.old.

Right Click to Rename .htaccess

If you cannot find your .htaccess file, then see our guide on how to find .htaccess in WordPress.

Once you rename the file, try logging onto your WordPress site to see if that has fixed the problem. If it hasn’t, then rename it back to .htaccess and move on to the next step.

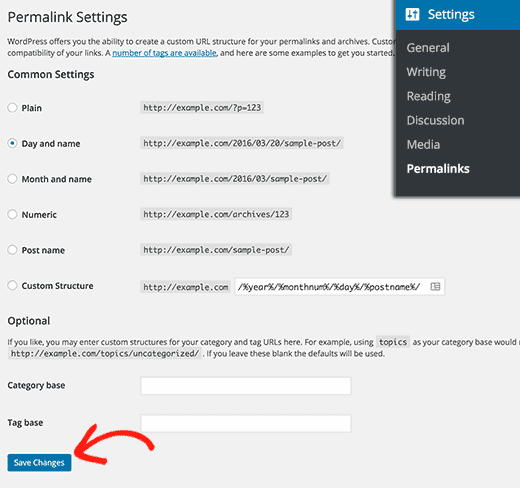
If you can log in, then you fixed the problem. The next step is to generate a new .htaccess file. To do that, navigate to the Settings » Permalinks page in WordPress.

Click Save Changes

Simply click on the Save Changes button at the bottom of the page and WordPress will generate a fresh .htaccess file.

Checking for Incorrect File Permissions

While you have your FTP client open, we’ll check to make sure there isn’t a problem with your file permissions. File permissions control who can access files and folders on your website.

The following settings are recommended for most users:

755 for all folders and sub-folders.
644 for all files.

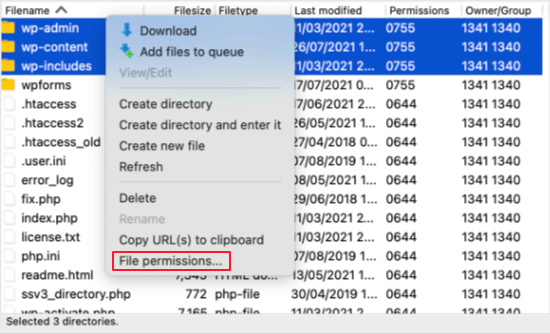
Using your FTP client, you need to navigate to the root folder containing all your WordPress files and select the wp-admin, wp-content and wp-includes folders. Then you need to right click and select ‘File Permissions’.

Right Click to Select File Permissions

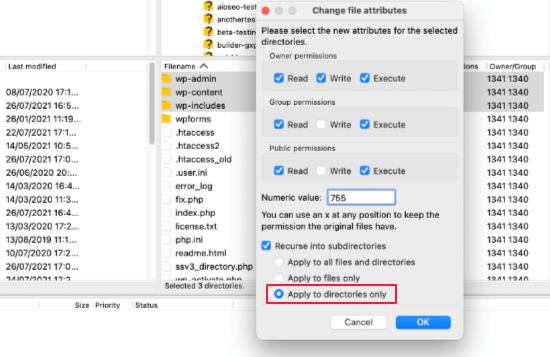
This will bring up the file permissions dialog box.

Now you need to enter 755 in the numeric value field. After that, you can click on the ‘Recurse into subdirectories’ checkbox and then select ‘Apply to directories only’ option.

Folders Should Have Permissions of 755

Click on the OK button to continue. Your FTP client will start setting file permissions to folders and sub-folders. You will need to wait for it to finish.

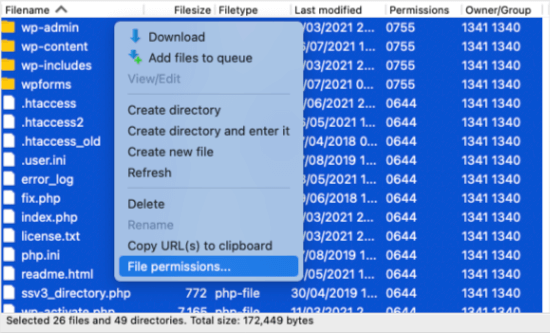
Next, you need to select all files and folders in the root folder of your WordPress site and then right click to select file permissions.

Right Click to Select File Permissions

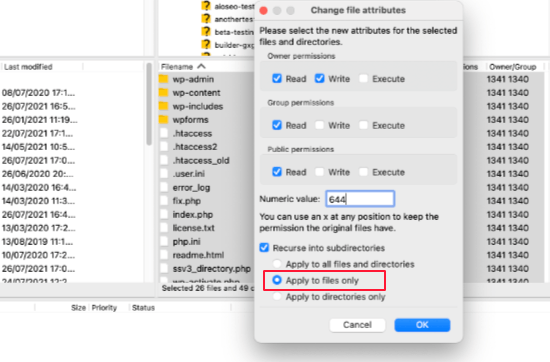
The file permissions dialog box would appear.

This time you need to enter 644 in numeric value. After that you need to click on ‘Recurse into subdirectories’ checkbox and then select ‘Apply to files only’ option.

Files Should Have Permissions of 644

Click on OK to continue and your FTP client will now start setting file permission to all files on your WordPress site.

Once you’ve done this, try logging into your WordPress website again. If you’re successful, then you’ve fixed the problem. If not, then move on to the next step.

Deactivating All Plugins Using FTP

If the steps above haven’t resolved the issue, then our next step is to check whether a faulty WordPress plugin is causing the error. We’ll do that by temporarily deactivating all plugins.

First, you need to connect to your website using an FTP client. Once connected, you need to navigate to the /wp-content/ folder.

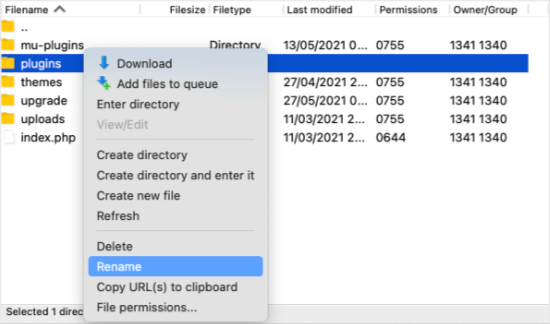
Right Click to Rename the Plugins Folder

Once there, you will see a folder called plugins. This is where WordPress stores all plugins installed on your website.

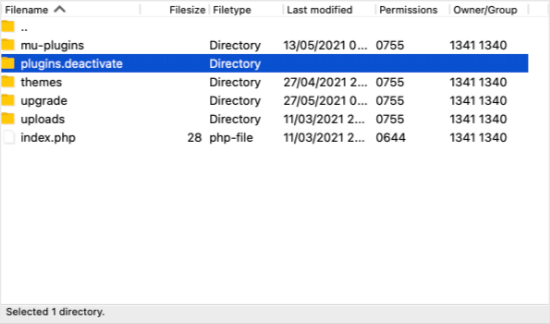
You need to right click on the plugins folder and select Rename. Next, you should type in a different name. We will call it ‘plugins.deactivate’.

The Folder is Now Named plugins.deactivated

All of your plugins have been deactivated. Now try to log into your WordPress site to see if this has fixed the problem.

If you still receive the “Sorry, you are not allowed to access this page” error, then the problem isn’t caused by a plugin. You’ll need to rename the ‘plugins.deactivate’ folder back to ‘plugins’ and move on to the next step.

If you can now log in, then you know that one of the plugins is causing the error. We just have to find out which one.

Using your FTP client, rename the ‘plugins.deactivate’ folder back to ‘plugins’ then navigate inside the plugins folder. Now rename the first plugin to something like ‘plugin-name.deactivate’.

Now go back to your site to see if you can log in. If you can’t, then change the plugin’s name back and move on to the second plugin. Repeat the process until you find the one that caused the issue.

Once you’ve found the faulty one, you can switch to a different plugin that doesn’t cause the problem. Or you can contact the plugin author and work with them to come up with a solution.

Activating the Default Theme Using FTP

If the plugin solution didn’t work for you, then we’ll need to check if your WordPress theme could be causing this issue.

This step is similar to deactivating your plugins. You’ll need to connect to your website using an FTP client and navigate to the wp-content folder.

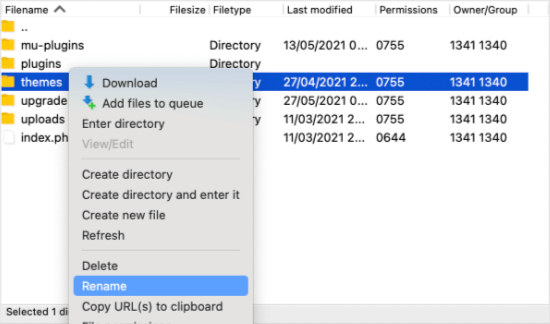
Right Click to Rename the Themes Folder

Once there, you will see a folder called themes. This is where WordPress stores all themes installed on your website.

This time you need to right-click on the plugins folder and select Rename. We’ll call it ‘themes.deactivate’.

This will activate the default theme. Now try to log into your WordPress site to see if this has fixed the problem.

If you still receive the “Sorry, you are not allowed to access this page” error, then the problem isn’t caused by a theme. You need to rename the ‘themes.deactivate’ folder back to ‘themes’ and move on to the next step.

If you can log in, then the previous theme caused the problem and you can start to troubleshoot. You could try using a different theme or reinstall the same theme and carefully configure it.

If the error returns, then report it to the theme author. They may be able to help you solve the problem or fix a bug in the theme.

Final Troubleshooting Steps

If you’re still reading, then unfortunately the other steps haven’t solved your problem. Here are a few more things you can try.

Check Error Log

You may be able to check an error log for clues about what went wrong. Your hosting provider may be keeping logs, or you may have previously set WordPress up to keep them.

For more details, check our guide on how to set up WordPress error logs, or contact your hosting provider.

Update to Latest PHP

If your WordPress site is running an older version of PHP, then it may be causing problems. Upgrading to the latest version may be helpful.

For more information, check our guide on how PHP updates by your web host impact your WordPress site, or contact your hosting provider.

Restore Your Most Recent Backup

If you’ve made a recent backup of your WordPress website, then restoring it to an earlier version is likely to fix the “Sorry, you are not allowed to access this page” error.

The problem is, you will lose any changes to your settings and content made after the backup.

For more information, check our beginner’s guide on how to restore WordPress from backup.

Contact Your Hosting Provider

If you are unable to fix the error on your own, then you should contact your WordPress hosting company to see if there is anything they can do.

Many providers offer excellent technical support and may be able to solve the problem for you.

For example, they may be able to check their server error logs or have created their own backups of your WordPress site. They will be able to advise you on how they can help and what you should do next.

For the best results, make sure you check our guide on how to properly ask for WordPress support and get it.

We hope this tutorial helped you learn how to fix the “Sorry, you are not allowed to access this page” error in WordPress. You may also want to bookmark our ultimate troubleshooting guide of the most common WordPress errors, or see our guide on how to get a free email domain.

If you liked this article, then please subscribe to our YouTube Channel for WordPress video tutorials. You can also find us on Twitter and Facebook.

The post How to Fix the “Sorry, You Are Not Allowed to Access This Page” Error in WordPress appeared first on WPBeginner.


August 16, 2021 at 03:39PM