Tuesday, September 28, 2021

How to Send WordPress Emails Using Amazon SES (Step by Step)

Are you having trouble sending emails from your WordPress site?

One easy way to improve WordPress email reliability is by using the Amazon Simple Email Service, or Amazon SES.

In this article, we will show you step by step how to send emails from your WordPress site using Amazon SES.

How to Send WordPress Emails Using Amazon SES (Step by Step)

Why and When You Need Amazon SES for WordPress Emails

All too often we hear that users have trouble sending emails from their WordPress website. That’s a problem because you rely on email to keep your website running smoothly.

For example, your site relies on email to reset lost passwords, or send notifications when new users register or someone fills in your contact form.

By default, WordPress uses the PHP mail function to send out emails. However, this function doesn’t always work as expected. That’s often because WordPress hosting companies block it to prevent abuse and spam.

Also, spam filters on popular email service providers check incoming emails to verify the sender. Default WordPress emails fail this check and sometimes may not even make it to the spam folder.

SMTP (Simple Mail Transfer Protocol) is the industry standard for sending email. Unlike the PHP mail function, SMTP uses proper authentication, which increases the chances your emails will be successfully delivered.

Amazon SES is an SMTP service designed for business email. It’s a good solution for sending WordPress notification emails to just you and your team, and also sending email newsletters to large mailing lists.

The service is free for the first year. After that, you may need to pay as you go, depending on the number of emails you send and other factors. You can get an idea of what it will cost you on the Amazon SES pricing page.

In this tutorial, we’ll show you how to send email to the Amazon SES service from your WordPress website using the WP Mail SMTP plugin.

Editor’s Note: we believe that Amazon SES is a bit complicated for beginners. This is why we generally recommend users to use SMTP.com or Sendinblue which both works with WP Mail SMTP plugin as well.

Configuring Your Amazon AWS Account

First, you’ll need to sign up for a free account by visiting the Amazon Web Services website. While the account is free, you will need to enter credit card details when setting up the account.
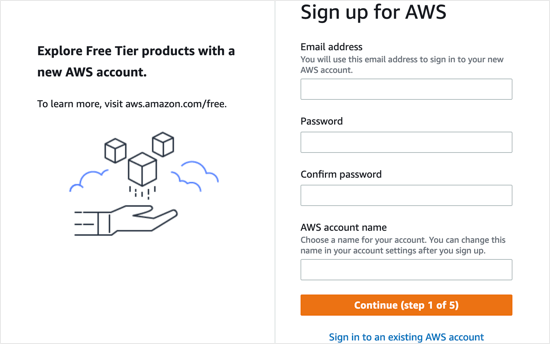
You’ll Need to Sign Up for a Free Account with Amazon Web Services

Once you’ve created an AWS account, you’ll need to set up a User. This will provide you with access keys needed later.

To do that, you need to open the Amazon Web Services Users page. Within this page, you need to click the ‘Add users’ button.
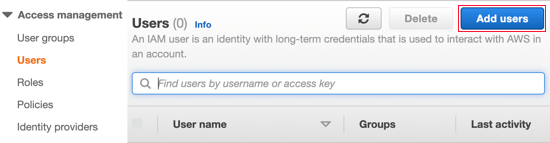
Click the Add Users Button

Next, you need to set up a new user. In the User name field, you can add any name you’d like, but we recommend you use the format yourdomain_wpmailsmtp.

This will be helpful in the future if you create additional users for other websites. You’ll know at a glance which website each user is for, and that it’s used by the WP Mail SMTP plugin.
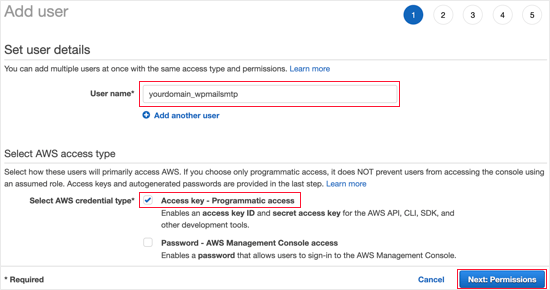
You Need to Set Up a New User

You will also need to select the AWS credential type. You should click the checkbox next to ‘Access key – Programmatic access’.

Once you’re finished, you can click the ‘Next: Permissions’ button at the bottom of the screen.

You’ll now see the ‘Set permissions’ screen. You need to click on the third option, ‘Attach existing policies directly’.
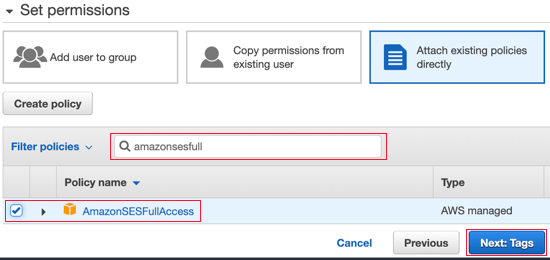
You’ll Now See the 'Set Permissions' Screen

Then you should type ‘AmazonSESFullAccess’ into the search bar to filter the list. Now just one policy should be listed. Make sure you click the checkbox on the left of that policy.

After that, click on the ‘Next: Tags’ button at the bottom of the screen. We don’t need to change any settings on the ‘Add tags’ page, so just click the ‘Next: Review’ button and you’ll be taken to the Review page.

Once there, you can see all of the details you’ve chosen for this user. If everything looks correct, then simply click on the ‘Create user’ button.
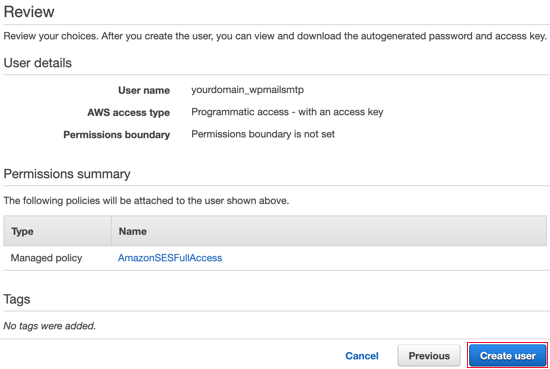
You Can See All of the Details You’ve Chosen for this User

You will now see a message that you successfully created the user. You will also see an Access Key ID and Secret Access Key for your user.

You’ll need these later in the tutorial, so you should make a copy of them in a safe location or simply download the CSV file. Alternatively, just keep this browser window open so you can come back to it later.
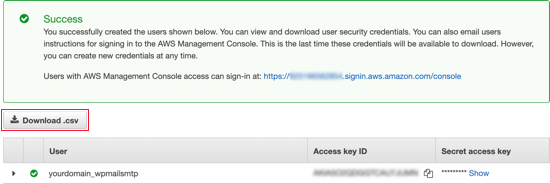
You Will Now See a Message that You Successfully Created the User

Switching Amazon Web Services to Production Mode

By default, your Amazon SES account will be run in Sandbox Mode. This limited mode will only allow you to send emails to verified email addresses and is designed to stop spammers from abusing the system.

If you want to send emails to anyone, then you’ll have to make a request to move from Sandbox Mode to Production Mode. The first step is to visit the AWS Support page for creating a new case.

First you’ll need to log in as the user you just set up. Once you’re on the ‘Create case’ page, you’ll need to click on the second option, ‘Service limit increase’.
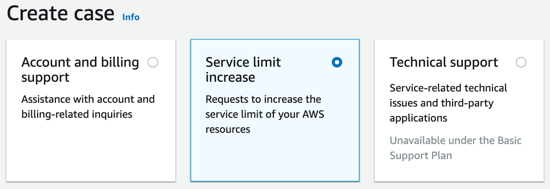
Click on the Second Option, ‘Service Limit Increase’

Next, you will need to fill in the case details. Amazon will use your answers to make sure that you won’t be sending spam emails.

You should leave the limit type as ‘SES Service Limits’ and select ‘Transactional’ as the mail type. In the Website URL field you should type in your site’s address.
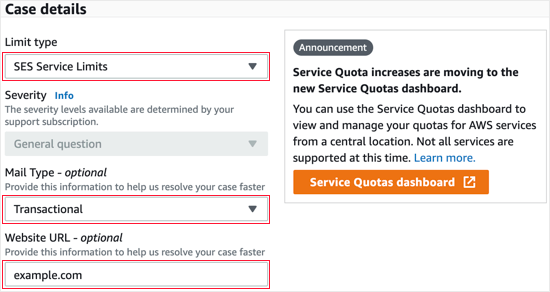
Case Details

The next section is labeled ‘Describe, in detail, how you will only send to recipients who have specifically requested your mail’. Here you should share some details about your email sending process.

For example, you could say that you are only sending site notifications to the site administrator, or sending mail only to those who have filled out a form on your site.

Case Details

Then you are asked to ‘Describe, in detail, the process that you will follow when you receive bounce and complaint notifications’. For example, you can explain that the ‘Force From Email’ setting in WP Mail SMTP will send all bounce notifications to a specified email address.

When asked whether you will comply with the AWS terms of service, you should answer ‘Yes’.

Next, you should scroll down to the Requests section. Start by selecting the same region as when you set up your AWS account. This will be the region closest to where your site’s server is located.

For the limit field, you should select ‘Desired Daily Sending Quota’ from the drop down menu. After that, under ‘New limit value’ you should type in your estimate of the maximum number of emails you expect to send in a day.
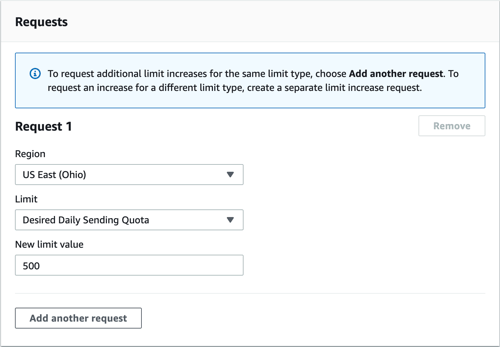
Select ‘Desired Daily Sending Quota’ From the Drop Down Menu

The last section on the page is ‘Use Case Description’. Here you should share details of the kind of website you have and why you will be sending emails.

Make sure you include the types of emails that will be sent, such as confirmations of form submissions, purchase receipts, or newsletters. A more detailed response here may give your application a greater chance of success.
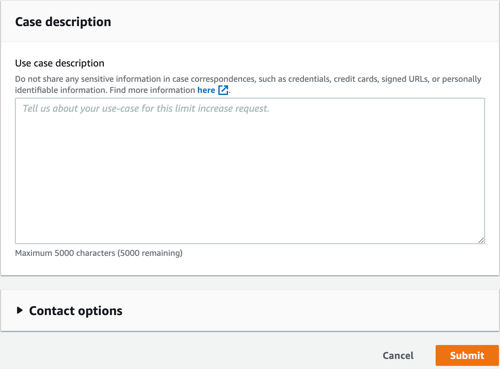
Use Case Description

Once you have completed the application, go ahead and click the Submit button. You’ll get two emails from Amazon Web Services confirming that a new case has been created.

You should receive a decision from Amazon within one business day. But in the meantime, you can continue with this tutorial.

Installing WP Mail SMTP on Your WordPress Website

WP Mail SMTP is the best SMTP plugin for WordPress. You will need to buy a Pro plan or higher to use Amazon SMTP. This also gives you access to premium support and white glove set up by one of their experts.

If you’d like to have the WP Mail SMTP support team set this up for you, you can follow their guide on how to request white glove set up for SMTP instead of following the steps below.

First, you’ll need to install and activate WP Mail SMTP on your website. For more details, check out our guide on how to install a WordPress plugin.

Installing WP Mail SMTP

On activation, the WP Mail SMTP setup wizard will start automatically. You’ll need to click on the Let’s Get Started button.
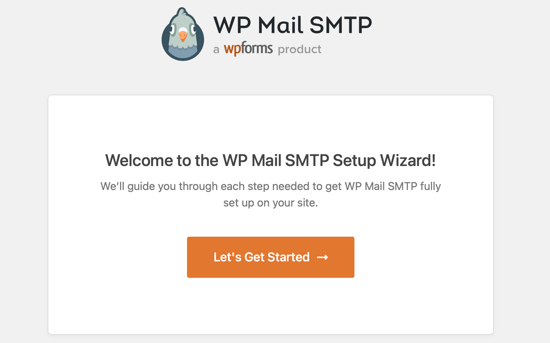
WP Mail SMTP Setup Wizard

Next, you’ll be shown a list of email services that are supported. Here you need to select Amazon SES and then click on the ‘Save and Continue’ button.
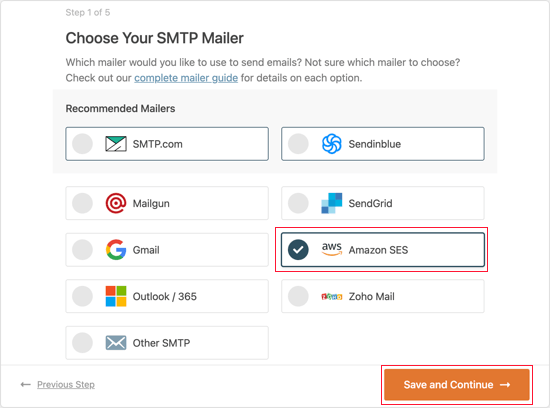
Select Amazon SES

You will see a message explaining that Amazon SES is a good choice for technically advanced users. You should click the ‘I Understand, Continue’ button to dismiss the message.

After that, you’ll be asked to configure your mailer settings. You’ll need to fill in the Access Key ID, Secret Access Key, and Region fields with the information you copied earlier when you created an Amazon AWS account.
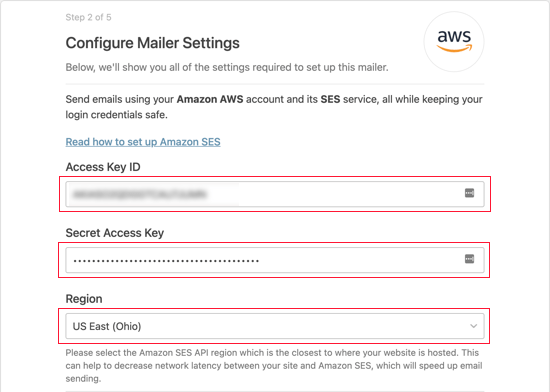
Fill in the Access Key ID, Secret Access Key, and Region Fields

Now you need to scroll down to the SES Identities section. Here you can choose to verify either your domain or email address.

Verifying Your Domain

The benefit of verifying by domain is that it will verify any email address that uses that domain. Verifying an email address is easier, but then you will have to verify every email address you wish to use separately.

To verify your domain name on Amazon SES, you need to make sure the Verify Domain option is selected. After that, you should type in the domain name you used when signing up for Amazon AWS.
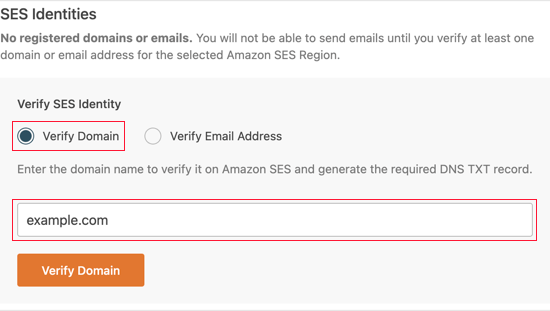
Verify Your Domain Name on Amazon SES

Once you’ve entered the domain name, you need to click the Verify Domain button. You will be given a name and value to add to a new TXT record in your domain’s DNS settings.
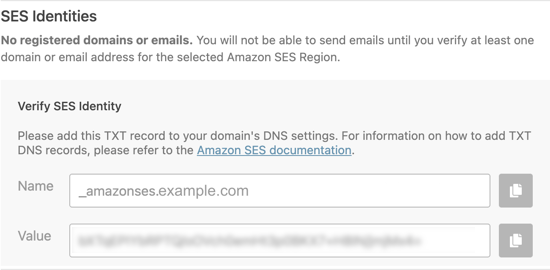
Verify Domain TXT Record

For instructions on how to create a TXT record to your site’s DNS settings, see our DNS guide

After you have successfully verified your domain, you should return to your site’s WP Mail SMTP settings and then refresh the page. Any verified domains will now be displayed.

You can now skip the ‘Verifying Your Email’ section below and move on to ‘Setting Up the From Name and Email’.

Verifying Your Email

If you only plan on using a single email address with WP Mail SMTP, then verifying your email address is a good choice.

First, you need to click on the Verify Email Address option and then you should type the email address you plan to use in the field provided.
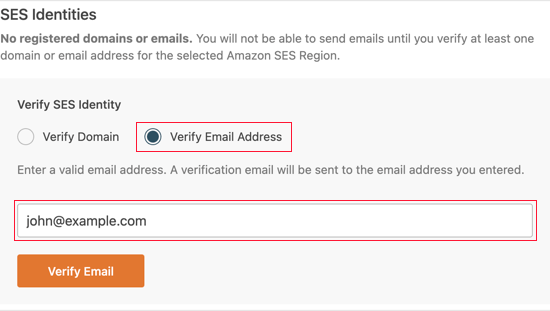
Verify Email Address

Once you’ve entered the email address you need to click the Verify Email button. You will see a notice asking you to check your email inbox for a confirmation email.

This email will be sent from Amazon Web Services and will include a verification link. You must click this link within 24 hours in order to verify this email address.
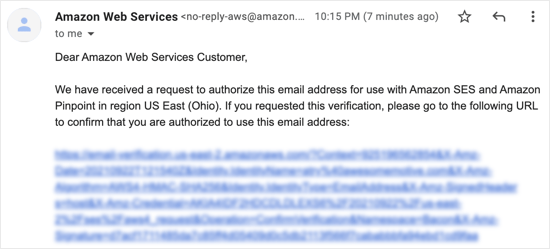
Check Your Email Inbox for a Confirmation Email

After you’ve successfully verified your email, you can return to your site’s WP Mail SMTP settings and refresh the page. Any verified email addresses should be displayed.

Setting Up the From Name and Email

Now you should scroll down to the final section of the page where you can enter the ‘From’ name and email address.

You need to type a name in the From Name field. This is the name associated with the emails you send and will be set to your site’s name by default.

You can change this to any name, such as your business name or personal name. You can also check the Force From Name option to apply this setting site-wide.
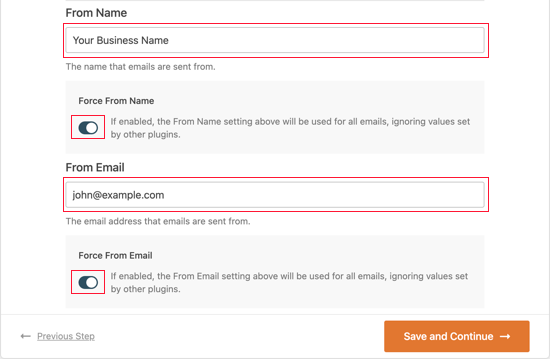
Type the From Name and From Email

You can enter any verified email address into the From Email field. For best results, we recommend that you use a business email address with your site’s domain such as example@yourwebsite.com.

We recommend you check the box labeled Force From Email. This means you’ll automatically use the same outgoing email address across your WordPress site.

This option will save you the trouble of editing the email settings throughout your site and makes it less likely that your emails will go to spam.

Once you’ve finished entering the settings, you can click the Save and Continue button.

Enabling WP Mail SMTP Features

Finally, you will be asked which email features you wish to enable. By default, the first three options are enabled. These are improved email deliverability, email error tracking, and a weekly email summary.
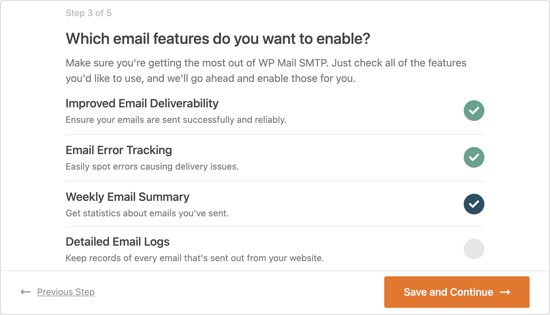
You Will Be Asked Which Email Features You Wish to Enable

If you like, you can enable detailed email logs as well. Once you have made your selection, you should click the Save and Continue button.

Entering Your WP Mail SMTP License Key

Finally, you need to enter your WP Mail SMTP license key. You were sent this key by email when you signed up for your WP Mail SMTP Pro account.

You can also find your license key by clicking ‘View License Key, Details, and Downloads’ from the Account Page on the WP Mail SMTP website.

Enter Your WP Mail SMTP License Key

Once you’ve entered your license key you should click the Verify License Key button. You should see a success message. Simply click OK to acknowledge the message and then click on the Continue button.
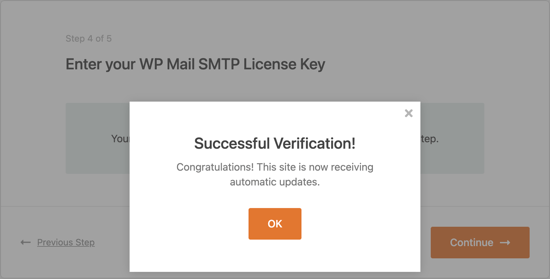
You Should See a Success Message

WP Mail SMTP will now check your mailer configuration. If everything is working as expected, then you’ll see a screen with the message ‘Congrats, you’ve successfully set up WP Mail SMTP!’

If there is something wrong, then you’ll see a message that says ‘Whoops, looks like things aren’t configured properly’. You will need to click the Start Troubleshooting button to fix the error.
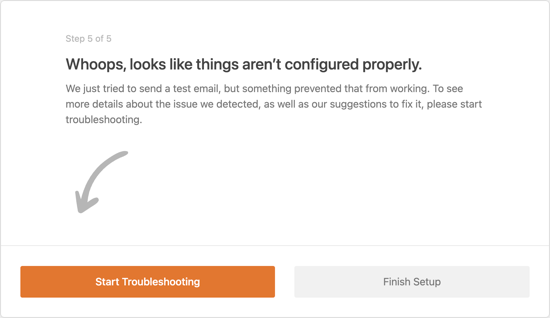
Click the Start Troubleshooting Button

Sending a Test Email

Once you’ve finished troubleshooting, you might like to send out another test email to make sure everything is working correctly.

You’ll need to navigate to WP Mail SMTP » Tools and then click on the ‘Email Test’ tab. By default, the test email will be sent to your site’s admin email address, but you can change this. Next, click ‘Send Email’.
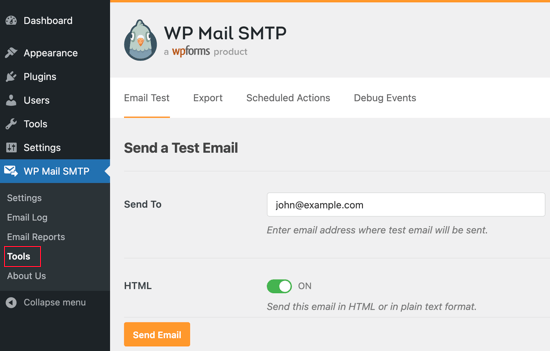
Send a Test Email

If everything has been set up correctly, then you should see a Success! message.

You Should See a Success! Message

That’s it! We hope this tutorial helped you learn how to send WordPress emails using Amazon SES. You may also want to learn how to get a free SSL certificate for your WordPress website or check out our list of must have WordPress plugins.

If you liked this article, then please subscribe to our YouTube Channel for WordPress video tutorials. You can also find us on Twitter and Facebook.

The post How to Send WordPress Emails Using Amazon SES (Step by Step) appeared first on WPBeginner.


September 28, 2021 at 05:18PM
Monday, September 27, 2021

How to Easily Move WordPress to a New Domain (Without Losing SEO)

Do you want to move your WordPress site to a new domain? Changing your website’s domain name can significantly impact your SEO rankings, so it’s a process that needs to be done very carefully.

While you cannot avoid temporary SEO fluctuations when migrating your website to a new domain, you can definitely minimize the impact and quickly regain your search traffic and rankings.

In this guide, we will show you the proper way to move WordPress to a new domain without losing SEO.

Migrating a WordPress website to a new domain name without loosing SEO

Here’s the 5 step process that we’ll cover to help you migrate your WordPress site to a new domain name:

  1. Create a Duplicator package of your WordPress site
  2. Create a database for your new domain name
  3. Unpack WordPress on the new domain
  4. Setup permanent 301 redirects
  5. Notify Google about the change

What to Know Before You Change Domains

Before you start, there are a few things you should know.

The process of transferring to a new domain will temporarily affect your search engine rankings, since Google and other search engines will need to adjust to the changes.

Yes, this will also temporarily affect your search traffic as well. Please keep in mind that this is normal, and it happens to all websites that switch to a new domain.

However, you can dramatically decrease the SEO impact by following this guide. We will show you the right way of moving your WordPress site to a new domain name, setting up proper 301 redirects, and notifying search engines.

Please note that this guide is not for moving WordPress site to a new host. This is for switching a domain name only. While the process is similar, there are a few extra steps involved in this process. These extra steps will help you to protect your SEO rankings and traffic.

Lastly, if your old website is on WordPress.com, then you need to follow the instructions in our guide on how to move from WordPress.com to WordPress.org instead.

Pre-Steps: What You Need to Get Started

In this guide, we are assuming that you have your WordPress website setup on oldsite.com, and you are trying to migrate it to newsite.com.

We are also assuming that you already have a WordPress hosting account, and you are familiar with your web hosting control panel.

You’ll also need to know how to use an FTP client like FileZilla, or how to edit files using the File Manager app available under your hosting account dashboard.

In case you don’t have a web hosting provider or are looking to switch to a new one, we recommend using Bluehost (great for small sites + comes with a free domain) and either SiteGround or WP Engine (great for larger sites or online stores).

Once you have those things in place, you’re ready to start the process!

Step 1: Create a Duplicator Package of Your WordPress Site

The first thing you need to do is create a full backup of your WordPress site. We’ll use this backup to create a duplicate of your website, so you can set up the redirects properly from your old domain to the new one.

While there are many WordPress backup plugins available, we’ll be using Duplicator which is a free backup and migration plugin.

Let’s start by installing and activating the Duplicator plugin on your old domain name. For more details, see our step by step guide on how to install a WordPress plugin.

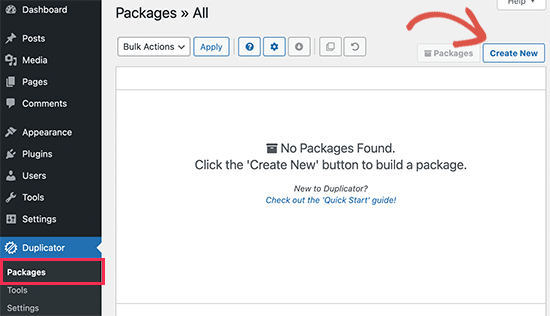
Once activated, the plugin will add a Duplicator menu item in your WordPress admin. You need to click on the Duplicator menu, and then click on the ‘Create New’ button to create a new package, or copy of your WordPress site.

Create a new Duplicator package

After that, you will be asked to click on the Next button to continue.

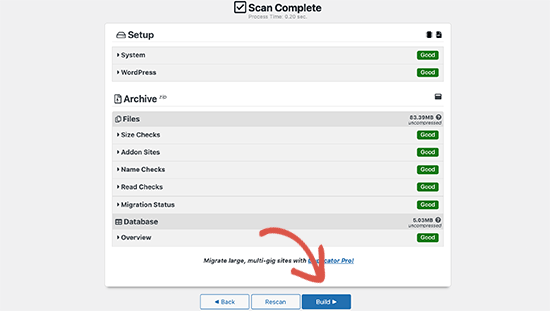
Duplicator will now run the website duplicator wizard. First, it will run some tests to see if everything is in order. If the plugin finds an issue, then you will see a warning with instructions.

If all items are marked ‘Good’, then click on the ‘Build’ button.

Build package

The plugin will now start creating a duplicator package of your website files. This process may take a few minutes depending on the size of your site.

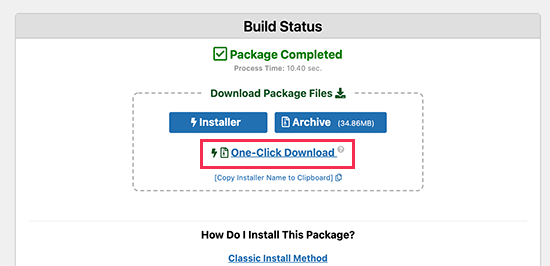
Once finished, you’ll see download options for the Installer and the Archive package. You need to click on the ‘One-click download’ link to download both files to your computer.

Download Duplicator package

The archive file is a complete copy of your WordPress files. It includes your WordPress themes, permalinks settings, plugins, uploads, and any other files created by WordPress plugins.

The installer script is a PHP file that will automate and run the WordPress migration by unpacking the archive file.

Step 2. Create a Database for Your New Domain Name

Before you can move your WordPress site to the new domain, you’ll need a new SQL database to unpack WordPress on your new domain name.

If you have already created a database, then you can skip this step.

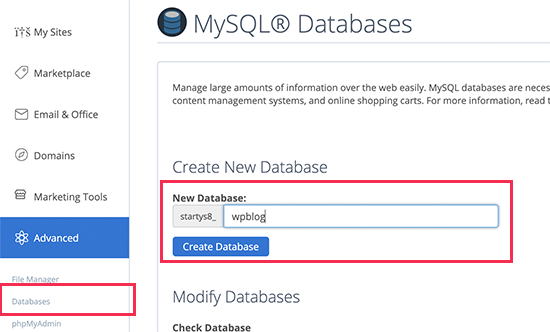
To create a database, you need to visit your hosting account’s cPanel dashboard, scroll down to the ‘Databases’ section, and then click on the ‘MySQL Databases’ icon.

Creating a new database

Note: Your hosting control panel may look slightly different than the screenshots. However, you should still be able to find a Databases section with an option to create a new database.

Simply provide a name for your database and then click on the ‘Create Database’ button.

cPanel will now create a new database for you. After that, you need to scroll down to the MySQL Users section.

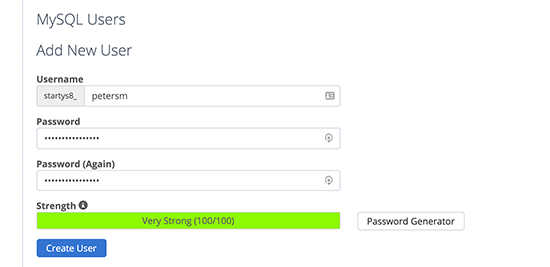
Next, provide a username and password for your new user and click on the ‘Create a user’ button. Make sure to note the username and password in a safe place.

Adding a new MySQL database user

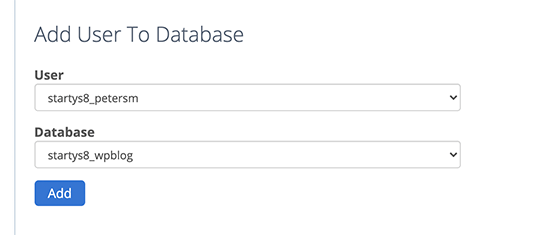
The new user you just created still does not have permission to work on the database. Let’s change that.

Scroll down to the ‘Add User to Database’ section. First select the database user you created from the dropdown menu next to the ‘User’ field. Then select the new database you just created and click on the Add button.

Add user to database

Your database is now ready to be used for moving WordPress to the new domain name. Make sure to note down the database name, username, and password. You’ll need this information in the next step.

Step 3. Unpack WordPress on Your New Domain Name

Now you need to upload the Duplicator files you downloaded earlier to your new domain name.

The Duplicator package includes your WordPress installation as well. This means you don’t need to install WordPress on your new domain.

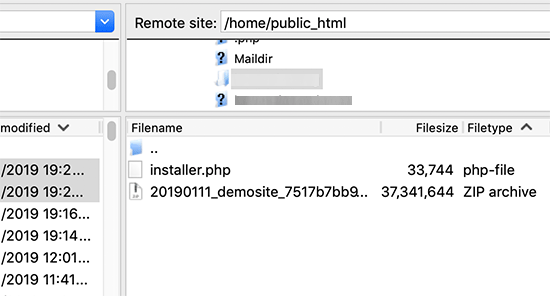
First, connect to your domain name using an FTP client. Once connected, make sure that the root directory of your website is completely empty.

After that, you can upload the archive and installer files to the root directory (usually it is public_html).

Upload Duplicator files to new domain name

Once both files have finished uploading, you are now ready to unpack WordPress.

Open a new browser tab and go to the following URL:

https://ift.tt/2JKPycc

Don’t forget to replace example.com with your new domain name. This will launch the Duplicator migration wizard.

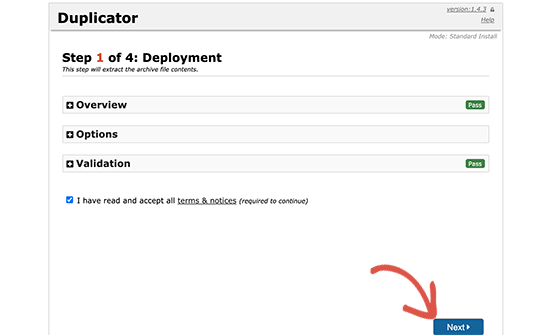
Duplicator Wizard

The installer will look for the archive file. You need to check the terms checkbox and click on the Next button to continue.

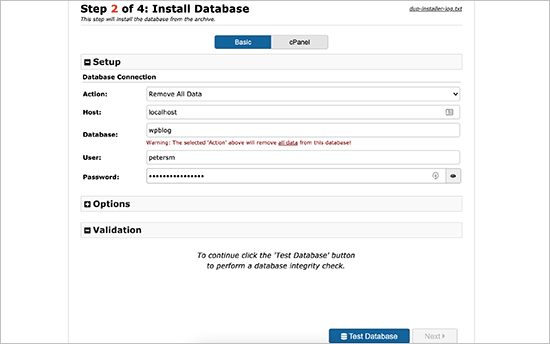
Now, the installer will ask you to configure your WordPress database information.

Your host will likely be localhost. After that, you will enter the details of the database you created for your new domain name in the earlier step.

Connect your new database

Once done, click on the next button to continue.

Duplicator will now unpack your WordPress database backup from the archive into your new database.

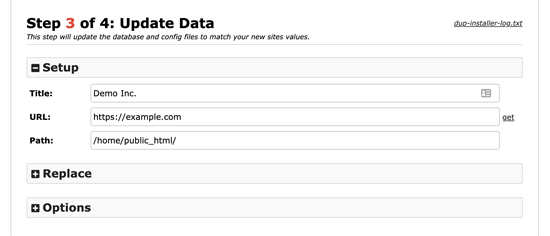
Next, it will ask you to update the site URL or Path. You shouldn’t have to change anything since it automatically detects the new URL of your domain name and its path.

If it doesn’t, then you can change the URL to your new domain name. After that, click on the next button to continue.

Update site URLs

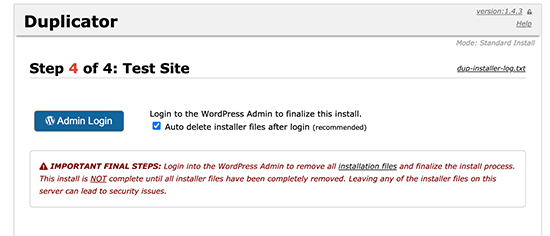
Duplicator will now finish the migration.

You can click on the ‘Admin Login’ button to enter the WordPress admin area of your website on the new domain name.

Finishing WordPress migration to new domain name

Step 4. Set Up Permanent 301 Redirects

The next step is to point users arriving on your old domain name to the new domain. This is done by setting up 301 redirects.

301 redirects are very important for SEO and user experience. Adding them will allow you to automatically redirect users and search engines to your new domain name.

In other words, whenever someone lands on a post or page on your old domain, they will be automatically redirected to the same post or page on your new domain, instead of seeing a 404 error.

To keep your redirects in place, you’ll need to keep your old WordPress installation active so it can continue to redirect to the new one you just created.

There are two ways to set up the redirects. The first method is easy and just takes a few clicks. The second method requires you to edit files manually.

Method 1. Set Up 301 Redirects With All in One SEO

For this method, we’ll be using All in One SEO (AIOSEO). It is the best WordPress SEO plugin on the market and allows you to easily optimize your WordPress website for SEO.

First, you need to install and activate the All in One SEO plugin on your old domain. For more details, see our step by step guide on how to install a WordPress plugin.

Note: You’ll need at least the Pro version of the plugin to access redirect manager addon. You can also set up AIOSEO on your new WordPress site to boost your search engine rankings and traffic even more.

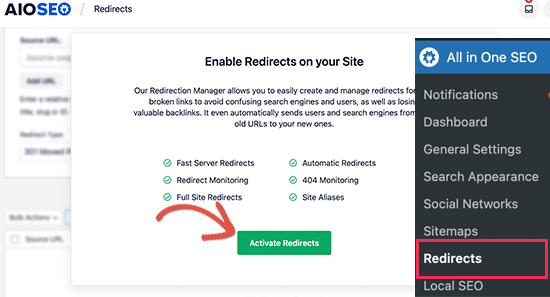
Upon activation on your old domain, you need to visit All in One SEO » Redirects page and click on the Activate Redirects button.

Activate redirects

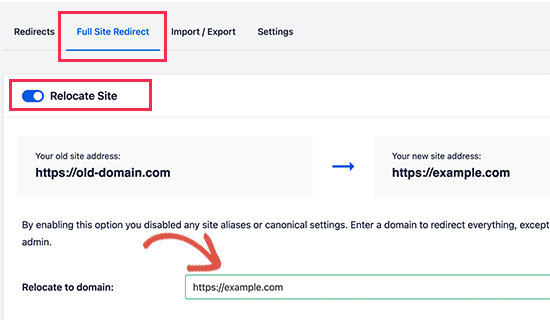
Next, you need to switch to the ‘Full Site Redirect’ tab and turn on the ‘Relocate Site’ toggle. After that, you need to enter your new domain name next to ‘Relocate to domain’ option.

Full site redirect

Don’t forget to click on the Save Changes button to store your settings.

Method 2. Manually Set Up Redirects to New Domain

This method requires you to edit the WordPress .htaccess file on your old domain name.

First, you need to connect to your old site using FTP and edit the .htaccess file.

This will be located in the same directory as your wp-includes or wp-admin folder. Open the .htaccess file and paste the following lines of code at the very top:

#Options +FollowSymLinks
RewriteEngine on
RewriteRule ^(.*)$ http://www.newsite.com/$1 [R=301,L]

Note: Replace newsite.com with your new domain in the above code.

Once you have applied these changes, then visit your old domain name. It should automatically redirect you to the new domain.

If it doesn’t, then it means the redirection is not setup properly, and your server likely doesn’t support redirect rules. You need to contact the support team at your web hosting company to get RewriteEngine turned on.

Step 5. Notify Google About Your New Domain

Now that you have moved WordPress to a new domain name and set up redirects, it is time to notify Google about your change of address. This will help Google find your new website domain quickly and start showing it in search results.

First you need to make sure that both your new and old domain are added to the Google Search Console as two different properties. See step 1 in our Google Search Console guide for instructions.

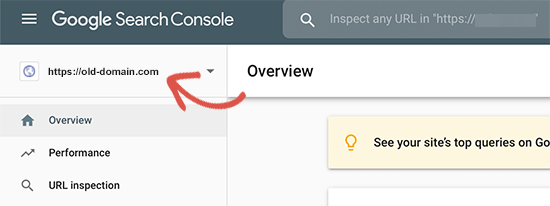
Next, you need to select the old domain name as the active property in your Google Search Console account dashboard.

Select old domain

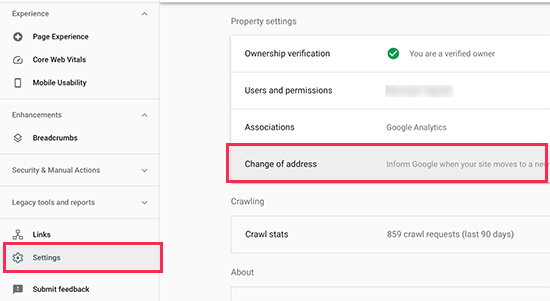
After that, click on the Settings menu from the left column and then click on the ‘Change of Address’ tool.

Change of Address

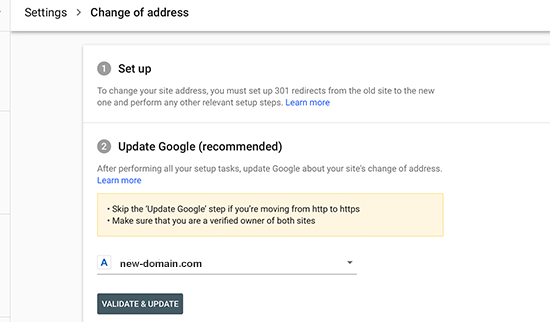
Now you need to select your new domain under the Update Google section, and then click on the ‘Validate & Update’ button.

Add new address to change of address

That’s all, Google will now validate that your old domain is redirecting to the new domain and save your changes.

On the next screen, Google Search Console will show you a step by step wizard to submit your change of address request.

Notify Your Users About the New Domain Name

While the 301 redirects do their job, it is always good to make a public announcement about the migration.

You can do this by simply writing a blog post on your new site and sharing it on your social media accounts.

If you have an email newsletter or push notification subscribers, then you should send out an announcement to them, too.

This can be helpful in a lot of ways.

First and foremost, your users are more likely to remember the new domain once they read about it.

Second, you can ask your users to let you know if they see any bugs. You alone cannot test your site in every different type of browsers or system environment. It’s always helpful to have a fresh pair of eyes looking at it.

We hope that this tutorial helped you move your WordPress site to a new domain name. You may also want to see our guide on how to get a free email domain, or see our expert pick of the best business phone services.

If you liked this article, then please subscribe to our YouTube Channel for WordPress video tutorials. You can also find us on Twitter and Facebook.

The post How to Easily Move WordPress to a New Domain (Without Losing SEO) appeared first on WPBeginner.


September 27, 2021 at 03:00PM

Friday, September 24, 2021

8 Best Help Desk Software for Small Business 2021 (Compared)

Are you looking for the best help desk software for your business?

Using help desk software can help you improve your customer support workflow, better manage requests, and improve your customer relationships.

In this article, we’ve hand picked some of the best help desk software you can use along with your WordPress site. We’re using these tools across our various businesses to help deliver a great customer experience.

8 best help desk software for small business (compared)

Why Use Help Desk Software?

Help desk software makes it easy to manage customer support requests to serve your customers better.

This leads to happier customers and improved customer retention, which means more money for your business over the long term.

When you’re just getting started online, it can be easy to manage all of your customer support requests yourself through your business email address.

But as your WordPress website continues to grow, it can be challenging to keep up the same quality of customer support.

Using help desk software in your business can elevate the quality of your customer interactions and give you a competitive advantage in your space.

The best help desk software:

  • Helps you scale your customer support as your business grows
  • Makes it easy to keep track of support requests across multiple channels
  • Lets you create detailed customer profiles and better understand your users
  • Improves support response time and customer relationships easily

That being said, let’s take a look at some of the best help desk software you can use to help your small business website grow.

1. Help Scout

Help Scout

Help Scout is one of the best all in one help desk software in the market. It has nearly every feature you need to streamline your help desk and customer support process.

We use Help Scout here at WPBeginner and our other businesses for all of our email support needs.

It can help you manage all of your chat and email support requests from one place. That way, your customers can reach out using the method they prefer, and your support team can manage requests from a single queue.

You can speed up support requests by created saved replies, so your team can respond to common questions instantly.

There’s a built-in knowledge base feature, so you can build your own help center. This reduces the total number of support requests since your users can find solutions to their problems.

You’ll also find in depth reporting data, so you can see where your team is doing great and what needs to be improved.

The time tracking report lets you see where your support team is spending the most time, so you can improve your product workflows.

A live chat feature, also known as Beacon, is available if you want to add an additional support channel.

It recommends articles to help solve your users solve problems. If they can’t find a solution, then they can chat with your team.

Pricing: The Basic plan starts at $20 per user per month and includes 3 mailboxes, live chat, and more. The Plus plan starts at $35 per user per month if you have a bigger team.

2. HelpDesk.com

HelpDesk.com

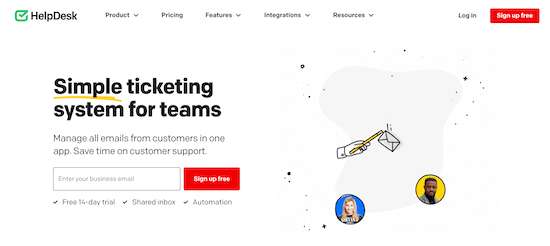
HelpDesk is a very easy to use help desk tool and ticketing software. It’s very intuitive and a simple way to keep all your messages in one place.

Any requests from contact forms, incoming emails, live chat, and more will come to a single dashboard, and a ticket will be created.

There are advanced ticketing, sorting, and tagging features, so you can prioritize the most important messages.

Plus, there are useful team collaboration tools like multiple mailboxes, agent groups, and private notes for support tickets to help your entire support team become more effective.

You can use the automation features like automated task assignments, canned responses, and custom automated workflows to optimize your response time.

Those running IT help desks can use the specialized IT service teams features to create groups of agents responsible for certain areas like subscriptions, signs up process, end-users, and more.

You can even create an IT support help desk for internal teams to help employees get up to speed on your software and processes.

There’s also an integration with LiveChat, so you can manage help desk tickets and solve customer issues in live chat all in one place.

You’ll find additional integrations like Hubspot, Salesforce, Zapier, Slack, and more that you can use to improve your support workflow.

Pricing: For teams, pricing starts at $19 per agent per month and includes a ticketing system, 60-day chat history, and more.

3. Hubspot

HubSpot

Hubspot offers business owners a wide range of customer management tools to help improve customer satisfaction and relationships.

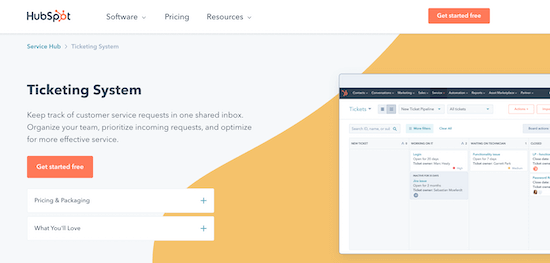
It includes easy to use help desk software and a ticketing system to keep track of long term customer service requests.

They offer one of the best CRMs for small businesses that easily integrates with the customer service management software.

The service desk software and ticketing system organizes all of your support requests into a single dashboard that your entire team can access.

You can keep track of important support metrics like ticket volume, agent response time, and more. This helps you see if you’re hitting your goals and meeting your customer service level agreements (SLAs).

You’ll find additional features like knowledge base software to help your customers resolve their own issues and routing and automation to help save you time.

Plus, there’s bundled live chat and chatbot functionality, so you can communicate in real time with your customers.

Pricing: There’s a free plan for all users. Paid plans start at $45 per month and give you access to additional automation tools and support for more team members.

4. FreshDesk

FreshDesk

FreshDesk is another popular help desk provider for businesses. It’s very user friendly, while still offering plenty of advanced features.

The help desk system has a shared inbox for easy and fast team collaboration, escalation, and issue management. You can even route tasks based on team member availability.

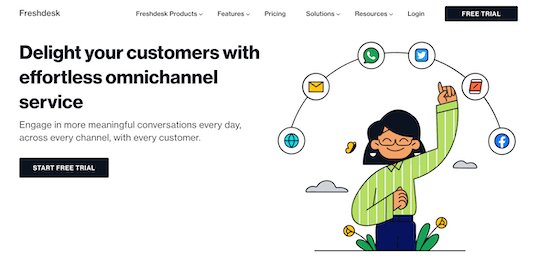
Beyond help desk features, you’ll find chatbots, live chat, modern messaging, automation features, omnichannel support, and more.

There’s built in reporting and data, so you can refine your support processes over multiple communication channels. You can even use the social media integration to convert messages and brand mentions into tickets and respond.

It also includes various tools to help create your own self service portal like forum support, FAQ creation, a help widget, and more.

Pricing: The basic version of the software starts at $15 per month. While full omnichannel support plans start at $79 per month when billed per year.

There is a free version of the support software that supports an unlimited number of agents. But, it only includes ticketing and knowledge base features.

5. Nextiva

Nextiva

Nextiva is the best business phone service for small businesses. Beyond phone support, they offer a complete multichannel support solution.

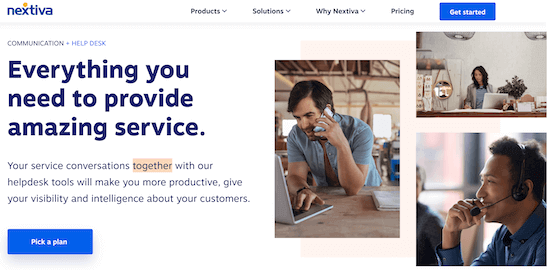
The integrated help desk solution lets you communicate across many different channels from a single app including, phone, email, and team messaging.

No matter where your customers reach you from, you can respond from one place.

The ticket management system is straightforward to use, and you can set priorities, send reminders, message your team, and more.

If you’re using other Nextiva services like Nextiva business VoIP or the sales CRM, then these will instantly integrate.

You’ll find other useful features like call routing, canned responses, a mobile app, and a self-service knowledge base.

We use Nextiva at WPBeginner for all of our phone support needs. It’s the best option available if you need to offer phone support.

There are all kinds of powerful features to help your phone support team including, call forwarding, custom greetings, virtual business phone number, analytics, and more.

Nextiva works great for small business owners as well as large call centers who want to automate sales and customer support.

Pricing: Nextiva starts at $18.95 per month for between 20-99 users. If you want support for SMS and more integrations, then the Pro plan starts at $22.95 per month.

6. LiveChat

LiveChat

LiveChat is the best live chat software in the market. It lets you quickly add live chat support to your website, so you can instantly respond to customer’s requests.

The LiveChat apps are easy to use and work on mobile, desktop, and tablet devices across Android and iOS. So, your support team can answer requests without logging into the WordPress dashboard.

Plus, there’s a WordPress plugin that makes it easy to integrate with your website.

You can set up LiveChat to work during your non-work hours, so all live chat requests will go directly to your help desk management system.

We use LiveChat across all of our eCommerce businesses to support our pre-sales staff.

The chat window is very easy to customize to match your website’s branding.

One really great feature of this tool is the speed. The chat window loads faster than other providers and works across every device.

It integrates easily with other customer support and marketing tools you’re already using, like HelpDesk, HubSpot, and Google Analytics.

You’ll also find additional support tools to help improve the quality of your support, like visitor tracking, a smart API that integrates with your knowledge base, and more.

Pricing: There are plans for businesses of all sizes. The starter plan begins at $16 per agent per month when paid yearly. Plus, there’s a 14 day free trial to test out the service.

7. Chatbot.com

ChatBot.com

Chatbot.com is the best AI chatbot software in the market today. This tool makes it easy for small businesses to create their own AI chatbot and improve customer service.

You can use the drag and drop builder to create a customer support chatbot quickly.

There’s also a library of industry specific templates you can use. These will help you develop your unique chatbot based on user questions and scenarios.

It integrates easily with both WordPress and WooCommerce. Plus, your live chat and customer service software of choice.

We use ChatBot.com in several of our SaaS businesses to handle pre-sales questions and forward users to our live support team if necessary.

This process can make your customer service workflow more effective, and free up time for your support staff.

Pricing: It starts at $50 per month billed monthly for up to 1,000 monthly chats, and goes up from there.

There’s a 14-day free trial included in every plan, so you can see if chatbots work for your business.

8. WPForms

WPForms

WPForms is the best contact form plugin for WordPress used by over 4 million websites. It’s packed with features, while still being incredibly easy to use.

We use WPForms here on WPBeginner and across all of our other websites.

You can use the drag and drop builder to create a customer support form quickly, so your users can submit a support request to your team.

The free version of the plugin lets you build a basic contact form and includes spam protection, email notifications, and more.

The pro version of the plugin takes these features even further and turns it into a useful service desk tool. It lets you create more advanced forms with conditional logic, form abandonment functionality, geo-location, and more.

Every form submission goes directly to your WordPress dashboard, so you can quickly respond to customer queries. You can also set up instant form notifications that automatically send you an email when a user submits a form.

You can notify yourself or your team members in charge of customer support.

There’s also a user journey addon that lets you see what your visitor did on your website before submitting a form. This makes it easy to see where your user got stuck, so you can resolve their issue faster.

Plus, there are over 3000 different software integrations, including service desk, HR software, project management tools, marketing automation tools, and more.

Pricing: The Basic plan starts at $39.59 per year and has features for simple form creation, but to get access to user journey reports, advanced integrations, and more, the Pro plan is $199.50 per year.

What is the Best Help Desk Software (Expert Pick)?

In our expert opinion, there are several different help desk software solutions that can be the perfect choice for your business.

If you’re looking for the best email help desk that brings all of your customer support channels together, then Help Scout is the best option.

If you need a great all in one help desk tool that integrates perfectly with LiveChat, then HelpDesk is perfect.

If you want a customer help desk that also includes a business phone system, then Nextiva is a great choice.

Regardless of which help desk software you use, you’d want to use WPForms since it helps you forward the message from your website to the right help desk software.

Aside from the top help desk software on our list, we also looked at other providers like Zoho Desk, Jira, LiveAgent, FreshService, HappyFox, Zendesk support, and more.

However, we decided not to list them to help you avoid choice paralysis, so you can quickly find the best help desk software for you.

We hope this article helped you find the best help desk software for your business. You may also want to see our picks of the best email marketing services for small businesses and our guide on how to choose the best web design software.

If you liked this article, then please subscribe to our YouTube Channel for WordPress video tutorials. You can also find us on Twitter and Facebook.

The post 8 Best Help Desk Software for Small Business 2021 (Compared) appeared first on WPBeginner.


September 24, 2021 at 04:00PM