Friday, October 1, 2021

7 Best WooCommerce Reporting and Analytics Plugins for 2021

Are you looking for a reporting plugin for your WooCommerce store?

A reporting and analytics plugin for WooCommerce will help you track your online store’s performance and also give you key insights to understand your audience and boost your revenue.

In this article, we’ll help you pick the best WooCommerce report and analytics plugins for your online store.
Best WooCommerce reporting and analytics plugins

Why Do You Need a WooCommerce Reporting Plugin?

WooCommerce is the world’s most popular eCommerce platform. It’s a free eCommerce plugin for WordPress that makes it super easy to sell products and services online.

If you’re running a WooCommerce store, then it’s important to know how well it’s performing. You should be able to track your conversions, find out where your customers are from, and uncover which marketing strategies are working.

To find out all of this and more, you’ll need a WooCommerce reporting plugin. It will help you get insights into how customers use your website, so you can offer the products and services they like the most.

Besides that, you can use a WooCommerce reporting and analytics tool to measure your marketing campaigns and discover where potential customers are leaving your site before they complete a purchase.

That being said, let’s look at some of the best WooCommerce reporting and analytics plugins.

1. MonsterInsights

MonsterInsights

MonsterInsights is the best Google Analytics plugin for WordPress. It comes with an eCommerce addon that lets you track your WooCommerce conversions with ease.

The best part about using MonsterInsights is that it shows all the information you need to measure your WooCommerce store’s performance inside your WordPress dashboard.

It makes it super easy to set up and use Google Analytics. Plus, you don’t have to work your way through the complicated Google Analytics reports to find the data you need to make decisions.
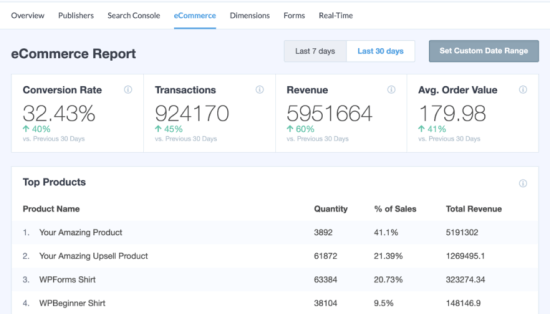
An example of an ecommerce report in MonsterInsights

The MonsterInsights eCommerce report lets you view your revenue, number of transactions, conversion rate, and average order value at a glance.

MonsterInsights also shows the most popular products on your WooCommerce store and helps you find out which products generate the most sales and revenue.

Using this information, you can offer similar products and services that your customer prefer and grow your eCommerce revenue.

The plugin also tracks your top conversion sources, so you can see which websites are sending you high-converting traffic. This helps you to invest more in marketing strategies that are already proven to work.
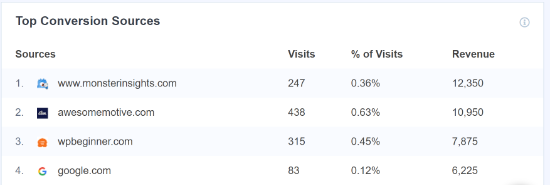
Top Conversion Sources

There are more shopper behavior reports you can view in your WordPress dashboard. For instance, MonsterInsights shows you the total items added to cart, removed from cart, time to purchase, and sessions to purchase a product.

Another advantage of using MonsterInsights is its Popular Products feature. You can display your top-selling products anywhere on your WooCommerce store using this feature.
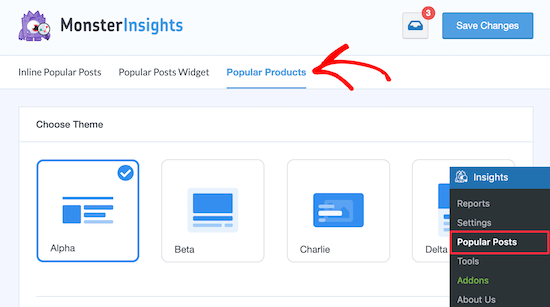
Customize popular products blog post

MonsterInsights offers multiple themes to choose from and also provides different options to customize and display popular products on WooCommerce product pages.
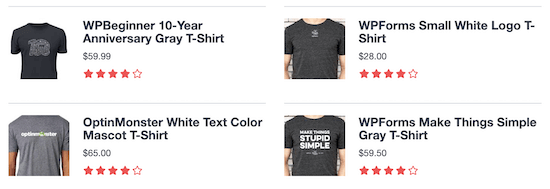
Display popular products end of blog post

Other than that, you also get advanced tracking features with MonsterInsights. For instance, it helps you set up custom dimension tracking, scroll tracking, link click tracking, outbound link tracking, and much more.

Pricing: To track your WooCommerce store in Google Analytics, you’ll need the MonsterInsights Pro plan which will cost you $199.50 per year. There is also a free version, but it doesn’t include enhanced eCommerce tracking report.

2. WP Mail SMTP
WP Mail SMTP

WP Mail SMTP is one of the best WooCommerce plugins for your store. It ensures that your emails reach the inbox of your customers, and offers tracking and reporting on all the emails your site sends out.

On a WooCommerce store, you’ll need to send your customers receipts of their purchases, order details, user account details, order confirmation emails, and much more.

If your customers aren’t getting these important emails, then it will result in a bad user experience and you’ll lose potential customers.

With WP Mail SMTP, you can track whether your emails are being delivered or not. All you have to do is enable the email logs in WP Mail SMTP and the plugin will take care of the rest.
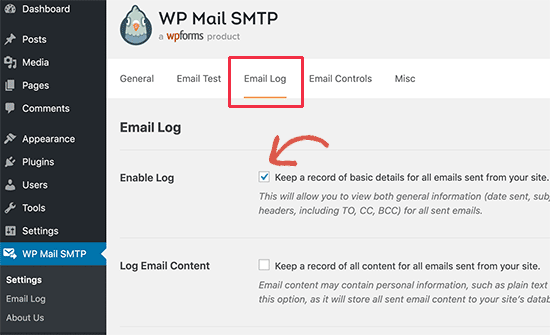
Turn on email logs

You can then view your email logs inside your WordPress dashboard and see the delivery statues, opens, and clicks for each email.
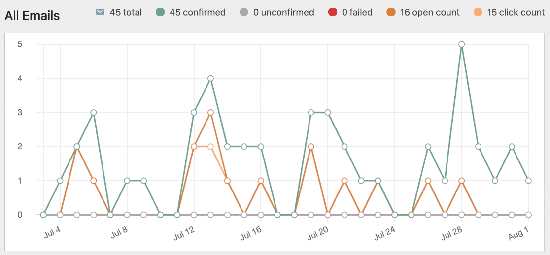
WP Mail SMTP email reporting

For more information, you can follow our step by step tutorial on how to setup WordPress email logs.

Pricing: WP Mail SMTP premium plans include the email logs feature with prices starting from $39 per year.

3. Product Sales Report for WooCommerce

Product Sales report for WooCommerce

Product Sales Report for WooCommerce is a great reporting tool for finding out how many sales your eCommerce store is getting and then sharing the sales reports with other people.

The WordPress plugin is very easy to use and create by Aspen Grove Studios. You can change the reporting period and select which products to include in the sales report.

There are also different options for showing reporting fields in the report. For instance, you can choose to show product ID, SKU, name, quantity sold, gross sales, product category, and much more.

The best part about using Product Sales Report for WooCommerce is that you can generate and view the sales report inside your WordPress dashboard and download it as a CSV file to share it with others.

Pricing: You can use Product Sales Report for WooCommerce for free. However, you can also subscribe to its premium version for more reporting features with prices starting from $199 per year.

4. Google Analytics and Google Shopping plugin for WooCommerce

Google Shopping plugin for WooCommerceGoogle Analytics and Google Shopping plugin for WooCommerce, which was formerly known as Enhanced Ecommerce Google Analytics Plugin, is the next plugin on our list.

The plugin allows you to easily set up Enhanced Ecommerce tracking in Google Analytics with your WooCommerce store. Not only that, but you can also connect your Google Ads and Google Merchant accounts.

The downside of using Google Analytics and Google Shopping plugin for WooCommerce is that you don’t get to see reports inside your WordPress dashboard, like you can with MonsterInsights.

However, you can unlock different Google Analytics eCommerce reports and view them in your Analytics. These include the shopping behavior report, checkout behavior report, product performance report, and sales performance report.

Pricing: Google Analytics and Google Shopping plugin for WooCommerce is available for free.

5. Sales Report By Country for WooCommerce

s
Sales report by country for WooCommerce

Sales Report By Country for WooCommerce is another popular WooCommerce reporting and analytics tool. The plugin is designed specifically to track sales from different regions on your online store.

It is very easy to use and doesn’t require any setup. All you have to do is install the plugin and then view the sales report by country in your WooCommerce reports section.

With the plugin, you can easily see the top 10 countries that drive revenue to your WooCommerce store. You get different options to change the visualization of the graphs in the report.

Besides that, the plugin lets you sort the data based on different date ranges. For example, you can view your sales from last year, month, week, or choose a custom date range.

Pricing: Sales Report By Country for WooCommerce is a free WordPress plugin.

6. Advanced Reporting for WooCommerce

Advanced Reporting for WooCommerce

Advanced Reporting for WooCommerce is a free WordPress plugin that helps you track sales on your eCommerce store.

The plugin shows a detailed report inside your WordPress admin area. You can easily view your WooCommerce sales summary and get data about total sales, refunds, items purchased, and more.

Besides that, the Advanced Reporting for WooCommerce plugin shows your daily number of orders and earnings. You can also identify your top products and top categories in WooCommerce.

Another advantage of using the plugin is that it helps in finding your top customers. You can even view which country and state your highest paying customers are from.

Pricing: Advanced Reporting for WooCommerce is a free WooCommerce reporting plugin.

7. Abandoned Cart for WooCommerce
Abandoned cart for WooCommerce

Abandoned Cart for WooCommerce is one of the best WooCommerce reporting and analytics plugins to have on your website. It’s designed specifically to track abandoned carts and help recover lost sales.

An abandoned cart occurs when people visit your WooCommerce store, add products to the cart, but then leave without checking out. As a result, you lose potential customers and sales.

Using the plugin, you can easily track abandoned users and see a report inside your WordPress dashboard. You get to see a complete list of abandoned carts, capture customer emails at checkout, and see from which page the user left your store.

Another advantage of using the plugin is that it helps create workflows for abandoned customers and send automated emails to abandoned users.

Pricing: Abandoned Cart for WooCommerce is a free plugin to use. If you upgrade to the paid version, then you get features like instant notifications when any cart abandonment happens and more.

Which Is the Best WooCommerce Reporting Plugin?

If you want a complete reporting tool that easily tracks your WooCommerce store’s performance along with advanced tracking features, then we recommend MonsterInsights.

Its eCommerce addon automatically tracks your WooCommerce store and show you a detailed report insides the WordPress dashboard. Besides that, you also get features like scroll tracking, link tracking, custom dimensions, and much more.

We hope this article helped you pick the best WooCommerce reporting and analytics plugin. You may also want to look at our guide on how to create a free business email address, or see or expert comparison of the best live chat software for small business.

If you liked this article, then please subscribe to our YouTube Channel for WordPress video tutorials. You can also find us on Twitter and Facebook.

The post 7 Best WooCommerce Reporting and Analytics Plugins for 2021 appeared first on WPBeginner.


October 01, 2021 at 04:00PM

Thursday, September 30, 2021

How to Add a CRM on Your WordPress Site and Get More Leads

Do you want to add a CRM to your WordPress site?

Integrating WordPress with a CRM allows you to easily manage customer interactions on your website and follow up with leads.

In this article, we’ll show you how to add a CRM on your WordPress website to boost conversions and sales.

How to easily add a CRM software to your WordPress website

What Is a CRM?

CRM or Customer Relationship Management software allows you to easily manage a customer’s interactions with your business. A CRM helps you track the user journey of each website visitor, keep a record of previous interactions, and successfully convert leads into customers.

There are many CRM solutions available on the market. Most of them allow you to store customer information in the cloud so you can track and manage customer relationships with an easy to use dashboard.

We recommend using HubSpot. It is the best CRM software on the market and can be easily integrated into your WordPress website.

It allows you to capture customer information with forms, chat bots, email service providers, and more. It also integrates with all popular third-party tools that you may already be using to grow your business online.

More importantly, it is extremely easy to use even for beginners who have never used a CRM before.

That being said, let’s take a look at how to easily add a CRM to your WordPress site.

Adding a CRM on Your WordPress Site

First thing you need to do is sign up for a HubSpot CRM account. They have a limited free CRM software plan which allows you to get started and try out the software without a big upfront investment.

HubSpot CRM

Once you have signed up, you need to connect your HubSpot CRM account to your WordPress website.

Simply install and activate the HubSpot plugin. For more details, see our step by step guide on how to install a WordPress plugin.

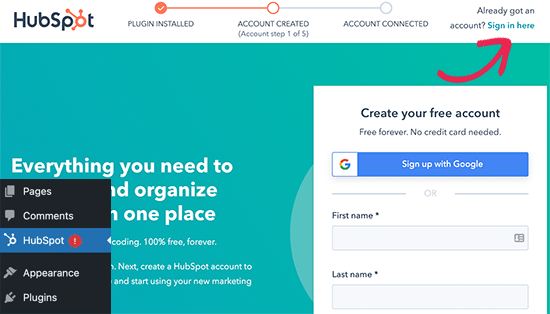
Upon activation, the plugin will add a new HubSpot menu to your WordPress admin sidebar. Clicking it will take you to the setup wizard where you need to click on the ‘Sign in here’ link at the top.

Sign in to your HubSpot account

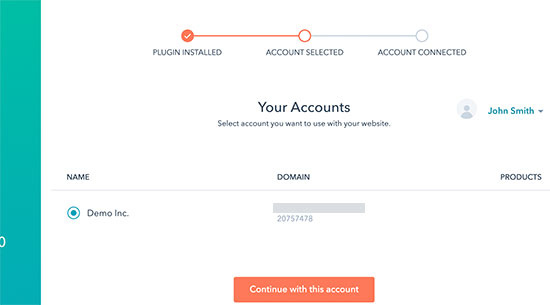
This will bring up a popup where you need to enter your HubSpot login details. After that, you can select your website and then click on the ‘Continue with this account’ button.

Select your website

The plugin will now connect your WordPress site to your HubSpot CRM account.

Collecting Data in Your CRM on WordPress

HubSpot CRM comes with built-in tools to collect customer data on your WordPress website and add it to your contacts list. This includes forms, live chat, and email.

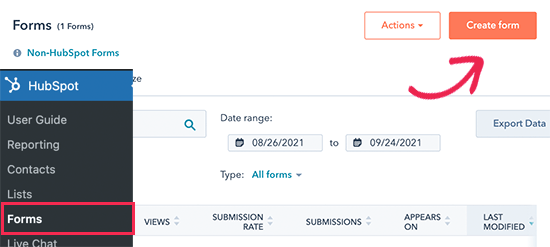
You can easily create forms by visiting HubSpot » Forms page and clicking on the Create Form button.

HubSpot forms

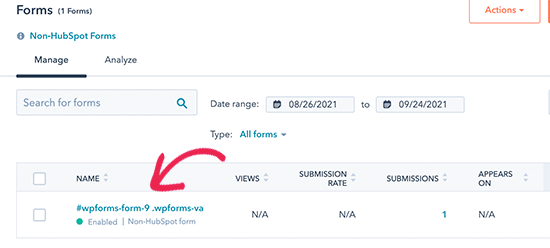
If you’re already using a form plugin on your website such as WPForms, then HubSpot will automatically detect those form submissions and adds them to your contacts.

WPForms captured lead

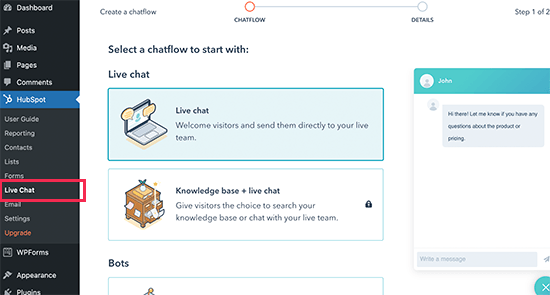
Similarly, you can also create a live chat widget by visiting HubSpot » Live Chat page and clicking the ‘Create a chatflow’ button.

HubSpot chat flow

HubSpot also integrates with other top live chat software on the market if you prefer to use a different provider. HubSpot will automatically start populating your contacts list from your live chat conversations.

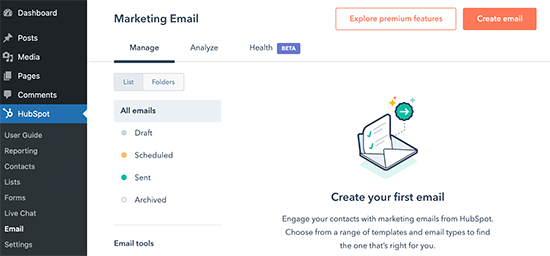
You can also import your contacts from your existing email marketing service provider. Simply go to HubSpot » Email page and choose your email service provider for detailed instructions.

Send marketing emails

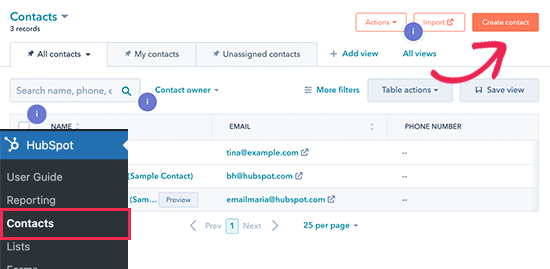
You can also manually add contacts by visiting HubSpot » Contacts page and clicking on the Create Contact button.

Contacts

Using HubSpot CRM to Manage and Nurture Leads

After you start adding leads from your WordPress site to your CRM software, the next step is to manage your business’s interactions with them.

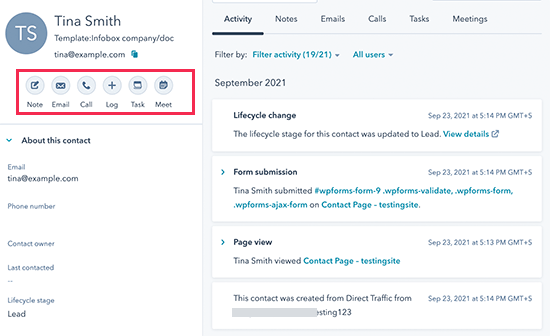
From the Hubspot menu in your WordPress dashboard, you can simply click on a contact name to edit it and see a detailed view of all interactions. You can view the user journey that led them to the form submission.

Contact view

From here, you can assign the contact to a team member, send and track emails, create tasks, schedule meetings and calls, and more.

All these interactions will be automatically tracked and recorded into your CRM software.

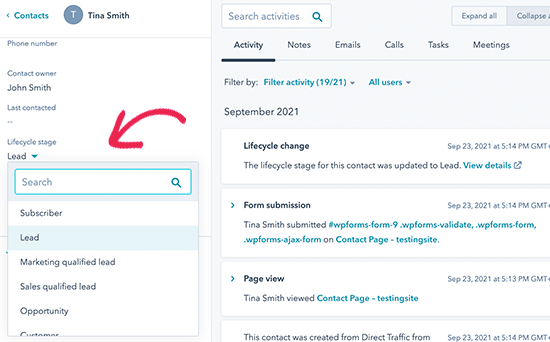
You can also set a status for a contact based on how far along they are in your sales funnel. For instance, you can mark the status as lead, potential lead, customer, opportunity, and more.

Contact status

Using Third Party Tools with Your CRM

HubSpot offers a good set of tools to capture leads, track contacts, and manage customer relationships. However, you may want to use other third-party tools for conversion optimization and lead capturing.

The good news is that HubSpot works automatically with many of the popular marketing tools. Following are a few the most popular marketing tools you can use with your HubSpot CRM.

1. WPForms

WPForms

WPForms is the best WordPress form builder plugin that is perfect for creating lead capturing forms for your website.

It has payment addons, user journey tracking, and many advanced features that are missing in the default HubSpot forms. For example, the form abandonment feature allows you to capture leads even with the user doesn’t finish filling out the form.

You can also use WPForms to create surveys and polls, forms with digital signatures, multi-page forms, and most any other type of form you need for your business.

2. OptinMonster

OptinMonster

OptinMonster is the best tool for conversion optimization. It allows you to capture more leads and quickly grow your email list.

With OptinMonster’s drag and drop builder, you can create lightbox popups, spin-a-wheel popups, slide in boxes, header and footer banners, countdown timers, and much more.

3. LiveChat

LiveChat

LiveChat is the best live chat and marketing automation platform on the market. Whether you use it for support or sales, it integrates with your HubSpot CRM and allows you to easily follow up with potential leads.

Unlike Hubspot’s built-in chat feature, it comes with incredibly powerful targeting rules that let you show personalized campaigns at right time to maximize your conversions.

4. SeedProd

SeedProd is the best WordPress page builder tool on the market. It allows you to quickly create professional grade marketing pages, landing pages, sales pages, and other campaigns. This helps you get even more leads without any coding skills.

Apart from these tools, you can also connect your HubSpot CRM to thousands of other apps via Zapier.

We hope this article helped you add a CRM on your WordPress site. You may also want to see our guide on why building an email list is important, or our comparison of the best HR payroll software for small business.

If you liked this article, then please subscribe to our YouTube Channel for WordPress video tutorials. You can also find us on Twitter and Facebook.

The post How to Add a CRM on Your WordPress Site and Get More Leads appeared first on WPBeginner.


September 30, 2021 at 04:00PM
Wednesday, September 29, 2021

How to Add or Remove Capabilities to User Roles in WordPress

Do you want to add or remove capabilities to user roles in WordPress?

WordPress comes with a simple but powerful user management system. Each user has capabilities based on the roles they are assigned.

In this article, we’ll show you how to modify user roles in WordPress by adding or removing capabilities from user roles.

Customing user role permissions in WordPress

Why Add or Remove User Role Capabilities in WordPress

WordPress comes with a built-in user management system and some predefined user roles and permissions.

As an Administrator, you have the ability to perform any action on your WordPress website. For instance, you can add or remove new users, install plugins and themes, delete content, and more.

If you run a multi-author WordPress blog, then you can add other users with Editor, Author, or Contributor user roles. This gives them user role permissions to add new content, but they cannot do administrative tasks.

WordPress also comes with a Subscriber role so users can log in to your site and manage their profiles.

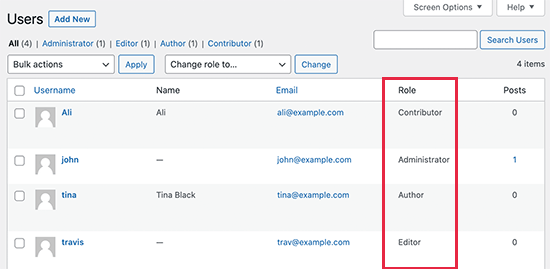
Users with different roles on a WordPress website

Similarly, WordPress plugins can also create user roles with custom permissions. For example, eCommerce plugins can create a user role for customers with specific custom permissions, or a membership plugin can create its own custom user roles for members.

But what if you wanted to give a user role certain extra permissions or take away some existing permissions?

For instance, you may want to take away publishing permission from the Author user role, or allow Authors to edit other user’s blog posts.

What if you wanted to create a totally custom user role with limited capabilities?

That being said, let’s take a look at how to easily modify user role capabilities in WordPress and create custom user roles with specific permissions.

Add / Remove User Role Capabilities in WordPress

The first thing you need to do is install and activate the Members plugin. For more details, see our step by step guide on how to install a WordPress plugin.

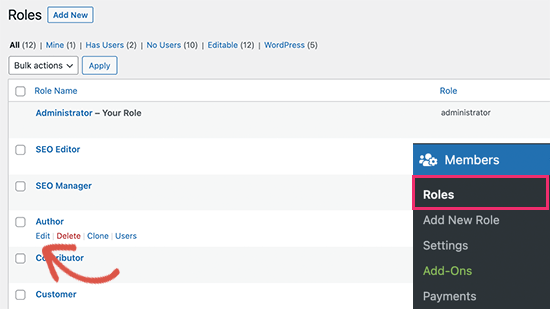
Upon activation, you need to visit the Members » Roles page and click on the Edit link below the user role that you want to modify.

Edit user role

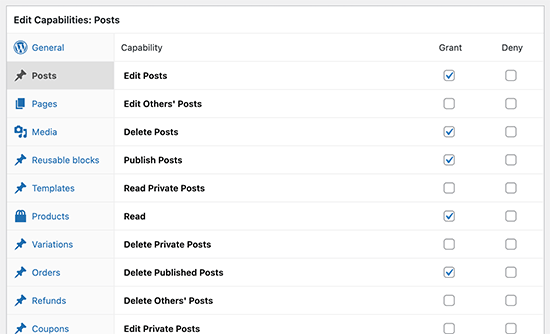
This will open the user role editor where you will see different sections in the left column and available capabilities to the right.

Edit capabilities

You’ll notice two checkboxes to Grant or Deny the permission next to each capability.

If a user role is granted permission that you want to take away, then you need to uncheck the Grant option and check the Deny box.

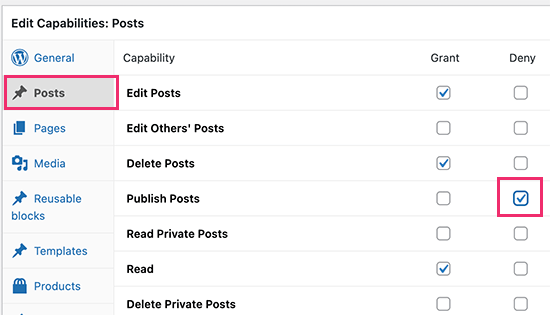
For instance, if you want to prevent the Author user role from publishing blog posts, then you need to switch to the Posts section and then check the Deny box next to the ‘Publish Post’ option.

Remove capability

Similarly, you can also give additional capabilities to a user role.

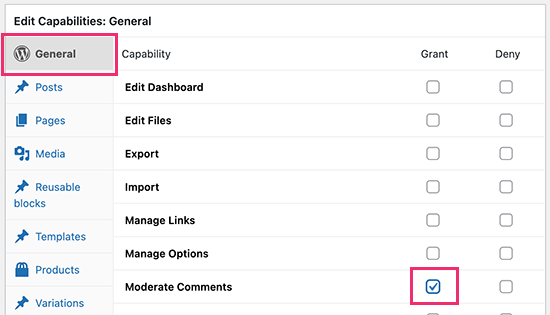
For instance, let’s suppose you want to allow users with the Author user role to be able to moderate comments as well. By default, the Author user role does not give users permission to moderate comments.

To do that, you need to switch to the ‘General’ section and check the Grant box next to the Moderate Comments option.

Add capability

Don’t forget to click on the ‘Update’ button to save your changes after you are done modifying a user role.

You can now create a new user account with that particular user role and log in to make sure that your customized permissions are working as you intended.

Adding A New User Role with Custom Permissions

The plugin also allows you to create custom user roles where you can select which permissions and capabilities the role would give to the users.

Let’s suppose you have a ‘Movies’ custom post type on your website and you want some users to be able to add movie reviews there. However, you don’t want them to edit any other section.

To do this you’ll need to create a custom user role.

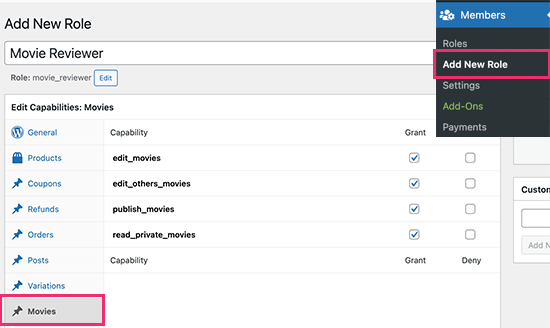
Simply go to Members » Add New Role page. First, you need to provide a title for the custom user role.

New custom user role

After that, you can switch to the section where you want to grant the user the capabilities. For instance, we have a section called Movies for our custom post type on our test site.

There you can give users the permissions to edit and publish content for that post type.

After that, you can review other sections too and see if you want to give users capabilities to do anything else on your site.

Once you are finished, don’t forget to click on the Add Role button to save your changes.

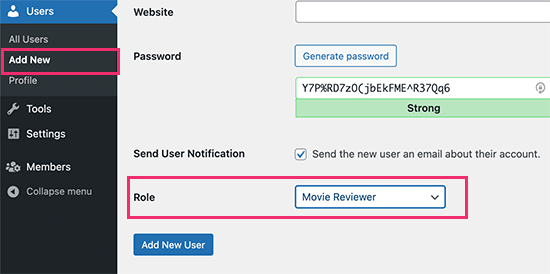
You can now add a new user to your website and assign them the custom user role you just created.

User with custom role

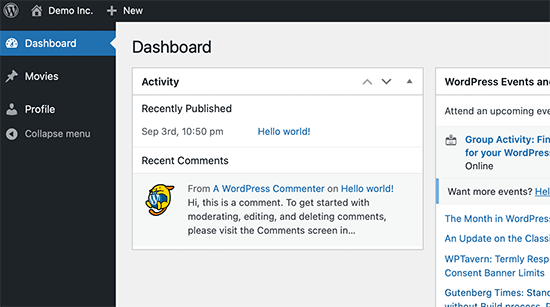
After that, you can log in with that new user account to make sure that everything is working fine. Here is what our custom user role dashboard looked like:

Custom user role dashboard

Securely Managing User Accounts in WordPress

Customizing WordPress user roles and permissions allows you to control user access to the admin area of your WordPress website.

However, it also opens up your site to hacking attempts and vulnerabilities. Following are a few things that you can do to make sure that only users with access can securely log in to your WordPress website.

1. Enforce Strong Passwords

WordPress includes a strong password generator by default, but users can skip it. You can add a password policy manager to ensure all users are using a strong password.

2. Enforce Two-Step Authentication

Two-step authentication asks users to enter a one-time code to login to their account in addition to their password. Users can generate this code via an authenticator app on their computers or phone.

For more details, see our guide on how to add two-step authentication in WordPress.

3. Install a WordPress Security Plugin

WordPress security plugins help protect your website by monitoring it for suspicious activity and login attempts. We recommend using Sucuri, which is the best WordPress security plugin on the market.

We hope this article helped you learn how to add or remove capabilities to user roles in WordPress. You may also want to see our guide on how to get a free email domain, or our comparison of the best business phone services for small business.

If you liked this article, then please subscribe to our YouTube Channel for WordPress video tutorials. You can also find us on Twitter and Facebook.

The post How to Add or Remove Capabilities to User Roles in WordPress appeared first on WPBeginner.


September 29, 2021 at 04:00PM