Friday, October 15, 2021

7 Best WordPress Image Compression Plugins Compared (2021)

Are you looking for the best WordPress image compression plugin for your website?

Image compression plugins allow you to easily optimize images in WordPress for better speed and performance automatically.

In this article, we have compared the best image compression plugins for WordPress.
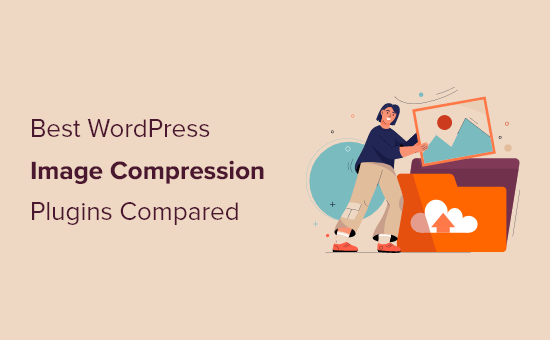
7 best WordPress image compression plugins compared

When Do You Need a WordPress Image Compression Plugin?

Images are larger in size than plain text which means they take longer to load and can slow down your website.

However you’ve probably heard the saying: “a picture is worth a thousand words”. Images make your content more engaging and interactive.

To improve your WordPress website speed, you need to optimize your images for the web.

Since optimizing your images can make your site load faster, it will improve your WordPress SEO, and help you get more traffic.

The best way to do this is by using Photoshop or another image editing software before you upload the image to WordPress. This gives you a lot more control on the quality of images on your website.

However, not all users are comfortable working with an image editing program. For some people, optimizing every single image they upload sounds like a lot of work.

Luckily, there are several WordPress image compression plugins that can help you with that. These plugins optimize your images by automatically compressing them and using the smaller sized version on your website.

That being said, let’s take a look at the best WordPress image compression plugins, and how they stack up in terms of image optimization, performance, and quality.

1. EWWW Image Optimizer

EWWW Image Optimizer

EWWW Image Optimizer is the best WordPress image compression plugin. It is easy to use and can automatically optimize images you upload on the fly.

It can also compress and optimize your previously uploaded images in bulk.

Even though your images are being compressed, it’ll be very hard to tell the difference between compressed and uncompressed in terms of quality.

Plus, the entire process of compressing and optimizing is automated. This includes image scaling to fit the right size page and device, lazy loading, and even conversion into the next-gen WebP image format.

It can also optimize images generated by other WordPress plugins and stored outside your media library folders. This plugin support JPG, PNG, GIF, and even PDF optimization.

There is also a free version of the plugin available, which lets you perform image optimizations on your own server. This can be great for WordPress website owners concerned about privacy.

However, sites with a lot of images or sites that get a lot of traffic will want to opt for the paid plan, since it includes an image optimizing CDN, which will automatically compress and convert images as they are viewed.

Best of all, EWWW Image Optimizer is very affordable. Plans start at $7 per month and support unlimited images. If you have more than one site, then you’ll need a higher priced plan.

Included in your plan is a caching engine, CSS/JS optimization, and Google Font optimization to help your site load even faster.

2. Optimole

Optimole

Optimole is another excellent option for a WordPress image compression plugin.

Using this plugin requires a quick account creation and API key setup. After that, it’s straightforward to use and gives you complete control over your image optimization.

Optimole is powered by an image CDN, so your images will load quickly no matter where your visitors are coming from. With a CDN, your images are optimized in real-time and delivered to your website visitors in the perfect size.

You can view all of your optimized images in a single dashboard, making it easy to customize compression settings for individual images.

It lets you adjust things like the compression quality, large image resizing, lazy loading, and more.

There’s even a unique setting that will automatically watermark your images for you. This is great for photographers who are trying to protect their work.

Pricing is based on the number of visitors you have per month. The free plugin allows for up to 5,000 visitors per month. While the paid plans start at $19.08 per month when billed yearly and support up to 25,000 visitors per month.

3. ShortPixel Image Optimizer

ShortPixel

ShortPixel Image Optimizer is another great WordPress image compression plugin.

It’s packed with advanced features and gives you the ability to choose compression formats. It starts compressing images as soon you as activate plugin and stores your original images in a separate folder.

If you’re using the free plugin, then it requires you to get an API key by providing your email address.

The basic free account allows you to compress up to 100 images per month, and you will need to upgrade to their paid plans to increase this limit.

You can even simply convert PNG to JPEG and vice versa with the click of a button.

It’s also compatible with WooCommerce, NextGEN Gallery, and the WPML translation plugins.

If you’re using Cloudflare as your WordPress CDN, then you can integrate the service, so your images will be automatically updated with the new version.

ShortPixel is also very affordable. Plans are based on the number of images and start at $4.99 per month for up to 5,000 images per month.

4. reSmush.it

ReSmush.it

reSmush.it is another great choice for a WordPress image compression plugin. It allows you to automatically optimize images on upload as well as offer a bulk optimization option for older images.

You have full control over the image quality and compression with an easy to use slider.

It uses the reSmush API to optimize images and allows you to choose the optimization level for your uploads.

The downside is that it doesn’t have different compression levels. It also limits optimization to uploads lower than 5MB in size. You can exclude individual images from compression in case you need to add an image in full size.

5. Compress JPEG & PNG images

Compress JPEG & PNG images

Compress JPEG & PNG is created by the team behind TinyPNG, and you will need to create an account to use the plugin. You can only optimize 500 images each month with the free account.

It can automatically compress images upon upload, and you can also bulk optimize older images.

The plugin settings allow you to choose which image sizes you want to optimize. You can also set a maximum size for your original uploads. Images larger than that size will be automatically resized by the plugin.

You can also choose to save image data like time and date, copyright information, and GPS location on JPEG files.

6. WP Rocket
WP Rocket

WP Rocket is the best WordPress caching plugin in the market. It’s very beginner friendly and will help to make your site blazing fast.

There are image optimization features within WP Rocket, like lazy loading, which will only load images when they are viewed.

They also developed a plugin called Imagify. This plugin lets you optimize all of your images with a single click. It will also resize your images on the fly and lets you restore your images to their original size.

You also have full control over your image optimization and compression settings. All of your images will be optimized to your preferences.

7. Jetpack

Jetpack

Jetpack is a powerful WordPress plugin suite that combines essential WordPress features into a single plugin. The primary focus is security, performance, and marketing.

The image optimization features fall under the performance category. To enable image compression, all you have to do is turn on a single setting. There are no additional settings for you to set up.

What it does is automatically optimize your image and serve images to your visitors using a CDN. This reduces your server load and provides faster image loading for your visitors.

To access the image optimization, you can use the free version of the plugin as well.

If you like the idea of Jetpack, but are looking for plugins to replace all of Jetpack’s features, then see our guide on the best alternatives to the WordPress Jetpack plugin.

Comparison Test Scores for Image Compression Plugins

Now that you know about the different WordPress image compression options, let’s take a look at how they compare against each other in terms of performance.

To measure this, we ran test by uploading the same image using each of these plugins.

Testing JPEG Image Compression

We used the following JPEG image for our tests, it is 118.3 KB in file size.

JPEG test image

We didn’t touch any of the plugin settings and tested the compression with out of the box settings. Here are our test results:

Plugin Compressed Size Saved (%) Method
EWWW Image Optimizer 64 KB 54.24% Lossless
Optimole 64 KB 54.24% Lossless
ShortPixel Image Optimizer 72 KB 39.30% Lossless
reSmush.it 78 KB 20.81% Lossless
Compress JPEG & PNG images 118.1 KB 2 % Lossy

Testing PNG Image Compression

Next we wanted to test a PNG image to see how our contenders optimize it.

We used the following PNG image for the test, and it is 99.4 KB in file size.

PNG test image

Here are our test results:

Plugin Compressed Size Saved (%) Method
EWWW Image Optimizer 97 KB 1.9% Lossless
Optimole 41 KB 64% Lossless
ShortPixel Image Optimizer 36 KB 56% Lossy
reSmush.it 36 KB 56% Lossless
Compress JPEG & PNG images 34.3 KB 54% Lossy

Which is The Best Image Compression Plugin for WordPress?

If you are looking for the best image compression plugin, then EWWW Image Optimizer is the best choice.

It offers high levels of compression that don’t sacrifice image quality, plus it’s equipped with an image CDN and other features that will optimize your website for speed.

Another great option for sites that get less traffic is Optimole. It operates entirely in the background and takes care of image optimization for you, plus it’s free up to 5,000 visitors per month.

If you’re looking for an affordable plugin that offers high levels of compression and image conversion, then ShortPixel is worth checking out.

We hope you found this comparison of best WordPress image compression plugins useful. You may also want to see our beginner’s guide to image SEO to optimize images for search engines, and our expert picks of the best email marketing services for businesses.

If you liked this article, then please subscribe to our YouTube Channel for WordPress video tutorials. You can also find us on Twitter and Facebook.

The post 7 Best WordPress Image Compression Plugins Compared (2021) appeared first on WPBeginner.


October 15, 2021 at 04:30PM
Thursday, October 14, 2021

How to Exclude Pages from WordPress Search Results (Step by Step)

Do you want to learn how to exclude pages from the WordPress search results?

By default, the internal search on your WordPress site will include all posts and pages in the search results. To make it easier for your site visitors to find what they’re looking for, you may want to exclude certain content, so it never appears in those results.

In this article, we’ll show you how to exclude certain pages from the WordPress search results, step by step.

How to exclude pages from WordPress search results (step by step)

Why Exclude Pages from WordPress Search Results?

The default WordPress site search includes all of your posts, pages, and custom post types in the search results. This works well enough for many WordPress website owners.

However, if you’re running an online store, then you may want to hide pages like your account page, checkout page, thank you page, and more.

The same goes for those running membership websites or online courses. You may want to hide subscriber-only content from appearing in search.

With that said, let’s show you how to exclude pages from your sitewide WordPress search results.

Note: This guide covers on-site search results, when a visitor to your website uses a search box to search through your website content. If you’re looking to exclude pages from Google search results, then you should see our guide on how to hide a WordPress page from Google.

Create a New WordPress Search Algorithm with a WordPress Plugin

The easiest way to exclude pages from the WordPress search results is by using the SearchWP plugin. It’s the best search plugin for WordPress used by over 30,000 websites.

It’s very easy to use and gives you complete control of your WordPress search results.

First thing you need to do is install and activate the plugin. For more details, see our step by step guide on how to install a WordPress plugin.

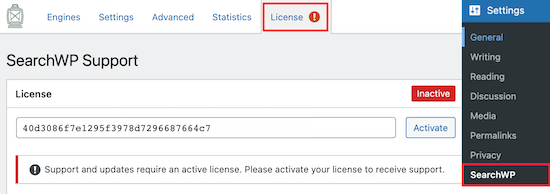
Upon activation, navigate to Settings » SearchWP and then click the ‘License’ menu option.

Enter SearchWP license key

Then, you can enter your license key into the ‘License’ box and click the ‘Activate’ button. You can find this information in your account on the SearchWP website.

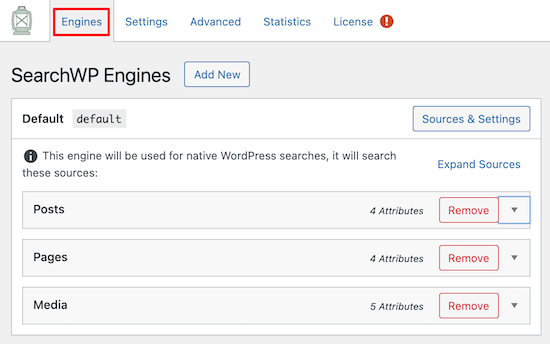
After that, you need to click on the ‘Engines’ menu option.

SearchWP default engine settings

This takes you to a page where you need to set your default search engine settings. Think of it like creating your own Google search algorithm that’s only for your website.

With SearchWP, you need to create a sitewide search engine before you can start excluding pages from the WordPress search results.

You can change the search engine settings by clicking on the ‘Posts’, ‘Pages’, ‘Media’, and other custom post type drop downs.

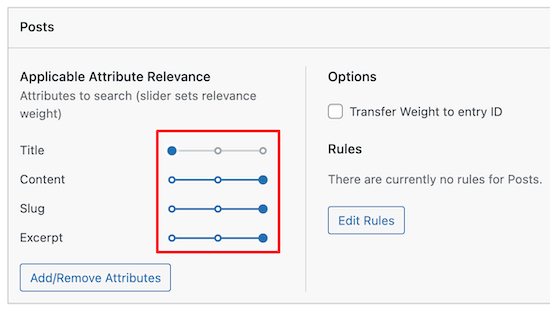
Each section has a weight multiplier that will change how the search engine ranks your website’s content.

For example, if you move the ‘Title’ slider down and the ‘Content’ slider up, then the content will hold more value than the title.

Customize search engine weight

You can also completely remove all pages from appearing in the WordPress search here.

Simply click the ‘Remove’ button in the ‘Pages’ section.

Click button to remove page source

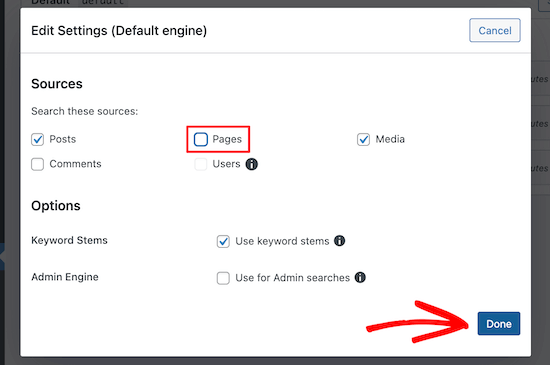
This brings up a popup where you need to uncheck the ‘Pages’ box.

Then, click the ‘Done’ button to remove all pages from appearing in search.

Uncheck pages box and save

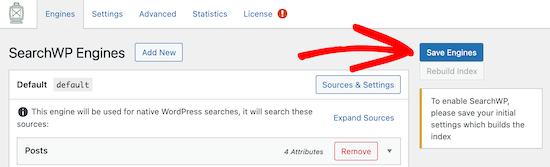
After you’re done customizing the default search engine settings, you need to click the ‘Save Engines’ button to create your first engine.

Save default SearchWP engine

Exclude Specific Pages From the WordPress Search Results

If you only want to exclude specific pages from the search results on your website, then this section is for you.

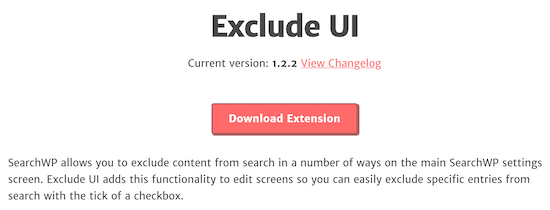
To do this, we’ll be using the Exclude UI extension from SearchWP. When you’re logged into your SearchWP account, go to the Exclude UI download page and click ‘Download Extension’.

SearchWP exclude UI extension

Then, install and activate the extension as you would any other WordPress plugin.

After that, open up the page that you want to exclude from the search results.

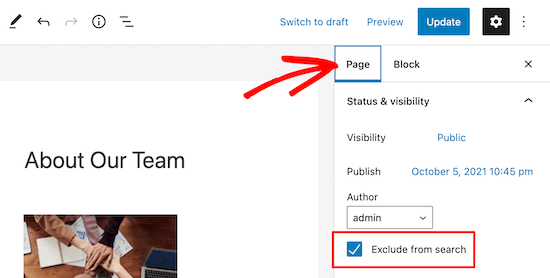
Next, make sure the ‘Page’ option is selected in your right hand menu, and simply check the ‘Exclude from search’ checkbox.

Exclude from search checkbox

Then click the ‘Update’ button, and that page will now be
hidden from the search results. Even if your visitors enter the exact title of the page into your search bar, it will not appear.

If you want to hide more individual pages from the search results, then simply follow the above steps again.

To exclude specific blog posts from WordPress search results, you can follow the same steps above. The only difference is that the right-hand menu will say ‘Post’ instead of ‘Page’.

We hope this article helped you learn how to exclude pages from the WordPress search results. You may also want to see our beginner’s guide on how to get a free SSL certificate for your website and our best business phone services for small businesses.

If you liked this article, then please subscribe to our YouTube Channel for WordPress video tutorials. You can also find us on Twitter and Facebook.

The post How to Exclude Pages from WordPress Search Results (Step by Step) appeared first on WPBeginner.


October 14, 2021 at 01:30PM

Wednesday, October 13, 2021

How to Properly Move from Ghost to WordPress (Free Tool)

Do you want to move your website from Ghost to WordPress?

Ghost is a website builder that allows you to easily create websites. Due to its limitations, many users realize that they would be better off with WordPress.

In this article, we will show you how to easily move from Ghost to WordPress.

Moving from Ghost to WordPress

Moving From Ghost to WordPress

There are many similarities between Ghost and WordPress, but Ghost lacks certain features that make WordPress the best website builder on the market. You can read more about these features in our side-by-side comparison of Ghost vs WordPress.

When we say WordPress, we are talking about self-hosted WordPress.org and not WordPress.com which is a hosting service. To understand the difference, see our guide on the difference between WordPress.com vs WordPress.org.

Many users who start with Ghost soon realize the limitations of the platform and want to move to WordPress. This article will help you do that.

Here is what we will cover in this article:

Step 1. Getting Started with WordPress

To start a WordPress website, you need a domain name and website hosting.

A domain name is the name of your website (e.g. wpbeginner.com), and it’s what users will type in their browsers to visit it. A web hosting account is where all your website files are stored.

While WordPress itself is free, both domain name and web hosting come at a cost ($14.99 / year for domain and $7.99 / month for web hosting).

Thankfully, Bluehost, an official WordPress recommended hosting provider has agreed to offer our users a free domain name and over 60% off on web hosting.

→ Click Here to Claim This Exclusive Bluehost Offer ←

Note: You may already have a domain name for your Ghost website, which you can point to WordPress after moving your website. However, if you don’t have a domain name, then you can get one for free when signing up for Bluehost.

Once you have signed up for a hosting account, you can follow our instructions on how to install WordPress.

Tip: If your Ghost website uses a custom domain name that you would like to keep for your WordPress website as well, then you can still install WordPress on a temporary subdomain. We will show you how to add your domain to your WordPress hosting account later in this article.

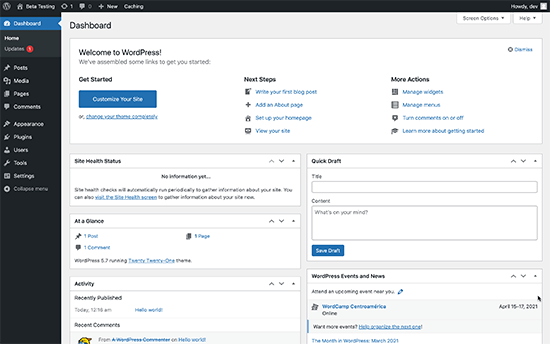
After installing WordPress, you will see the WordPress admin dashboard which looks like this:

WordPress dashboard

Step 2. Export Content from Ghost

Ghost allows you to easily export content from your account.

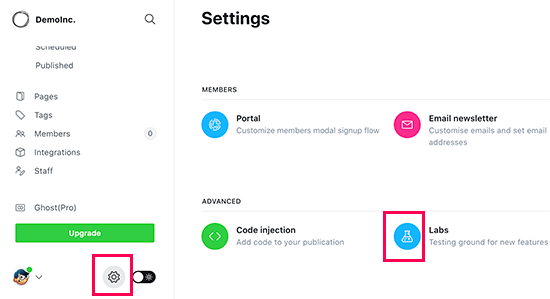
Simply log in to your account dashboard and click on the Settings icon located at the bottom of the left column.

Accessing the labs page from Ghost settings

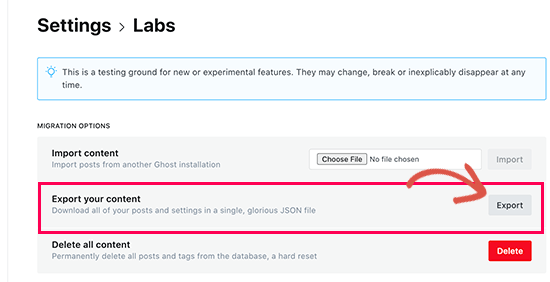
From here you need to click on the Labs menu. This will bring you to Ghost features that are still under development. Click on the Export button next to the ‘Export your content’ section.

Exporting content from your Ghost website

Your browser will now download an export file in JSON format. However, this format is not supported by WordPress importer tools, so you’ll need to convert it to WordPress XML format.

Step 3. Converting Ghost Export File to WordPress Format

The default Ghost export file does not use a format supported by WordPress, and there used to be no reliable way to safely convert it into the correct format.

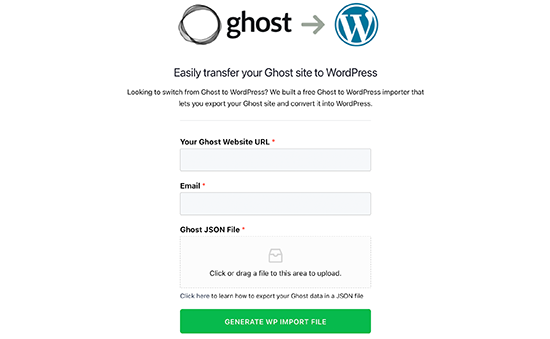
We decided to fix this issue and created the Ghost to WordPress Importer tool. This tool is completely free to use and allows you to convert your Ghost JSON export file into a WordPress compatible XML file.

Simply go to the Ghost to WordPress migration tool website and fill in the form. Next, you need to select the Ghost export file you downloaded earlier.

Ghost to WordPress migration tool

Click on the Generate WP Import File button to continue.

The Ghost to WordPress migrator tool will then convert your Ghost export file into WordPress XML format. Once finished, you’ll be able to download the file to your computer.

Now you’re ready to start importing content to your WordPress website.

Step 4. Import Content in WordPress

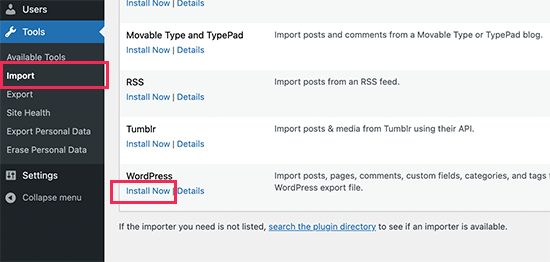
From your WordPress admin area, you need to visit the Tools » Import page and click on the Install Now link below the WordPress importer.

Install WordPress importer

WordPress will now install the importer plugin. Once finished, the install link will change to say ‘Run Importer’. Go ahead and click on the Run Importer link.

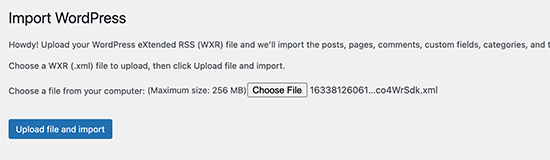
On the next screen, you need to click on the Upload file button to select the WordPress XML file you downloaded in the previous step.

Upload import file

Click on the Upload file and import button to continue.

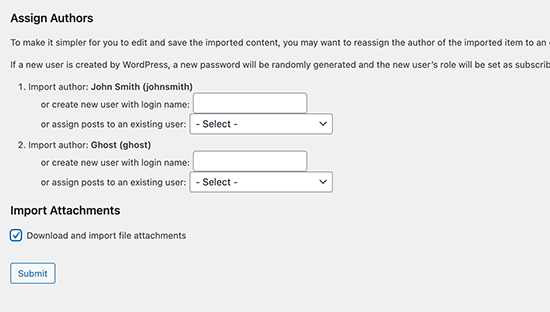
WordPress will now upload the import file. After that, you will be asked to assign authors.

You can import an author from your Ghost website, create a new author, or assign all content to an existing WordPress user.

Import settings

Don’t forget to check the box next to ‘Download and import file attachments’. It will attempt to fetch images from your Ghost website and import them into the WordPress media library, so you can use them later.

Once the importer has finished running, you will see a success message.

WordPress import successful

In rare cases, you might see an issue like some posts are missing, or the importer timed out. Don’t worry, you can run the importer as many times as you like. It will automatically avoid duplicate imports and will only import items that it missed.

Depending on how much content you have, the importer may fail to import images inside posts and pages to your WordPress media library

Let’s see how to easily fix this and import images from Ghost to WordPress.

Step 5. Import Images from Ghost to WordPress

The WordPress importer will try to import images from your Ghost website to your WordPress media library.

However, it may miss some images or not import any images at all. Your website would still show images from your Ghost website, which would become an issue if your Ghost website is deleted.

Luckily, there is an easy way to import external images into the WordPress media library using a plugin.

Simply install and activate the Auto Upload Images plugin. For more details, see our step by step guide on how to install a WordPress plugin.

Upon activation, you simply need to edit and update your blog posts and the plugin will then import any external images in those articles to your media library.

You can also bulk update all your blog posts to quickly import images from your Ghost site. For more details, see our tutorial on how to easily import external images in WordPress.

Step 6. Pointing Your Domain to WordPress

Once you have successfully migrated content from Ghost to WordPress. It is time to start pointing your users to the new WordPress website.

If your website was using a Ghost branded sub-domain (e.g. yourwebsite.ghost.io), then you cannot point that link to your new WordPress website. Instead, we recommend editing your Ghost website and add a plain text notification informing users to check out your website on the new location.

On the other hand, if you were using a custom domain like yourdomain.com, then you can change its DNS settings and point it to your new WordPress hosting provider.

In order to change domain settings, you will need to log in to your domain registrar account and find the option to change the DNS settings.

In the DNS settings area, you need to enter your new WordPress hosting provider’s nameserver information. Usually, it looks something like this:

ns1.bluehost.com
ns2.bluehost.com

For other domain registrars, see our complete guide on how to easily change DNS nameservers.

Once you change the DNS name server, your domain will start showing your WordPress website instead of your older Ghost website. Note that it can take a couple of days for the changes to take effect.

The next step is to redirect users from each page of your Ghost website to the correct post or page in WordPress.

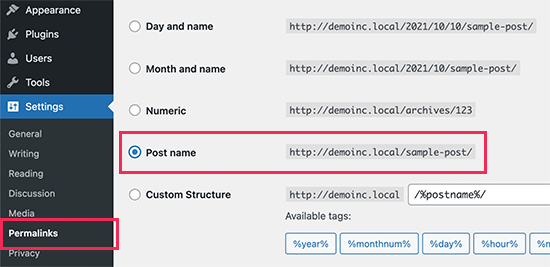
By default, Ghost websites use the post or page name as the default permalink structure. You can match them on your WordPress site by simply going to Settings » Permalinks and choosing Post Name as your URL structure.

Setting up permalinks in WordPress

Don’t forget to click on the Save Changes button to store your changes.

Note: If your Ghost website used a subdomain, then you’ll not be able to set up redirects by changing permalinks.

Step 8. Essential WordPress Plugins and Tools

Now that you have transferred from Ghost to WordPress, it’s time to take advantage of WordPress plugins and tools to grow your website.

1. WPForms – WPForms is the best WordPress contact form plugin. It allows you to easily create any type of form on your WordPress website without writing any code.

2. All in One SEO – AIOSEO is the most comprehensive WordPress SEO plugin on the market. It is super easy to use and comes with a set up wizard, SEO audit tool, TruSEO score for posts and pages, and other features to help you get more traffic.

3. PushEngage – Want to send instant notifications to users on mobile and desktop devices? PushEngage is the best push notification service on the market and helps you bring back website visitors, increase pageviews, and boost conversions.

4. MonsterInsights – MonsterInsights helps you easily install Google Analytics in WordPress and shows you easy-to-understand website traffic reports right inside your dashboard.

Need more tools and tips to grow your new WordPress website? See our full list of essential WordPress plugins for all types of websites.

We hope this article helped you move you properly move from Ghost to WordPress. You may also want to see our checklist of things to do after installing WordPress or see our tips on how to make money online with your WordPress website.

If you liked this article, then please subscribe to our YouTube Channel for WordPress video tutorials. You can also find us on Twitter and Facebook.

The post How to Properly Move from Ghost to WordPress (Free Tool) appeared first on WPBeginner.


October 13, 2021 at 03:00PM