Tuesday, October 19, 2021

How to Find the Most Important Page of Your WordPress Site

Do you want to know which page is the most important on your website?

Finding out your top landing pages and blog posts can help you understand where your traffic is coming from and what your audience is looking for, so you know where to focus your efforts.

In this article, we’ll show you how to find the most important page of your WordPress site.
Find the Most Important Page of your Site

Why Find the Most Important Page of Your Site?

When you’re running a WordPress blog, you end up with more and more content over time. However, there will be some pages that will be more important than others.

Besides getting a lot of traffic, these pages also tend to have high engagement. By optimizing your most important pages, you can get even more traffic and then convert those visitors into subscribers and customers.

You can also create similar pages to attract more visitors and boost user engagement and conversions.

That being said, many content managers and business owners don’t know which pages are essential to their website’s success.

Let’s take a look at how you can find the most important page of your WordPress website.

See the Most Important Pages in Your WordPress Dashboard

The easiest way to uncover your top-performing pages is by using MonsterInsights. It’s the best Google Analytics plugin for WordPress and is trusted by over 3 million professionals to grow their business with confidence.

MonsterInsights makes it super easy to use Google Analytics to reveal insights about your visitors. It helps you view your most important pages inside your WordPress dashboard without the need to edit code or create reports.
MonsterInsights

For this tutorial, we’ll be using the MonsterInsights Lite version. It’s 100% free to use and will help you view your most important pages insides your WordPress dashboard.

There is also a MonsterInsights Pro version that includes premium integrations and advanced features like WooCommerce tracking, custom dimensions, PDF exports, email summaries, and more.

First, you’ll need to install and activate the MonsterInsights plugin on your website. If you need help, then please refer to our guide on how to install a WordPress plugin.

Upon activation, you’ll be taken to Insights from your WordPress admin panel. Next, go ahead and click the ‘Launch the Wizard’ button and follow the wizard to connect your Google Analytics account with your WordPress site.
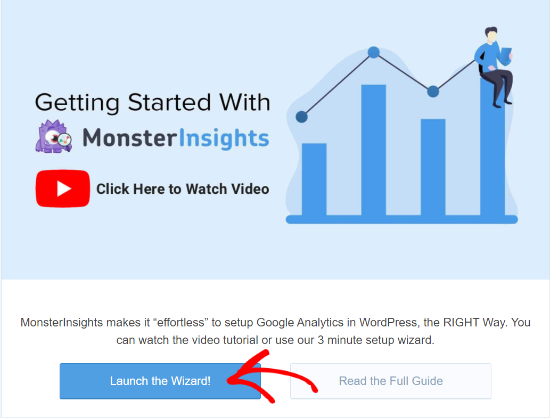
launch MonsterInsights setup wizard

For more details, you can follow our step-by-step tutorial on how to install Google Analytics in WordPress.

Once you’ve set up Google Analytics in WordPress, you can now view the most important pages on your site by going to Insights » Reports from your WordPress admin panel.

Next, head over to the Overview tab and then scroll down to the ‘Top Posts/Pages’ report. In the report, you’ll see the most important pages and posts on your website.
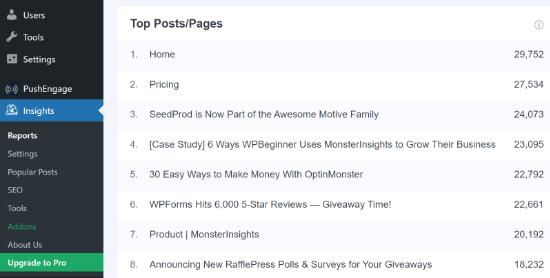
View the top pages and posts report

This gives you a quick overview of which pages perform well on your website and attract website traffic.

Now, if you upgrade to the MonsterInsights Pro version, then you can unlock more dashboard reports. These reports provide more insights into how people are interacting with your most important pages.

For example, if want a closer look at your top-performing landing page, then simply go to the ‘Publishers’ tab at the top and then see the ‘Top Landing Pages’ report.
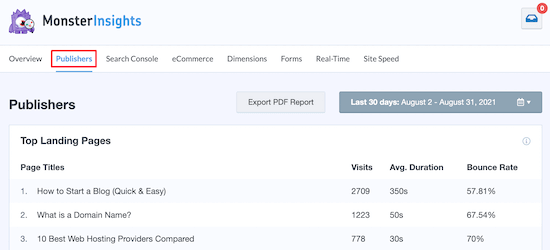
MonsterInsights top pages

These are the top pages that users first land on when visiting your website. You can view the total number of visits, average duration, and bounce rate for each page.

You can identify your most important page from the report and see which topics attract the most visitors. Then using this information, you can come up with similar content ideas for your website.

Similarly, you can compare your best pages with other pages that aren’t performing well and then optimize them to boost their engagement and conversions.

View Your Most Important Page in Google Analytics

While MonsterInsights makes it super easy to find the most important page on your website and view the data inside your WordPress dashboard, you can also use Google Analytics to view your top pages.

After installing Google Analytics on your site, you’ll need to log in to your Google Analytics account. After that, simply head over to Behavior » Site Content » All Pages from the menu on your left.
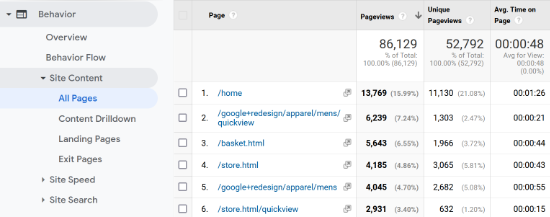
See important pages in Analytics

In the report, you can see your top pages and the total number of pageviews for each page. For example, the report above shows that the homepage gets the most traffic, which shows it’s an important page for your site.

But it also shows that the basket page and some apparel pages are also very popular and should get special attention.

What to Do After Finding Your Top Pages?

The next step after you find the most important pages on your WordPress site is to optimize them to get more traffic, and convert that traffic into subscribers and customers.

Here are a few ways to get started.

Improve SEO Rankings on Your Top Pages

Search engine optimization (SEO) is a smart way to get more visitors to your top pages, because it helps you grow your traffic over time.

You should check the keyword ranking for the top pages on your website. They are likely ranking on the first page, but you can optimize them further to improve your position to rank #1 in Google.

We recommend using AIOSEO plugin to optimize your blog posts.

To get started, see our checklist to optimize your blog posts for SEO. These tips will work for any page or post on your website.

Convert Visitors Into Email Subscribers

Did you know that, on average, over 75% of visitors to your top page will never return to your website?

That’s why building an email newsletter is so important. It allows you to communicate with visitors after they leave your website.

The best place to convert visitors into subscribers is on the top pages of your website.

You should consider using OptinMonster which is the #1 rated WordPress plugin to convert engaged and abandoning visitors into email subscribers.
OptinMonster

If you signup from inside the OptinMonster WordPress plugin, they actually have a free account that you can use which is not available on their main website.

If you don’t have an email newsletter already, then you may also want to see our guide on how to create an email newsletter the right way.

Optimize Your Sales Funnels

Are you selling a product or service on your top pages?

In that case, you can boost your sales by optimizing those pages to offer a better user experience, reduce distractions, and nudge users towards completing the purchase.

For example, you can add floating announcement bars on the top pages to get users to join your email list, check out your other popular posts, see your product, and more.
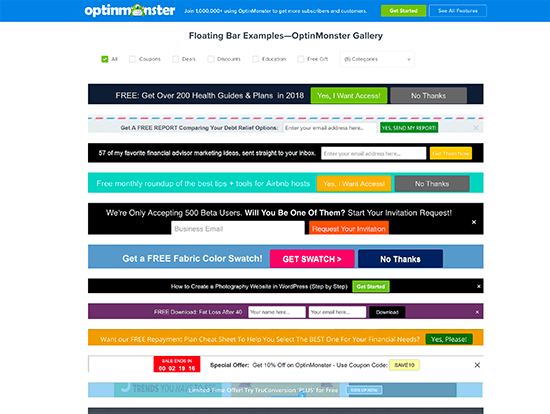
OptinMonster Floating Bar Screenshots

To get started, see our guide on how to make a high-converting sales funnel in WordPress.

We hope this article helped you learn how to find the most important page of your WordPress site. You may also want to take a look at our guide on how to choose the best website builder, or our comparison of the best email marketing services for small business.

If you liked this article, then please subscribe to our YouTube Channel for WordPress video tutorials. You can also find us on Twitter and Facebook.

The post How to Find the Most Important Page of Your WordPress Site appeared first on WPBeginner.


October 19, 2021 at 04:00PM
Monday, October 18, 2021

How to Share Your Blog Posts With Readers (4 Ways)

Are you looking for proven ways to share your blog posts with blog readers to grow your traffic?

Most people who read your blog won’t come back to see if you’ve published new posts. By sharing your new posts with readers, you can get them to come back to your website and potentially convert into customers.

In this article, we’ll show you how you can share new blog posts you’ve recently published with your readers.

How to share your blog posts with readers (4 ways)

Why Share Your Blog Posts with Readers?

Nearly 70% visitors leaving your website will never come back to visit again. As a website owner, you need to give them a reason to come back.

One of the best ways to do this is by sharing your new blog posts with them. If your blog posts are packed with value, then you’re helping your readers succeed by encouraging them to read your new content.

If you run an online store, then sharing your posts will deepen the relationship and turn subscribers into customers. Those running affiliate or review websites will get more views on their content, which means more clicks and commissions.

With that said, let’s take a look at a few different ways you can share your blog posts with your readers. Simply use the quick links below to go straight to the method you want to use to share your blog posts.

1. Share Your Blog Posts with Push Notification Subscribers

One of the easiest and most effective ways to share new blog posts with your readers is by using push notifications.

A push notification is a popup message that goes out to your subscribers across desktop and mobile devices.

These can be very effective because they show up instantly no matter where your visitors happen to be. You don’t have to wait until they check their email or social media accounts for them to see your notification.

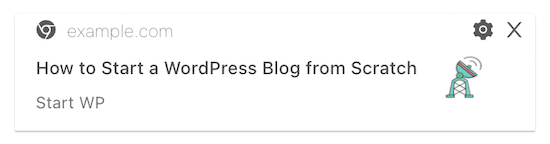
Here’s an example of what a blog post notification can look like:

PushEngage blog post notification

The easiest way to add push notifications to your WordPress blog is by using PushEngage. It’s the best push notification software in the market used by over 10,000 businesses.

PushEngage

For more details on setting up and sending push notifications, see our guide on how to add web push notifications to your WordPress site.

After you activate and set up the plugin, push notifications for new blog posts will automatically be enabled on your site.

The moment you publish a new post, your notification will send out to all of your subscribers.

The push notification will include the title of your blog post and the featured image. Once they click the notification, they’ll be taken to the post on your website.

2. Share Your Blog Posts with Your Email List

Your email list is one of most valuable assets in your business and one of the best ways to stay in touch with your readers.

Email subscribers who have joined your list have already verified their identity and are very interested in what you have to offer, which makes them more likely to open your emails and return to your website.

Haven’t started to build your email list yet? The first thing you need to do is get a high quality email marketing service provider.

We recommend using Constant Contact since it’s one of the best email marketing services for small businesses.

Constant Contact

Constant Contact offers tools that make it easy to manage your email list, like simple tracking and reporting, unlimited emails, segmentation, an image library, and more.

For more details on setting up your email list and sending emails, see our guide on how to create an email newsletter the right way.

Once your email list is set up, you can start sharing your blog posts with your email list.

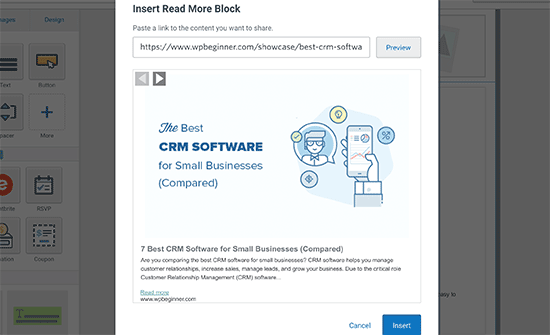
Constant Contact has all the tools you need to start sending your blog posts to readers, including an option to embed posts directly into your email.

Constant Contact send blog post

If you’re looking for creative ways to get more email subscribers, then consider adding a yes/no optin, using content upgrades, or getting started with coupon code popups on your website.

Looking for a Constant Contact alternative?

There are dozens of other email marketing services that you can use too including HubSpot, Sendinblue, and ConvertKit.

3. Share Your Blog Posts with Your Social Media Followers

Social media platforms are a great place to tap into a network of billions of people, build a following, and send traffic back to your site.

To build a loyal following, you need to engage with your users by interacting with them, posting updates, and sharing your content.

We regularly share our latest blog posts with our audience on Twitter and Facebook.

WPBeginner Facebook share example

However, the big issue with manually sharing your blog posts on social media is that posting can be very time consuming.

Luckily, you can automate your WordPress website so that the moment you publish a new post, it’ll automatically share to social media.

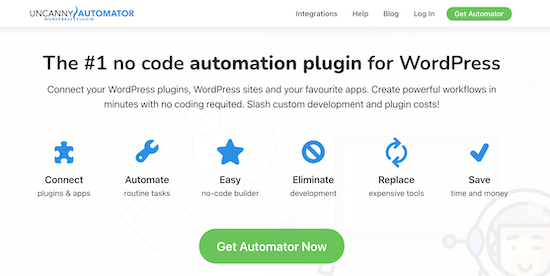
The easiest way to do this is by using Uncanny Automator. It’s the best WordPress automation plugin that lets you create automated workflows without writing any code.

Uncanny Automator

It connects with over 50 different plugins, tools, and applications, including popular social media networks like Facebook, Twitter, and Instagram.

If you want to share your blog posts to Facebook, then see our guide on how to automatically post to Facebook from WordPress. For Twitter, see our guide on how to automatically tweet when you publish a new post in WordPress.

With your automations all set up, the moment you publish a new blog post, it’ll automatically share your blog posts with your social media followers.

4. Share Your Blog Posts with Your SMS Subscribers

Sending SMS messages can be a great way to share your new posts with your readers. Not only do text messages have a very high open rate, but people will check their text messages almost instantly.

The first thing you need to send SMS messages to your subscribers is an SMS marketing provider.

We recommend using Sendinblue since it’s one of the best email marketing providers that also allows you to send SMS messages.

Sendinblue

For more details, see our guide on how to send SMS messages to your WordPress users.

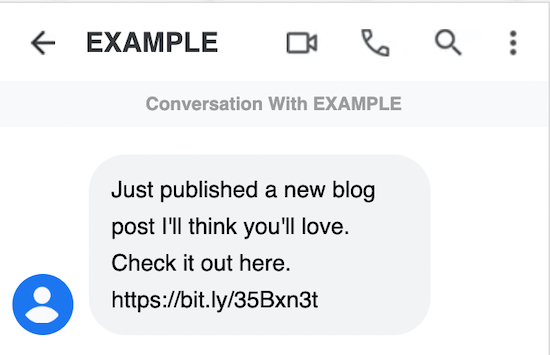
Once your account is set up, you can share your blog posts with your readers via SMS. You’ll have full control over the recipients, message, sending time, and more.

SMS message example

We hope this article helped you learn how to share your blog posts with readers. You may also want to see our comparison of the best domain name registrars, and our expert picks of the best AI chatbots software for your website.

If you liked this article, then please subscribe to our YouTube Channel for WordPress video tutorials. You can also find us on Twitter and Facebook.

The post How to Share Your Blog Posts With Readers (4 Ways) appeared first on WPBeginner.


October 18, 2021 at 02:05PM

Saturday, October 16, 2021

How to Organize or Reorder WordPress Pages with Drag & Drop

Do you want to organize your WordPress pages by simply dragging and dropping them where you want?

WordPress will arrange your blog posts and pages based on the published date or alphabetical order by default. However, with the right WordPress plugin, you can reorder your pages to organize them more logically.

In this article, we will show you how to reorder and organize WordPress pages with drag and drop.

Organize Pages with Drag and Drop in WordPress

Why Change the Order of WordPress Pages?

By default, WordPress will organize your pages alphabetically or use the publish date to show the recent page first.

If you have a lot of pages, it can be difficult to manage them and find the pages you need in your WordPress dashboard.

Luckily, you can use a simple plugin to rearrange the pages by simply dragging and dropping them where you want.

Let’s take a look at how you can organize your WordPress pages by using drag and drop.

Note: This guide will show you how to reorder your pages in your WordPress dashboard, so you can then use this order in custom WP_Query. If you’d like to reorder pages the easy way, then we recommend using our guide on creating navigation menus in WordPress.

Organize Your WordPress Pages Using a Plugin

First, you’ll need to install and activate the Simple Page Ordering plugin. If you need help, then please refer to our guide on how to install a WordPress plugin.

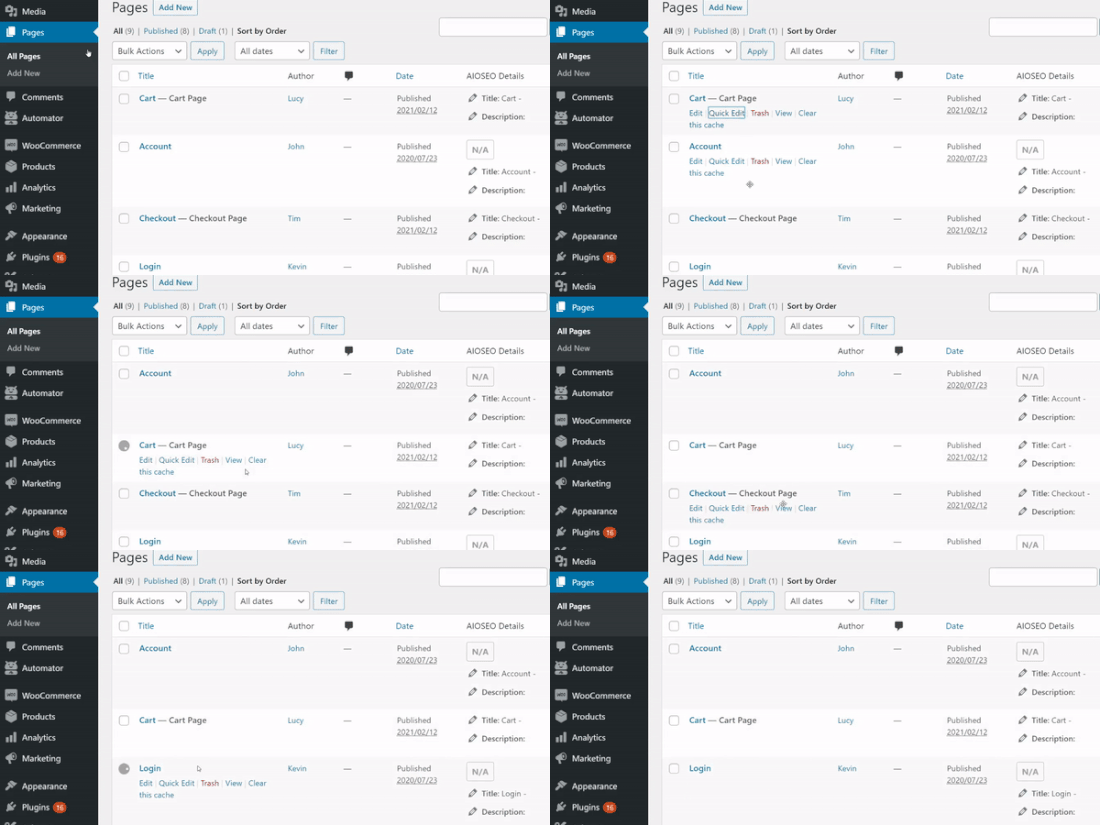
Once activated, there are no additional settings to use the plugin. Simply go to Pages » All Pages from your WordPress admin panel and start ordering your pages by dragging and dropping them.

Change page order in WordPress

You can now rearrange your WordPress pages and place them in any order you want.

How to Organize WordPress Pages Manually

Another way you can reorganize your WordPress pages is by changing the order in the page attributes section.

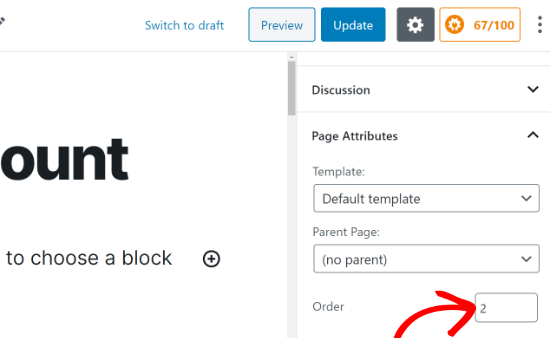
To start, simply edit any page. Once you’re in the WordPress block editor, navigate to the ‘Page Attributes’ box located in the menu on your right.

After that, you can enter the ‘Order’ value for your page. The lower the number, the higher it will appear in the list.

Change page attributes settings

The problem with this method is that you’ll have to manually change the order value on all other pages that you want to rearrange on your website.

This can be time-consuming and doesn’t offer the drag and drop option to organize your pages. That’s why using the Simple Page Ordering plugin is a better option.

If you’d like to reorder your blog posts as well, then see our guide on easy ways to re-order your blog posts.

We hope this article helped you learn about the Simple Page Ordering plugin and how to organize WordPress pages with drag and drop. You may also want to look at our guide on how to create a free business email address, or see our expert comparison of the best domain registrars.

If you liked this article, then please subscribe to our YouTube Channel for WordPress video tutorials. You can also find us on Twitter and Facebook.

The post How to Organize or Reorder WordPress Pages with Drag & Drop appeared first on WPBeginner.


October 16, 2021 at 04:00PM