Thursday, October 21, 2021

How to Fix The Critical Error in WordPress (Step by Step)

Are you seeing the critical error on your WordPress site?

WordPress may sometimes show you a message that ‘There has been a critical error on this website. Please check your site admin email inbox for instructions’. It will also include a link to debugging in the WordPress guide.

In this guide, we will show you how to easily fix the critical error in WordPress. We will also talk about what causes this error and how to avoid it.
Fixing the critical error in WordPress step by step

What is Critical Error in WordPress?

The critical error in WordPress is an error that stops WordPress from loading all the scripts it needs to work properly.

Previously, this WordPress error resulted in a white screen of death or a fatal error message on screen. Most beginners didn’t find it very helpful and struggled to resolve the issue on their own.

Since WordPress 5.2, users will now see a generic error message ‘There has been a critical error on this website. Please check your site admin email inbox for instructions’ with a link to the WordPress debugging guide.
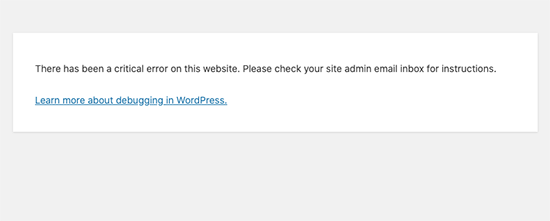
WordPress critical error message

It will also send an email message to your WordPress site’s admin email address with more details about the error and a link to access your WordPress dashboard in the recovery mode.

What Causes the Critical Error in WordPress?

The critical error in WordPress is generally caused by a malfunctioning plugin, script, or code that prevents WordPress from functioning properly.

WordPress is unable to load the rest of the files it needs unless you resolve this issue.

If you have recently copied and pasted code snippets from some tutorial to your website, then it might trigger the critical error.

All top WordPress plugins are thoroughly tested, so they are less likely to cause a critical error on their own. However, a conflict with another WordPress plugin or some custom code may trigger the error.

That being said, let’s take a look at how to easily fix the critical error in WordPress and get your website back.

Fixing The Critical Error in WordPress (2 Methods)

The critical error message itself is not very useful in finding the cause of the issue and fix it. Luckily, WordPress also sends an email to the admin email address of your website.

Now, many WordPress sites have issues sending emails, so you might not get this crucial email notification. If you are among those users, don’t worry. We will show you how to fix the critical error even without the email.

On the other hand, if you did receive the WordPress technical issue email notification, then we’ll show you how to make sense of it and use it to bring your website back.

Simply click the links below to skip straight to the section you need:

Fixing Critical Error with WordPress Debugging Email

First, you need to go visit the inbox for the email address you use as the WordPress administration email on your website.

Not sure which email address you used as the admin email? It is the email address you provide when installing WordPress.

If you are on Bluehost or used a WordPress auto-installer, then your admin email address will likely be the same address that you have used for your WordPress hosting account.

In your inbox, you’ll see an email with the subject line ‘Your Site is Experiencing a Technical Issue’. Inside it, you will find a lot more helpful information about what caused the critical error on your WordPress website.

For instance, in the following screenshot, you can see that the critical error was caused by the WordPress theme on our test site.
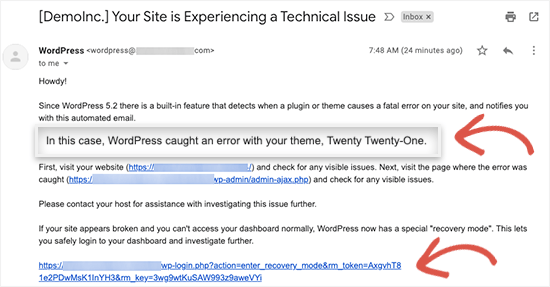
WordPress critical error email notification

The email also includes a special link that will allow you to login to your WordPress website in recovery mode to fix and investigate the issue.

At the bottom of the email, you will see even more detailed information about the error, including the specific file and code that triggered it.

In this example below, some code at line 614 in our theme’s functions.php file is responsible for triggering the error.
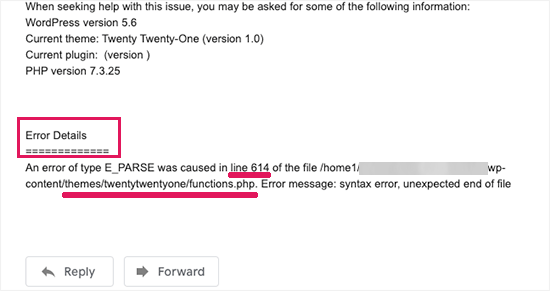
Critical error details

Here is another example which is showing error details caused by a malfunctioning WordPress plugin.
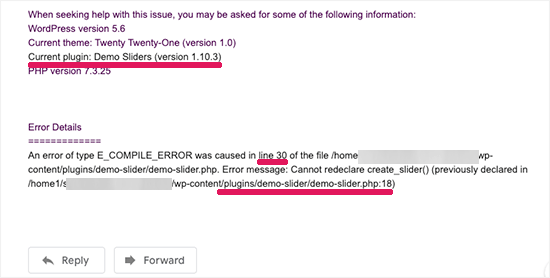
Error caused by a WordPress plugin

Now you just need to click on the link to WordPress recovery mode, which will take you to your WordPress admin area.

You’ll be asked to log in to continue.
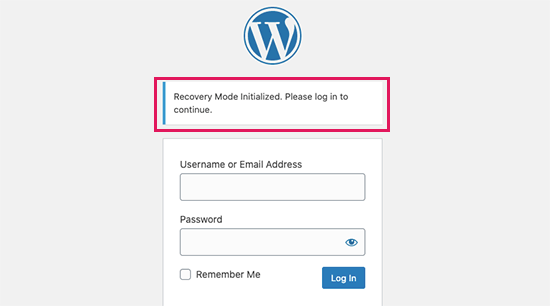
WordPress recovery mode login

Once you are logged in, you will see a notification informing you about the critical error, what caused the error, and a link to the place where you can go to fix it.

For instance, in the following screenshot, it is informing us about the critical error caused by the plugin with a link to the plugins page.
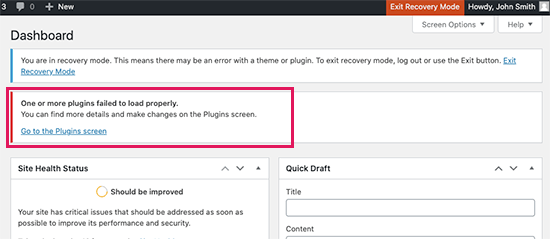
Recovery mode information

Now, if you click on the link, then it will show you the misbehaving plugin. It will also show you exactly which line of code caused the error.

You can go ahead and deactivate the plugin for now.
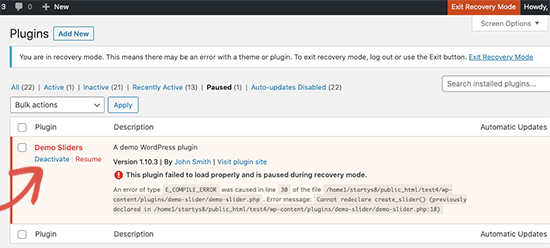
Deactivate the misbehaving plugin

Then you can simply find an alternative WordPress plugin, or see if you can get support from the plugin developers.

Similarly, if the issue is with your theme, then you will see a link to the Themes page. At the bottom of the page, you can see the theme causing the issue.
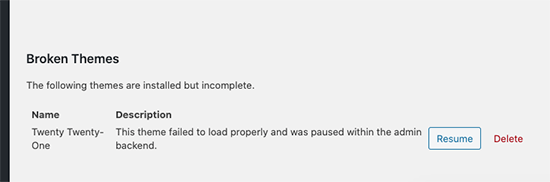
Broken theme message in WordPress recovery mode

You can simply change your WordPress theme, or delete the broken theme and reinstall a fresh copy of the same theme from the official source to see if that resolves the issue.

Once you have addressed the issue, you can simply go ahead and click on the Exit Recovery Mode button at the top.
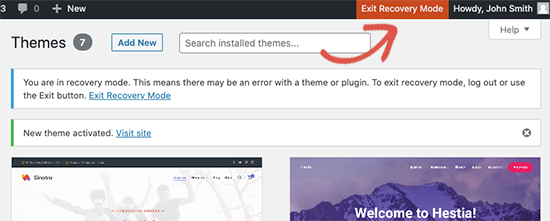
Exit recovery mode in WordPress

In most cases, your WordPress website would now start working normally.

However, if you are still seeing the critical error in WordPress, then you can try the troubleshooting steps in the next step.

Fixing Critical Error in WordPress Manually

If you are didn’t receive the WordPress critical issue notification email, then here is how you can troubleshoot and fix the critical error in WordPress.

If the error was caused by a recent action you took, then you can simply undo that action to fix the issue.

For instance, if you installed a new plugin and activating it caused the critical error, then you need to deactivate that plugin (we’ll show you how to do that in the first step below).

On the other hand, if you are unsure, then you can simply follow these steps.

1. Deactivate All WordPress Plugins

The easiest way to disable a faulty WordPress plugin is by deactivating it. However, due to the critical error, you don’t have access to the admin area and you don’t know which plugin to deactivate.

To address this we will deactivate all WordPress plugins. Don’t worry, you can easily reactivate them once you get access to your WordPress admin area.

Simply connect to your WordPress website using an FTP client or the File Manager app in your WordPress hosting control panel.

Once connected, you need to navigate to the /wp-content/ folder.
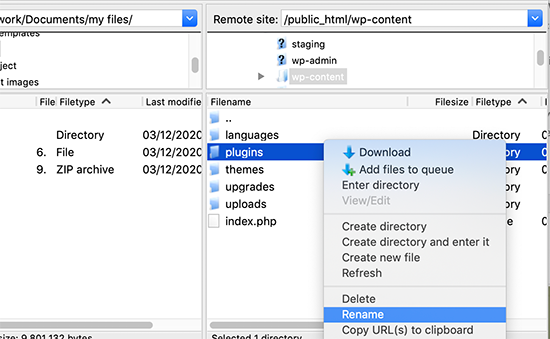
Rename plugins folder

Inside the wp-content folder, you will see a folder called ‘plugins’. You need to right-click on it and then select ‘Rename’ option.

Next, change the name of the plugins folder to anything that you like. In our example, we’ll call it ‘plugins.deactivate’.
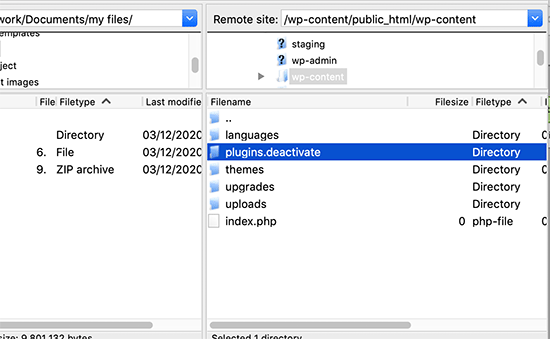
Plugins folder renamed

Once you do this, all of your plugins will be deactivated.

Basically, WordPress looks for the plugins folder to load the activated plugins on your website. When it cannot find the plugins folder, it simply cannot activate the plugins and automatically sets them as deactivated.

You can now visit your website to see if the critical error message has disappeared.

Important: Whether the critical error issue is resolved or not, don’t forget to rename the plugins.deactivated folder back to ‘plugins’. WordPress will then recognize the folder, and you’ll be able to reactivate them one by one from the WordPress dashboard so you can identify which one caused the critical error.

2. Switch to Default Theme

The next step in troubleshooting the critical error is to switch your WordPress theme to a default theme. This would fix the critical error issue if it is caused by some code in your current WordPress theme.

Simply go to WordPress.org themes directory and download a fresh copy of the TwentyTwenty or Twenty Twenty-One WordPress theme.
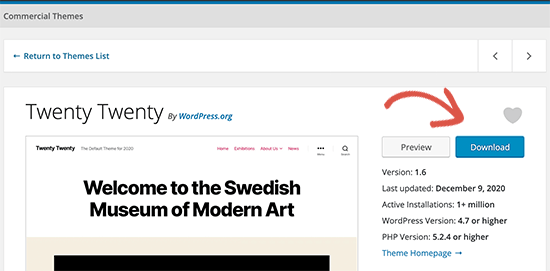
Download default WordPress theme

Next, you need to unzip the theme file to your computer. This will create a folder with the theme name on your computer.
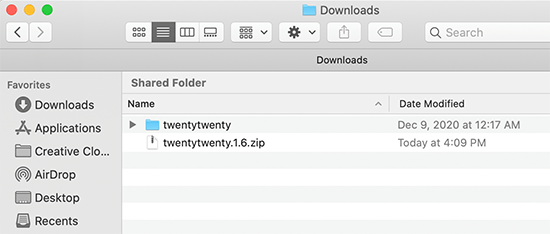
Unzipped theme folder

Now you need to connect to your WordPress site using an FTP client or the file manager app in your hosting control panel. Once connected, navigate to the /wp-content/themes folder and you will see a list of all themes installed on your website.
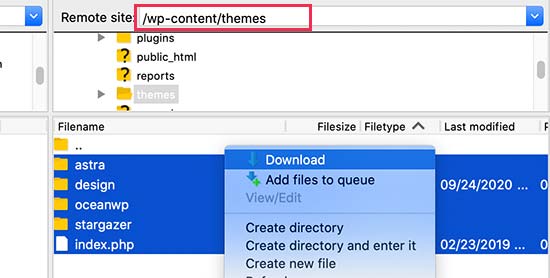
Download themes as backup

Go ahead and download all of them to your computer as a backup. After that, you need to delete all theme folders from your website.
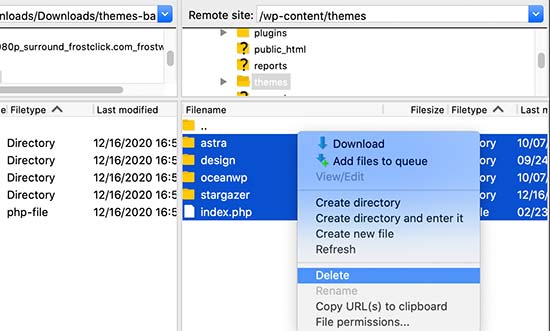
Delete all themes from your website

Your WordPress site now has no theme installed. To fix this, go ahead and upload the default theme folder you downloaded earlier.
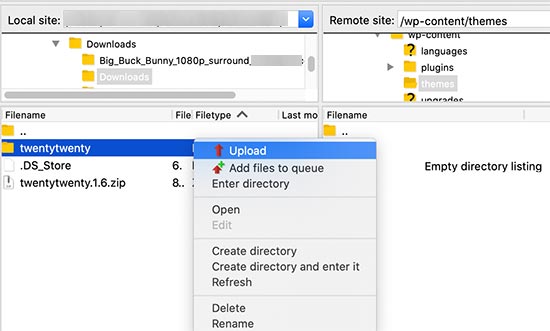
Upload default WordPress theme

Once finished, you can try visiting your website.

If the critical error was caused by your WordPress theme, then it should disappear now and you’ll be able to access your website.

3. Reinstall WordPress

A corrupt WordPress core file or malware could also trigger the critical error in WordPress. The easiest way to fix this is by reinstalling WordPress.

Simply go to WordPress.org and download a fresh copy of WordPress to your computer. After downloading the file, you need to unzip it to your computer. This will create a folder called ‘wordpress’ which contains all the files you need for the reinstall.
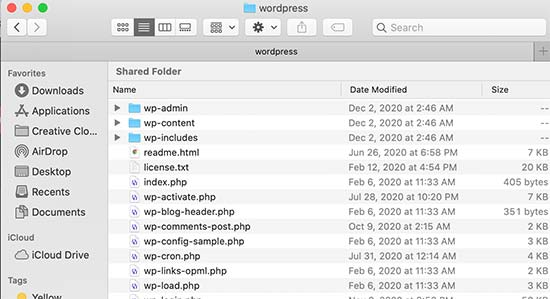
Extracted WordPress files on your computer

Next, you need to connect to your WordPress site using an FTP client or the file manager app in your hosting control panel.

Once connected, you need to navigate to the root folder of your website. The root folder is the one that contains wp-admin, wp-content, wp-includes, and wp-admin folders inside it.
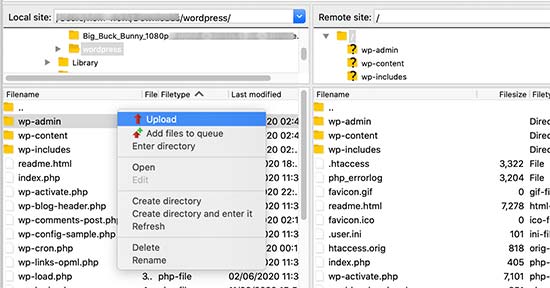
Upload WordPress files from your computer

Now select the files inside the wordpress folder on your computer and upload them to your website. Your FTP client will ask if you want to overwrite these files or skip them. You need to select ‘Overwrite’ and check the box next to ‘Always use this action’ option.
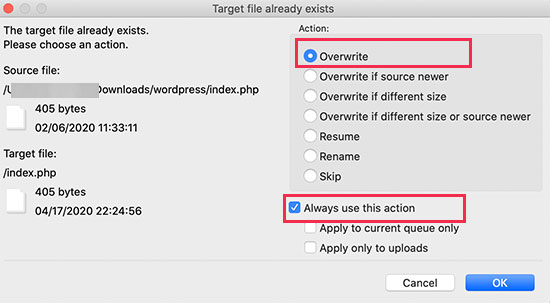
Overwrite WordPress files

Click on the OK button to continue. Your FTP client will now replace all your core WordPress files with fresh copies from your computer.

Once finished, you can try visiting your website to see if this resolved the error.

If the critical was caused by a corrupt WordPress core file or malware, then the error should disappear now.

We hope this article helped you troubleshoot and fix the critical error in WordPress. You may also want to see our guide on how to get a free SSL certificate for your WordPress site, or our expert comparison of the best business phone services for small business.

If you liked this article, then please subscribe to our YouTube Channel for WordPress video tutorials. You can also find us on Twitter and Facebook.

The post How to Fix The Critical Error in WordPress (Step by Step) appeared first on WPBeginner.


October 21, 2021 at 04:30PM
Wednesday, October 20, 2021

How to Build Customer Loyalty in WordPress with Gamification

Do you want to build customer loyalty in WordPress with gamification?

Gamification lets you reward your loyal customers and users with points and other incentives. This can help to build customer loyalty and increase engagement and conversions on your website.

In this article, we’ll show you how you can build customer loyalty in WordPress with gamification.

How to build customer loyalty in WordPress with gamification (2 ways)

Why Build Customer Loyalty with Gamification in WordPress?

Adding gamification to WordPress lets you reward visitors with different incentives when they take certain actions on your website, like leaving a review, commenting, or buying a product.

This can help to improve customer loyalty, since your customers will feel more engaged with your WordPress website when they’re rewarded with discounts, redeemable points, and more.

Using gamification to reward customer loyalty can be a great way to get more sales in your online store or increase conversions on any type of website.

With that said, let’s show you two different ways you can build customer loyalty with gamification in WordPress. Simply use the quick links below to jump straight to the method you want to use.

Method 1. Add a Gamified Customer Loyalty Program to Your Online Store in WordPress

Before getting started, you need to have a functioning WooCommerce store already set up. If you’re still building your store, then check out our step by step guide on how to start an online store.

You’ll also want to make sure you choose high quality WooCommerce hosting and a professional WooCommerce theme.

After that, you can add a gamified customer loyalty program to your store.

The easiest way to do this is by using the Advanced Coupons plugin. It’s the best coupon code plugin for WordPress used by over 10,000 online stores.

Note: You can purchase the Advanced Coupons and Loyalty Program plugins together by getting the ‘All-In-One Bundle’. At the very least, you need to get the Loyalty Program plugin to create your own loyalty program.

First thing you need to do is install and activate the plugin. For more details, see our beginner’s guide on how to install a WordPress plugin.

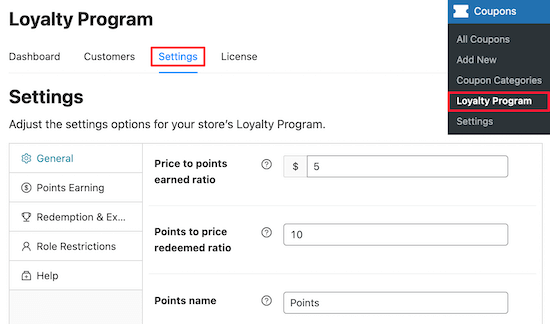
Once you’ve done that, you need to go to Coupons » Loyalty Program in your WordPress admin dashboard and then click on the ‘Settings’ menu option.

This brings you to a screen where you can change how much your rewards points are worth.

Loyalty Program plugin settings

You can set the ‘Price to points earned ratio’ where a user will earn 5 points for every dollar spent. The ‘Points to price redeemed ratio’ is how many points it takes to reach a dollar. In this case, 10 points will equal one dollar.

You can also change the name if you want points to be called something else in your store.

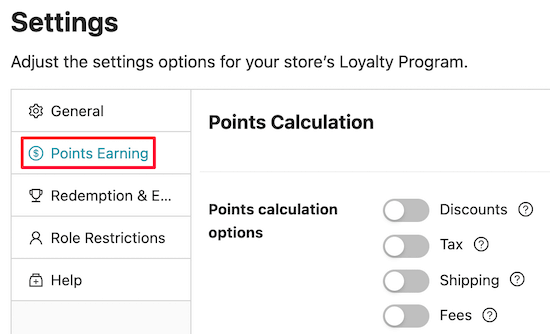
Next, click on the ‘Points Earning’ menu option. Here you can choose the settings for how your points will be earned.

Points earning settings

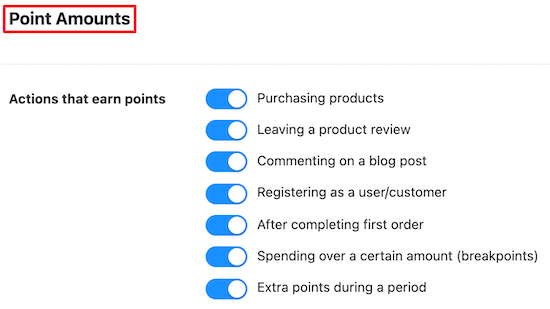
If you scroll down to the ‘Points Amounts’ section, then you can choose the actions that will earn points.

Simply click the toggle for any action you want to earn points.

Point amounts toggle

You can also set the amount of points a user can earn per action on this page as well.

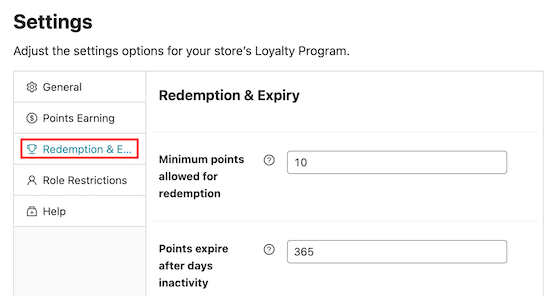
After that, click the ‘Redemption & Expiry’ menu option.

We’ll leave the default settings, but you can customize the minimum number of points before redemption, the expiry time for points, and more.

Redemption and expiry settings

As you make changes to your rewards program, it’ll save automatically, so you don’t have to worry about saving your changes.

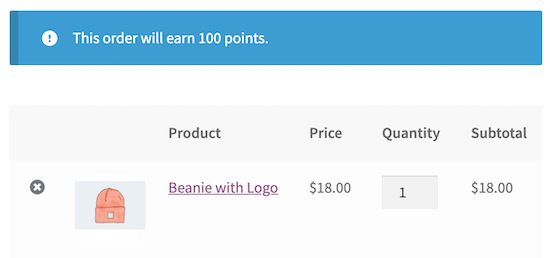
Now your users can earn points whenever they purchase items, leave a review, complete their first order, and more.

Earn points example

Method 2. Build Loyalty with Gamified Popups in WordPress

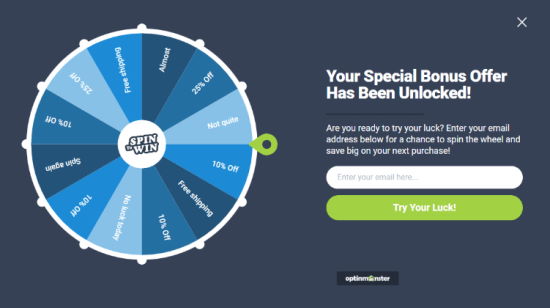
Another way you can add gamification to your WordPress site and reward your loyal customers is with a spin to win popup. You can use this kind of popup to share discounts, special offers, and other perks as a reward.

Here’s how it can look to your visitors:

OptinMonster spin to win popup example

This type of popup can encourage your visitors to take action in your online store or website by enticing customers with an exclusive discount code or deal.

The easiest way to add spin to win and gamified popups to WordPress is with OptinMonster. It’s the best lead generation plugin for WordPress used by over 1.2 million websites.

OptinMonster

For more details, see our guide on how to add spin to win optins in WordPress and WooCommerce.

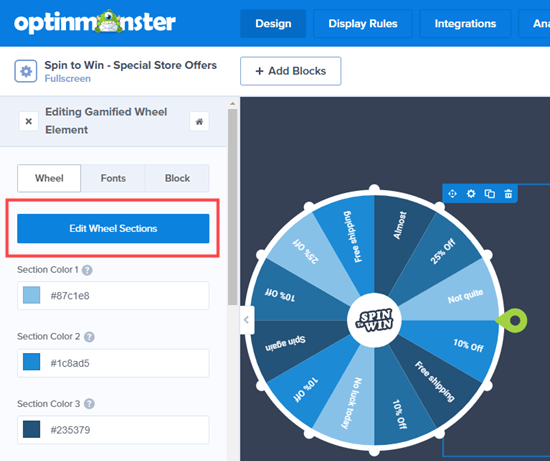
After you activate and setup the plugin you can fully customize what your gamified popups will look like, and who they will display for.

OptinMonster edit spin the wheel popup

We hope this article helped you learn how to build customer loyalty in WordPress with gamification. You may also want to see our expert picks of the best domain name registrars, and our step by step guide on how to start your own podcast.

If you liked this article, then please subscribe to our YouTube Channel for WordPress video tutorials. You can also find us on Twitter and Facebook.

The post How to Build Customer Loyalty in WordPress with Gamification appeared first on WPBeginner.


October 20, 2021 at 05:30PM

Tuesday, October 19, 2021

How to Find the Most Important Page of Your WordPress Site

Do you want to know which page is the most important on your website?

Finding out your top landing pages and blog posts can help you understand where your traffic is coming from and what your audience is looking for, so you know where to focus your efforts.

In this article, we’ll show you how to find the most important page of your WordPress site.

Find the Most Important Page of your Site

Why Find the Most Important Page of Your Site?

When you’re running a WordPress blog, you end up with more and more content over time. However, there will be some pages that will be more important than others.

Besides getting a lot of traffic, these pages also tend to have high engagement. By optimizing your most important pages, you can get even more traffic and then convert those visitors into subscribers and customers.

You can also create similar pages to attract more visitors and boost user engagement and conversions.

That being said, many content managers and business owners don’t know which pages are essential to their website’s success.

Let’s take a look at how you can find the most important page of your WordPress website.

See the Most Important Pages in Your WordPress Dashboard

The easiest way to uncover your top-performing pages is by using MonsterInsights. It’s the best Google Analytics plugin for WordPress and is trusted by over 3 million professionals to grow their business with confidence.

MonsterInsights makes it super easy to use Google Analytics to reveal insights about your visitors. It helps you view your most important pages inside your WordPress dashboard without the need to edit code or create reports.

MonsterInsights

For this tutorial, we’ll be using the MonsterInsights Lite version. It’s 100% free to use and will help you view your most important pages insides your WordPress dashboard.

There is also a MonsterInsights Pro version that includes premium integrations and advanced features like WooCommerce tracking, custom dimensions, PDF exports, email summaries, and more.

First, you’ll need to install and activate the MonsterInsights plugin on your website. If you need help, then please refer to our guide on how to install a WordPress plugin.

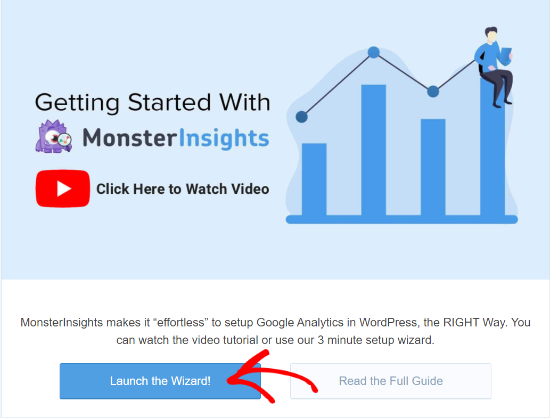
Upon activation, you’ll be taken to Insights from your WordPress admin panel. Next, go ahead and click the ‘Launch the Wizard’ button and follow the wizard to connect your Google Analytics account with your WordPress site.

launch MonsterInsights setup wizard

For more details, you can follow our step-by-step tutorial on how to install Google Analytics in WordPress.

Once you’ve set up Google Analytics in WordPress, you can now view the most important pages on your site by going to Insights » Reports from your WordPress admin panel.

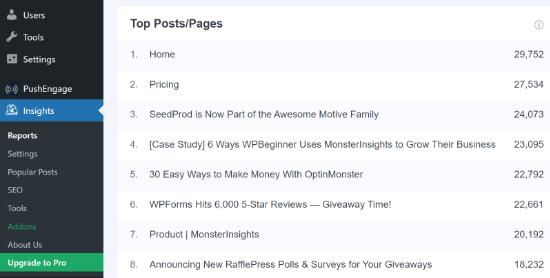
Next, head over to the Overview tab and then scroll down to the ‘Top Posts/Pages’ report. In the report, you’ll see the most important pages and posts on your website.

View the top pages and posts report

This gives you a quick overview of which pages perform well on your website and attract website traffic.

Now, if you upgrade to the MonsterInsights Pro version, then you can unlock more dashboard reports. These reports provide more insights into how people are interacting with your most important pages.

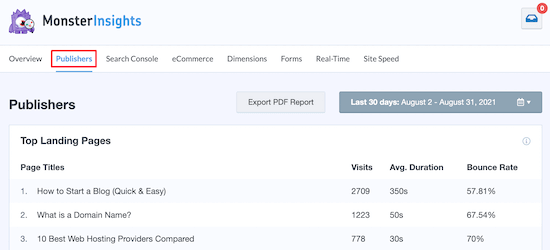
For example, if want a closer look at your top-performing landing page, then simply go to the ‘Publishers’ tab at the top and then see the ‘Top Landing Pages’ report.

MonsterInsights top pages

These are the top pages that users first land on when visiting your website. You can view the total number of visits, average duration, and bounce rate for each page.

You can identify your most important page from the report and see which topics attract the most visitors. Then using this information, you can come up with similar content ideas for your website.

Similarly, you can compare your best pages with other pages that aren’t performing well and then optimize them to boost their engagement and conversions.

View Your Most Important Page in Google Analytics

While MonsterInsights makes it super easy to find the most important page on your website and view the data inside your WordPress dashboard, you can also use Google Analytics to view your top pages.

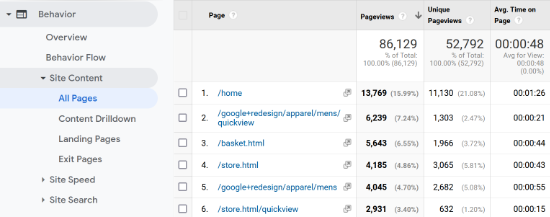
After installing Google Analytics on your site, you’ll need to log in to your Google Analytics account. After that, simply head over to Behavior » Site Content » All Pages from the menu on your left.

See important pages in Analytics

In the report, you can see your top pages and the total number of pageviews for each page. For example, the report above shows that the homepage gets the most traffic, which shows it’s an important page for your site.

But it also shows that the basket page and some apparel pages are also very popular and should get special attention.

What to Do After Finding Your Top Pages?

The next step after you find the most important pages on your WordPress site is to optimize them to get more traffic, and convert that traffic into subscribers and customers.

Here are a few ways to get started.

Improve SEO Rankings on Your Top Pages

Search engine optimization (SEO) is a smart way to get more visitors to your top pages, because it helps you grow your traffic over time.

You should check the keyword ranking for the top pages on your website. They are likely ranking on the first page, but you can optimize them further to improve your position to rank #1 in Google.

We recommend using AIOSEO plugin to optimize your blog posts.

To get started, see our checklist to optimize your blog posts for SEO. These tips will work for any page or post on your website.

Convert Visitors Into Email Subscribers

Did you know that, on average, over 75% of visitors to your top page will never return to your website?

That’s why building an email newsletter is so important. It allows you to communicate with visitors after they leave your website.

The best place to convert visitors into subscribers is on the top pages of your website.

You should consider using OptinMonster which is the #1 rated WordPress plugin to convert engaged and abandoning visitors into email subscribers.

OptinMonster

If you signup from inside the OptinMonster WordPress plugin, they actually have a free account that you can use which is not available on their main website.

If you don’t have an email newsletter already, then you may also want to see our guide on how to create an email newsletter the right way.

Optimize Your Sales Funnels

Are you selling a product or service on your top pages?

In that case, you can boost your sales by optimizing those pages to offer a better user experience, reduce distractions, and nudge users towards completing the purchase.

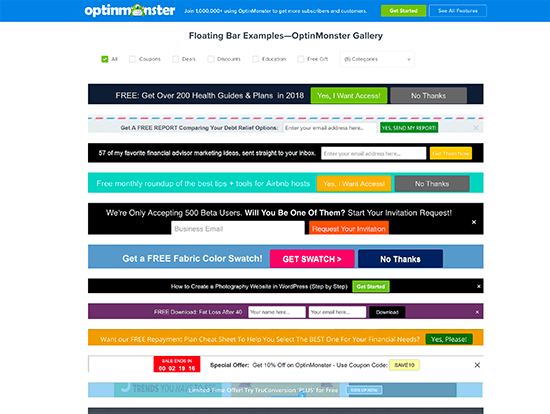
For example, you can add floating announcement bars on the top pages to get users to join your email list, check out your other popular posts, see your product, and more.

OptinMonster Floating Bar Screenshots

To get started, see our guide on how to make a high-converting sales funnel in WordPress.

We hope this article helped you learn how to find the most important page of your WordPress site. You may also want to take a look at our guide on how to choose the best website builder, or our comparison of the best email marketing services for small business.

If you liked this article, then please subscribe to our YouTube Channel for WordPress video tutorials. You can also find us on Twitter and Facebook.

The post How to Find the Most Important Page of Your WordPress Site appeared first on WPBeginner.


October 19, 2021 at 04:00PM