Saturday, October 30, 2021

How and Why You Should Limit Login Attempts in WordPress

Would you like to limit login attempts in WordPress?

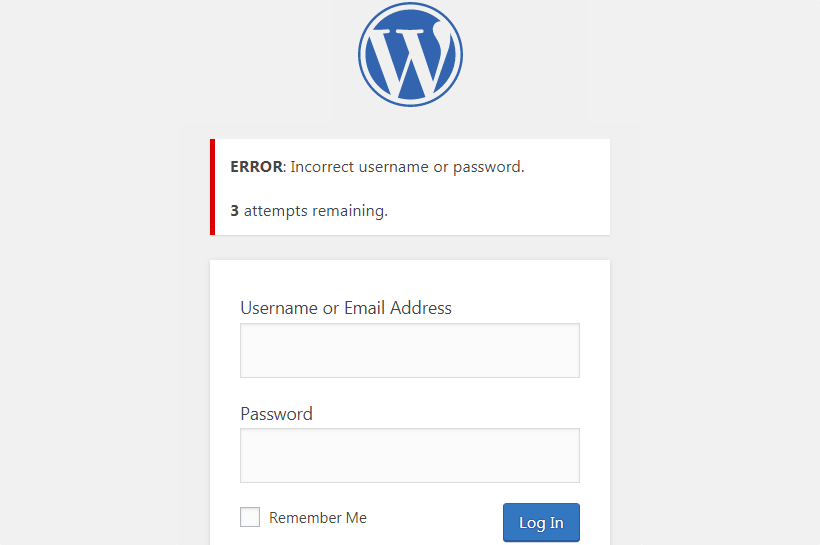
Hackers may use a brute force attack to try to guess your admin password. If you limit the number of times they can attempt to log in, then you significantly reduce their chances of success.

In this article, we will show you how and why you should limit login attempts on your WordPress site.

How and Why You Should Limit Login Attempts in WordPress

Why Should You Limit Login Attempts in WordPress?

A brute force attack is a method that uses trial and error to hack into your WordPress website.

The most common type of brute force attack is password guessing. Hackers use automated software to keeping guessing your login information so they can gain access to your website.

By default, WordPress allows users to enter passwords as many times as they want. Hackers may try to exploit this by using scripts that enter different combinations until they guess the right login.

You can prevent brute force attacks by limiting the number of failed login attempts per user. For example, you could temporarily lock a user out after 5 failed login attempts.

Temporarily Lock Out a User After Failed Login Attempts

Unfortunately, some users find themselves locked out of their own WordPress website after typing their password incorrectly a number of times. If you find yourself in that situation, then you should follow the steps in our guide on how to unblock limit login attempts in WordPress.

With that being said, let’s take a look at how to limit login attempts on your WordPress website.

How to Limit Login Attempts in WordPress

The first thing you need to do is install and activate the Limit Login Attempts Reloaded plugin. For more details, see our step by step guide on how to install a WordPress plugin.

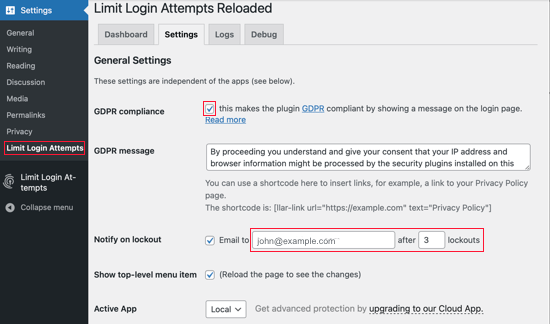
The free version is all you need for this tutorial. Upon activation, you should visit the Settings » Limit Login Attempts page, and then click on the Settings tab at the top.

The default settings will work for most websites, but we’ll walk you through how you can customize the plugin settings for your site.

Limit Login Attempts Reloaded Settings

To be compliant with GDPR laws, you can click the ‘GDPR compliance’ checkbox to show a message on your login page. You can learn more about the GDPR in our guide on WordPress and GDPR compliance.

Next, you’ll choose whether to be notified when someone has been locked out. You can change the email address the notification is sent to if you wish. By default, you will be notified the third time the user is locked out.

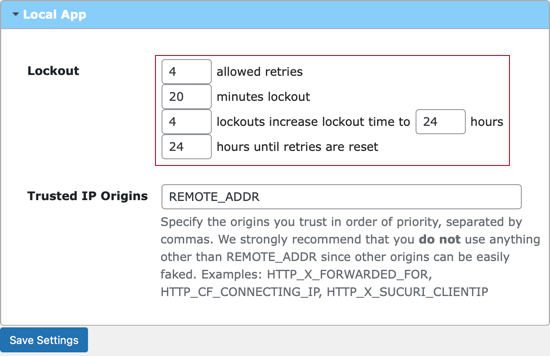
After that, you should scroll down to the Local App section where you can define how many login attempts can be made and how long a user will have to wait before they can try again.

Limit Login Attempts Reloaded Settings

First, you need to define how many login attempts can be made. After that, choose how many minutes a user will have to wait if they exceed that number of failed attempts. The default value is 20 minutes.

You can also increase the wait time once the user has been locked out a specified number of times. For example, the default settings will not allow the user to attempt to log in for 24 hours once they have been locked out 4 times.

It’s recommended that you do not change the ‘Trusted IP Origins’ setting for security reasons.

Don’t forget to click the Save Settings button at the bottom of the screen to store your changes.

Pro Tips on How to Protect Your WordPress Website

Limiting login attempts is just one way to keep your WordPress site secure.

The first layer of protection to your WordPress sites is your passwords. You should always use strong passwords on your WordPress site.

Strong passwords can be difficult to remember, but you can use a password manager to make it easy. If you run a multi-author WordPress site, then see how you can force strong passwords on users in WordPress.

If your WordPress login page is still being attacked, then another layer of protection you can add is Google reCAPTCHA for WordPress login. This will further help reduce the DDoS attacks.

No website is 100% safe because hackers always find new ways to get around the system. That’s why it’s crucial that you keep complete backups of your WordPress site at all times. We recommend using the UpdraftPlus or another popular WordPress backup plugins.

If your website is a business, then we strongly recommend that you add a firewall that takes care of the brute force attacks and so much more. We use Sucuri, which guarantees our safety and if anything happens to our site, then their team is responsible to fix it at no additional charge.

For more security tips, be sure to see our ultimate WordPress security guide.

We hope this tutorial helped you learn how to limit login attempts in WordPress. You may also want to learn how to choose the best WordPress hosting or check out our list of must have plugins to grow your website.

If you liked this article, then please subscribe to our YouTube Channel for WordPress video tutorials. You can also find us on Twitter and Facebook.

The post How and Why You Should Limit Login Attempts in WordPress appeared first on WPBeginner.


October 30, 2021 at 04:00PM

Friday, October 29, 2021

12 Tips to Optimize Your WordPress RSS Feed (Quick & Easy)

Do you want to optimize your RSS feed in WordPress?

Every WordPress site has an RSS feed by default. You can optimize this feed to protect your content, send more traffic to your site, and more.

In this article, we’ll show you how to optimize and customize your RSS feeds the right way.
12 tips to optimize your WordPress RSS feed

Why Optimize Your WordPress RSS Feeds?

RSS feeds offer a way for your readers to subscribe and read your blog posts in their favorite feed reader apps like Feedly.

Even though feed readers aren’t as popular as they once were, there are still many readers who prefer to read WordPress blog content this way.

By optimizing your RSS feed you can also prevent content scraping, get more backlinks, send traffic to your site, and more.

With that said, let’s get into our expert tips for optimizing your RSS feed.

1. Create an RSS Feed Sitemap

An RSS sitemap is different from an XML sitemap. RSS sitemaps only contain your most recent content, which helps Google to keep your content fresher in search results.

If you publish content frequently, then this can lead to a boost in your search engine rankings.

All in One SEO allows you to add an RSS sitemap to your website easily, without having to code.

The first thing you need to do is install and activate the All in One SEO plugin. For more details, see our step by step guide on how to install a WordPress plugin.

Upon activation, you’ll be prompted to set up the plugin. You can follow the guided steps in the setup wizard, or see our guide on how to set up All in One SEO for WordPress.

AIOSEO enables RSS sitemaps automatically, so there’s nothing else you need to do.

If you’d like to double check, simply go to All in One SEO » Sitemap and then click on the ‘RSS Sitemap’ tab.

You can see that the ‘Enable Sitemap’ toggle in the ‘RSS Sitemap’ box is already enabled.
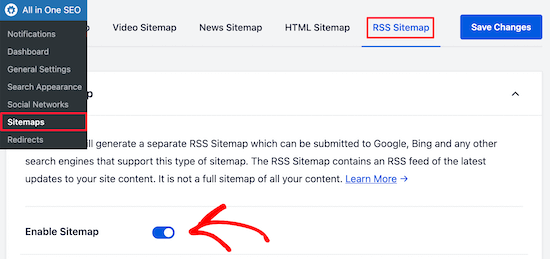
Enable RSS sitemap

You can also set the number of posts and the post types you want to include in the ‘Sitemap Settings’ box.

We’ll leave the default settings, but you can include more posts or only include certain post types.
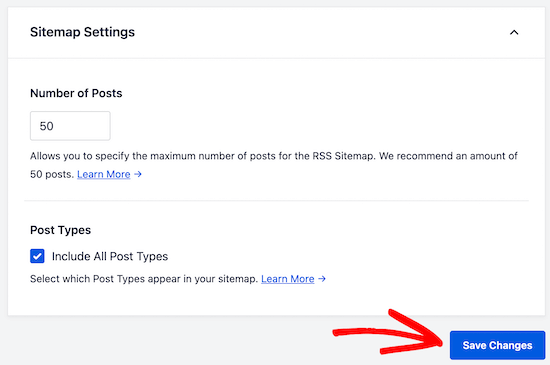
Edit RSS sitemap settings

Before you leave the screen, make sure to click the ‘Save Changes’ button.

Now you’ve enabled your RSS sitemap for your website.

To submit your new RSS sitemap to Google, you can see our guide on how to add your WordPress site to Google Search Console. It’s the same process as submitting an XML sitemap.

2. Edit Your RSS Feed Before and After Content

By default, WordPress RSS feeds will show your recent post content, and there’s no built-in option to customize that content for your readers.

Luckily you can use the All in One SEO plugin to easily customize your RSS feed before and after content.

Simply follow the same steps as above to install, activate, and set up the plugin.

After that, navigate to All in One SEO » General Settings and then click the ‘RSS Content’ menu option.
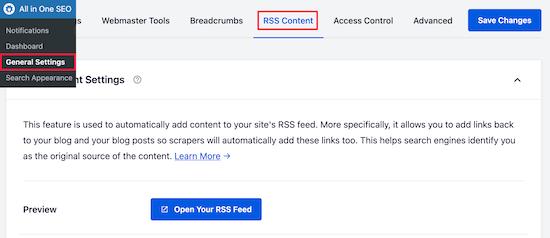
Edit RSS content

On this screen, you can add any content you want to display before and after each post in your RSS feed.

You can add HTML, smart tags for links, and other metadata to each section.
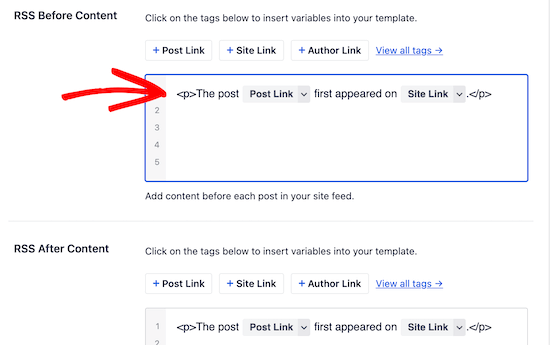
Edit header and footer RSS content

Once you’re satisfied with your changes, make sure to click the ‘Save Changes’ button to save your RSS feed.

3. Protect Your RSS Feed From Content Scrapers

Content scraping is when content is taken your site, usually via your RSS feed, and republished on someone else’s site as their own.

It can be very frustrating to see someone stealing your content, monetizing it, and even outranking your website in the search results.

Luckily, you can customize your RSS feed to actually benefit your site if someone steals your content via your RSS feed.

For more details, see our beginner’s guide to preventing blog content scraping in WordPress.

4. Show Excerpt Instead of Full Article in RSS Feed

Showing your full article in the RSS feed lets your users read the entire article in their feed reader. This can negatively affect your page views, advertising revenue, and conversion rates.

By showing the article summary instead of the full article in your RSS feed, you require readers to come to your WordPress website to read the full post.

WordPress comes with a built-in solution. Simply go to Settings » Reading in your WordPress admin dashboard.

Then, scroll down to the section titled ‘For each post in a feed, include’ and select the ‘Excerpt’ radio button.
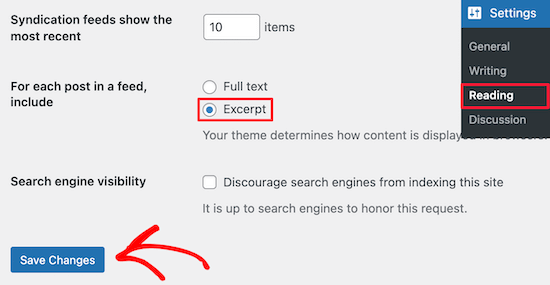
Show article excerpt in RSS feed

You can also control the number of posts that display in your RSS feed as well.

In the ‘Syndication feeds show the most recent’ box, simply enter a number into the box.

Before you leave this screen, make sure to click the ‘Save Changes’ button to update your RSS feed settings.

5. Add a Featured Image to Posts in RSS Feed

By default, WordPress doesn’t add your post featured images to your RSS feed. When your users read your post in a feed reader, it’ll often pull the first image in your post.

You can change this by adding code to your WordPress files. If you haven’t done this before, then see our beginner’s guide to pasting snippets from the web into WordPress.

All you need to do is add the following code to your functions.php file, in a site specific plugin, or by using a code snippets plugin.

function wpb_rsstutorial_featuredimage($content) {
global $post;
if(has_post_thumbnail($post->ID)) {
$content = '<p>' . get_the_post_thumbnail($post->ID) .
'</p>' . get_the_content();
}
return $content;
}
add_filter('the_excerpt_rss', 'wpb_rsstutorial_featuredimage');
add_filter('the_content_feed', 'wpb_rsstutorial_featuredimage');

This code simply adds your featured image inside a paragraph just before the post content.

6. Add Custom Post Types to Your RSS Feed

Many WordPress sites use custom post types to create separate sections from regular blog articles.

For example, here at WPBeginner, we created separate custom post types for our Deals and Glossary sections.

If you publish a lot of content using different custom post types, then you’ll want to add these to your main feed.

To do this, you’ll need to add the following code to your functions.php file, in a site specific plugin, or by using a code snippets plugin.

function myfeed_request($qv) {
        if (isset($qv['feed']) && !isset($qv['post_type']))
                $qv['post_type'] = array('post', 'books', 'movies');
        return $qv;
}
add_filter('request', 'myfeed_request');

This code adds two custom post types, ‘books’ and ‘movies’, to the main RSS feed. Make sure you replace these with your own custom post types.

7. Add Additional Text to Post Titles in RSS

Adding additional text to your post titles in RSS can be helpful if you create multiple kinds of post content.

For example, this can help your readers distinguish between guest posts, regular blog content, and sponsored content.

Here’s a code snippet you can use to display the post category in the title:

function wpb_rsstutorial_titlecat($content) {
$postcat = "";
foreach((get_the_category()) as $cat) {
$postcat .= ' ('.$cat->cat_name . ')';
}
$content = $content.$postcat;
return $content;
}
add_filter('the_title_rss', 'wpb_rsstutorial_titlecat');

For more details and examples, see our guide on how to completely customize your WordPress RSS feeds.

8. Allow Users to Subscribe to RSS Feed via Email

Not all your users want to use a feed reader to subscribe to your posts. A lot of people will prefer to subscribe by email instead. That’s one reason why having an email newsletter is important.

To send RSS emails automatically, we recommend using Sendinblue. It’s a popular email marketing service provider that has a forever free plan to send up to 300 emails a day.

Sendinblue

Once your email list is set up, you can automatically send RSS emails when you publish a new blog post.

For more details, see our guide on how to notify subscribers of new posts in WordPress.

9. Allow Users to Subscribe to Categories in RSS Feed

Each category on your WordPress site will automatically have its own RSS feed. If you run a massive blog with many diverse categories, then this lets your readers only subscribe to categories that interest them.

However, a lot of users don’t realize they can easily subscribe to specific categories. You can make this easier on your readers by highlighting this on your website.

Subscribe to category RSS

For more details, see our guide on how to make separate RSS feed for each category in WordPress.

10. Add Custom Field Data to Your RSS Feed

Custom fields let you add extra metadata to your WordPress posts and pages. However, this metadata isn’t included in your default RSS feed.

To display custom fields in your RSS feed, simply add the following code snippet to your functions.php file, in a site-specific plugin, or by using a code snippets plugin.

function wpb_rsstutorial_customfield($content) {
global $wp_query;
$postid = $wp_query->post->ID;
$custom_metadata = get_post_meta($postid, 'my_custom_field', true);
if(is_feed()) {
if($custom_metadata !== '') {
// Display custom field data below content
$content = $content."<br /><br /><div>".$custom_metadata."</div>
";
}
else {
$content = $content;
}
}
return $content;
}
add_filter('the_excerpt_rss', 'wpb_rsstutorial_customfield');
add_filter('the_content', 'wpb_rsstutorial_customfield');

This code checks if the custom field is being used and if the RSS feed is being displayed. After that, it will add the custom field data below the post content.

11. Delay Posts From Appearing in RSS Feed

Delaying posts from appearing in your RSS feed can save you from accidental publishing and can help you beat content scrapers, if that’s an issue you regularly face.

When you delay posts from appearing in your RSS feed, you give the search engines time to crawl and index your content before it appears elsewhere.

Plus, you can check for any typos before it gets sent out to RSS subscribers.

To do this, you’ll need to add the following code to your functions.php file, in a site-specific plugin, or by using a code snippets plugin.

function publish_later_on_feed($where) {

        global $wpdb;

        if ( is_feed() ) {
                // timestamp in WP-format
                $now = gmdate('Y-m-d H:i:s');

                // value for wait; + device
                $wait = '10'; // integer

                // http://dev.mysql.com/doc/refman/5.0/en/date-and-time-functions.html#function_timestampdiff
                $device = 'MINUTE'; //MINUTE, HOUR, DAY, WEEK, MONTH, YEAR

                // add SQL-sytax to default $where
                $where .= " AND TIMESTAMPDIFF($device, $wpdb->posts.post_date_gmt, '$now') > $wait ";
        }
        return $where;
}

add_filter('posts_where', 'publish_later_on_feed');

This code will add a 10 minute delay before posts appear in your RSS feed. You can change it to your own needs by changing the 10 and MINUTE values.

12. Add Social Buttons to Your WordPress RSS Feeds

Most RSS feed readers don’t have social sharing features, or they’re not very noticeable. However, you can add your own social media icons to your RSS feed to encourage sharing.

First, you’ll need to create image icons for the social media networks you want to add. For this tutorial, we created images for Facebook and Twitter and uploaded them by going to Media » Add New.

After you upload your image files, you need to copy the ‘File URL’ and paste it into your favorite text editor to save it for the next step.

For more details, see our guide on how to get the URL of images you upload in WordPress.
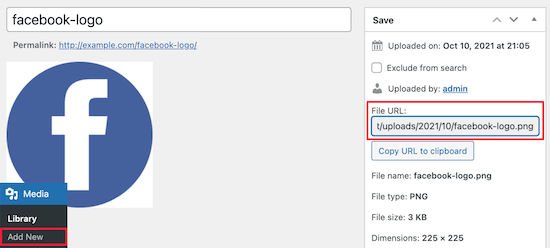
Upload social media icons copy URL

Next, you need to add the following code snippet to your functions.php file, in a site-specific plugin, or by using a code snippets plugin.

// add custom feed content
function wpb_add_feed_content($content) {

// Check if a feed is requested
if(is_feed()) {

// Encoding post link for sharing
$permalink_encoded = urlencode(get_permalink());

// Getting post title for the tweet
$post_title = get_the_title(); 

// Content you want to display below each post
// This is where we will add our icons

$content .= '<p>
<a href="http://www.facebook.com/sharer/sharer.php?u=' . $permalink_encoded . '" title="Share on Facebook"><img src="Facebook icon file url goes here" title="Share on Facebook" alt="Share on Facebook" width="64px" height="64px" /></a>

<a href="http://www.twitter.com/share?&text='. $post_title . '&amp;url=' . $permalink_encoded . '" title="Share on Twitter"><img src="Facebook icon file url goes here" title="Share on Twitter" alt="Share on Twitter" width="64px" height="64px" /></a>
</p>';
}

return $content;
}

add_filter('the_excerpt_rss', 'wpb_add_feed_content');
add_filter('the_content', 'wpb_add_feed_content');

This code above will simply add the social sharing buttons for Twitter and Facebook. You need to replace the src= attribute in the image tag with your own image URLs that you pasted into your text editor earlier.

If you’ve optimized your RSS feed and are seeing errors, then see our guide on how to fix RSS feed errors.

We hope this article helped you learn how to optimize your WordPress RSS feed. You may also want to see our expert picks on the best email marketing services for small businesses and our guide on how to choose the best website builder.

If you liked this article, then please subscribe to our YouTube Channel for WordPress video tutorials. You can also find us on Twitter and Facebook.

The post 12 Tips to Optimize Your WordPress RSS Feed (Quick & Easy) appeared first on WPBeginner.


October 29, 2021 at 02:30PM
Thursday, October 28, 2021

How to Allow Users to Choose a Payment Method on WordPress Forms

Do you want to allow users to choose between different payment methods on a WordPress form?

When you allow your customers to choose their preferred payment method, you’ll build trust and increase conversions on your website.

In this article, we’ll show you how to allow your users to choose a payment method in your WordPress forms.

How to Allow Users to Choose a Payment Method on Your WordPress Form

Why Offer Multiple Payment Methods in WordPress?

PayPal and credit cards are two popular ways to pay for online purchases. Each has its pros and cons, and your visitors are likely to already have a preference for one or the other.

So, if you’re selling products or services on your WordPress website, or asking for donations, then it is important to allow your visitors to use their preferred payment method.

You don’t need to set up a complete online store with a shopping cart to accept online payments. All you need is a simple online order form with a choice of payment options.

This makes a lot of sense, especially if you’re selling a single product, accepting payments for services, or raising money for a cause or charity.

You will need to enable HTTPS/SSL on your website so that you can accept payments securely. For more details, you can follow our guide on how to get a free SSL certificate for your WordPress site.

That being said, let’s look at how you can offer multiple payment options on your website.

How to Setup a Payment Form in WordPress

The first thing you need to do is install and activate the WPForms plugin. For more details, see our step by step guide on how to install a WordPress plugin.

WPForms is the best drag and drop form builder plugin for WordPress. It lets you create a simple order form or donation form without the hassle of a full-fledged eCommerce platform or shopping cart plugin.

While they have a Lite version that’s free, you will need their Pro plan to access the payment addons and order form template.

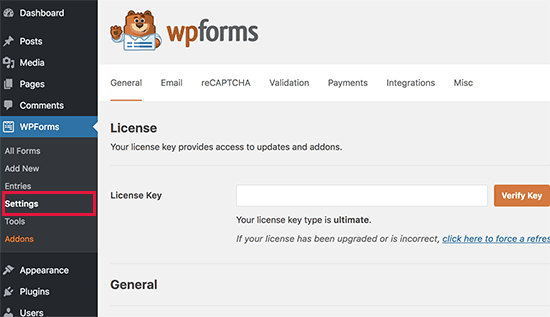
Upon activation, you need to visit the WPForms » Settings page to enter your license key. You can find this information in your WPForms account area.

Connecting Payment Platforms to WPForms

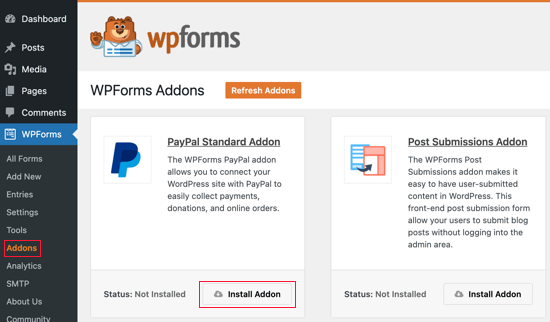
Next, we’ll connect WPForms with the payment platforms you plan to use. To do this, you need to head over to WPForms » Addons and install the payment addons.

Once there, you need to scroll down to the PayPal Standard Addon and then click on its Install Addon button.

Scroll Down to the PayPal Standard Addon and Click Its 'Install Addon' Button

You’ll see a message saying that the addon has been installed and activated, and the text on the button will change to Deactivate.

We’ll set up your PayPal account details later in the tutorial.

You’ll also need to install an addon for accepting credit card payments. WPForms supports Stripe, Square and Authorize.net. For this tutorial, we’ll set up Stripe, but the steps for setting up the other two platforms are similar.

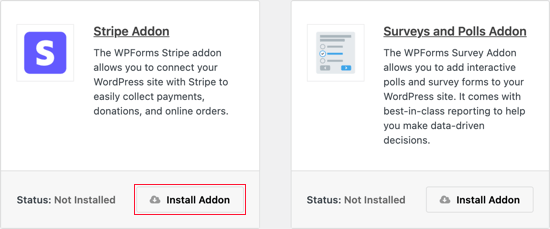
You’ll need to scroll to the Stripe Addon and click on the Install Addon button.

Click on the Install Addon Button

Once the addons have been installed and activated, you’ll need to connect WPForms to your Stripe account.

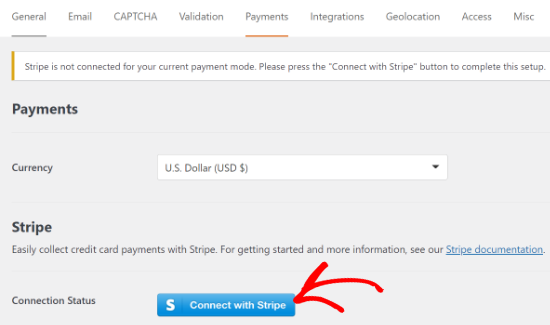
To do that, head over to WPForms » Settings page and click on the ‘Payments’ tab. After that, you will need to connect your Stripe account by clicking the ‘Connect with Stripe’ button.

Click the Connect with Stripe Button

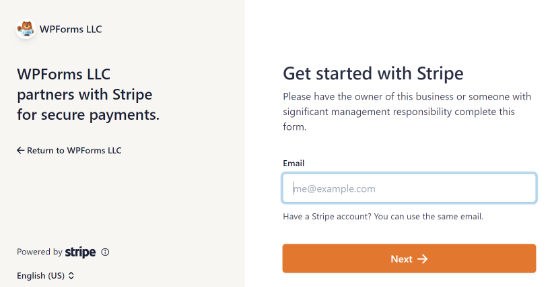
On the next screen, you can enter your Stripe email address and click the ‘Next’ button.

Enter Your Stripe Email Address

Once that is done, Stripe will now ask for your password so that it can log in to your account.

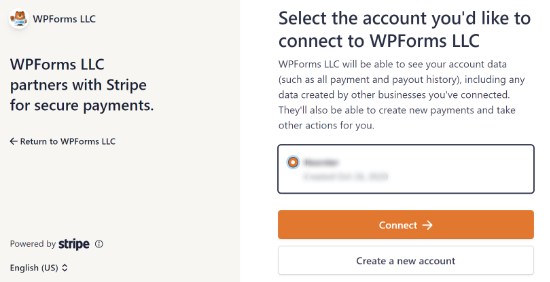
After logging in, you can select your Stripe account and then click the ‘Connect’ button.

Select Your Website and Connect It with Stripe

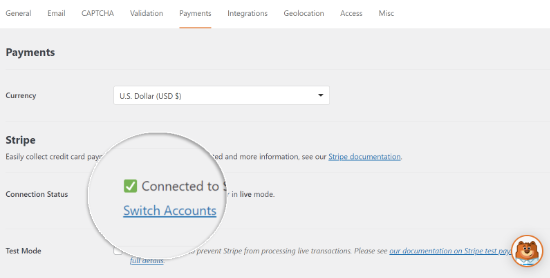
Next, you will be redirected back to the WPForms Payments settings tab. To make sure that your account is successfully connected, you can go to the Connection Status settings under Stripe settings.

When you see a green tick mark, it means your Stripe account is now live with WPForms. Go ahead and click the ‘Save’ button to store your settings.

Successfully Connected Your Stripe Account

WPForms is now ready to accept credit card payments.

Creating an Order Form with Multiple Payment Methods

Now we’ll create an online order form that can accept both PayPal and credit card payments.

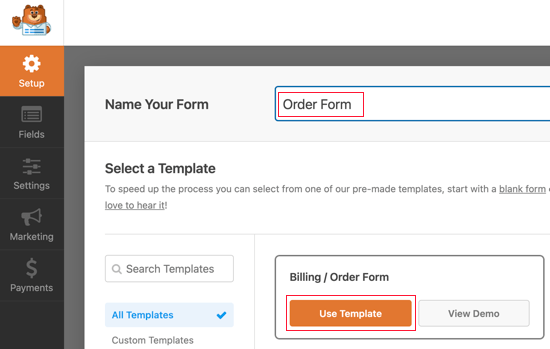
To start, head over to WPForms » Add New page. From here, you need to provide a title for your form and then select the ‘Billing / Order Form’ template.

Select the ‘Billing / Order Form’ Template

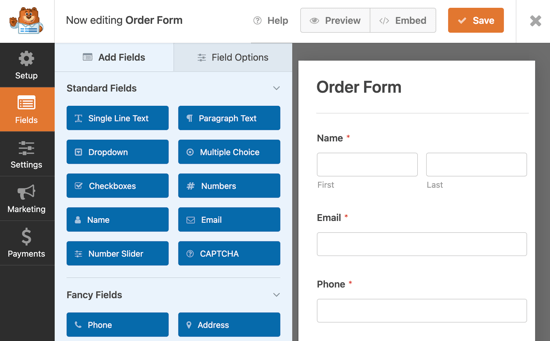
WPForms will pre-load the form builder with a simple order form with commonly used fields. You can edit any field by clicking it.

WPForms Will Pre-load the Form Builder with a Simple Order Form

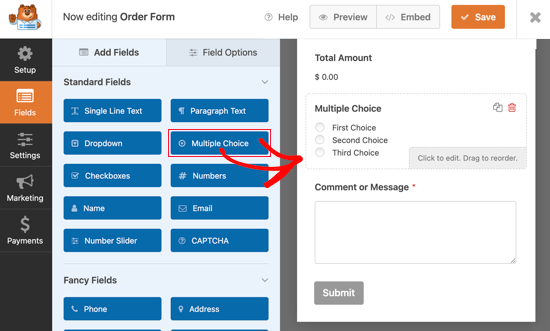
You can add new fields from the left column using drag and drop. You’ll need to drag a Multiple Choice field onto the form to allow your customers to select from multiple payment options.

Add a Multiple Choice Field

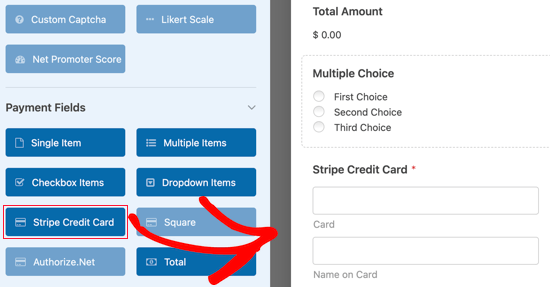
After that, you should drag the Stripe Credit Card field onto the form just underneath the Multiple Choice field.

Add a Stripe Credit Card Field

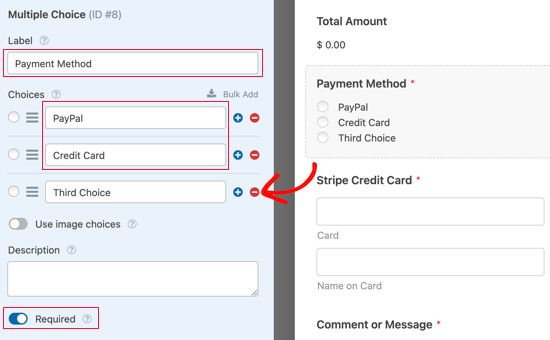
Next, you need to change the options on the Multiple Choice field to match the payment methods you are offering.

Start by giving the field the label Payment Method. After that, you should name the first two choices PayPal and Credit Card.

Multiple Choice Field Options

You can simply remove the third choice by clicking the red minus button.

After that, you need to switch the Required option on. This will make sure that users select a payment method before they submit the order form.

Now we need to set up the Stripe Credit Card field, so it is hidden until a user selects it as their payment option. We can achieve that by using WPForms’ conditional logic feature.

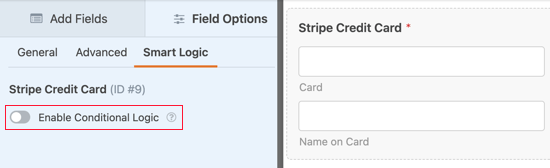
You’ll need to click on the Stripe field so that you can edit it. Next, you should click on the Smart Logic tab and then enable conditional logic by clicking the toggle switch to the on position.

Click on the Smart Logic Tab and Enable Conditional Logic

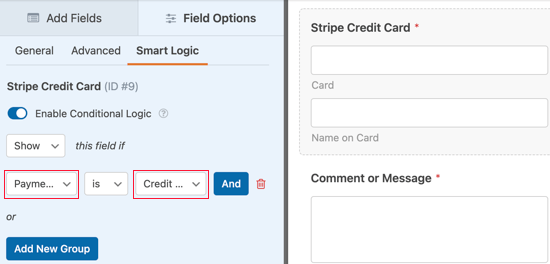
You will now see some additional options that allow you to set up rules for the field. You need to make sure that the first option is selected to ‘Show’ and then use the drop down menus so that the remaining fields say ‘Payment is Credit Card’.

Set up Some Rules for the Field

Now the Stripe Credit Card field will only be shown after a user selects Credit Card from the Payment Method field.

Enabling Payment Methods for the Order Form

The next step is to enable PayPal and Stripe payments for the order form.

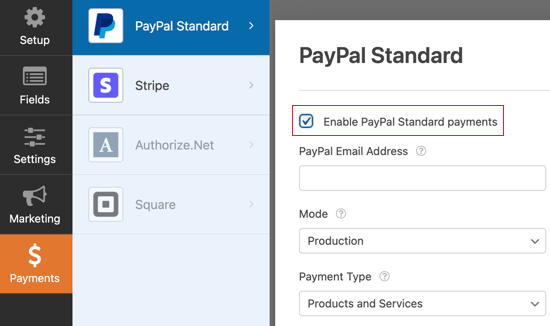
You should first navigate to Payments » PayPal Standard in the WPForms form builder. Once there, you should check the ‘Enable PayPal Standard payments’ box in the right panel.

Check the ‘Enable PayPal Standard Payments’ Box

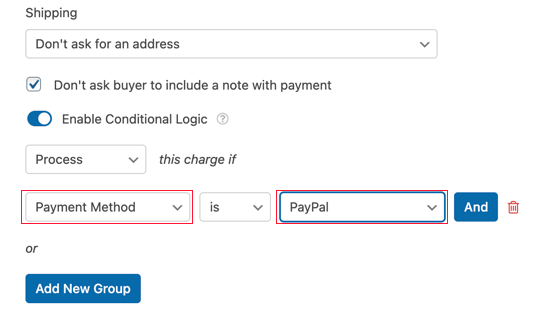
After that, you should fill in the rest of the fields. Type in your PayPal email address and place the account in Production mode. You also need to configure whether users need to supply a shipping address.

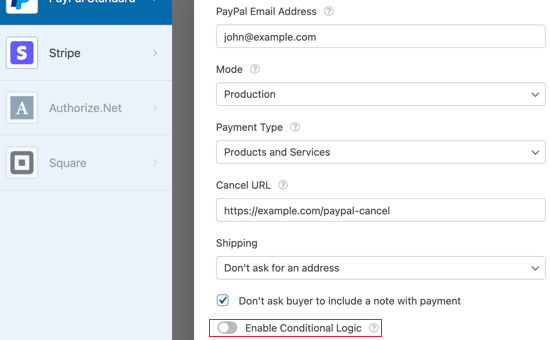
Toggle the Enable Conditional Logic Option

After that, you need to scroll down to the Enable Conditional Logic option and toggle it to the ON position. This will reveal more settings.

Toggle the Enable Conditional Logic Option

You should set the rule to Process the charge if the Payment Method is PayPal.

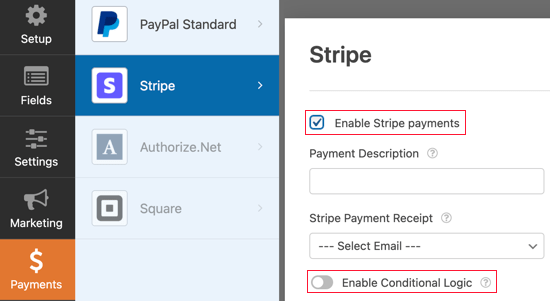
Next, you need to click on the Stripe section of the Payments tab and then check the ‘Enable Stripe payments’ box.

Check the ‘Enable Stripe Payments’ Box

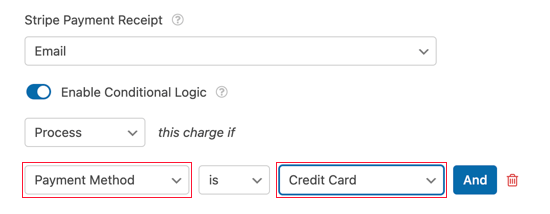
You can add a payments description and opt to email a receipt if you wish. After that, you need to switch the Enable Conditional Logic toggle to the on position so that you can create a rule for this payment option.

Toggle the Enable Condition Logic Option

You need to configure the rule to read Process this charge if the Payment Method is Credit Card.

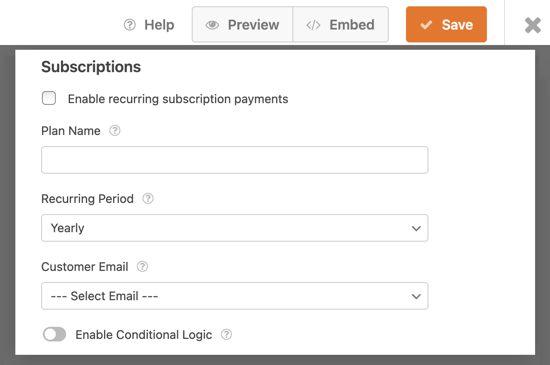
If you’d like to accept recurring subscription payments by credit card, then you can scroll down to the Subscription section and configure it.

Stripe Subscriptions

Once you are done, you need to click on the Save button at the top and exit the form builder.

Adding the Order Form to Your WordPress Site

Your online order form with multiple payment options is now ready, and you can add it to any WordPress page on your site.

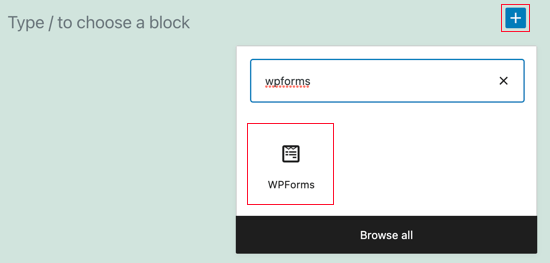
To add your form, simply edit a post or page or create a new one. Then, click on the plus + sign on the right of the page and add a WPForms block in your WordPress editor.

Add a WPForms Block

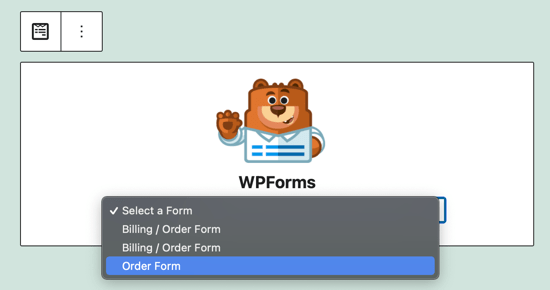
After that, you need to click on the dropdown menu in WPForms block and select your order form.

Select Your Order Form from the Dropdown Menu

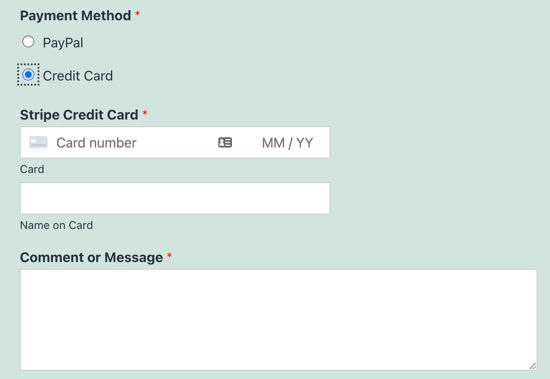
You can now save or publish your page and click on the preview button to see your form in action.

Preview Order Form

We hope this tutorial helped you learn how to allow users to choose a payment method on your WordPress form.

You may also want to see our expert pick of the best virtual business phone number apps for small businesses, and our step by step guide on how to create a business email address.

If you liked this article, then please subscribe to our YouTube Channel for WordPress video tutorials. You can also find us on Twitter and Facebook.

The post How to Allow Users to Choose a Payment Method on WordPress Forms appeared first on WPBeginner.


October 28, 2021 at 04:39PM