Friday, November 26, 2021

How to Add and Customize Admin Columns in WordPress

Are you looking for a way to add and customize admin columns on your website?

WordPress shows built-in columns by default for posts, pages, comments, users, and more. However, you can make your editorial workflow faster and smoother by adding more admin columns.

In this article, we will show you how to add and customize admin columns in WordPress.
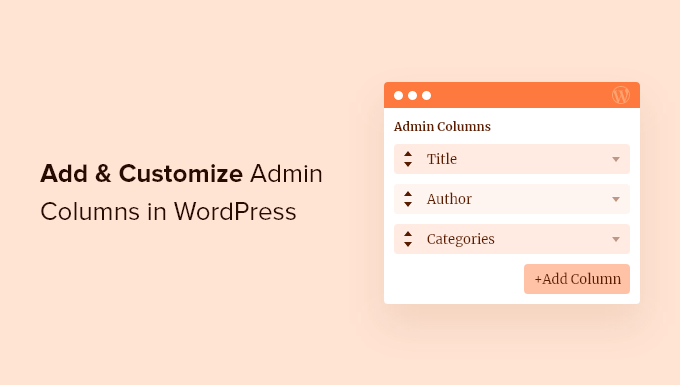
Add and customize admin columns in WordPress

Why Add Admin Columns in WordPress?

By default, WordPress only shows a few built-in columns. For instance, in the posts section, you can only view the post’s title, author, categories, tags, and date.

Managing a WordPress site with lots of content or multiple authors means more tasks for admins to perform.

Admins of growing WordPress sites are always looking for tools and plugins to improve their editorial workflow.

A lot of the tasks that need to be performed can be done quicker if you can see all the useful information on one screen.

That’s when admin columns come in handy.

You can display additional columns in the WordPress admin area and have complete control over all columns for pages, posts, media, comments, and users.

Let’s look at how you can add and customize admin columns in WordPress.

Adding and Customizing Admin Columns in WordPress

The easiest way to add more columns in the admin area is by using the Admin Columns plugin.

It’s a free WordPress plugin that lets you manage and organize columns in the WordPress admin panel and get a clear overview of your editorial workflows.

First, you’ll need to install and activate the Admin Columns plugin on your website. For more details, please see our guide on how to install a WordPress plugin.

After activation, you can navigate to Settings » Admin Columns to configure admin columns.
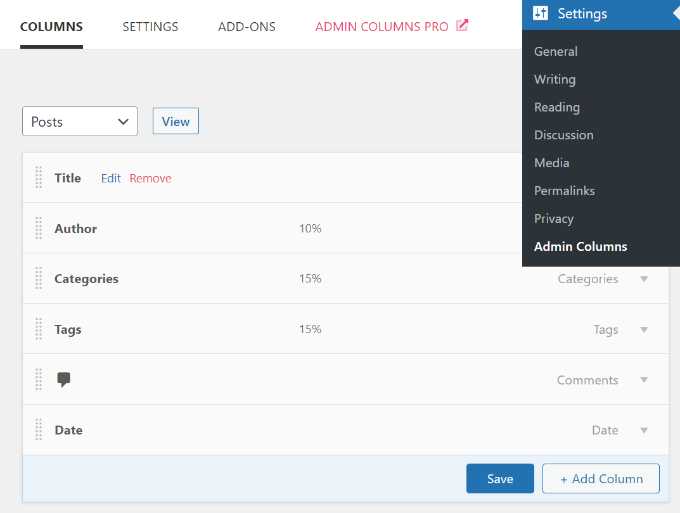
Edit existing columns

You can customize existing admin columns by simply using the drag and drop interface and rearranging items in the order you want.

The plugin also lets you edit existing columns. For instance, you can click the ‘Edit’ button for any column and then change its type, label, and width.
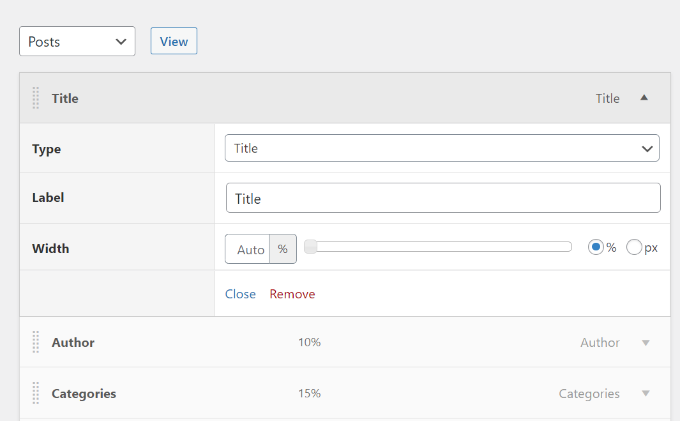
Editing admin columns

In addition to the default columns, you can add more admin columns by clicking the ‘+ Add Column’ button.
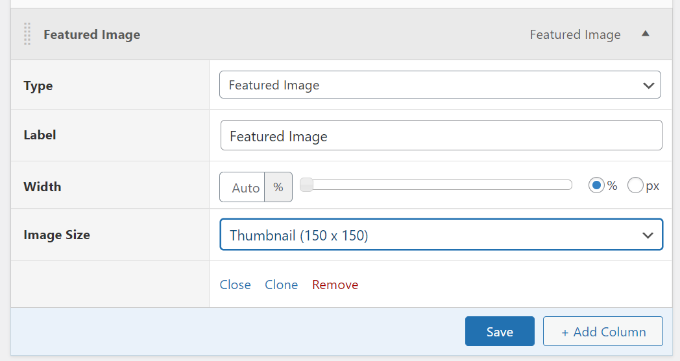
Add new admin column

For example, we added the featured image admin column for the posts screen. Admins will now see the featured images of all the blog posts in the admin panel and won’t have to view each article individually.

It’s important to note that if your thumbnails appear too big or in the wrong size, then you will need to regenerate thumbnails for new image sizes in WordPress.

After adding columns for the posts section, don’t forget to click the ‘Save’ button.

You can now do the same for other sections on your WordPress website. Simply click on the dropdown menu at the top and select a section for your site.
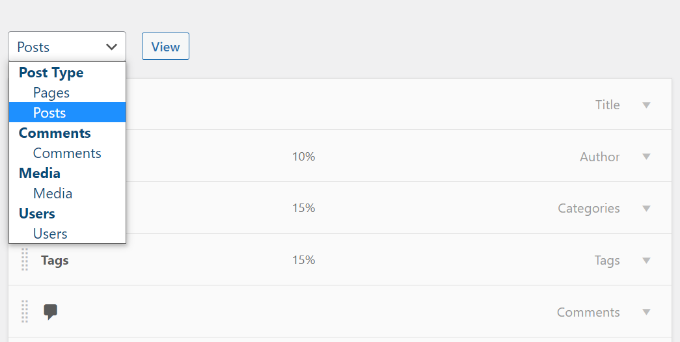
Add columns to other sections in WordPress

For example, on the media screen, you can add image dimensions, EXIF data, Alt text, and caption.
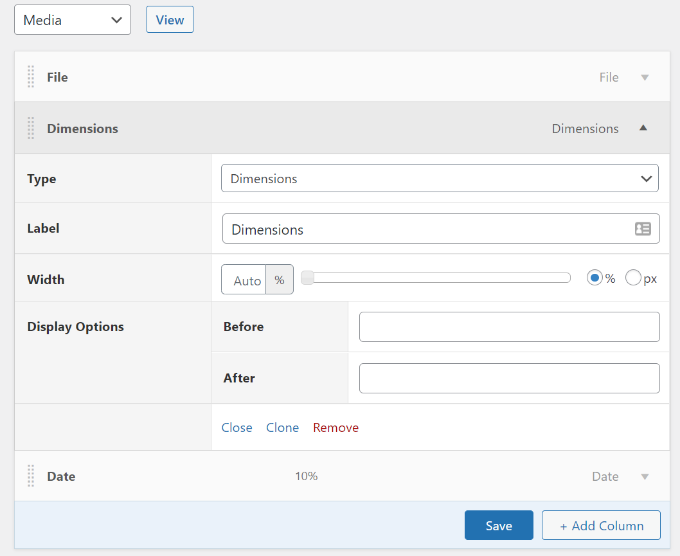
Dimensions column in media

After adding these columns in the plugin, you can now head over to the WordPress admin panel to see them in action.

Here’s a preview of how a featured image column will look like in the posts section on our demo website.
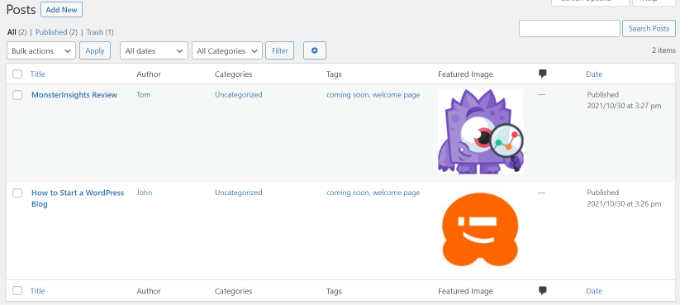
Admin columns preview

Customize Other Admin Columns in WordPress

Certain popular WordPress plugins All in One SEO for WordPress and others will also automatically add columns in the admin area.

This can help you bulk edit SEO titles, meta descriptions, and more right from the post edit screen.
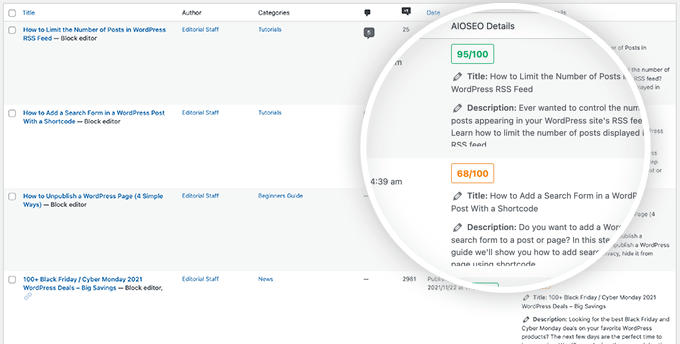
All in One SEO Bulk Edit Meta Description

If you see any plugin that’s adding an admin column that you do not want, then you can easily hide it by clicking on the Screen Options menu on the top right.

This will slide down a menu where you can simply uncheck the column that you don’t want to see.
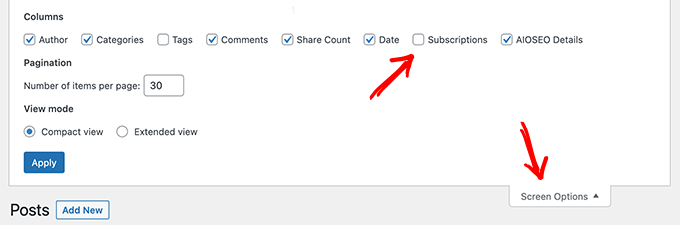
Hide admin columns in WordPress using Screen Options

We hope this article helped you customize and add admin columns in WordPress. You may also check out our guide on how to choose the best web design software and the best WooCommerce plugin.

If you liked this article, then please subscribe to our YouTube Channel for WordPress video tutorials. You can also find us on Twitter and Facebook.

The post How to Add and Customize Admin Columns in WordPress first appeared on WPBeginner.


November 26, 2021 at 04:00PM
Thursday, November 25, 2021

How to Limit the Number of Posts in WordPress RSS Feed

Do you want to limit the number of posts in your WordPress RSS feed?

By default, WordPress displays the ten most recent posts in the main RSS feed. You can change that to include more or fewer articles in the feed.

In this tutorial, we’ll show you how to easily limit the number of posts in the WordPress RSS feed. We’ll also show you how to easily create an RSS sitemap for search engines as well.

Limit number of posts in WordPress RSS feed

Video Tutorial

If you don’t like the video or need more instructions, then continue reading.

Change Posts Limit in WordPress RSS Feed

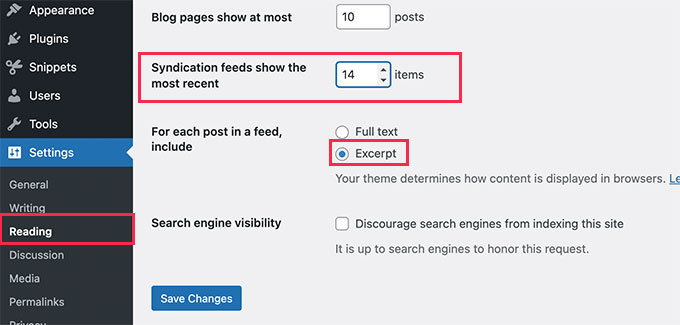
First thing you need to do is go to Settings » Reading page in your WordPress admin dashboard.

From here, you need to change the value next to the ‘Syndication feeds show the most recent’ option. Simply enter the number of posts you want to be shown in your RSS feed.

Change posts limit in RSS feed

Below this option, you’ll also see the option to show either the full text or excerpt of your posts in RSS feeds.

We recommend using the Excerpt option because it reduces the feed size and increases your page views.

After that, don’t forget to click on the Save Changes button to store your settings.

That’s all, you have successfully limited the number of posts displayed in RSS feed of your site.

Create RSS Sitemap for Search Engines

If you only want to change the number of posts in your RSS feeds for more search engine visibility, then increasing posts in your main WordPress RSS feeds is not the best way to do this.

Many popular search engines like Google and Bing support RSS sitemaps.

Unlike XML sitemaps which contain most of your content, an RSS sitemap provides search engines with the latest posts on your site.

This helps search engines quickly find the updated posts on your website. You can set a different limit of posts that you want to include without affecting your main WordPress RSS feed.

The easiest way to add an RSS sitemap in WordPress is by using All in One SEO for WordPress. It is the best WordPress SEO plugin on the market and allows you to easily optimize your website without any SEO skills.

First, you need to install and activate the All in One SEO for WordPress plugin. For more details, see our step-by-step guide on how to install a WordPress plugin.

AIOSEO setup wizard

This will bring up the All in One SEO setup wizard. Follow the on-screen instructions or check out our tutorial on how to properly set up All in One SEO for WordPress.

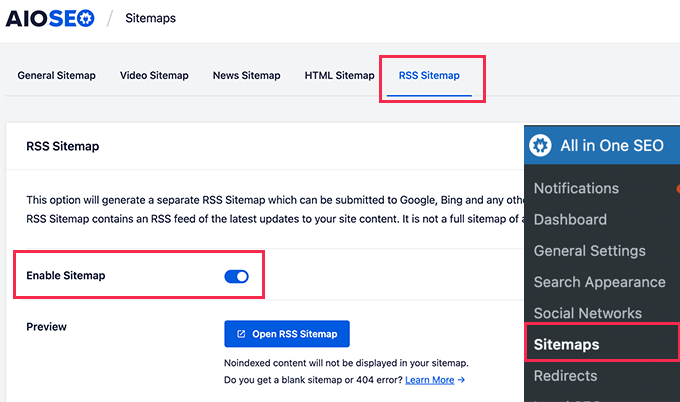
After that, you need to go to the All in one SEO » Sitemaps page and switch to the RSS Sitemap tab.

Enable RSS sitemap

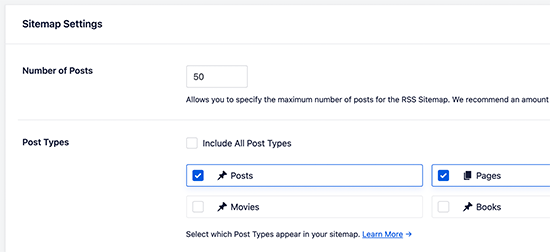
From here you can enable the RSS Sitemap and also set the number of posts you want to include in the sitemap.

Set post limit for RSS sitemap

This sitemap includes all your post types. This means it will include posts, pages, products, or any custom post types you may have.

If you only want to include blog posts, then uncheck the ‘Include All Post Types’ and then select ‘Posts’.

Once you are satisfied, don’t forget to click on the Save Changes button to store your settings.

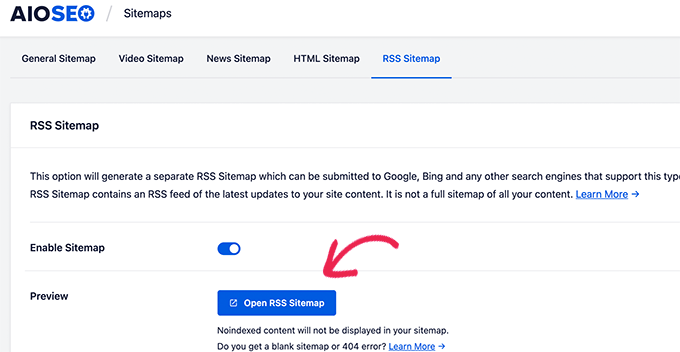
You can now click on the Open RSS Sitemap button to copy the URL of your RSS sitemap.

View RSS sitemap

Next, you need to submit your RSS sitemap to Google Search Console. See our step by step tutorial on how to add your WordPress site to Google Search Console.

We hope this article helped you limit posts in your WordPress RSS feed. You may also want to see our guide how to choose the best business VoIP provider and our expert pick of the must have WordPress plugins for your website.

If you liked this article, then please subscribe to our YouTube Channel for WordPress video tutorials. You can also find us on Twitter and Facebook.

The post How to Limit the Number of Posts in WordPress RSS Feed first appeared on WPBeginner.


November 25, 2021 at 04:00PM

Wednesday, November 24, 2021

How to Add a Search Form in a WordPress Post With a Shortcode

Do you want to add a search form to a WordPress post?

Adding a search form to your post or page content is a good way to encourage your visitors to find more content and stay on your website longer.

In this article, we’ll show you how to add a search form in your posts and pages using a WordPress search shortcode.

How to Add Search Form in Your Post with a WordPress Search Shortcode

Why Add a Search Form to Your Posts and Pages?

If a visitor has enjoyed reading a post on your WordPress blog, then they will likely want to read more. Offering a search form in the post will help them find more of your content that they are interested in.

When you make it easy for users to spend more time on your website, you can increase your pageviews and reduce your bounce rate.

Your visitors are also more likely to join your email list, leave a comment, make a purchase, and follow you on social media.

In this tutorial, we’ll show you how to add the standard WordPress search form to your posts. If you want to add a custom search form, then see our step by step guide on how to create a custom WordPress search form.

We’ll show you two methods to add a search form to your posts, and the first is the simplest. Use the links below to jump to the method you’d like to use.

Method 1: Adding a Search Form with a Plugin

The easiest way to add a search form to your posts is by using the SearchWP plugin. It’s the best search plugin for WordPress used by over 30,000 sites.

Setting Up SearchWP

The first thing you need to do is install and activate the plugin. For more details, see our step by step guide on how to install a WordPress plugin.

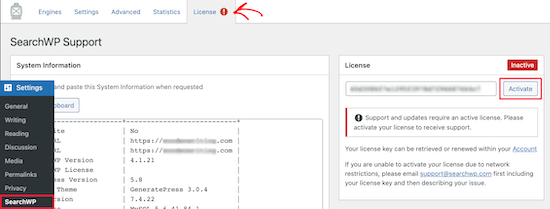
Upon activation, you need to visit the Settings » SearchWP page and then click on the ‘License’ menu option.

Enter SearchWP license key

You then need to enter your license key in the License box. You can find this information in your account on the SearchWP website. After that, you should click the Activate button.

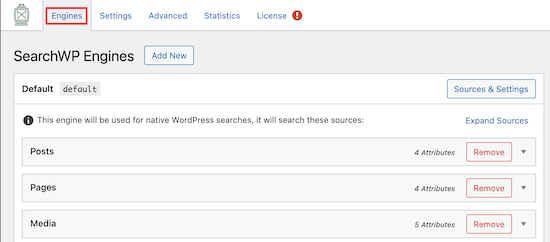
Next, you need to click on the Engines menu option. This brings you to a screen where you can choose your search engine settings.

SearchWP engines settings

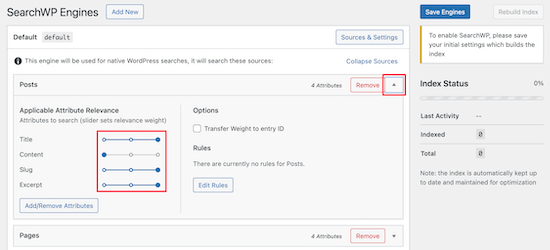
Here you need to create a site-wide search engine. You can adjust your search engine settings by clicking on the Posts, Pages and Media drop downs.

The Attribute Relevance sliders in each section adjust how the search engines value and rank content. For example, if you want to value the post title higher than the content, then you can adjust the sliders accordingly.

Adjust SearchWP slider settings

After you’ve finished adjusting the settings, make sure to click the ‘Save Engines’ button to save the default search engine.

Adding a Search Form to a Post

Now you need to download the SearchWP shortcodes extension to easily add your new custom post search form to WordPress.

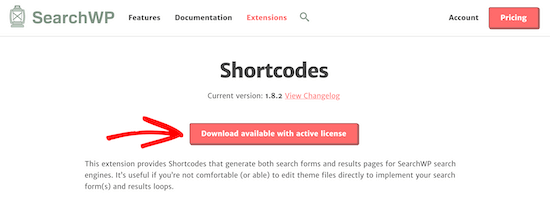
You’ll need to visit the SearchWP Shortcodes Extension website and then click the ‘Download available with active license’ button.

Download SearchWP Shortcodes extension

After that, you need to install and activate the extension the same way you installed the plugin above. Now you can add a search form in your posts.

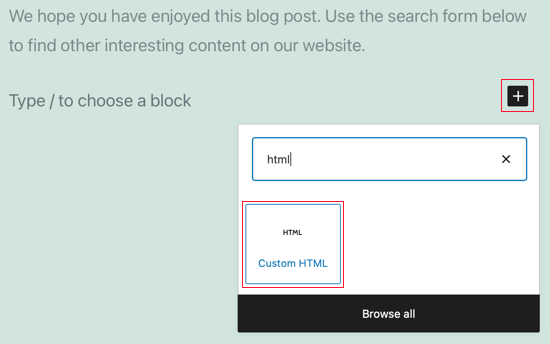
Simply edit the post and place your cursor where you want to add the search form. After that, click the plus ‘Add Block’ icon to bring up the blocks menu.

Insert a Custom HTML Block

Next, type ‘html’ into the search box. Then, select the ‘Custom HTML’ block.

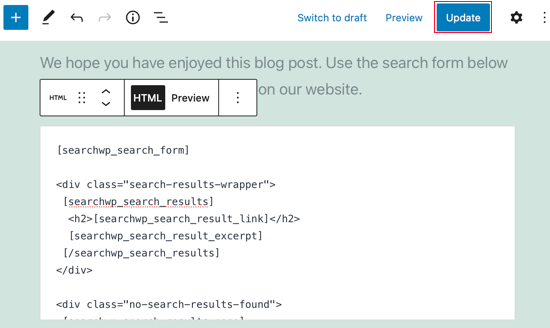
Once you’ve added the new block, you can add the following shortcodes and HTML to your page. If you need more help, then see our guide on how to add a shortcode in WordPress.

[searchwp_search_form]
   
<div class="search-results-wrapper">
 [searchwp_search_results]
  <h2>[searchwp_search_result_link]</h2>
  [searchwp_search_result_excerpt]
 [/searchwp_search_results]
</div>
   
<div class="no-search-results-found">
 [searchwp_search_results_none]
 No results found, please search again.
 [/searchwp_search_results_none]
</div>
   
<div class="search-results-pagination">
 [searchwp_search_results_pagination direction="prev" link_text="Previous"]
 [searchwp_search_results_pagination direction="next" link_text="Next"]
</div>

This code will add a search form to the post, create a section to display the search results, show a no results message if necessary, and add pagination if the results go into multiple pages.

Make sure you click Publish or Update to save your post and make it live.

Click Publish or Update to Save Your Post

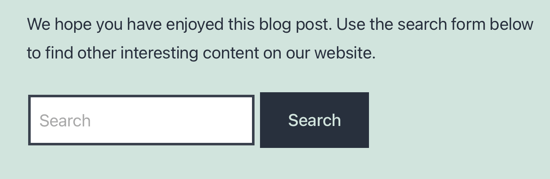
To see the search form in action, simply view the post on your WordPress website. This is how it looks on our demo site running the Twenty Twenty-One theme.

SearchWP Form Preview

For more tips on customizing your search, see our guide on how to improve WordPress search with SearchWP.

Method 2: Adding a Search Form Using Code

You can also add a search form to your WordPress posts by use of a code snippet. This method is not recommended for beginners, so if you’re not familiar with code, then you should use Method 1 instead.

In this method you will have to edit your theme’s functions.php file.

If you have not edited the functions.php file before, then take a look at our beginner’s guide on pasting snippets from the web into WordPress.

All you have to do is open your theme’s functions.php file or a site-specific plugin and paste the following code:

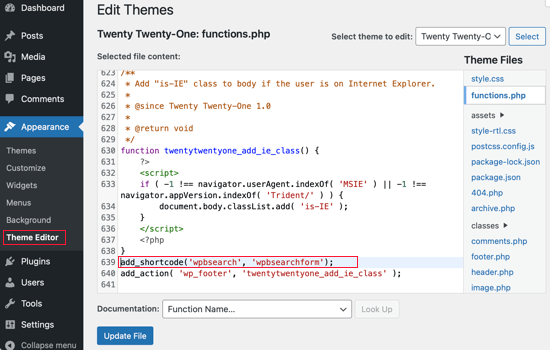
add_shortcode('wpbsearch', 'get_search_form');

Here is how it looks on our demo website when using the WordPress Theme Editor to add the snippet to the Twenty Twenty-One theme’s functions.php file.

Editing functions.php in the Theme Editor

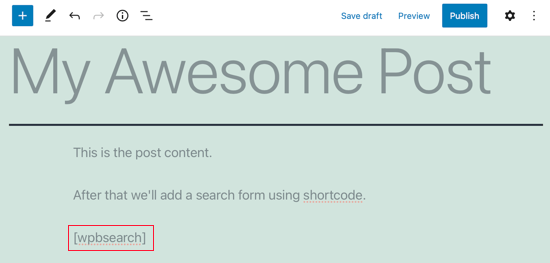
After that, you simply add the shortcode [wpbsearch] to the post or page where you would like the search form to appear.

Search Form Shortcode

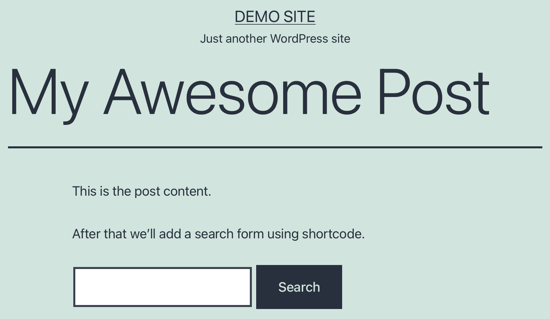
This will display the default search form. To see the search form, simply view the post on your WordPress website.

Search Form Preview

If you would like to display a custom search form, then you should use this code instead.

function wpbsearchform( $form ) {
  
    $form = '<form role="search" method="get" id="searchform" action="' . home_url( '/' ) . '" >
    <div><label class="screen-reader-text" for="s">' . __('Search for:') . '</label>
    <input type="text" value="' . get_search_query() . '" name="s" id="s" />
    <input type="submit" id="searchsubmit" value="'. esc_attr__('Search') .'" />
    </div>
    </form>';
  
    return $form;
}
  
add_shortcode('wpbsearch', 'wpbsearchform');

Feel free to modify the code to customize the search form as you would like.

We hope this tutorial helped you learn how to add a search for in your post with a WordPress search shortcode.

You may also want to learn how to create a free business email address, or check out our list of reasons why you should use WordPress for your website.

If you liked this article, then please subscribe to our YouTube Channel for WordPress video tutorials. You can also find us on Twitter and Facebook.

The post How to Add a Search Form in a WordPress Post With a Shortcode first appeared on WPBeginner.


November 24, 2021 at 03:39PM