Thursday, December 2, 2021

How to Do an SEO Competitor Analysis in WordPress

Are you wondering what strategies your competitors are using to grow their organic traffic?

Conducting an SEO competitor analysis can uncover a world of information. Instead of guessing which keywords to target or links to build, you can see what your competitors are doing and skyrocket your site’s SEO.

In this article, we’ll show you how to do an SEO competitor analysis in WordPress.

How to do SEO Competitor Analysis in WordPress

Why Should You Perform an SEO Competitor Analysis?

Getting your WordPress SEO strategy right can be tricky, especially if you don’t know which type of content to create, which search terms to focus on, and which backlinks to build.

This is where looking at what your competitors are doing can help you out.

By performing a competitor analysis, you can see what’s working for others and how they can attract organic visitors to their website.

Building on the success of these strategies, you can grow your WordPress site’s organic traffic and outrank your competitors for different keywords.

There are multiple ways to perform a competitor analysis. You can use a WordPress plugin like All in One SEO (AIOSEO) to do an SEO competitor analysis inside your WordPress dashboard or use an SEO tool.

We’ll cover both these methods in our guide, so you can jump ahead to any section you prefer:

Method 1. Perform an SEO Competitor Analysis using AIOSEO

The easiest way to conduct an SEO competitor analysis in WordPress is by using the All in One SEO (AIOSEO) plugin. It is the best SEO tool for WordPress and is trusted by over 3 million businesses.

AIOSEO makes it super easy to optimize your site for search engines without the need to hire an expert or any technical knowledge.

The plugin offers an SEO Analysis tool that you can use to identify what your competitors are doing to grow their organic traffic.

For this tutorial, we’ll be using the AIOSEO free version as it includes the SEO Analysis tool. There is also a premium version of AIOSEO that offers more features like sitemap tools, redirection manager, schema markup, robots.txt editor, and more.

The first thing you’ll need to do is install and activate the AIOSEO plugin on your website. For more details, please follow our guide on how to install a WordPress plugin.

Upon activation, the plugin will automatically launch its setup wizard. You can go ahead and click the ‘Let’s Get Started’ button to continue.
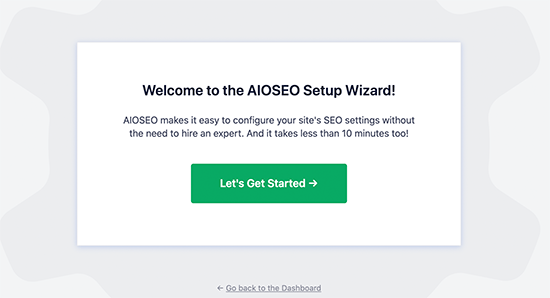
All in One SEO set up wizard

For detailed instructions on AIOSEO setup, please refer to our tutorial on how to setup All in One SEO for WordPress.

Next, you can head over to All in One SEO » SEO Analysis from your WordPress dashboard and then go to the ‘Analyze Competitor Site’ tab.

After that, you can enter the URL of your competitor’s site and click the ‘Analyze’ button.
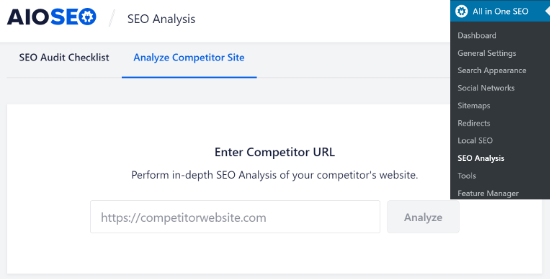
AIOSEO Analyze Competitor Site

AIOSEO will show you an overall score of your competitor’s website along with a preview of the meta title and meta description that appears in the search results.

You can also view the keywords your competitor is targeting on their site. This information is helpful, as you can get clues about different search terms to focus on your own website and improve your rankings.
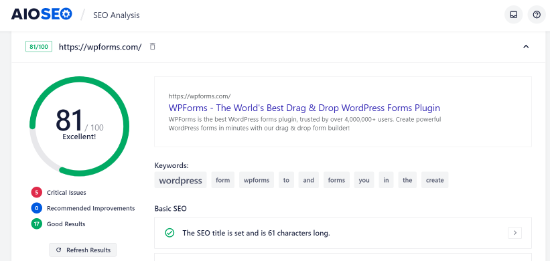
Competitor Site Score

Next, AIOSEO will analyze your competitor’s site on different parameters. It will highlight critical issues along with things that are working well on their website.

You can start with the ‘Basic SEO’ section and view the SEO title and meta description along with their character length.

The plugin also shows the keywords used in the meta tags, H1 and H2 tags, whether your competitor uses image alt attributes, and the total number of internal and external links found on the page.
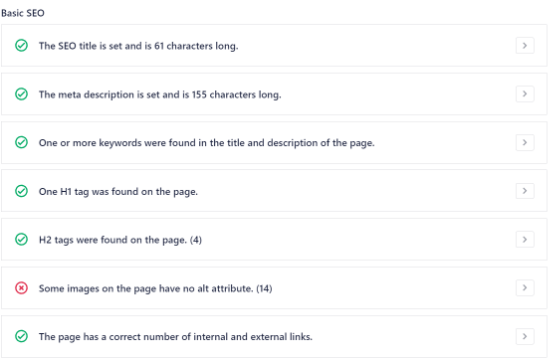
Basic SEO Competitor Analysis

Now, using the data from the Basic SEO section, you can compare it with your website and find areas for improving your rankings and organic traffic.

For example, you can see that your competitor has missing image alt attributes. Image alt text helps search engines understand an image and rank them in the image search results.

You can capitalize on this opportunity and use alt attributes to optimize images on your site. This way, you can attract more visitors to your site by grabbing top rankings in the image search results.

After that, you can scroll down to the ‘Advanced SEO’ section.

Under this section, you can find out if a competitor uses a canonical link tag, if a page contains any noindex header or meta tag, and if the www and non-www versions of the URL redirect to the same site.
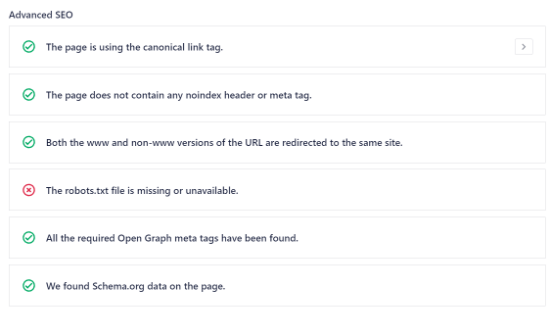
Advanced SEO section

Besides that, AIOSEO will also show whether your competitor is using a robotx.txt file to improve their site’s crawling and indexing or using schema markeup to display additional information in the search results.

By comparing your website on these parameters, you can find out which areas to focus on and outrank your competitor.

Next, go ahead and view the ‘Performance’ section in the AIOSEO SEO Analysis tool. In this section, the plugin will analyze your competitor and show what they’re doing to speed up their site or eCommerce store.
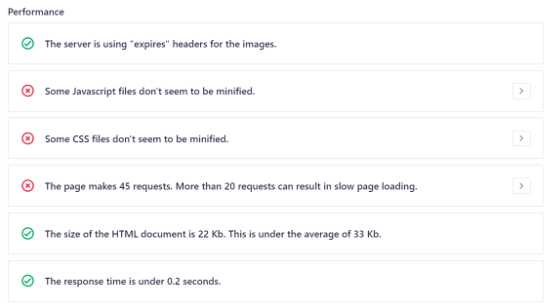
Performance competitor analysis

Your website speed is critical for SEO success. That’s because Google now uses page load time as a ranking factor. If you can make your site load quicker than your competitor, then you can gain a significant advantage in terms of search engine rankings.

For more tips on how to speed up your website, check out our guide to boost WordPress speed and performance.

Lastly, you can view the ‘Security’ section in the AIOSEO.
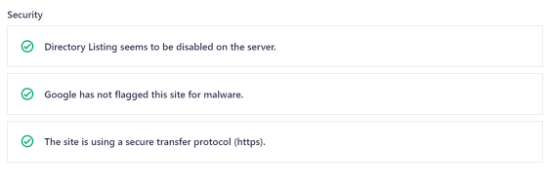
Security parameters for competitor analysis

Under this section, the plugin checks if the competitor has disabled directory listings on the server. By disabling directory listings on a server, you can protect your sensitive information from falling into the hands of malicious hackers.

You can go through our guide on WordPress security for more tips and tricks to secure your website and gain a competitive advantage.

Besides that, AIOSEO will also analyze your competitor and look for malware that Google would flag. If Google detects that your site has malware or harmful programs, then it would lower your search engine rankings.

Another important thing that the plugin checks is if your competitor is using HTTPS. Search engines give priority to sites that use HTTPS over sites using HTTP.

If you’re still using HTTP, then check out our guide on how to get a free SSL certificate for your WordPress website.

Method 2. Perform an SEO Competitor Analysis using Semrush

Another way you can conduct SEO competitor analysis is by using an SEO tool like Semrush.

It’s one of the most popular SEO checker and website analyzer tools in the market and is used by professional SEO experts, bloggers, marketers, online store owners, and businesses of all sizes.

Semrush offers a powerful competitor analysis tool that helps you uncover keywords they’re using, their backlinks, top content, and much more.

You can start by heading over to the ‘Domain Overview’ section under Competitive Research in the menu on your left. After that, simply enter the URL of your competitor and click the ‘Search’ button.
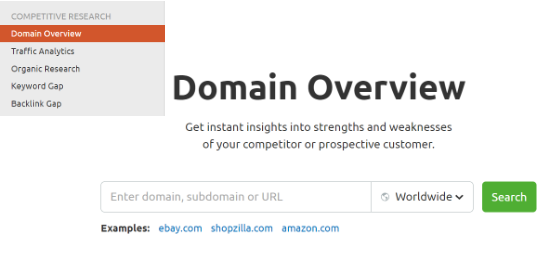
Domain overview in Semrush

Semrush will now give you an overview of your competitor’s website. You can view its authority score, organic search traffic for the current month, paid search traffic, backlinks, and display advertising.

It will also show you which country contributes to the most significant traffic share, along with a monthly breakdown of organic traffic.
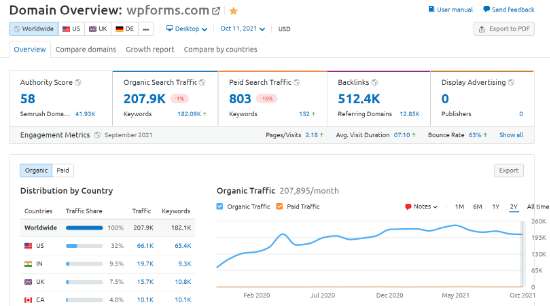
Domain stats in Semrush

Besides that, you can also view other reports in the Domain Overview section, such as the number of SERP features, top organic keywords, organic position distribution, main organic competitors, top paid keywords, and much more.

The best part about using Semrush is that it lets you view each of these reports in more details, so you can get insights into your competitor’s SEO strategies.

You can use the Domain Overview report to see how your competitor is performing at a glance. Using the information from these reports, you can set goals for your website and identify areas for improvement.

For more detailed analysis, you can go to the ‘Traffic Analytics’ section from the menu on your left. In this section, Semrush gives you a detailed breakdown of your competitor’s traffic sources.

To start, view the total visits, unique visitors, average visit duration, and bounce rate.
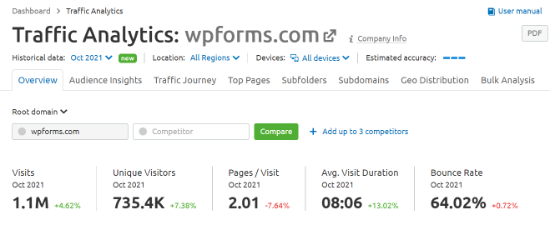
Traffic analytics for your competitor

If you scroll down, you can identify the top traffic sources and see which source attracts a lot of visitors.

For example, if the competitor is getting many users from social media and you aren’t, then you can look for ways to boost traffic from social platforms.
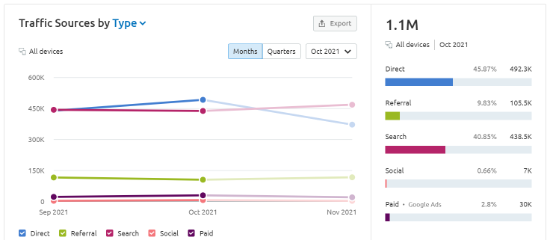
Traffic sources in Semrush

After that, you can head over to the ‘Organic Research’ section from the menu on your left.

Under this section, you can discover your competitor’s top keywords, position changes, top pages, search engine page results (SERP) features like featured snippets, and more.
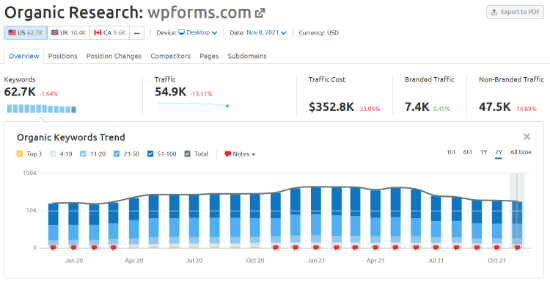
Organic research

To start, you can view the Top Organic Keywords to see which search terms users are using to find your competitor’s website.

Semrush shows the position of the search term, it’s search intent whether the keyword is informational or transactional, total volume, and more.

Now, this is extremely useful information for boosting your WordPress SEO. It helps find new keywords to target on your website, identify opportunities to capture SERP features, and come up with new content ideas.

For instance, you get to see the most important pages that drive the most organic traffic for your competitor. Once you’ve identified them, you can then cover similar topics on your own site.
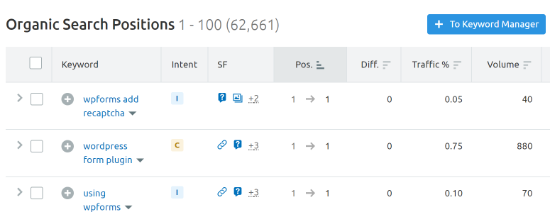
Top keywords reports

Next, you can head over to the Keyword Gap section from the menu on your left and get more insights about the search terms used by your competitors.

Semrush allows you to enter up to 5 domains in the Keyword Gap tool. You can start by entering your website, your competitor’s websites, selecting the Organic keywords option, and then clicking the ‘Compare’ button.
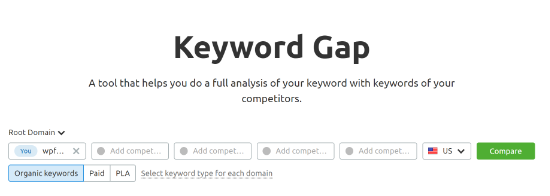
Keyword gap tool in Semrush

After that, Semrush will show a list of keywords that are shared between you and your competitors. The key here is to look at the ‘Missing’ keywords report.

These are search terms that are missing from your website but are being used by your competitor. It provides an excellent opportunity to find new keywords to use on your website and grow your organic traffic.
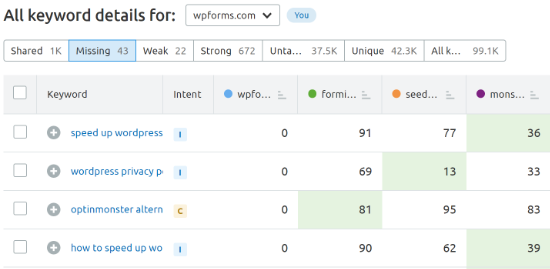
Missing keywords to target

Aside from keywords, you can also identify backlinks using Semrush. Backlinks or referring domains are an important Google ranking factor, and they provide a vote of confidence for your site.

Since backlinks positively impact your site’s SEO, it’s important to find out where your competitors are getting their backlinks from. Then using the data, you can also try to get backlinks for your site.

To start, you can go to the ‘Backlink Gap’ section, enter up to 5 competitor websites, and then click the ‘Find prospects’ button.
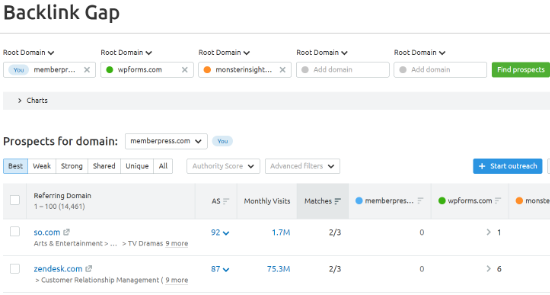
Backlink gap tool in Semrush

Semrush will show a list of referring domains that are linking to your competitors. Next, you can select a competitor from the ‘Prospects for domain’ dropdown menu.

After that, you can filter the referring domains by best, weak, strong, shared, and unique. To uncover backlinks that only point to your competitor and not you, go ahead and select the ‘Best’ option.

This way, you’ll find new opportunities to get more backlinks for your site and boost your keyword rankings.

Another way you can use Semrush to capture backlinks from your competitors is by looking for lost links.

Simply go to the ‘Backlink Analytics’ section from the menu on your left. Then enter the website URL of your competitor and click the ‘Analyze’ button.
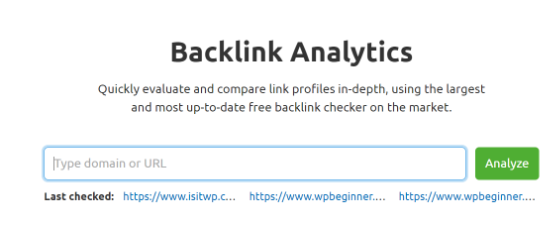
Backlink analytics section

Next, you can go to the ‘Backlinks’ tab and select ‘Lost’ from the available filters. Semrush will display all the backlinks of your competitor that no longer exist.

This provides a great opportunity for you to get more backlinks. You can pitch your own blog post or landing page to replace the lost backlink to referring site.
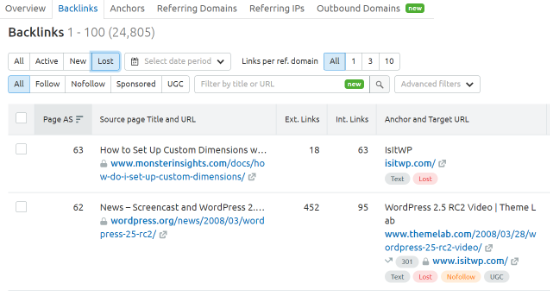
Look for lost backlinks

We hope this article helped you learn how to do an SEO competitor analysis in WordPress. You may also want to check out our guide on best managed WordPress hosting and how to move WordPress from HTTP to HTTPS.

If you liked this article, then please subscribe to our YouTube Channel for WordPress video tutorials. You can also find us on Twitter and Facebook.

The post How to Do an SEO Competitor Analysis in WordPress first appeared on WPBeginner.


December 02, 2021 at 05:00PM
Wednesday, December 1, 2021

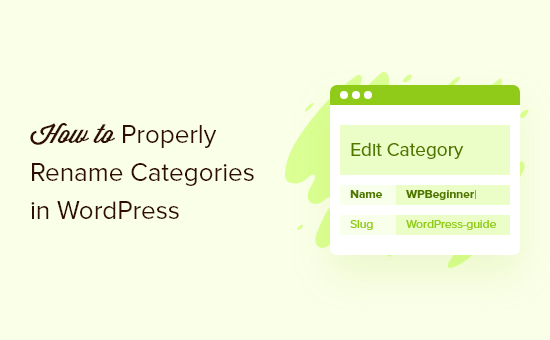
How to Properly Rename Categories in WordPress (Beginner’s Guide)

Do you need to rename some categories on your WordPress site?

As your site grows, you might need to change the name of some of your categories or merge them with other categories.

In this article, we will show you how to properly rename categories in WordPress without affecting your SEO strategies.

How to Properly Rename Categories in WordPress

Why Rename Categories in WordPress?

If you’ve recently created a WordPress website, then creating a good organizational structure will make it easier for your visitors to find your content and can help your site rank higher in search engine results pages.

That’s why WordPress offers categories and tags. You can learn how to organize your content effectively in our guide on best practices for categories and tags.

As you add more content, you may wish to improve the way you organize your posts, and you may decide to rename some of your categories.

Let’s have a look at how to properly rename categories in WordPress.

How to Properly Rename Categories in WordPress

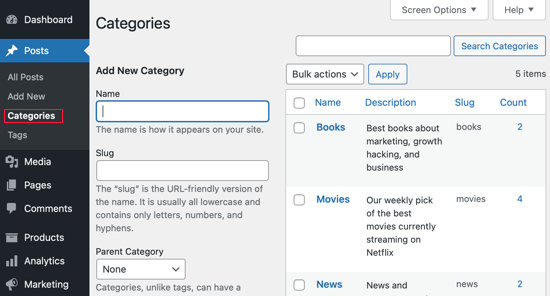
You will find the WordPress category management area by visiting Posts » Categories. On this page, you can manage WordPress categories, edit existing categories, and delete unwanted categories.

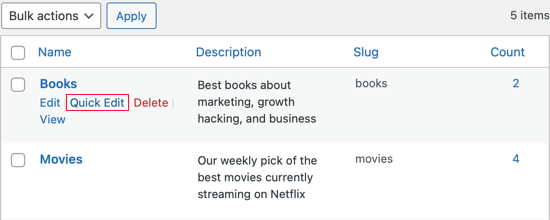
There are two ways to rename categories. The first is to click the ‘Quick Edit’ link under the category you wish to rename.

Click the Quick Edit Link

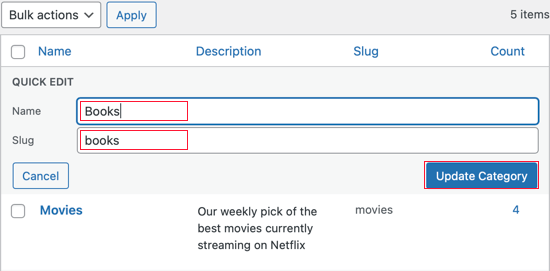
The Quick Edit metabox will now be displayed. Here you can quickly change the name of the category.

You can also change the category’s slug, which determines the URL of the category page. For example, if the slug is ‘books’, then the category page URL will be:

https://example.com/category/books
The Quick Edit Metabox Will Now Be Displayed

Editor’s Note: You don’t have to change the slug if you’re only making a minor name change, but if you do, then you must set up a 301 redirect. We will show you how to do that later in this article.

Make sure you click the Update Category button when you’re finished.

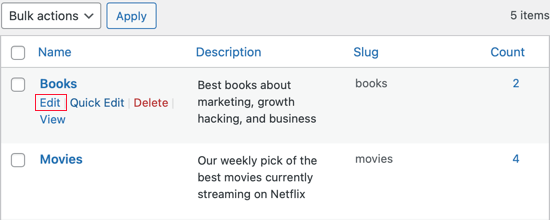
The second way to rename a category also allows you to add a description of the category. To do this, you will need to click the ‘Edit’ link under the category you wish to rename.

Click the Edit Link Under the Category You Wish to Rename

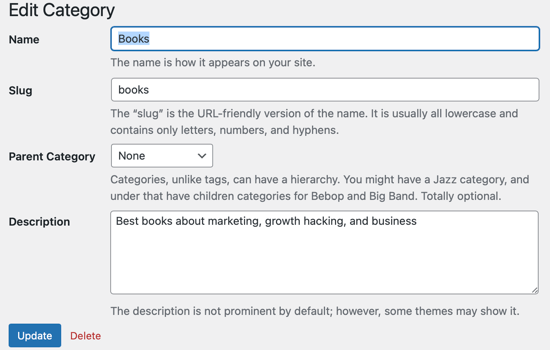
This will take you to the category edit page. Here you can change the category name, slug and description.

Category Edit Screen

The category edit page also lets you choose a parent category. You can learn more in our guide on how to add subcategories in WordPress.

Changing the Category Prefix

WordPress also allows you to change the /category/ prefix in category URLs. This is called the category base.

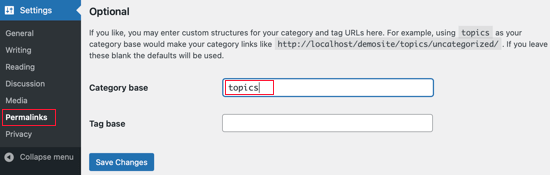
To change it, go to Settings » Permalinks and scroll down to ‘Optional’. There you will see a form to change category base and tag base.

WordPress Also Allows You to Change the Category Prefix in Category URLs

The default category base is ‘category’. Here, you can change it to anything you like, such as ‘topics’.

This would change the URL from http://www.example.com/category/your-category-slug/ to http://www.example.com/topics/your-category-slug/.

Merging and Bulk Editing Categories

As your site grows, you may decide to simplify your organizational structure and merge several categories into one.

This is useful if you find that you have a few categories that are very similar. By combining them into a single category, you will make your WordPress site less complex and easier to navigate.

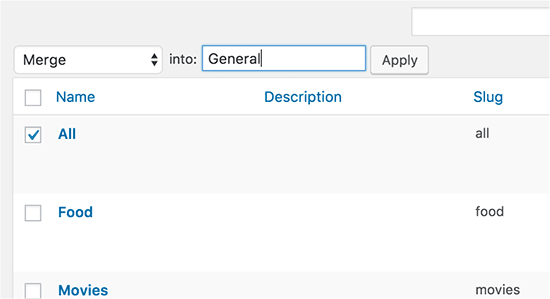
To learn how, check our guide on how to merge and bulk edit your categories and tags.

Merge categories, tags, or terms in custom taxonomies

Redirecting Users to the New Category URL

If you changed the category’s slug, then the URL to the category page has changed and the old URL will no longer work.

Luckily, if you added that category to your WordPress menu, then WordPress will automatically update the menu to reflect your changes.

But when users or search engines try to use the old category URL, it will no longer work. Instead, they will see a 404 Page Not Found error message.

These 404 errors create a bad user experience which can lead to a drop in search engine rankings and lower eCommerce sales.

To avoid this, you will have to set up a redirection from the old URL to the new one. Learn how to do this using our tutorial on how to track 404 pages and redirect them in WordPress.

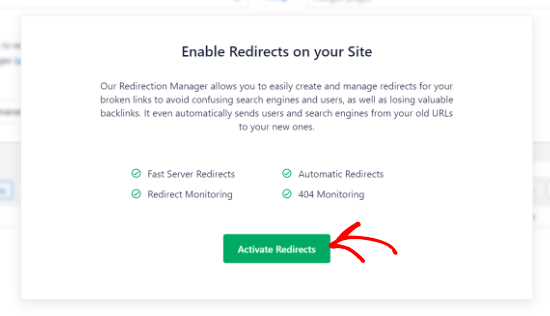
Activate redirects in AIOSEO

It’s extremely important that you set up the 301 redirect using AIOSEO otherwise changing the category URLs could negatively impact your website search rankings.

We hope this tutorial helped you learn how to properly rename categories in WordPress. You may also want to learn how to improve your site’s SEO, or check out list of must have plugins to grow your website.

If you liked this article, then please subscribe to our YouTube Channel for WordPress video tutorials. You can also find us on Twitter and Facebook.

The post How to Properly Rename Categories in WordPress (Beginner’s Guide) first appeared on WPBeginner.


December 01, 2021 at 01:15PM

Tuesday, November 30, 2021

How to Clear Your Cache in WordPress (Step by Step)

Recently, one of our readers asked us how to clear cache in WordPress?

Your web browser, hosting server, and caching plugins can all serve cached content which can make it difficult for you to see the changes you made to your website right away.

Clearing your WordPress cache is also the first troubleshooting advice that you’ll often hear.

In this article, we will show you how to properly clear the cache in WordPress. We’ll cover browser cache, web hosting cache, and top WordPress caching plugins in this guide.

How to clear your cache in WordPress (4 ways)

What is Caching in WordPress?

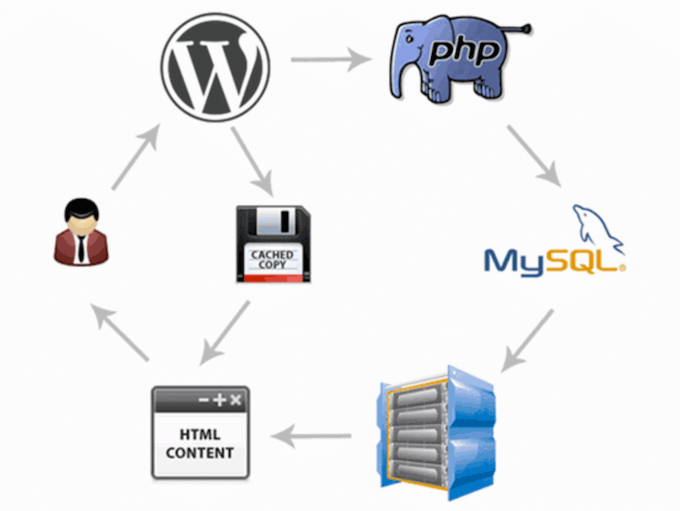
Caching solutions will store static versions of your website in a cache. This allows WordPress to skip running heavier PHP scripts every time your site loads.

The caching process helps to improve WordPress speed and performance, and the overall user experience.

Here’s an example of what the caching process looks like:

How caching works in WordPress

There are several different types of caching solutions available for WordPress. The most popular method is using a WordPress caching plugin like WP Rocket or WP Super Cache.

These plugins give you control over what files and media are cached, when the cache expires, when the cache is cleaned up, and more.

Depending on your hosting provider, you might already have WordPress caching built in. For example, managed WordPress hosting companies like WP Engine run their own caching solutions.

Popular WordPress hosts like Bluehost and SiteGround also have built in caching for their users.

If you’re using a web application firewall like Sucuri or Cloudflare to improve your WordPress security, then there’s also a cache to speed up your site and reduce downtime.

Finally, most modern web browsers will also store cached versions of pages on your web browser.

Why Clear Your WordPress Website Cache?

Sometimes the cache won’t realize that changes have been made to your WordPress website. Instead of loading the new version of your site, you’ll be stuck seeing an old version.

This will prevent both you and your visitors from seeing any updates you’ve made.

Clearing your WordPress cache ensures the most recent version of your website will always be live.

With that said, let’s take a look at how to clear your browser cache in WordPress. Simply use the quick links below to jump straight to the method you want to use.

Video Tutorial

If you prefer written instructions, then please continue reading.

Method 1: Clear Your Web Browser Cache

First, you need to clear your web browser cache. Most web browsers store static website content like stylesheets, JavaScript, images, and other website files to improve loading speeds.

But sometimes, web browsers may fail to realize a web page has changed. Instead of fetching a fresh copy, they’ll load the page from the cached version stored in your browser.

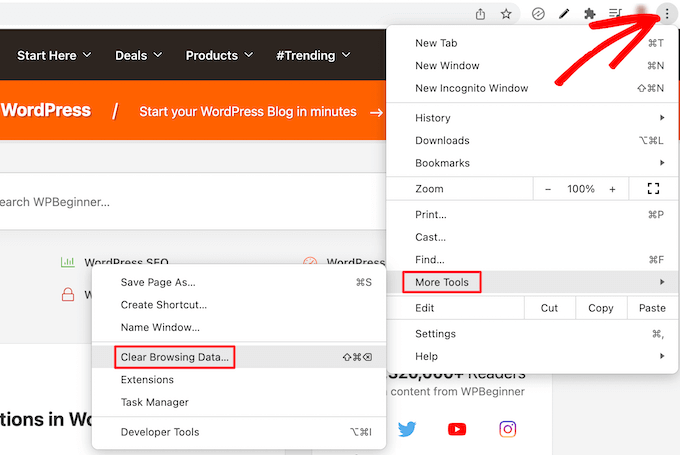
To clear your browser cache in Google Chrome, click on the menu icon, then select More Tools » Clear Browsing Data.

Clear browser cache

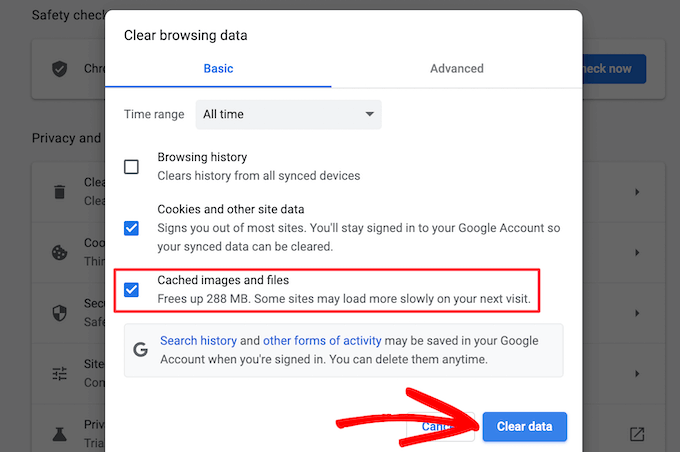
This brings up a popup where you can select the content you want to remove from the cache.

Make sure the ‘Cached images and file’ box is checked, then click the ‘Clear browsing data’ button.

Clear cached images and files

Now, you’ve successfully cleared your browser cache. You can visit your WordPress blog to see if it’s loading the new version of your site.

For more details, see our guide on how to clear your browser cache in all major browsers.

If you’re still not seeing the changes you made to your website, then move on to the other methods in this article.

Method 2: Clear Cache in Your WordPress Caching Plugin

If you’re using a WordPress caching plugin on your site, then you need to clear your plugin cache.

Here’s how to clear your cache with some of the most popular WordPress caching plugins.

Clear Cache in WP Rocket

WP Rocket is the best WordPress caching plugin in the market. The best part about using WP Rocket is that it proactively builds your WordPress cache in the background, so your users are always served a cached version of your site.

It also makes it very easy to clear cached files with a single click.

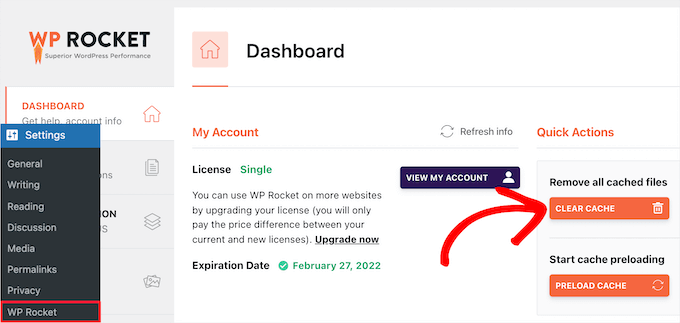
Simply go to the Settings » WP Rocket and click on the ‘Clear Cache’ button in the plugin dashboard.

Clear WP Rocket cache

Now WP Rocket will now clear all of your cached files for you.

Clear Cache in WP Super Cache

WP Super Cache is another popular WordPress caching plugin. It allows you to clear or purge all cached content with a single click.

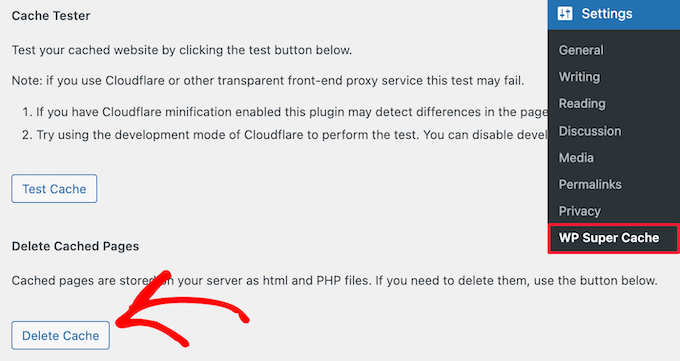
Simply go to Settings » WP Super Cache in your WordPress admin dashboard, and then click the ‘Delete Cache’ button in the ‘Delete Cached Pages’ section.

Clear WP Super Cache

Now, WP Super Cache will delete all of the cached files from your website.

Clear Cache in W3 Total Cache

W3 Total Cache is a widely used WordPress caching plugin. Like the other plugins above, you can clear all caches with a single click.

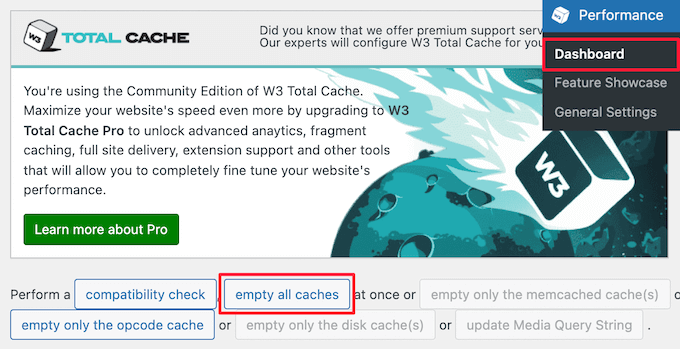
You need to go to Performance » Dashboard and then click on the ‘empty all caches’ button.

Clear W3 Total Cache

W3 Total Cache will now delete all cached content for your site.

Method 3: Clear Cache in Your WordPress Hosting

Some WordPress hosting providers have built in caching options to help speed up WordPress.

Here’s how you can clear your web host cache in some of the most popular WordPress hosts.

Clear Cache in WP Engine

WP Engine is one of the top managed WordPress hosting providers. They have their own built-in caching solution, so users don’t need to install a caching plugin.

If you’ve made changes to your site, but they aren’t showing up, then you can clear the WP Engine cache from your WordPress admin area.

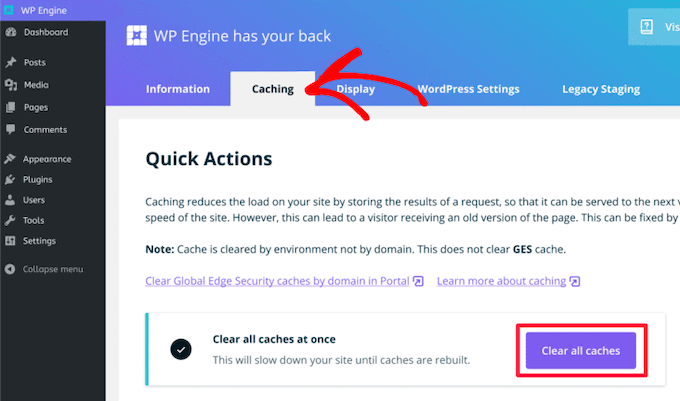
You need to click the ‘WP Engine’ menu item in your WordPress admin bar, select the ‘Caching’ menu option, then click the ‘Clear all caches’ button.

WP Engine clear cache

WP Engine will automatically purge every stored cache for your WordPress site.

Clear Cache in Bluehost

Bluehost is one of the best WordPress hosting providers and is officially recommended by WordPress. They have a built in caching solution that instantly improves your WordPress performance and speed.

Bluehost makes it easy to clear your WordPress cache from your WordPress admin area.

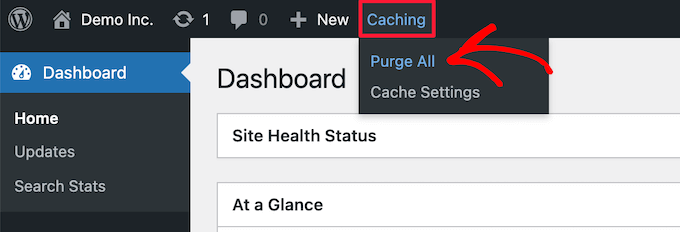
Simply log in to your WordPress admin dashboard, and you’ll see a ‘Caching’ button in the top admin toolbar. Hover over this, then click the ‘Purge All’ option.

Clear Bluehost cache

Bluehost will now clear all files from your WordPress cache.

Clear Cache in SiteGround

SiteGround is a leading WordPress hosting provider that’s known for speed and top-notch customer support. They offer a built-in caching solution to improve your website performance.

You can clear the SiteGround cache from your hosting account control panel as well as the WordPress admin area.

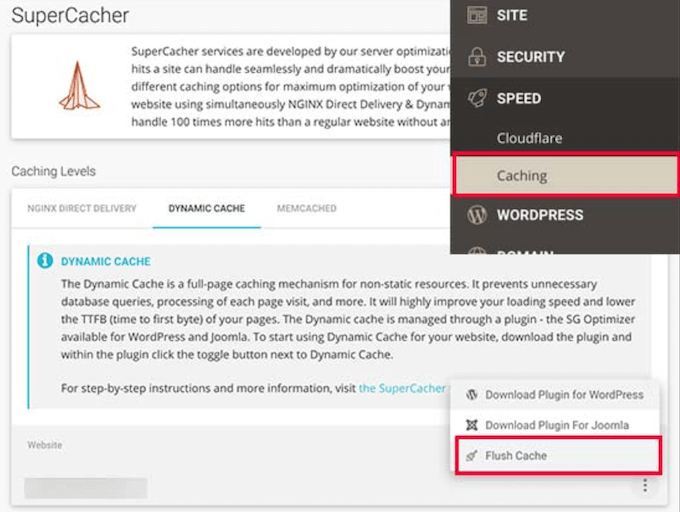
To clear your cache from your Siteground control panel, you need to log in to your hosting account dashboard and go to Speed » Caching under the site tool section.

Then, select the ‘Dynamic Cache’ menu option. Next, click on the menu icon next to your domain name and select the ‘Flush Cache’ option from the drop down.

Clear SiteGround hosting cache

Another way you can manage your Siteground cache is with the SG Optimizer plugin. First thing you need to do is install and activate the plugin. For more details, see our guide on how to install a WordPress plugin.

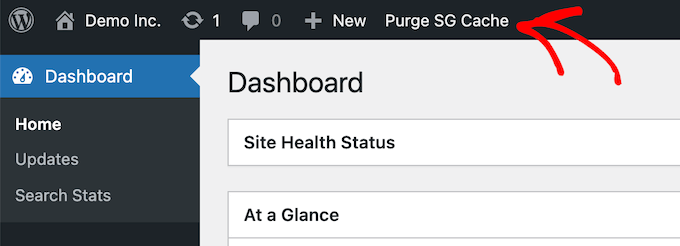
Upon activation, you need to click the ‘Purge SG Cache’ button in your top WordPress admin toolbar.

Purge SG cache

The plugin will automatically clear your SiteGround WordPress cache.

Method 4: Clear Your WordPress Firewall Plugin Cache

If you’re using a WordPress firewall like Sucuri to protect your website, then there’s another layer of caching you’ll need to clear.

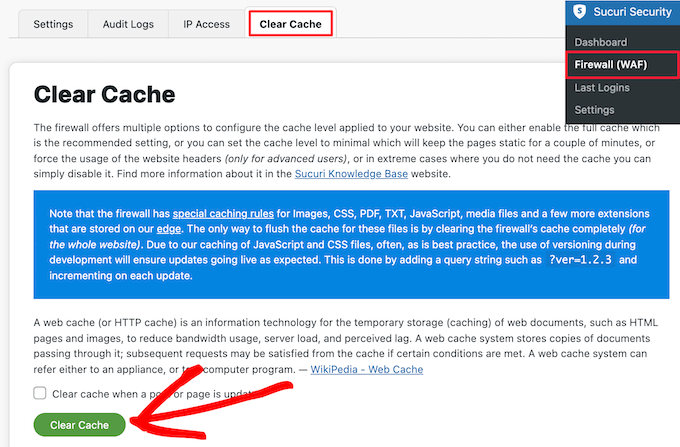
You can clear your Sucuri cache by going to Sucuri » Firewall (WAF) in your WordPress admin panel.

Then, select the ‘Clear Cache’ menu option and then click the ‘Clear Cache’ button.

Clear Sucuri cache

Bonus tip: If you’ve recently moved your WordPress site, then you may also need to clear your DNS cache. This ensures you’re getting updated DNS information and accessing the newest version of your site. For more details, see our guide on how to clear your DNS cache.

We hope this article helped you learn how to clear your cache in WordPress. You may also want to see our step by step guide on how to create an email newsletter and our expert picks of the best live chat software for small businesses.

If you liked this article, then please subscribe to our YouTube Channel for WordPress video tutorials. You can also find us on Twitter and Facebook.

The post How to Clear Your Cache in WordPress (Step by Step) first appeared on WPBeginner.


November 30, 2021 at 11:30PM