Certified WordPress Developer and SEO Specialist with 10+ years of experience on Fiverr. I provide expert solutions for WordPress error fixing, debugging, speed optimization, and security hardening. Services include hacked site recovery, malware removal, on-page SEO optimization, and full customization to ensure your website runs fast, secure, and ranks higher on Google.
Do you need to add custom styling to the first and last items of your WordPress navigation menu?
You could simply add a custom CSS class to the first and last menu items, but if the menu is rearranged, then those items will no longer be first and last.
In this article, we’ll show you how to add a .first and .last class that will style the first and last menu items even if the menu items are reordered.
Why Style the First and Last Navigation Items Differently?
In a past custom design project, we needed to add some custom styling to the navigation menu items of a WordPress website. This design in particular required different styling for the first menu item and the last menu item.
Now we could easily edit the menu and add a custom CSS class to the first and last menu item. But because we were delivering the project to a client, our solution had to work even if they rearranged the order of the menus.
In this tutorial, we’ll show you two ways to style the first and last items of your navigation menu. You can choose your preferred method from the list below:
This creates .first and .last CSS classes for your first and last navigation menu items respectively. You can use those classes to style the menu items.
For this tutorial, we’ll add the following basic CSS formatting to our theme’s style.css stylesheet to simply bold the first and last menu items:
.first a {font-weight: bold;}

.last a {font-weight: bold;}
Here you can see screenshots before and after we added the code to our demo site.
Method 2: Styling First and Last Items Using CSS Selectors
A second way to style the first and last menu items differently is to use CSS selectors. This method is simpler, but it may not work with some older browsers, such as Internet Explorer.
Note that you will need to replace ‘yourmenuid’ with the actual ID of the navigation menu. The selectors ‘first-child’ and ‘last-child’ select an element if it is the first and last child of its parent, which is the navigation menu.
For example, we used this code to bold the first and last navigation menu items on our demo site:
ul#primary-menu-list > li:first-child a {
    font-weight: bold;
}
ul#primary-menu-list > li:last-child a {
    font-weight: bold;
}
We hope this tutorial helped you learn how to add the .first and .last class to WordPress navigation menus.
Do you want your WordPress site to show up in Google News?
Getting your site in Google News can skyrocket your website traffic and help you reach new audiences. It also helps build credibility and authority for your brand.
In this article, we’ll show you how to submit your WordPress site to Google News.
What is Google News?
Introduced in 2002, Google News is a news aggregator that shows the latest news and stories from the last 30 days.
The goal of Google News is to provide recent news update and headlines from around the world. It uses multiple sources to provide content and is available in numerous languages.
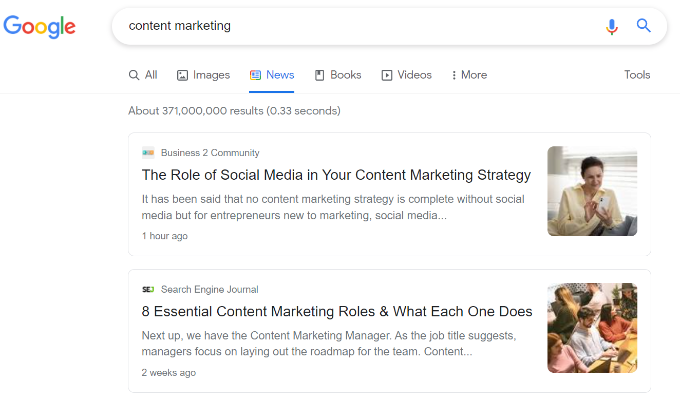
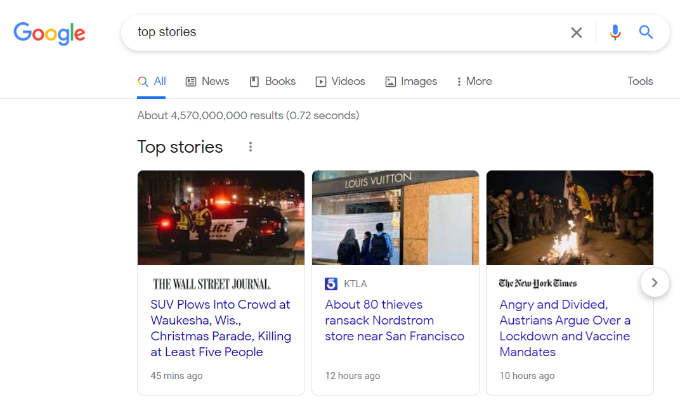
You can view Google News in a dedicated ‘News’ tab in Google when you search for a topic.
Additionally, Google News also appears at the top of the search results under ‘Top stories’ featured snippets.
Why Submit Your WordPress Site to Google News?
Google News is one of the most trusted windows when people look for the latest stories from around the world.
Getting your WordPress site to show up in the Google News section can instantly boost your organic traffic and help you reach new audiences.
It also helps build credibility and authority for your brand because your site will likely be shown next to big brands like The Wall Street Journal, The New York Times, and more. This suggests that your site is trustworthy and offers quality information.
Besides that, getting featured in Google News can have a positive impact on your WordPress SEO. More websites will pick up your content as a source which provides backlinks. As a result, your website rankings will improve for other keywords.
Now that we know the benefits, let’s take a look at the eligibility requirements for being listed in Google News.
Requirements for Being Considered in Google News
Before you can submit your WordPress website to Google News, it’s important that you meet Google News policies.
Google has set specific content guidelines which determine if your content can qualify to appear in the Google News section. If your site doesn’t meet these guidelines, then it will be rejected.
For example, your content shouldn’t be dangerous, deceptive, hateful, or include violence or gore. Similarly, advertisements shouldn’t exceed your content, and you should disclose if your content is sponsored.
Besides that, you’ll need to provide clear dates, author bylines and information about the company or network behind the content.
There are more guidelines that you’ll have to comply with. We recommend following these policies very carefully to avoid your site being rejected for Google News.
That being said, let’s see how you can create a news sitemap for your WordPress, so you can submit it to Google News.
Creating a Google News Sitemap in WordPress
The first thing you’ll need to do is create a Google News sitemap for your website. After setting up a news sitemap, you can then submit your site to Google News.
A sitemap is a file that lists all your website content and helps Google find new articles and display them in the search results. It also makes the search engine bots crawl your site faster and improves the indexing of your content.
It’s important to note that Google News Sitemap is different from the regular XML sitemap. Google News Sitemap only includes news articles, and it allows the search engine to quickly discover content that needs to appear in the news section.
To create a Google News sitemap, we recommend using All in One SEO (AIOSEO). It’s the best WordPress SEO plugin and helps you optimize your site for search engines without hiring an expert or requiring technical knowledge.
We’ll be using the AIOSEO pro version for this tutorial because it includes Google News sitemap and other powerful features like the redirection manager and schema markup. There is also a free version of AIOSEO that you can use to get started, but it doesn’t come with the news sitemap.
After that, you can head over to All in One SEO » Sitemaps from your WordPress dashboard and then navigate to the ‘News Sitemap’ tab.
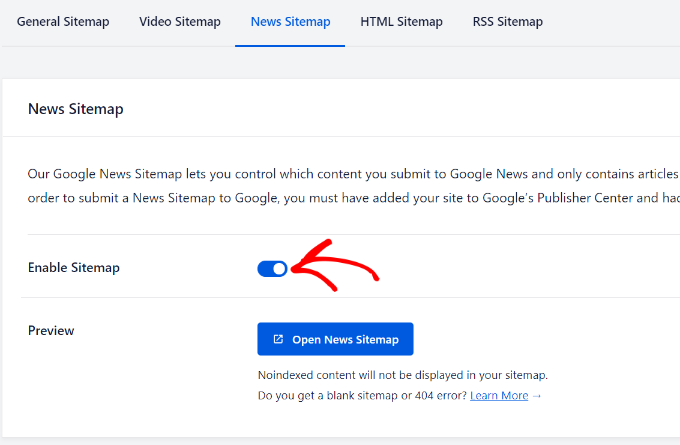
Next, you’ll need to click the ‘Activate News Sitemap’ button.
Once active, make sure that the toggle for ‘Enable Sitemap’ is switched on. There’s also an option to preview your news sitemap.
Next, you can scroll down and edit other settings related to the News sitemap.
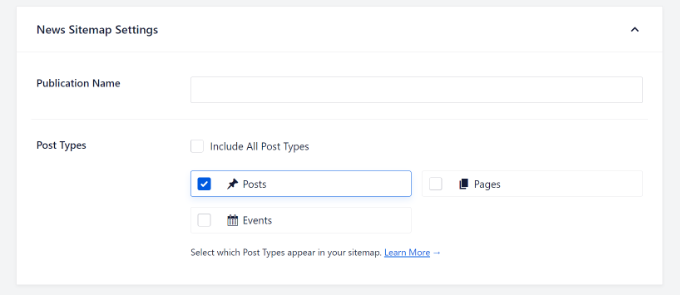
For example, you can add the Publication Name that you entered in the Publisher Center. If you don’t enter a name, then AIOSEO will automatically use your site’s title.
Aside from that, you can select which content to include in the news sitemap under Post Types.
You can include posts, pages, events, or check the box for ‘Include All Post Types’. It’s important to note that the Google News Sitemap will consist of content that’s published in the last 48 hours.
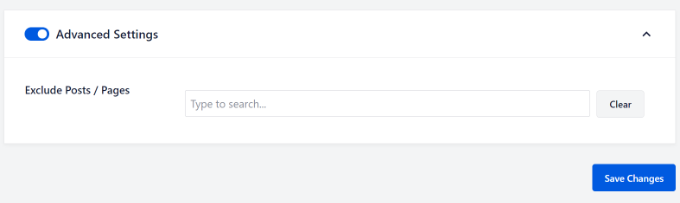
Next, you can click the toggle for ‘Advanced Settings’ and exclude any page or post that you don’t want included in the news sitemap.
Once that’s done, go ahead and click the ‘Save Changes’ button.
AIOSEO will now create a Google News Sitemap for your WordPress website.
Submitting Your WordPress Site to Google News
Once your news sitemap is ready, you can now submit your website to Google News.
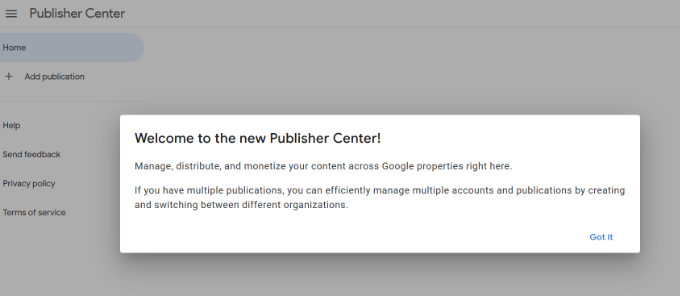
To start, you’ll need to go to the Google Publisher Center website and log in with your Google account.
Once you’re logged in, you’ll see a welcome notice. Simply click the ‘Got it’ button to continue.
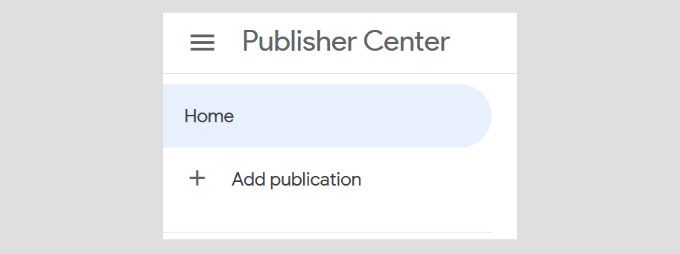
After that, you can click the ‘Add publication’ button from the options given in the menu on your left.
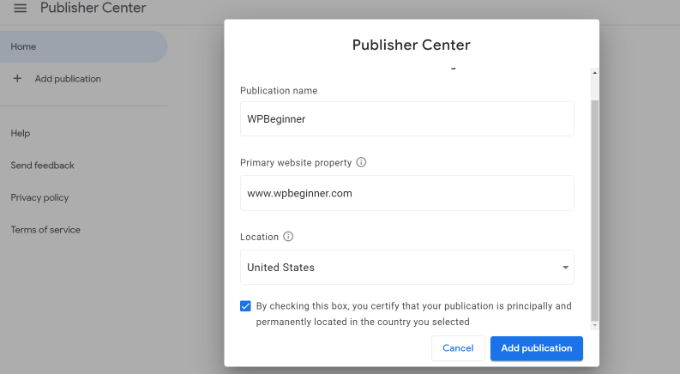
Next, a popup window will appear where you’ll have to enter the name of your WordPress blog, its URL, and select a location.
After entering these details, check the box to certify that your publication is principally and permanently located in the country you’ve selected and click the ‘Add publication’ button.
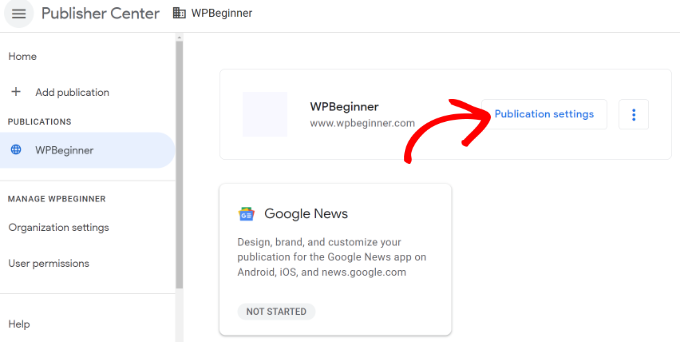
Your publication will now be added to the Publisher Center.
Go ahead and click the ‘Publication settings’ button for your publication.
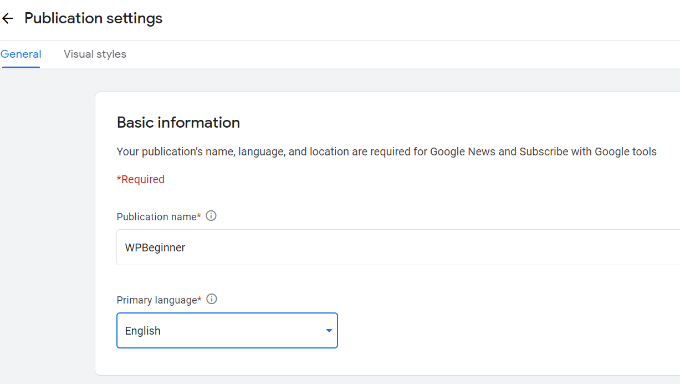
On the next screen, you can edit your Publication name and select a ‘Primary language’ from the dropdown menu under Basic information.
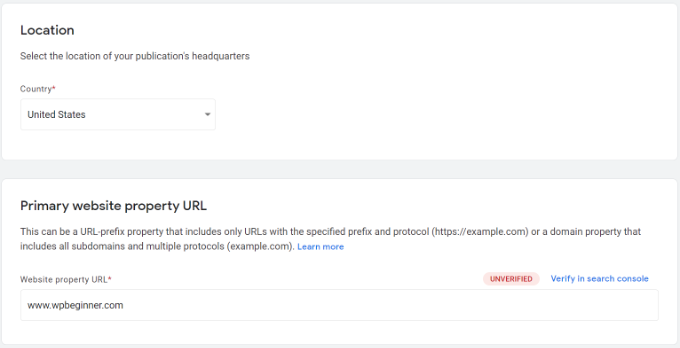
Next, you can scroll down and edit the Location for your publication and the Primary website property URL.
If you haven’t verified your website, then click the ‘Verify in search console’ button. This will open a popup asking you to open the Google Search Console so that you can verify your site’s ownership.
After verifying your publication, you can head back to the Publication Settings and scroll down to view more options.
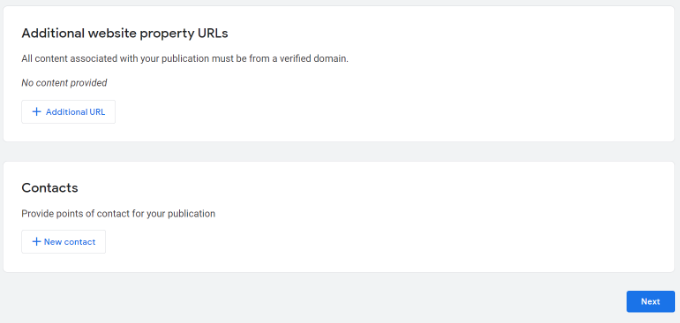
For instance, you can add additional website property URLs. Google News will use these links as a content source. Similarly, you can also add a contact email address for your publication.
Once you’ve added these details, click the ‘Next’ button.
After that, you can add a logo for your publication. Google News offers multiple options for adding a logo for your site.
There is an option to enter a Square logo and a Rectangular logo. Plus, you can also upload custom fonts.
After uploading your logo, simply click the ‘Save’ button at the top and head back to the Publisher Center homepage.
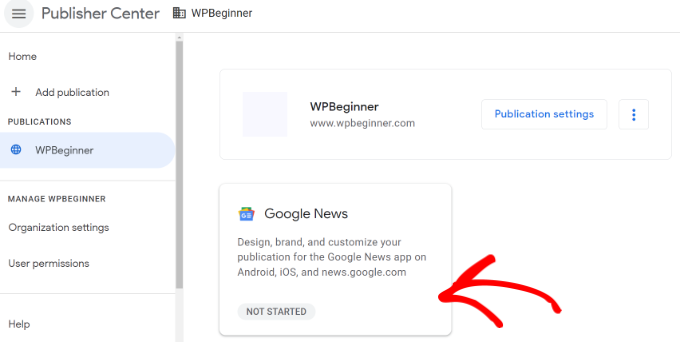
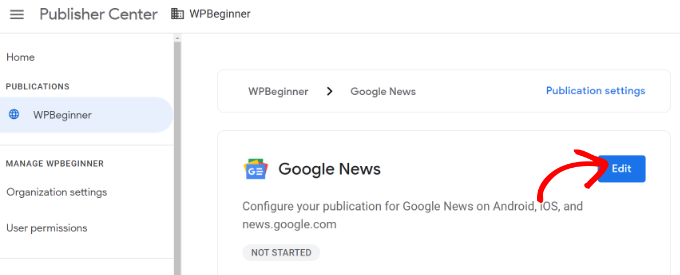
Next, select your publication from the menu on your left and then click the ‘Google News’ box.
Go ahead and click the ‘Edit’ button to configure your site for Google News.
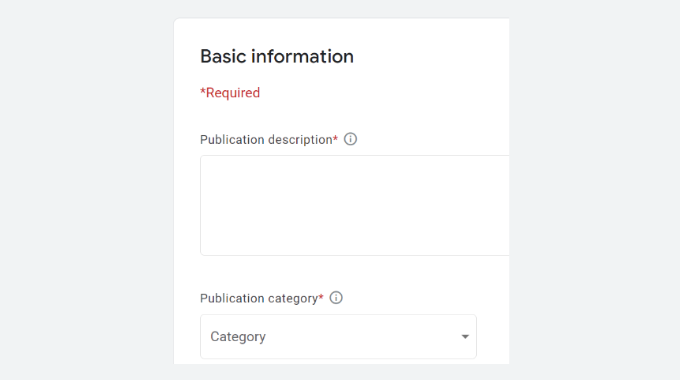
Next, enter Basic information including a Publication description, which acts as a meta description and helps people find your publication. Then you can select a Publication category from the dropdown menu.
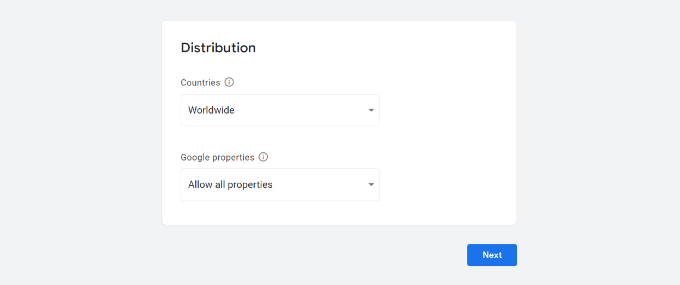
If you scroll down, you’ll see Distribution settings. By default, your content will be available in all countries and other Google products.
However, you can limit your site to appearing in certain regions by allowing and blocking specific countries from the ‘Countries’ dropdown menu. Similarly, you can also change the Google properties settings from the dropdown menu.
Don’t forget to click the ‘Next’ button when you’re done.
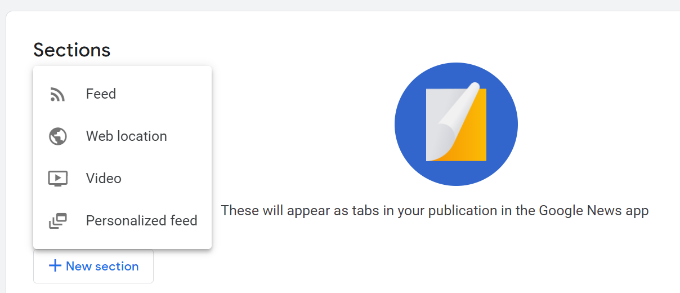
After that, you’ll need to add Sections in Google News, which will appear as tabs. Sections help organize your content in Google News.
For example, you can add videos, web location, feed, or create a personalized feed for your site.
To begin, simply click the ‘+ New section’ button and select an option. For this tutorial, we’ll add a Feed.
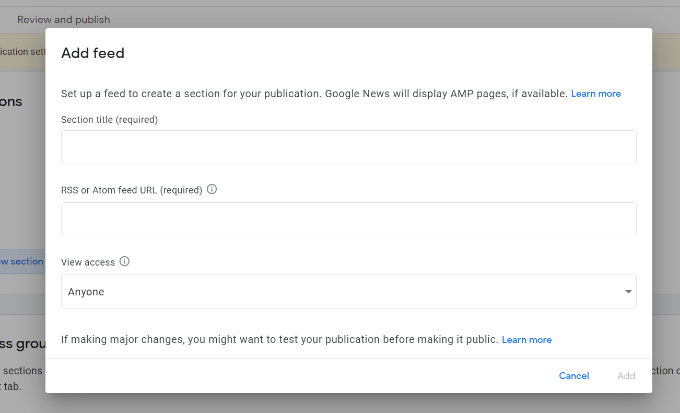
When you select Feed, a popup window will appear.
Go ahead and add a Section title, RSS feed URL that Google News will use as a content source, and choose who can view this section. After entering these details, click the ‘Add’ button.
You can add as many sections as you want to organize your publication in Google News.
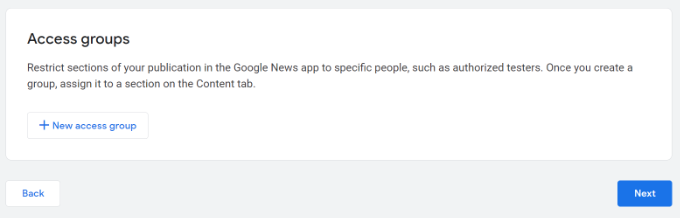
Besides that, you can also restrict certain sections of your publication in the Google News app for specific people under the ‘Access groups’ settings.
When you’re done, don’t forget to click the ‘Next’ button.
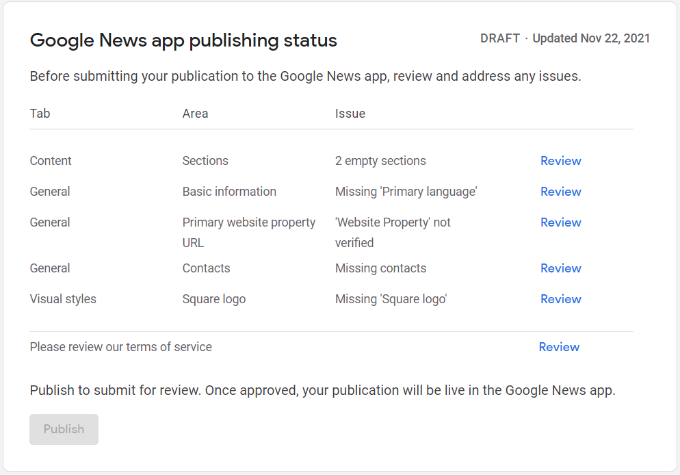
After that, you can review any missing items in ‘Google News app publishing status’ and test your application.
Simply click the ‘Review’ button for any item and see what information is missing or what requirements you haven’t met.
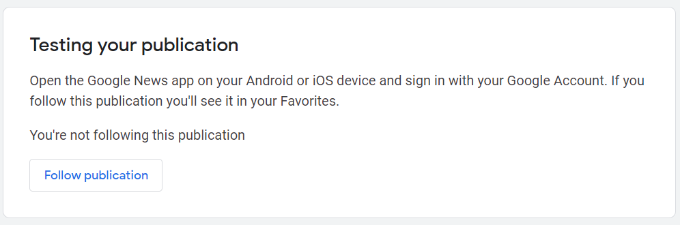
Before submitting your publication, you can scroll down to the ‘Testing your publication’ section click the ‘Follow publication’ button. This will make your site appear under Favorites in the Google News app.
Next, you can go ahead and click the ‘Publish’ button under the Google News app publishing status’ box and sign off on terms of service agreements.
You’ve now successfully submitted your publication for review. It usually takes 2 weeks or more for the review process to complete.
You will provide a much better user experience by customizing these user pages to match your website theme, display your own logo, and offer additional content.
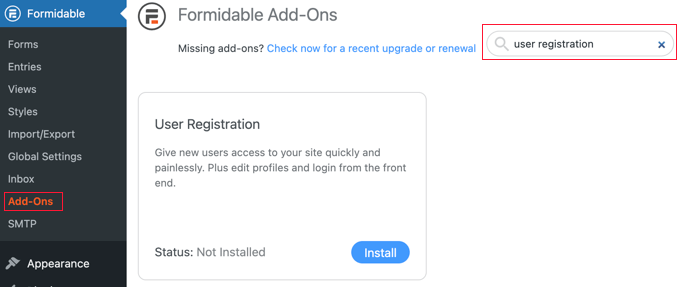
Formidable Forms is the most advanced WordPress form plugin in the market. While there’s a free version, you’ll need a Pro account to be able to create a reset password page.
Upon activation, you need to navigate to the Formidable » Add-Ons page. Here you should search for the User Registration add-on which is required to add a login screen and reset password page to the front end of your website.
Once you’ve found it, simply click the Activate button to enable the add-on.
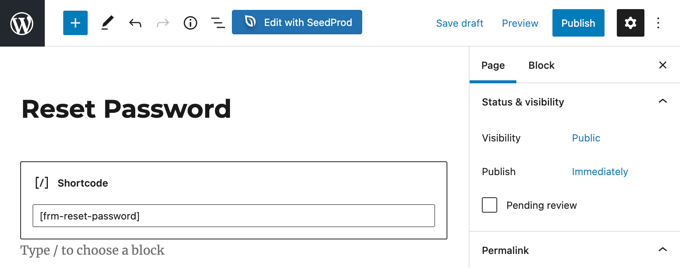
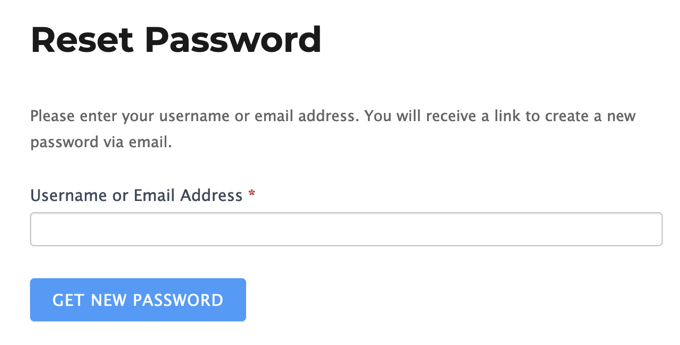
Now you’re ready to create a custom reset password page.
You need to go to Page » Add New to create a new page. Next, you need to give your page a title and then enter the following shortcode [frm-reset-password] inside the WordPress content editor.
Make sure you add any additional content you would like to display on the page, then click the Publish button at the top right of the screen.
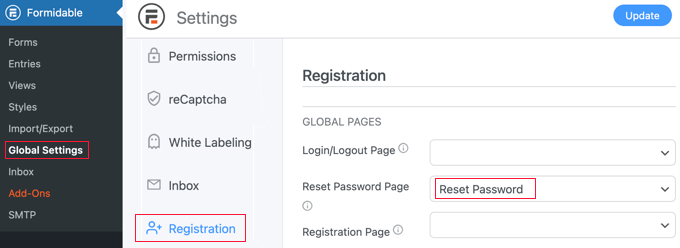
Finally, you need to make sure that WordPress will use this page when resetting a password. To do that, head over to the Formidable » Global Settings and then click the ‘Registration’ tab in the menu.
From here you need to find the ‘Reset Password Page’ option and then simply select the page you just created from the drop down menu.
Don’t forget to click the ‘Update’ button at the top of the screen to store your settings.
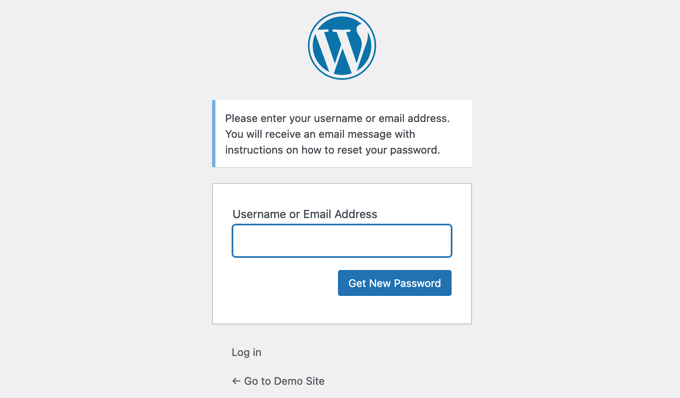
You can now visit your website to see the custom reset password page in action.
Method 2: Customizing Reset Password Page Using Theme My Login
Theme My Login is not very customizable, but it’s a simple and free way to change your login and reset password pages to match your WordPress theme.
The first thing you need to do is install and activate the Theme My Login plugin. For more details, see our step by step guide on how to install a WordPress plugin.
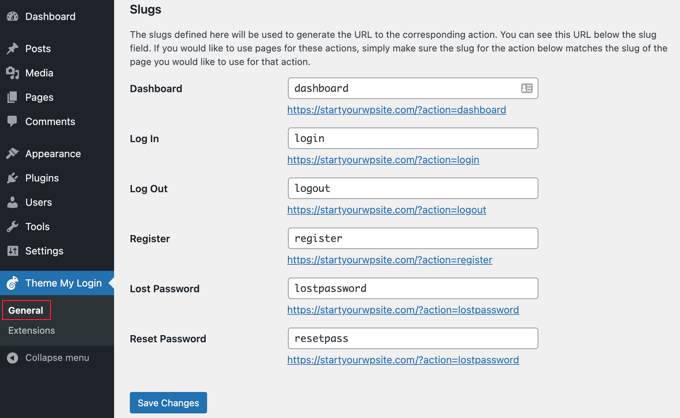
Upon activation, Theme My Login automatically creates URLs for your custom login, logout, registration, forgot password, and reset password actions.
You can view or customize these URLs by visiting Theme My Login » General page. Scroll down to the ‘Slugs’ section to modify these URLs used by the plugin for login actions.
Notice the slugs for ‘Lost Password’ and ‘Reset Password’. We’ll leave the default settings and start by creating a new lost password page.
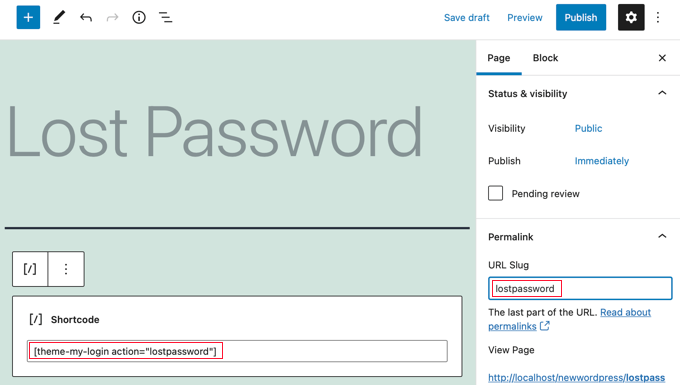
You need to head over to Page » Add New to create a new WordPress page. Next, you need to give your page a title and then enter the following shortcode [theme-my-login action="lostpassword"] inside the content area.
You also need to change the page’s URL slug to lostpassword so that Theme My Login will redirect the normal lost password URL to this page.
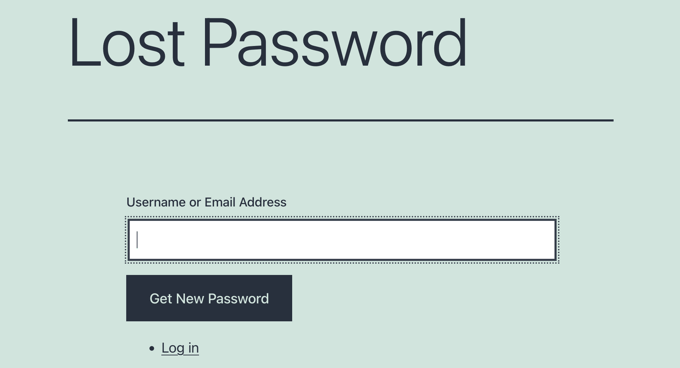
Once you’ve added any additional content you want on the page, you can click the ‘Publish’ button and preview it to see your custom login page in action.
Next, you will need to repeat the process to create a custom reset password page. You will need to add the shortcode [theme-my-login action="resetpass"] to the content of the page, and change the URL slug to lostpassword.
Method 3: Changing Reset Password Logo Using Plugin or Code
You may not need to create a completely custom WordPress login page for your website. In fact, a lot of websites just replace the WordPress logo and logo URL while still using the default login page.
At the end of our guide on how to create a custom WordPress login page, we show you two ways to replace the login screen logo with your own logo, one using a plugin and the other using code.
The best thing is, both of these methods will also automatically change the logo on the reset password page as well.
We hope this tutorial helped you learn how to customize the WordPress reset password page.