Monday, December 27, 2021

How to Make Custom Fields Searchable in WordPress

Do you want your visitors to easily search custom fields to find content on your website?

WordPress search doesn’t work with custom fields by default, which can make it harder for your visitors to find what they need. By making custom fields searchable, you can provide a better user experience for your visitors.

In this article, we’ll show you how to make custom fields searchable in WordPress.

How to make custom fields searchable in WordPress

What Are Custom Fields & Why Make Them Searchable?

WordPress custom fields allow you to store any kind of additional information (metadata) about a post or page.

WordPress adds metadata such as title, author, date, time, and more to your posts and pages. With custom fields, you can add more information about your content, and display them on your website if you wish. A lot of popular WordPress plugins and themes use custom fields to store important data.

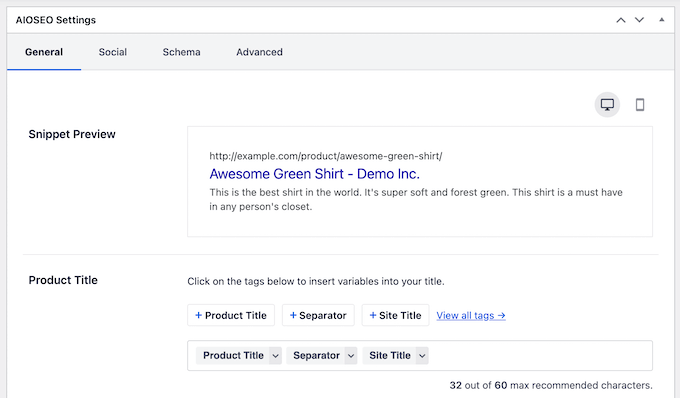
For example, the content you enter in your WordPress SEO plugins such as All in One SEO is technically a custom field, or custom product attributes that you may add to your WooCommerce products sometimes are also custom fields.

AIOSEO Product Title Optimization

However, WordPress doesn’t search content on your website using custom fields. By default, when a visitor uses a search bar on your website, WordPress will only show them results where the title and content match their search terms.

Making your custom fields searchable improves the user experience on your WordPress website. It allows your visitors to search for any content with ease, keeping them on your website longer and reducing any frustration.

That said, let’s look at how you can make custom fields searchable.

Making Custom Field Searchable in WordPresss

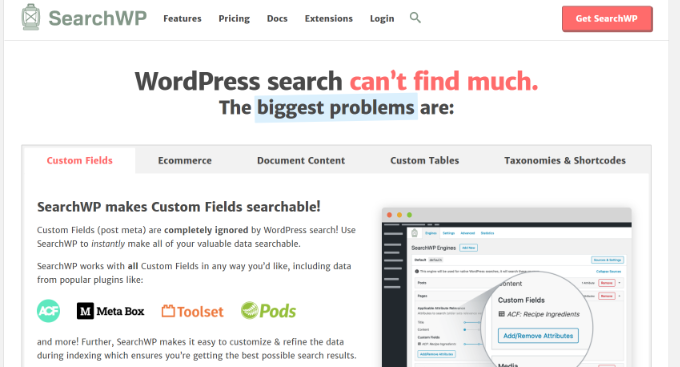
The easiest way to make custom fields searchable is by using the SearchWP plugin. It’s the best WordPress search plugin and allows you to adjust the search algorithm without editing code.

The plugin indexes everything on your WordPress site. For instance, it uses custom fields, PDF documents, text, custom tables, files, categories, shortcodes, and more to improve WordPress search for your users.

Besides that, SearchWP works seamlessly with other popular plugins like Advanced Custom Fields, Meta Box, Toolset, Easy Digital Downloads, WooCommerce, and Pods.

SearchWP

To start indexing your custom fields, first you’ll need to install and activate the SearchWP plugin. If you need help, then please see our guide on how to install a WordPress plugin.

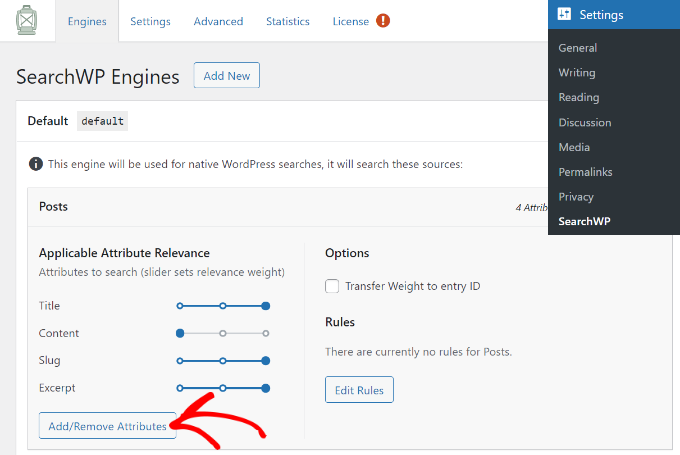
Upon activation, you can head over to Settings » SearchWP and then navigate to the ‘Engines’ tab from the WordPress admin panel.

After that, you’ll need to click the ‘Add/Remove Attributes’ button to add custom fields to the search algorithm for your posts, pages, and media.

Add and remove attributes

When you click the button, a popup window will now appear.

Go ahead and click the dropdown menu under Custom Fields and then select the ‘Any Meta Key’ option to make all your custom fields searchable. Or you can type the custom fields you want to include during the search process. if you don’t want to include them all.

Choose any meta key

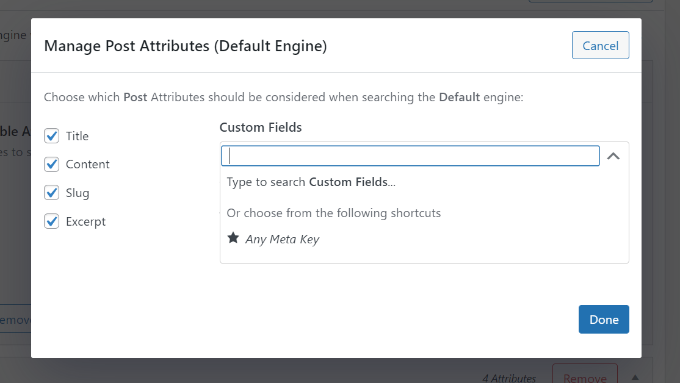
Once you’ve chosen the custom fields, simply click the ‘Done’ button.

A custom fields option will now be added to the search algorithm for posts. You can see the ‘Custom Fields’ under the Applicable Attribute Relevance section.

Next, you can adjust the attribute slider to set the relevance weight given to each attribute during a search.

Adjust the search relevance

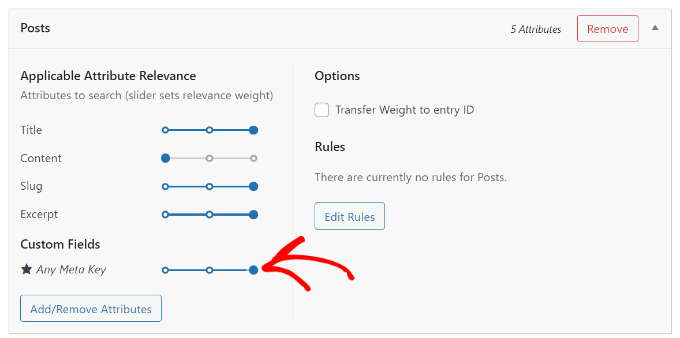
For example, if you move the slider to the right and set it to maximum, then SearchWP will give high preference to the data in the custom fields when searching content on your site.

You can now repeat the step for making custom fields searchable for pages and media files.

After making these changes, don’t forget to click the ‘Save Engines’ button.

Click the Save Engines button

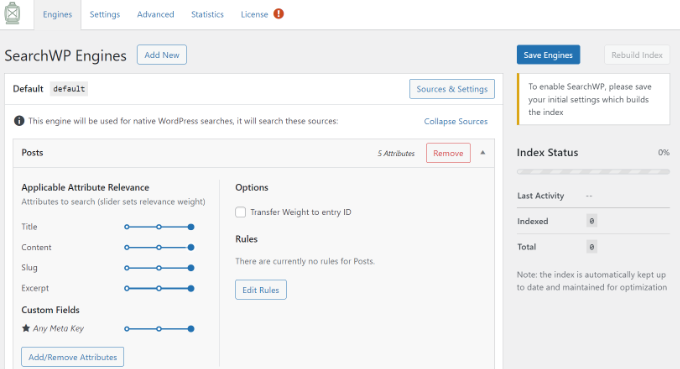
SearchWP will now index your content, PDF metadata, custom fields metadata, images, files, and other types of metadata to include in WordPress search.

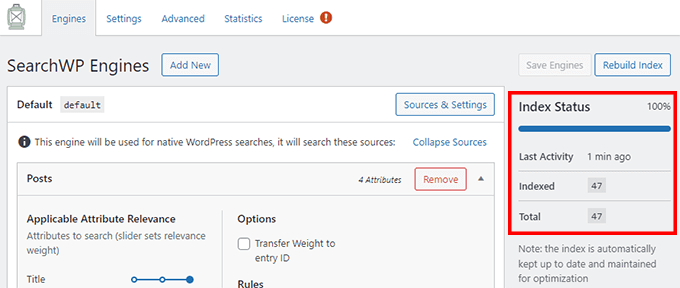
You’ll be able to see the ‘Index Status’ in the right corner and view how many items the plugin has indexed.

SearchWP index status

Besides that, SearchWP also offers other customization settings.

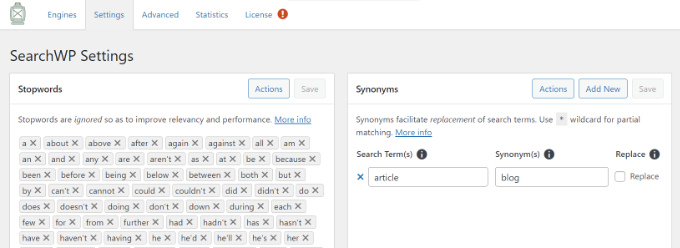
For instance, if you go to the ‘Settings’ tab, then you can add stopwords and synonyms to be ignored during the search process to improve relevancy and performance.

The plugin will already have a list by default, but you can add more stopwords if you want. Similarly, you can add synonyms for search terms that you want to ignore while searching.

Add stopwords in settings

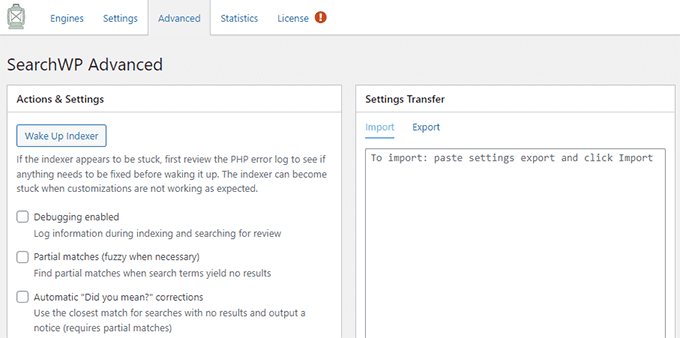
Next, you can edit more settings by going to the ‘Advanced’ tab.

For example, the plugin lets you enable the option to show partial matches when search terms show no result, limit results to exact matches when double quotes are used, remove minimum word length, and more.

SearchWP Advanced Settings

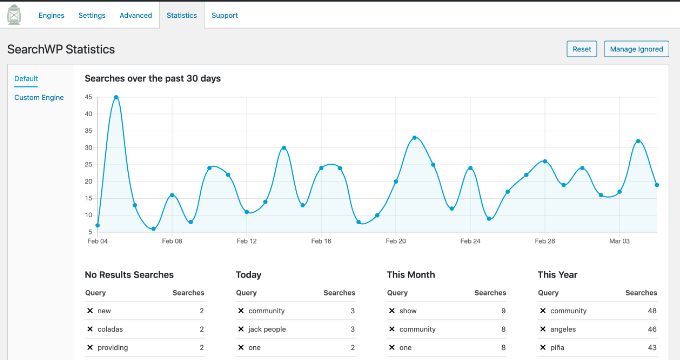
Now, if you want to see the search history and see which queries your users search the most, then head over to the ‘Statistics’ tab.

The plugin will give all the stats about your WordPress search from the past 30 days or the last 1 year. You can use this data to see which queries your users search while on your site and come up with new content ideas.

View search stats

We hope this article helped you learn how to make custom fields searchable in WordPress. You may also want to look at our guide on how to register a domain name and the best WordPress plugins for business sites.

If you liked this article, then please subscribe to our YouTube Channel for WordPress video tutorials. You can also find us on Twitter and Facebook.

The post How to Make Custom Fields Searchable in WordPress first appeared on WPBeginner.


December 27, 2021 at 04:00PM

Friday, December 24, 2021

6 Best File Upload Plugins for WordPress (Free & Paid)

Do you want to allow your visitors to easily upload files on your WordPress site?

A WordPress file upload plugin lets your users upload documents, images, PDFs, spreadsheets, and other files without having to login to your website.

In this article, we’ll share our expert pick of the best WordPress file upload plugins.

Best file upload plugin for WordPress

Why Use a WordPress File Upload Plugin?

By default, only WordPress site users can upload files by logging in to the dashboard. That means that if you want someone to be able to upload a file to your site, then you’d have to create a new user account and let them log in to your website.

This can be time-consuming and a potential security risk.

However, you can easily accept file uploads on the front end of your WordPress website by using the right plugin.

Accepting documents, images, and other files can help you to get more information from your users when providing customer support.

It also makes it super easy to receive guest posts, resumes, quotations from clients, images, videos, and other content from your visitors.

That being said, let’s look at some of the top file upload plugins for WordPress.

1. WPForms

WPForms

WPForms is the best contact form plugin for WordPress, and it’s super easy to use. The plugin has a drag and drop builder that lets you create any type of form for your website including file upload forms.

It also offers prebuilt templates, so you can quickly get started and add forms to your website. Each template is fully customizable.

There are two different options for file upload fields: a classic file upload for just one file, or a more modern drag-and-drop file upload field that can accept multiple files at once.

WPForms file upload field

With WPForms, you can accept images, videos, documents, spreadsheets, PDFs, presentations, and much more. You can choose whether or not you’d like to save the file uploads in your WordPress media library.

There are also options to restrict different file types to keep your website safe, and you can even increase the maximum upload size, so you can accept larger files if needed.

Besides file uploads, WPForms also offers spam protection, multi-page forms, and conditional logic. It is also compatible with different email marketing services and payments services to create online payments and donations forms.

2. File Upload Types by WPForms

File upload types by WPForms

File Upload Types by WPForms is a free file upload plugin for WordPress. It lets you accept additional file types in WordPress which aren’t available by default.

WordPress allows specific file extensions that your users can upload. If someone tries to upload content outside the permitted file types, then they’re shown an error saying, ‘Sorry, this file type is not permitted for security reasons.’

To overcome this issue and fix the error, you can use the File Upload Types by WPForms plugin.

The plugin is beginner-friendly, and you can manage which file extensions to allow on your website from your WordPress dashboard. Simply enable or disable the extensions from your WordPress admin area.

Some common file extensions the plugin lets you add to WordPress include .zip, .ai, .xml, .svg, .csv, and more.

This free plugin is great for allowing additional file types in WordPress, but it doesn’t have any front-end file upload form. That’s why it must be used in combination with WPForms or any of the other plugin in our list.

3. Formidable Forms

Formidable Forms

Formidable Forms is another popular file upload plugin for WordPress. Using its drag and drop builder, you can create a file upload form for your website.

Users can add a file or drag and drop the file into the form field. The uploaded files are then stored in the WordPress Media Library, so you can easily access them when you want.

The plugin lets you accept multiple files from your visitors in the same form instead of requiring people to fill out numerous forms. Other than that, you can select which file types to allow on your form and set the maximum file size limit.

Aside from creating a file upload form, Formidable Forms also helps build complex forms like mortgage calculators and payment forms. The plugin offers prebuilt templates and multiple customization options as well.

4. WordPress File Upload

WordPress File Upload

WordPress File Upload is a free WordPress plugin that allows visitors to upload any content to your website. The plugin lets you accept file uploads from any blog post, landing page, or sidebar widget by using a shortcode.

Once a user uploads a file, you can view them inside your WordPress dashboard under the Uploaded Files menu. This makes it easy to organize and manage different content uploaded by your users.

On the downside, the plugin is a bit more complex to use. However, you can create file upload filters for different user roles in WordPress, limit file extensions that can be uploaded, and set an allowed file upload size in the plugin settings.

It also offers different customization options for your file upload form. You can add or remove existing form fields, change their colors, labels, dimensions, and add additional custom fields.

5. MemberPress

MemberPress

MemberPress is the best WordPress membership plugin. It allows you to upload files and have full access control over file permission.

For example, you can upload file in WordPress and restrict permissions, so only logged in users with paid subscription can access the file. This is great for selling online courses, eBooks, or other files.

You can also restrict permissions, so only select users can upload files. This can be helpful if you’re running a membership association where only members with a certain level of paid subscription can add files on their user profiles or submit guest posts, and more.

MemberPress has everything you need to create registration forms, set up membership subscriptions, manage transactions, and more.

6. Easy Digital Downloads

Easy Digital Downloads

Easy Digital Downloads is one of the best WordPress eCommerce plugins that allows you to sell digital products including eBooks, PDF files, music, software, and more.

It allows you to upload WordPress files to cloud platforms like AWS, Dropbox, and others. You can then password protect the files and only allow download access to those with active user licenses.

Easy Digital Downloads also comes with a multi-vendor marketplace functionality, so you can allow users to upload and sell files through your website. This basically lets you make your own marketplace like Envato or CreativeMarket.

BONUS: MonsterInsights

MonsterInsights

MonsterInsights is the best analytics solution for WordPress, and it helps you track form submissions and file downloads on your website.

Abandoned forms mean less conversions and revenue. MonsterInsights helps you to understand when and why your users abandon your forms, so you can optimize them for more conversions. For more details, see our guide on how to track and reduce form abandonment in WordPress.

If you offer content that users can download from your website like PDFs, videos, spreadsheets, and other documents, then it’s important to know which files get the most downloads.

With MonsterInsights, you can automatically track file downloads in Google Analytics without editing code. The plugin lets you track any file extension inside Google Analytics.

You also get to see the form tracking and file download reports right inside your WordPress dashboard.

We hope that this article helped you find the best file upload plugin for WordPress. You may also want to check out our guide on the best managed WordPress hosting and how to start your own podcast.

If you liked this article, then please subscribe to our YouTube Channel for WordPress video tutorials. You can also find us on Twitter and Facebook.

The post 6 Best File Upload Plugins for WordPress (Free & Paid) first appeared on WPBeginner.


December 24, 2021 at 05:00PM

Thursday, December 23, 2021

How to Create a Live Sale Notification for WooCommerce

Do you want to create live sale notifications for WooCommerce?

Live sale notifications let your visitors know about all the real-time sales happening on your online store. It’s a powerful form of social proof that can increase your overall sales.

In this article, we’ll show you how to create a live sale notification for WooCommerce.

How to Create a Live Sale Notification for WooCommerce

Why Display Live Sale Notifications on WooCommerce?

People feel more comfortable making a purchase when they know others have also bought the same product or service and had a good experience with it.

This is why smart WooCommerce store owners use social proof in their marketing. You might add reviews and testimonials or display the number of Facebook followers your store has.

Another good strategy is to display live sale notifications. This creates a sense of FOMO, or fear of missing out, among your online store visitors and makes them more likely to take action.

Live Sale Notification Example

By displaying recent customer interactions on your WooCommerce store, you can use social proof to increase sales by up to 15%. You can follow our guide to learn how to

track how user engagement on your online store so you can see the effects on your own site.

That being said, let’s look at how to create a live sale notification on your WooCommerce store.

How to Create a Live Sale Notification for WooCommerce

The first thing you need to do is install the FOMO & Social Proof Notifications by TrustPulse plugin. To learn more, see our step by step guide on how to install a WordPress plugin.

TrustPulse is a powerful social proof plugin that displays recent customer interactions on your website to grow trust, boost conversions, and increase sales.

There is a premium version with more advanced features like analytics notifications, priority support, and sub-accounts, but for this tutorial we’ll be using the free plugin since it offers everything needed to set up basic live sale notifications.

Upon activation, you’ll be taken to the TrustPulse page of your WordPress admin area. Here you can click on a button to create a free account, or connect your existing TrustPulse account if you already have one.

Click on the Button to Create a Free Account

You will need to enter a credit card or debit card number even if you choose a free account. Your account will not be charged at this time, but the details will be used if you decide to upgrade in the future.

Once you’ve signed up for TrustPulse, you’ll be asked to add your website details. You’ll need to enter the name of your site and also its URL. When you’re done, you should click the green ‘Save Site’ button.

Add Your Website Details to TrustPulse

Creating a Live Sale Notification Campaign

Now that you’ve added your WooCommerce site to TrustPulse, the next step is to create a campaign. Simply click the ‘Create Campaign’ button at the top right of the screen.

Click the ‘Create Campaign’ Button

The first thing you need to do is give the campaign a name. We’ll call it ‘Live Sale Notification’.

After that, if you have more than one website connected to TrustPulse, then you’ll need to select the correct online store from the drop down list.

Name Your Campaign

Next, you should scroll down to the section labeled ‘Select Your Campaign Type’ and then select the ‘Recent Activity’ option.

This will create notifications of purchases, registrations, and signups on your online store.

Select the 'Recent Activity' Option

After that, simply click on the ‘Next Step’ button at the bottom right of the screen.

On the next screen, you can customize the design and appearance of your live sale notification. For this tutorial, we’ll stay with the default settings, but feel free to make adjustments to suit your own online store.

Customize the Design and Appearance of Your Live Sale Notification

These settings include the language to use, the way you refer to your visitors, the link that will be used when visitors click on the notification, the size and position of the notification, and much more.

When you’ve finished customizing the notification, you should click on the ‘Next Step’ button.

You’ll now be asked to decide where TrustPulse will find the information to include in the live sale notifications. For this tutorial, we’ll select ‘AutoMagic’. This option is the simplest and works well if you’re a beginner.

The 'Automagic' Option Is Easy to Use and Works Well for Beginners

Next, you should scroll down to the section labeled ‘Where should we watch for activity on this site?’ For this tutorial, we’ll select the default ‘Activity on any page’ for simplicity and to maximize the number of notifications shown.

Select Where TrustPulse Watches for Activity

However, if you want your notifications to be more targeted, then you might select ‘Exact URLs’ instead. You could then enter, for example, the URL of your WooCommerce store checkout page so your notifications will display only purchases.

We’ll also go with the default options for ‘Select an Automagic Activity Type’ and ‘Activity Verification’ TrustPulse is very flexible, so you can set this up however you’d like, and then you should click the ‘Next Step’ button at the bottom of the screen.

The next page allows you to decide how the notifications will be displayed. The first question is ‘Where should we display your notifications?’ We want live sale notifications displayed everywhere on our site, so we’ll go with the default setting ‘Display on any page’.

Select 'Display on Any Page'

If you only want to show live sale notifications on certain pages, then you can choose to display them on certain URLs, or URLs containing certain text or matching a pattern.

After that, you should scroll down to the ‘Notification Settings’ section. Here you can decide how long to delay your notifications and how long to display them.

Scroll Down to the 'Notification Settings' Section

You can also decide whether to show them on mobile and whether to loop them.

In this tutorial, we’ll stay with the default settings, but you can make any changes you like. After that, you’ll need to click the ‘Next Step’ button and we’re almost finished.

Publishing the Live Sale Notification Campaign

The last step is to publish your live sale notification to your online store. On this page, you will see a confirmation that your website is connected, and a preview of your campaign will be displayed.

All you need to do is click the ‘Launch your TrustPulse campaign’ button to push it live.

Click the ‘Launch Your TrustPulse Campaign’ Button
Note: Sometimes it takes a few minutes to complete the connection to your site. You can test whether your site is connected by clicking the green ‘Check Now’ button.

Congratulations! Your customers can now see live notifications when other customers purchase items from your store. If you’d like to make any changes to the campaign, then you can go back and change the settings at any time.

We hope this tutorial helped you learn how to create a live sale notification for WooCommerce. You may also want to learn how to create an email newsletter the right way, or check out our expert pick of the best WooCommerce plugins for your store.

If you liked this article, then please subscribe to our YouTube Channel for WordPress video tutorials. You can also find us on Twitter and Facebook.

The post How to Create a Live Sale Notification for WooCommerce first appeared on WPBeginner.


December 23, 2021 at 04:00PM