Thursday, January 20, 2022

How to Do a Full Site Redirect in WordPress (Beginner’s Guide)

Do you want to redirect your website to a new location?

A full site redirect allows you to easily move your website to a new domain without losing search engine rankings. It helps prevent broken links and provides a smooth user experience.

In this article, we’ll show you how to do a full site redirect in WordPress.

Full site redirect in WordPress

Why Do a Full Site Redirect in WordPress?

A full site redirect allows you to move your entire website to a new location without losing traffic or search engine rankings. When a user enters the old URL of your website in their browser, they will be automatically redirected to the new domain.

It also helps you keep all the backlinks you’ve built over the years and direct them to your new website domain. Your users can easily find all your existing content on the new domain.

A full site redirect also prevents broken links or 404 errors from occurring, which can be bad for your WordPress SEO and user experience.

From a technical point of view, a complete site redirect is a 301 redirect. This type of redirect tells search engines that the page has permanently moved to the new location.

This is the most beneficial type of redirect for your keyword rankings and traffic, and it helps pass the SEO authority of your old domain to the new domain.

That said, let’s see how you can set up a full site redirect in WordPress.

Editor’s Note: Before you set up a WordPress full site redirect to a new domain, it’s important that you transfer all your content first. You can use our tutorial on how to export a WordPress site, or follow our step by step guide on how to move WordPress to a new domain (without losing SEO).

How to Do a Full Site Redirect in WordPress

The easiest way to set up a full site WordPress redirect is by using the All in One SEO (AIOSEO) plugin. It’s the best SEO plugin for WordPress and is used by over 3 million professionals.

AIOSEO helps you optimize your website for search engines without the need to hire an expert. Plus, it offers a powerful redirection manager that allows you to properly redirect users to a new domain without losing SEO rankings while also tracking 404 errors.

For this tutorial, we’ll be using the AIOSEO Pro version because it includes the Redirection Manager. There is also an AIOSEO free version that has all the basic features you need to start optimizing your WordPress website to get more search engine traffic.

First, you’ll need to install and activate the AIOSEO plugin. For more details, please see our guide on how to install a WordPress plugin.

Upon activation, you can head over All in One SEO » General Settings from your WordPress dashboard and enter the license key. You can find the key in your AIOSEO account area.

Enter license key

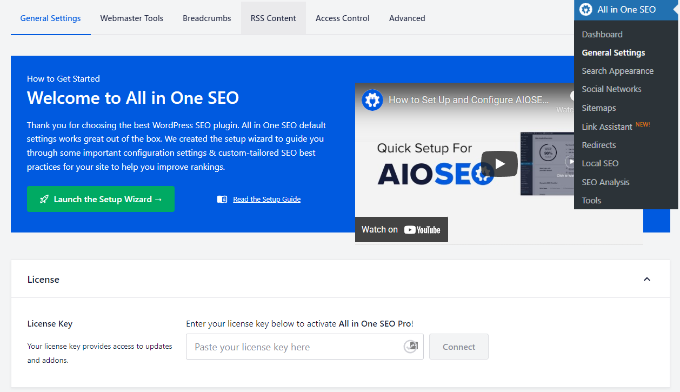
To set up AIOSEO on your website and optimize your site for search, you can launch the setup wizard and follow the onscreen instructions. For more details, please see our guide on how to setup AIOSEO in WordPress.

Next, you can head over to All in One SEO » Redirects from the WordPress admin panel and then click the ‘Activate Redirects’ button.

Activate redirects

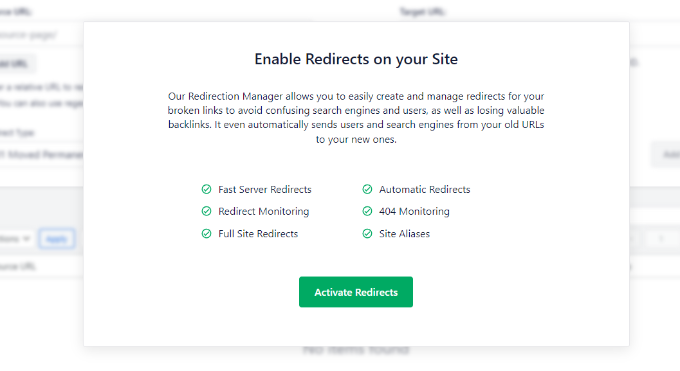
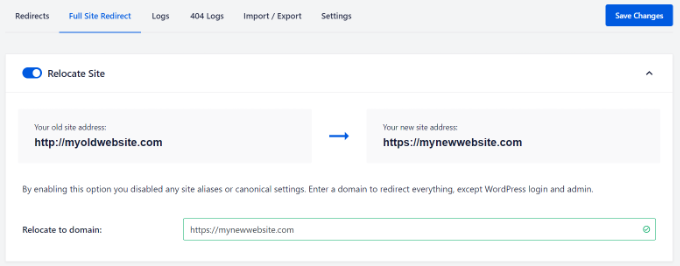
Once the addon is active, you can go to the ‘Full Site Redirect’ tab under Redirects.

After that, click the ‘Relocate Site’ toggle to display more options.

Enable relocate site toggle

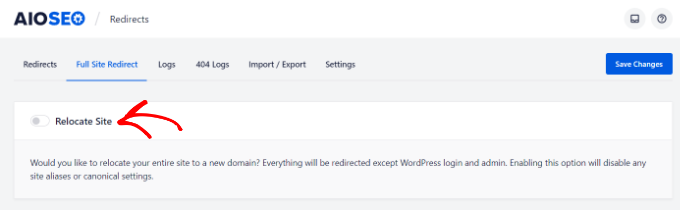
You’ll now see a field where you can enter the new location for your website.

Simply enter the new URL in the ‘Relocate to domain’ field and click the ‘Save Changes’ button. The plugin will automatically redirect everything except the WordPress login page and admin.

Enter new domain address for relocation

To check if your redirection is working, simply enter the old URL in the browser, and it should automatically redirect you to the new domain.

Track and Fix Broken Links in WordPress

When you move to a new domain, it’s always possible that some of the links on your site could break and result in 404 errors. However, with AIOSEO, you can easily track broken links in WordPress and fix them using the redirection manager.

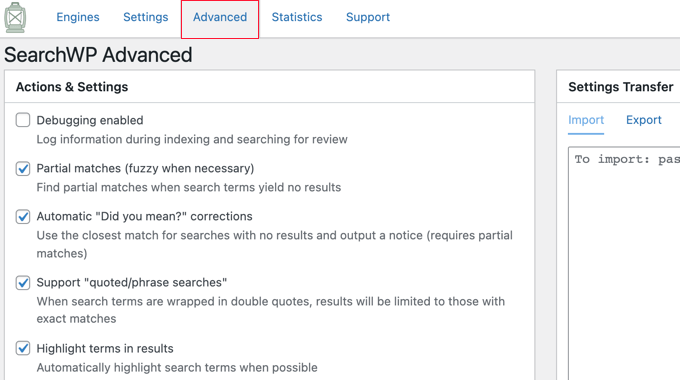
Simply head over to All in One SEO » Redirects from the WordPress admin area and then click the ‘Settings’ tab. Next, enable 404 Logs and Redirect Logs by clicking the toggle.

Enable 404 logs

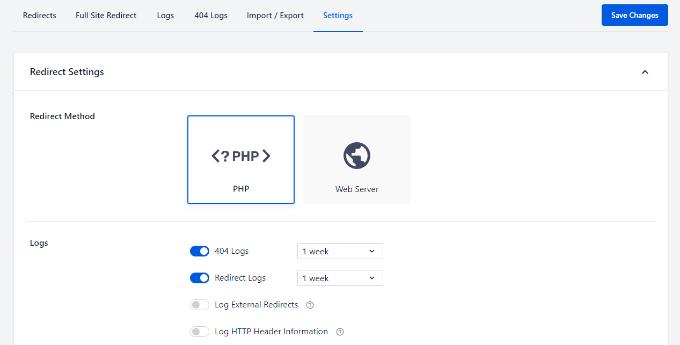
Once you enable this feature, AIOSEO will start recording 404 errors on your website. Do note that at first, there will be nothing in the logs. It only starts recording 404 errors after you’ve enabled the option.

Once anyone has triggered a 404 error on your WordPress site, you can view the logs by going to the ‘404 Logs’ tab under Redirects.

404 logs menu option

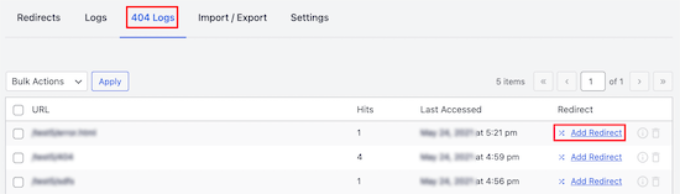
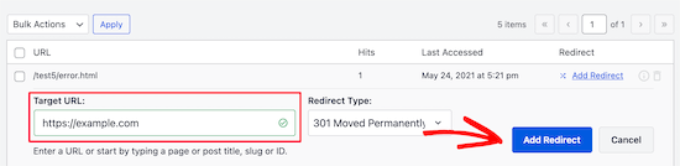
To fix any broken link, simply click the ‘Add Redirect’ option. Then enter the new location under the ‘Target URL’ field and choose your Redirection Type.

After adding these details, simply click the ‘Add Redirect’ button.

Click the add redirect button

For more details, you can follow our guide on how to track and fix broken links in WordPress.

We hope this article helped you learn how to do a full site redirect in WordPress. You can also check out our guide on the best managed WordPress hosting and how to start an online store.

If you liked this article, then please subscribe to our YouTube Channel for WordPress video tutorials. You can also find us on Twitter and Facebook.

The post How to Do a Full Site Redirect in WordPress (Beginner’s Guide) first appeared on WPBeginner.


January 20, 2022 at 04:45PM

Wednesday, January 19, 2022

How to Add Tooltips in Your WordPress Posts and Pages

Do you want to add tooltips in your WordPress posts and pages?

Tooltips are additional pieces of information that show when your mouse hovers over certain words. It’s a helpful way to clarify your content.

In this article, we’ll show you how to add WordPress tooltips in your posts and pages.

Add tooltips to your WordPress posts and pages

Why Display Tooltips in Your WordPress Posts and Pages?

Tooltips display useful information in small boxes that pop up when you hover over an area on your WordPress site. They’re a great way to add clarity to your content.

You can use tooltips to add definitions of difficult words, highlight important facts, and reveal the sources of your information. Like footnotes, they can improve user experience and help build trust with your visitors.

However, tooltips should never be used for essential information. Your post should contain everything your readers need even if they don’t read the tooltip, just in case they don’t see them. You should also make sure you do not overuse tooltips, or they can become a distraction to your website visitors.

That being said, let’s look at how you can add tooltips to your WordPress posts and pages.

How to Add Tooltips in Your WordPress Posts and Pages

The first thing you need to do is install and activate the WordPress Tooltips plugin. To learn more, see our step by step guide on how to install a WordPress plugin.

Once the plugin is activated, there are several ways to add tooltips to your posts and pages. The first is to automatically add tooltips to certain keywords.

Adding Tooltips to Keywords Automatically

All you have to do is navigate to Tooltips » Add New to create a new tooltip. You need to start by adding a title.

This title is a keyword, and the tooltip will be automatically be displayed everywhere the keyword appears in your posts and pages. This can save you a lot of time, since you don’t need to add the tooltip in multiple locations throughout your website.

If you would like other words to also display the tooltip, then you can enter them in the synonyms section on the right of the screen. If you enter multiple synonyms, then they should be separated by the pipe symbol |.

Add a New Tooltip

Now, in the content section, add your tooltip. A tooltip might be only a few words long, or it could be several paragraphs of rich content with images and other media. However, keep in mind that you are writing content for a tooltip, not a full post, so keep it as brief as possible so it’s easily readable on any screen.

Once you’ve finished, you should click the ‘Publish’ button on the right of the screen. Now tooltips will be automatically displayed on your posts and pages wherever the tooltip’s title and synonyms are found.

Preview of Tooltip Automatically Added to a Keyword

Adding Tooltips Using Shortcode

Another way to add tooltips is to add a shortcode to the content of your posts and pages. This method is suitable for shorter tooltips, or when you want to display the tooltip just once instead of on every matching keyword on your website.

If you’re new to shortcodes, then you can learn more in our beginner’s guide on how to add a shortcode in WordPress.

To add your tooltip shortcode, first you need to create or edit the post or page where you wish to add the tooltip. Then you should add this shortcode where you wish the tooltip to be displayed:

[tooltips keyword="YOURKEYWORD" content="YOURTOOLTIPCONTENT"]

Simply replace YOURKEYWORD with the word or phrase you want to add the tooltip to, and replace YOURTOOLTIPCONTENT with the text you want to add to the tooltip. Be sure to leave the quotes in the shortcode so that it works properly.

Adding a Tooltip Using Shortcode

You can preview the page to see the tooltip in action.

This is how it appears on our demo site.

Preview Tooltip Added Using Shortcode

Building a Glossary From Your Tooltips

Each tooltip is a description of a keyword, similar to what you would find in a dictionary or glossary. As you go on adding tooltips, it is as if you are building a basic glossary.

This is why the WordPress Tooltips plugin allows you to display a glossary of tooltips on your website. Simply add the [glossary] shortcode to the post or page where you want the glossary to appear.

Adding the Glossary Shortcode

After you have published the post or page, you can visit your website to see the glossary.

This is how it appears on our demo site. It includes the tooltips we added to the plugin’s tooltips list, but not the tooltips we created using shortcode.

Preview of Tooltip Glossary

If you want to customize the glossary, then you can do so from the Tooltips » Glossary Settings menu in your WordPress dashboard. Here you will find a number of options you can tweak on how the glossary will be displayed and what will be included.

Tooltip Glossary Settings

For example, you can choose whether or not to display images in the glossary, and you can list the ID of any tooltips you don’t want to include.

We hope this tutorial helped you learn how to add tooltips to your WordPress posts and pages. You may also want to see our guide on how to create an email newsletter, or our expert comparison of the best free website hosting.

If you liked this article, then please subscribe to our YouTube Channel for WordPress video tutorials. You can also find us on Twitter and Facebook.

The post How to Add Tooltips in Your WordPress Posts and Pages first appeared on WPBeginner.


January 19, 2022 at 04:01PM

Tuesday, January 18, 2022

How to Add PDF Indexing and Searching in WordPress

Do you want to make the PDFs on your WordPress website searchable?

WordPress allows you to upload PDF files to your media library, but doesn’t include their contents in search results.

In this article, we’ll show you how to add PDF indexing and searching in WordPress.

How to Add PDF Indexing and Searching in WordPress

Why Add PDFs to Your WordPress Search Results?

PDFs are a great way to offer your visitors ebooks, user manuals, catalogs, and more. You can learn more in our guides on how to upload PDF files to your WordPress site, and how to add a PDF viewer in WordPress.

However, WordPress site search is quite limited and will only search the contents of the WordPress database.

This means that if your visitors use the search bar on your website, only the title and description of your PDFs and other documents will be included in the search results, not their contents.

As a result, your visitors may be missing out on valuable information.

The good news is that you can use a custom search plugin to improve the default WordPress search experience. If your PDFs are unencrypted, then the right search plugin will index the contents and metadata of your PDFs and add them to your search results.

With that being said, let’s take a look at how to add PDF indexing and searching in WordPress.

Adding PDFs to Your WordPress Search Results

The first thing you need to do is install the SearchWP plugin. For more details, see our step by step guide on how to install a WordPress plugin.

SearchWP is one of the best premium search plugins for WordPress. It’s easy to use and lets you search the contents of PDFs and other files in your WordPress media library.

Upon activation, you will need to visit the Settings » SearchWP page and then click on the ‘License’ menu tab.

Enter Your SearchWP License Key

Here you need to enter your license key in the ‘License’ box. You can find this information in your account on the SearchWP site. Once you’re done, make sure to click the ‘Activate’ button.

The next step is to add the contents of your PDF documents to the WordPress search results. To do that, you need to click on the SearchWP ‘Engines’ menu tab. This brings you to a screen where you can determine what is included in your WordPress search results.

SearchWP Engines Let You Customize WordPress Search

You’ll notice that by default, posts, pages and media files will be included in the search results.

If the ‘Media’ section is missing, then you will need to add it by clicking the ‘Sources & Settings’ button then clicking the ‘Media’ checkbox.

Make Sure the Media Box Is Checked

Don’t forget to click the ‘Done’ button to store the new settings.

You can adjust your search engine settings by clicking on the ‘Posts’, ‘Pages’, ‘Media’, or other available drop downs. To make sure that PDFs are included in the search results, you will need to configure the Media settings by clicking the ‘Add/Remove Attributes’ button in that section.

Click Add/Remove Attributes in the Media Section

Make sure that the ‘Document Content’ box is checked.

This means that the contents of your PDFs, Microsoft Office files, text files, and other documents in your WordPress media library will be indexed and included in search results.

Check the Document Content and PDF Metadata Boxes

You should also check the ‘PDF Metadata’ box. This will index PDF metadata that isn’t part of the file’s contents. Depending on the PDF file, this may include the document title, author, subject, keywords, and more.

Make sure you click the ‘Done’ button when both of these boxes are checked.

Next, you need to decide how much weight to give to PDF content and metadata in the search results. In other words, how high do you want PDFs to appear in your site’s search results?

By default, the sliders for Document Contents and PDF Metadata are all the way to the left, so they will not be given much weight. If you want them to appear higher in the search results, then you can move the slider to the middle or right positions.

Decide How Much Weight to Give Document Contents and PDF Metadata

Finally, you need to click the ‘Save Engines’ button at the top right of the screen to save your new search settings.

If you’re then shown the message ‘The index needs to be rebuilt’, then you should click the ‘Rebuild Index’ button so that the PDF content and metadata are added to the search index.

Rebuild the Index if Prompted

Congratulations! Your WordPress website can now index and search PDF files.

Next, you may like to enable some advanced settings that will make it easier for your users to find what they are looking for.

To do that, you should navigate to Settings » SearchWP and click on the ‘Advanced’ tab.

SearchWP Advanced Settings

You can now activate any of these options that you would like:

  • Partial matches will also display results that don’t quite match the term that is being searched for.
  • Automatic ‘Did you mean?’ corrections will suggest a slightly different search term that will match some posts on your website.
  • Support ‘quoted/phrase searches’ will allow your users to use quotes when searching for exact phases.
  • Highlight terms in results will make it easier to find what they are looking for in the search results.

Now when your website visitors search for a word or phrase, all relevant PDF files will be included in the search results.

PDF Search Preview

We hope this tutorial helped you learn how to add PDF indexing and searching in WordPress. You may also want to learn how to create a WordPress membership site, or check out list of must have plugins to grow your site.

If you liked this article, then please subscribe to our YouTube Channel for WordPress video tutorials. You can also find us on Twitter and Facebook.

The post How to Add PDF Indexing and Searching in WordPress first appeared on WPBeginner.


January 18, 2022 at 04:00PM